BERRY ALLOC STYLE User manual

1
style installation manual
Version: 16/03/2020
Style is suited for both residential and commercial areas such as shops, hotel rooms, etc.
To obtain a perfect result, we recommend that the installation instructions are followed carefully.
TRANSPORT AND STORAGE
Transport your floor carefully on a flat surface. Planks should be stored and transported
flat in their packaging, in small neat piles, max. 5 boxes high. It is recommended not to
place the boxes down on the short side as this can cause damage to the locking system.
It is important to store the planks for at least 48 hours at room temperature (18-25°C)
before installation. Make sure the packs are spread out so they all have the chance to
adjust. This temperature should be maintained throughout the installation and for least
24 hours aer installation.
Storage: Style must be stored inside.
TOOLS
Trimming knife, saw or guillotine, pencil, T-square, measurer and spacers (wedges).
Additionally for skirting boards and profiles: power drill.
SUBFLOOR
Careful subfloor preparation is essential for an excellent result. Roughness or unevenness
in the subfloor may telegraph through the new floor, resulting in an unsightly surface
and causing excessive wear on high spots, damage to the locking system or indentation
on lower spots.
Remove all traces of plaster, paint, glue, oil, grease, etc. The subfloor must be clean, flat,
dry and stable. Remove textile floor coverings (such as carpet, needle felts, etc.) Remove
all debris (including nails) and vacuum.
Style can be installed on top of concrete, tiles, wood and most existing hard surface
floor coverings, provided that the subfloor is smooth, dry and clean. It is not suited to be
installed on so surface floor coverings s.a. carpet or cushion vinyl.
Although Style is impervious to moisture, subfloors must be checked for moisture
problems. If there is moisture, carry out sealing before installation. Excessive moisture
can generate mould or fungus.
Depending on your subfloor, a moisture barrier/ damp screen might be necessary. When
properly installed with aluminium adhesive tape, our Dreamtec+ underlay functions as
a dampscreen.
Make sure floor level deviation is a maximum of 3 mm per m, and 2 mm per 20 cm. If
these margins are exceeded, the subfloor must be evened out with a suitable filler or
levelling compound, and a check must be carried out to determine if a sealer is needed.
If you are not certain about the quality or suitability of your subfloor for the installation of
Style, then contact your dealer, who will be more than happy to help you.
48h
18-25°C
max. 3 mm
1 meter
20 cm
max. 2 mm
✓
✓
✓
✓
clean
dry
even
hard
max. 3 mm
per meter
1. PREPARATION

2
style installation manual
Underfloor cooling and heating
Floor heating is also possible, provided that the heated floor temperature does not
exceed 27°C. Only underfloor heating systems with heating components – hot water
or electric – embedded in the floor are suitable. Heating films or other systems that are
placed ON the screed or subfloor are not suitable.
Switch off or lower the underfloor heating to 15°C 48 hours before installation and during
installation. 24 hours aer installation, increase the underfloor heating gradually by 5°C
daily, up to a maximum floor temperature of 27°C. With electrical underfloor heating, we
advise not to exceed 60W/m².
The subfloor construction (surface) of the heating system must be hard.
Floor cooling uses the same systematic as the indirect floor heating systems. It is
important that the system is advanced enough to avoid condensation under the floor.
Otherwise fungi can start to grow. If the system is advanced enough, it can without
doubt be installed in combination with our floors.
Preparation of concrete/screed subfloor
Let new concrete dry sufficiently. The moisture content of the subfloor must be less than
75 RH at min. 20°C. Max 2 % CM for cement and 0.5 % for anhydrite. Where there is
underfloor heating, moisture content should be less than 1.8 CM%, and 0.3 CM% for
anhydrite. Always record and keep your moisture content results.
Repair surface imperfections with an appropriate repair compound and check if a primer
or sealer is needed. Vacuum the subfloor aerwards to remove all debris.
Preparation of tile subfloor
Check the subfloor for moisture problems.
The joints of the Style floor covering should never be aligned with
the underlying tile joints.
It is not necessary to fill the grouts of a subfloor comprised of ceramic tiles with joints
when these do not exceed 6 mm in width.
When installing Style on a tile subfloor, use the Dreamtec+ underlay to overcome surface
imperfections.
Preparation of wooden subfloor
Check the floor for insect infestations.
Make sure the subfloor is level and nail down loose sections.
Wooden subfloors should always have access to air and should be ventilated.
UNDERLAY
We advise using the BerryAlloc LVT underlay (Dreamtec +) to reduce walking and sound
transmission performance. Other underlays might be used if they have a thickness of
maximum 1.5mm and a compressive strength of more than 400kPa. We do not guarantee
any acoustic or insulation properties with third party underlays.
2
Cement
<3% CM
CaSo4
<0,5%CM
MOISTURE
METER
max.
27°C
Clicks not on top
of old tile joints
6
mm
Cement
<3% CM
CaSo4
<0,5%CM
MOISTURE
METER
max.
27°C
Clicks not on top
of old tile joints
6
mm
Cement
<3% CM
CaSo4
<0,5%CM
MOISTURE
METER
max.
27°C
Clicks not on top
of old tile joints
6
mm
Cement
<3% CM
CaSo4
<0,5%CM
MOISTURE
METER
max.
27°C
Clicks not on top
of old tile joints
6
mm
Cement
<3% CM
CaSo4
<0,5%CM
MOISTURE
METER
max.
27°C
Clicks not on top
of old tile joints
6
mm
Cement
<3% CM
CaSo4
<0,5%CM
MOISTURE
METER
max.
27°C
Clicks not on top
of old tile joints
6
mm
3
style installation manual
Style is not suitable for outdoor use or conservatories. Ensure that the indoor temperature
is always kept above 5°C and ideally between 18 and 25°C.
Avoid long-lasting exposure to direct sunlight (direct meaning without a glass or window
barrier).
Check all planks for visible defects in optimal light conditions, both before and during
installation. Planks with defects must not be used.
Make sure that you mix panels from different boxes, in order to minimize shade
variations. This will ensure a more natural looking floor.
Style cannot be used in areas where drainage systems have been incorporated into the
floor.
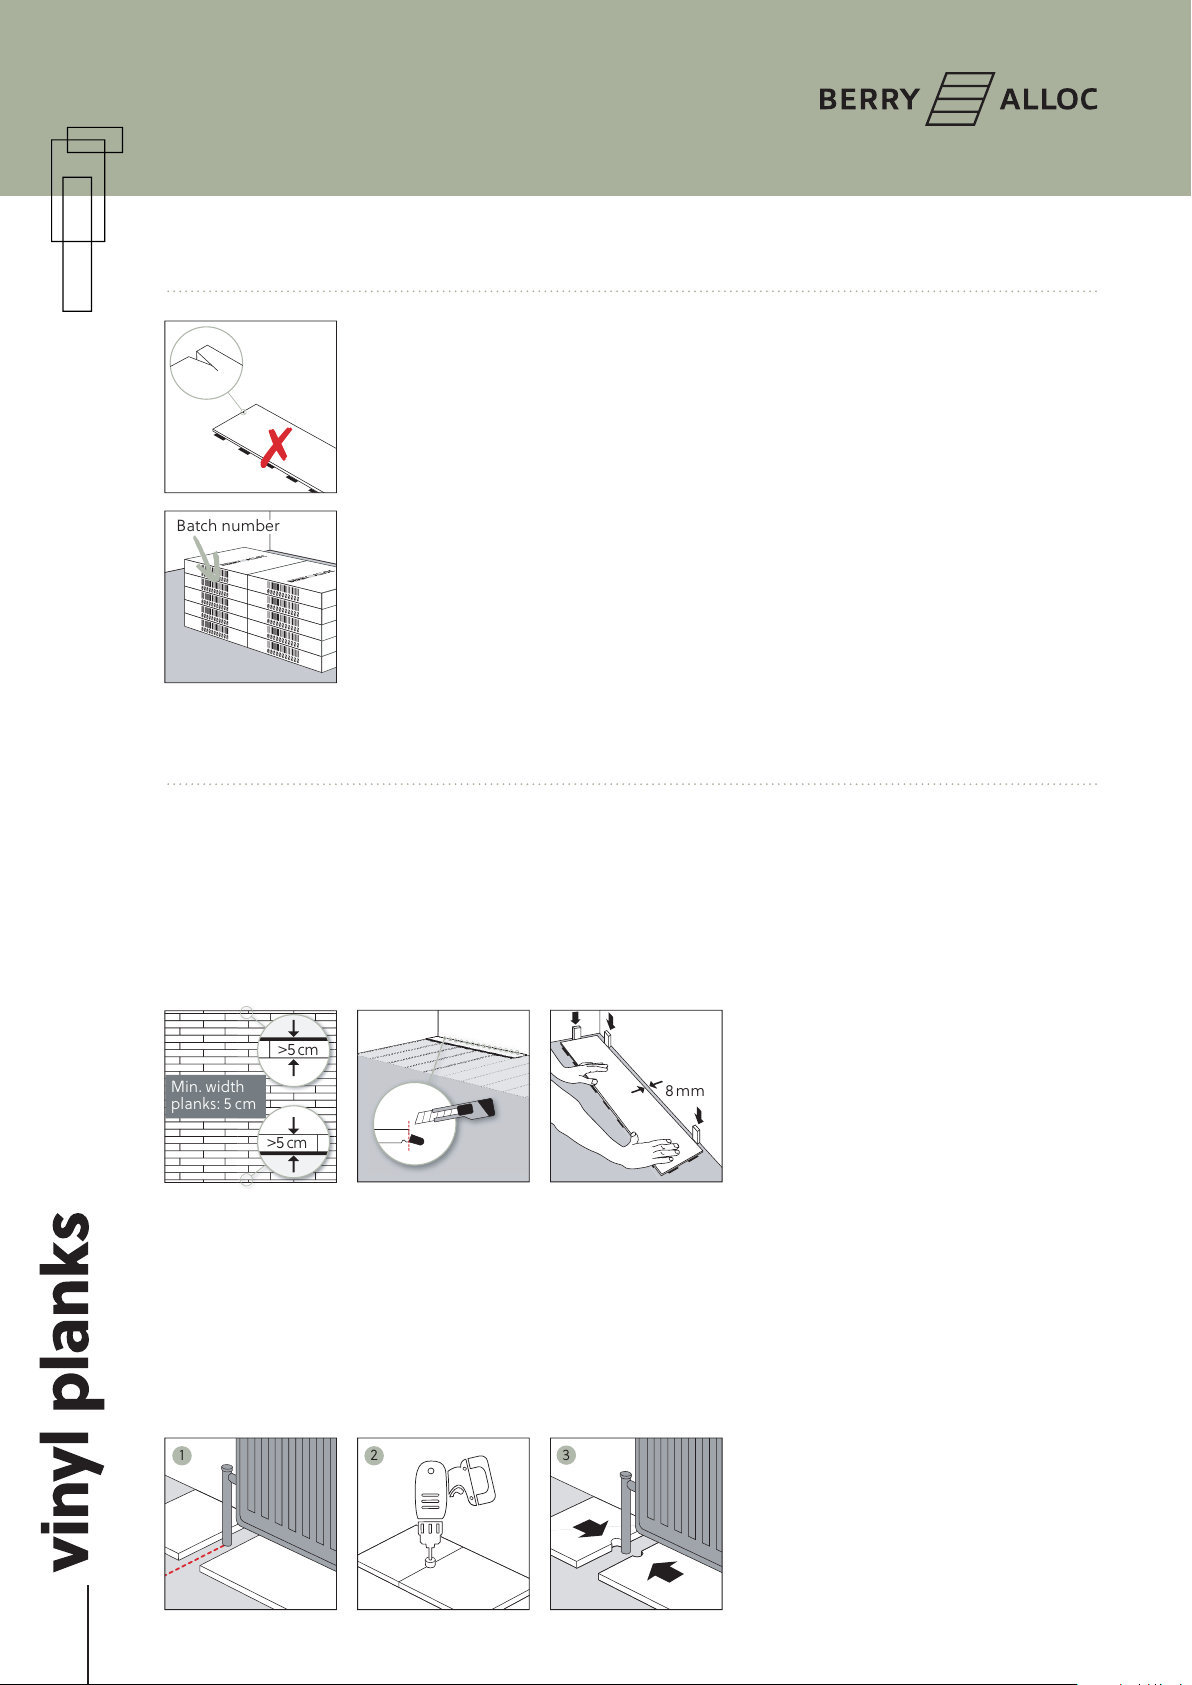
Always keep the production batch number (printed on the box), together with your order
form/invoice.
Check that the floor planks have no visible defects before installing them.
Style should be installed so that it is ‘floating’. This means that there should be sufficient space between the floor
and all walls or any fixed objects, so that the floor can move in any direction, i.e. it should not be screwed or nailed
down to the subfloor.
The installation of the floor must be the final operation in the project. Exceptionally heavy furniture, such as kitchen
cabinets, fireplaces, system walls etc., cannot be installed on top of the flooring, as this restricts the floor’s ability
to expand.
Measure the room to create a balanced layout. By measuring, you will be able to determine if the first row needs to
be cut. The first and last rows should not be less than 5 cm wide.
If the first row of panels does not need to be trimmed in width, you must remove the locks on the side that faces
the wall.
It is important to leave an expansion gap around the total perimeter of the floor and around columns, pipes,
thresholds etc. This expansion gap should measure at least 8mm and increase with 1mm once the installed floor
exceeds 8 meter (example: if the room measures 15x15m, the expansion gap should be 15mm around the perimeter).
It needs to be noted that the expansion gap can measure at most 15 mm.
8mm
Batch number
1 2 3
>5
cm
>5
cm
Min.width
planks: 5cm
8mm
Batch number
1 2 3
>5
cm
>5
cm
Min.width
planks: 5cm
8mm
Batch number
1 2 3
>5
cm
>5
cm
Min.width
planks: 5cm
8mm
Batch number
1 2 3
>5
cm
>5
cm
Min.width
planks: 5cm
2. PRECAUTIONS
3. INSTALLATION
4
style installation manual
The largest recommended installation area depends on the room temperature.
- 5-25°C (Heating, Ventilation & Air Conditioning): 30x30m
- 5-40°C (normal):15x15m
- 5-70°C (extreme): 5x5m
An expansion profile must be used in door openings, and/or if the area is bigger than
recommended for the room temperature.
In commercial applications, metal BerryAlloc profiles need to be used.
Do not use a hammer to put planks together.
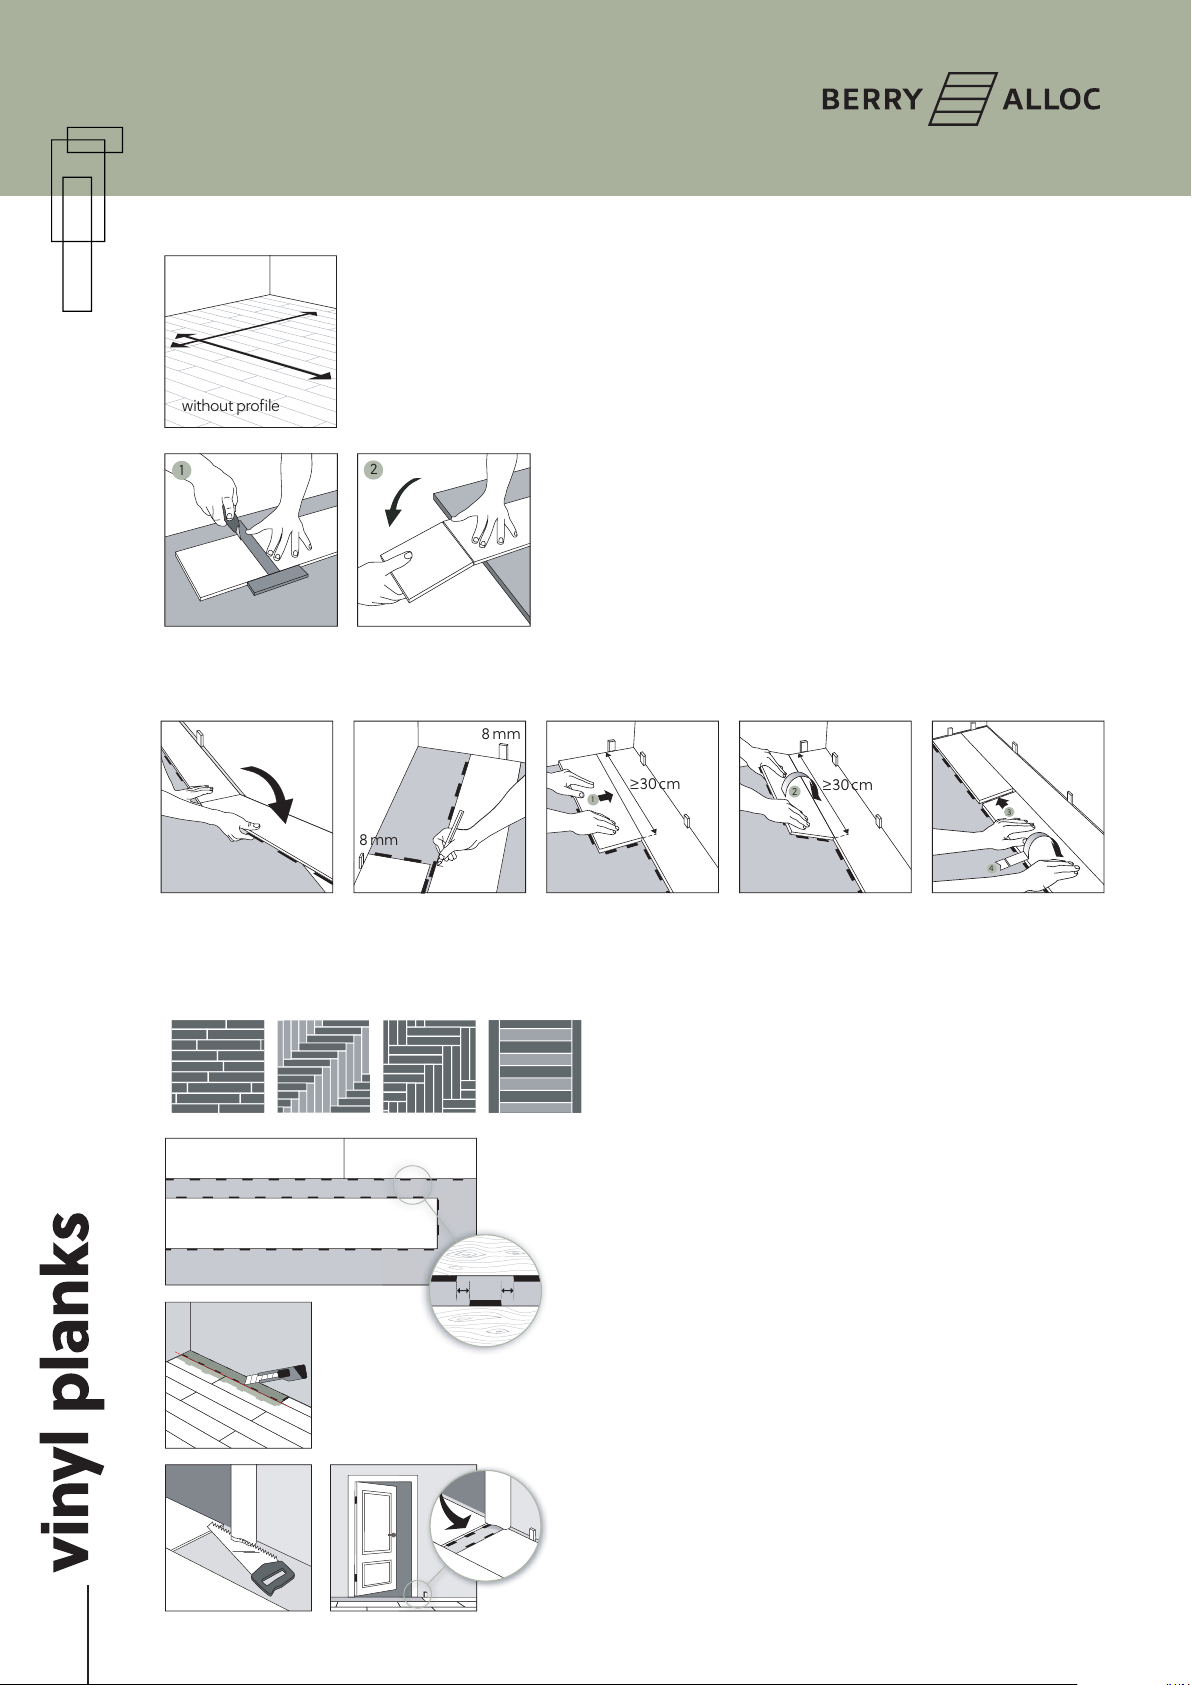
Cut boards with a trimming knife, decor side up.
When you need to cut a board in a different shape than one
straight line, use a saw.
Always ensure that the short end joints are staggered by a minimum of 30 cm (= 3 click elements) when you start
the next row. Use the leover piece from the previous row as the first piece of the next row, provided that this piece
is at least 30 cm long. In order to find a connection with the locking tabs of the previous row, it may be necessary to
cut off an extra part of the leover piece.
Style planks can be installed in a variety of different paerns.
PLANKS
3
4
8 mm
8 mm
8mm
8mm
≥30
cm
1
≥30
cm
2
without profile
12
3
4
8 mm
8 mm
8mm
8mm
≥30
cm
1
≥30
cm
2
without profile
12
3
4
8 mm
8 mm
8mm
8mm
≥30
cm
1
≥30
cm
2
without profile
12
5
SILICONE
The click elements of the new row, need to be
positioned, exactly in the middle of two locks of the
previous row. From second row on, always connect
the short side first and then the long side.
To install the last row, position a loose panel exactly
on top of the last laid. Place another panel upside
down up to the wall and mark the panel underneath.
Cut the marked panel to size and fit in place.
This method should be repeated for each panel
until the last row is complete.
For door mouldings, lay a panel face down next to
the door moulding. Saw the panel, then slide the
plank under the moulding. Make sure the moulding
doesn’t support on the floor.

5
style installation manual
5
SILICONE
5
SILICONE
Use Style accessories for a perfect result.
To allow the floating floor the necessary contraction and expansion we advise against
fixing any accessory on the floor. Never aach skirting boards directly onto the installed
floor. Permanent sealing products (silicone) should never be used to seal up the
gap between the floor covering and skirting boards/profiles. Joints on fixed building
elements (door frames, heating pipes, etc.) should never be completely sealed with
elastic filler. You should use filler twine as a basis for filling expansion joints. Another
option is to make use of end profiles to seal of expansion joints. Profiles, doorstops and
suchlike should not be screwed through the floor covering into the subfloor.
To keep your floor in good condition, it is important to place non-rubber backed
doormats at all entrances, to prevent dirt or grit on your floor. Placing doormats will
eliminate abrasive particles driven by footwear and will reduce damage. Do not use
rubber-backed mats, as long-lasting contact with rubber can cause permanent
discolouration. Never place doormats on a wet floor.
Consider saving a few planks for any potential future repairs.
4. FINISHING
5. MAINTENANCE
DOORMATS
Type ‘w’sowheel
felt pads
6. W
H O
Rolling office chairs, furniture legs, fitness appliances, etc. should be fied with so, non-rubber casters, to avoid
permanent damage to your floor. Use a suitable desk mat.
You should use felt pads or protective feet for items that contain rubber, such as chair legs, furniture legs, fitness
appliances, etc.
Type ‘w’sowheel
felt pads
6. W
H O
CLEANING
Initial cleaning
First remove all dirt and dust from the flooring with a brush or vacuum cleaner. Then
clean with water and a neutral appropriate cleaning agent, at least twice and until the
water stays clean. We strongly recommend using BERRYALLOC Vinyl Planks cleaning
products. Any other cleaning product may contain agents that damage resilient floor
surfaces. The coating of the top-layer makes a specific treatment aer installation
unnecessary.
Regular cleaning instructions
Vacuum or wet mop. When required, use a solution of clean water and mild, pH-neutral
detergent or domestic floor cleaning emulsion.
We strongly recommend using BERRYALLOC Vinyl Planks cleaning products, as other
products may damage your flooring surface. Rinse thoroughly and soak up residual
water.
NB: the floor can feel more slippery when it becomes wet. Spots, marks and spillages
should be wiped up as soon as possible.
Do not use chlorinated solvents. Never use wax or varnish coating.
Never use maintenance products that contain wax or oil. Never use a steam mop.

6
style installation manual
The warranty is only valid when the installation guide is followed carefully. More information about the warranty
can be found in the ‘Warranty document’ of Style on the website (www.berryalloc.com).
This document presents the general installation instructions, based on the latest available information. For the best
result, and to ensure the validity of the guarantee, these instructions should be followed carefully.
This document replaces all previous versions and is valid until further notice. This information is a representation
of the technical knowhow at the time that this document was produced/published and may be amended,
complemented or replaced at any time. The version that should be followed is the one valid at the time of
installation. Please check for updates at: www.berryalloc.com
6. WARRANTY INFO AND CONDITIONS
7. LEGAL INFORMATION
Table of contents
Other BERRY ALLOC Household Appliance manuals

Popular Household Appliance manuals by other brands


Stinger
Stinger UV-15 owner's manual

ScentAir
ScentAir ISD8001 instructions

Morphy Richards
Morphy Richards SPILLMASTER - AUTRE instructions

Conrad Electronic
Conrad Electronic 77 67 04 operating instructions

Jeld-Wen
Jeld-Wen SVC001 installation instructions

pols potten
pols potten Taro in pot 540-300 Series instruction manual