BeSense IM20 Zwave User manual

im20
Zwave Plus Window/Door Sensor Specification
I. Introduction
IM20 Zwave is a wireless door sensor regarded as an important part of wireless alarm
panel. It can immediately detect open or close of door/window, has anti-tamper and
battery level real time detection functions. With exquisite design, it will perfectly match
up with your home decoration and integrate into installation environment. As it is a
separation triggered door sensor, when the magnet part and main body are separate, it
will send alarm signal to Control Panel and then Control Panel’s buzzer rings and will
call or send message to Alarm Central Station or user phones.
●Adopt imported high sensitivity magnetic sensor, with stable and reliable
performance !
●Special magnet position design, assure its high induction property toward
metal door/window !
●Ultra-low power consumption and extra-long standby time, battery life is up to
3 years !
●Low battery alert!
Model No. : IM20 Zwave
Communication Protocol : Zwave Plus.
Working Voltage : 3VDC (2PCS AAA alkaline batteries)
Working Current : Static current≤9uA; transmit current≤35mA
Indoor Transmit Distance : ≥30m
Induction Distance : ≥10mm
Alarm Indicator : LED status indicator
Output Signal Type : Alarm report, tamper report, battery level status.
Working Humidity & Temperature : -10°C~50°C; ≤95%RH no condensation
Dimension : 80*50*20mm (L*W*H)
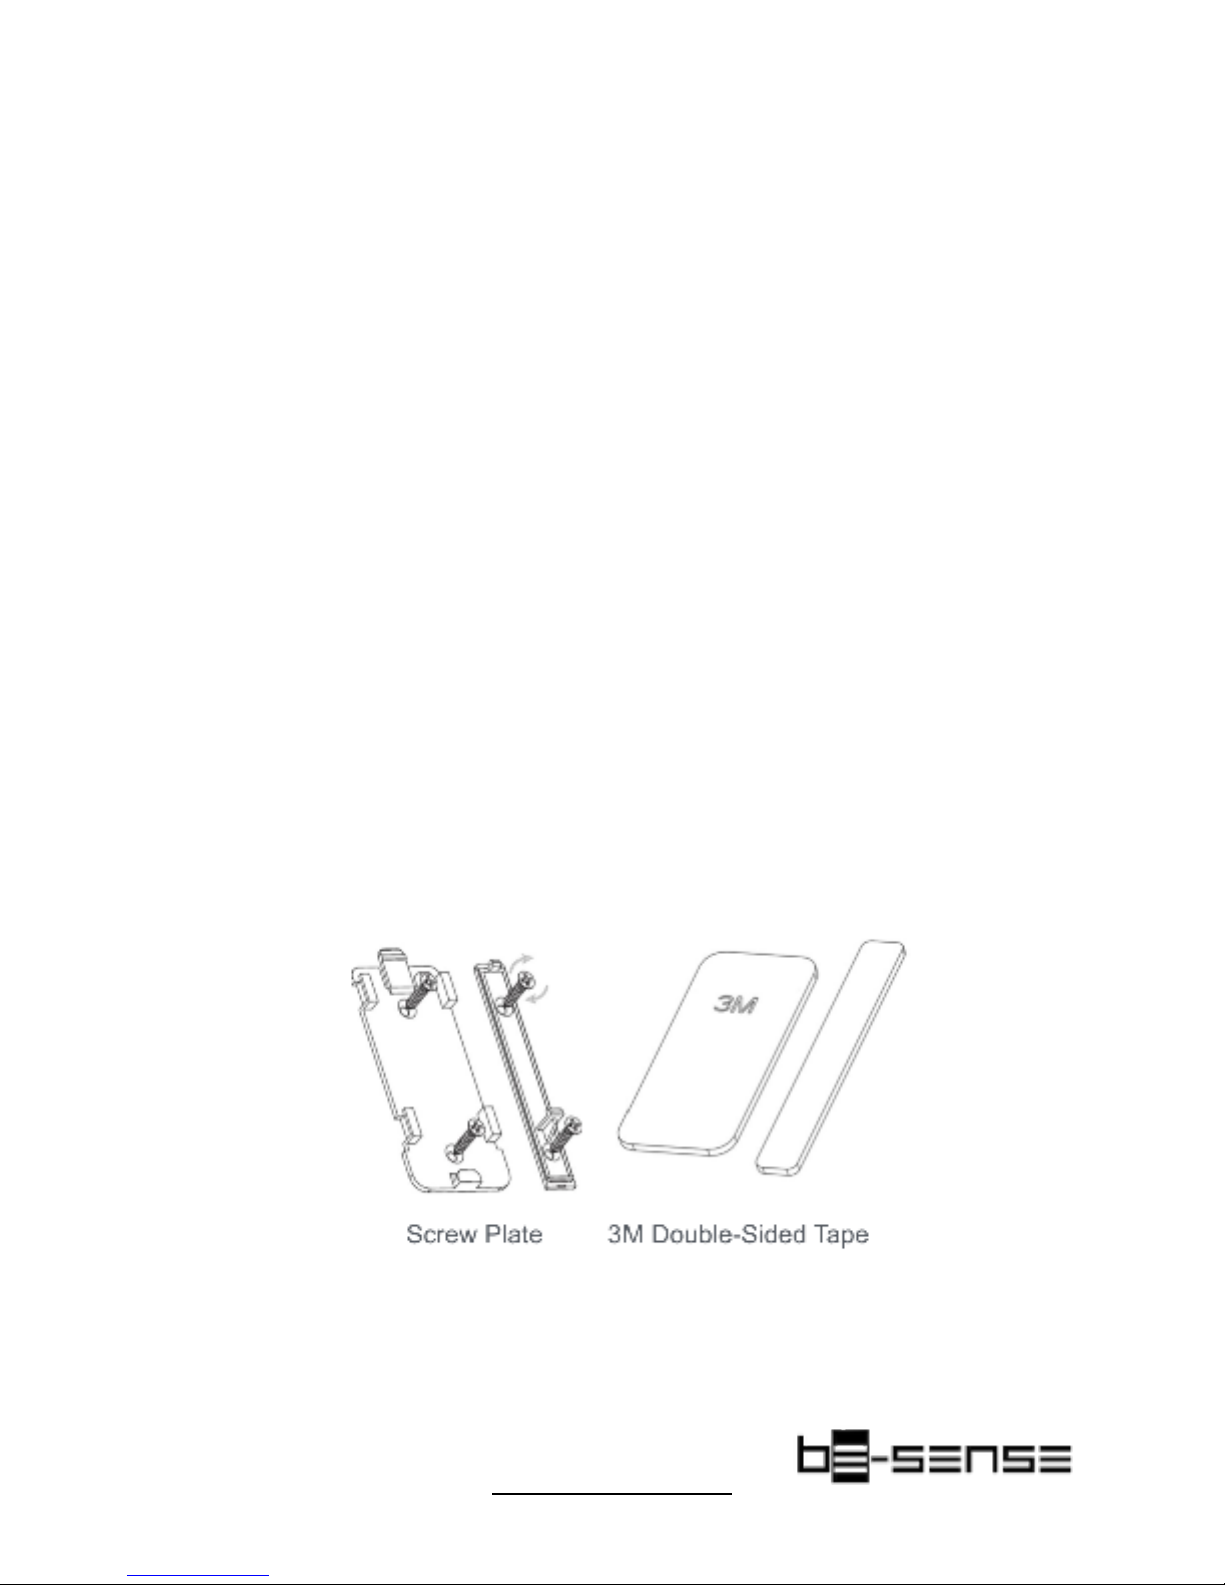
Screw plate and 3M double-sided tape are included.

II. Network Inclusion/ Exclusion
The sensor must be added to the Zwave network prior to use. To include the sensor in a
network both the sensor and the Network controller or HUB must be in inclusion mode
at the same time.
Add : start by placing the controller in inclusion mode. Activate the inclusion mode at
the sensor pressing the tamper switch 3 times, then the door sensor will stay in
enrollment state.
Wait about 15-30 seconds while the sensor and controller finished the inclusion
process.
!
Remove: enter the Exclusion Mode on the controller, and press the tamper switch 3
times, then the door sensor will be removed after 15-30 seconds.
III. Restore Factory Settings
Press the tamper switch for 6 times to restore factory settings.
IV. Installation
The edge of the magnet must align with the line on the
sensor, AND the magnet must locate next to the arrow on
the sensor. Maximum gap between the magnet and the
sensor is 5/8”. If the magnet is not located following these
rules, the sensor may not get activated.

Here are some instructions that should help you
get our Motion Sensor device handler to work
in SmartThings.
Why update the handler?
•Customized to avoid false alarms
•Generate Tamper alerts
•Battery indicator
•Colors and Background improved
How to ADD a device Handler for the BeSense
Motion Sensor?
CHANGE THE DEVICE HANDLER TO “Z-WAVE PLUS DOOR/WINDOW
SENSOR”
1. Add the devices to your SmartThings hub by clicking on Add thing > +
Connect New Device in your app. Press and release the tamper switch button
on the sensor three times quickly.
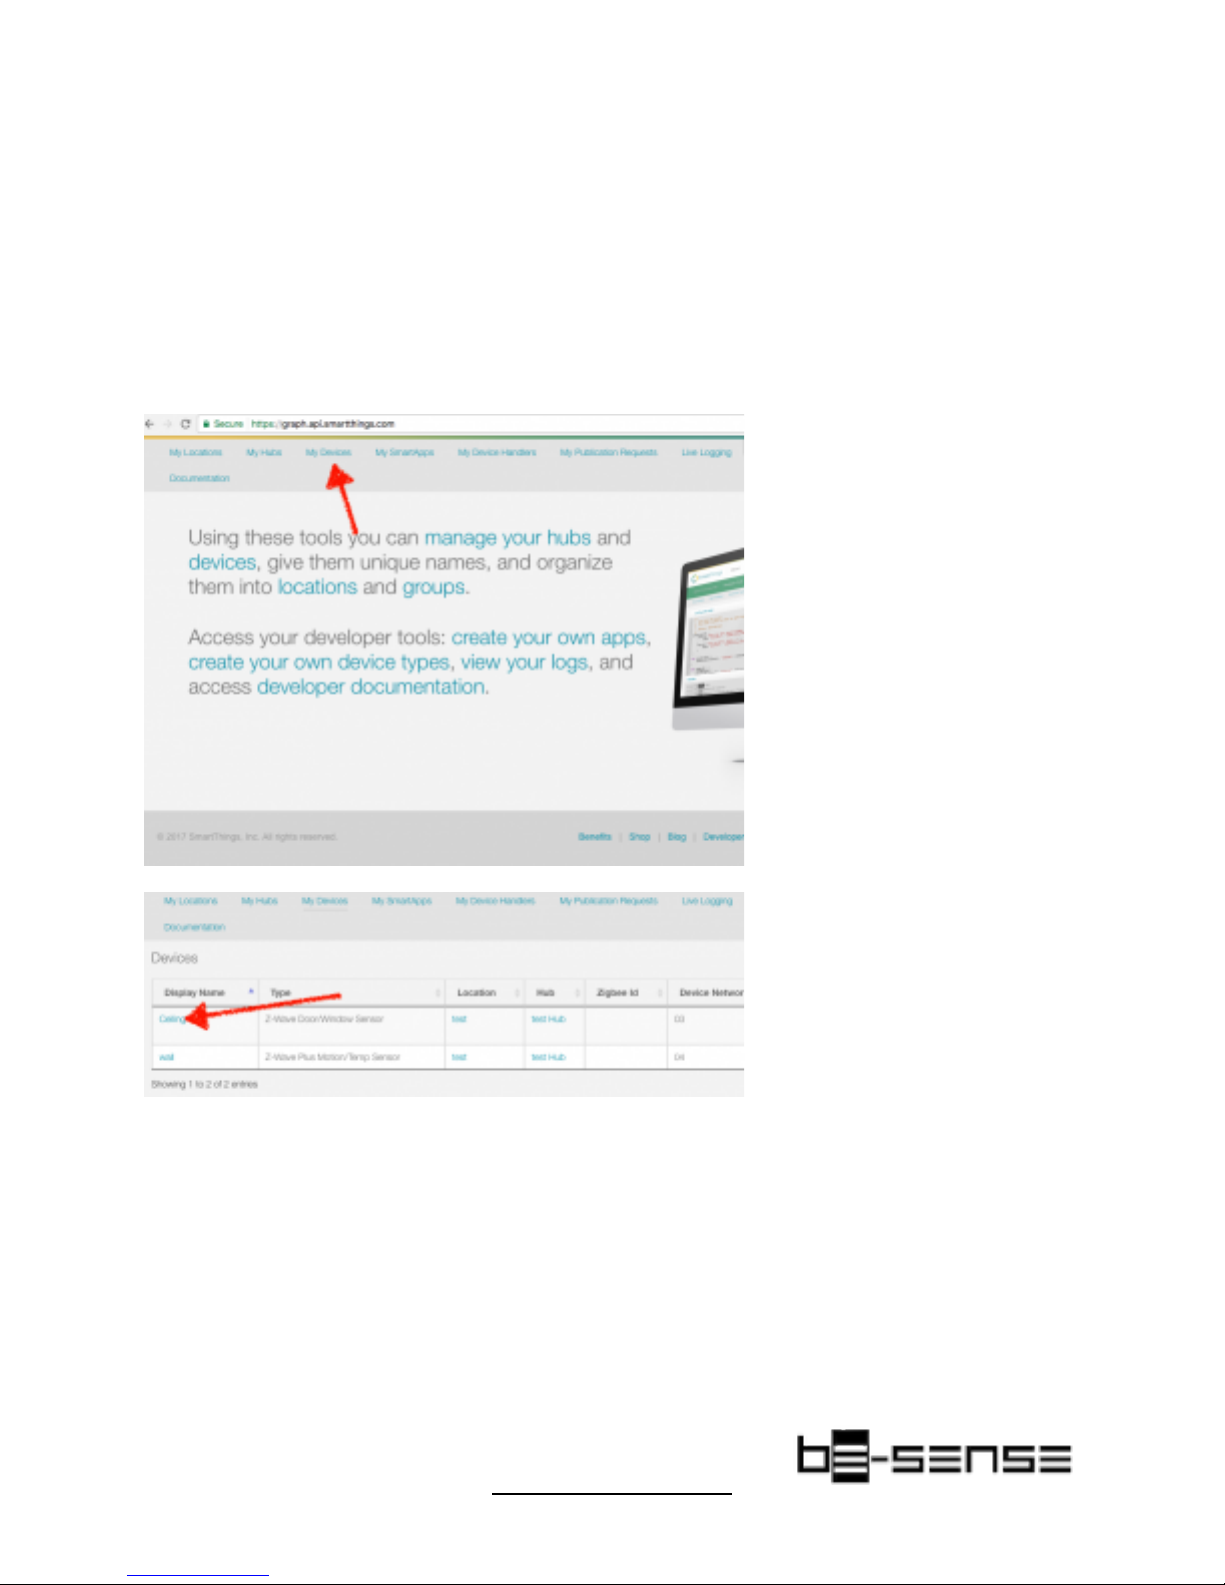
2. Log in here with the same username and password you use for your
SmartThings app: https://graph.api.smartthings.com/login/auth
3. Click on My Devices Handlers in the top menu and select your included
Device.
4. Next, scroll to the bottom and click Edit

5. Choose “Z-Wave Plus Door/Window Sensor” from the TYPE option (in our
case is Motion we don’t sense Temperature but smartThings joined both in the
same handler).
6. Now click Update

You should now see this device type in your list of Devices.!
And that should be it! I hope this was helpful in simplifying the process behind
custom device handlers. Feel free to share your questions and feedback to
BeSense Z-Wave
Command Class Specification
When the door sensor is opened or recovered, it will send “Binary Sensor Report” and
“Notification Report” commands to the device under Lifeline group.!
When door sensor is opened:!
Sensor Binary Report, Value = 0xFF, Type = 0x0C
Notification Report, Notification Type = 0x07, Event = 0x08 When door sensor is recovered:
Sensor Binary Report, Value = 0x00,Type = 0x0C Notification Report, Notification Type = 0x06,
Event = 0x16
When tamper switch is triggered or recovered, the door sensor will send “Sensor Binary Report”
and “Notification Report” command to the device under Lifelinegroup.!
Tamper Triggered:!
Sensor Binary Report, Value = 0xFF,Type = 0x08
Notification Report, Notification Type = 0x07, Event = 0x00 Tamper recover (press tamper
switch for 0.5s):!
Sensor Binary Report, Value = 0x00, Type = 0x08 Notification Report, Notification Type = 0x07,
Event = 0x00
Association Group2
If there is any device under Association Group2, the door sensor will send “BASIC SET”
command to control those devices when the door sensor is triggered. For example: when the door

sensor is triggered, it sends adjustable parameter “BASIC SET” command to a lamp under
Group2, you can adjust the lamp’s luminance through the parameters of this command; if the set
light-up time out (see the Configuration Description), the sensor will send “BASIC
SET”command to turn-off the lamp.
When sensor is triggered:!
[Command Class Basic,Basic Set,Value = 0xFF(default 0xFF, configurable, see the
Configuration Description)] When light-up time out:!
[Command Class Basic,Basic Set,Value = 0x00]
Configuration Description
a) “Basic Set” configuration!
If there is any device under Association Group2, the door sensor will send “Basic Set = value”
command to control that device when the door sensor is opened. “Value” configuration rule is as
below:
b) Turn Off Light Time Configuration!
If there is any device under Association Group2, the door sensor will send “Basic Set = value”
command to Group2, and send “Basic Set = 0x00” command to turn-off light after “t” seconds,!
Set value = “t”, means to send Basic Set command after “t” seconds.
c) PIR Sensor Alarm Elimination Time Configuration!
Min set time is 5s. If the configuration is 1, that means it will eliminate alarm after 1*5s (5
seconds), if t, will eliminate alarm after t*10s.
Z-Wave Supportive Commands

Generic Deice Type = GENERIC_TYPE_SENSOR_BINARY!
Specific Device Type = SPECIFIC_TYPE_ROUTING_SENSOR_BINARY
Support Command Class =
COMMAND_CLASS_ZWAVEPLUS_INFO_V2
COMMAND_CLASS_ASSOCIATION_V2
COMMAND_CLASS_WAKE_UP_V2
COMMAND_CLASS_BATTERY
COMMAND_CLASS_ZWAVEPLUS_INFO_V2
COMMAND_CLASS_ASSOCIATION_GRP_INFO
COMMAND_CLASS_NOTIFICATION_V4
COMMAND_CLASS_SENSOR_BINARY_V2
COMMAND_CLASS_MANUFACTURER_SPECIFIC_V2
COMMAND_CLASS_VERSION_V2
COMMAND_CLASS_POWERLEVEL
COMMAND_CLASS_DEVICE_RESET_LOCALLY
Commands to Control Other Devices: COMMAND_CLASS_BASIC
Other BeSense Accessories manuals

Popular Accessories manuals by other brands

Jung
Jung RW 95 Operation manual

NOKIAN TYRES
NOKIAN TYRES INTUITU quick start guide

Dorner
Dorner AquaPruf 7400 Ultimate CE Series Installation, Maintenance, and Parts Manual

UPPAbaby
UPPAbaby Travel Bag manual

Honeywell Home
Honeywell Home RDWL313A2000 Installation and operation guide

Selve
Selve Commeo Control Operating instruction


