bestelectric slimline curve User manual

SC0006104V00
Installation and User
Manual
Installation manual and instructions for use.
2
A. PRESENTATION
Firstly we would like to thank you for purchasing this product. Your business is much appreciated
and we trust that this equipment will provide many years of use and deliver full satisfaction. Before
proceeding to the installation, you should read all the instructions and recommendations detailed in
this instruction manual, since the manufacturer will not be responsible for any breakdown or damage
caused by misuse. Once your electric radiator is installed, keep this manual in a safe place so that it
can be consulted at any time.
B. RECYCLING
Warnings for the correct disposal of the product as established by the European Directive
2012/19 / EU. At the end of its useful life, the product should not be disposed of together
with urban waste. It can be delivered to specic recycling centres or to distributors that can
facilitate this service. Removing a household appliance separately means avoiding possi-
ble negative consequences for the environment and health resulting from improper disposal and recy-
cling of the materials and components, thus obtaining signicant savings in energy and resources. To
underline the obligation to collaborate with a selective collection, the product shows the marking that
this product includes warning signs to conrm the non-use of traditional disposal methods.
For more information, contact your local authority or the store where you purchased this device.
C. IMPORTANT SAFETY NOTES
The installation of the heating device must be chosen correctly and must
be carried out according to the rules and in accordance with the installation
guides included in the manual.
The equipment should be kept away from any ammable objects and chil-
dren should not be left near the appliance without being supervised. Chil-
dren under 3 years of age should be kept out of the reach of the appliance
unless they are continuously supervised.
Children from 3 years old to 8 years of age should only switch the applian-
ce on / o as long as it has been placed and installed in its normal opera-
ting position.
They must also be supervised or have received instructions regarding the
use of the appliance in a safe and secure manner and understand the risks
of a heating device.
Children from 3 years old to 8 years old should not plug, operate, clean or
perform maintenance operations.
This device can be used by children aged 8 years and above including peo-
ple with reduced physical, sensory or mental abilities or lack of experience
and knowledge providing they have been given appropriate supervision or
training regarding the use of the device in a safe manner and understand
the dangers involved. Children should be supervised to ensure they do not
play with the device.

Installation manual and instructions for use.
3
Cleaning and maintenance to be performed by the user, should not be per-
formed by children without supervision.
Caution: some parts of this product can get hot and potentially may
cause burns. Particular attention must be paid when children and vul-
nerable people are present.
The equipment must under no circumstances be covered by clothing, or
any other object, nor placed under a cabinet or any other obstacle that pre-
vents the circulation of hot air.
WARNING:
To avoid overheating, DO NOT COVER the heating
appliance.
The heating appliance must not be placed immediately below a socket outlet.
If your radiator is a dry type, it can be connected only to a supply with sys-
tem impedance no more than 0,24 Ω. In case necessary, please consult a
qualied electrician for more information.
Avoid the use of extension cords as these can cause overheating and cau-
se a re risk. However, in case of using an extension cord, the cable must
be the minimum size 14 AWG and with a power no less than 2500w.
The connecting cables of the heater itself must not come into contact with
the surface of the appliance, and in the event that they come into contact
with each other, they must be protected with an insulating cover to maintain
a low temperature level.
The equipment must not be installed in places where there is a risk of
splashing water, such as bathtubs, washbasins, etc.
The equipment must be installed so that the switches, thermostat, outlet
cannot be touched directly or indirectly by a person in a bathtub or shower
(respect the distances of prohibition according to RBT).
In case the power supply cable is damaged, it can only be replaced by the
Technical Assistance Service, in order to safety risks.
Always respect the safety measures when xing the device on the wall.
The electrical installation must have a switch with a fuse and magnetic protection.

Installation manual and instructions for use.
4
Likewise, a dierential protection against ground faults is advisable. The
voltage and frequency values of the electricity network must be the same
as those indicated on the nameplate.
It is possible that the radiator may produce slight noises at the beginning of
its operation which is normal due to the expansion and contraction of alu-
minium. With a few times of operation, the noise should disappear.
It is recommended that the underside grill of the radiator is regularly clea-
ned/cleared with a vacuum in order to prevent build up of debris such as
u or animal fur.
D. INSTALLATION
BEFORE INSTALATION
The installation and start-up of this device is extremely simple, however you should read very care-
fully all the instructions and recommendations detailed in this instruction manual, as the manufactu-
rer will not be held responsible for any damage caused by non-compliance.
Once unpacked the device, the remains of the packaging must be removed in a responsible manner
since all the elements have been designed for recycling. If, once unpacked, it detects apparent da-
mage to the appliance, you should consult your supplier before proceeding with the installation and
electrical connection within a period of less than 24 hours.
Assembly and installation must be carried out following the instructions detailed in this manual.
For safety reasons, the radiator should not be installed so that switches and other controls can be
touched by a person in the bathroom or in the shower.
VERY IMPORTANT!
• Read the installation manual before assembling the equipment.
• Read the user manual to operate the equipment.
• Observe the warnings carefully.
• Install the equipment in a place where the air can fully circulate.
• It is advisable to be assembled by an individual with DIY skills or qualied electrician.
ELECTRIC CONNECTION
• If you decide to remove the 3 pin plug from the power cord then you must follow the instructions
below regarding the electrical installation and the connection must be made by a qualied installer.
• If the electrical connection is spurred to a mains electric supply then it must be installed in accor-
dance with the installation regulations in force in the country in which it is to be tted.
• For safety reasons, verify that there is no voltage in the network prior to connecting the device to
the mains.
• Before connecting the appliance to the mains it must be ensured that the supply voltage is within
the indicated on the nameplate 230V.
• The device must be connected to the protective conductor of the xed installation.
• Any incident arising from the breach of these instructions will invalidate the guarantee.
• For the electric connection please take close note of the electrical diagram with special attention to
the colours of the cables.
• If the power cord is damaged, it must be replaced by the manufacturer, its after-sales service or by
a similar qualied personal so that the user is not in danger.

Installation manual and instructions for use.
5
WIRING DIAGRAM
WALL FIXATION
The supplier will provide an installation kit inside the packaging consisting of the following elements:
Tools required:
L
R2
R1
I
R
N
Yellow/green
Blue
Blue
Brown
Power plateDisplay
Brown or Black
Ts
L: Phase
N: Neutral
R1: Electronics neutral output
R2: Electronics phase output
I: Switch
Ts: Safety thermostat
R: Resistance
Ø 8mm
2x DIN7505A 4X40
2x WALL BRACKET
2x
DIN7981 4,2X9,5
2x SCREW PLUG
2x NUT
1x TEMPLATE

Installation manual and instructions for use.
6
Follow the steps illustrated below to hang and install your radiator:
1. Remove the radiator from its packaging and choose where to hang it.
2. Note that the minimum distances required around the radiator.
3. Use the template included inside the box for your help.
4. We suggest that you use a spirit level to ensure that the radiator is positioned correctly.
5. Using the marks of the template, make the holes that are needed.
6. Using a drill, drill the holes for the plugs appropriate to the type of wall.
7. Place the radiator brackets in place using the supplied screws, washers and wall plugs.
8. Bring the radiator to the wall and hook the grooves at the back of the radiators through the corres-
ponding holes on the wall brackets.
9. Hang the radiator and x it with the screws.
A
BC
D
A 250 mm
B 250 mm
C 150 mm
D 150 mm
Installation manual and instructions for use.
7
WARRANTY
The company oers an electrical guarantee for the period of 2 years.
In order for this guarantee to be valid, you must present the original of the invoice, delivery note or
purchase receipt.
Previous requirements:
• The warranty only covers manufacturing defects or any problem caused by such defects.
• All problems resulting from insucient installation or power (not enough power to heat the room,
incorrect installation, etc.) are not covered by this warranty.
• This radiator is for domestic use, installation in any other environment is not guaranteed.
• The manufacturer reserves the right to decide whether to repair any defective part or replace the
product.
•All costs resulting from damage caused by improper use, transportation, improper power supply, are
not covered by this warranty.
• If the appliance is not installed or used as indicated in this manual, the responsible company will not
be responsible for any damage caused by its misuse.
• In the last case of resorting to legislation, both parties will be under the jurisdiction of the courts of the
province of the manufacturer.
E. TECHNICAL CHARACTERISTICS
Temperature measurement resolution 0,1ºC
Setpoint temperature increases 0,5°C
Measuring range ambient temperature 0°C - 45°C
Temperature selection range 5°C - 30°C
Weekly schedule Each 1h
Maximum load (resistive only) 16A TRIAC 8 A. (2000W)
Supply voltage 230 Vac +/- 10% 50 Hz
RF 868Mhz
Operating temperature <70ºC
Consumption error measurement <3%
Norms and directives:
The thermostat has been designed in accordance with
the following European standards and directives.
EN 60730-1 : 2013
EN 61000-6-1 : 2007
EN 61000-6-3 : 2007
EN 61000-4-2 : 2009
2006/95/EC low voltage
EMC 2004/108/EC
ENERGY SUPPLY:
Connect the electric radiator using the switch installed for this function. Before using your radiator it
is necessary to make some type of adjustment.
In its rst use, the transmitter has an internal battery, which must be charged for a minimum of 24
hours so that the programming is not lost. If the radiator is disconnected, the time and day of the last
time before the disconnection will be saved (it does not count while it is o) unless it is connected to
the Internet, which will be updated automatically.
NOTES:
To control the radiators through the APP, you need a Multilink that connects the radiators to the in-
ternet, using the router in the house. The APP will allow you to congure, program and access the
consumption statistics of the devices through an intuitive interface and with a simple operation (user
manual included with the Multilink).

Installation manual and instructions for use.
8
F. USE OF RADIATOR
Setting the radiator in programming mode, will allow you to assign temperatures at dierent times
of the day, for each day.
Understanding the full programming potential of your radiator will help to reduce energy consumption.
Display:
G. OPERATING INSTRUCTIONS
MODES:
Pressing [OK] selects the operating mode of the radiator:
• Auto. The target room temperature varies automatically according to customizable programming
based on 3 temperatures (Confort, Eco, Antifreeze). In “Auto” mode you can temporarily vary the
temperature also with [+] o [-], and the change will be eective until the next heating period or
the end of the day. In this mode, on the screen you will see the temperature, alternating with the
letters “Pro” and “AUTO” icon.
• Manual. The target room temperature remains xed, depending on the user’s choice (default
19ºC). In “Manual” mode press the key [+] and [-] to change the temperature. The temperature
will be xed. In this mode, you will see on the screen the selected temperature and hand icon.
Pressing [ON/OFF] the radiator stays o (default mode). In this mode, on the screen we will see the
time and “OFF” icon.
SETTING TIME AND DAY
Press [>] for 3 seconds, then scroll with [>] from 1 to 7 and press
[>] once more until the ashing 1 appears.
With [+] and [-] select the current day (1 = Monday, 7 = Sunday) and
press [OK].
With the hours blinking, set the time with [+] and [-] and select [OK].
Repeat the same process with the minutes and press [OK]to accept
and exit.
It is very important to have the time and day congured so that the
programming works correctly if you use the “Prog” mode.
Link
7
65
4
3
21
AUTO
Prog.
Decrease Increase
ON/OFFModes
Alternate between manual and
automatic / Long press to link
Link
1
Hour
Minutes
Weekday

Installation manual and instructions for use.
9
ADJUST PROGRAMMED TEMPERATURES:
In “Auto” mode the temperature of each hour will change automatically following the programmed
Schedule. The user must assign to each hour one of the following temperatures modes:
• Comfort ( ), used normally when the user is at home.
• Eco or saving ( ), used at night or when the user is away from the home or not using the room.
• Antifreeze or minimum temperature ( ),used for longer absent periods.
To dene these temperatures:
• Press [>] and then press [OK].
• Select the temperature with [+] or [-] for comfort mode (default 19ºC) and press [OK].
• Select the temperature with [+] or [-] for the eco mode (default 17ºC) and press [OK].
• Select the temperature with [+] or [-] for the antifreeze mode (default 5ºC) and press [OK].
• Press [>] to exit.
Comfort mode can be congured from 1 to 30ºC. The eco mode can be congured up to 0.5ºC less
than the degrees congured in the comfort mode (from 0.5ºC to 29.5ºC). The antifreeze mode can
be congured up to 0.5ºC less than the degrees congured in the eco mode (from 0 to 29ºC)
Annotation: The radiator does not have an o mode in its programming. If you want to do this, you
can congure the eco mode with the lowest possible temperature. In this way, in the hours that you
have congured the eco mode, the radiator will not turn on unless the room temperature is less in
the room than the congured one.
SETTING PROGRAM
The radiator allows the creation of a weekly programme schedule assigning one of the 3
temperature settings to each hour. The program for each day (day 1 to day 7) can be dierent.
Press the [>] key for 3 seconds to start programming your bespoke heating settings.
1. The display will show 0:00 on day 1.
2. With [OK], select the desired “temperature mode” for the time that appears on the screen (Com-
fort, eco or antifreeze, at all times of each day, the eco mode will be preset by default).
Link
3
A
UTO
Link
Link
1
Link
Link
1
Link
Link
1

Installation manual and instructions for use.
10
3. Use the [+] key to increase the time value (or [-] to return to the previous time) and select the
desired mode again with [OK].
4. You must perform this procedure from 0:00 to 23:00 each day and 7 days (when you arrive at
23:00 on day one, when you press [+], it will automatically skip to 0:00 hours on day two and so on
until day 7. You can also advance through the days with the [>] key).
5. When you nally reach 23.00 on day 7 and press [+], the day and time settings will be displayed
(you will see the current day ashing). Please press [>] to exit the program without modifying the
time settings. Another option when reaching 23.00 on day 7 is to press [>] twice.
KEYPAD LOCKING
Use this function to prevent any changes to your settings (In a child room, public area, etc.).
Press [+] and [-] simultaneously for 3 seconds to lock the screen and the “Lock” message will appear
on the display:
Pres [+] and [-] for 3 seconds to unlock.
ADVANCED ADJUSTMENTS
To enter the advanced setting mode:
1. Press [>] while the radiator is in one of the main modes.
2. Press again [>] for 5 seconds. Then press [+] or [-] to choose the parameter to modify (C1-C6).
3. To modify one of the parameters press [OK] on the desired parameter and then change the set-
ting with [+] or [-] and press [OK] again to conrm. You can continue navigating to the parameters
with the [+] or [-] keys or press [>] to exit the advanced settings.
Link
1
Link
1
Link

Installation manual and instructions for use.
11
The advanced settings are:
• C1- Choose ºF or ºC (default ºC).
• C2- Choose type of control (default PID).
• C3- Temperature Compensation Oset (default 0ºC).
• C4- Firmware.
• C5- Open window detection (turning o for 30 minutes if a drop of 2.4 °C is detected in 4 minu-
tes), is indicated by the icon: (default OFF).
• C6: Activation of the adaptive start-up function, so that the device predicts the optimal start-up
time to obtain the desired temperature according to the program. In this way the user does not
need to take these times into account when creating the program. Maximum anticipation time:
24h. It is indicated by the icon: (default OFF).
RESET RADIATOR
Press simultaneously [>] and [OK] for 10 seconds. When “rES” appears, click on [OK] to conrm.
H. ERROR MESSAGES
• OC: Temperature probe not present.
• SC: Temperature probe shorted.
• Err1: Actuating element in short circuit.
• Err2: Overload (more power than allowed).
• Err4: Overheating (> 90ºC in the electronics area).
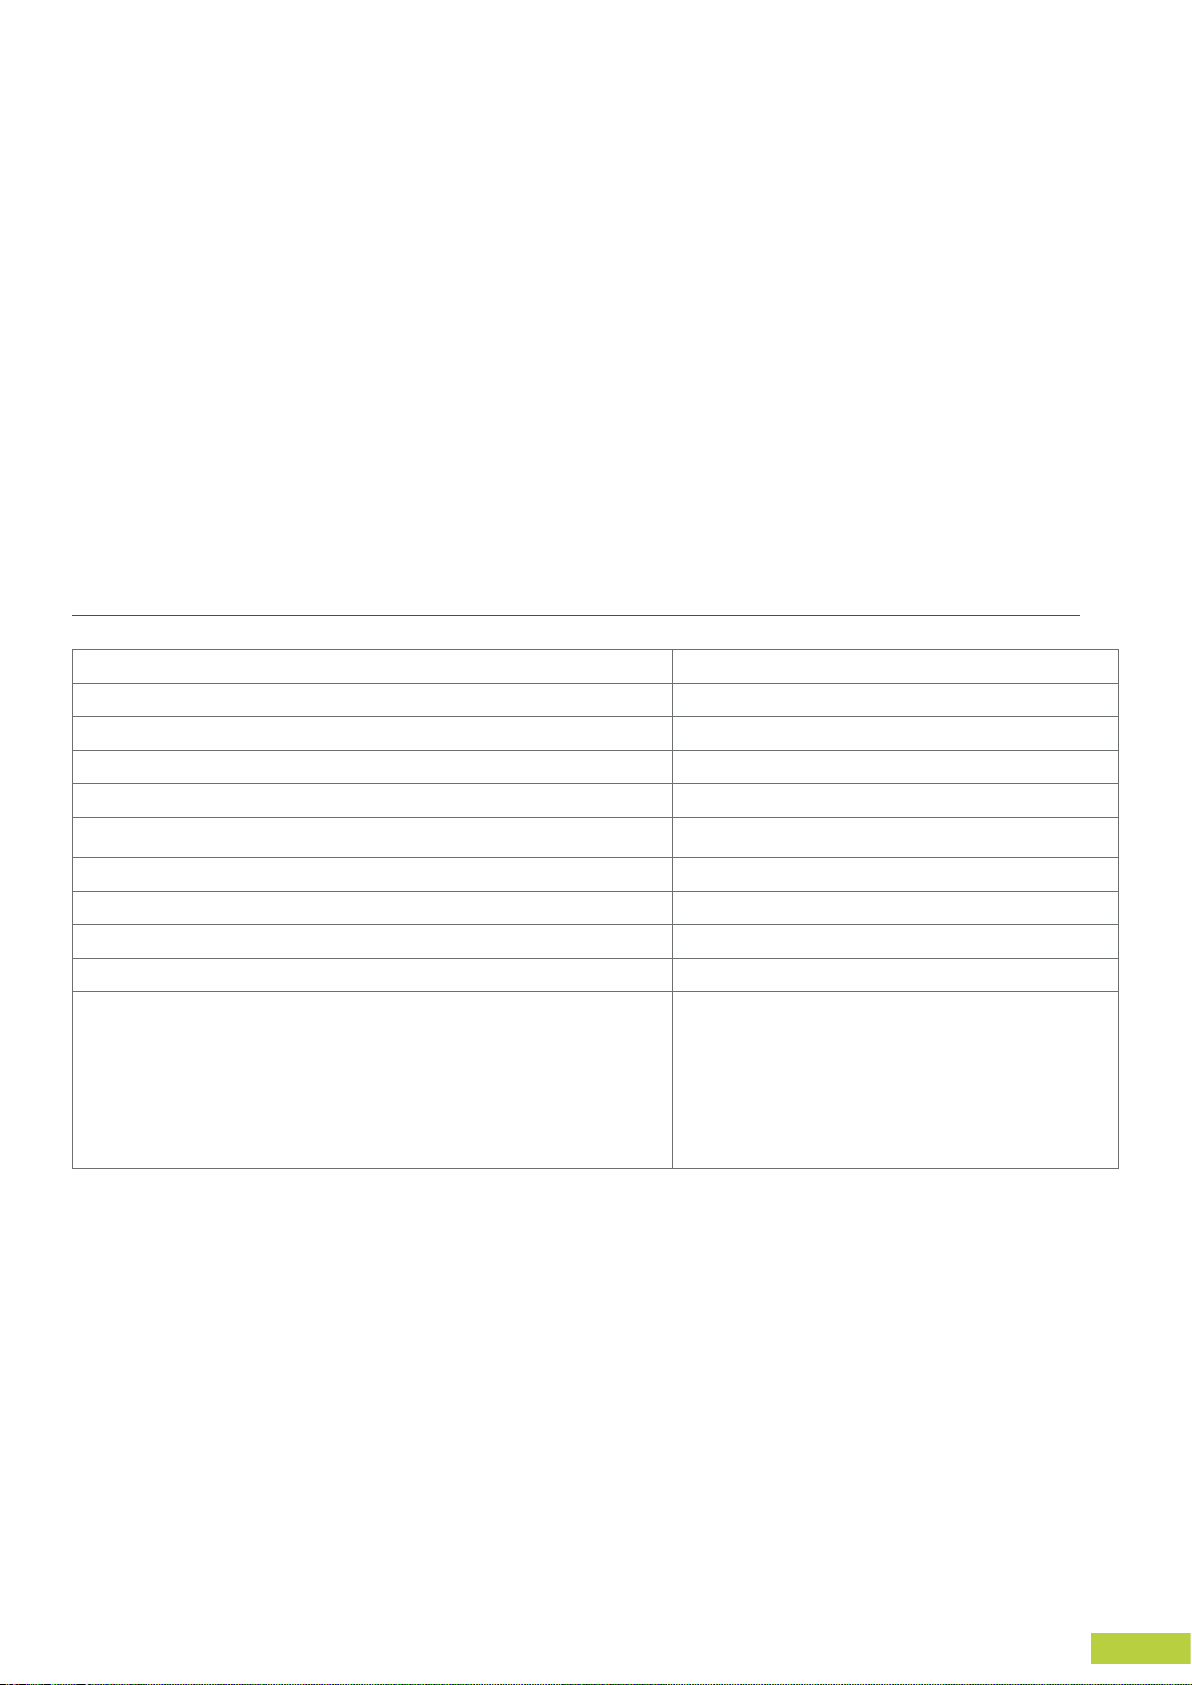
I. ECO-DESIGN
Item Unit
Type of heat output/room temperature control
Electronic room temperature control plus week timer yes
Other control options (multiple selections possible)
Room temperature control, with open window detection yes
With distance control option yes
With adaptative start control yes
With working time limitation yes
Contact information: see back cover
Data Value
Item Simbol Unit 600 900 1.200 1.500 2.000
Heat output
Nominal heat output Pnom kW 0,6 0,9 1,2 1,5 2,0
Minimum heat output (indicative) Pmin kW 0 0 0 0 0
Maximum continuous heat output Pmax,c kW 0,6 0,9 1,2 1,5 2,0
Auxiliary electricity consumption
At nominal heat output elmax kW 0,6 0,9 1,2 1,5 2,0
At minimum heat output elmin kW 0 0 0 0 0
In standby mode elSB kW 0,00095 0,00095 0,00095 0,00095 0,00095
Link

Unit 7, Marrtree Business Park,
Grimbald Crag Close, Knaresborough HG5 8FA
Phone: 01423 733000
Email: [email protected]
Table of contents
Popular Heater manuals by other brands


Clarke
Clarke DEVIL 2800PTC-B Operation & maintenance instructions

Frost Fighter
Frost Fighter IHS700P LP Installation - Operation/Maintenance Instructions and Parts List

Goldair
Goldair Platinum GPPH220 operating instructions

Desa
Desa RCLP35B owner's manual

Alpina
Alpina SF-9381 Instructions for use

Sterling
Sterling Separated Combustion Tubular Gas Fired... Installation instructions and parts list