BestWater BW 1500 User manual
1
Instruction Manual
BW 1500
Stationary water softening appliance
with control system RX 79BD / 82BD
Edition 1/2020

www.bestwater.de 2

www.bestwater.de 3
Content
1. Introduction .......................................................................................................................... 4
2. System components .............................................................................................................. 5
3. How does the water softening device work? ........................................................................ 5
4. Technical parameters of the water softener ......................................................................... 6
5. Overall View of the water softener appliance ....................................................................... 7
6. Installation ............................................................................................................................ 8
7. Installation of Bypass ............................................................................................................ 8
8. Installation of the device ....................................................................................................... 9
9. Description of the control unit ............................................................................................ 12
10. Setup of the water softeners ............................................................................................ 14
11. first time of Usage ............................................................................................................. 15
11.1. Vent the installation ................................................................................................... 15
11.2. First Regeneration ...................................................................................................... 16
12. Operation of the water softener ....................................................................................... 16
12.1. Checking the salt inventory and filling up the salt ..................................................... 16
12.2. Avoiding salt deposits ................................................................................................ 17
12.3. Cleaning the injector .................................................................................................. 17
12.4. Regeneration started manually .................................................................................. 18
13. System operating cycles .................................................................................................... 18
14. Possible malfunctions and their remedies ........................................................................ 19
15. Certificates ........................................................................................................................ 20
16. Disposal ............................................................................................................................. 20
17. Guarantee conditions ........................................................................................................ 20
18. Installation sheet ............................................................................................................... 22
Your water softener supplier:

www.bestwater.de 4
1. Introduction
Dear user,
Thank you for purchasing our water treatment plant. This is a right choice that allows you to
use the treated water of the highest quality.
Please read these instructions before installation and use. This allows you to install the device
properly. Correct installation ensures long-term and problem-free use of the system.
The device contains a microcomputer with LCD display, with which the parameters of the wa-
ter softener can be set. This intelligent system lets you operate the water softener optimally.
The operation of the device is based on the rotary technology of ceramic disks, which form
the "heart" of the control head. This pioneering control head technology ensures excellent
sealing within the valve and guarantees you long and economical operation. The ceramic
components are also resistant to dirt and iron, so that no substances can accumulate in the
control and the operation cannot be negatively influenced.
We hope you enjoy your new water softener!
Important terms of use
• Improper use of the device can lead to permanent damage to the system or cause mal-
functions.
• The water treatment system should be used for its intended purpose. Failure to observe
the conditions of use contained in the instructions will invalidate the guarantee.
• Do not interfere with the design of the softener. Changes to the design will invalidate
the
guarantee.
• Improper use of the softener can endanger your health or your life.
• Do not touch the power plug with wet or damp hands.
• If you find any damage to the power cord or plug, immediately contact a service centre
authorized for this type of repair.
• Do not use a damaged device. As soon as you have identified an error, please contact an
authorized service centre.
• It is important that the water treatment system is in a safe place. Avoid contact with wa-
ter
on all electrical components of the softener.
• Do not clean the softener from the outside with running water.
• Any repairs may only be carried out by trained specialist personnel.
• Protect the device from contact with sharp tools and strong impacts, do not expose the
device to high temperatures or fire.
• Secure the place where the device is connected to the power supply.
• The softener should be checked regularly during its operation.
• Regular refilling of salt into the brine tank is required for the system to operate
properly; otherwise, it may cause the device to malfunction or be damaged.
• Disconnect the device from the power supply if it is to be cleaned or moved. If the de-
vice

www.bestwater.de 5
plug is not removed, remember that the device is live.
Careless handling of the device while it is connected to the power supply can lead to
severe paralysis or death.
• Switch off the device before disconnecting it from the power supply.
• The electrical installation to which the device is to be connected must comply with
national standards.
• For safety reasons, children and unauthorized persons should not be near the water
treatment system.
2. System components
Table 1. Delivery part list
Description
Amount (Pcs.)
Stationary located water softening appliance
1
Bypass
1
2.5“ key
1
Seal 3/4"
1
Power Supply 12V
1
3. How does the water softening device work?
Hard water containing iron and manganese flows through the main supply line into your
home.
This water is passed into the water softening appliance which flows through the ion ex-
changer, which softens the water. The treated water then flows into the water system in your
house. An individually programmed softener controls the remaining amount of water for
treatment.
After reaching the ion exchange capacity of the ion exchanger, the device is automatically
revitalised with prepared saline solution (saline solution in the brine tank). During the
revitalisation, the device replenishes the programmed amount of brine in the ion exchanger.
This "recharges" the ion exchanger with sodium ions again. The rinsed-out water from the ion
exchanger is discharged into the sewage system. During rinsing. During the revitalisation pro-
cess, the appliance regains its ion exchange capacity and can treat water again. This revitalisa-
tion process allows you to use the water treatment system for a long time.
www.bestwater.de 6
4. Technical parameters of the water softener
Table
Dimensions [mm]
490/360/1060
Weight
29kg
Pipe diameter inlet / outlet
¾“
Nominal flow[m3/h]
1.2
Operating temperature range [° c]
5-45
Operation pressure [Ba]
2-6
Average salt consumption per regeneration[kg]
2,4
Possibility of taking water from the network during re-
generation
Yes
regeneration behaviour
Volumetrically delayed type up-flow down-
flow
Child lock
Yes
Mass of the ion exchange container diameter / height
10 x 35
Contents of the ion exchange resins[L]
20
Power connection
100-240 V/50-60 Hz
Power usage [W]
18

www.bestwater.de 7
5. Overall View of the water softener appliance
1
The control system is the most important part
of the softening appliance. Its functioning
technique is based on ceramic plate technol-
ogy, which is dependent on the relative posi-
tion to one another, which generate succes-
sive work and revitalisation cycles.
The water softener is factory-ready and will
work immediately after connection. Only the
time of day, the water hardness and the revi-
talisation time have to be entered.
2
The bypass is another important element that
accomplishes several important functions in
the operation of the water softening system.
Thanks to this bypass, it is possible to quickly
and easily remove or add the water softener
in to or out of the existing water installation.
In addition, you can adjust the water flow in
the system, so that softened water or normal
tap water flows through. The bypass can also
handle mixing functions.
3
The tank is filled with a filter which allows ion
exchange. For optimal operation of the device,
the filter should be replaced at least every 10
years (depending on the water quality and
water hardness).
4
The body of the appliance is made of durable, flexible plastic. It acts as a salt and brine tank.
Inside there is mounted a cylinder with a filter, an ion exchanger and a float valve. Check and
control the level of the brine in the tank - Protect the unit from overfilling. There is an over-
flow pipe on the side wall of the housing.
5
The float valve regulates the refilling process of water and supplies the saline solution. Proper
functioning ensures the correctness of the revitalisation process.

www.bestwater.de 8
6. Installation
TO BE PERFORMED BY AUTHORIZED PERSONS ONLY
After unpacking the device, you must remove the power pack and the bypass valve from the
salt container and remove the protective film from the device. Use the special cutouts in the
housing to lift and move the device.
The device must not be lifted by the cable, control head or supply lines. This can cause dam-
age.
Before installation, make sure that the water pressure is higher than 2.0 bar and less than 6.0
bar. If the pressure is higher, a pressure reducer must be installed in front of the device.
If possible, choose an optimal location near your water connection and sewer drain. A con-
stant power supply is required to control the system.
The floor should be stable to support the water-filled system. The ambient temperature
should never drop below 5 ° C, otherwise the device can be permanently damaged. It is not
advisable to install the devices in rooms with high humidity. The location should be large
enough to ensure free access to the device because regular refilling of the salt is required.
7. Installation of Bypass
The device is equipped with a valve that allows you to bypass the system if necessary, to pass
on unfiltered water.
• Close the water inlet.
• Remove the safety bar from the slide.
• Pull the screw connection out of the bypass and mount it on the control sec-
tion of the water softener using the seals provided.
• There is a turbine at the outlet that can measure the water flow. Before as-
sembly, check whether the turbine is rotating freely. Check this by blowing
hard into the drain. Push the water softener bypass onto the screw connec-
tion (control head).
• Insert the safety bar.
• Insert the plug to connect the water meter - drawing (A).

www.bestwater.de 9
Drawing. A. Installation of Bypass
8. Installation of the device
The device must be connected with a flexible hose (not supplied) for installation. A mechani-
cal coarse particle filter (min. 50 microns) should be installed in front of the water softener to
protect it from contamination. If the device is to be operated with the additional bypass valve,
it must first be connected to the device and then to the hoses. You can also bypass the usual
valves as shown in the illustration (C).
Look for the flow direction arrows on the control head on the water inlet and outlet connec-
tion. The turbine should be at the outlet of the device. Before assembly, check that the tur-
bine is rotating freely. To assemble the device, you must use the existing installation materi-
als. If you have any problems or questions, contact a qualified company or authorized service
company.
Control panel water softener
Remove Safety foil (2x)
Control panel water softener
Push Safety bar of slide lock for up for dismantling
Plug for connection of water meter
Attention: direction of connection
Open - closed
Pull out the screw connection and screw
it onto the control head, check the seat
of the seal
www.bestwater.de 10
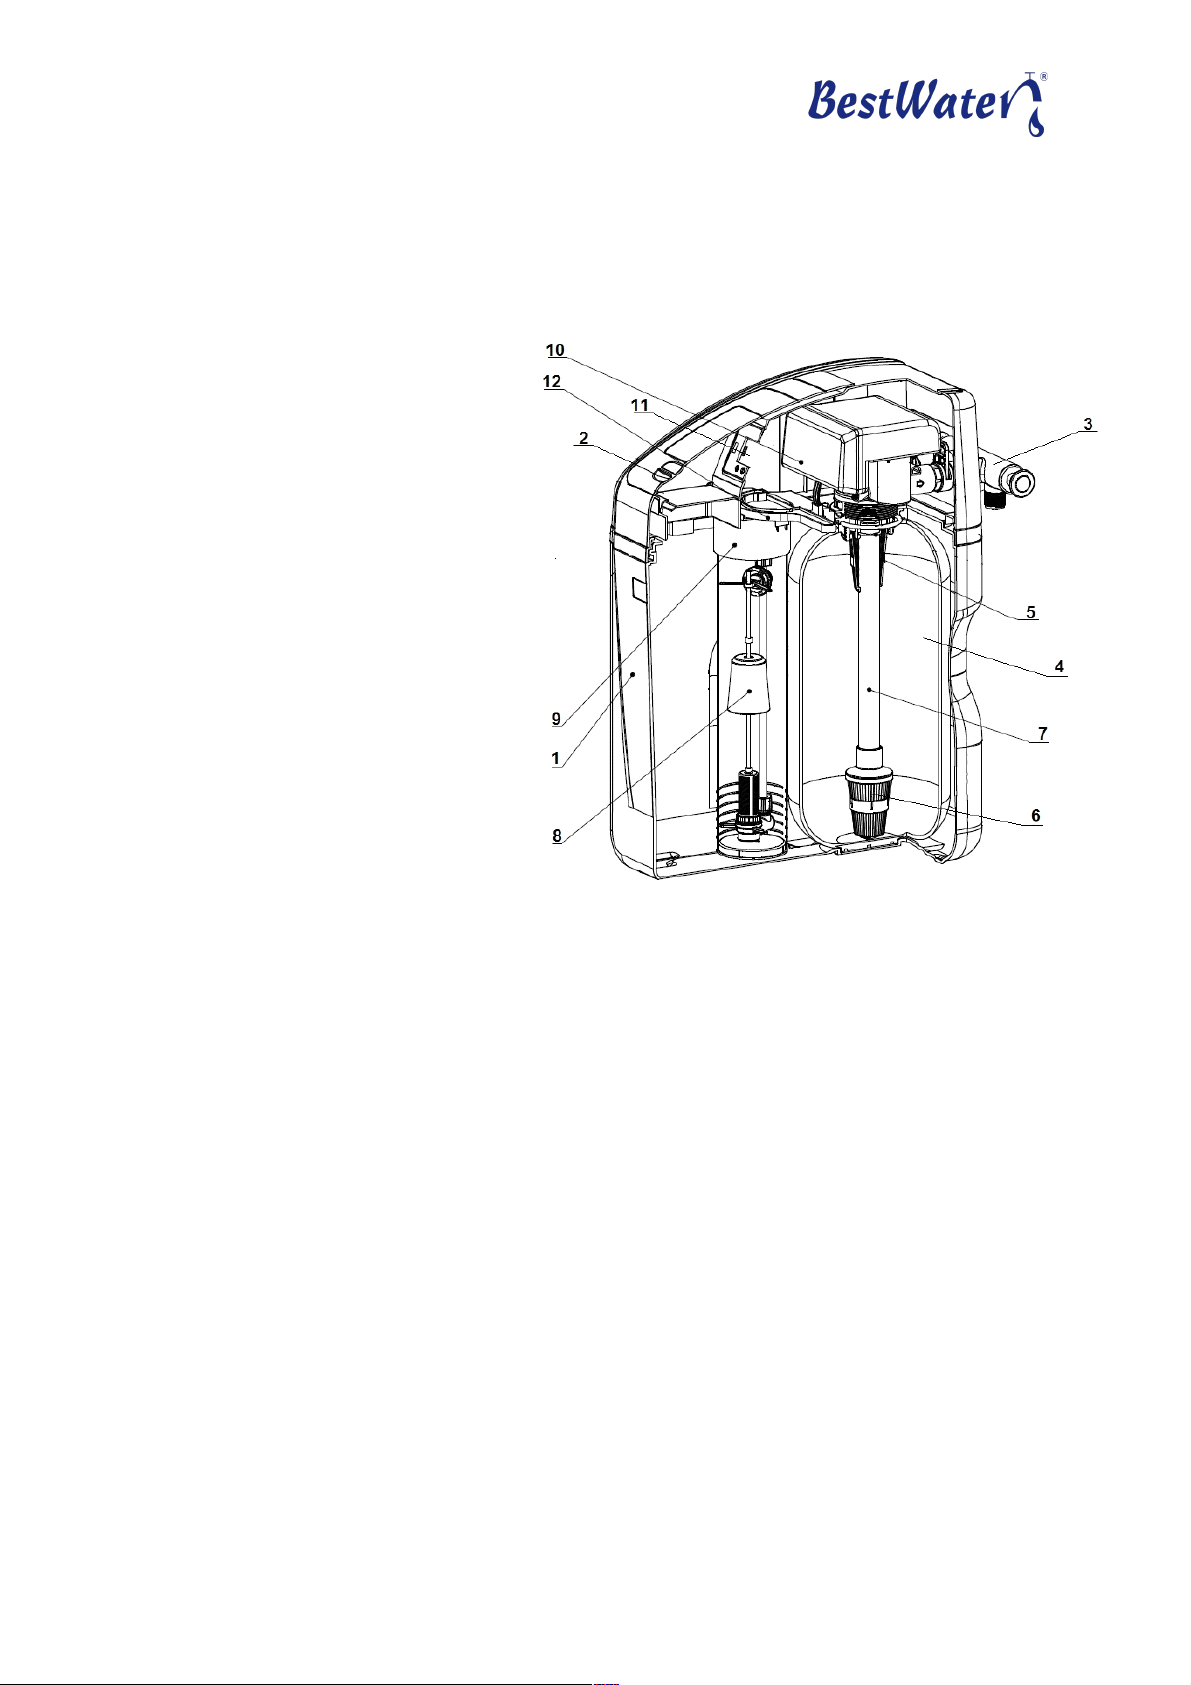
Drawing B.
Cross section of the device
1 container
2 tank cover
3-bypass
4 resin container
5-Upper basket
6 lower basket
7-pipe
8-the salt valve with float
9-salt container
10 control head
11-LCD display
12 flange key for control head
The regeneration water drainage from the control head can be connected to the sewage sys-
tem using a flexible ½ “hose.
The overflow mounted on the device housing should also be connected to the sewer drain
with a ½ “flexible hose.
The sewage connections must be installed below the level of the salt pool in the storage con-
tainer so that the overflowing water can drain off without pressure.
After connecting the softener, the storage container should be filled with regeneration salt
tabs. The regeneration salt level should always be higher than the water level in the storage
container. If necessary, the regeneration salt should be refilled so that the salt pool is availa-
ble in sufficient quantity for the upcoming regeneration processes. Table 2 shows the average
regeneration salt consumption.
Attention: Please only use regeneration salt in tabs form.

www.bestwater.de 11
Drawing C. An example of a recommended assembly scheme
The following requirements should be observed for assembly and use:
• All parameters such as water hardness, time, etc. are already set on delivery.
If you do not supply the system with power for a longer period of time (ap-
prox. 30 days), the values must be reset.
• The menu language is German, another language can be set before delivery
• The water hardness is automatically determined by the system and "sof-
tened" according to your specifications
• Special knowledge or execution by a specialist is advisable during installation
It is absolutely necessary to use a drinking water filter, if possible, with a pres-
sure reducer, with at least 50-micron filter
• All connections must be made in accordance with the applicable guidelines
and standards.
• The subsurface must be level and able to bear the weight of the filled water
system
Connections must be made according to local conditions
• The connection to the existing installation must be made using flexible hoses
Control valve control head may only be connected to the existing water sys-
tem with flexible hoses.
• Flexible hose included should be connected to the drain. The line should not
be longer than 6 m.
• In the case of threaded connections without an additional seal, a suitable
sealant e.g. Use PTFE Teflon tape.
• Only open the main water connection when all work has been properly car-
ried out
Garden
Water softener
Activated
carbon filter
Pre-Filter
Water outlet
Sewerage
Water Inlet

www.bestwater.de 12
Water checks (e.g. with litmus paper) should be carried out at regular inter-
vals. This guarantees the correct operation of the device.
• Please use only salt tablets suitable for the device for water softening (purity
should be 99.5%). Others, such as finely ground salt, are not permitted.
• The device is only to be installed for indoor use, in the temperature range of 5
- 45 ° C, with no excessive air humidity.
• If the water line pressure is greater than 6 bar, a pressure reducing valve must
be connected upstream.
• Only original parts may be connected to the control valve.
• Please protect from children
9. Description of the control unit
The RX control unit is equipped with a microcomputer, with which the operating parameters
of the water treatment system can be adapted to the physio-chemical parameters of the wa-
ter.
There are two types of menus on the 79BD and 82BD control units: open and closed.
To open an open menu, you must unlock the device by simultaneously pressing the "up-
down" buttons.
You can edit the basic parameters in open menus. H. Set the time and water hardness and de-
termine the time of regeneration.
Switching between the parameters or changing the values is done by pressing the "up-down"
buttons. The parameter selection and the confirmation of the changes are confirmed with
"Enter".
www.bestwater.de 13
Drawing Control Unit
A. Icon showing the locked keyboard
If the symbol is displayed, the keyboard is locked. This function is activated after one mi-
nute of inactivity. To activate the keyboard, one should press the and buttons simulta-
neously for min.5 seconds until the blockage symbol disappears.
Adjustment screw mixer
Connection brine tank
Display
Down
UP
Manuel/Back
Menu/ OK

www.bestwater.de 14
B.
Menu Button/ Confirm
Press the button while the device is in normal working state to access the configuration.
Then select the parameter to be changed.
Press again to select the parameter and the value of the parameter starts to blink.
With the help of the button and can you change the value. Please press again on ,
after the value of the parameter is set. Please press again to confirm your settings.
C.
Manual / back
Press the button while the device is in the normal work cycle, to switch to the next work
mode by hand control, e.g. if the hardness of the water increases and additional regeneration
is necessary, you can initiate regeneration manually by pressing the button.
During the regeneration process can you change the steps of the regeneration by pressing
If you press during the setup mode the process will go back into the menu before.
When entering a parameter value, the button takes you back to the parameter selection
without saving the value.
10. Setup of the water softeners
The system has a skin programming mode. It allows the following parameters to be set:
current time, regeneration time and water hardness.
Table 3. Parameter
Parameter
Region
Pre-setup
Current time
00:00~23:59
Current time
Time for regeneration
00:00~23:59
02:00
Water hardness
50~999mg/L
300 mg /L
The water hardness can vary in different networks, so it is recommended to check this before
installation and to make all settings only afterwards. The system gives the value in mg / L.
Please use table 4 to convert to this unit.
Table 4. Water hardness - conversion table
mmol / l
mval / l
mg CaCO3
/ l ( ppm)
German
Degree
French
degree
gpg
1 mmol / l =
1
2
100
5,6
10
5,8
1 mval / l =
0,50
1
50
2,8
5
2,9
1 mg CaCO3 / l =
0,01
0,02
1
0,056
0,1
0,058
German degree=
0,178
0,356
17,8
1
1,78
1,04

www.bestwater.de 15
French degree =
0,10
0,20
10,00
0,56
1
0,58
1 gpg =
0,143
0,29
14,30
08
1,43
1
Table 5. Programming of parameters
Parameter
Programming
Display
Current time
If the Symbol shows, hold the button and for 5
seconds, until the Symbol disappears.
1. Press to get access to the settings, like in LR1.
Parameter setting "Time" will show automatically.
2. Press again and the current time will be shown (LR2);
the value "12" starts blinking. With the buttons and
can you change the value.
3.Press again and the value of minutes "30" starts to
blink. With the button and can you change the value.
4.Press again and the change will be saved.
LR1:
Settings
Current time
Time of ration
Water hardness
LR2:
Current time
12 :30
Start Time of
Regeneration
1. Press and in LR1 "advanced settings" will show.
2. Press and the Parameter "Start time Regeneration" will
be shown. Press and the actual value, like in LR3, will be
shown. The value "02"of the Parameters is blinking and can
be changed with and .
3. Press again , the value "00" starts to blink. with and
can you change the value.
4. Press again and the settings will be saved.
LR3:
Start Time of
Regeneration
02 :00
(Hour: Min)
Water
hardness
1.Press and in LR1 "advanced settings" will show.
2. Press and the Parameter "Water hardness" will be
shown. Press and the current value, like in LR4, will be
shown. The value "300"of the Parameters is blinking and can
be changed with and .
3. Press again and the settings will be saved.
LR4:
Water hardness:
300 mg/L
11. first time of Usage
11.1. Vent the installation
For safety reasons, it is necessary to bleed the entire system before the first start-up. First,
the water supply to the water treatment system must be stopped or the slide switch of the
bypass set to "closed". Then the valve on the water softener for sampling must be open and
the water inlet can be opened slowly, step by step, to let water run into the system. The air
escapes audibly through the inflowing water through the open valve on the water purifier.

www.bestwater.de 16
The valve can only be closed again when no air escapes from the valve but a steady stream of
water. The water should run in slowly and a pause should be taken when taking in the water if
necessary.
The installation is now vented.
CAUTION! Water and salt must be filled in before the first start-up. After that, you should
wait 30 minutes to dissolve the salt in the water. A first regeneration must then be carried
out.
11.2. First Regeneration
you can start the Regeneration with the button for manual setting .
The Regeneration runs automatically and after the first regeneration the system is ready for
operation
12. Operation of the water softener
12.1. Checking the salt inventory and filling up the salt
The salt level in the container should be checked regularly (preferably once a week) to avoid a
lack of salt. Table 2 shows the average amount of salt consumed per regeneration. Salt must
then be refilled if necessary. It must be ensured that the salt stock is higher than the water
level (water surface must not be visible). Salt may only be used in tablet form.
CAUTION! Dissolved salt can cause irritation in contact with eyes and skin. In case of contact,
rinse quickly with plenty of clear water.
salt replenishment

www.bestwater.de 17
12.2. Avoiding salt deposits
High humidity or the wrong type of salt can lead to salt deposits and lumps in the salt con-
tainer. This can slow down the solution process and less brine can be provided, which reduces
functional performance. The water hardness will then not develop as desired. If you suspect
salt deposits and clumping, it is recommended to pour warm water into the brine container
and to remove the deposit by tapping the container lightly. If normal humidity levels exist at
the location, please check the quality of the salt used.
Drawing. Salt deposits
12.3. Cleaning the injector
In the event of contamination by sand, small stones and other dirt, the injector, which is re-
sponsible for the introduction of the brine, can be blocked. If a sediment filter (drawing F) is
installed in front of the water treatment system and the salt is of sufficient quality, the injec-
tor should not become blocked. If this is the case, the injector must be cleaned.
The design of the injector is described in drawing F. The main parts responsible, in case of
constipation, are marked with 3 and 2. To carry out the removal and cleaning, you must first
stop the water supply. Then the cold-water inflow must be unscrewed. The fastening screw
must be loosened using a screwdriver (marked with 1). Then the injector can be detached
from the control section. Pay attention to the integrity of the seals. Parts 12 and 14 must be
loosened with a screwdriver. All parts should be rinsed under clear, warm water and then
blown through. Then all parts are reassembled in reverse order.
Drawing. F. Injector

www.bestwater.de 18
12.4. Regeneration started manually
Manual regeneration is recommended if:
• a particularly large amount of water was required in a short period of time
• Salt has been added to the brine tank (if no salt has been added for a long time)
For the start of the regeneration press .
13. System operating cycles
NORMAL OPERATION - the system is in the 1st cycle - water softening
BACKWASH - the system is in the 2nd cycle - the water runs through the valve and the cen-
tral pipe backwards through the brine tank and is then discharged through the drain into the
sewage system.
REGENERATION - the system is in the 3rd cycle - regeneration with salt and slow rinsing. The
container slowly fills with fresh water. As soon as the container is completely filled, the con-
tents together with the “used” brine are drained into the sewage system. Then the container
is rinsed again with fresh water to ensure that all salt residues are removed. Also, in this cy-
cle, no water is released into the house installation to protect it from contamination.
SALT REFILL - the system is in the 4th cycle - water is fed into the salt container to dissolve
new salt in the water and prepare new brine for regeneration. The salt stock is adjusted with
the help of refill time. The longer the refill takes, the more salt can be dissolved.
QUICK WASH - the system is in the 5th cycle - the brine bed (grounds container) is rinsed
again and discharged through the main pipe into the sewage system.

www.bestwater.de 19
After the quick wash is completed (the 5th cycle), the system automatically returns to normal
operation.
14. Possible malfunctions and their remedies
Problem
Cause
Solution
No Regeneration
No power
Check the power connections -
fuse, plug, switch. In an emer-
gency - switch on manual regener-
ation.
No correct setup of the
system
Set the control unit yourself or
contact a specialist
Hard water is piped
into the house instal-
lation
Bypass open
Close the Bypass
Not enough salt
Add salt to the brine tank (the salt
container) and start manual re-
generation
Dirty injector
Contact a specialist or do the in-
jector cleaning yourself
Iron base
Clean control unit and resin
Increase the regeneration fre-
quency and / or extend the dura-
tion of the backwash
Pressure fall
The inlet to the control unit is
blocked by remnants of the
installation
Clean inlet
A blocked or faulty prefilter
Clean or change prefilter
Air in the installation
Check installation, bleed again if
necessary
Too much water in
the brine tank (more
water than salt)
Blocked injector
Clean Injector
Foreign particles in the brine
valve
Change the valve
No power
Check power supply
Not enough pressure in the
system
Increase pressure to min. 1.8 bar
Brine is not sucked in
Blockage of the hose for
brine supply
Check hose for blockage
Leakage in the brine supply
hose
Change pipe
Injector damaged
Change Injector
particles in the valve
Check the valve and remove parti-
cles and then check the valve in
the various regeneration stages
www.bestwater.de 20
Continuous discharge
into the sewage
system
Power failure during
regeneration
Power supply restoration. Option-
ally set the bypass to the "closed"
position until then.
15. Certificates
CE-Conformity for EMV-Guideline 2014/30/EU
16. Disposal
After the useful life has elapsed, the device may no longer be disposed of as waste. Rather,
the stationary water softener should be taken to a collection point for electronic waste. The
user is responsible for the proper disposal of the device. Failure to comply with the above
rules may result in a penalty being imposed. Please note the regulations applicable to your
federal state.
Proper disposal of the device ensures proper waste treatment in an environmentally friendly
manner.
17. Guarantee conditions
• The manufacturer provides a guarantee for the trouble-free operation of the
water softener, provided that it was operated according to the instructions in
this manual and with regular refilling of the salt.
• The stationary water softener is guaranteed for 2 years from the date of sale.
• The prerequisite for the granting of the guarantee is the correct installation
and commissioning of the devices in accordance with the instructions and a
professionally qualified person.
• It is the responsibility of the user to have the device checked by an authorized
person at least once a year.
• Production damage or defects must be reported to the manufacturer no later
than 14 days after they occur.
• If our service technician determines that the defect you reported is not pre-
sent, the service costs must be borne by the user.
• The prerequisite for granting the guarantee is installation before the main line
and systematic maintenance of the device.
The guarantee does not apply to
• inspection services;
• device program change services;
This manual suits for next models
2
Table of contents
Other BestWater Water Filtration System manuals

BestWater
BestWater Jungbrunnen 66-10 User manual

BestWater
BestWater Jungbrunnen 55-00 Mobil User manual

BestWater
BestWater Jungbrunnen 66-00 Ultimate User manual

BestWater
BestWater Jungbrunnen 66-11 User manual

BestWater
BestWater Jungbrunnen 66-10 User manual

BestWater
BestWater Jungbrunnen 22-00 ULTIMATE User manual


