CONTROL VALVE OVERVIEW
WARNING: To prevent equipment damage and possible injury,
always switch off the sand filter before changing the Control Valve
fuction. Changing valve positions while the pump is running can
damage the Control Valve, which may cause personal injury or
property damage.
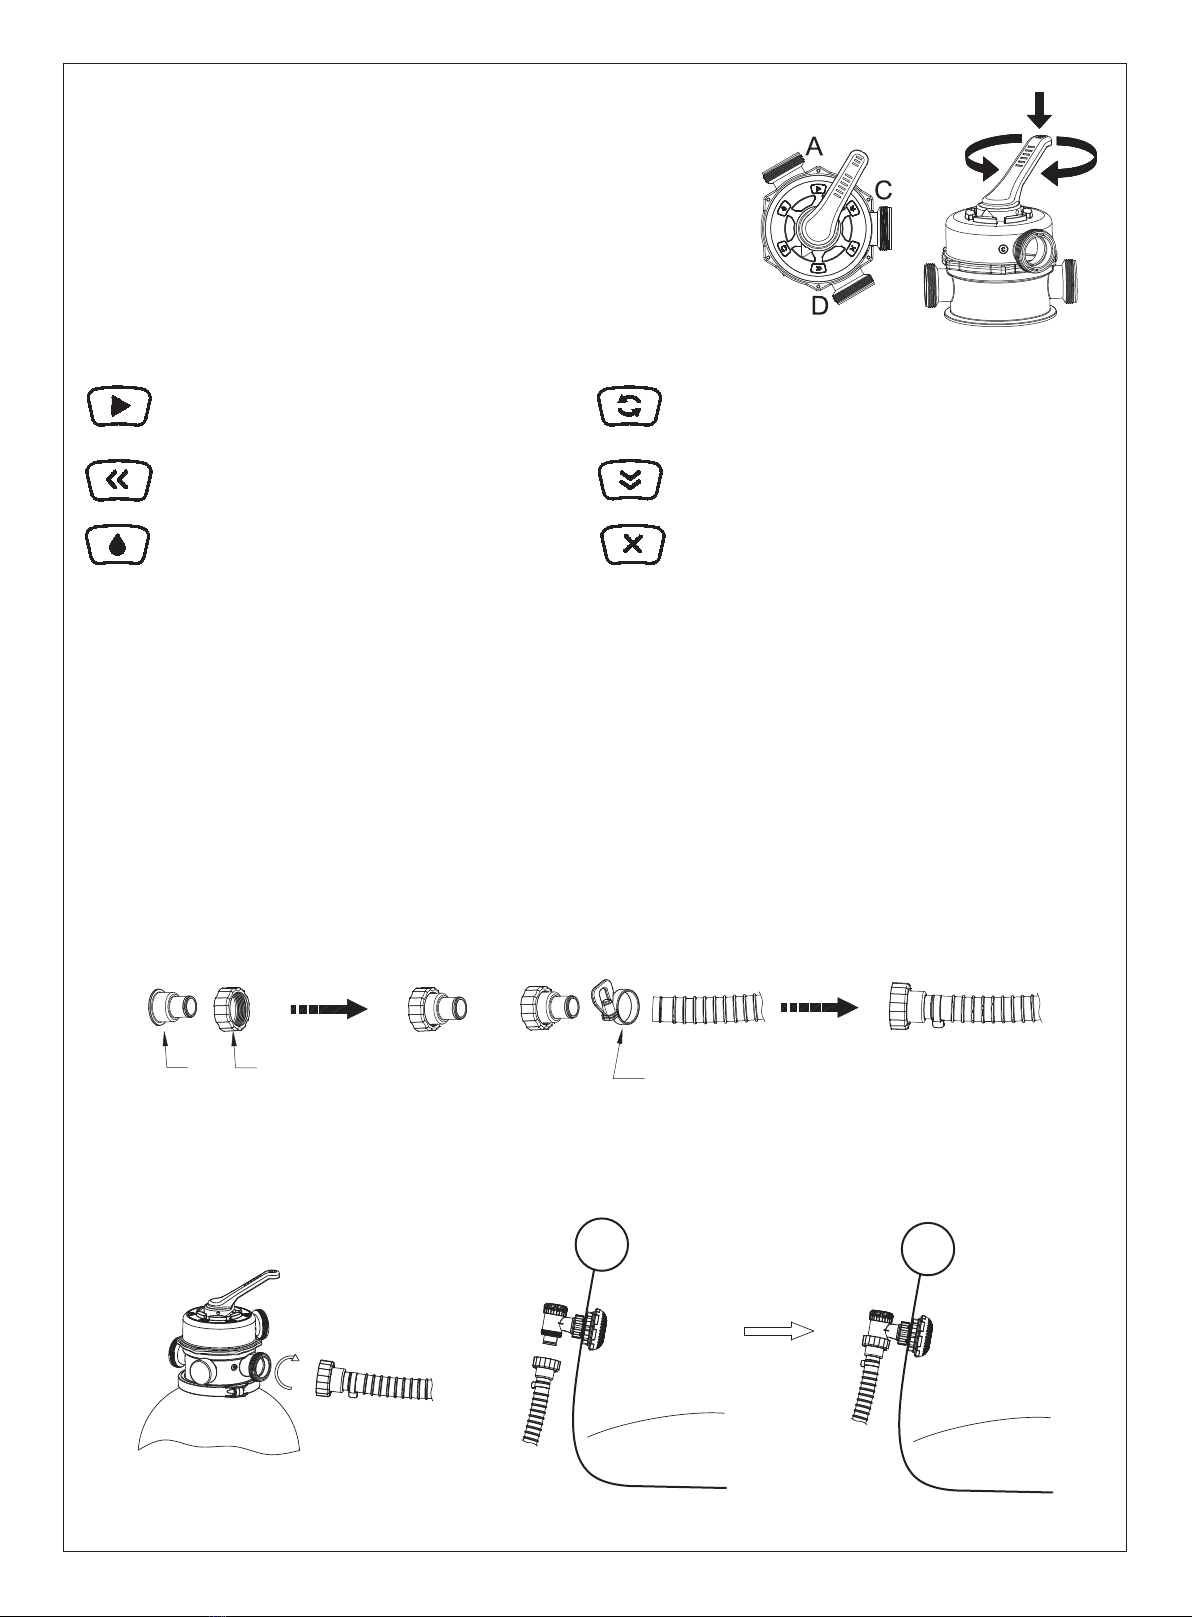
How to Use the Control Valve
Press down on the Control Valve handle and rotate to desired function.
CONTROL VALVE FUNCTIONS
The Control valve is used to select 6 different filter functions: Filter, Rinse, Circulate, Backwash, Closed and Drain.
Filter: This function is used to filter pool water and should be
positioned here 99% of the time. Water is pumped through
the sand filter, where it is cleaned and returned to the pool.
Backwash: This function is used to clean the sand bed;
water is pumped down through the Collector Hub, upwards
through the sand bed, and deposited out of Port D.
Rinse: This function for initial startup, cleaning, and
sand bed leveling after Backwash; water is pumped
downwards through the sand bed, up through the
Collector Hub and deposited out of the valve Port D.
Circulate: This function circulates pool water bypassing
the sand filter; use this function if the filter is broken to
collect debris in the Debris Screens.
Drain: This function drains water from the pool; another
filter bypass setting, water is pumped and deposited out
of Port D, instead of returning it to the pool.
Closed: This function stops water flowing between
the sand filter and the pool.
NOTE
• Be sure all provisions for wastewater disposal meet applicable local, state or national codes. Do not discharge
water where it will cause flooding or damage.
• When the Control Valve is set to the Backwash, Rinse, or Drain position, water will discharge from Port D on the
Control Valve.
• Do not switch on or operate the sand filter with the Control Valve set to the Closed function or it will seriously
damage the sand filter.
• Do not set the Control Valve between two functions, or it will lead to leaking.
• To avoid water leakage, screw the Port D Cap onto the Control Valve Port D before operating the sand filter.
HOSE ADAPTOR FUNCTIONS
Pool with Valves (Ф3.8cm)
1) Connect the Hose Adaptor (22) with Adapter Nut (21) to both two ends of the hoses and tighten with the hose
clamps (24).
2) Attach the Hoses to the Sand filter by pressing the hose fitting on the pump port. Screw the threaded locking
rings into position.
3) Attach the Hoses to the connection valves on the pool. Ensure the corresponding letters on both the pool and
the Sand filter match (A to A, B to B).
6
GARDEN HOSE ADAPTOR FUNCTIONS
1. Assemble the garden hose adaptor(11).
2. Screw the garden hose adaptor onto port D of the sand filter.
3. Attach garden hose to the garden hose adaptor(21)
NOTE:
1. Garden hose adaptor can be used for draining only, and can only be assembled to port D of the sand filter.
2.
Always switch off and unplug the sand filter before assembling the garden hose adaptor, and set the control valve to Closed position.
3. Ensure the washer is in position before assembling the garden hose adaptor.
Section I: Assembly (You will need a Phillips screwdriver).
1. Carefully remove all components from the package and check to ensure nothing is damaged.
If equipmentis damaged, immediately notify the retailer from where the equipment was purchased.
2. The sand filter should be placed on solid, level ground, preferably a concrete slab. Position the
sand filterso the Ports and Control Valve are accessible for operation, servicing and winterizing.
3.
IEC60335-2-41 TEST standard requires the sand filter to be vertically fixed on ground or
a certain pedestal made of wood or concrete before use to prevent the sand filter from
accidentally falling. Fully assembled sand filter will exceed 18kg. The mounting holes should
be 8mm in diameter and spaced 110mm apart.
Use two bolts and nuts with a maximum of
8mm in diameter to fasten the sand filter to the pedestal.
Load pool-grade filter sand.
NOTE: Use only special pool-grade filter sand, free of all limestone or clay: #20 Silica sand 0.45-0.85mm, approximately one
18kg bag should suffice. If you do not use the recommended size of filter sand, filtering performance will be reduced and the
sand filter may damaged, there by voiding the warranty.
NOTE: To avoid damaging the Skimmer when adding sand, pour some water into the Bottom Tank to submerse the Skimmer
on the Hub.
NOTE: SAND NOT INCLUDED.
1. Turn the nut counter clockwise to release the flange clamp and remove the Top Tank.
2. Slowly add the sand so the weight of the sand does not damage the Skimmer on the Hub, until it reaches between the
marked “MAX” and “MIN”. Do not pour the sand into the pipe of the Hub. #20 Silica sand 0.45-0.85mm, approximately 18 kg.
3. Ensure the O-ring is in place on the rim of the Bottom Tank. Make sure the O-ring and the rim of the Bottom Tank are clean
without nicks, tears, scraps or sand. Attach the Top Tank to the Bottom Tank, place the Flange Clamp over the seam and turn
the Nut clockwise to fasten it .
4. Attach the Control Valve to the Top Tank,
ensuring the O-ring is in place on the rim of the
Top Tank. Make sure the O-ring
and the rim of the Top Tank are clean without
nicks, tears, scrapes or sand and that the vertical
pipe of the Hub is inserted into the base of the
Control Valve.
5. Make sure Port C on the Control Valve is
aligned with Port C on the Pump. Attach the Top
Flange Clamp and screw into position.
6. Attach the Piping to Pump Port C and to
Control Valve Port C, screw the threaded locking
rings into position. Make sure the Washer is
properly positioned on both ends of the Piping.
Section II: Hose Configuration for Backwashing and Rinsing
NOTE: Ensure the Control Valve is set to the Closed function. Your pool should be filled with water, make certain
all of the pool’s Debris Screens (25)are fully submerged in water.
Please check if your product includes a T-Joint (25)(see Fig. E).
Please check if your product includes a T-Joint (27)(see Fig. E). If yes, assemble your sand filter referring to
method A; if no, assemble your sand filter referring to method B.
Method A(see Fig.A-1)
1. Attach one end of the long hose(24) to the sand filter’s Port B; screw the threaded locking ring into position.
2. Attach the T-joint(27) to the other end of the long hose(24).
3. Attach one end of both the short hoses(26) to the T-joint(27), and the other end to the pool’s Outlet “B”. Tighten
the Hose clamps(23) of the T-joint(27).
4. Remove the Stopper Plug from the pool’s Outlet B and insert Debris Screen(25) supplied with your kit.
5. With the Hose and the Debris Screen in position, secure and tighten the Hose Clamp(23).
Method B(see Fig.B-1)
1. Attach one Hose(24) to the sand filter’s Port B; screw the threaded locking ring into position.
2. Connect the other end of the Hose(24) to the pool’s Outlet B.
3. Remove the Stopper Plug from the pool’s Outlet B and insert Debris Screen(25) supplied with your kit.
4. With the Hose and the Debris Screen in position, secure and tighten the Hose Clamp(23).
NOTE: It is important to ensure all elements: Hose, Debris Screen and pool outlet are properly aligned.
• Screw the other Hose to Port D and place the opposite end in drain area.
• With the Hoses attached, you can proceed to fill the pool, refer to pool owner’s manual for filling instructions.
Section III: Backwash and Rinsing
Backwash and Rinsing must be preformed to prepare the pump for its first use and to wash the sand.
CAUTION: DO NOT DRY RUN THE SAND FILTER
1. Press down on the Control Valve handle and rotate to the Backwash function.
2. Insert the plug into a residual current device and run the sand filter for 3-5 minutes, or until the water runs clear.
3. Unplug the sand filter and set the Control Valve to the Rinse function.
4. Insert the plug and run the sand filter for 1 min. This circulates water backwards through the sand filter and
drains water out Port D.
5. Unplug the sand filter. Set the Control Valve to the Closed function.
6. Top up pool water.
IMPORTANT: This procedure removes water from the pool, which you’ll need to replace. Unplug the sand filter
immediately if water levels near the pool’s Inlet and Outlet valves.
DO NOT DRY RUN THE SAND FILTER.
Section IV: Complete Sand Filter Installation
Connect the Fourth Hose
NOTE: It is imperative to check that the hydraulic connectors are not closed.
NOTE: Ensure the Control Valve is set to the Closed function.
Assemble your product referring to Fig. A-2 if there is a T-joint (Fig. E), and referring to B-2 if not. The
assembly methods are the same.
1. Detach the Hose from Port D.
2. Attach the Hose (24) to the Control Valve’s Port A; screw the threaded locking ring into position.
3. Connect the other end of Hose(24) to the pool’s Inlet A.
4. Remove the Stopper Plug from the pool’s Inlet A and insert Debris Screen (25) supplied with your kit.
5. With the Hose and the Debris Screen in position, secure and tighten the Hose Clamp(23).
NOTE: It is important to ensure all elements: Hose, Debris Screen and pool Inlet are properly aligned.
Section V: Sand Filter Operation
1. Now the sand filter is ready for use. Set the Control Valve to the Filter function.
NOTE: To prevent the risk of electrical shock dry any excess water from yourself and
the sand filter.
2. Switch on the sand filter to run it.
NOTE: The sand filter has now started its filtering cycle. Check that water is returning
to the pool and take note of the filter pressure on Pressure Gauge. Generally, the
recommended sand filter pressure is less than 0.45 Bar (6.5 PSI) when it is running.
Sand Filter Maintenance
CAUTION: You must ensure the sand filter is switched off and unplugged before
any maintenance begins or severe risk of injury or death exists. As dirt builds up in the
sand filter, the pressure reading on Pressure Gauge will increase. When the Pressure
Gauge is 0.45 Bar (6.5 PSI) or higher, or water flow to the pool is too low, it is time to
clean the sand. To clean the sand bed, follow all instructions outlined previously in
Section II and Section III: Backwash and Rinsing.
NOTE: The Pressure Gauge is just used for measuring the water pressure, not used
for precision measurement.
NOTE: We recommend you clean the sand bed once a month or less regularly
depending on how often the pool is used. Do not clean the sand too frequently.
Cleaning the Strainer
1. Switch off the sand filter and set the Control Valve to the Closed function.
2. Replace the Debris Screens with Stopper Plugs to prevent water from escaping.
3. Remove the Strainer Cover by unscrewing it.
4. Take out the Strainer, remove any debris.
5. Put the Strainer back into position. Ensure the hole in the strainer is aligned.
6. Ensure the Seal Ring is in place. Secure the Strainer Cover back.
7. Remove the Stopper Plugs and insert the Debris Screens
NOTE: The Strainer must be emptied and cleaned periodically. A dirty or blocked
strainer will reduce the performance of the sand filter.
Lowering or Draining Pool Water
1. Switch off the sand filter and set Control Valve to the Drain function.
2. Detach the Hose from the connection valve’s Port A and sand filter Port A and
attach to Port D.
NOTE: Remember to replace the Debris Screen with Stopper Plug to prevent water from escaping.
3. Switch on the sand filter to remove pool water.
WARNING: DO NOT DRY RUN THE SAND FILTER.
Winterizing
In areas that have freezing winter temperatures, pool equipment must be winterized to protect against damage.
Allowing water to freeze will damage the sand filter and warranty.
1. Backwash the sand filter as previously outlined in Section II and Section III.
2. Drain the pool according to the pool owner’s manual.
3. Unscrew the drain valve cap at the bottom of the tank and release the remaining water.
4. Disconnect the two Hoses from the pool and the sand filter.
5. Completely pour the sand out of the tank and dry all components.
6. Store the sand filter in a dry location out of child’s reach.
24
22 12
Pool Pool
S-S-004293