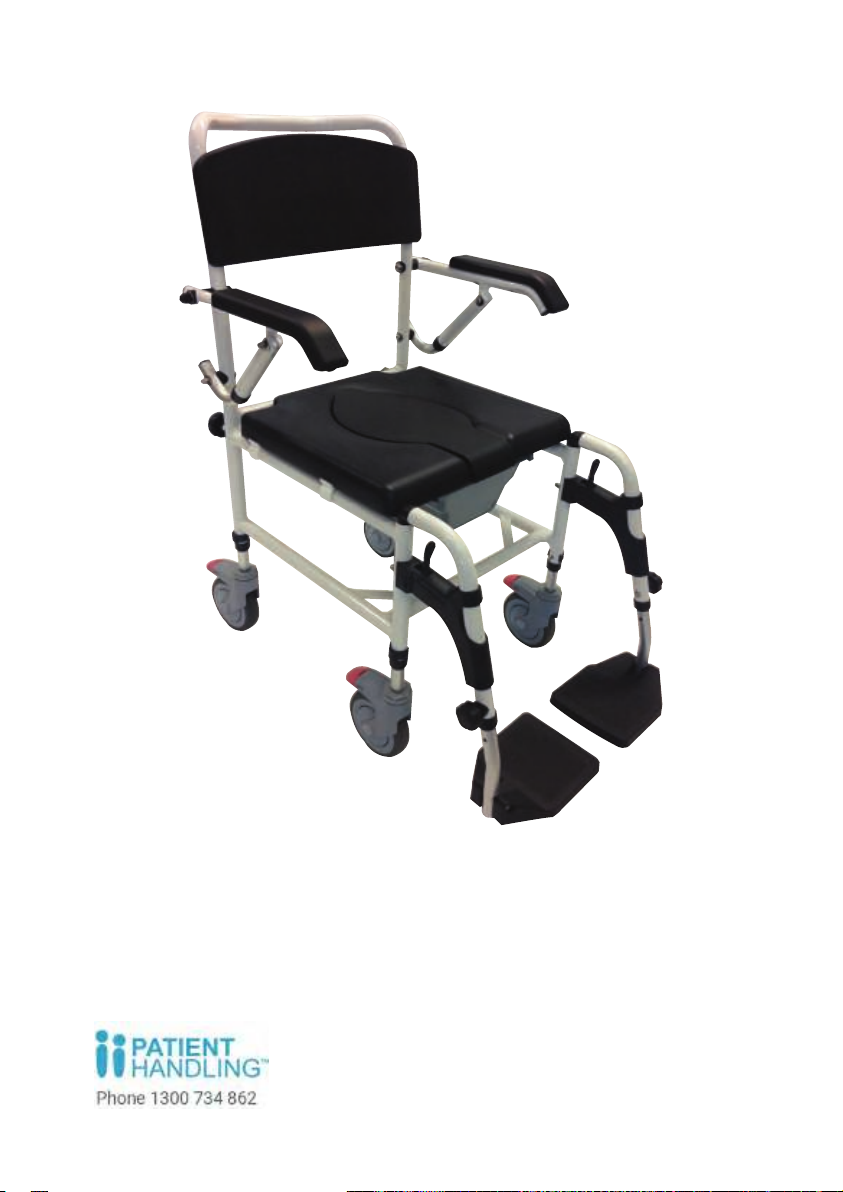
BetterLiving BL0030 User manual

Mobile Shower Commode
USER GUIDE
136 kg
1
YEAR
WARRANTY

2
User GuideMobile Shower Commode
The BetterLiving Mobile Commode is designed for aged care, community and homecare
environments. The frame and its major components are constructed from corrosion resistant
aluminium and powder coated for extra protection. All accessories, including pins, nuts and
bolts are constructed with corrosion resistant materials to help ensure the strength and
longevity of the product when used as intended.
Intended Use
This Mobile Shower Commode is designed
primarily for indoor use. It is suitable for use in
wet areas but not pools and similarly corrosive
environments. It is not suitable to be fully
submersed in water.
It is not designed to be used as a wheelchair and
should only be used for short transfers in the
intended usage environment.
The maximum occupant weight otherwise known
as safe working load (SWL) of this product is 136
kilograms as stated on the manufacturer’s label.
This SWL should not be exceeded under any
circumstances.
Overview
Important Notice
Before operating this medical equipment, it is
important to read this manual and understand the
operating instructions and safety precautions.
Failure to do so could result in patient injury and/or
damage to the product.
Therapeutic devices and/or medical equipment
should only be used in accordance with
manufacturer’s instructions and under the
consent, supervision and management of a
suitably qualified health professional.
Definitions of Symbols Used
Important information
Caution
Do not...
Novis Healthcare has a policy of continuous
product improvement and reserves the right to
amend specifications presented in this guide.
Information correct at the time of production
(August 2018).
© 2018 Novis Healthcare. All rights reserved.
The Mobile Shower Commode should only be
used and maintained in accordance with the
instructions in this User Guide.

3Mobile Shower Commode User Guide
Overview 2
Set Up 4
Operation 7
Cleaning 10
Safety and Maintenance 11
Specifications 12
Warranty 13
Index
Corrosion resistant
accessoriesSwing back arm supports
Pan and lid
Flip up foot rests
Padded PU seating and
comfort components
Swing away
leg supports
Height adjustable
4x lockable castors
Height adjustable leg supports
Universal design
for easy fitment
All aluminium frame with powder coated finish

4
User GuideMobile Shower Commode
Set Up
Box Contents and Inspection
Carefully remove all components from the box and
check items as identified in the image. Any missing
components should be reported to your authorised
dealer or manufacturer.
Prior to use, remove all packaging and plastic
wrapping and check the mobile commode for any
damage that may have occurred in transit, paying
particular attention to:
The castors and their locking mechanisms.
The frame.
Any missing components, including nuts, bolts
and knobs.
Assembly
The Mobile Shower Commode comes flat
packed and requires some basic assembly.
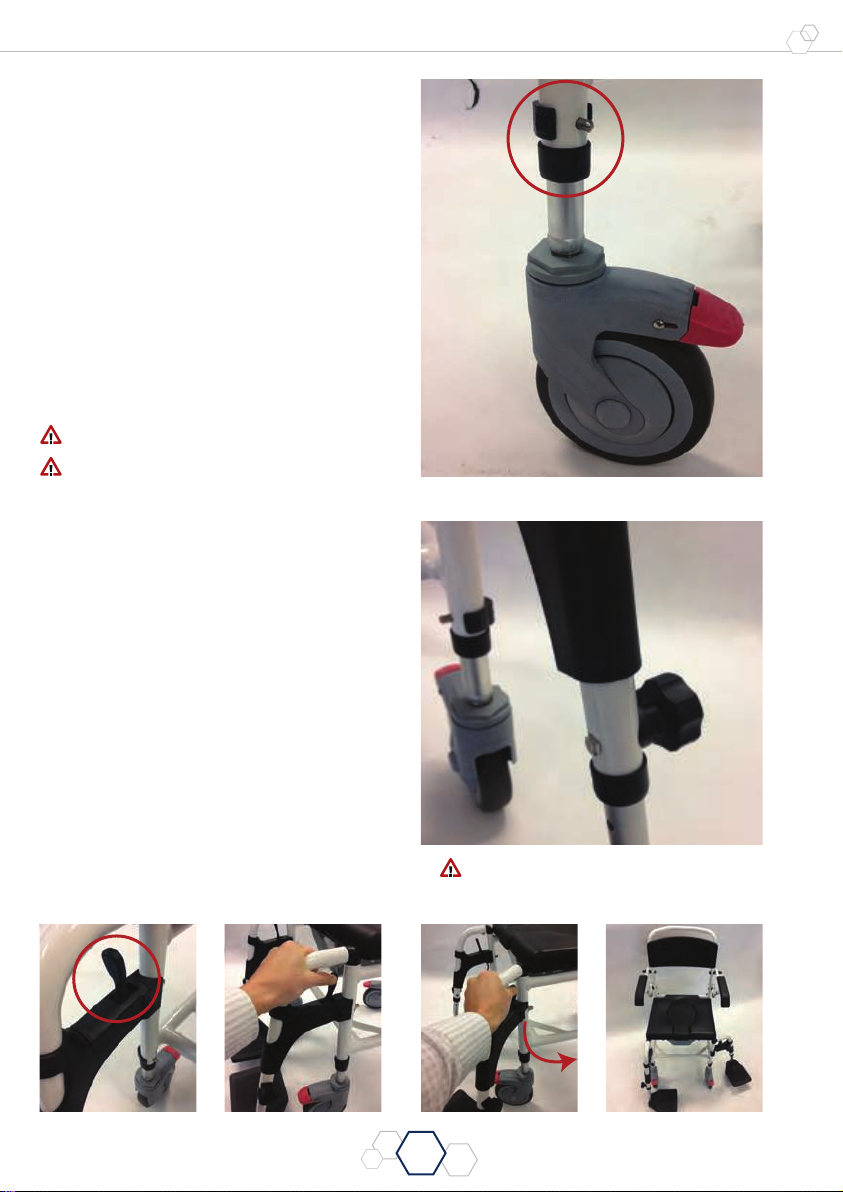
Attach the Castors
Remove the locking pins from the base frame and
install each castor onto one corner of the base frame
by inserting the castor tube into the reciprocal tube
on the base frame. Align the height adjustment hole
on the castor tube and re-insert the locking pin.
Repeat this process on each corner.
Be sure each castor height is set evenly.
Be sure the locking pin is securely inserted
though both the castor tube and the base tube.
Backrest
Assembly
2x Backrest
Locking Knobs
4x Lockable
Castors
Padded Seat
Insert
4x Castor
Locking Pins
2x Leg Supports Padded Seat
Pan and Lid
Base Frame

5Mobile Shower Commode User Guide
Set Up
Install the Backrest
Install the Backrest by removing the locking knobs
located at the rear of the base frame, then align the
tubes on the backrest with the reciprocal tubes on
the lower frame and screw the locking knobs onto the
lower frame.
Tighten the locking knobs and push or pull the arm
supports down.
Be sure the backrest is facing forward and is
securely fastened to the lower frame before
proceeding.
The backrest frame may require some slight
flexing in order to line up the tubes with the
holes on the lower frame.
Install the Seat
Install the Seat by lining up the clips on the underside
of the seat with the support bars on the top of the
Base Frame and press downwards. The seat should
‘click’ into place.
Be sure the two clips at the front of the seat are
aligned with the horizontal support bars at the
front of the Base Frame. If installed correctly,
the opening should face forward.
Installing the pan and lid
If required, the pan can be installed from the rear of
the commode with or without the lid. Hold the pan by
the handle and align it with the pan holder opening
located underneath the rear of the seat and gently
slide the pan along the full length of the pan holder.
To avoid dropping the pan, ensure you have a
firm grip of the handle before installation and/
or removal.

6
User GuideMobile Shower Commode
Install the Leg Supports
Install the Leg Supports by firstly identifying the
left and right Leg Support. Then, hold the Leg
Support at a 90 degree angle to the lower frame
and insert into the reciprocal tube at the front of
the frame. Gently slide the Leg Support in towards
the frame until it locks into place.
Set Up
The Leg Supports are not identical. Be sure to
install the correct Leg Support on the correct
side of the frame. The Foot Rests must face
inwards towards each other.
The Leg Supports can be fully removed or slid
out to the side by pushing on the Leg Support
adjustment lever.
The Leg Supports and Foot Rests are non-
weight bearing. Do not stand on the leg
supports.
7Mobile Shower Commode User Guide
Operation
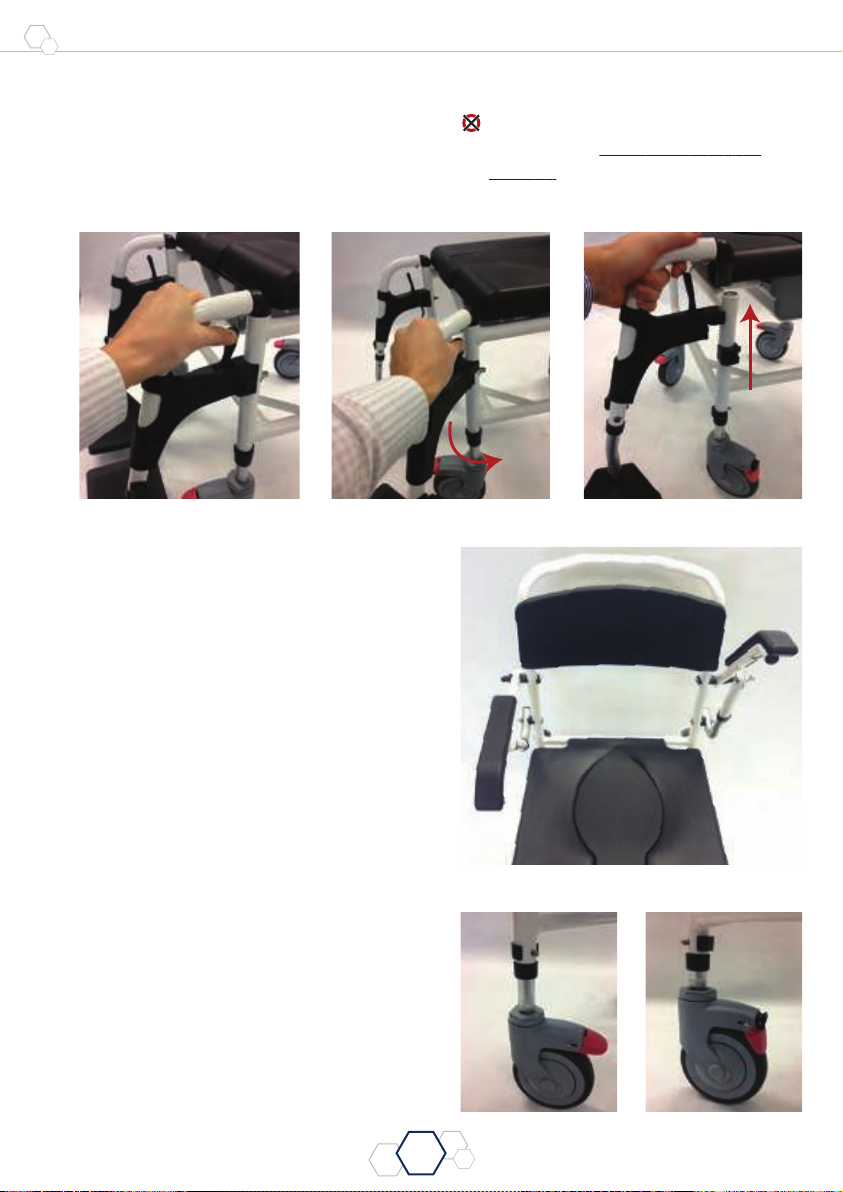
Seat Height Adjustment
The Mobile Shower Commode can be adjusted in
height in order to accommodate a user’s needs
and usage environment. There are four (4) height
adjustments available, which allow the seat height
(as measured from the ground) to be set to the
following levels: 495, 520, 545 and 570 mm.
To adjust the seat height, remove the locking pin
located above the castor by pulling on the plastic
collar to remove it from the height adjustment hole.
Adjust to the desired height and re-insert the
locking pin. Repeat this process on each remaining
corner, one corner at a time.
Be sure each castor height is set at the same level.
Be sure the locking pin is securely installed
Leg Support Height Adjustment
Onceseatheightis determined, the Leg Supportheights
can be adjusted to the appropriate length for the user.
Unscrew the locking knob and remove the bolt from the
tube. Adjust the leg support to the appropriate height,
ensure the adjustment holes align and reinsert the bolt
through the tube. Re-tighten the locking knob.
Leg Support Swing Away Function
The Leg Supports on this mobile commode can swing
away to facilitate transfer in and out of the commode.
To swing the foot rests out of the way, simply press the
lever and swing the foot rest away from the commode.
When required, the foot rests can then be swung back
into position.
TIGHTEN THE LOCKING KNOB SECURELY.
8
User GuideMobile Shower Commode
Operation
Leg Support Removal
To remove the Leg Supports completely; follow the
Leg Support swing away instructions and when
the Leg Support is swung to the side, pull upwards
to release completely.
Swing Up Arm Supports
The Mobile Shower Commode features Arm
Supports that can swing up to 90 degrees in order
to facility easier transfer in and out of the chair.
Simply pull or push the Arm Support upwards
when required.
Locking the Castors
To engage lock, press the red lever down with your foot.
To disengage lock, press the black lock down with
your foot.
The Leg Supports and Foot Rests are non-
weight bearing. Do not stand on the Leg
Supports.
9Mobile Shower Commode User Guide
Operation
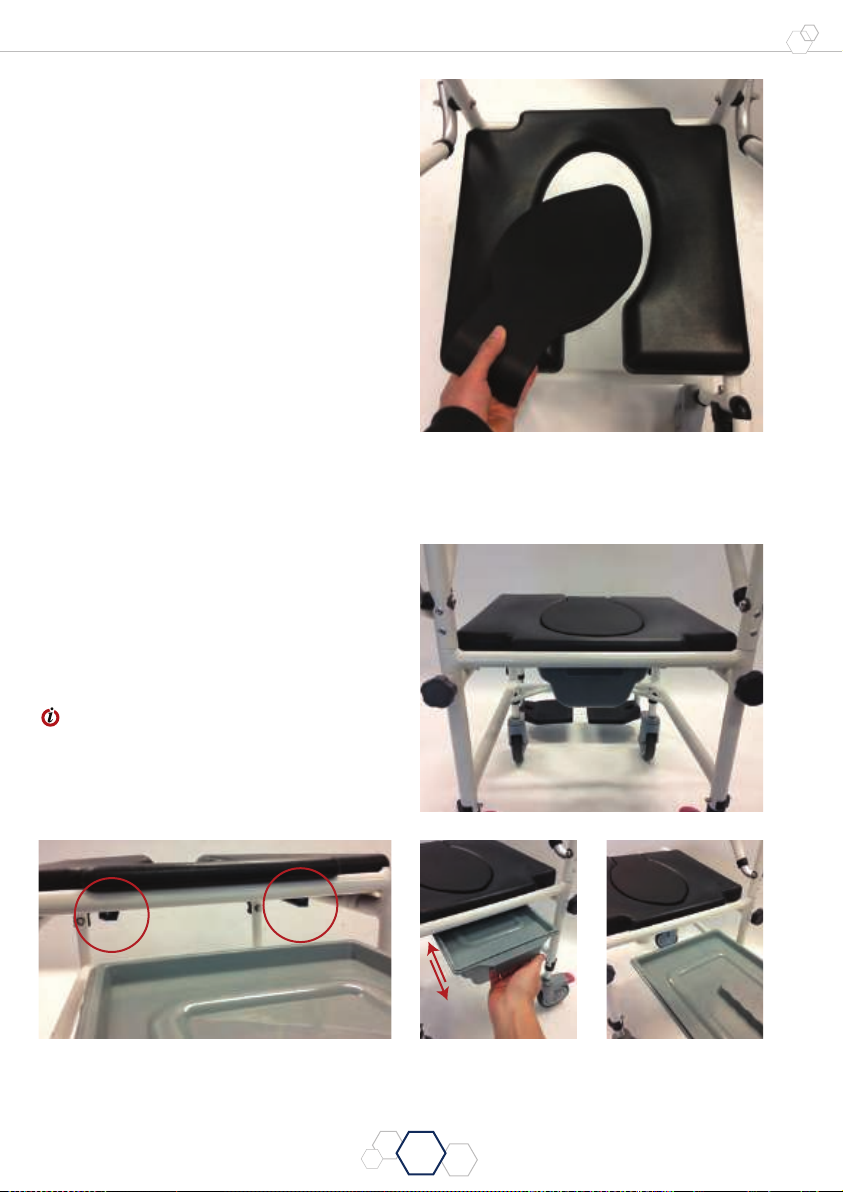
Shower Chair/Commode Use
The Mobile Shower Commode can be used as a
toileting aid and as a showering aid and is supplied
with a removable seat insert to improve comfort for
the user depending on their requirements.
For showering, if required, place the seat insert into
the open seat and press down firmly to secure the
insert in place.
When using as a toileting aid, the seat insert should
be removed.
The commode can also be used with or without the
pan, as required.
Installing/Removing the Pan
The pan can be installed from the rear of the
commode with or without the lid. Hold the pan by
the handle and align it with the pan holder located
underneath the seat and gently slide the pan along
the full length of the pan holder.
To avoid dropping the pan, ensure you have
a firm grip of the handle before installation
and/or removal

10
User GuideMobile Shower Commode
Cleaning
To prevent cross contamination, the Mobile
Shower Commode should be examined and
disinfected between patient use.
To clean the Mobile Shower Commode after
each use, wipe with a mild soap and warm water
solution and rinse well. Dry with a clean cloth.
For heavier soiling, wipe clean with a diluted
bleach solution and rinse well before drying. Do
not use water temperatures in excess of 80°C.
Dry with a clean cloth.
It is recommended the mobile commode be
cleaned after heavy use or at least once a week.
Avoid harsh, abrasive cleaning agents or utensils
(such as a wire brush) as these can lead to
deterioration of the frame and seat.
Do not use solvents or alkalines such as
cellulose or acetone thinners

11 Mobile Shower Commode User Guide
Safety and Maintenance
General Safety Precautions
ࣟAlways check with a healthcare professional
prior to using this commode.
ࣟA risk assessment should always be carried out
to ensure the product is suitable.
ࣟBefore use, the user should read these
instructions and familiarise themselves with
the product.
ࣟBefore use, ensure all components are
properly and securely installed and free from
damage.
ࣟBefore sitting on the product, ensure the
castor locks are firmly applied.
ࣟAlways apply the brakes when transferring in
and out of the commode.
ࣟDo not exceed the maximum recommended
safe working load of 136 kg.
ࣟAlways ensure that attendant and patient
limbs are free from potential entrapment areas
before operating any functions
ࣟDo not stand on the product or any of its
components, including the leg supports.
ࣟThis product is designed for indoor use only
and should not be used in a pool or any similar
fully submersed environments.
ࣟDo not change, modify or alter this product
in any way unless suggested by the
manufacturer.
ࣟLeg supports and foot rests are not weight
bearing and not designed to be stood on.
Regular Maintenance
Professional inspection of the mobile shower
commode is recommended at least once a
year.
Any service or repairs must be performed
by a trained professional. Any unauthorized
repairs or service may void warranty.
ࣟCheck the product for damage and wear. If
the product is damaged in any way, stop using
it immediately and contact your authorised
dealer or the manufacturer.
ࣟCheck all screws and nuts are firmly secured,
paying special attention to moving parts.
ࣟCheck for unusual wear and tear or damage to
components.
ࣟCheck castors operate freely and remove dirt
and debris regularly.
ࣟCheck arm supports move easily and freely
and remove dirt and debris regularly.
ࣟCheck leg support mechanism operates freely
and leg supports are easily adjusted.
Contact Novis for technical support and
servicing options

12
User GuideMobile Shower Commode
Specifications
NAMEMobile Shower Commode
PRODUCT CODE BL0030
COLOUR White
PRODUCT WEIGHT 12 kg
OVERALL HEIGHT930–1005 mm
OVERALL WIDTH 550 mm
OVERALL DEPTH 840 mm
SEAT HEIGHT495–570 mm
SEAT WIDTH 440 mm
SEAT DEPTH 435 mm
WIDTH BETWEEN
ARMRESTS 450 mm
CASTORS4 x Lockable
FRAME Aluminium
SAFE WORKING LOAD 136 kg
CONFORMS TO AS/NZS 3973:2009
ARTG 176831
WARRANTY 1 Year
Measurements are approximate only.

13 Mobile Shower Commode User Guide
Warranty
This warranty is provided by
Novis Healthcare (ABN 45 102 735 491)
of Unit 11, 12 Mars Road Lane Cove West
New South Wales 2066.
Novis Healthcare (Novis) products are manufactured
to the highest quality standards and are thoroughly
tested and inspected before leaving our factory. In
addition to any statutory rights and remedies you
may have, Novis warrants all of its products sold
directly or via an Authorised Novis Australia Dealer
against defective workmanship and faulty materials
from the date of purchase by the end user for a period
of twelve months unless otherwise specified for that
product and its components.
Warranty Claims
To claim under this warranty, please contact Novis
Healthcare and have your receipt or proof of
purchase available. Novis Healthcare may need to
assess the defect before determining any claim, and
additional information may be requested to process
your claim. Claims without proof of purchase may not
be able to be processed.
Novis Healthcare may at its option inspect the goods
on site or require them to be returned to its premises
or one of its Authorised Service Agents in person or
freight prepaid by you.
Novis will undertake at its option, to repair or replace,
free of charge, each product or part thereof on the
condition that:
ࣟThe product found on examination, to be
suffering from a manufacturing defect;
ࣟThe product or relevant part has been serviced
regularly by Novis or one of its Authorised
Service Agents and has not been subjected to
misuse, neglect or been involved in an accident;
ࣟThe repairs are not required as part of normal
wear and tear.
At our option
ࣟGoods repaired may be replaced by refurbished
good of the same type rather than being
repaired.
ࣟRefurbished parts may be used to repair goods.
Novis Healthcare will not be held responsible for any
repair other than those carried out by it or one of its
Authorised Service Agents.
Warranty repairs do not extend the length of the
warranty period.
Limited Liabilities
Our liability under this manufacturer’s warranty is
subject to us being satisfied that a defect was caused
by faulty parts, manufacture or workmanship, and
was not caused or substantially contributed to by
other factors or circumstances beyond our control,
including (but not limited to) defective installation,
maintenance or repair, product modification
or alteration, any neglect, misuse, or excessive
use, normal wear and tear or failure to follow
manufacturer’s instructions.
IMPORTANT NOTICE FOR
AUSTRALIAN CONSUMERS:
Our goods come with guarantees that cannot be
excluded under the Australian Consumer Law.
You are entitled to a replacement or refund for a
major failure and for compensation for any other
reasonably foreseeable loss or damage. You are
also entitled to have the goods repaired or replaced
if the goods fail to be of acceptable quality and
the failure does not amount to a major failure. To
obtain compensation, you will need to provided
documentary evidence of the loss or damage
suffered and documentary evidence that such loss or
damage was a reasonable foreseeable consequence
of a failure Novis Healthcare to comply with a
consumer guarantee under the Australian Consumer
Law. Subject to the provisions of the Australian
Consumer Law, Novis Healthcare excludes, to the
fullest extent permitted by law, all liability in respect
of loss of profit or other economic loss, direct to
indirect or consequential, special, general or other
damages or other expenses or costs which may
include negligence.

14
User Guide Mobile Shower Commode
Notes

15 Mobile Shower Commode User Guide
Notes
17082022F
Table of contents
Other BetterLiving Mobility Aid manuals

BetterLiving
BetterLiving BL1234 Manual instruction

BetterLiving
BetterLiving Petite User manual

BetterLiving
BetterLiving BL1478 Manual instruction

BetterLiving
BetterLiving Shower Chair Aluminium Manual instruction

BetterLiving
BetterLiving Ultra Compact Wheeled Walker User manual

BetterLiving
BetterLiving Euro Lightweight Wheeled Walker User manual
Popular Mobility Aid manuals by other brands


Unicare Health
Unicare Health ANSA Instruction & safety manual

Invacare
Invacare Ocea user manual

Drive DeVilbiss
Drive DeVilbiss GoLite 200 operating instructions

Alber
Alber Scalamobil iQ operating instructions

Rhythm Healthcare
Rhythm Healthcare B3800F manual

Otto Bock
Otto Bock Pheon 3R62 Instructions for use


