BH Tecnovita YF96 User manual

YF96
UNIDAD ELECTRÓNICA
ELECTRONIC MONITOR
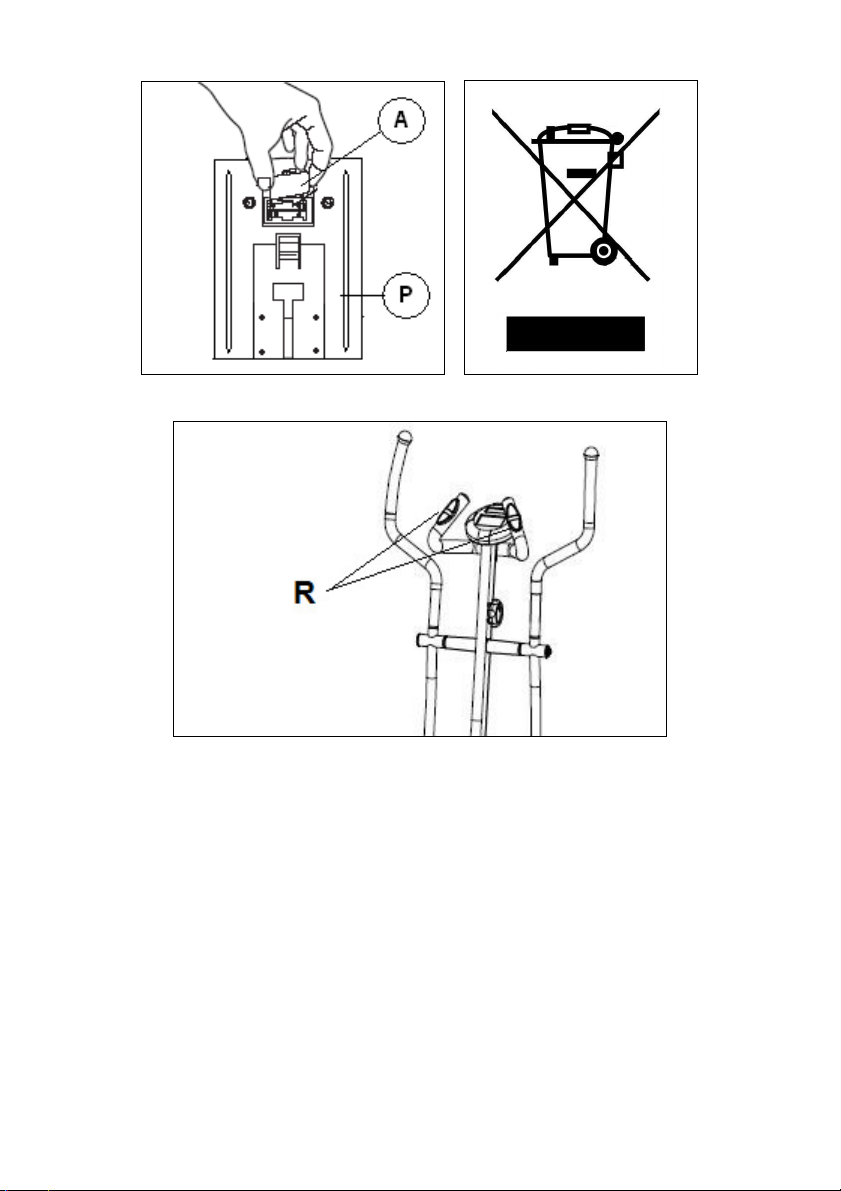
Fig.1 Fig.2
Fig.3

Español
COLOCACION PILAS.-
Este monitor utiliza dos PILAS
ALCALINAS de 1,5 voltios. Para
colocar las pilas, suelte la tapa trasera
del monitor, Fig.1, e inserte con
precaución pilas alcalinas del tipo «R-
6» en el compartimento de las pilas
(A) orientando correctamente la
polaridad de las pilas (haciendo
coincidir el polo «+» de las pilas con la
señal «+» del compartimento de las
pilas y el polo «-» con la señal «-»).
Cierre la tapa, como muestra la Fig.1.
Si después de conectar el monitor
electrónico, se produjeran
indicaciones erróneas o sólo aparecen
los segmentos parcialmente, extraiga
las pilas y espere unos 15 segundos
antes de volver a instalarlas.
Las baterías débiles (descargadas)
generan cifra débiles (sin contraste) e
indicaciones erróneas. Cámbielas
inmediatamente.
Importante. Deposite las pilas usadas
o residuos del embalaje en
contenedores especiales, Fig.2.
MONITOR ELECTRONICO.-
Para hacer más cómodo y simple el
control de su ejercicio este electrónico
muestra simultáneamente la veloci-
dad, la distancia, el tiempo de
ejercicio, las calorías consumidas y el
pulso.
La pantalla se encenderá automática-
mente al comenzar el ejercicio o
pulsando cualquier tecla.
El monitor se apagará automática-
mente a los 4 minutos.
A. FUNCIÓN SCAN
En el modo SCAN, el ordenador
revisa y visualiza continuamente
durante sus ejercicios todas las
funciones. La función visualizada se
indica por medio de parpadeos.
Para seleccionar la función SCAN:
1. Al comenzar el ejercicio o pulsando
cualquier tecla se enciende el monitor
en la función SCAN, que cada 4
segundos se visualizará en la pantalla
principal el TIEMPO, VELOCIDAD,
DISTANCIA, CALORÍAS, PULSO.
2. Pulse la tecla MODE y se eliminará
la función SCAN.
B. FUNCIÓN DISTANCIA.-
La función cuenta o descuenta en
incrementos de 0,1 Km/ml hasta un
máximo de 999,9 Km/ml.
Pulsando durante más de dos
segundos la tecla MODE todos los
valores pasan a cero.
1. Pulse cualquier tecla, para poner en
marcha el monitor.
2. Pulsando la tecla MODE
parpadeará la ventana pequeña de
DIST (DISTANCIA).
3. Pulsando las teclas SET seleccione
la distancia.
4. Comience el ejercicio y empezará a
disminuir la distancia, una vez haya
llegado a cero emitirá unos pitidos,
advirtiéndole que ha llegado al valor
seleccionado, comenzando a contar la
distancia hacia arriba.
C. FUNCIÓN CALORÍAS.-
La función cuenta y descuenta de una
en una caloría (10 a partir de 1000),
hasta un máximo de 9999 calorías.

4
Pulsando durante más de dos
segundos la tecla MODE todos los
valores pasan a cero.
1. Pulse cualquier tecla, para poner en
marcha el monitor.
2. Pulsando la tecla MODE
parpadeara la ventana pequeña de
CAL (CALORIAS).
3. Pulsando las teclas SET seleccione
las calorías.
4. Comience el ejercicio y empezará a
disminuir las calorías, una vez haya
llegado a cero emitirá unos pitidos,
advirtiéndole que ha llegado al valor
seleccionado, comenzando a contar
las calorías hacia arriba.
D. FUNCION ODO.-
Esta función le permite ver la distancia
total recorrida que va acumulando en
el monitor, cuando realiza los
ejercicios.
Para poner a cero la distancia total
recorrida (ODO), suelte la tapa trasera
de las pilas (A) Fig 1. Quite una de las
pilas para dejar sin corriente el
monitor, y vuelva a colocar la pila y la
tapa trasera de las pilas (A) Fig. 1.
NOTA: Siempre que se repongan las
pilas por unas nuevas, la función ODO
se resetea al valor cero.
E. INSTRUCCIONES - USO
DEL HAND-GRIP (PULSO).-
El pulso de este modelo se mide
colocando ambas manos en los
sensores (R), que están puestos en el
manillar como se indica en la Fig. 3.
Una vez colocadas ambas manos en
los sensores, comenzará a parpadear
el corazón en la parte derecha de la
pantalla que indica PULSE de la
pantalla del monitor y al cabo de unos
segundos aproximadamente apare-
cerá el valor de su ritmo cardíaco.
Si no tiene colocadas ambas manos
correctamente como muestra Fig. 3, el
pulso no funciona.
Si en pantalla aparece un «0» o no
parpadea el corazón, asegúrese de
que tiene colocadas ambas manos en
los sensores y de que los conectores
estén conectados en la parte de atrás
del electrónico.
F. FUNCIÓN TIEMPO.-
La función cuenta o descuenta en
incrementos de un minuto hasta un
máximo de 99:59 segundos.
Pulsando durante más de dos
segundos la tecla MODE todos los
valores pasan a cero.
1. Pulse cualquier tecla, para poner en
marcha el monitor.
2. Pulsando la tecla MODE
parpadeara la ventana pequeña de
TIME.
3. Pulsando las teclas SET seleccione
el tiempo.
4. Comience el ejercicio y empezara a
disminuir el tiempo, una vez haya
llegado a cero emitirá unos pitidos,
advirtiéndole que ha llegado al tiempo
seleccionado, comenzando a contar el
tiempo hacia arriba.
GUIA DE PROBLEMAS.-
Problema: Se enciende el display y
sólo funciona la función de Tiempo
Solución:
a.- Compruebe si el cable de conexión
está conectado.
Problema: El display no se enciende
o la visualización de los segmentos
del display es muy débil.

5
Solución:
a.- Compruebe que las pilas estén
colocadas correctamente
b.- Compruebe la carga de las
baterías
c.- Si están bajas, cambie las pilas
inmediatamente.
Problema: Si algún segmento de
alguna función no se enciende o si se
producen indicaciones erróneas en
alguna función.
Solución:
a.- Desconecte las pilas durante 15
segundos y vuelva a instalarlas
correctamente.
b.- Compruebe la carga de las pilas.
Si están bajas, cambie las pilas.
c.- Si los pasos anteriores no le
ayudan, reemplace el monitor
electrónico.
Evite que le dé a su monitor
electrónico la luz directa del sol, pues
se puede estropear la pantalla del
cristal líquido. No lo exponga tampoco
al agua ni a golpes.
EL FABRICANTE SE RESERVA EL
DERECHO A MODIFICAR LAS
ESPECIFICACIONES DE SUS
PRODUCTOS SIN PREVIO AVISO.
Para cualquier consulta, no dude en
ponerse en contacto con el
(S.A.T).Servicio de Asistencia
Técnica, llamando al teléfono de
atención al cliente (ver página final del
presente manual).

6
English
FITTING THE BATTERIES.-
This monitor uses two 1.5 volt
ALKALINE BATTERIES. To fit the
batteries, remove the rear cover on
the monitor, Fig.1, and carefully insert
the two “R-6” type batteries into the
battery compartment (A) making sure
that the battery’s polarity is correct
(matching the battery’s «+» terminal
with the «+» sign inside the battery
compartment, and the «-» terminal
with the «-» sign). Close the cover, as
shown in Fig.1.
If, after having switched the monitor
on, it displays errors or merely partial
segments then remove the batteries
and wait for about 15 seconds before
reinstalling them.
Weak batteries (run down) produce a
weak digital display (poor contrast)
and erroneous readings. Change them
immediately.
Important. Deposit all spent batteries
or waste packaging in special
containers, Fig.2.
ELECTRONIC MONITOR.-
To give you greater control over the
exercise, this electronic unit provides
simultaneous read-outs of speed,
distance, exercise time, calories burnt
and pulse rate.
The screen will switch itself on
automatically as soon as you start
exercising or by pressing any key.
The screen will switch itself off
automatically after 4 minutes.
A. SCAN FUNCTION.-
In SCAN mode the computer
continuously scans and displays all of
the functions during exercise. The
function being displayed will flash on
and off.
To select the SCAN function:
1. The monitor starts in SCAN mode
as soon as exercise begins or if any
key is pressed, the main screen will
display TIME, SPEED, DISTANCE,
CALORIES, PULSE RATE values
every 4 seconds.
2. Press the MODE key and this will
cancel the SCAN function.
B. DISTANCE FUNCTION.-
This function counts up or down in
steps of 0.1 km/ml, up to a maximum
of 999.9 km/ml. Pressing the MODE
key for more than two seconds will
reset all of the values.
1. Press any key to switch the monitor
on.
2. Press the MODE key to start the
small DIST (DISTANCE) window
flashing.
3. Press the SET keys to select the
distance.
4. Begin the exercise and the distance
value will begin the countdown, when
it reaches zero it will beep for 8
seconds, advising you that the
selected distance has been covered,
the distance value will then start
counting upward.
C. CALORIE FUNCTION.-
This function counts up or down in
steps of one calorie, up to a maximum
of 9999 calories. Pressing the MODE
key for more than two seconds will
reset all of the values.

7
1. Press any key to switch the monitor
on.
2. Press the MODE key to start the
small CAL (CALORIE) window
flashing.
3. Press the SET keys to select the
calories.
4. Begin the exercise and the calorie
value will begin the countdown, when
it reaches zero it will beep for 8
seconds, advising you that the
selected calorie value has been
reached , the calorie value will then
start counting upward.
D. ODOMETER.-
This function shows you the total
accumulated distance that you have
travelled throughout the exercises.
To reset the total distance travelled
(ODO), take the battery cover off (A),
Fig. 1, and remove one of the
batteries to deactivate the monitor,
then replace the battery and the cover
(A), Fig.1.
NOTE: The ODO function will
automatically reset whenever the old
batteries are replaced with new ones.
E. HAND-GRIP (PULSE)
INSTRUCTIONS / USE.-
On this model the pulse rate is
measured by placing both hands on
the sensors (R), located on the
handlebar, as shown in Fig.3.
When both hands are placed on the
sensors the heart symbol on the right-
hand side of the screen, marked
PULSE, will begin to flash and after a
few seconds a heart rate reading will
be displayed.
If both hands are not placed correctly
as shown in Fig. 3 then the pulse
function will not work.
If a “0” appears on the screen or the
heart symbol does not flash then
make sure that both hands are placed
on the sensors and that the
connectors are connected at the back
of the electronic unit.
F. TIME FUNCTION.-
This function counts up or down in
steps of one minute, up to a maximum
of 99:59 seconds.
Pressing the MODE key for more than
two seconds will reset all of the
values.
1. Press any key to switch the monitor
on.
2. Press the MODE key to start the
small TIME window flashing.
3. Press the SET keys to select the
time.
4. Begin the exercise and the time
value will begin the countdown, when
it reaches zero it will beep for 8
seconds, advising you that the
selected time has elapsed, the time
value will then start counting upward.
TROUBLESHOOTING GUIDE.-
Problem: The display comes on but
only the Time function works
Solution:
a.- Make sure that the connection
cable is connected.
Problem: The display does not come
on or the displayed segments are very
weak.
Solution:
a.- Check that the batteries are fitted
correctly.
b.- Check the battery charge.

8
c.- If they are run down change them
immediately.
Problem: Display segments of a
function read-out are not visible or
error messages for a particular
function appear.
Solution:
a.- Remove the batteries for 15
seconds and then refit them correctly.
b.- Check the battery charge If they
are run down change the batteries
c.- If the above steps do not help then
replace the electronic monitor.
Avoid leaving the electronic monitor in
direct sunlight as this might damage
the liquid crystal display. Similarly, do
not expose it to water or knocks.
THE MANUFACTURER RESERVES
THE RIGHT TO MODIFY THE
SPECIFICATIONS OF ITS
PRODUCTS WITHOUT PRIOR
NOTICE .
Do not hesitate to get touch with the
Technical Assistance Service if you
have any queries by phoning customer
services (see last page in manual)

BH FITNESS SPAIN
EXERCYCLE,S.L.
(Manufacturer)
P.O.BOX 195
01080 VITORIA (SPAIN)
Tel.: +34 945 29 02 58
Fax: +34 945 29 00 49
e-mail: sat@bhfitness.com
www.bhfitness.com
POST-VENTA
Tel: +34 945 292 012 /
902 170 258
Fax: +34 945 56 05 27
e-mail: sat@bhfitness.com
BH FITNESS NORTH AMERICA
20155 Ellipse
Foothill Ranch
CA 92610
Tel: + 1 949 206 0330
Toll free: +1 866 325 2339
Fax: +1 949 206 0013
e-mail:
fitness@bhnorthamerica.com
www.bhnorthamerica.com
BH FITNESS ASIA
BH Asia Ltd.
No.80, Jhongshan Rd.,
Daya Dist.,
Taichung City 42841,
Taiwan. R.O.C.
Tel.: +886 4 25609200
Fax: +886 4 25609280
BH FITNESS PORTUGAL
MAQUINASPORT, APARELHOS
DE DESPORTO, S.A.
Rua do Caminho Branco Lote 8,
ZI Oiã 3770-068 Oiã
Oliveira do Bairro (PORTUGAL)
Tel.: +351 234 729 510
Fax: +351 234 729 519
e-mail: info@bhfitness.pt
BH SERVICE PORTUGAL
Tel.: +351 234 729 510
Fax: +351 234 729 519
e-mail: info@bhfitness.pt
BH FITNESS MEXICO
BH Exercycle de México S.A. de
CV
Eje 132 / 136
Zona Industrial, 2A Secc.
78395 San Luis Potosí
S:L:P: MÉXICO
Tel.: +52 (444) 824 00 29
Fax: +52 (444) 824 00 31
www.bhlatam.com.mx
BH FITNESS CHINA
BH China Co., Ltd.
Block A, NO.68, Branch Lane
455, Lane 822,
Zhen Nan RD., Li Zi Yuan,
Putuo, Shanghai 200331, P.R.C.
Tel: +86-021-5284 6694
Fax:+86-021-5284 6814
e-mail: info@i-bh.cn
BH Germany GmbH
Altendorfer Str. 526
45355 Essen
Tel: +49 201 450910-0
e-mail:
info@bhgermany.com
Kostenfreie Telefonnummer:
0800 0996655
Ersatzteile:
www.bhfitness.com
BH FITNESS UK
Tel: 02037347554
e-mail:
sales.uk@bhfitness.com
AFTER SALES – UK
Tel.: 02074425525
e-mail:
service.uk@bhfitness.com
BH FITNESS FRANCE
SAV FRANCE
Tel : +33 0810 000 301
Fax : +33 0810 000 290
savfrance@bhfitness.com
BH SE RESERVA EL DERECHO A MODIFICAR LAS ESPECIFICACIONES DE SUS PRODUCTOS
SIN PREVIO AVISO.
SPECIFICATIONS MAY BE CHANGED WITHOUT PRIOR NOTICE DUE TO OUR PROGRAMME OF
CONTINUOUS PRODUCT DEVELOPMENT.
BH SE RÉSERVE LE DROIT DE MODIFIER LES SPECIFICATIONS DE SES PRODUITS SANS
PRÉAVIS.
BH BEHALT SICH DAS RECHT VOR, ÄNDERUNGEN DER MODELL-ANGABEN OHRE
VORHERIGE ANKÜNDIGUNG VORZUNEHMEN.
DATI TECNICI E COMMERCIALI RELATIVI AGLI ARTICOLI DEL PRESENTE CATALOGO
POSSONO ESSERE SOGGETIL A VARIAZIONI SENZA ALGUN PREAVVISO.
BH SE RESERVA O DIREITO A MODIFICAÇÀO ESPECIFICAÇOES DOS SEUS PRODUCTOS SEM
PRÉVIO AVISO.
DOOR KONSTANTE PRODUKTVERNIEUWING EN VERBETERING HOUDEN WIJ ONS HET
RECHT VAN WIJZIGING VOOR ZONDER VOORAFGAAND BERICHT. v2
Table of contents
Languages:
Other BH Fitness Electronic manuals


