BHM Medical V3 User manual

001.16000.EN rev. 7 • September 2011
V3
Instructions for Use

Printed in Canada
BHM Medical Inc. reserves the right to change or discontinue any specifications, design, features,
model or accessories shown without notice.
TM Trade-mark of BHM Medical Inc. All rights reserved.
© BHM Medical Inc., 2010
The content of this publication may not be copied either whole or in part without the consent of BHM
Medical.

3
Table of Contents
General Information ............................................................................................... 5
Foreword .........................................................................................................5
Service and Support .....................................................................................5
Manufacturer Information ...............................................................................6
Authorized European Representative ...........................................................6
Definitions Used in this Manual ...................................................................6
Intended Use .................................................................................................6
Operational Life ........................................................................................... 6
Equipment Identification ..............................................................................7
Verifying the Package Contents ...................................................................7
How to Use this Manual ...............................................................................7
Symbols Used .................................................................................................8
Safety Instructions................................................................................................... 9
General Instructions ........................................................................................9
Safe Working Load ...................................................................................... 9
Important Safety Directions ............................................................................ 10
Shock Prevention ..........................................................................................10
Fire and Explosion Prevention ........................................................................11
Human and Environmental Safety Practices ................................................ 11
Battery and Battery Charger Safety Practices ................................................. 11
Equipment Warning Labels ..........................................................................11
Part Designation ...................................................................................................... 12
V3 Portable Lift and Charger Station .............................................................12
Legend ..........................................................................................................12
Handset ............................................................................................................13
Slings......................................................................................................................... 14
Compatible Slings ...........................................................................................14
How to Use the V3 ................................................................................................... 15
Before Approaching the Patient ................................................................... 15
Transferring the Patient ................................................................................ 15
Emergency Shut-off ..................................................................................... 16
Emergency Lowering ................................................................................... 16
Emergency Brake ......................................................................................... 16
Battery Information ......................................................................................... 18
Charging the Batteries .................................................................................. 18
Use of Slings ...................................................................................................19
Pass-Through Hook ......................................................................................... 20
Before Transferring the Lift ......................................................................... 20
Acceptable Track Configurations .................................................................20
Unacceptable Track Configurations .............................................................20
Pass-Through Procedure ..............................................................................21
Preventive Maintenance Schedule .................................................................. 22
User Inspections .............................................................................................. 22

4
Table of Contents
Care and Maintenance............................................................................................ 22
Inspections by an Authorized Service Technician ..........................................23
Daily Checklist ................................................................................................ 24
Inspection and Cleaning ............................................................................... 24
Strap Inspection ............................................................................................24
Handling and Storage ................................................................................... 24
Battery Replacement ....................................................................................25
Verification of the Charger’s Power Source ................................................25
Sling Inspection and Care ............................................................................... 25
Annual Inspection ........................................................................................... 25
Maintenance Requirements .......................................................................... 25
Troubleshooting....................................................................................................... 26
Labels on the Lift..................................................................................................... 27
Technical Specifications.......................................................................................... 28
Lift Dimensions ...............................................................................................29
Limited Warranty ................................................................................................... 33

5
General Information
Thank you for purchasing the V3
portable lift from BHM Medical.
Your V3 is part of a series of
quality products designed
specially for home care, nursing
homes and other health care
uses.
We are dedicated to serving your
needs and providing the best
products available along with
training that will bring your staff
maximum benefit from every
BHM Medical product.
Please read this manual
thoroughly, and contact us if you
have any questions about the
operation or maintenance of
your BHM Medical equipment.
Foreword
Please read this manual in its entirety before using your V3.
The information in this manual is crucial to the proper
operation and maintenance of the equipment, and will help
protect your product as well as ensure that the equipment
performs to your satisfaction. Lifting and transferring a
person always presents a potential risk. Some of the
information in this manual is important for your safety and
must be read and understood to help prevent injuries. BHM
Medical strongly advises and warns that to avoid injuries
that can be attributed to the use of inadequate parts, only
parts designated by BHM Medical should be used on
equipment and other appliances supplied by BHM Medical.
Furthermore, unauthorized modifications on any BHM
Medical equipment may affect its safety. BHM Medical will
not be held responsible for any accidents, incidents or
deficiencies of performance that occur as a result of any
unauthorized modification to its products.
Tested according to standards by:
Service and Support
A service routine must be performed on your V3 by
qualified service personnel. This will ensure the safety and
good functioning of your product. See section called “Care
and Maintenance” in this manual.
If you require further information, please contact your local
BHM Medical representative which can offer
comprehensive support and service programs to maximize
the long-term reliability, safety and value of the product.
Contact your local representative for replacement parts.
Additional copies of this manual can be purchased from
your local BHM Medical representative. When ordering,
include the Instructions for Use product number (see front
page) and equipment identification number.

6
General Information
Manufacturer Information
This product has been manufactured by:
BHM Medical Inc.
2001 Tanguay Street
Magog (Quebec)
Canada J1X 5Y5
Authorized European Representative
Huntleigh Healthcare Ltd.
310-312 Dallow rd.
Luton, UK
LU1 1TD
Definitions Used in this Manual
Means: Failure to understand and follow
these instructions may result in injury to
yourself and others.
Means: Failure to follow these instructions
may cause damage to the product.
Means: This is important information
regarding the correct use of the equipment.
Intended Use
The V3 is designed for lifting patients in a homecare
setting, at nursing homes and other assisted living
centers. Patient transferring is performed under the
supervision of an appropriately trained caregiver
staff in accordance with the instructions outlined in
this manual. All other uses must be avoided.
The equipment must only be used for the purposes
stated above, and must be installed by BHM Medical
authorized personnel and in accordance with local
codes.
WARNING:
CAUTION:
NOTE:
Operational Life
The equipment is designed and tested for a useful life
of seven (7) years or 10,000 transfers—whichever
comes first—subject to preventative maintenance as
specified in the “Care and Maintenance” section in
this manual. Time equivalence between the number
of transfers versus the number of years is made clear
in the table in Fig. 1.
The red indicator light on the portable lift will blink
when it is about halfway to its useful life, and again
to indicate the end of the useful life period.
The operating life of this equipment corresponds
directly to the safe operating time period before a
complete overhaul is required. Aging of the cassette,
frequency of use (transfers per day), the weight of the
patient and maintenance frequency are factors that
have an impact on the V3’s life span. A transfer is
defined as the displacement of a patient from one
point to another. A transfer cycle includes a lifting
and a descending action.
The expected operational life for fabric slings and
fabric stretchers is approximately two years from
date of purchase. This life expectancy only applies if
the slings and stretchers have been cleaned,
maintained and inspected in accordance with the
Instructions for Use that comes with the sling and the
“Preventive Maintenance Schedule.”
The expected life for other consumable products,
such as batteries, fuses, lamps, slings, straps and
cords is dependent upon the care and usage of the
equipment concerned. Consumables must be
Transfers per Day Years
(10,000 transfers)
4 7
6 4.5
8 3.5
Fig. 1
WARNING: The manufacturer cannot
ensure full safety for a portable lift or an
accessory of which the life span has been
exceeded.

7
General Information
maintained in accordance with published
Instructions for Use and the “Preventive
Maintenance Schedule”.
Equipment Identification
The unit's identification number (specification,
model, serial number) appears on a silver nameplate
affixed underneath the casing.
Verifying the Package Contents
Always ensure that the portable lift will be installed
by a contractor or installer that has been authorized
by BHM Medical.
Upon receipt of the equipment, verify it against the
packing list to ensure it is complete and inspect the
equipment for possible damage due to shipping. If
there is any damage, notify the carrier immediately to
file a claim. Provide complete information
concerning damage claims or shipping errors to your
local BHM Medical representative. Include all
equipment identification numbers and group part
numbers (if any) as described above along with a full
description of damaged parts.
How to Use this Manual
To ensure the safe operation of the V3, read the entire
manual carefully, especially the “Safety Instructions”
section, before installing, operating, or servicing this
equipment.
If anything is not completely understood, please
contact your local BHM Medical representative for
more details. Failure to comply with warnings in this
manual may result in injuries.
Keep this manual with the lift and refer to it as
required. Make sure that all operators are regularly
trained in the use of the equipment according to the
information found therein.
WARNING: Do not attempt to use this
equipment without fully understanding the
information contained in this manual.

8
General Information
Symbols Used
Symbol Key to symbols
This symbol is accompanied by the name and the address of the authorized
representative in the European Community.
This symbol is accompanied by a date to indicate the date of manufacture
and by the address of the manufacturer.
This symbol indicates the products comply with the medical device directive
93/42/EEC.
This symbol is accompanied by the manufacturer's catalogue number.
This symbol is accompanied by the manufacturer's serial number.
This symbol indicates “separate collection” for all batteries and
accumulators as per the WEEE Directive.
This symbol refers to the Instructions for Use.
This symbol indicates a class II electrical equipment: term referring to
electrical equipment in which protection against electric shock does not rely
on basic insulation only.
This symbol indicates a type BF applied part.
This symbol indicates a risk of pinching
Fig. 2

9
Safety Instructions
The equipment must be used in
accordance with these safety
instructions.
Anyone using the equipment
must also have read and
understood the instructions in
this manual.
If there is anything you are not
sure about, contact your local
BHM Medical representative.
General Instructions
Keep these safety instructions with the portable lift at all
times.
Read the instructions for use before installing, operating, or
servicing this equipment.
Safe Working Load
The V3 has been designed with a lifting capacity of 200 kg
(440 lb).
WARNING: The V3 is for transferring patients
only. Do not use the lift for any other purpose.
WARNING: Always place the sling around the
patient according to the instructions enclosed.
Failure to do so may result in injuries to you or to
others.
CAUTION: Do not drop the lift, since it may cause
internal damage that is not easily seen. If the
portable lift is suspected to be damaged, contact
your local BHM Medical representative for
servicing.
WARNING: The V3 is intended to be used for
patients whose weight is within a specified safe
working load. Do not attempt to lift more than the
lowest weight limit indicated on the following:
• the track system;
• the “maximum load” label on the lift;
• on the accessories;
• on the sling.

10
Safety Instructions
Important Safety Directions
Always ensure that:
• The portable lift is installed by an authorized
BHM Medical contractor or installer.
• The equipment is used by trained staff.
• The track installation will accept a load equal or
higher to that of the portable lift.
• You are prepared before attempting to transfer a
patient.
• An assessment of the suitability for transfer of a
patient who is connected to electrodes, catheters
or other medical devices is conducted by quali-
fied personnel before performing the transfer.
• Violent impact during transfers is avoided.
• The sling is intended to be used for this lift and
can take the weight of the patient.
• The sling is not damaged, torn or frayed.
• The lifting procedures outlined in this manual are
followed.
• All controls and safety features are used only
according to the rules specified in this manual.
Never attempt to force a control or button on the
lift.
• The charger is not stored in a shower, bath or
other areas with high humidity.
• The sling straps are in good condition and prop-
erly fastened.
• The daily maintenance is carried out before using
the lift.
• Any precautionary or instruction labels that can-
not be easily read are replaced.
• If storing the lift when it is not in use, the humid-
ity in the storage area does not exceed 100% at
20ºC (68ºF).
WARNING: Before attempting a transfer, a
clinical assessment of the patient’s
suitability for transfer should be carried
out by a qualified health professional
considering that, among other things, the
transfer may induce substantial pressure
on the patient’s body.
• The ambient temperature range when storing the
is between –40ºC and 50ºC (-40ºF to 122ºF).
Shock Prevention
• Do not touch or use a lift with bare conductors or
a damaged power cord. Electrically live equip-
ment can result in serious injuries. If the lift or
charger has any exposed or damaged wires, con-
tact your local BHM Medical representative
immediately.
• Do not splash or expose electric parts of the
device to water or moisture.
• Check nameplate for input voltage and frequency
requirements. These requirements differby coun-
try. Do not attempt to use the lift in an area that
has a different voltage and frequency require-
ment.
• Do not attempt to expose, service or repair the
lift, battery or charger. If any unit is malfunction-
ing, contact your local BHM Medical representa-
tive.
• Read batteries and charger instructions thor-
oughly before using or storing them.
NOTE: BHM Medical portable lifts are
specifically designed for KWIKtrak ceiling
rail systems, and BHM Medical slings and
accessories.
CAUTION: Keep all components of the lift
clean and dry, and have electrical and
mechanical safety checks performed as
instructed in the “Care and Maintenance”
section of this manual
CAUTION: Excessive exposure of the
handset to water (or other liquid) could
cause malfunction of the device.

11
Safety Instructions
Fire and Explosion Prevention
• Do not short circuit the battery terminals.
• Do not incinerate the battery.
Human and Environmental Safety
Practices
• Should the battery casing crack, allowing its con-
tents to come into contact with skin or clothing,
rinse immediately with water. If the contents
comesin contact withthe eyes, rinse immediately
with plenty of water and seek medical attention.
• Inhalation of the contents can cause respiratory
irritation. Sensitivity to nickel can cause allergic
asthma to result. Seek out fresh air and medical
attention.
• For recycling and disposal of the batteries, the
rules according to the WEEE directive (Waste of
Electronic and Electrical Equipment) as well as
local laws and regulations must be followed. If
not they may explode, leak and cause personal
injury. When returning batteries, insulate their
terminals with adhesive tape. Otherwise, the
residual electricity in used batteries may cause
fireor explosion. Fig. 3 belowshows the symbols
for disposal and recycling.
Fig. 3
WARNING: Do not place or store the
battery under direct sunlight or near a heat
source. Do not expose the batteries or
battery charger to flames. Do not use the
charger in the presence of flammable
anaesthetic gases.
Battery and Battery Charger Safety
Practices
• Be careful not to drop the batteries.
• Only use the charger that has been supplied with
the equipment.
• Do not charge the batteries in an unventilated
area.
• The charger must not be covered or exposed to
dust.
• Do not crush, puncture, open, dismantle or other-
wise mechanically interfere with the batteries.
• Donot store batteriesata temperaturehigherthan
50ºC (122ºF).
Equipment Warning Labels
• Carefully read the labels on the battery and fol-
low the instructions.
• Inspectall precautionarylabelsontheequipment.
Order and replace all labels that cannot be easily
read.
WARNING: Do not expose the battery
connector or the battery charger to water.
The charger is designed for dry areas only
and for normal air humidity conditions.
12
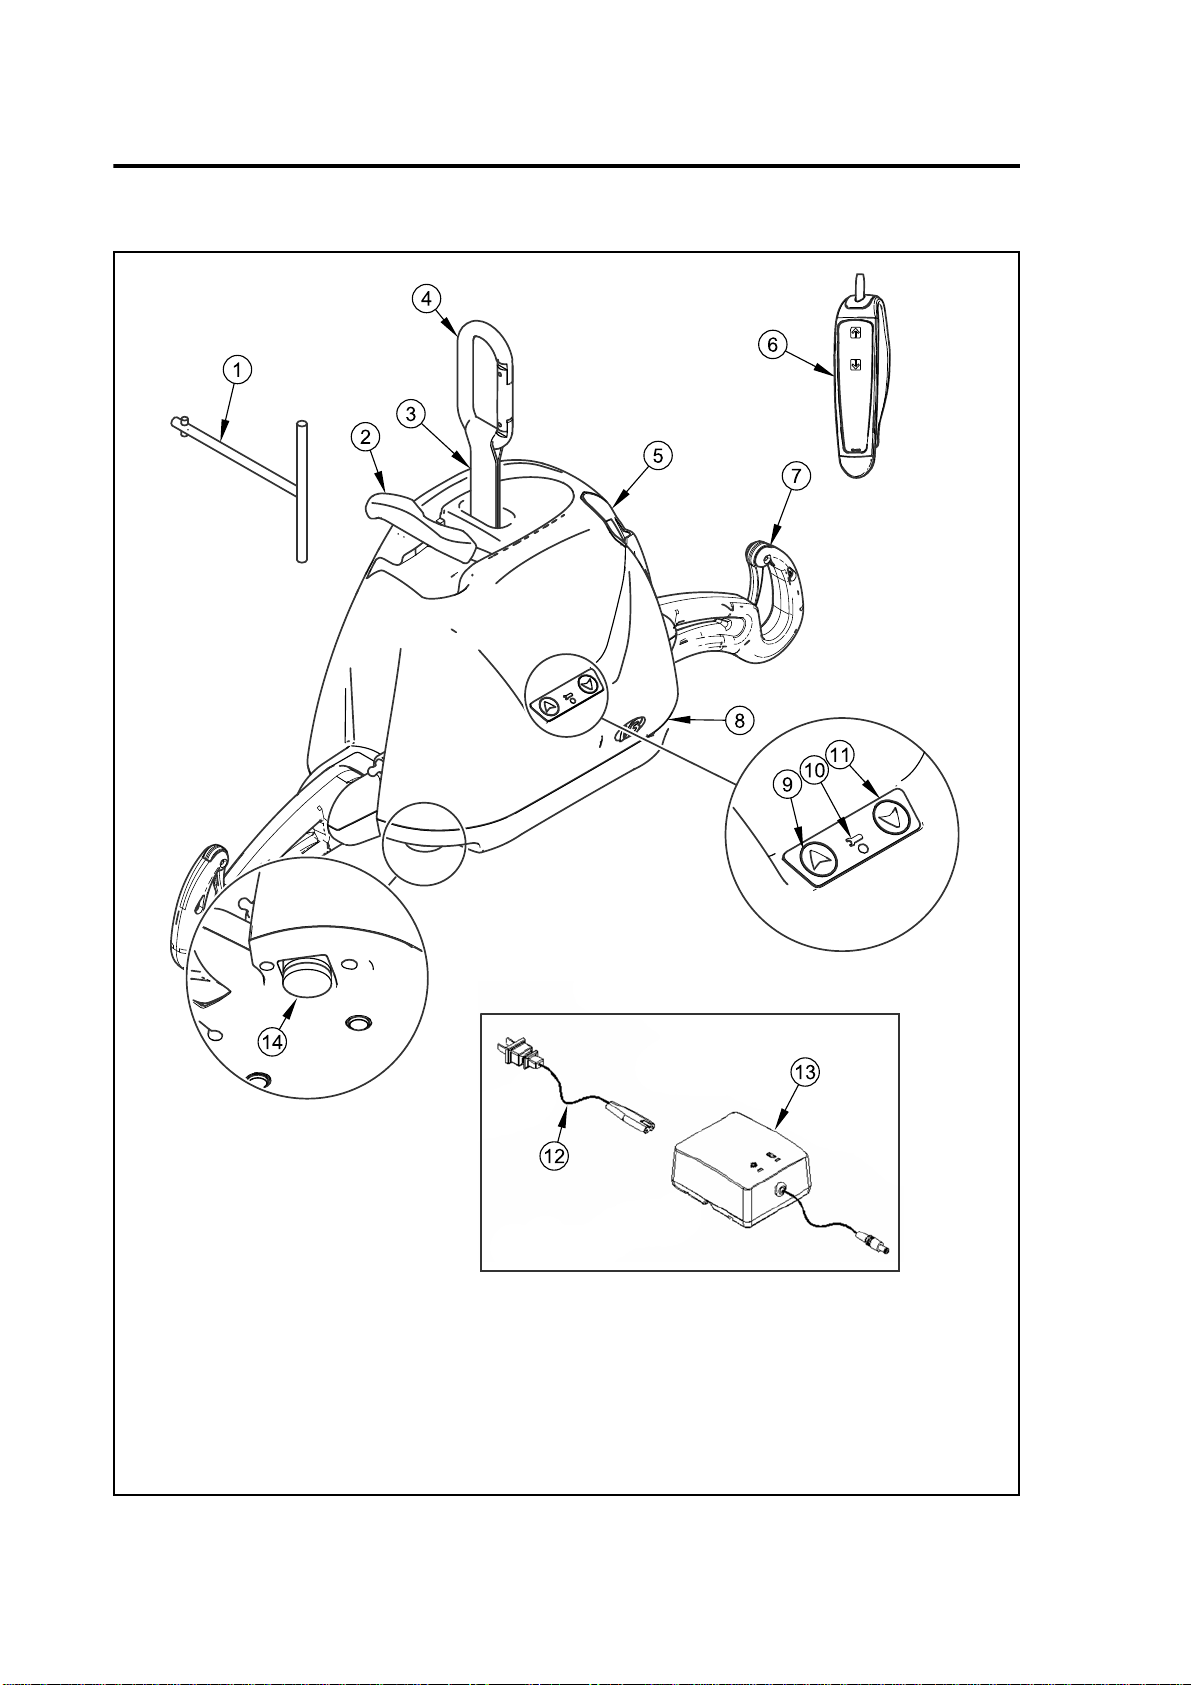
Part Designation
V3 Portable Lift and Charger Station
Fig. 4
Legend
1) Emergency lowering tool
2) Pass through hook
3) Strap
4) Carabiner
5) Handset holder
6) Handset unit
7) Support
8) DC charger inlet
9) UP button
10) Maintenance indicator
11) DOWN button
12) Power cord
13) Charger
14) Emergency shut-off


14
Compatible Slings
Hammock sling
(THA-X & THAI-X)
Hammock 6 sling
(THA6-X & THA6I-X)
Quick Fit sling
(TIR-X)
Hygienic sling
(THY-X)
Combi sling
(62600X-X)
Walking Sling
(TEM)
Limb sling
(300.20005)
Repositioning sling
(624500)
Slings
15
Before Approaching the Patient
Attendants should always tell the patient what they
are about to do. Make sure to have on hand a sling
that is of the correct model and of adequate size for
transfer with the V3 unit.
Before performing the transfer, it is important to
evaluate the patient’s general condition. For
example, an agitated patient will require a more
specific type of sling.
Transferring the Patient
To begin the transferring procedure:
1) Install the patient into the sling according to the
Instructions for Use that comes with the sling.
2) Unwind the strap by pressing the DOWN button
on the handset while holding a tension on the
strap with the other hand. Note: there must be
tension on the strap for the lift to function.
3) Attach the carabiner to the trolley and then move
the lift over the patient.
4) Lower the lift below the chin and unfold supports
before attaching the sling straps (this will prevent
the lift from striking the patient’s face due to the
lift’s movement). Note: for a patient in a supine
position, lower the lift near the chest, unfold
supports then install the straps.
WARNING: Always read the “Safety
Instructions” section before operating the
V3.
The track must be installed and modified
only by BHM Medical authorized personnel
and in accordance with local codes.
• All tracks must be closed with end stop-
pers or connected to other closed track
components.
• Before use, make sure all end stoppers
are in place and secured.
WARNING: The unit must never be
operated by the patient but only by the
caregiver.
5) To attach the sling, unfold the support on each
side of the lift. Insert the strap loop onto the
support and pull gently on the strap.
6) The support retaining hooks will lower, allowing
the strap to slide within. The strap will be trapped
inside the support and the retaining hooks will
automatically block the opening. Do not attempt
to transfer a patient if the retaining hooks are not
blocking the support’s opening for the strap.
Fig. 6
7) To lift the patient, press the UP button on the
handset.
8) Lift the unit until the patient's buttocks clear the
arm supports of the wheelchair, the top of the bath
or the bed before moving the patient. Guide the
patient’s legs past any obstacles.
9) When the patient is located above the desired
point of transfer and ready to be lowered, press
the DOWN button.
10) Once the patient is properly seated, loosen the
straps and disengage the sling from the lift.
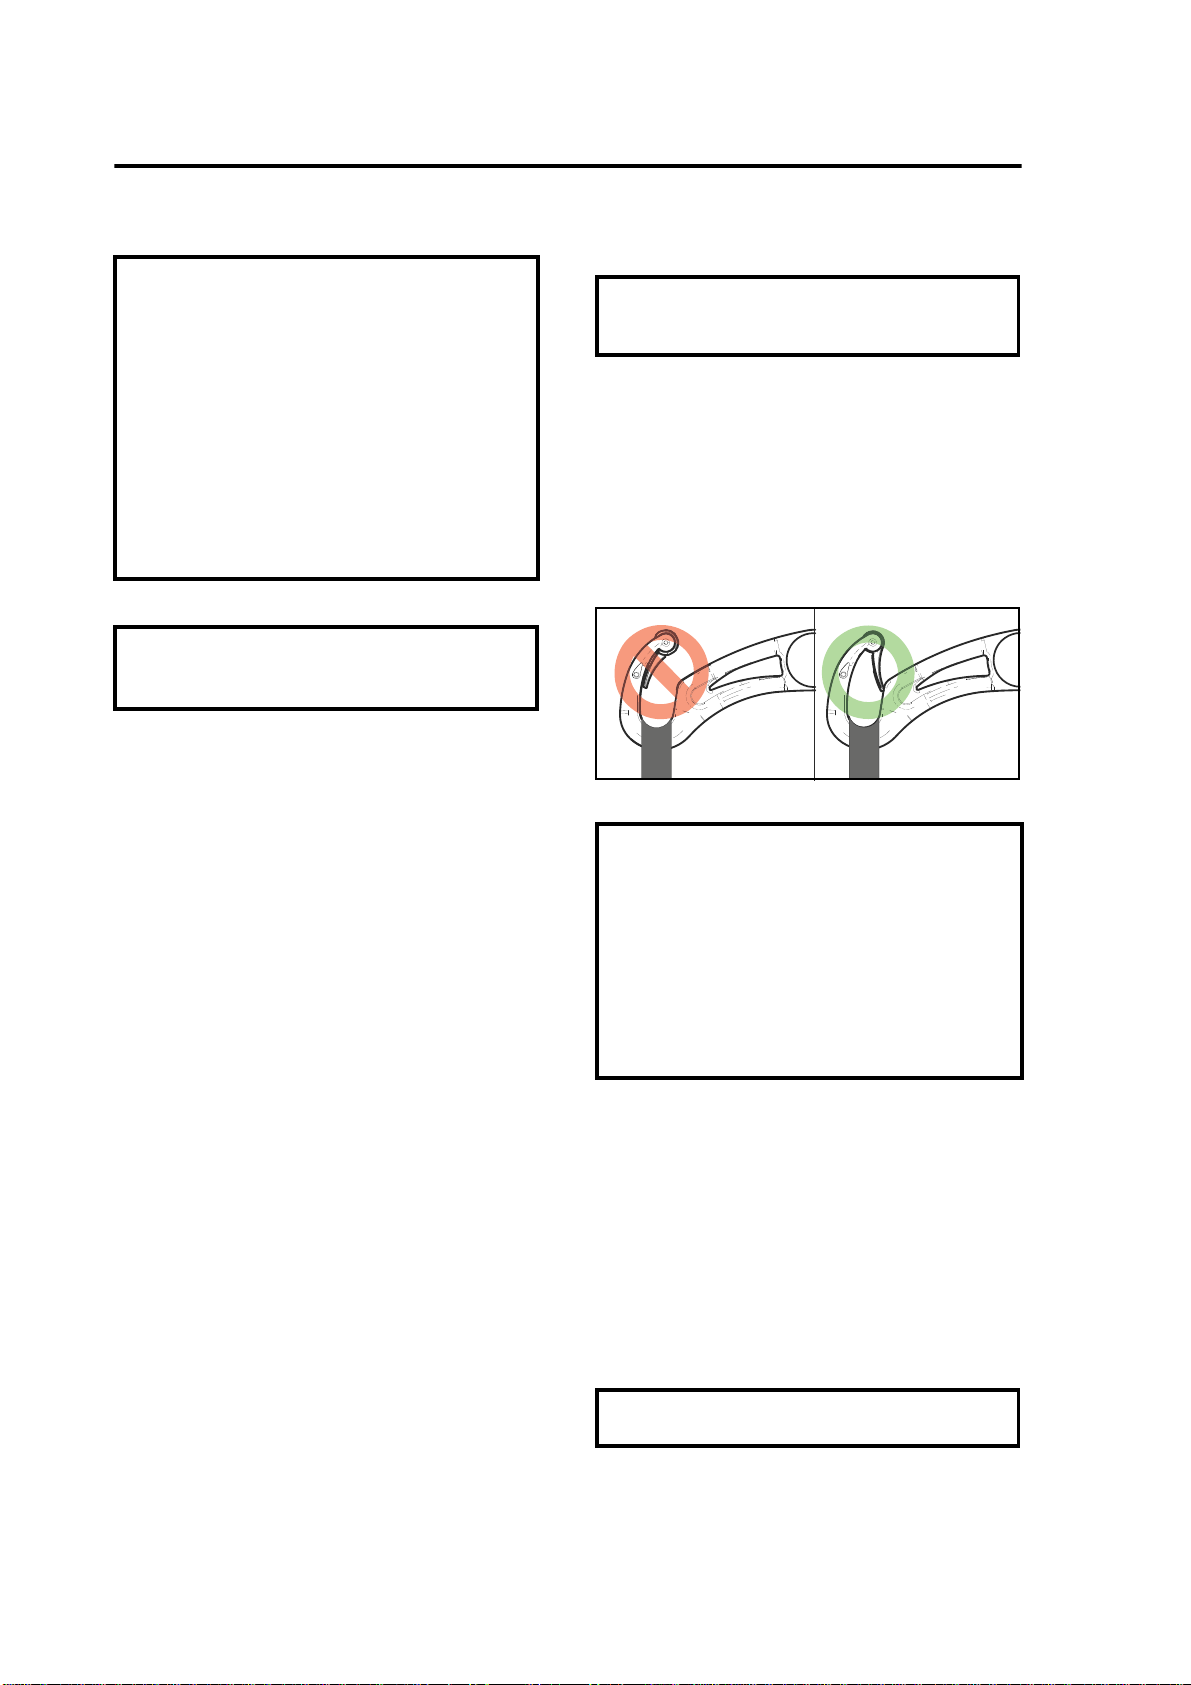
WARNING: The back of the sling has sewn
handles to allow better positioning for the
caregiver and enhancing patient safety.
Unsafe strap
installation Safe
installation
WARNING: Before lifting the patient:
1. Make sure that all straps are attached to
the supports.
2. Make sure the patient is comfortable.
3. Make sure the sling is not caught on
any obstruction (wheelchair brake or
arm of chair).
If any of the above occurs, lower the patient
immediately and correct the problem.
CAUTION: Hold the lift with one hand at all
times when near a patient.
How to Use the V3

16
How to Use the V3
11) Slide the lift away from the patient. Unhook the
lift from the trolley and use the handset to shorten
the strap. You can now remove the sling from
around the patient.
12) When the V3 is no longer required, plug the
portable lift back to the charger.
Emergency Shut-off
The operator can shut off the electrical power at any
time by pressing the red mushroom-shaped
emergency button under the lift. The button is reset
by twisting it clockwise in the direction of the
arrows. First time users should practice the shut-off
manoeuvre before operating the lift with a patient
Emergency Lowering
The V3 is equipped with a special safety feature that
allows the lift to be lowered even if the electrical
system does not operate.
Located on the right side of the lift (near the folding
sling support), the emergency lowering device is
activated by the insertion of the special key included
with this manual.
To lower safely a patient, follow these steps, as
illustrated in Fig. 7:
1) Press on the red, emergency shut-off button under
the lift. Move the lift with the patient over the bed
or the wheelchair.
2) Remove the plastic cap covering the emergency
lowering mechanism’s entry.
3) Insert the special key into the opening then turn it
clockwise to lower the patient. The key rotation
turns the motor directly, so that for each key turn,
the patient will lower slightly. Once the patient is
lowered safely on a bed or into a wheelchair,
remove the key from the lift and call a qualified
technician to service your V3.
Emergency Brake
The emergency brake is an additional safety feature
that automatically prevents the patient from falling in
the unlikely event that of a transmission or motor
failure.
NOTE: When you transfer a patient, make
sure to be assisted by another caregiver.
CAUTION: The emergency lowering feature
is to be used only in case of emergency.
WARNING: After an incident has occurred
and the brake was deployed, never attempt
to unlock the brake or press the UP button.
This may disengage the brake and make
the patient fall. The emergency lowering
device cannot be used.
WARNING: Never use a portable lift with the
emergency brake deployed. Use other
equipment to lower the patient.
The emergency brake is intended for a
single activation and therefore can only be
used once. Call your BHM Medical
representative Service Department to
arrange for the unit to be replaced.
17
How to Use the V3
Fig. 7

18
How to Use the V3
Battery Information
The life cycle (number of charging cycles) of the
batteries is largely dependent on the depth of
discharge within each cycle. The more the batteries
are drained, the shorter their overall life span. The
life of the batteries is also related to such factors as
varying temperatures and rest periods between when
they are charged and discharged.
The batteries included in the V3 are 12 VDC, 2.3 Ah
and rechargeable. They provide 10 to 30 transfers per
battery charge.
Charging the Batteries
The steps for recharging the batteries are as follows:
1) Plug the charger into a wall socket compatible
with universal voltage input from 90 Vac to
240 Vac.
2) Check to make sure the green light on the charger
is illuminated. This indicates that the charger is
on.
3) Plug the charger’s DC connector to V3 DC inlet.
NOTE: To prolong battery life, plug the
charger to the charger whenever the
portable lift is not in use. If the low battery
indicator beeps, and a green light flashes,
make sure to recharge the batteries as
soon as possible. Charge the batteries
until the charging indicator light is a solid
yellow before using the lift again. This will
extend the life of the batteries.
NOTE: BHM Medical uses sealed lead-acid
batteries. These batteries are not affected
by any memory effect. Therefore, batteries
should not be completely drained before
recharging.
WARNING: Do not operate the charger with
a damaged cord or if the unit has been
dropped or damaged.
Do not bend the power cord by force, or
place a heavy object on it. This will damage
the cord and may cause fire or electrical
shock.
4) The charger indicator light turns yellow while the
battery is in charging. When batteries are fully
charged, the charging indicator light will turn off.
The unit is ready to use.
5) If the battery is low, it will take approximately
two hours for a full charge.
6) When you need the lift again, unplug the charger.
The power cord can remain plugged into the wall
indefinitely, which is convenient for overnight
charging. The lift can be charged for an extended
period of time without damaging either the charger
or the batteries. Optionally, the charger can be
installed on the wall. If you install it on the wall, the
back of the charger is designed to be clipped on the
heads of screws.
If the batteries have been completely drained it could
take up to 6-8 hours to completely recharge them. In
order to reduce the charging time, refrain from
completely draining the batteries and leave the
portable lift connected to the charger between uses.
NOTE: Connect the charger to the lift when
the lift is not in use. At minimum, charge the
batteries until the light is yellow before
using the lift again. This will extend the life
of the batteries.

19
How to Use the V3
Fig. 8
NOTE: If the green indicator light does not
go on when you plug the charger into an
electrical outlet, see the “Troubleshooting”
section included in this manual.
CAUTION: Do not attempt to use a battery
not authorized by the manufacturer. The V3
and its charging system use specially
designed batteries may seriously damage
the lift or the charger.
CAUTION: The lift should not remain stored
for long periods of time without charging
the batteries.
Use of Slings
The two sling supports can accommodate any of the
BHM Medical loop attachment slings.
All slings are color coded for size by having a
different colored edge binding or attachment strap
coloring:
• Grey - Extra Extra Small - XXS
• White - Extra Small - XS
• Red - Small - S
• Yellow - Medium - M
• Green - Large - L
A range of special purpose slings are available as
accessories, for these or for special size slings,
contact your BHM Medical representative.
For more information on how to use use loop slings,
see the Loop Sling Instructions for Use that comes
with the sling.
20
How to Use the V3
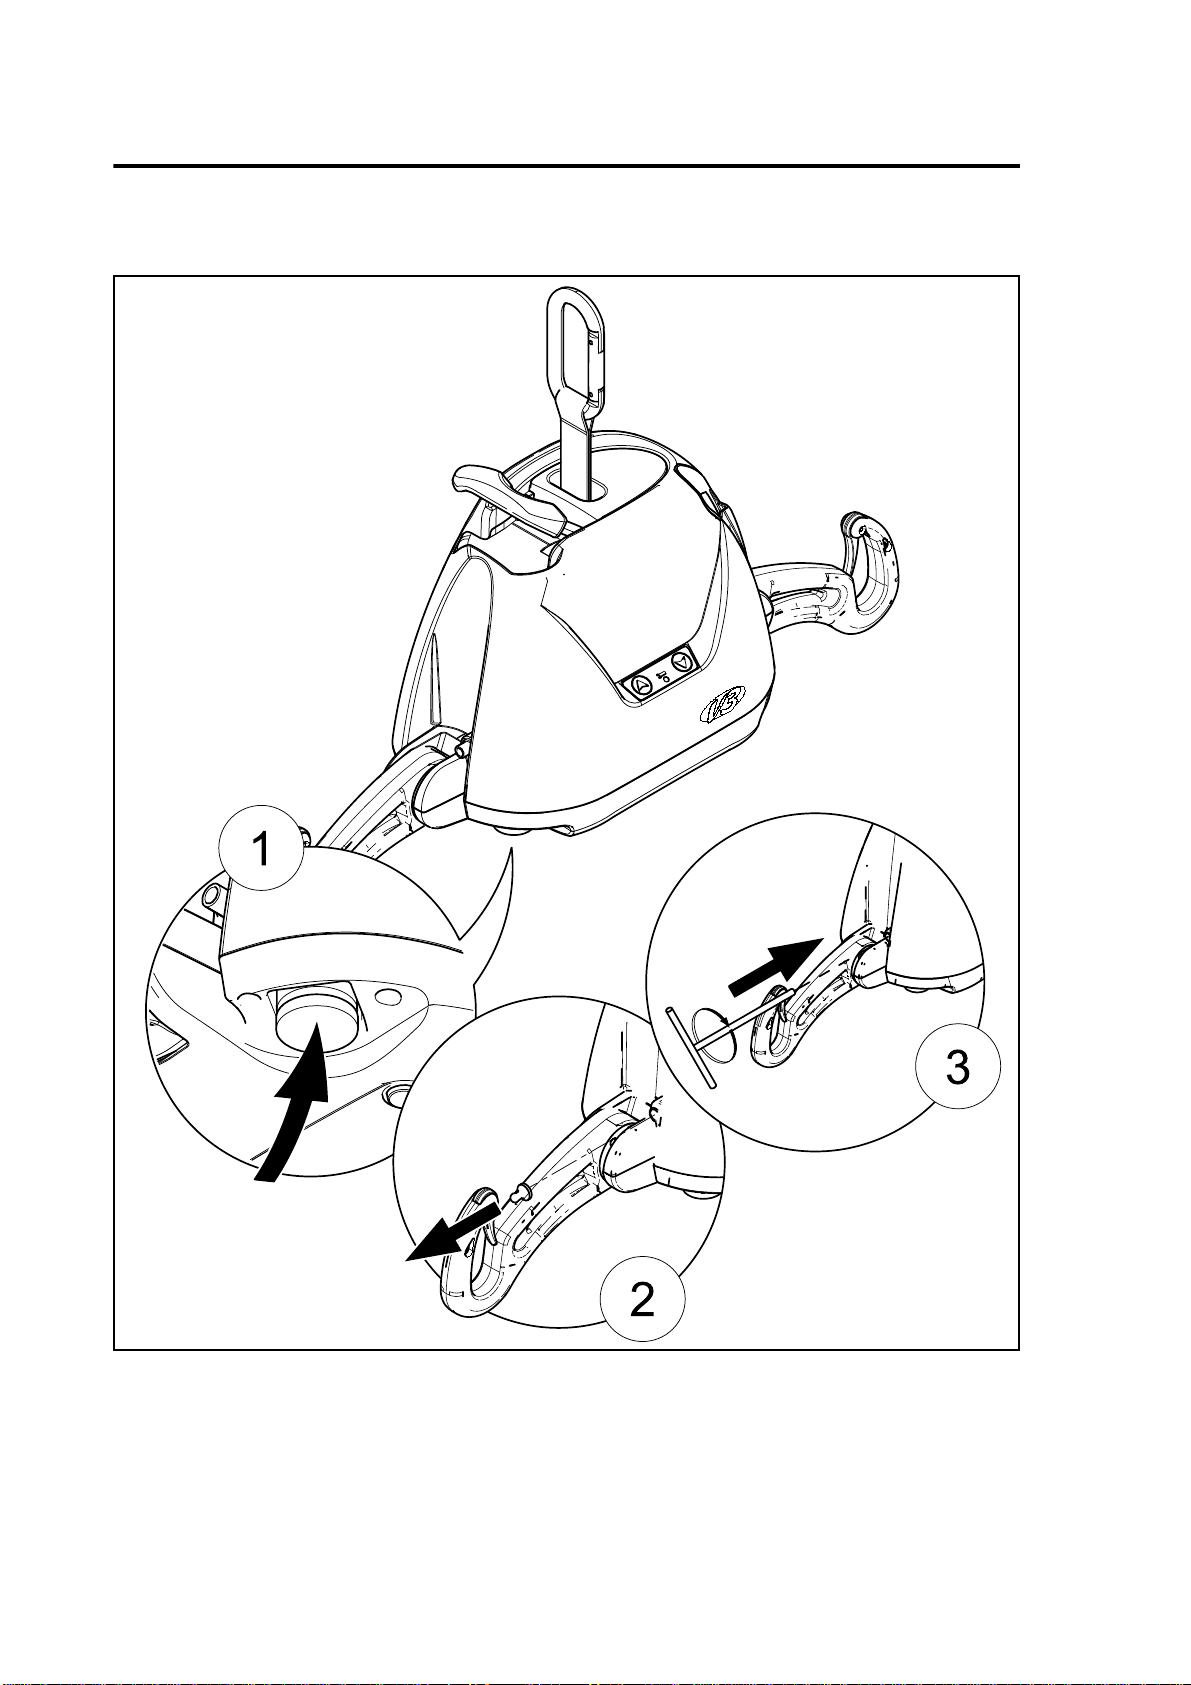
Pass-Through Hook
The “pass-through hook” feature is an ergonomic
handle serving to transport the lift and a practical
way to transfer a patient from one rail to the other
without removing the lift or the patient.
Before Transferring the Lift
An extension strap is required to perform the lift
transfer from one track to another. This strap must be
measured and adjusted to twice the distance between
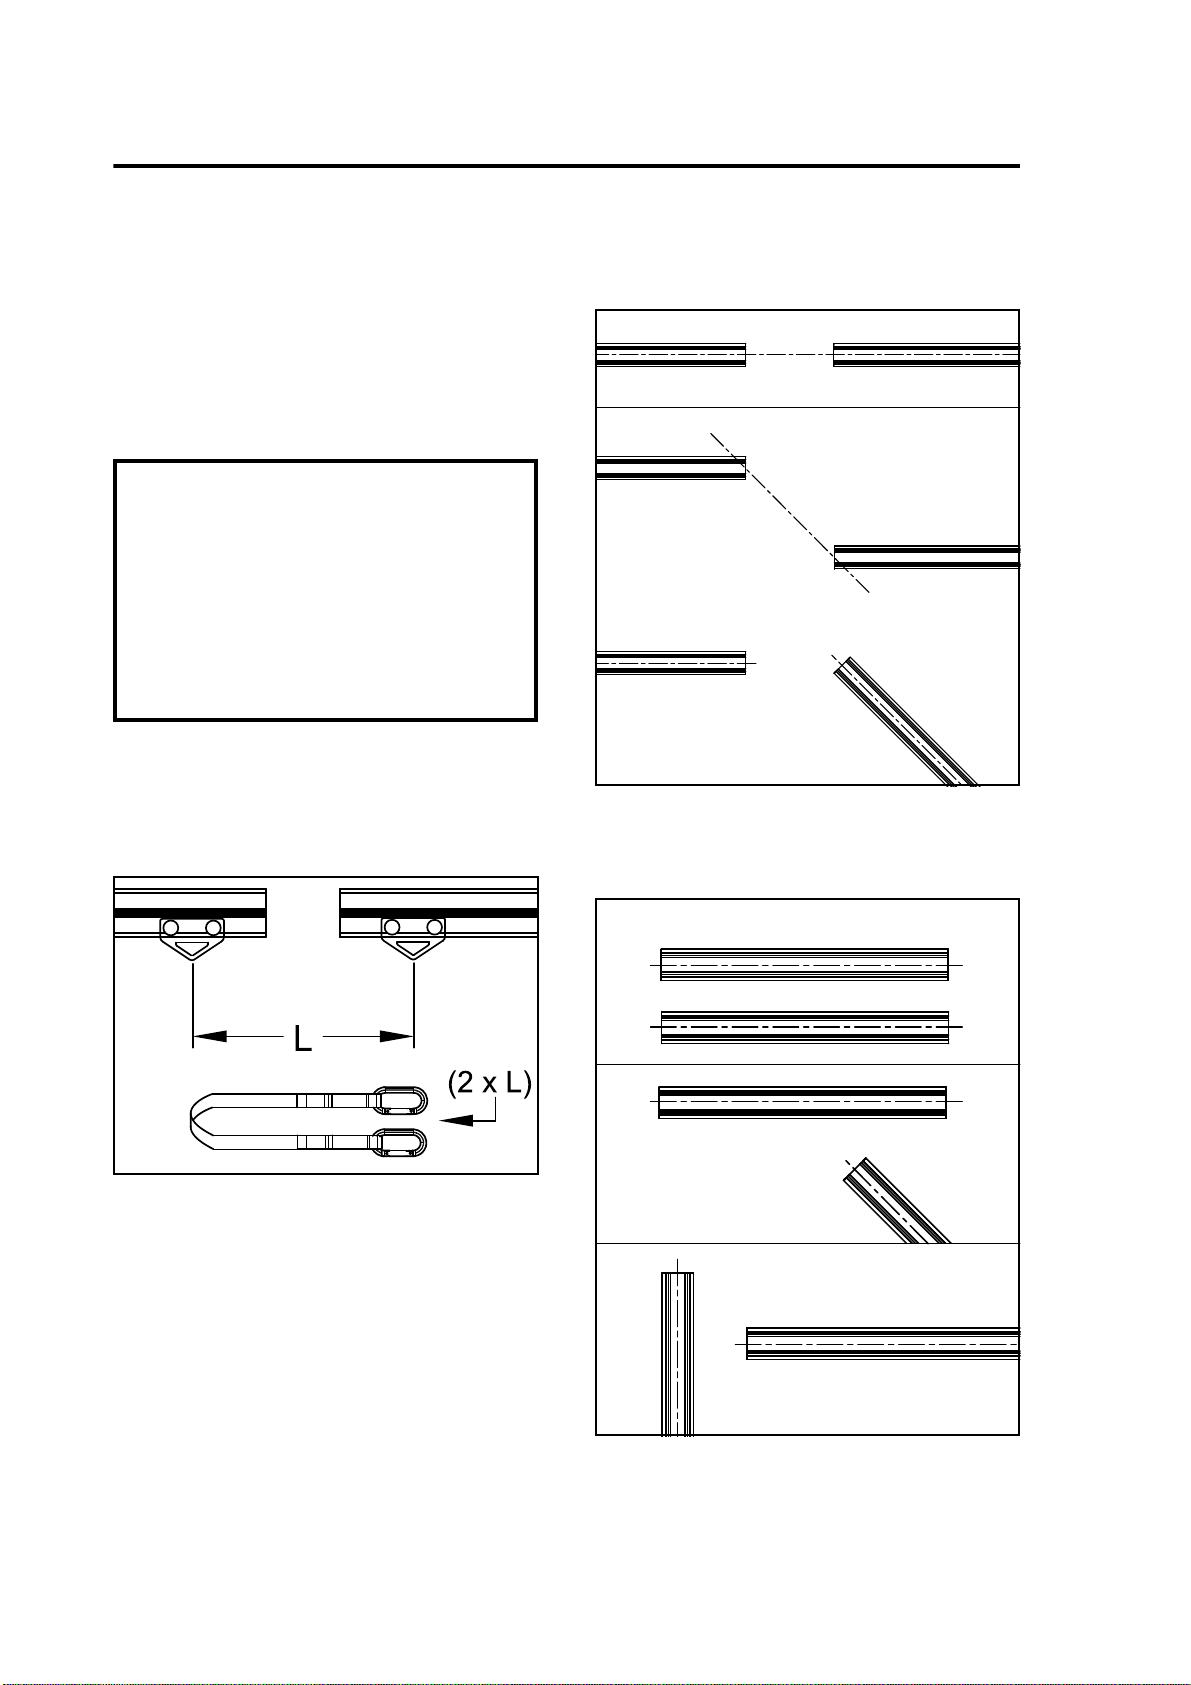
the two trolleys (L) involved in the transfer. See Fig.
9.
Fig. 9
Before attempting any transfer, make sure that the
configuration of the tracks is acceptable.
WARNING:
• The track must be installed by BHM
Medical qualified personnel and in
accordance with local codes.
• All tracks are closed with end stoppers or
are connected to other closed track
components.
• Before use, make sure all end stoppers
are in place and tightened.
Acceptable Track Configurations
Fig. 10
Unacceptable Track Configurations
Fig. 11
PARALLEL AND CENTERED
NON-PARALLEL WITH A 45° ANGLE
PARALLEL WITH A 45° ANGLE
PARALLEL
AT A 45° ANGLE
PERPENDICULAR
Table of contents
Other BHM Medical Lifting System manuals


Popular Lifting System manuals by other brands

Sealey
Sealey DH03.V2 instructions

Antano Group
Antano Group LG2020 Use and maintenance handbook

Haklift
Haklift LTABT08 Original instructions

Applied
Applied L-16 Series instruction & operation manual

Lippert Components
Lippert Components ground control 3.0 owner's manual

pewag
pewag levo hook LH Series Original operating manual


