BidetMate BM-1000R User manual

User’s Guide
BM-1000R 120V
60Hz
This unit should be installed according to this manual. Read this manual carefully and install properly.
Do not attempt to service this unit yourself. Doing so could void your warranty.
Safety Instructions
1Important Safetyguards
When using electrical products, especially when
children are present, basic safety precautions
should always be followed.
Read All Instructions
Before Using
• For 120V 60Hz: Power supply must be a 15
AMP GFCI outlet.
• The electrical cord must be connected to a
GFCI outlet.
• The GFCI outlet should be 1ft. above the floor.
• Install only in well-ventilated areas to avoid
excess humidity.
• Do not install in narrow toilet stalls or in shower
stalls.
• Install only where direct contact with water is
minimized.
• Do not install near any heat source.
• Avoid using extension cords if possible. Consult
with a certified electrician where extension
cords are necessary.
Danger!
Reduce the risk of electrocution:
• Do not use while bathing.
• Do not place or store product where it can fall
or be pulled into a tub or sink.
• Do not place in or drop into water or other
liquid.
• Do not reach for a product that has fallen into
water. Unplug immediately.
Warning!
To reduce the risk of burns,
electrocution, fire or injury to
persons:
• Close supervision is necessary when this
product is used by, on, or near children or
handicapped individuals.
• Use this product only for its intended use as
described in this manual. Do not use
attachments not recommended by the
manufacturer.
• Never operate this product if it has a damaged
cord or plug, if it is not working properly, has
been dropped or damaged, or dipped into
water. Return the product to a service center for
examination and repair.
• Keep the cord away from heated surfaces.
• Never drop or insert any object into any
opening or hose.
• Do not use outdoors or operate where aerosol
(spray) products are being used or where
oxygen is being administered.
• Connect this product to a properly grounded
outlet only. See grounding instructions.
• Unplug this product before filling. Fill (reservoir)
with water only.
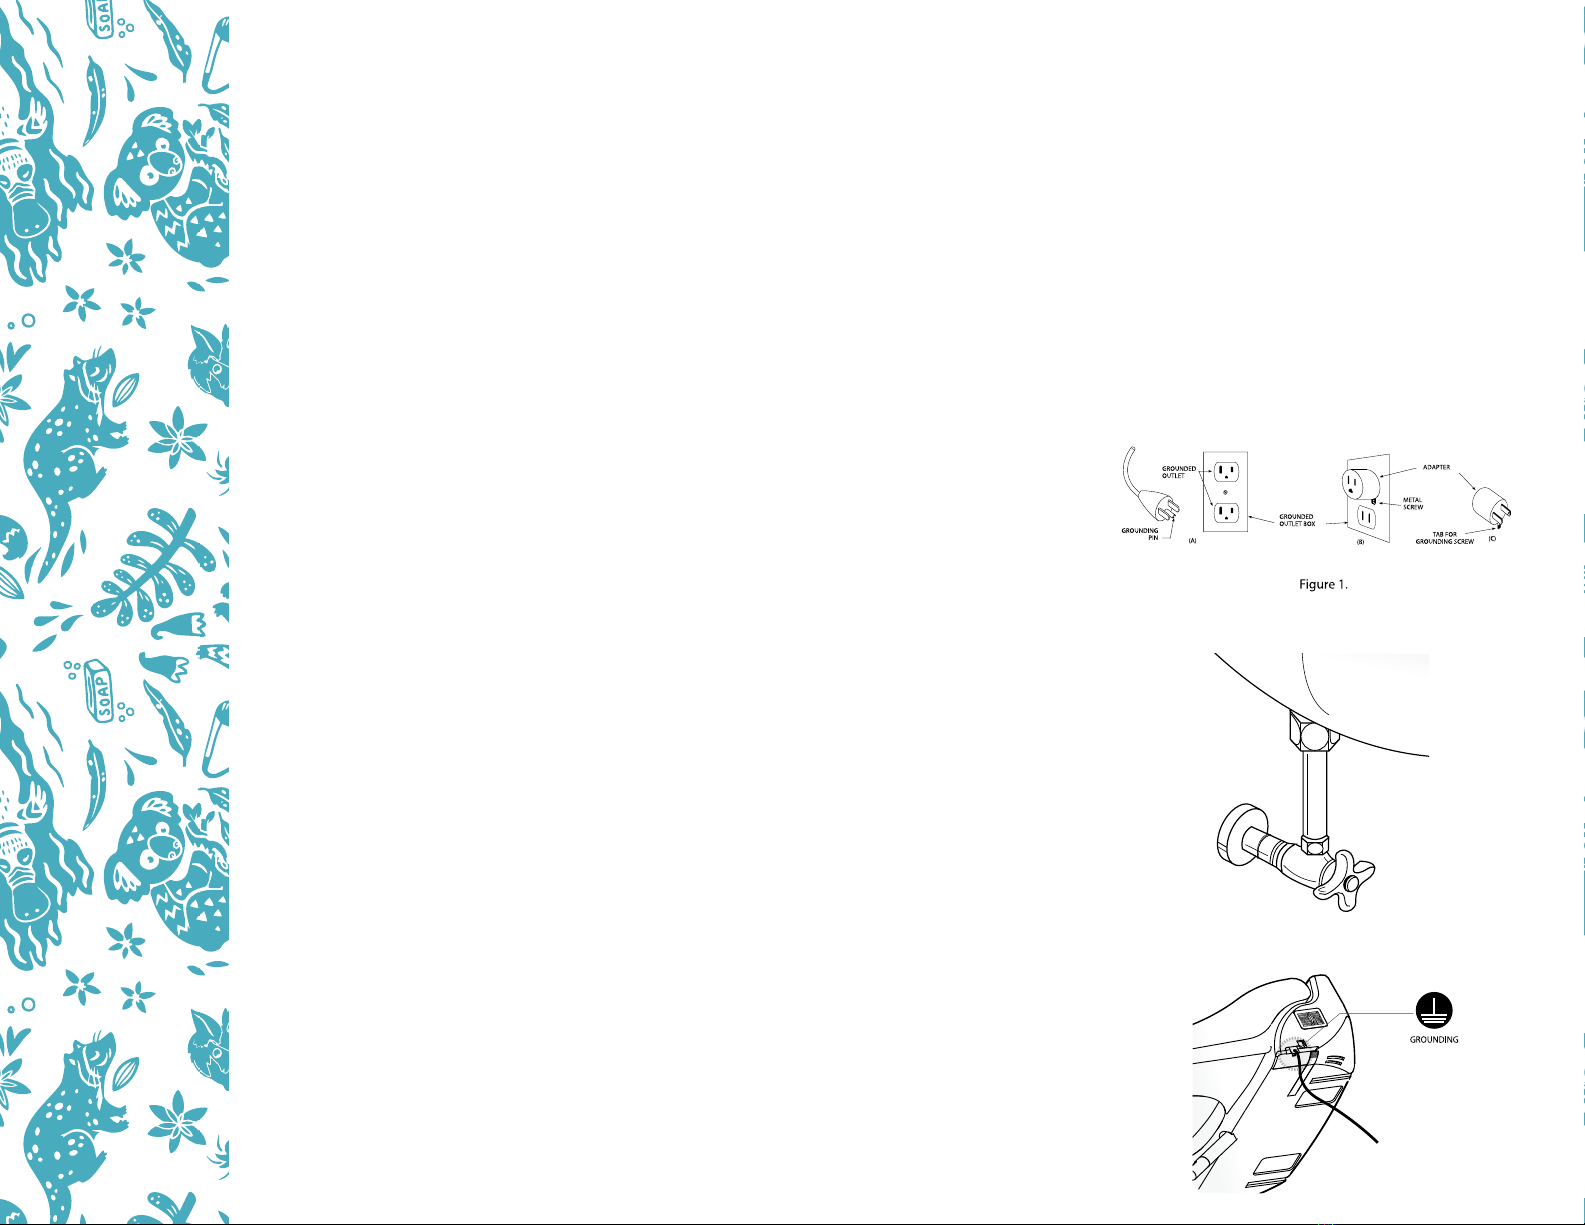
Grounding Instruction
Danger- Improper use of the
grounding plug can result in a risk
of electric shock.
This product has a three-prong grounding plug,
which must be plugged into an outlet that is
properly installed and grounded. In the event of
an electrical short circuit, grounding reduces the
risk of electric shock by providing an escape wire
for the electric current. If repair or replacement of
the cord or plug is necessary do not connect the
grounding wire to either flat blade terminal.
The wire with insulation having an outer surface
that is green or with or without yellow stripes is
the grounding wire. Check with a qualified
electrician or service person if the grounding
instructions are not completely understood, or if
in doubt, as to whether the product is properly
grounded.
This product is for use on a nominal 120V circuit,
and has a grounding plug that looks like the plug
illustrated in sketch A in Figure 1.
A temporary adapter, which looks like the adapter
illustrated in sketches B and C, may be used to
connect this plug to a 2-pole receptacle as shown
in sketch B if a properly grounded outlet is not
available.
The temporary adapter should be used only until a
properly grounded outlet (sketch A) can be
installed by a qualified electrician. The green
colored rigid ear, lug, or the like extending from
the adapter must be connected to a permanent
ground such as a properly grounded outlet box
cover. Whenever the adapter is used, it must be
held in place by the screw.
Optional Grounding Instructions
Parts & Configuration
2Main Body
Accessories
Operation Panel
Power Plug
Top Mount
Metal Bolt
Bracket
Holder
Catch PlateWater Supply HoseTop Mount
Rubber Nut
Washer T-Valve
Cover
Dryer
Seat Sensor
Wash & Power Wash
Bidet
Heated Seat
Bidet
To run the bidet
function (1 minute)
Power Ctrl
Control water pressure
or dryer temperature
Child
Children safety and
automatic mode
Seat Temp
To control seat
temperature
(off/low/mid/high)
Water Temp
To control water
temperature
(off/low/mid/high)
Energy Saving
1: Automatic Mode
2: Powerful Mode
3: Cancellation
Nozzle Cleaning
Select nozzle cleaning
while not seated, the
nozzle cleans itself 3
times. Then nozzle
extends and stops for
manual cleaning process
Power Wash
To run the Power
Wash function
(1 minute)
Position Ctrl
To control the
nozzle position
Pulse
To run the pulse
function during
wash/ bidet/ Power
Wash operation
Wash
To run the wash
function (1 minute)
Stop
To stop any
operations
Operation Panel
Dry
To run the dry
function (3 minutes)

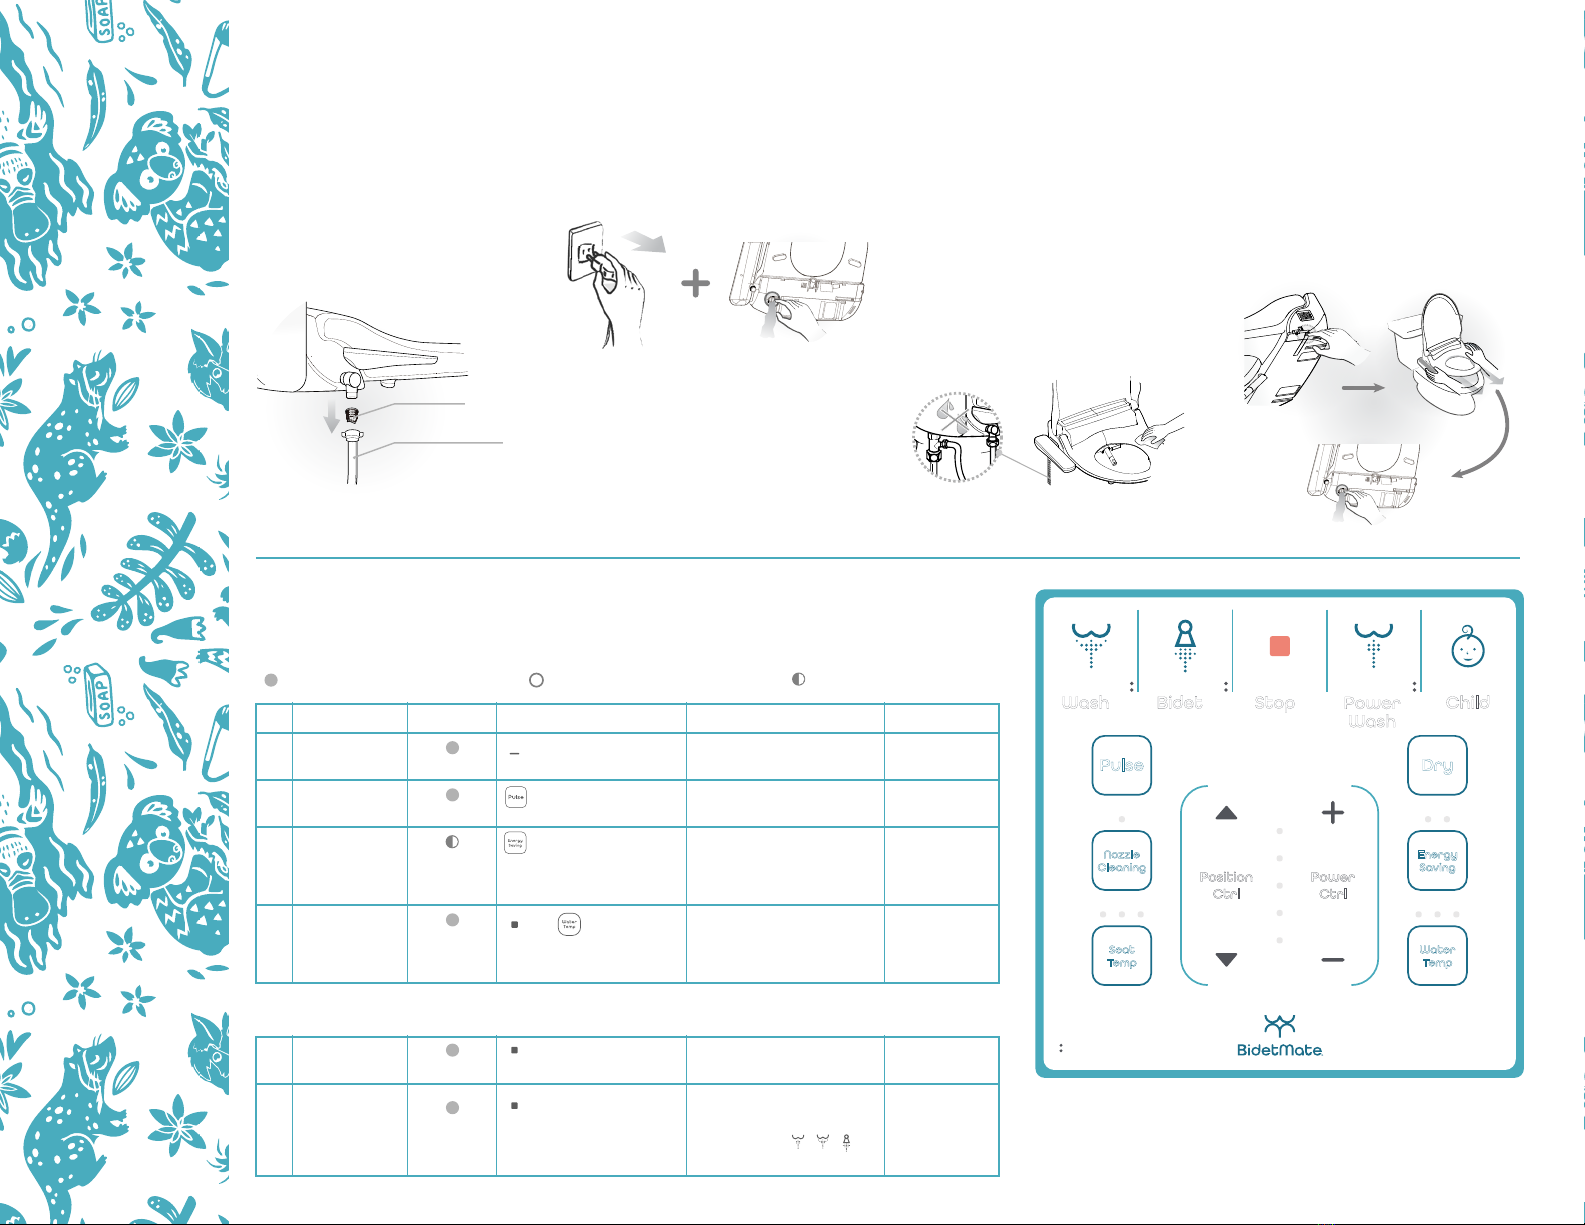
Installation & Trial Operation
How to Use
31. Remove the seat from
existing toilet body.
Release the nuts, and then remove
the seat and cover from it. Keep the
removed seat, cover and nuts in a
proper place in case you need to use
them again. Turn off the water.
Nozzle position is adjustable. (5 levels)
2. Remove the water hose
and then install T-valve.
Install T-valve
Water supply hose.
It’s okay to use
Teflon tape or similar
sealing compounds
for a better seal.
Top mount metal bolt
Washer
Bracket Holder
Catch Plate
Top Mount Rubber Nut
Align
3. Fix the bracket onto the
toilet first.
Adjust the seat and the front part of
toilet back and forth so that they
correspond before fastening the nuts.
4. Push the main body
toward the bracket
completely.
Push it back until you hear a click.
When the product is not installed
well, the seat may come apart.
5. After installing the
T-valve, connect the
bidet. Connect the hose
to the bidet body and
turn on the water.
T-valve
Bidet Water
Supply hose
Seat sensor
6. Turn on the water and
check for leaks.
7. Be sure that the nozzle
comes out and retracts
when powered on.
Don’t plug the power cord in with wet
hands. Risk of electric shock.
7. Remove the adhesive
protection to attach the
remote control bracket
to the wall or other
surface.
Clean the area thoroughly before
attaching the bracket.
8. Insert two “AA” type
batteries (included) as
indicated inside battery
compartment.
Identify a location in the bathroom for
the remote control that is visible and
reachable from the toilet.
1. Sit on the toilet seat
Be sure to sit on the seat sensor. If the
sensor is not occupied, all functions
will not operate.
2. Wash, Bidet, Power Wash
Selected function can be used as
described. When pressing the
selected function again, nozzle will
move back and forth to wash a
wider range. Press the button
once again to stop Massage
function. Specialized water spray
when in the Power Wash mode
helps relieve constipation and
fecal stasis.
3. Dry temperature control
Dryer operates for 3 minutes. Dryer
temperature is adjustable by pressing
power ctrl buttons. (5 levels)
4. Pulse
When pressing the Pulse button
during the operation of Wash,
Bidet, and Power wash, water
pressure will repeat high and low
for smooth pulsating wash. Pulse
function will not operate during
the operation of Sitz bath.
*See how to use section 5-13 for
Sitz bath.
5. Nozzle position control

How to Use Continued
4Water pressure is adjustable. (5 levels)
If the water or screen filters become
blocked, it may cause low water
pressure. Regularly check the screen
filter.
6. Water pressure control
All operations will stop. When
pressing the Stop button for 3
sec., the unit will be in sleep
mode. Press Stop, Wash, Bidet or
Power Wash to turn on. When
pressing the Stop button for 5
sec. consecutively, the unit will
be turned off and on automati-
cally and initialized. All presets
will be deleted.
7. Stop
When Selecting Child function,
settings* will be adjusted for children.
1 min Bidet - 30 sec Bidet oscillating -
30 sec Bidet Pulse - 2 min Dry work
consecutively.
8. Child Function 9. Seat/Water
Temperature Control
Seat/Water temperature is
adjustable. (4 levels) (Off - Low -
Middle - High)
To reduce the chance of low
temperature burns, the seat has a
seat heater auto adjustment
function which turns to low
temperature (35 C, 95 F) when
seat is occupied for more than 15
minutes consecutively. If the seat
is set lower than middle level, the
seat remain at off or low level.
10. Energy Saving
Function
Automatic energy saving mode:
This mode will be activated by
pressing the Energy Saving button
until yellow LED lamp lights on. (Seat
and water temperature will be kept at
32° C)
Powerful energy saving mode:
This mode will be activated by
pressing the Energy Saving button
until green LED lamp lights on. (Seat
and water heater will be kept off)
Release of energy saving mode:
Press the Energy Saving button until
LED lamp turns off.
When the unit is occupied, it adjusts
to the preset temperature and it
returns to the saving mode when seat
is unoccupied.
If the seat and water temperature are
off, they will remain off.
11. Nozzle Cleaning
When selecting Nozzle Cleaning while
not seated, the nozzle cleans itself 3
times. Then nozzle extends and stops
for the manual cleaning process.
Clean the nozzle with a brush and
press STOP button after completion
of manual cleaning. Then nozzle
cleans itself 3 times and retracts.
Nozzle Cleaning will not operate if the
seat sensor is activated.
12. Automatic tank draining
To protect water contamination,
the water tank will be drained
(replaced) for 2 minutes if the
seat is not used for 48
consecutive hours.
This feature is deactivated from
the factory. To activate this
feature, press Stop and Water
Temp buttons for 3 sec.
13. Sitz Bath
Wash or Bidet is switched to Wash
Sitz Bath or Bidet Sitz Bath if Nozzle
Cleaning button is selected during
Wash or Bidet operation.
Water Pressure is switched to 1st level
regardless of preset water pressure
setting and Sitz Bath operates for 5
minutes.
LED of Nozzle Cleaning turns on
during the operation of Sitz Bath.
Select the Nozzle Cleaning again to
switch to normal Wash or Bidet.
14. Seat Sensor Release
The seat sensor can be activated
and deactivated by pressing the
Pulse button for 3 sec.
If the seat sensor is deactivated,
the unit works without
occupying the seat and
features* cannot be controlled.
*Features
Silent mode, Nozzle cleaning.
Press for more than 3 sec.
The unit will be in sleep
mode
Press any of
and turn on
Maintenance & Cleaning
Settings
5Screen Filter Cleaning Maintenance during Winter Season Cleaning the Unit Body
1. Exterior surface of unit is made of plastic,
which may be damaged by abrasive scrubbers,
chemicals, etc.
2. Wipe the surface with a soft damp cloth. Do
not spray water directly onto the surface.
3. Clean the body after removing the power plug
from the outlet. Be sure no water splashes into
the power plug or outlet.
4. Be careful to not drop any chemical
detergents or toilet cleaner on the water supply
hose. Risk of hose damage.
1. Close the water valve.
2. Disconnect the water supply hose. Take the
screen filter out and clean it with a soft brush.
3. Return the filter after cleaning and reconnect
the water supply hose.
4. Open the water valve.
* The unit will work without sitting on the seat if the occupied seat sensor is
deactivated. (Turned off)
* If the seat sensor is deactivated, some features cannot be controlled. (Silent mode
on/off and nozzle cleaning)
*Above features are deactivated with 1 buzzer sound and activated with 2 buzzer
sounds.
1. Remove the power plug from the outlet.
2. Close the water feed valve.
3. Press the lever plate and gently pull to remove
the unit from the catch plate.
4. Use a coin to open the drain plug.
When bidet seat is not used for an extended
period of time, unplug and drain the unit.
Draining of Remaining Water
Screen Filter
Water Supply Hose
Seat sensor ‘off’ status Seat sensor ‘on’ status Regardless of on/off
No. Function Seat Status Switch Operation Description Initial Status
1 Silent Mode for longer than 3
sec. To turn on/off the
operating chime sound ON
OFF
2
Factory
default setting for longer than 5
sec. All settings will be
initialized
4
Seat Sensor
Release for longer than 3
sec. Seat sensor feature will
be deactivated
ON
Auto Start
Deodorizing for longer than 3
sec. Automatic deodorizing
start feature will be
deactivated
3
Sleep Mode for longer than 3
sec.
OFF
OFF
5
Automatic
Tank Draining
for longer than 3 sec.
+Automatic tank
draining feature will be
activated
7-1. User setting with remote control
7-2. User setting with remote control
StopWash Bidet
Pulse
Seat
Temp
Nozzle
Cleaning
Child
Dry
Water
Temp
Energy
Saving
Power
Ctrl
Position
Ctrl
Power
Wash
BM-1000R
Auto
Deodorizer
Oscillating Spray

* The remote should be located near by the main unit when ID is
set.
* Default ID of remote is “0”.
* In case of battery replacement, power resetting of main unit or
factory initialization, ID will be initialized, “0”, and setting process
should be done again.
Troubleshooting
6
Problem
Check List
Completely out of order • Check if the power plug is not connected
• Check for outlet failure
Water does not spray out • Check if the water supply is turned on
• Check if the water valve is locked
• Check if nozzle is blocked by foreign material
• Check if connection hose is bent
Water pressure is low • Check if screen filter is blocked by foreign material
• Check if the water pressure is set at too low of a level
Seat is not warm enough • Check if its temperature is set at off, a low level, or
economy mode
Water is not warm enough • Check if its temperature is set at off, a low level, or
economy mode
Water tank is drained intermittently • Check if the automatic water draining feature activates
Please check the following points before requesting the repair service.
7-3. Remote ID setting
ID setting is required to protect remote signal interruption if more
than one bidet seats are installed at one place (public toilets).
1. Press Nozzle Control for 3 sec. The indicator of “Nozzle
Cleaning” blinks and the unit is ready for ID setting.
2. Set the ID by pressing Power Control or (1~5 IDs available)
3. Press “Stop” to save the ID. The main unit will be synchronized
simultaneously.
Settings
Stop button to save ID
Set ID (1~5)
Blinking
Press for
3 sec.
Item
Wash
Heated
Seat
Dimension
Weight/Net Weight, (Gross Weight)
Dry
Feed
Volume
BM-1000R
Rated Voltage AC 120V, 60Hz
Max. Power Consumption 870W
Power Cord Length 1.2m
Water Feed Method Directly connected to water pipe
Recommended Water Inlet Pressure 99~106.6 psi
0.13~0.21 gal/min
Wash
0.13~0.18 gal/min
Bidet
0.13~0.18 gal/min
Power Wash
0.13~0.16 gal/min
Child
5 Levels
Pressure Control
4 Levels (Off, Low, Middle, High)
Temperature Control
800 W
Heater Capacity
Water Level Sensor, Thermal Fuse, Bi-Metal, Temperature Sensor
Safety Device
4 Levels (Off, Low, Middle, High)
Temperature Control
55W
Heater Capacity
Thermal Fuse
Safety Device
Room temp. ~122°F
Temperature Control
15.9” (406) x 20.8” (528) x 5.7” (145)
10.8lb (15.7)
250W
Heater Capacity
Thermal Fuse, Bi-metal
Safety Device
37 ~ 95°F (recommended 54 ~ 95°F)
Feed Water Temp. Tolerance Range
37 ~ 104°F (recommended 50 ~ 95°F)
Usage room temp. tolerance range
Features
7
Features
BM-1000R
Wash / Dry Features
Safety
Features Convenient / Comfortable Features
Comparison Chart Specifications
Dimensions
Wash
Bidet
Power Wash
Child
Oscillating / Pulsating
Continuous Heated Water
Heated Seat
Soft Closing
One Touch Release
Nozzle Cleaning
Seat Sensor Overriding
Low Burn Protection
Normal/Powerful
Energy Saving
Dry
Cord is
42” Long

1 Year Warranty
8BidetMate warrants its BM-1000R Series Bidet to
be free from defects in materials and
workmanship during normal use when properly
installed and serviced for a period of 1 year from
the date of purchase. This limited warranty is
extended only to the ORIGINAL PURCHASER of
the smart toilet seat and is not transferable to any
third party. This includes, but is not limited to, any
subsequent purchaser or owner of the smart toilet
seat.
BidetMate’s obligations under this warranty are
limited to repair, replacement, or any other
appropriate adjustment, at BidetMate’s option, of
the smart toilet seat or parts found to be
defective in normal use, provided that such
products are properly installed, used and serviced
in accordance with instructions.
BidetMate reserves the right to make such
inspections as may be necessary in order to
determine the cause of the defect. BidetMate will
not charge for labor or parts in connection with
warranty repairs or replacements. BidetMate is
not responsible for the cost of removal, return
and/or reinstallation of the smart toilet seat.
This warranty does not apply to any of the
following items:
• Damage or loss sustained in a natural calamity
such as fire, earthquake, flood, thunder, electrical
storm, etc.
• Damage or loss resulting from any accident,
unreasonable use, misuse, abuse, negligence, or
improper care, cleaning, or maintenance of the
smart toilet seat.
• Damage or loss resulting from sediments or
foreign matter contained in a water system.
• Damage or loss resulting from improper
installation or from installation of the smart toilet
seat in a harsh and/or hazardous environment, or
improper removal, repair or modification of the
smart toilet seat. This includes locations where
the water pressure is above local codes or
standards.
• Damage or loss resulting from electrical surges
or lightning strikes or other acts which are not the
fault of BidetMate or which the smart toilet seat is
not designed to tolerate.
• Damage or loss resulting from normal and
customary wear and tear, such as gloss reduction,
scratching or fading over time due to use,
cleaning practices, water, or atmospheric
conditions.
In order for this limited lifetime warranty to be
valid, proof of purchase is required. If the product
is used commercially, BidetMate warrants the
product to be free from defects in materials and
workmanship during normal use for 3 Months
from the purchase date of the product. All other
terms of this warranty shall be applicable except
the duration of the warranty.
BidetMate will advise you on how to proceed in
making warranty claims. To begin a warranty
claim, write to BidetMate explaining the defect
and include proof of purchase and your name,
address and telephone number. Email is
19215 SE 34th St., Ste. #106-382 Camas, WA 98607 USA www.BidetMate.com

Table of Contents
1 Safety Instructions
2 Parts & Configuration
3 Installation & Trial Operation
3 How to Use
5 Maintenance & Cleaning
5 Settings
6 Troubleshooting
7 Features
8 Warranty
Table of contents
Other BidetMate Toilet manuals


Popular Toilet manuals by other brands


American Standard
American Standard CONCEPT Cube TF-2704 installation manual

BIOLAN
BIOLAN ECO Instructions for installation, use and maintenance

Thetford
Thetford C260 Series user manual

KELISS
KELISS T162A Series instruction manual

Silent Venus
Silent Venus SVP600 Installation & maintenance

Kohler
Kohler K-22241K Installation and care guide