BidetMate BM-6000 User manual
BM-6000
Owners Manual
Thank you for purchasing our product. Please read this manual before installatino and use
to ensure that your product will function at pea performance. Read this manual thoroughly
and store in safe place for all future references.

IMPORTANT SAFEGUARDS
When using electrical products, especially when children are present, basic safety
precautions shouldalways be followed, including the following:
READ ALL INSTRUCTIONS BEFORE USING
WARNING– To reduce the risk of burns, electrocution, fire, or injury to persons.
1. Close supervision is necessary when this product is used by, on, or near children or i
nvalids.
2. Use this product only for its intended use as described in this manual. Do not use
attachments not recommended by the manufacturer.
3. Never operate this product if it has a damaged cord or plug, if it is not working properly,
if it has been dropped or damaged, or dropped into water. Return the product to a service
center for examination and repair.
4. Keep the cord away from heated surfaces.
5. Never block the air openings of the product or place it on a soft surface, such as a bed
or couch, where the air openings may be blocked. Keep the air openings free of lint, hair,
and the like.
6. Never use while sleeping or drowsy.
7. Never drop or insert any object into any opening or hose.
8. Do not use outdoors or operate where aerosol (spray) products are being used or
where oxygen is being administered.
10. Connect this product to a properly grounded outlet only. See Grounding Instructions.
SAVE THESE INSTRUCTIONS
GROUNDING INSTRUCTIONS
This product should be grounded. In the event of an electrical short circuit, grounding
reduces the risk of electric shock by providing an escape wire for the electric current. This
product is equipped with a cord having a grounding wire with a grounding plug. The plug
must be plugged into an outlet that is properly installed and grounded.
DANGER– Improper use of the grounding plug can result in a risk of electric shock.
If repair or replacement of the cord or plug is necessary, do not connect the grounding
wire to either flat blade terminal. The wire with insulation having an outer surface that is
green with or without yellow stripes is the grounding wire.
Check with a qualified electrician or serviceman if the grounding instructions are not
completely understood, or if in doubt as to whether the product is properly grounded.
This product is factory equipped with a specific electric cord and plug to permit connection
to a proper electric circuit. Make sure that the product is connected to an outlet having the
same configuration as the plug. No adapter should be used with this product. Do not
modify the plug provided — if it will not fit the outlet, have the proper outlet installed by a
qualified electrician. If the product must be reconnected for use on a different type of
electric circuit, the reconnection should be made by qualified service personnel.
If it is necessary to use an extension cord, use only a three wire extension cord that has a
three-blade grounding plug, and a three-slot receptacle that will accept the plug on the
product.Replace or repair a damaged cord.
BidetMate.com Info@BidetMate.com

Wind Temp Regulation
Seat Temp Regulation
Damping Slow Descent
Automatic deodorization
Strong Dry
Seat Heating
Nozzle self-cleaning
Removable Spout
Cold/Hot Massage
Cleaning Back and Forth
Auto-cleaning
Bubble Cleaning
Female Cleaning
Hip Cleaning
No Limited Cleaning
Eight Safe Keeping
Remote control
Spout Position Regulation
Water Temp Regulation
Warm Dry
Nano-antibiotic
Prevent Cross-flow
UV Sterilizer
Air Isolation
Filter Steel Mesh
Remote turn
Remote flip
Foot touch circle
Speed Microwave
Feet flush
Dry flush
Automatic flushing
Remote flush
Night Light
Frequency Instant Heating
Foot flip
Automatic flip
Memory Mode
Water Pressure Regulation
Flame and Heat Resistance
Seat Ring Induction
Part no.
Functions BM-6000
Remote
Cleaning
Comfort
Convenience
Safety
Self-cleaning glaze
Nozzle cleaning
BidetMate.com Info@BidetMate.com
The functions may vary from different part no.
1
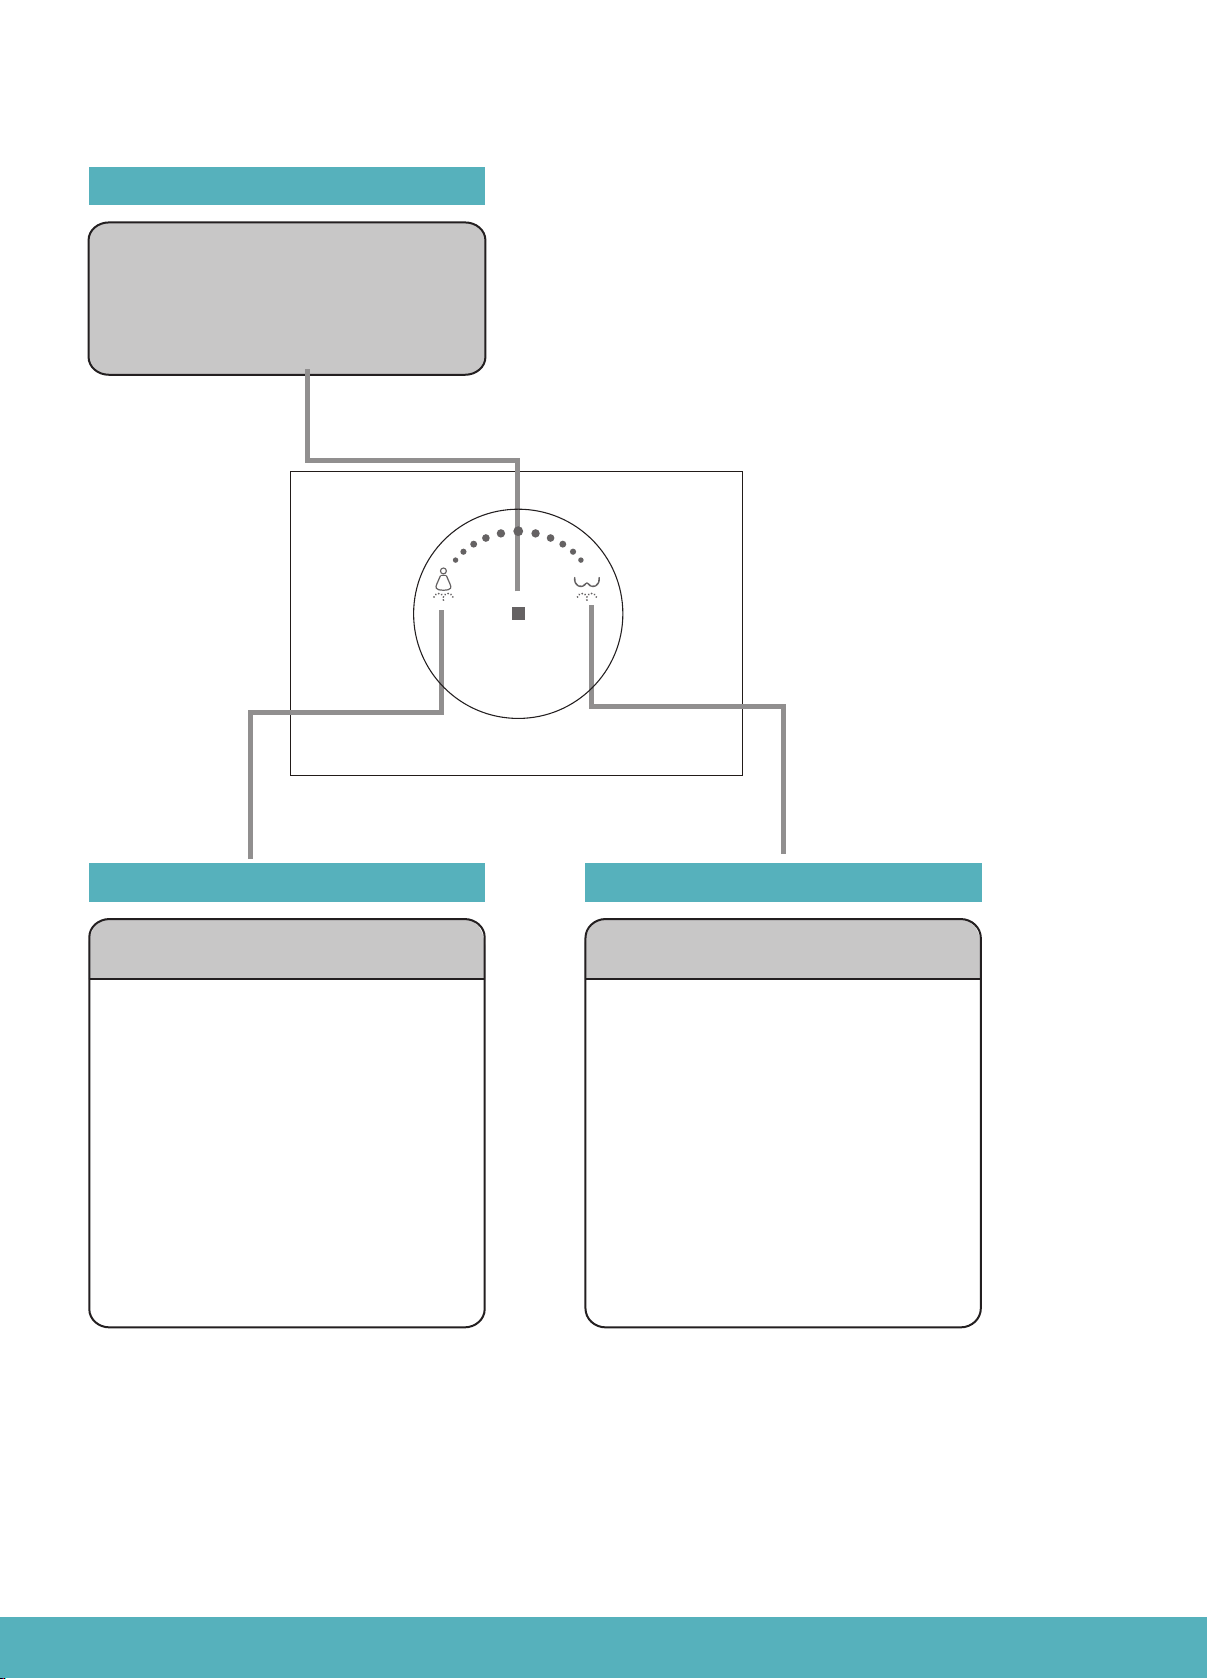
Rotated Switch
Functions
Table of Contents
Parts Information
Warnings & Safety
Remote
Installation
Before you Install
Installing Your Product
Function Explanations
Troubleshooting
Specifications
Maintenance
1
2
3
4
5
9
10
11
15
18
19
21
BidetMate.com Info@BidetMate.com
2

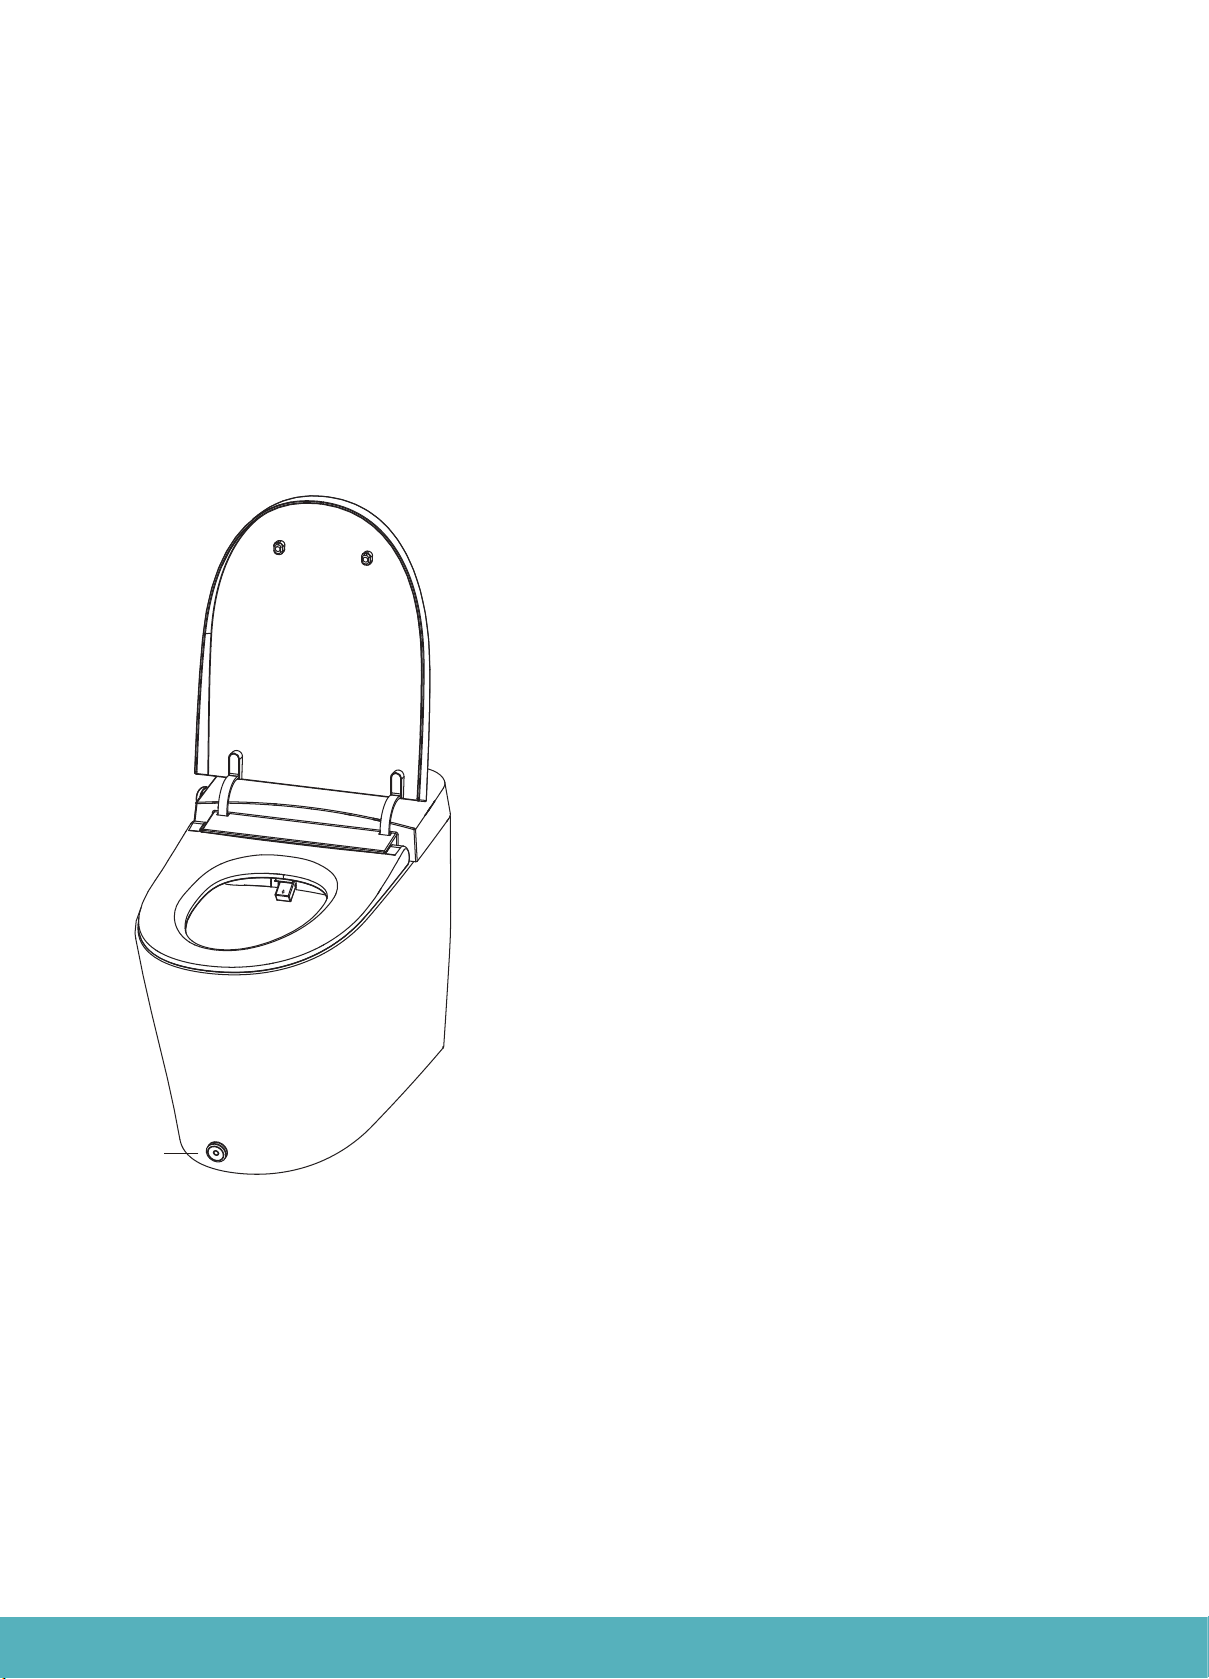
T-valve
Water valve
Hose
Power plug
Rotated Switch
Caution Label
Lid
Warm Dryer
Cleaner
(Rear & Front wash)
The heating seat
Toilet
Kick control
Rotated Switch
Rotated
forward
Rotated
backward
BidetMate.com Info@BidetMate.com
OVERVIEW
Overview Sideview Remote Control
PARTS INFORMATION
3

Nozzle Backward Water Pressure Air Temp Water Temp Seat Temp
Night Light
FrontStop FlushDryerRear
Open / Close cover Open / Close seat
Nozzle position
can be adjusted
in 5 positions
Adjust the wash
intensity of rear
wash and front wash
Adjustable warm
air temperature
Adjustable water
temperature
Adjustable seat
temperature
Water Pressure Nozzle Forward Nozzle Clean H/C Massage
Adjust the wash
intensity of rear
wash and front wash
Nozzle position
can be adjusted
in 5 positions
For manual
nozzle cleaning
Alternate cleaning
with hot and cold
water temperature
Night light lighting
on or off
Feminine WashStop Front Wash
or Rear Wash
Flushing after
toilet
Drying the cleaning
area with warm air
For hip cleaning
Open/close seat cover Open/close seat ring
Stop Front Rear Dryer Flush
H/C
Massage
Nozzle
clean
Nozzle
forward
Water
pressure
Water
pressure
Nozzle
backward
Air
temp
Water
temp
Night
light
Seat
temp
Remote Control Pair Code:
Pull the plug off→Press the stop
button until the gear lights flicker
→Pull the plug in when the remote
controller near the product→The
gear lights stop flicking and keep
lighting→Successful.
Open/Close
cover Open/Close
seat
BidetMate.com Info@BidetMate.com
REMOTE
4
BidetMate.com Info@BidetMate.com
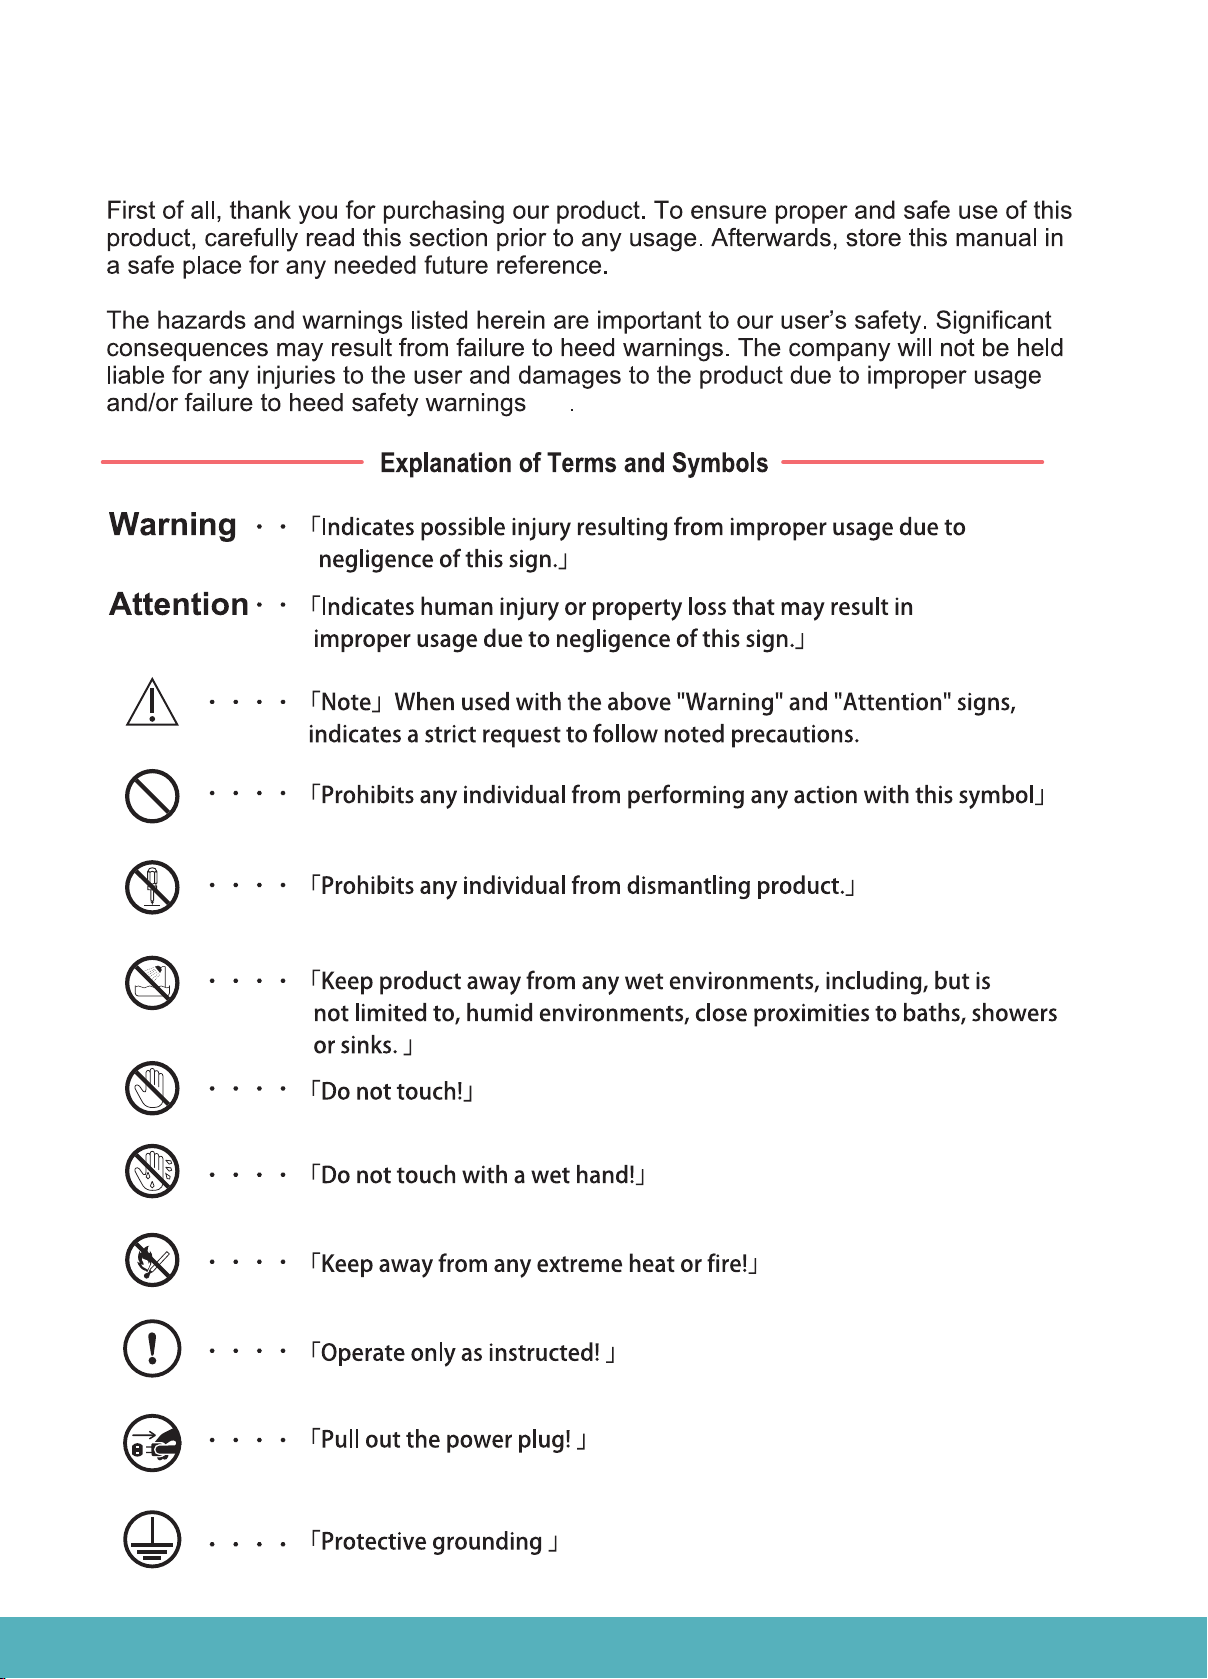
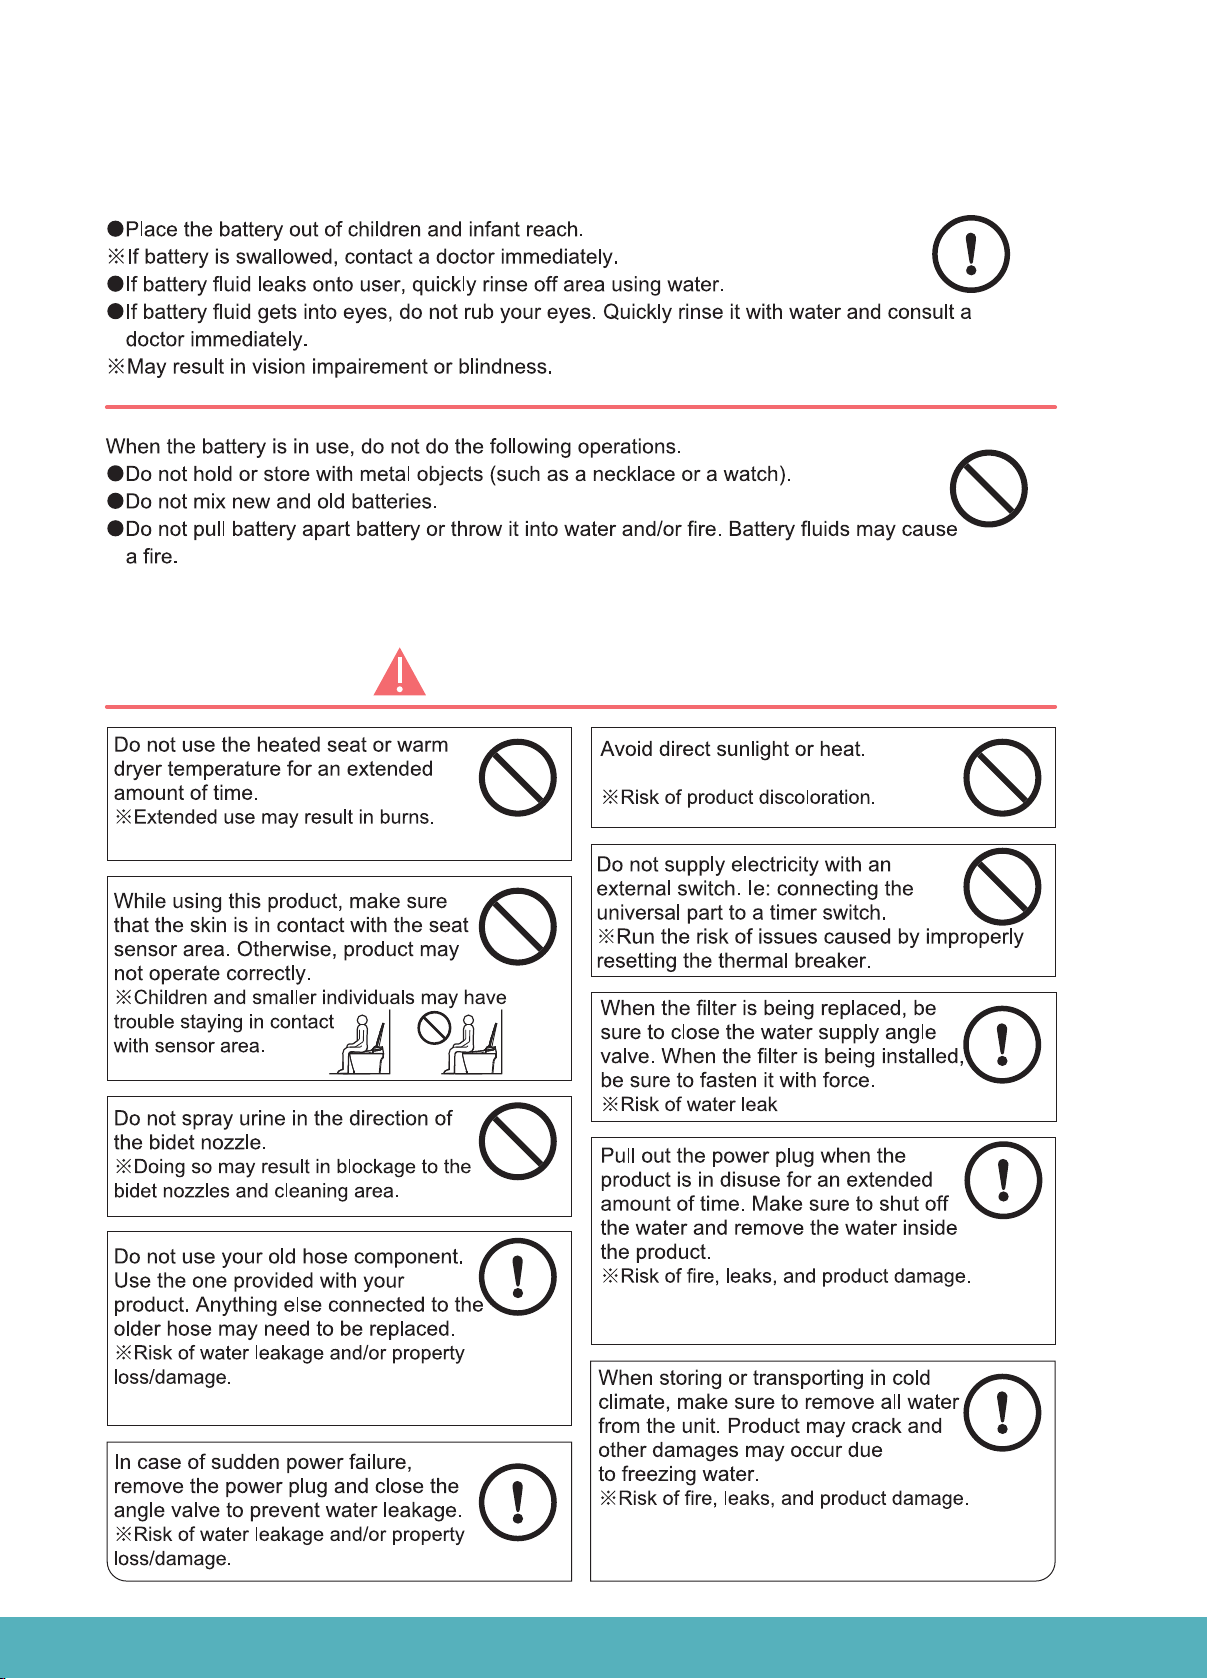
Please Read Thoroughly
WARNINGS AND SAFETY
5
BidetMate.com Info@BidetMate.com
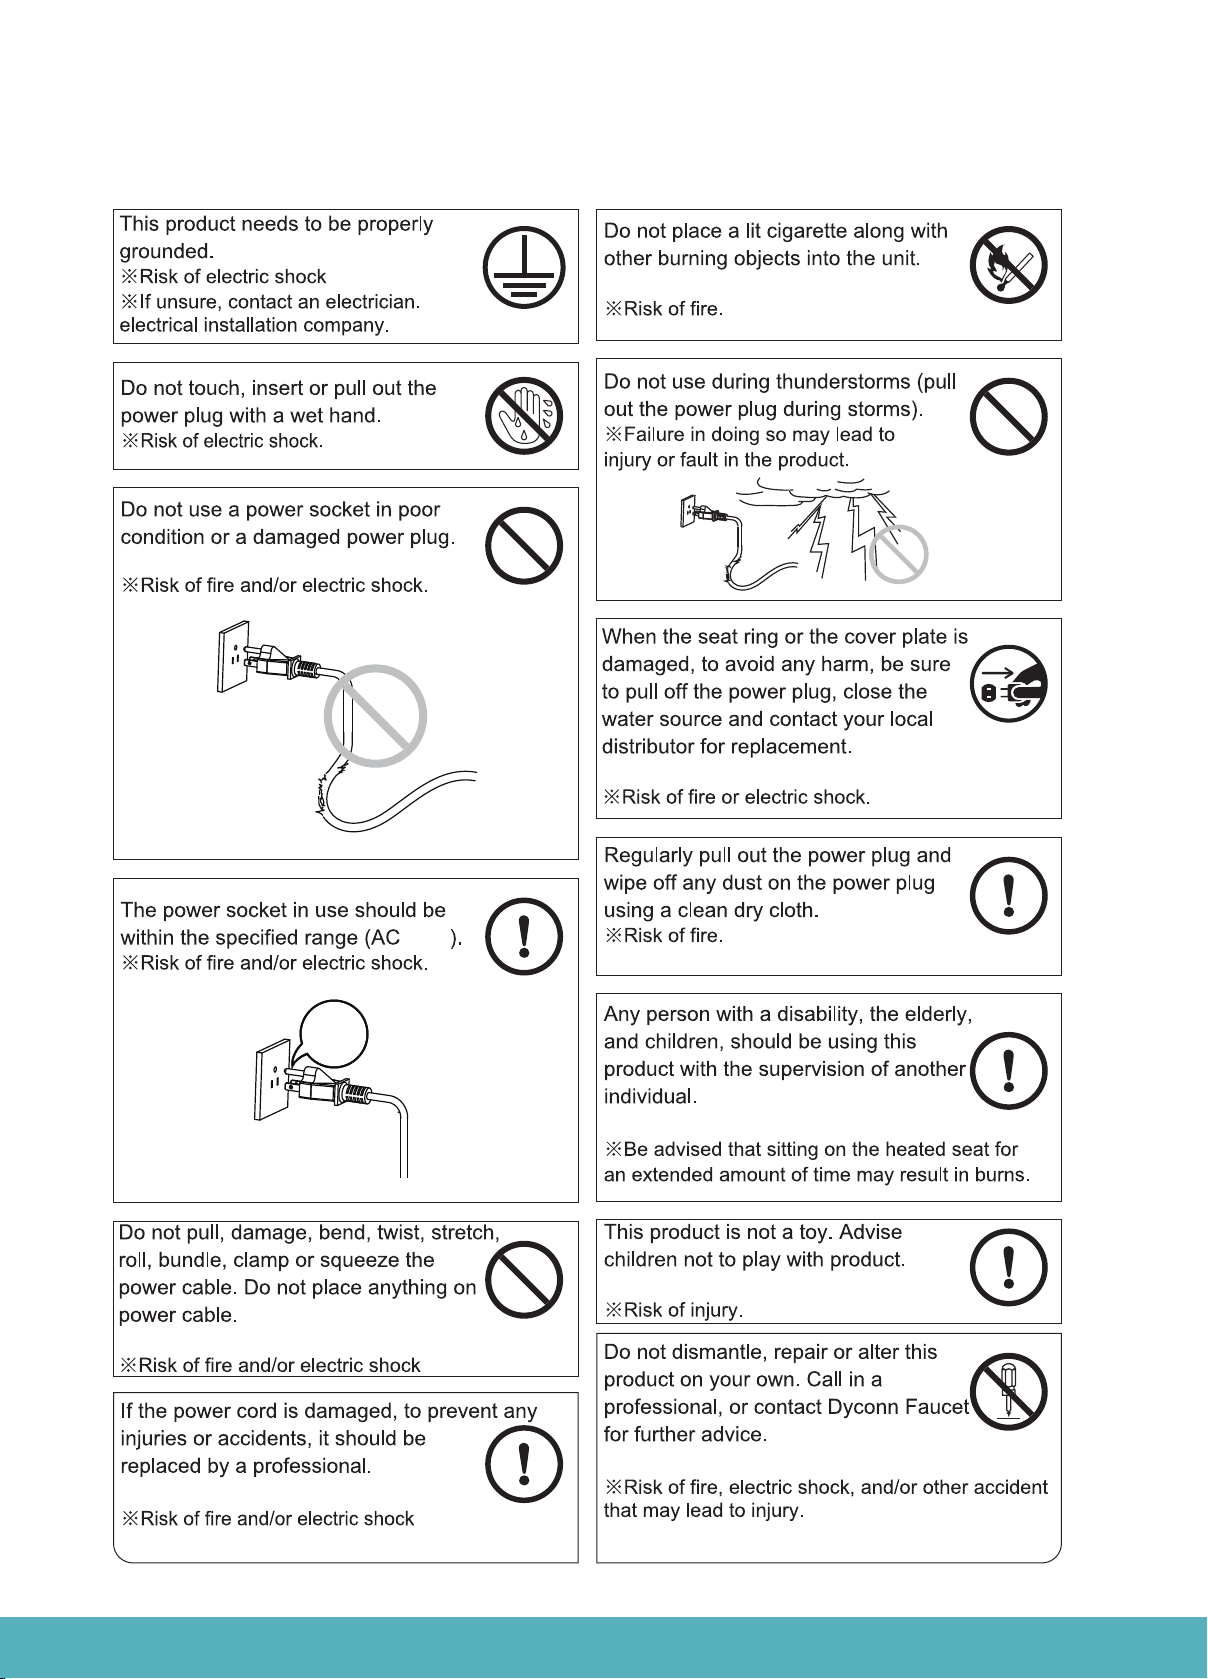
WARNINGS AND SAFETY
120V
120V
6

BidetMate.com Info@BidetMate.com
WARNINGS AND SAFETY
7
BidetMate.com Info@BidetMate.com
WARNINGS AND SAFETY
ATTENTION
8
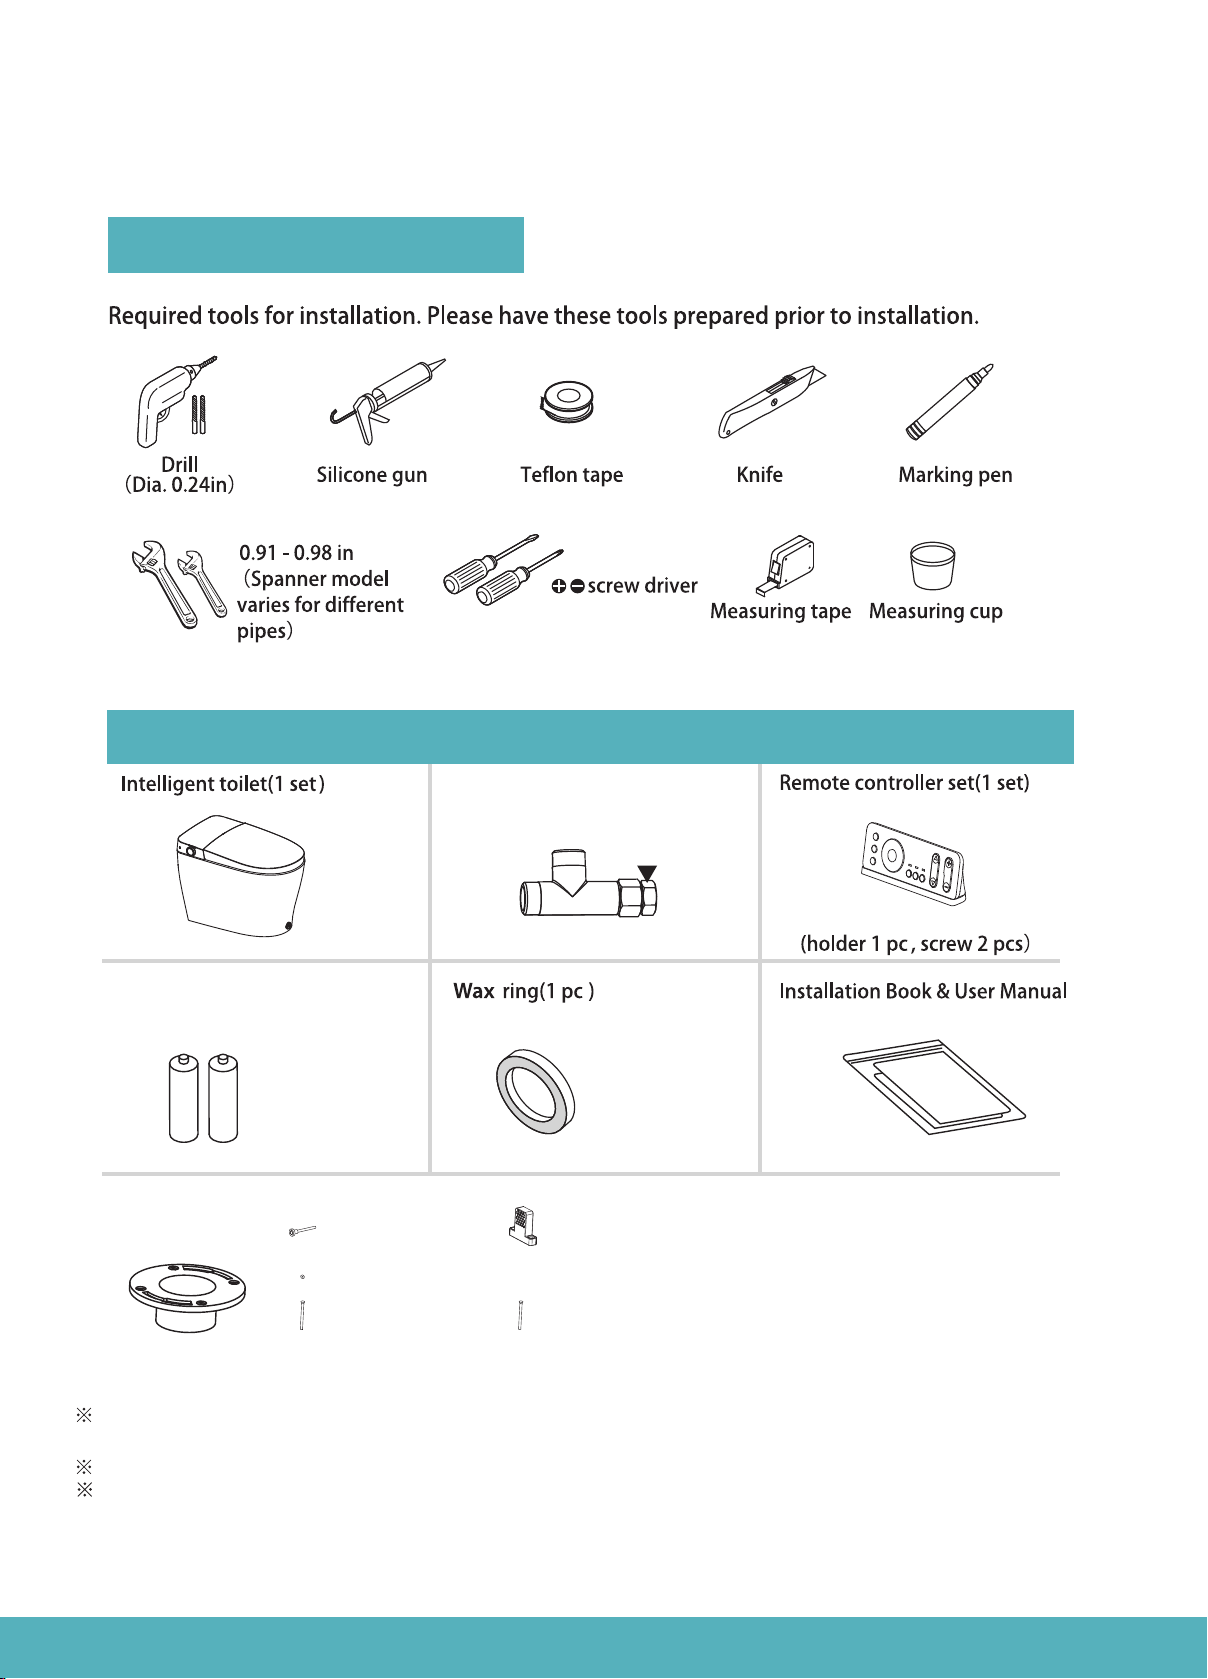
T-valve(1 pc)
(G1/2,G1/2,G1/2)
Two AAA Battery
Floor flange(1pc) Bolt (2pcs)
Washer (8pcs)
Hexagon bolt(4pcs)
Mounting bracket (2pcs)
Bolt(2pcs)
Please confirm all the aforementioned items are inside the package.
If there are any omissions, please contact our customer service.
Illustrations above are for references only,Actual objects may look different in person.
If your water valve is 3/8, you could directly connect the T-valve; If your water valve is 1/2,
please screw off the adapter, then connect it.
Pre-installed
3/8’’ adapter
BidetMate.com Info@BidetMate.com
INSTALLATION
Required Tools
Item List (Confirm all are included in the box)
9
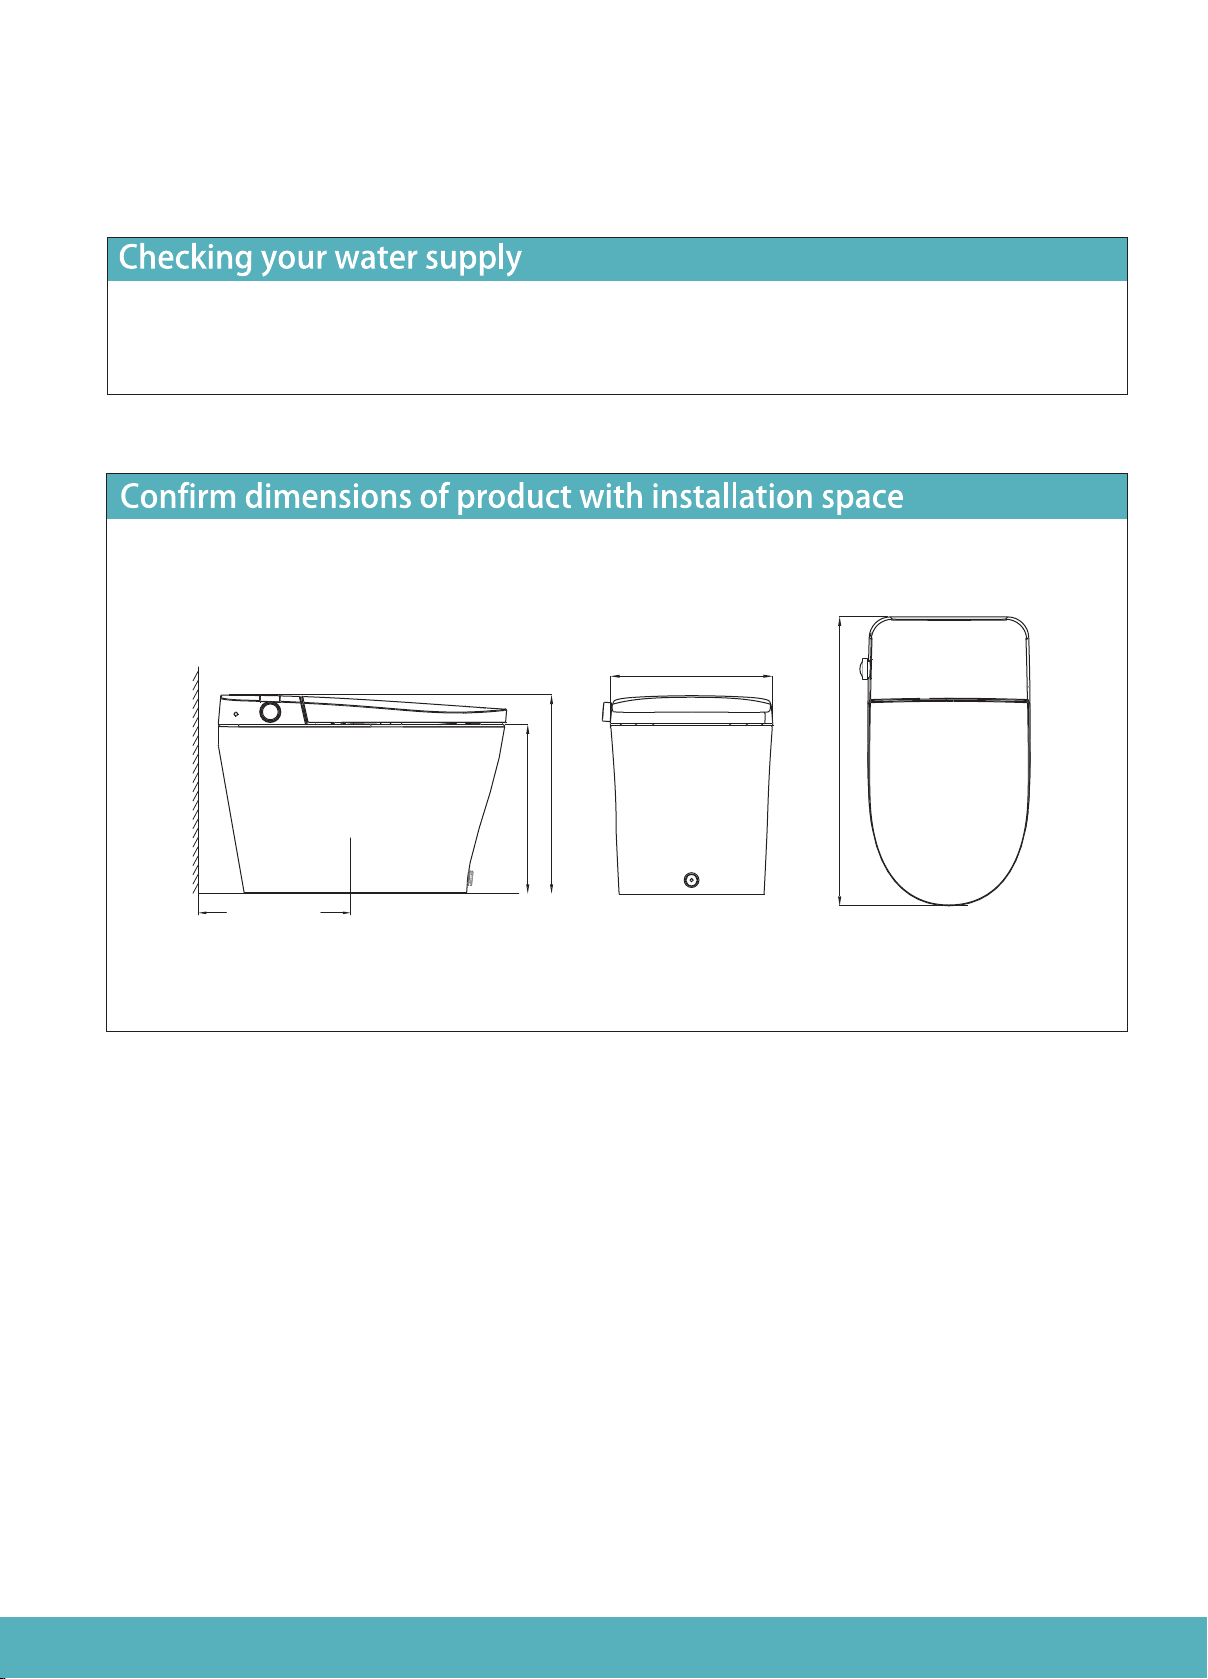
The lowest working water pressure is 0.08MPa, the highest water pressure is 0.75MPA, the toilet can not
reach the best clean situation when the lowest water pressure can not reach 0.08MPA.
Unit: inches
Wall
Drain hole distance
to wall12in
Front view Top viewSide profile
15.75
15.75
18.5
26.97
BidetMate.com Info@BidetMate.com
BEFORE YOU INSTALL
Water pressure check, dimensional drawing.
10
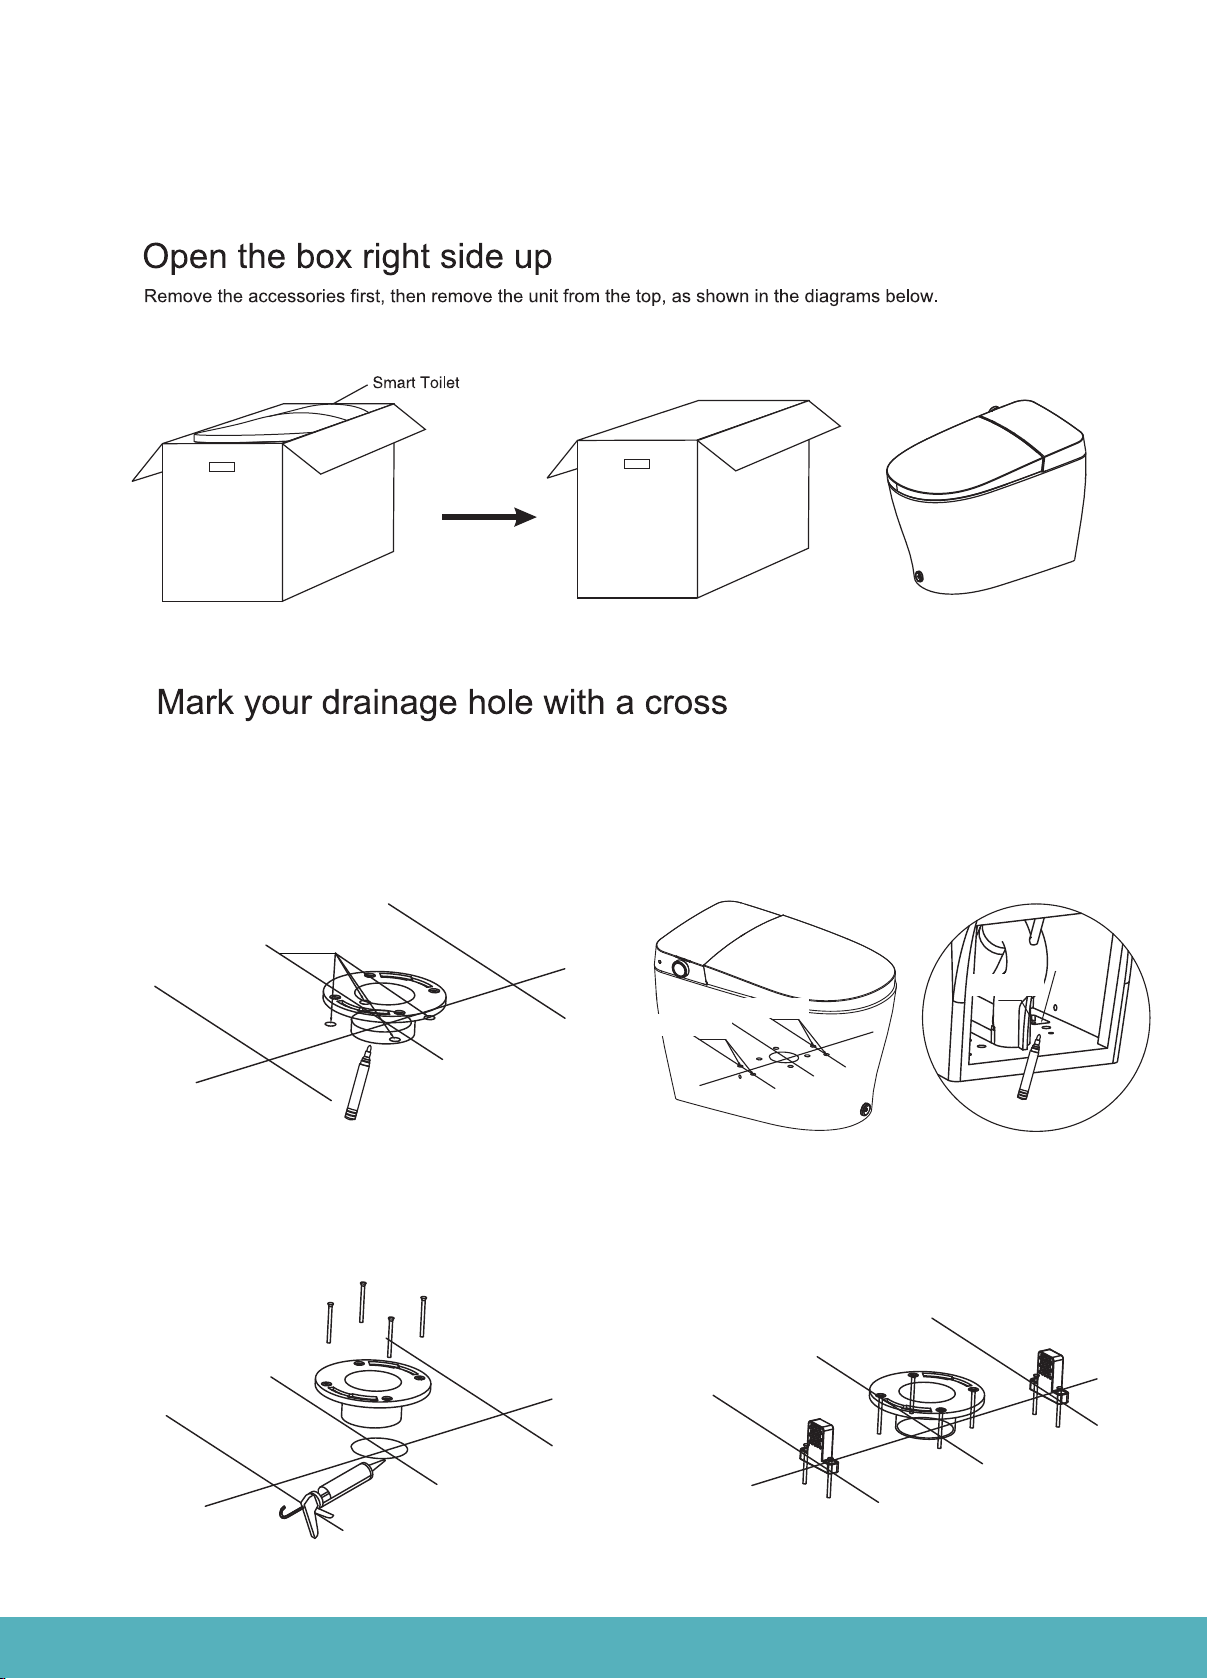
1.Put the flange on the drain hole, and fix it on
the ground with four bolts. Then Seal the
flange with glass glue.
2.Place the fixing block on the installation position
marked by the line drawing pen and fasten it with
two bolts.
Screw mounting
holes of fixing block
Openings of
ceramic bottom
Screw mounting
holes of fixing block
1.Align the flange with the drain hole, and
mark the positions of the four mounting holes
of the flange on the ground with a marking
pen.
2.Place the toilet on the ground with aligning the
ground drain hole, place two fixing blocks in the
openings on the left and right sides of the toilet
bottom, mark the screw mounting hole positions
of the fixing block with a marking pen, and then
remove the toilet.
Bolt mounting holes of flange
Screw mounting
holes of fixing block
BidetMate.com Info@BidetMate.com
INSTALLING YOUR PRODUCT
2
1
3
Install your unit using the following steps
11

1.Place the wax ring on the drain hole at the bottom
of the ceramic.
3.Fix the two sides of the ceramic with two bolts,
and finally install the cap.
2.Align the ceramic drain with the drain hole on the
ground, and press down to make the wax ring fully
contact with the ground.
G1/2 G1/2
G1/2
G1/2
G1/2
3/8”Adapter
3/8”Adapter
BidetMate.com Info@BidetMate.com
4
12

0.24in
BidetMate.com Info@BidetMate.com
5
13

BidetMate.com Info@BidetMate.com
120V
Air
temp
Water
temp
Seat
temp
※When the product leaves the factory, the remote control and the product are connected, if the
remote control went failure, please re-connect the code as following methods.
1. Unplug the product's
plug, press the stop ket for
few seconds until the level
light is flickered.
Press the stop key
for few seconds Level light
is flickered.
2. Plug the attaching plug
when the remote control get
closer to the product.
3. The level light stops
flickering, and then it is
lighted on.
All the level light (red)
is lighted on
4. At the time, the remote
control and product is
re-connected.
Stop Front Rear Dryer Flush
H/C
Massage
Nozzle
clean
Nozzle
forward
Water
pressure
Water
pressure
Nozzle
backward
Air
temp
Water
temp
Night
light
Seat
temp
Remote Control Pair Code:
Pull the plug off→Press the stop
button until the gear lights flicker
→Pull the plug in when the remote
controller near the product→The
gear lights stop flicking and keep
lighting→Successful.
1.Open the water supply angle valve to
maximum as shown in the figure.
2.Confirm various connecting parts are not
water leaking.
※In case of water leaking, unfasten the nuts
again and install them again.
120V
120V
Testing the Product
(Checking the side panel buttons and remote conrtol)
Matching Your Remote Control Code
14
BidetMate.com Info@BidetMate.com
Power/Stop
RearFront
Stand by: Press it for 3s to activate it.
Activated: under the hip cleaning, female
washing, drying mode, press it for short
time to stop it, press and hold for 3s to
shut down.
Under no cleaning and drying mode,
and seating the toilet.
“Rotated backward”, rotated it backward
for 45° to enter into the front wash
mode, which the mode is defaulted to
cleaning moving. The cycle of operation:
front wash 1.5mins + drying 4mins +
flushing when drying for once.
When the function of front wash is
activated, rotates the switch forward to
increase the cleaning strength, switch
backward to decrease the cleaning
strength.
Knob light color : pink
Under no cleaning and drying mode,
and seating the toilet.
“Rotated forward” , rotated it forward for
45° to enter into the rear wash mode,
which the mode is defaulted to cleaning
moving. The cycle of operation: rear
wash 1.5mins + drying 4mins + flushing
when drying for once.
When the function of front wash is
activated, rotates the switch forward to
increase the cleaning strength, switch
backward to decrease the cleaning
strength.
Knob light color : blue
※When starting up, short press the knob to send ceramic flushing command when there is no function.
Knob light color : lake blue
FUNCTION EXPLANATIONS
15
BidetMate.comBidetMate.com Info@BidetMate.com
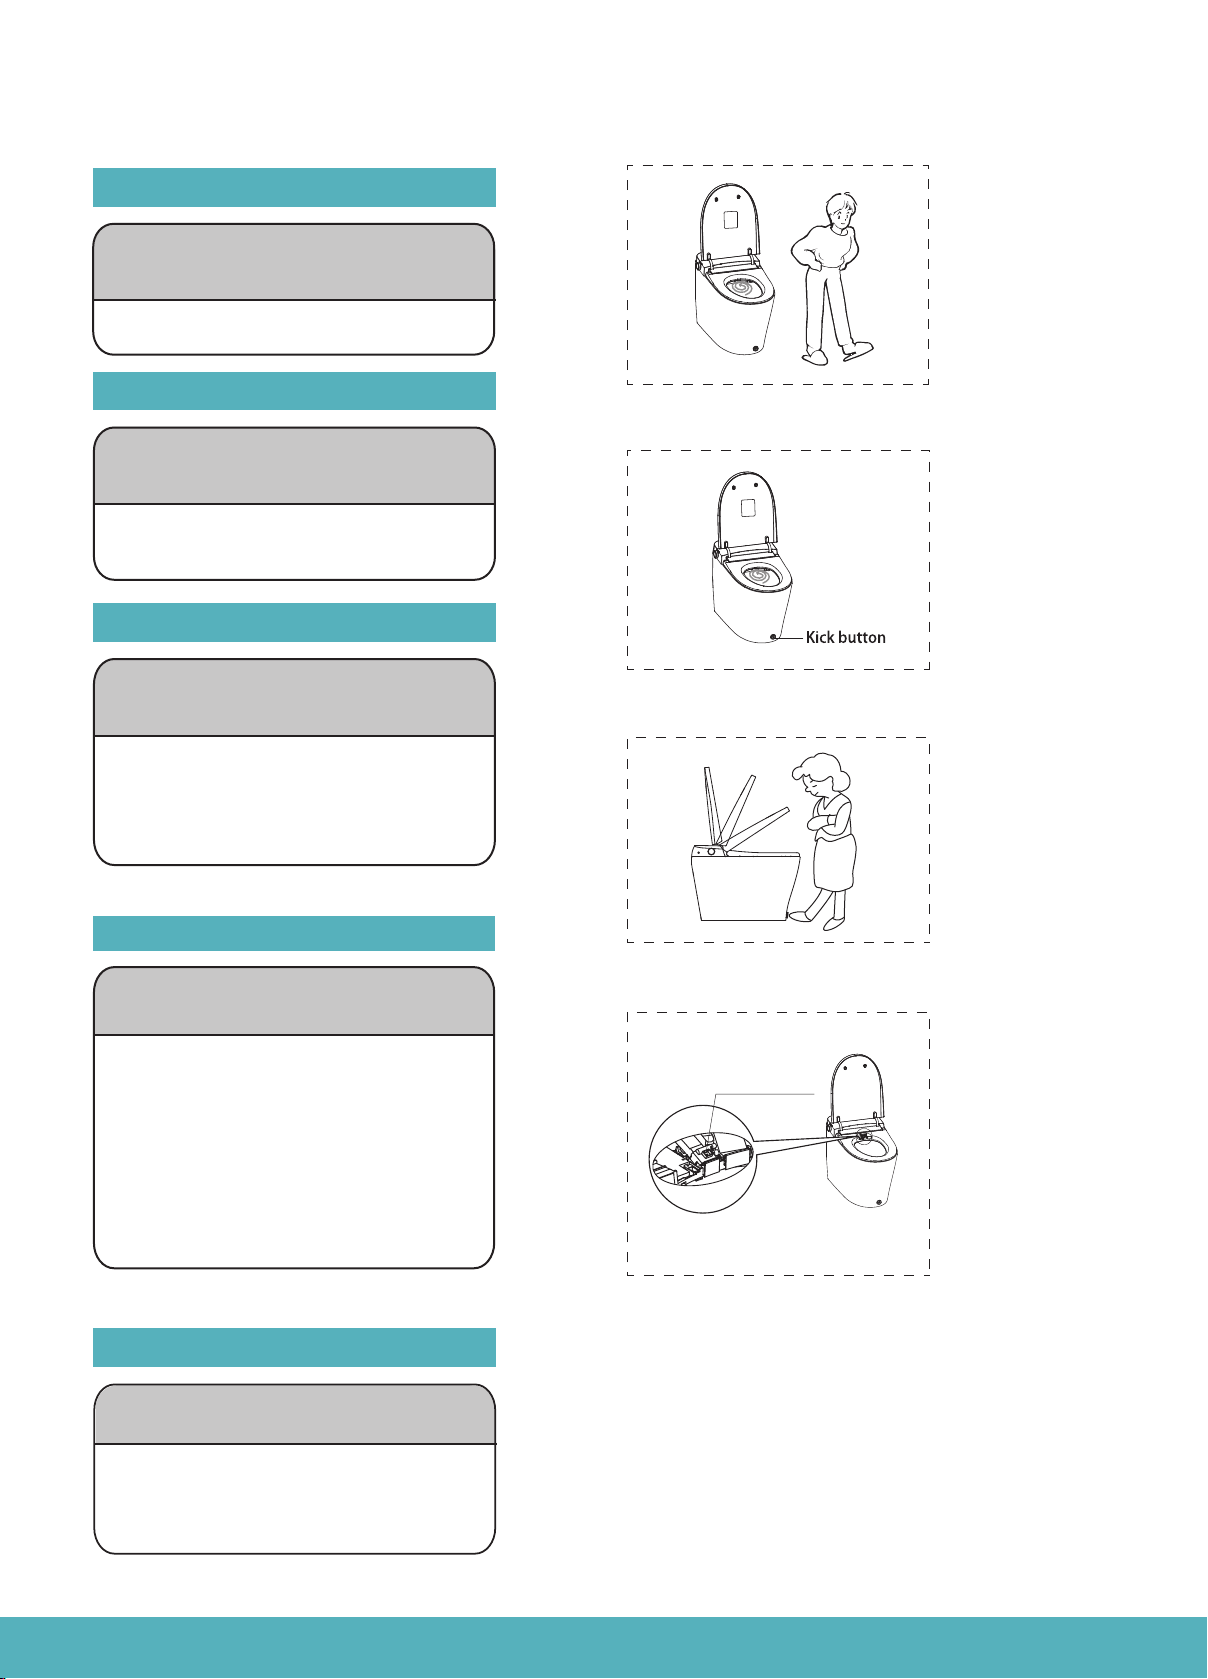
Kick controlled seat/lid
Tap the kick button once: Lid opens
Tap the kick button twice: Seat raises
Tap the kick button three times: Seat and
Lid will close and toilet will flush.
Tap the “Kick Button” with your foot
to raise your toilet seat/lid.
※Posterior/front wash is not available during flushing.
Dryer
Press "Dryer" once for front coverage.
Press the "Dryer" button a second time
to switch to rear. Dryer speed is adjust-
able. There are three different levels.
Dries front and rear.
Auto flush
The toilet will only flush once.
When the seat sensor no longer detects
a user, it will automatically flush.
Kick flush
During flushing, the function of
“Rear wash”, “Front wash” cannot be used.
Tap the "Kick Button" with your foot
for easy, manual flushing.
UV Light
UV Sterilization
Activated Once Seat is unoccupied.
Turns on automatically once seat is
vacated. Once cleaning spout is back in
position, the UV function will activate for
1O seconds. UV light is purple, and will
sterilize for three minutes. If seat is
occupied while UV sterilization is on,
function will stop and the purple light
will go out.
※Ultraviolet lamp device is installed on smart toilet.
FUNCTION EXPLANATIONS
11
2
3
4
2
3
4
16

Microwave induction
The toilet seat will open automatically.
Get close to the product
(about 3.5 feet)
※When you leave the seat and the product is activating,
press the "Feminine" button.
You will hear the sound of "DONG, DONG,DONG", which means that the induction function has turned
off. When you hear the sound of "DONG", it means that the induction function has turned on.
※This function is only limited to some models, see the details on the list of product functions.
※When the product cannot detect a human body, it will close the toilet cover and toilet seat automatically.
User-friendly Design
●Slow-closing lid/seat
Preserve your toilet’s life and allows you to close the lid/seat silently.
●Water purification
Equipped with dedicated filter to ensure your bidet will only spray clean, filtered water.
●8 Layers of safety
8 different built-in safety features to protect the user and product.
●Memory mode
After power failure, water temp, water pressure, seat temp, and wand position are all
restored to mid-range after power failure.Night light is turned on by default after power failure.
On / off, keep the last memorized setting state.
Dryer flush
When the body is seated, the seat will
automatically flush once.
The body leaves the seat sensing area.
Light of rotated switch
No functions operating, not seated White
Green
Blue
Pink
Aqua blue
No functions operating, not seated
Hip cleaning activates
Female washing activates
Flushing mode
YellowDry mode
PurpleUV
State Colour
Rotated
switch
light
Dryer
BidetMate.comBidetMate.com Info@BidetMate.com
FUNCTION EXPLANATIONS
17
BidetMate.comBidetMate.com Info@BidetMate.com
18
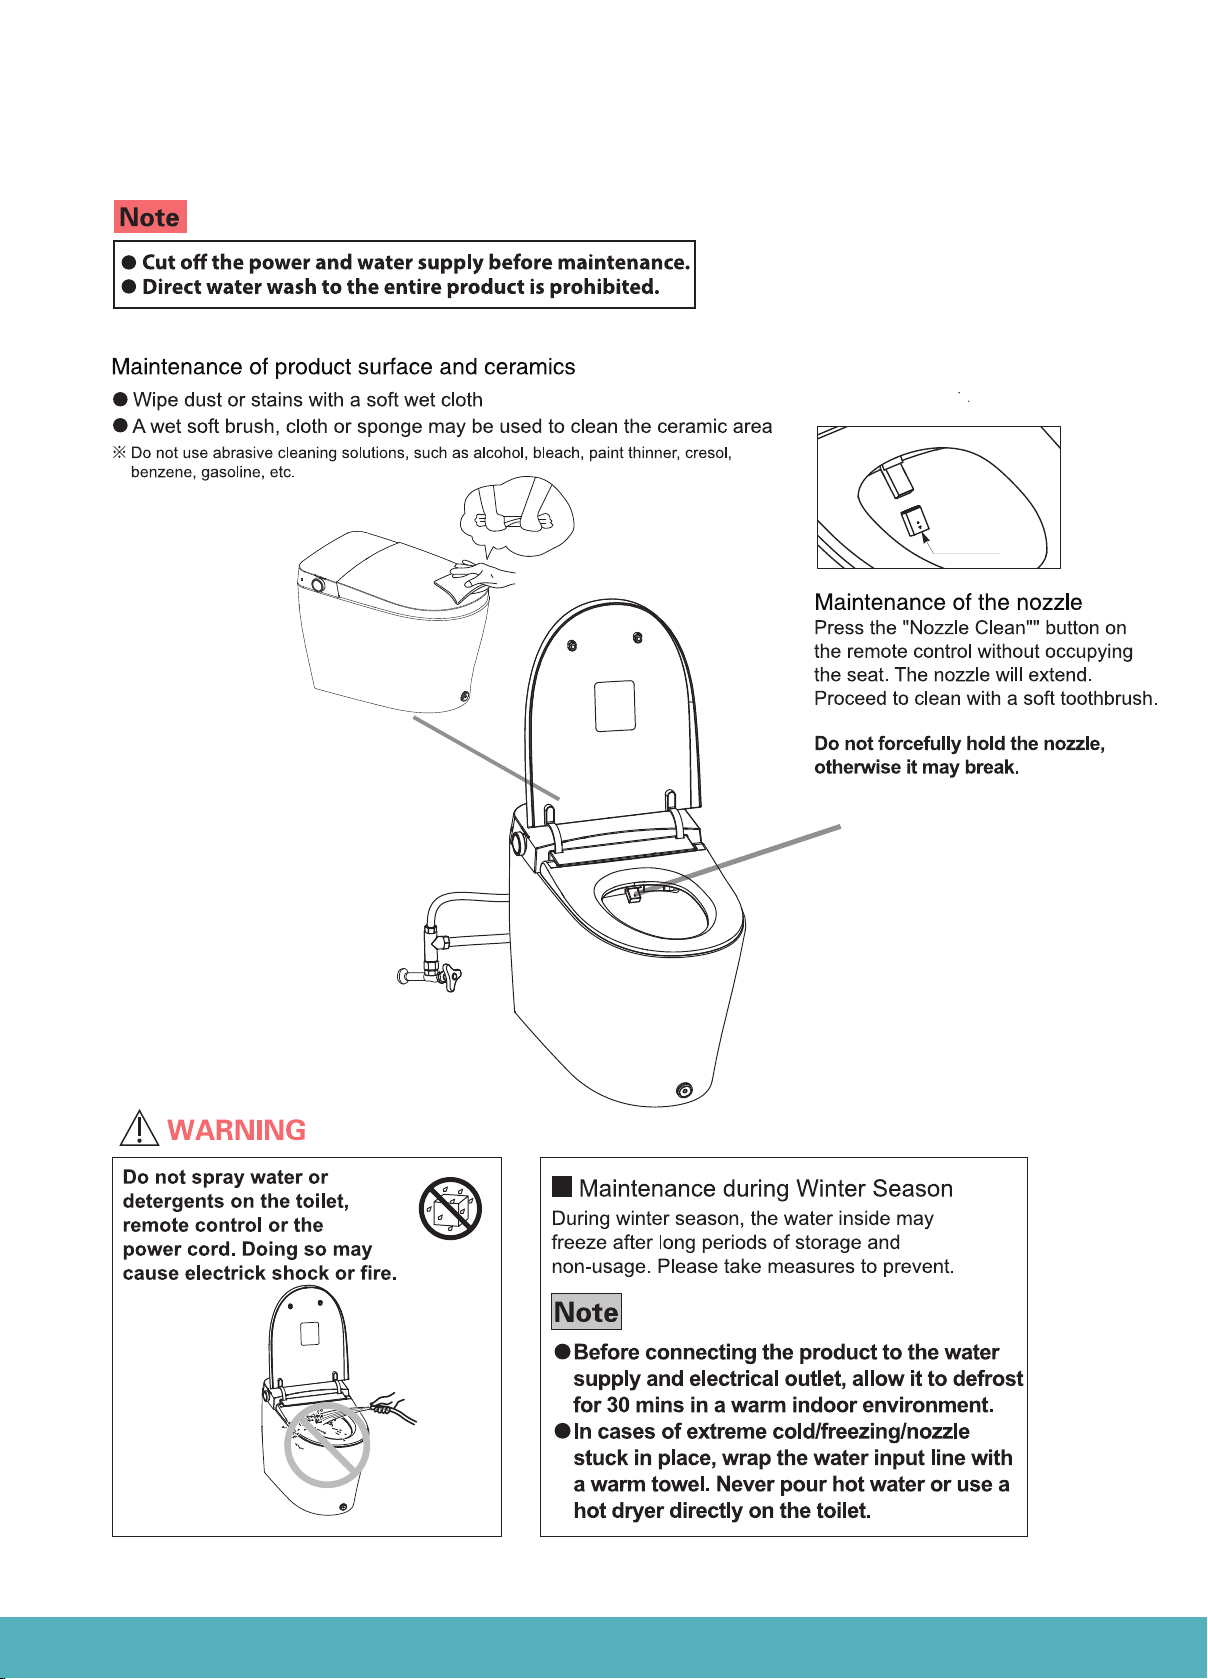
nozzle
Please change the spout if it blocked.
Regular maintenance is required to ensure normal use
MAINTENANCE
Other manuals for BM-6000
1
Table of contents
Other BidetMate Toilet manuals


Popular Toilet manuals by other brands


American Standard
American Standard CONCEPT Cube TF-2704 installation manual

BIOLAN
BIOLAN ECO Instructions for installation, use and maintenance

Thetford
Thetford C260 Series user manual

KELISS
KELISS T162A Series instruction manual

Silent Venus
Silent Venus SVP600 Installation & maintenance

Kohler
Kohler K-22241K Installation and care guide