Bike Friday Pocket Rocket User manual

Using Your Bike Friday®:
• Pocket Rocket™• Pocket Llama™
• Pocket Rocket Pro™• Pocket Gnu™
• Pocket Crusoe™• New World Tourist™
• Pocket Companion™, Sport™, Expedition™ , Pocket 8™
Green Gear Cycling, Inc.
3364 W 11th Ave. Eugene, OR 97402
800-777-0258 USA & Canada
+1-541-687-0487 Int’l
+1-541-687-0403 Fax
www.bikefriday.com •info@bikefriday.com
7/16/10
Pocket Llama owners Nina Tartako & Richard Kemnitz escape the winter freeze of
hometown Fairbanks, AK and head for Mexico.

2www.bikefriday.com 800-777-0258 • +1-541-687-0487
Extra Accessories
We also sell an extensive (and growing!) line of bicycle and travel
accessories. Whether you are riding the local back roads or ventur-
ing into foreign lands we have the gear you need. Call us for info on
spare tires & tubes, replacement parts, fenders, racks, bags, or other
items to complete your Travel System.
Congratulations!
You have just purchased the nest travel bicycle available today.
Your bike has been carefully designed and constructed for your
personal travel needs. All of our bikes are manufactured in our
Eugene, Oregon factory by real cyclists who care about our custom-
ers and our products.
Please take your time reviewing this manual and, if possible, watch
the video before you assemble your new Bike Friday travel bicycle.
You will nd your new bicycle simple and reliable anywhere you
go!
More Information
To check out our products, nd other useful information, discover
Bike Friday events and Yak with other Bike Friday owners on the
bulletin board, go to our main web site at www.bikefriday.com. Or
just call us at 800-777-0258.
Blue skies and happy trails from the gang at Green Gear Cycling.
If You Need Help . . .
If you need technical assistance with any Green Gear®Cycling
product, or are unclear on the proper operation of your Bike Friday
travel bicycle, please call us and a Service Technician will help you
get back on the road. Our toll-free number in the US and Canada
is 800-777-0258, international is +1-541-687-0487. Normal business
hours are 8 a.m. to 5 p.m. Monday through Friday, and 9 a.m. to 4
p.m. Saturdays, Pacic Standard Time. You can also email service
questions to service@bikefriday.com.
Because we understand the needs of world travelers, we oer
24-hour technical support in emergencies. If necessary, please call
our regular number and our answering service can forward you to
a Service Technician on call.

3
www.bikefriday.com800-777-0258 • +1-541-687-0487
Table of Contents
A Word on Safety 4
Anatomy of a Bike Friday Bicycle 5
Using a Quick Release 6
Getting Started 8
Assembly: Unpacking 9
Unfolding 11
Easy pack Seat Masts 12
Pocket Gnu Fork 13
Open Front Brake 15
Install Front Wheel 16
Install Stem 17
Handlebars 19
Seat Post & Saddle 20
Install Pedals 21
Packing: Pedals & Seat Post 22
Remove Front Wheel 23
Remove Handlebars 24
Remove Stem 25
Fold Frame 26
Place Bike in Case 27
Handlebars 28
Wheels 29
Accessories 30
Quick Fold 32
Accessories: TravelTrailer 36
Rear Rack 40
Front Rack 42
Fenders 44
Fit Stem 45
DualDrive™ Hub 46
Trouble Shooting 51
Bike Friday Service 52
Travel Tips 53
Warranty Information 54
4www.bikefriday.com 800-777-0258 • +1-541-687-0487
A Word on Safety
Bicycles are a lot of fun, but not free of hazards. Please
always ride safely!
• Always wear a helmet.
• Follow the rules of the road, and be courteous.
• Use front and rear lights after dark.
• Dress appropriately for the weather and the season, and
visiability.
• Always carry a spare tube, patch kit, pump and a tool kit.
• Keep your bicycle in good shape.
• Check your tire pressure before every ride.
• Make sure all quick releases are secure!
• Have your bicycle routinely serviced for trouble-free travels.
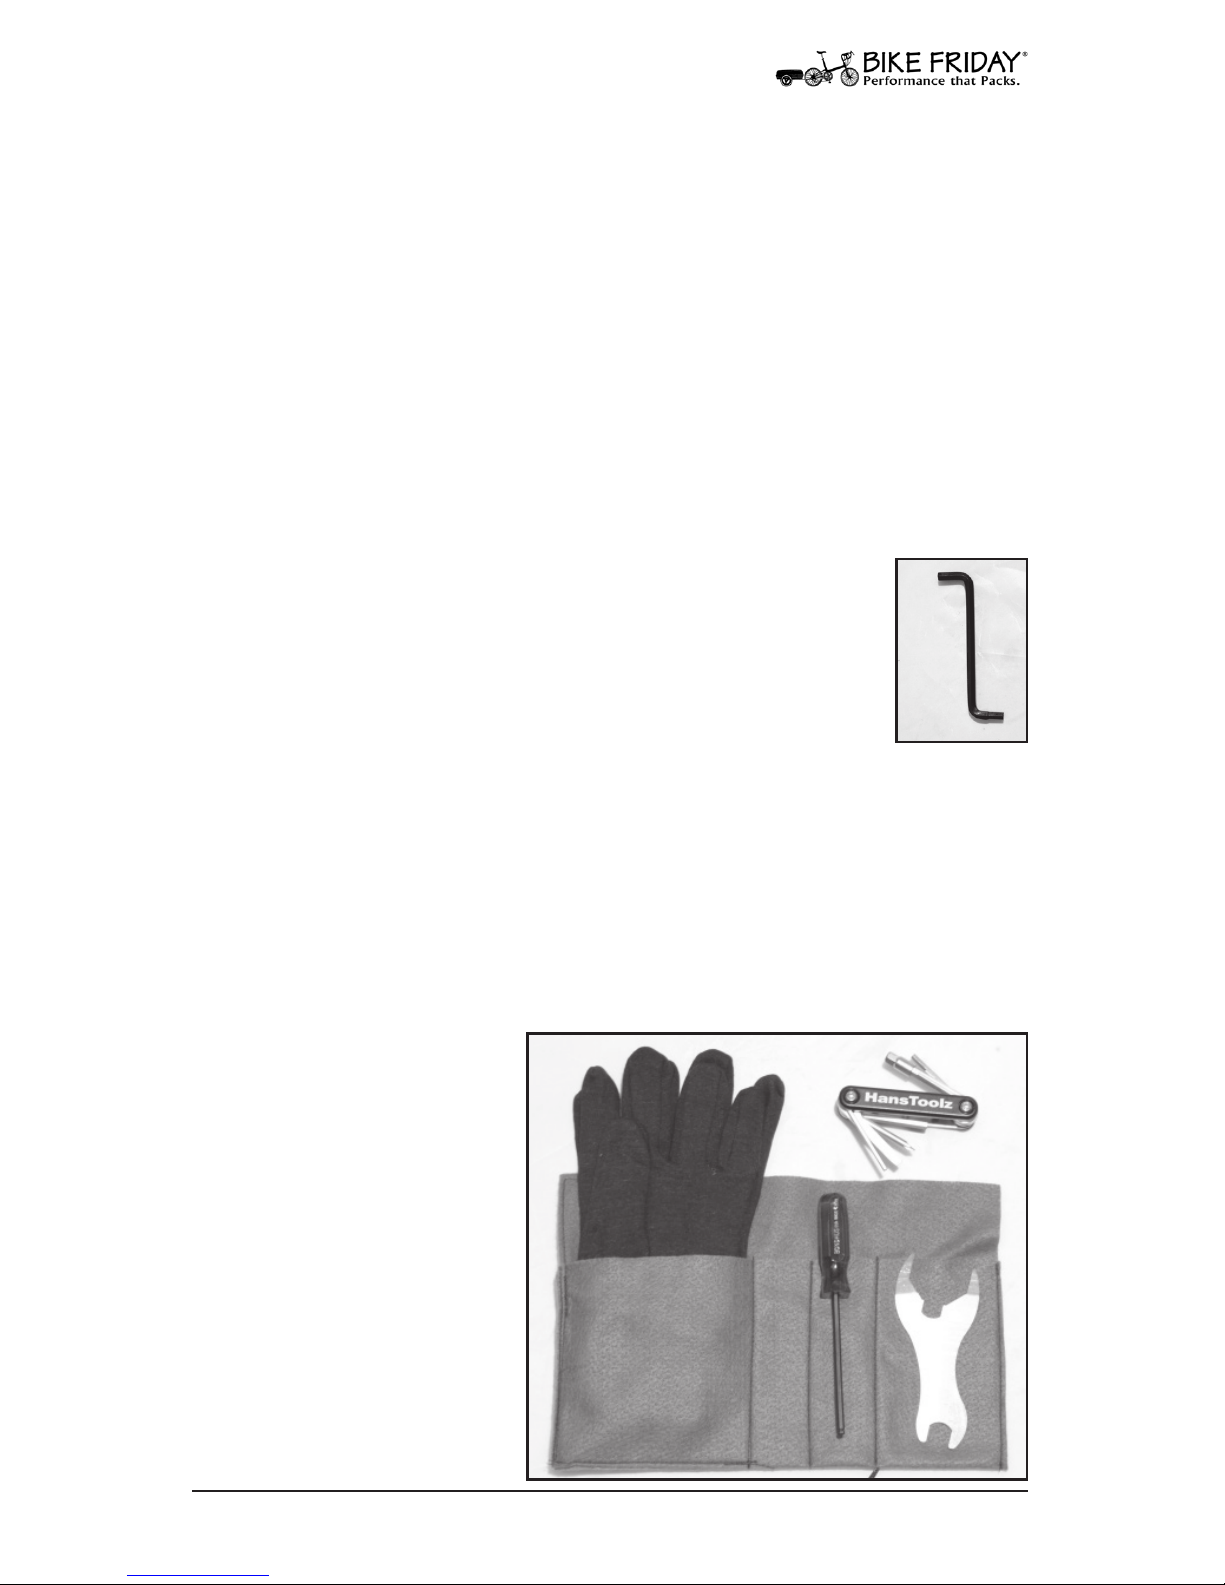
Your Tools
All Bike Friday travel bicycles are delivered with a com-
bination 5/6mm S-wrench that is attached to your water
bottle cage. This wrench should get your new bike on
the road (along with your own pedal wrench). Leave it
in your bottle cage so that you always have it handy.
All bikes ordered with a TravelCase™suitcase also come with a
tool pouch. In the tool pouch you will nd some cotton gloves to
keep your hands clean, a folding tool set, a combination headset
and pedal/axle nut wrench (15mm), and a 4mm ball-end driver.
The ball-end driver is perfect for mounting bottle cages, racks, and
other accessories.
We also sell more exten-
sive tool kits for home
repair work. We encour-
age you to learn how to
work on your own bike. If
you are not familiar with
bicycle maintenance, con-
sider taking a local class.
It will improve your con-
dence and self-suciency
as you venture across the
globe.
5
www.bikefriday.com800-777-0258 • +1-541-687-0487
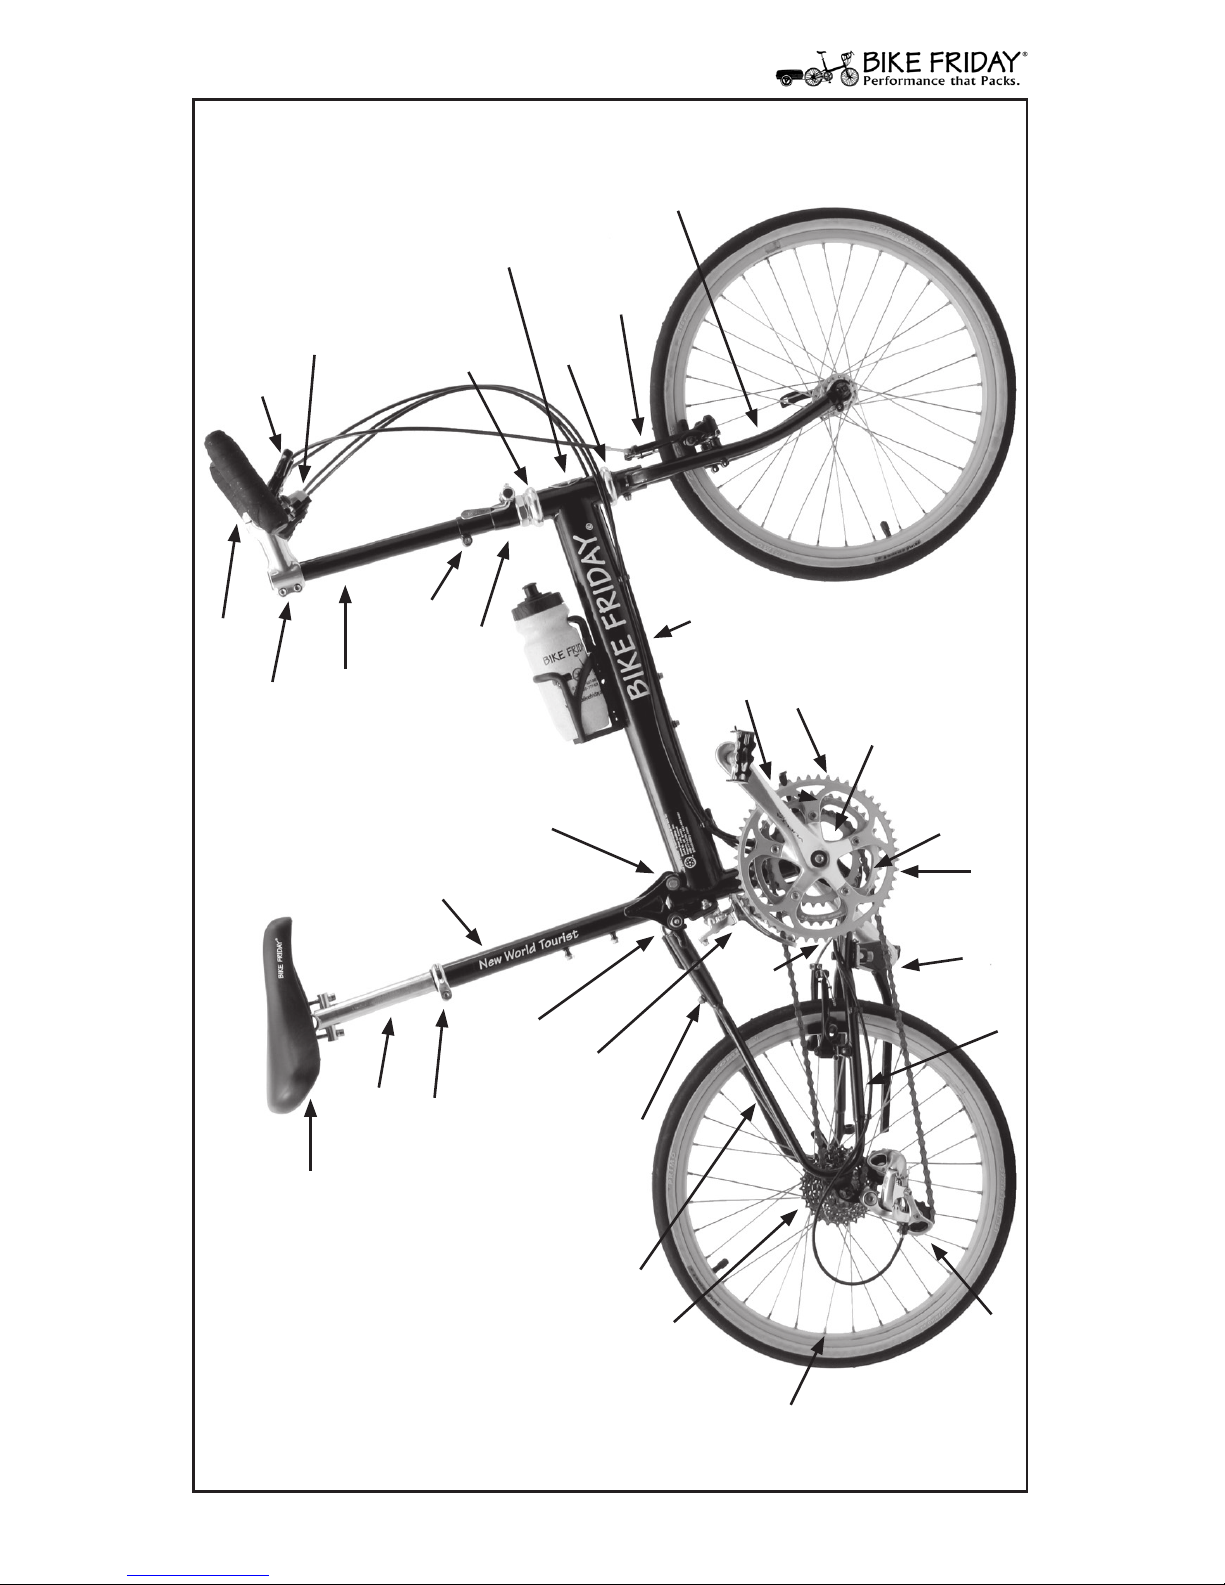
Anatomy of a Bike Friday Bicycle
Saddle
Seat Post
Seat Mast Clamp
Frame Quick Release
WishboneSeat Stays
Seat Mast
Seat Mast Hinge
Cassette (Cogs)
Rim
Rear Derailleur Chain Stays
Mono
Stay
Bottom Bracket
Mono-Tube
Stem Riser
Stem Collar (Clamp)
Handlebars
Stem Brake Levers
Shift Levers
Head Set
(upper)
Head Tube
Fork
Bottom Bracket Hinge
Crank Arm
Chain Ring
Kick Stand
Front Derailleur
Adjustable Stem
Clamp (optional)
Head Set
(lower)
Front Brake
Frame # between cranks on
bottom bracket shell

6www.bikefriday.com 800-777-0258 • +1-541-687-0487
Using Those Nifty Quick Releases
On a cold and snowy day in the 1927 Gran Premio della Vittoria, a
tired and numb Tullio Campagnolo struggled with the frozen wing
nuts on his rear wheel while trying to change gears. In a moment
of frustration and inspiration Campagnolo envisioned the modern
quick release, and the bicycle world was transformed.
The quick release is one of those simple but great inventions that
really makes life better. However, if used incorrectly you can
potentially endanger yourself. Although a reliable and safe prod-
uct, some people have been injured because they didn’t know how
to properly use this elegant device. Your Bike Friday travel bike
has several of them. If you are not familiar with their operation,
PLEASE study these directions carefully. If you are still unclear
on their operation, call us or contact your favorite local bike shop
before you ride!
Using a Quick Release
Quick Release Operation
A quick release is a simple cam with a lever that swings through an
arc that is square to the axle. As the lever moves the cam clamps the
wheel to the frame, or secures the frame joint. It is not a wing nut to
be rotated about the axle.
The tension on the quick release is controlled by how tight the
knurled nut on the other end is set. Only wheel quick releases have
the small cone-shaped springs. Note that the small ends of the
springs face toward the center of the hub.
Quick Release Maintenance
We recommend adding a few drops of light oil to the lever where
it enters the cap several times per year. This will keep your quick
release working smoothly for years to come.
Open
Closed
Knurled Nut
(adjust tightness here)
QR Lever
(Loose)
(Starts
getting
tight
here)
(Sti)
7
www.bikefriday.com800-777-0258 • +1-541-687-0487
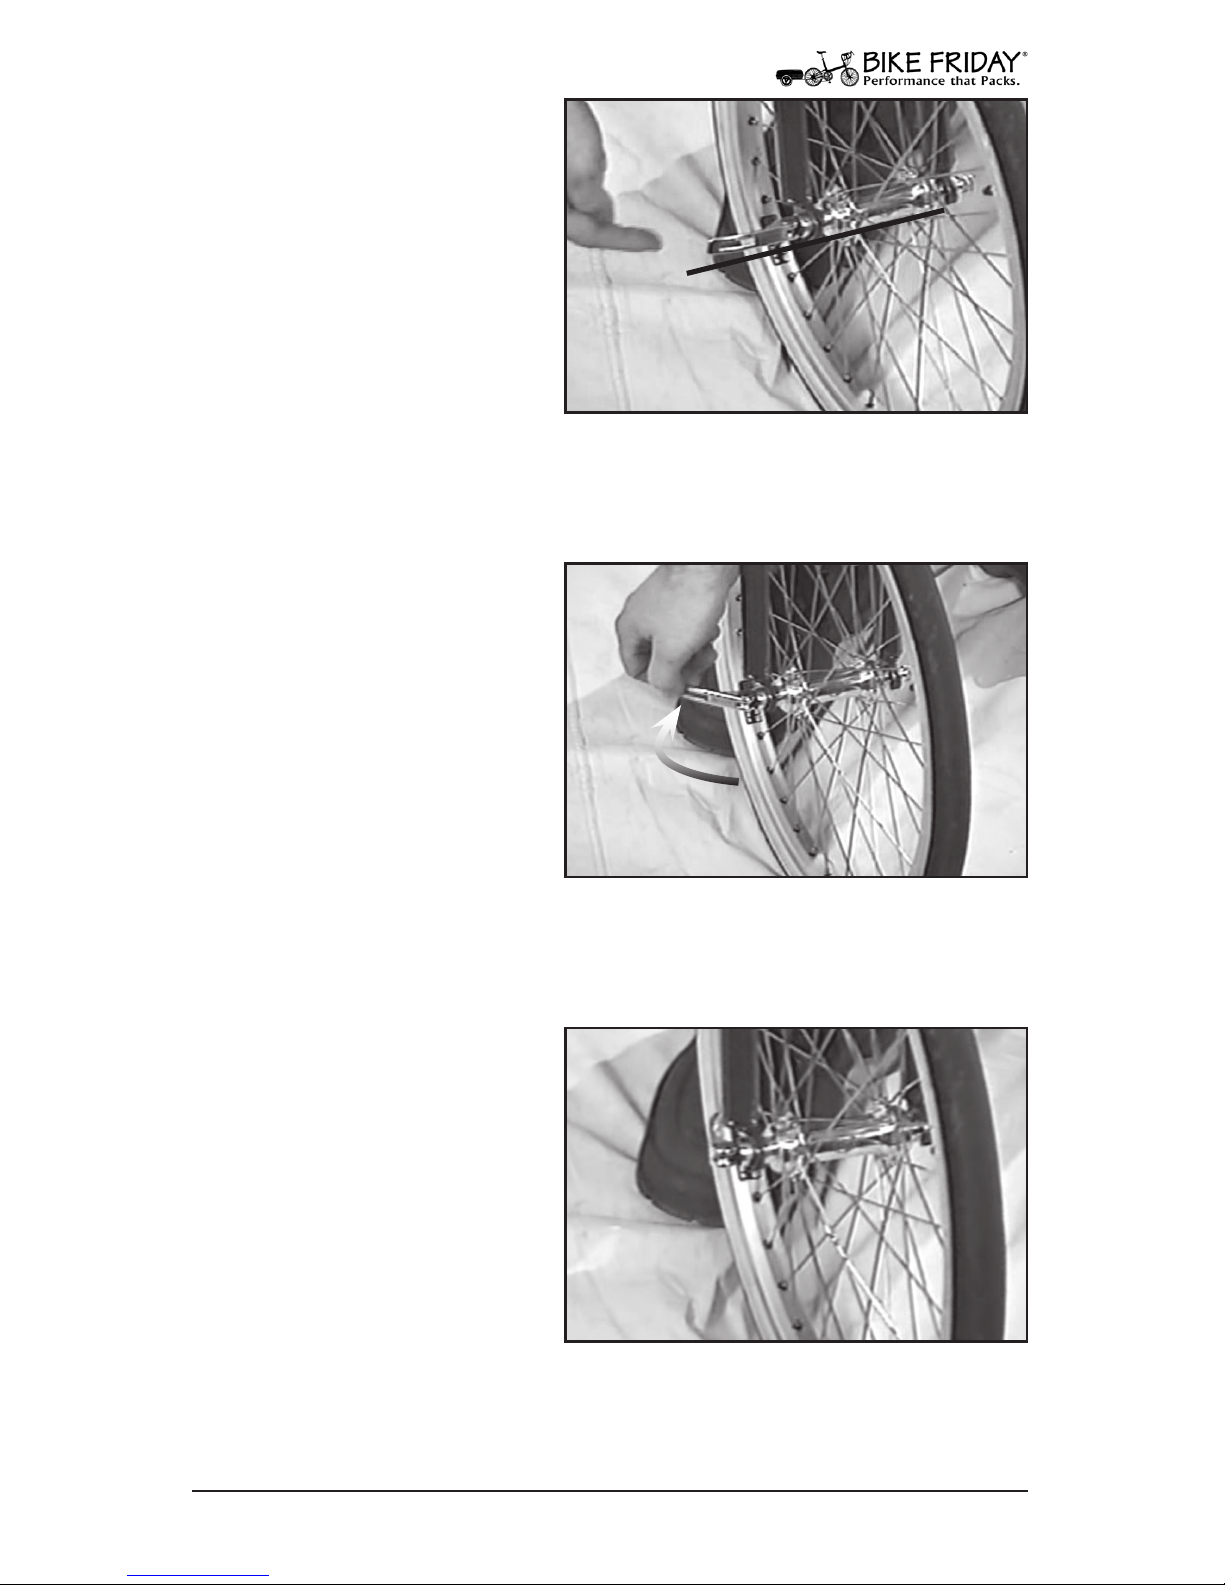
3. Double-Check!
Ideally, the QR lever should
be facing rearward, or
upward. Levers which are
facing forward can catch on
any number of things and be
accidentally opened.
Convention usually has the
front wheel quick release
lever on the left side of the
bike, although this is not critical.
Fig. 3 Closed QR pointing rearward.
Using a Quick Release
1. Adjust Knurled Nut
With the wheel installed and
the axle properly seated in
the frame (or the frame joint
closed), position the QR lever
so that it is in line with the
axle. Then turn the knurled
nut on the other side clock-
wise until it is snug. When
the QR is properly adjusted,
you should be able to freely swing the QR lever for the rst half of
its arc, at which point the lever should oer resistance.
Fig. 1 Quick release operation.
2. Continue Closing QR
Using the palm of your hand
press the QR lever through
the rest of its arc until the
lever is closed and parallel
to the wheel. You should feel
very rm resistance when
the QR is properly adjusted
(the lever may even leave a
light imprint in the palm of
your hand).
Fig. 2 Setting quick release tightness.

8www.bikefriday.com 800-777-0258 • +1-541-687-0487
Getting Started
Where to Begin
Opening your case for the rst time may present an intimidating
sight, particularly if you ordered many extra travel accessories with
your Bike Friday travel bicycle. Don’t worry, we work hard to keep
our products simple, and with a little practice you will nd that
using your new bicycle will become second nature to you.
We recommend nding a quiet area with access to the video,
these instructions, and some room to spread out. This manual
will address the fundamentals: packing and assembly tips and
techniques that are common to all of our travel bikes. However,
because this bike has been custom made for you, you may discover
that your bike was packed at the factory slightly dierent than
the one in this manual. Wherever possible, we mark any packing
materials unique to your bike.
Furthermore, you do not have to repack your bike in exactly the
same fashion. You may nd a better way of stowing your acces-
sories, and we encourage you to experiment. If you discover a
particularly good way doing things, let us know. Some of our best
ideas have come from members of the Bike Friday family.
If you encounter diculties assembling your bike, and the manual
and video do not help, please call us. Our goal is to get you on the
road so that you can enjoy your custom made Bike Friday bicycle.
Illustrated Accessories
In order to illustrate the assembly and use of all of our travel acces-
sories, the bike on the following pages has nearly everything we
could think of for a fully loaded tour. Your own bike may have only
a few or none of these accessories. If you ever choose to purchase
some of these accessories, this manual should help you pack the
extra items.
Bike Friday travel bicycles do not normally come with saddle or
pedals, unless you specically ordered them from us. However,
this manual shows them both to illustrate packing details.
Whether your own bike has drop handlebars or H-bars, V-brakes
or side-pull brakes, the assembly and packing steps are generally
the same. Because of component dierences, wrench sizes and the
number of bolts per clamp may vary from the illustrations.

9
www.bikefriday.com800-777-0258 • +1-541-687-0487
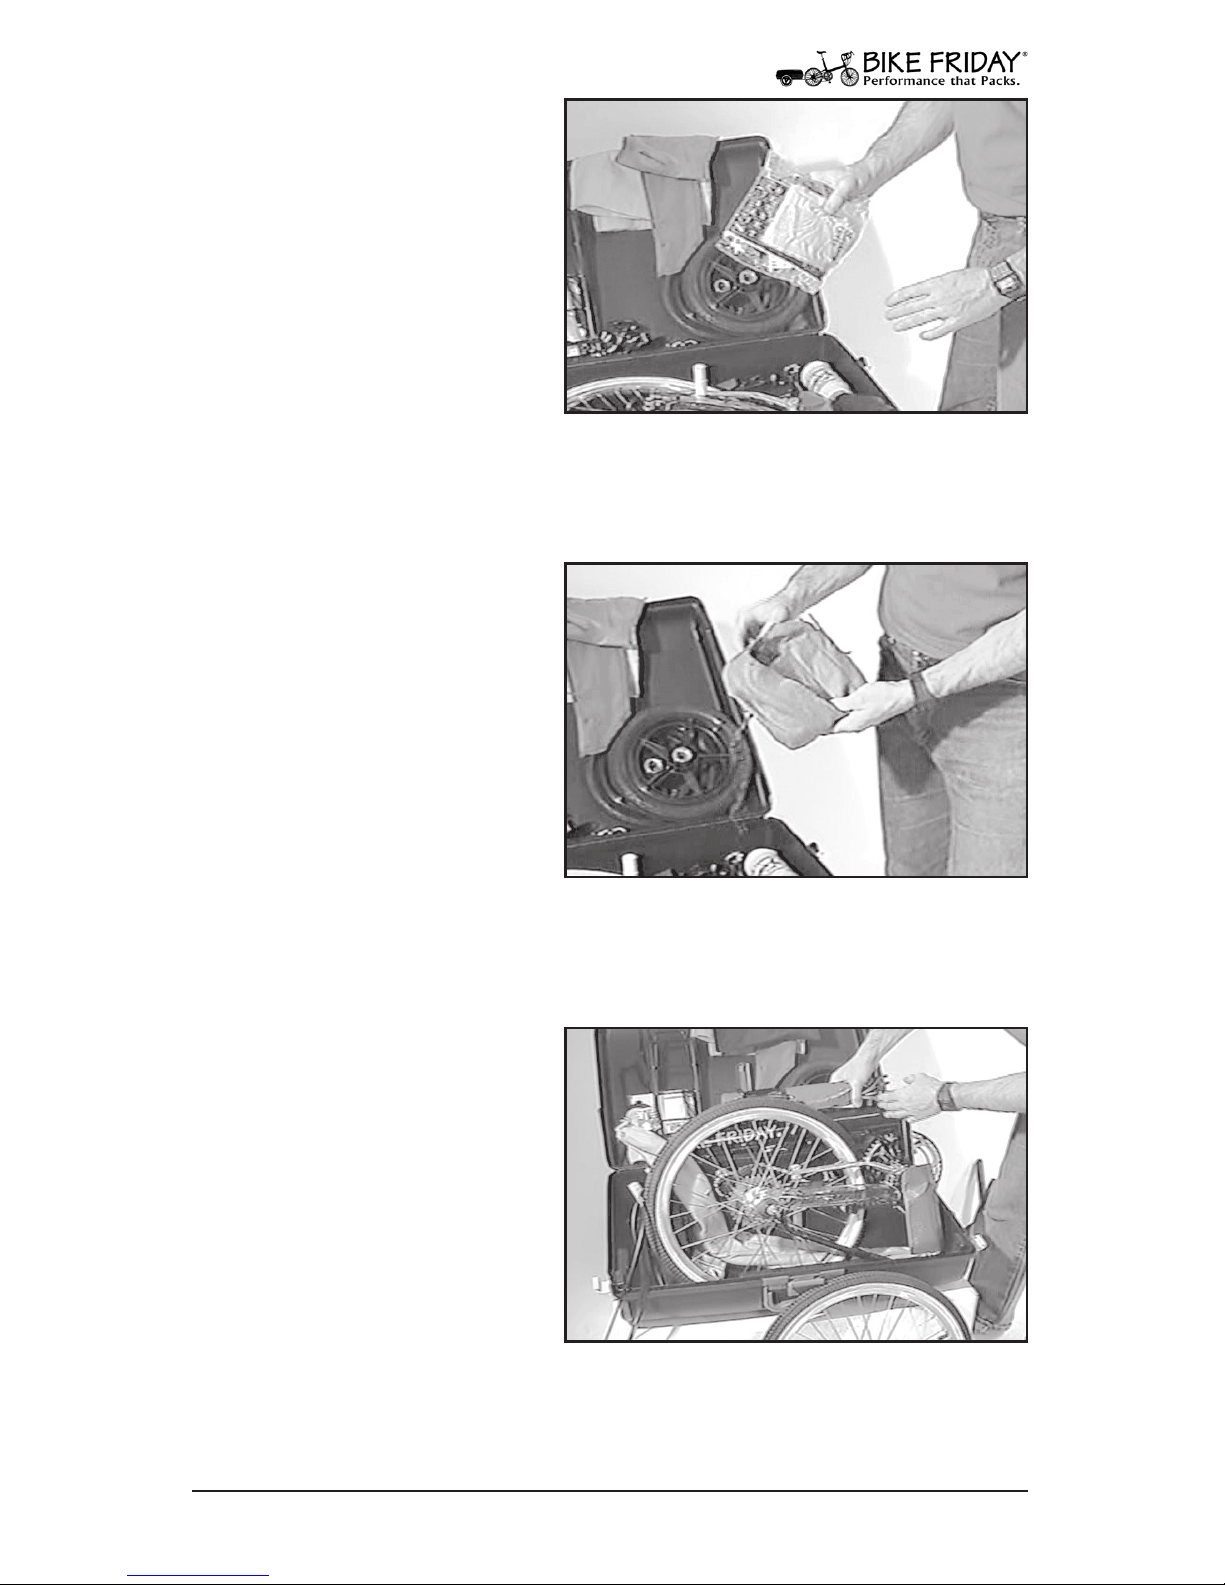
Assembly: Unpacking
1. Open The TravelCase
Start by removing some of
the obviously loose items
from the case including
water bottles, accessible col-
ored felt bags, trailer wheels,
the plastic pouch with extra
materials, and so on. Put the
accessories such as racks and
trailers out of the way for
now.
NOTE: If you did not purchase a TravelCase™ these instructions
will still help you unpack your Bike Friday from the box.
Fig. 1 The fully equipped travel bicycle.
2. Crush Protector
The crush protector is a PVC
dowel with a couple of at
caps on the ends. This piece
is a critical bit of packing
material: it spans the case so
that luggage dropped on top
of your bike is supported by
the dowel and not your bike.
The caps are lightly pressed
on—just pull the top cap o. Don’t worry if the dowel comes out
and the bottom cap is still in the case.
Fig. 2 Remove crush protector.
3. Remove Wheel & Bars
With the crush protector
removed, put the front wheel
nearby. The handlebars will
be in the left side of the case.
Pull them out, and let them
drape by the attached cables
over the left side of the case.
Fig. 3 Remove front wheel and bars.
10 www.bikefriday.com 800-777-0258 • +1-541-687-0487
4. The Goodie Bag
There might be a better name
for this pouch, but we’ve
always called it the Goodie
Bag. This bag holds a variety
of miscellaneous loose items
for your new bike. This may
include the technical lit-
erature that came with your
components, spare spokes,
some labels and decals, The component literature is not required
reading, but we supply it for those who are technically inclined.
Fig. 4 The goodie bag.
5. Remove Tool Pouch
The tool pouch that comes
with the case is a light blue
colored felt bag with a cord
around it. Inside you should
nd a folding tool set with
all of the Allen wrenches and
screwdrivers you will need
to assemble your bike, a pair
of cotton gloves to keep your
hands clean, and a 4mm ball-end driver. Note: You will also nd a
combination 5/6mm S-wrench attached to your water bottle cage
for quick road-side adjustments.
Fig. 5 The tool pouch.
6. Stand Up Bike Frame
At this point you should be
able to stand the bike up,
still folded, in the case. If
you ordered a TravelTrailer
the long yellow felt bag with
the S-bend in it is the trailer
tongue. It was inserted
between the frame and rear
wheel when the bike was
packed. Remove the yellow trailer tongue bag and set it aside for
now.
Fig. 6 Stand up bike frame.
Assembly: Unpacking
11
www.bikefriday.com800-777-0258 • +1-541-687-0487
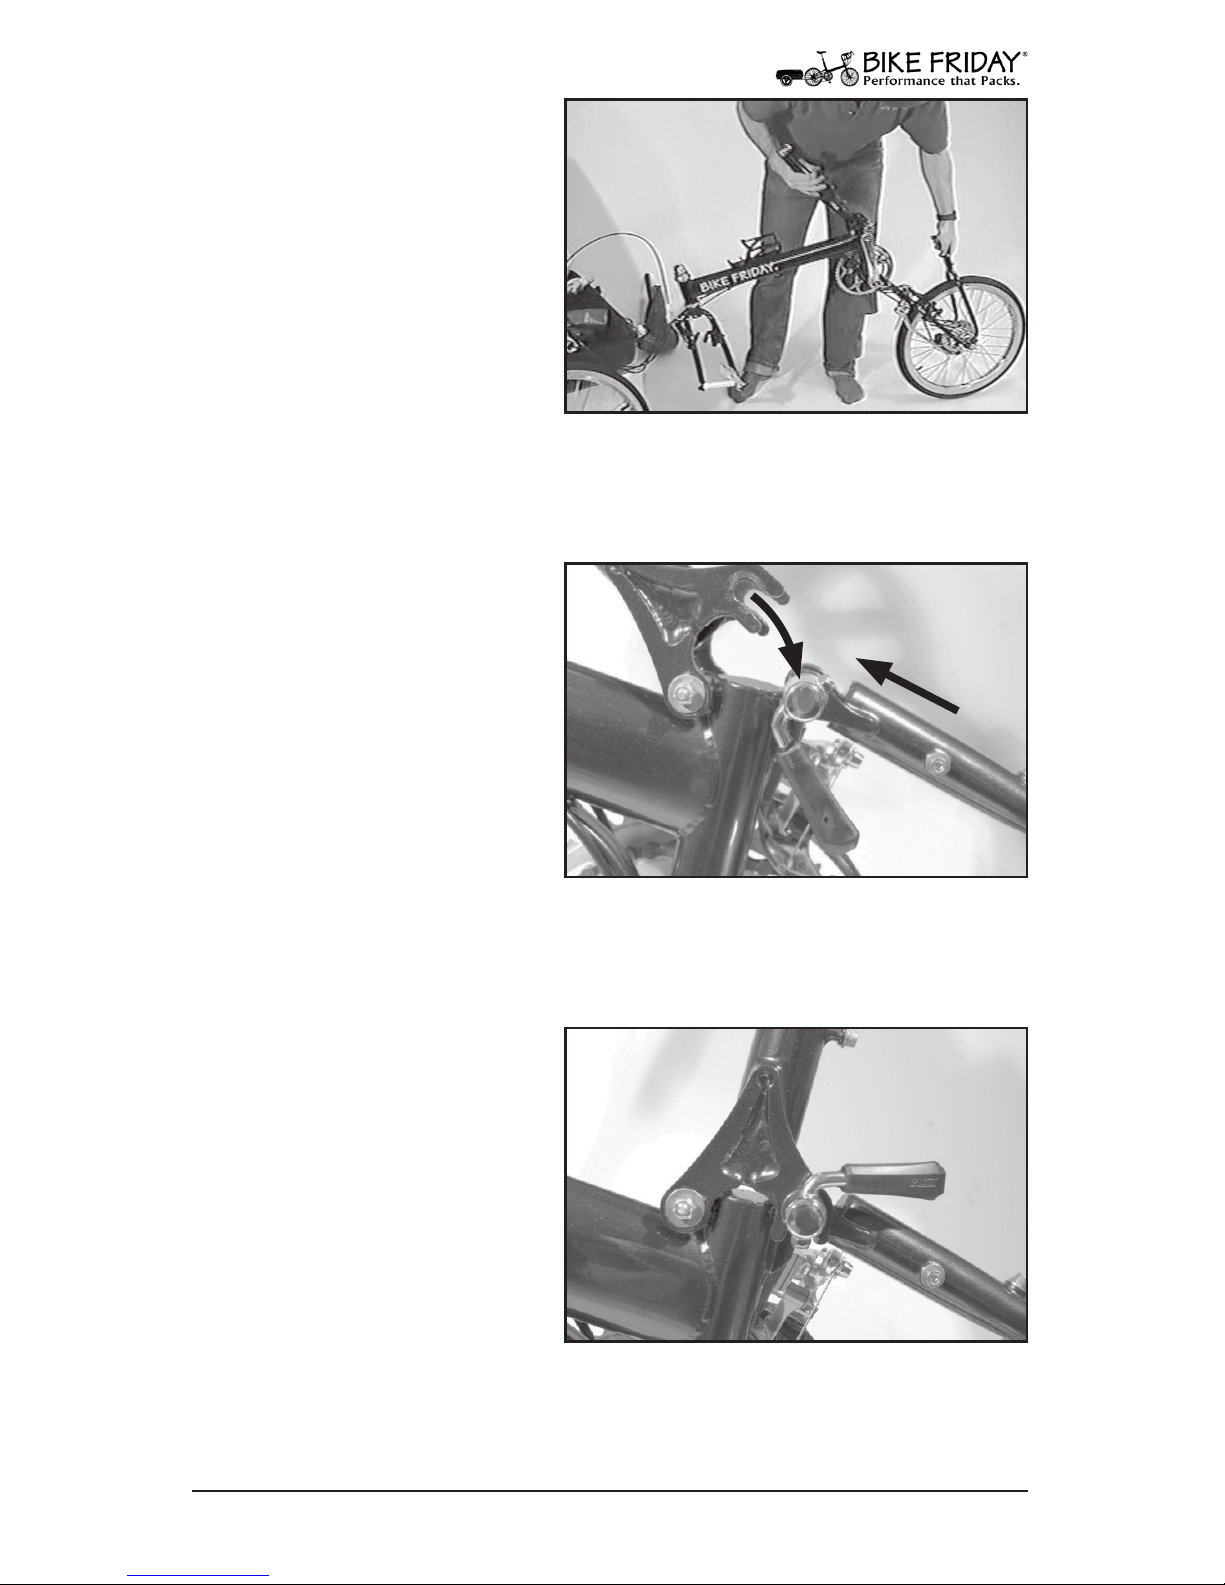
7. Unfold Your Bike
Lift out your bike and unfold
it. The rear end of the bike
will swing around until the
rear end hinge tips engage
the quick release on the
frame (make certain the
frame quick release is open).
As you unfold your bike,
make certain the cable hous-
ing that goes around the bottom bracket does not get hung up on
the left crank arm or hinge.
Fig. 7 Unfold your bicycle.
Assembly: Unfolding
9. Secure Seat Mast
With the seat mast upright,
close the quick release. You
may be concerned about hav-
ing a folding bicycle secured
with one quick release; how-
ever your Bike Friday bicycle
has been carefully designed
so that your weight tightens
this joint. The quick release
simply makes the bike easier to carry.
Remove packing materials from frame.
Fig. 9 Secure seat mast.
8. Unfold Seat Mast
With the rear end engaged,
lift the seat mast from its
stowed position along the
mono-tube and pull it fully
upright. The small fork tips
on the seat mast hinge will
overlap the rear end hinge
tips.
Fig. 8 Engage rear end hinge tips.
A
B

12 www.bikefriday.com 800-777-0258 • +1-541-687-0487
12. Remove Fork Spreader
The PVC tube between your
fork legs is intended to help
prevent frame damage when
traveling. It is held in place
by the wheel’s quick release.
Open the quick release, un-
thread the knurled nut, and
put the fork spreader in the
tool pouch for future use. Fig. 12 Remove fork spreader.
10. Easy Pack Seat Mast
Supplement
Rather than a hinged seat
mast like on the original Bike
Friday bicycle, the Easy Pack
Seat Mast bicycle models
have a sleeved seat mast that
telescopes out of the lower
seat tube.
If you bought a case with
your bike, the seat mast will be the painted tube (except for titanium
which is unpainted) in a grey felt bag. This conguration allows a
great deal of adjustment in saddle height for dierent sized riders
with the same bike. However, there is a minimum insertion mark
on the seat mast; at least the bottom four inches of the seat mast
should always be inside the seat tube.
Fig. 10 Pocket Bikes.
Assembly: Easy Pack Seat Mast
11.Easy Pack Style Seat Mast
For the Easy Pack Seat Mast
bicycles, the lower quick release
only clamps the rear end. A sep-
arate seat post collar on the seat
tube secures the seat mast. Both
quick releases must be closed
for safe riding.
Seat Mast
QR
Frame QR
Fig. 11 Secured seat mast.
13
www.bikefriday.com800-777-0258 • +1-541-687-0487
Assembly: Pocket Gnu Fork
15. Tighten Fork Legs
With the fork legs properly on the
steerer, tighten both clamp bolts
securely.
Fig. 15 Tighten fork clamp bolts.
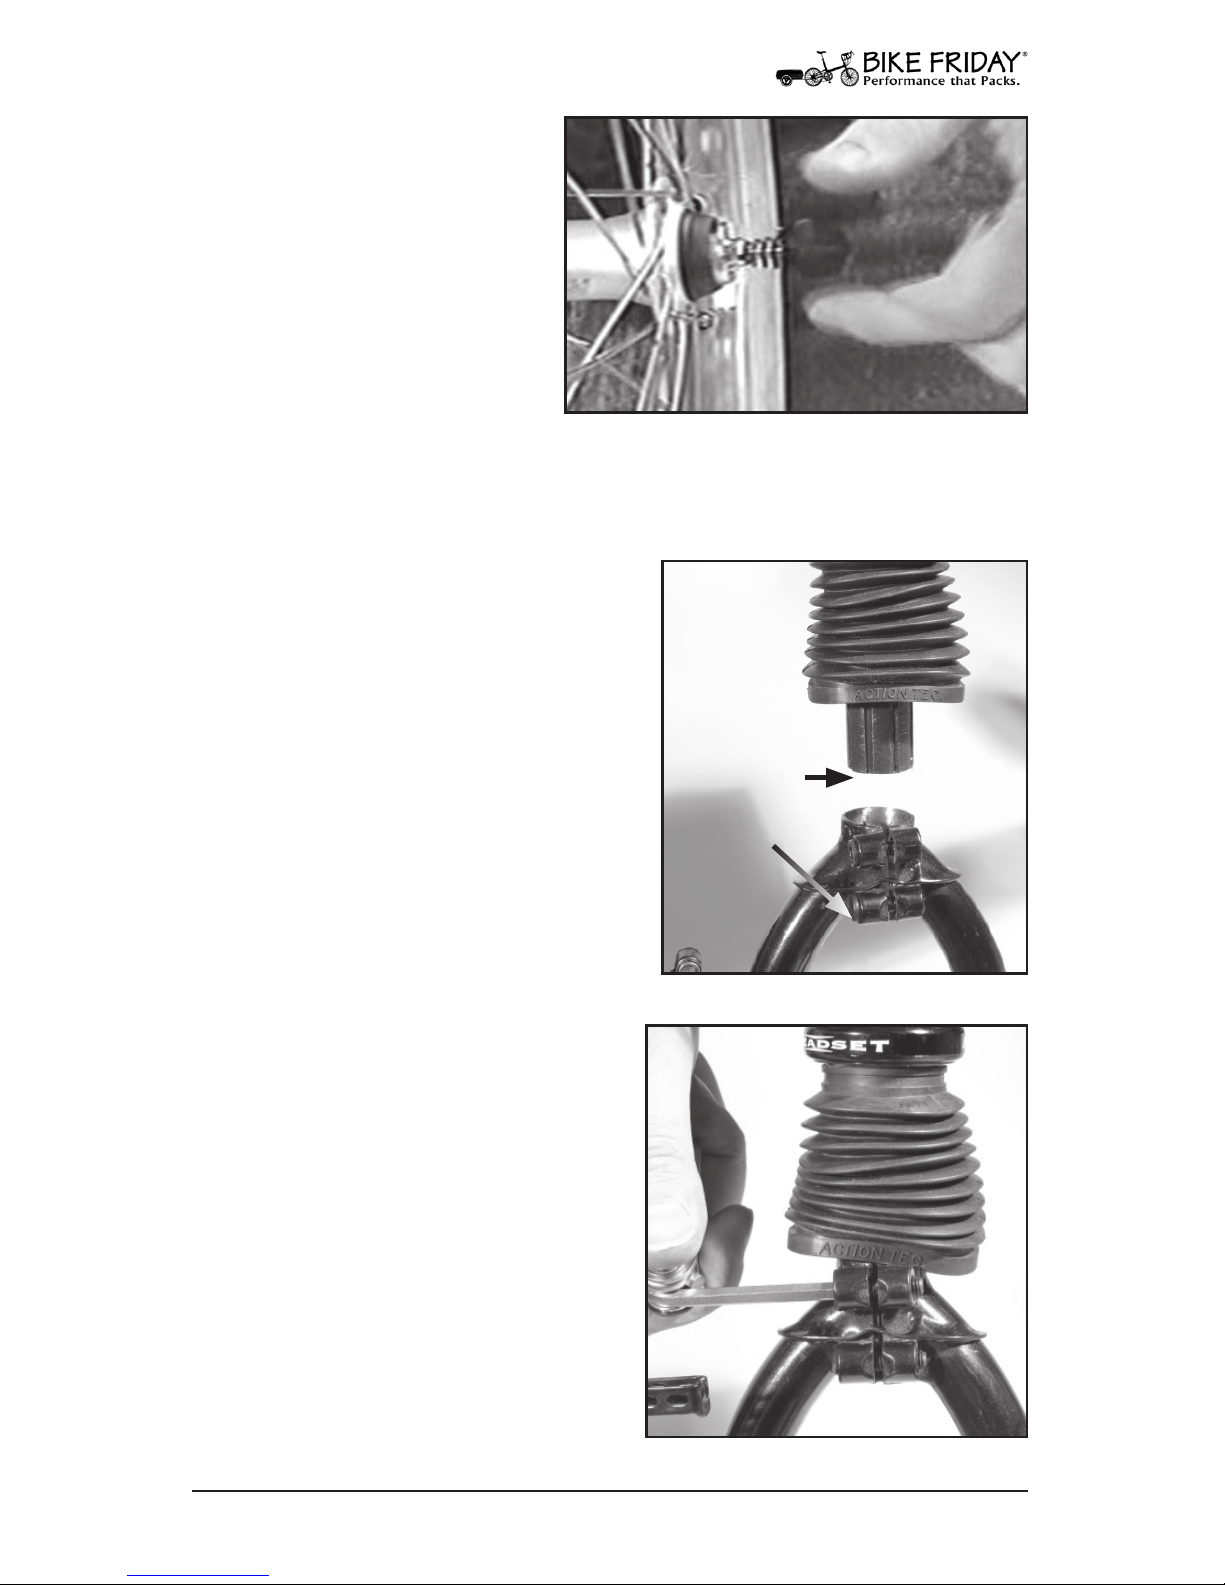
14. Pocket Gnu Suspension Fork
If you ordered a Pocket Gnu bicycle,
the fork legs were packed in a grey
felt bag and removed from the sus-
pension steerer tube (the part that
goes through the headset bearings).
The fork legs slide up the grooved
steerer until the steerer is ush with
the bottom of the fork leg clamping
collar. Keep the fork legs roughly
aligned with the wide part of the
rubber dust sleeve.
Fig. 14 Suspension fork.
Insert end
of steerer to
bottom of
clamp.
13. Install Wheel QR
Now install the quick release
from the fork spreader on the
front wheel. Make certain
that there is only one spring
per side and that the small
end of the spring is pointing
to the center of the hub on
each side. Loosely thread on
the knurled nut for now. Put
the wheel aside again.
Fig. 13 Quick release spring and nut.
14 www.bikefriday.com 800-777-0258 • +1-541-687-0487
Fig. 18 V-brake
17. Open Front Brake
To install your front wheel,
you will need to open the
front brake to allow the tire
to pass by the brake shoes. If
your bike is equipped with
a side-pull brake, simply
move the small lever to the
up position.
Fig. 17 Opening side-pull brake.
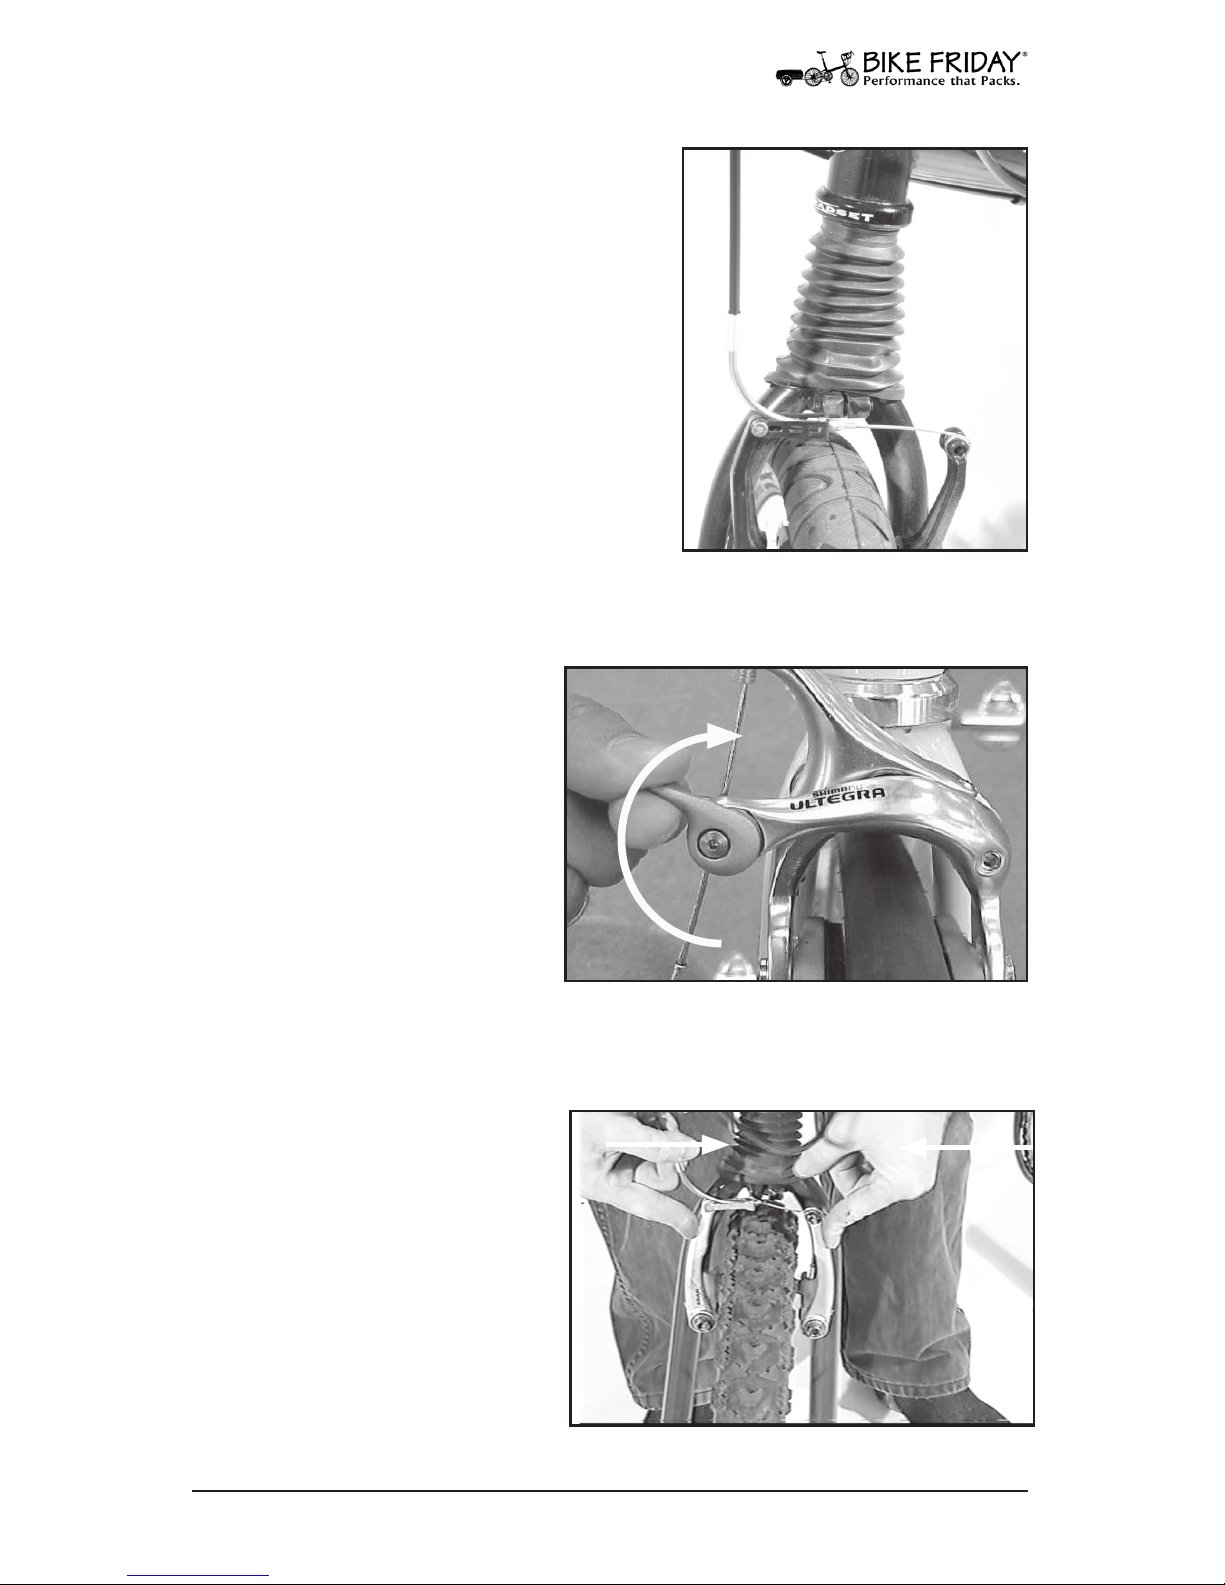
18. Operating V- Brakes
If your bike is equipped with
V-brakes, start by pressing
the brake arms together.
16. Attach Dust Cover
Once the fork clamp bolts are tight,
pull the rubber dust cover down and
snap over the oval ring on the fork legs.
After the rst ride, check the tightness
of these bolts.
Fig. 16 Attach dust cover.

15
www.bikefriday.com800-777-0258 • +1-541-687-0487
Assembly: Open Front Brake
20. Open Front Brake
At this point you should be
able to open the brake arms.
If you cannot release the
noodle from the noodle
holder, then the brake cable
may need to be loosened
a bit. See the next step for
instructions to add some
slack to the cable. Fig. 20 Open brake arms.
19. Release V-Brake
While continuing to press
the arms together (A), pull
the elbow-shaped noodle
out and up (B) and then push
the noodle holder down (C).
There is a slot in the end of
the noodle holder for the
brake cable to slip out.
Fig. 19 Pull out noodle from holder.
A
A
B
C
21.Brake Barrel Adjuster
To add some more brake
cable slack, you can turn the
barrel adjuster on the brake
lever. The barrel adjuster
is the knurled bolt that the
cable housing goes through
as it enters the brake lever.
Turn this adjuster clockwise
to loosen the cable. Note:
Some models may have a
lock nut on the adjuster,
which will need to be loosened rst. (Your own bike will not have
the stem installed at this point as shown in the illustration.)
Fig. 21 V-brake barrel adjuster.
To Add
Cable Slack

16 www.bikefriday.com 800-777-0258 • +1-541-687-0487
Assembly: Install Front Wheel
22. Install Front Wheel
Now install the front wheel.
Make certain the wheel is
fully seated in the fork drop
outs, and securely close the
quick release as illustrated in
the quick release safety sec-
tion. If you have a side-pull
brake, close the small lever
on the brake caliper at this
point.
Fig. 22 Install front wheel.
24. Close LV-Brake
Close the linear pull brake in
the reverse order of opening
it. Press both arms together
(A), and insert the noodle (B)
into the noodle holder (C).
The end of the noodle has a
bullet shaped tip that should
be inside the holder, but just
sticking through the cable
keyhole.
Fig. 24 Close V-brake.
AA
C
B
23. Reconnect Linear Pull
Brake
If you have a linear pull
brake, before closing it check
to make certain that the hous-
ing is properly seated into its
ferrules at both ends. With
the brake open, the housing
can slip to the side and keep
the brake from closing prop-
erly. Common places to check are the brake lever barrel adjuster
(top), and where the housing enters the noodle (bottom).
Fig. 23 Check housing for seating.

17
www.bikefriday.com800-777-0258 • +1-541-687-0487
Assembly: Install Stem
25. Double-Check Brake!
Regardless of which model
of brake you have, make
certain your brake is prop-
erly set up. Test squeeze the
brake levers; you may have
to adjust the barrel adjuster
to remove any excess cable
slack. A nal check can be
done after the rest of the bike
is assembled.
Fig. 25 Proper noodle tip position.
27. Mount Stem
Slide bottom of stem into the fork steerer
tube, keeping the stem’s quick release
assembly facing forward so that the hidden
stem pin will engage the slot in the fork.
Gently press the stem all the way down.
Fig. 27 Insert stem.
26. Stem Safety
If you look carefully at the
base of your stem, you will
see a pin hidden under the
clamping collar. This pin
must engage the slot in the
back of the fork’s steerer tube
(the threaded part sticking
up).
IF YOU DO NOT ENGAGE
THE STEM PROPERLY YOU MAY COMPROMISE SAFETY!
Fig. 26 Stem pin & fork slot.
18 www.bikefriday.com 800-777-0258 • +1-541-687-0487
Assembly: Install Stem
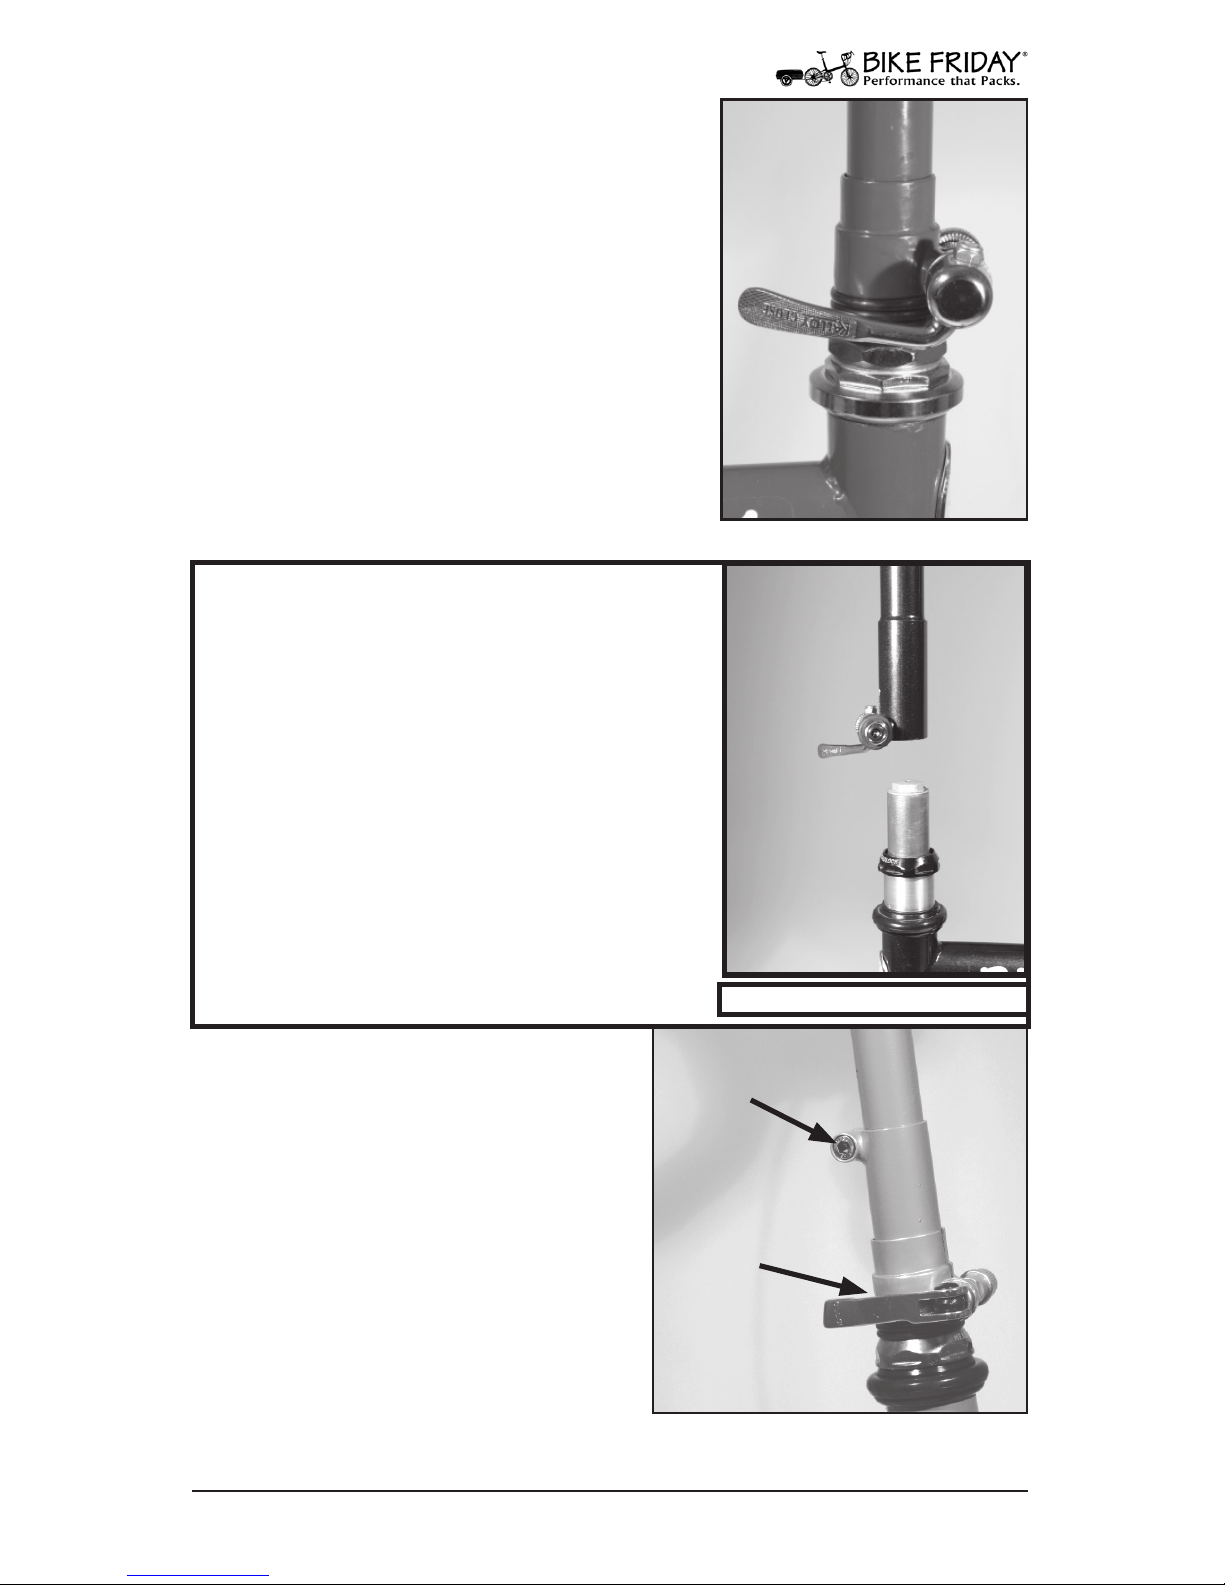
28. Tighten Stem
Tighten the quick release securely. It is
normally irrelevant whether the lever is
on the left or right side of the stem; how-
ever, a few stem collars only accept the
quick release from one direction. Also,
some stem models (i.e. Pocket Rocket Pro
bikes) will have a bolt instead of a quick
release to save weight.
Fig. 28 Stem clamp collar.
30. Adjustable Stem (Optional)
If you have purchased one of our
adjustable stems, set your desired
handlebar height using the clamp
directly above the stem collar. You
may choose to precisely set the
height once, or vary it according to
your riding needs; in either case be
certain this bolt is tight before riding
your bike. For t stem instructions,
see the section on “Accessories.”
Fig. 30 Adjustable stem.
Set bar height
here.
Release stem for
packing here.
29. Pocket Gnu Stem
If you purchased a Pocket Gnu bicycle,
your stem will be slightly dierent
because of the suspension fork. On this
bike the stem is a sleeve that ts over the
steerer tube (rather than into the steerer
tube). Furthermore, there is no alignment
pin as on the other stems. With the stem
all the way down over the steerer tube,
align the handlebars perpendicular to
the front wheel, and tighten the quick
release.
29. Pocket Gnu stem.

19
www.bikefriday.com800-777-0258 • +1-541-687-0487
31. Insert Handlebars
To facilitate packing, most
but not all Bike Friday
bicycles have two-part han-
dlebars with a reinforcing
sleeve in the left handlebar.
Make certain the attached
cables are not tangled or
wrapped around the frame
or fork. Insert left handlebar
into stem clamp, then right bar.
Fig. 31 Handlebar sleeve.
Assembly: Handlebars
33. Tighten Handlebars
Using the appropriate Allen
wrench (5 or 6mm), tighten
the handlebar clamp bolts
securely. If your bar clamp
has two bolts, tighten both
alternately. Now is a good
time to double-check your
steering system. Try stand-
ing in front of your bike with
the front wheel between your legs, and then push, pull, and twist
the bars and stem to make certain everything is secure.
Fig. 33 Tighten handlebar clamp.
32. Set Handlebars
With the handlebars in the
stem, press them rmly
together to ensure they are
fully seated. Custom stems
for drop bars have a round
window to allow you to cen-
ter the bar split in the stem.
All other handlebar types
have a small button screw on the stem
clamp to keep the bars centered. (Do not
remove.) For the angle of the bars, experi-
ment with what feels appropriate.
Fig. 32 Set handlebars.
Fig.32a Custom stem.

20 www.bikefriday.com 800-777-0258 • +1-541-687-0487
34. Install Seat Post
Remove the packing materi-
als from your seat post and
then insert the seat post into
frame. Once you have your
saddle height set, try adding
a piece of electrical tape to the
seat post or use a permanent
marker to mark your saddle
height for quick re-assembly.
If you did not purchase a saddle with your bike now would be a
good time to install your own saddle. Add a light dab of grease to
the saddle rails and seat carriage clamp.
Fig. 34 Install seat post.
Assembly: Seat Post & Saddle
36. Install The Pedals
Bike pedals have two dier-
ent thread directions. The
right pedal has a right-hand
thread, and the left pedal has
a left-hand thread. Thread
the right pedal in a clock-
wise direction; thread the left
pedal in a counter-clockwise
direction. Pedals are usually
stamped with a R or L on the pedal axle near the threads. A little
grease is always a good idea on pedal threads.
Fig. 36 Check pedals for threading.
35. Tighten Seat Post
Whenever you install the seat
post, make certain the seat
post shim (the split aluminum
sleeve inside the seat mast) has
its slot aligned with the slot in
the seat mast. (Some frames for
larger riders may not have a seat
post shim). Also make certain
the seat mast collar has its slot
aligned with the slot in the seat
mast. Tighten the seat post. (Be
careful not to overtighten, as the
bolt can break).
Fig. 35 Seat post shim.
Other manuals for Pocket Rocket
1
This manual suits for next models
9
Table of contents
Other Bike Friday Bicycle manuals

Bike Friday
Bike Friday tikit User manual

Bike Friday
Bike Friday Pocket Rocket User manual

Bike Friday
Bike Friday All-Packa Guide

Bike Friday
Bike Friday Hub Motor E-assist User manual

Bike Friday
Bike Friday Haul-a-Day User manual

Bike Friday
Bike Friday pakiT User manual

Bike Friday
Bike Friday tikit User manual

Bike Friday
Bike Friday Family Tandem Traveler User manual

Bike Friday
Bike Friday tikit User manual

Bike Friday
Bike Friday Haul-a-day Elite User manual


