Biltema YOSEMITE 27-2101 User manual

Art. 27-2101, 27-2102
© 2020-11-10 Biltema Nordic Services AB
TREHJULING
TREHJULSSYKKEL
KOLMIPYÖRÄ
TREHJULER
27-2101_02_A4_manual.indd • 2020-11-10, 08.37.13
Biltema, Garnisonsgatan 26, 2nd FL, SE-254 66 Helsingborg. www.biltema.com
Art. 27-2101, 27-2102
2
© 2020-11-10 Biltema Nordic Services AB
1.
2.
1.Place the seat cover over the body, as shown.
2. Pass the front fork assembly from bottom to top through the front circular pipe of
the body iron frame, insert the handlebar parts into the exposed part of the square
pipe, note that the front fork spring buckle direction is consistent with the direction
of the front fork buckle hole, complete the front end installation, as shown in figure,
if the front and rear directions are not in accordance with the drawing, please press
the spring buckle on the front of the car and pull it out and reinstall it.
3. Insert the rear section of the body iron frame into the corresponding
opening of the rear wheel assembly and fix it with a bolt, as shown in fig.
(please pay attention to the direction when installing) .
PRODUCT SPECIFICATION
Children's scooter
Part list
Installation steps
body seat handle
instruction
wrench
Cover under seat
Front wheel assembly
Rear wheel assembly
MODEL NUMBER:
LC-V1322
MONTERING/ASENTAMINEN DELAR/DELER/OSAT/DELE
DEL/OSAT/DELE BESKRIVNING/BESKRIVELSE/KUVAUS/
BESKRIVELSE
1.Place the seat cover over the body, as shown.
2. Pass the front fork assembly from bottom to top through the front circular pipe of
the body iron frame, insert the handlebar parts into the exposed part of the square
pipe, note that the front fork spring buckle direction is consistent with the direction
of the front fork buckle hole, complete the front end installation, as shown in figure,
if the front and rear directions are not in accordance with the drawing, please press
the spring buckle on the front of the car and pull it out and reinstall it.
3. Insert the rear section of the body iron frame into the corresponding
opening of the rear wheel assembly and fix it with a bolt, as shown in fig.
(please pay attention to the direction when installing) .
PRODUCT SPECIFICATION
Children's scooter
Part list
Installation steps
body seat handle
instruction
wrench
Cover under seat
Front wheel assembly
Rear wheel assembly
MODEL NUMBER:
LC-V1322
Axel med bakhjul/Aksel med bakhjul/Akseli ka
takapyörä/Aksel med baghjul
1.Place the seat cover over the body, as shown.
2. Pass the front fork assembly from bottom to top through the front circular pipe of
the body iron frame, insert the handlebar parts into the exposed part of the square
pipe, note that the front fork spring buckle direction is consistent with the direction
of the front fork buckle hole, complete the front end installation, as shown in figure,
if the front and rear directions are not in accordance with the drawing, please press
the spring buckle on the front of the car and pull it out and reinstall it.
3. Insert the rear section of the body iron frame into the corresponding
opening of the rear wheel assembly and fix it with a bolt, as shown in fig.
(please pay attention to the direction when installing) .
PRODUCT SPECIFICATION
Children's scooter
Part list
Installation steps
body seat handle
instruction
wrench
Cover under seat
Front wheel assembly
Rear wheel assembly
MODEL NUMBER:
LC-V1322
Framhjul med gaffelrör/Forhjul med gaffelrør/
Etupyörä ja haarukkaputki
1.Place the seat cover over the body, as shown.
2. Pass the front fork assembly from bottom to top through the front circular pipe of
the body iron frame, insert the handlebar parts into the exposed part of the square
pipe, note that the front fork spring buckle direction is consistent with the direction
of the front fork buckle hole, complete the front end installation, as shown in figure,
if the front and rear directions are not in accordance with the drawing, please press
the spring buckle on the front of the car and pull it out and reinstall it.
3. Insert the rear section of the body iron frame into the corresponding
opening of the rear wheel assembly and fix it with a bolt, as shown in fig.
(please pay attention to the direction when installing) .
PRODUCT SPECIFICATION
Children's scooter
Part list
Installation steps
body seat handle
instruction
wrench
Cover under seat
Front wheel assembly
Rear wheel assembly
MODEL NUMBER:
LC-V1322
Fäste för pedaler/Feste for pedaler/Kiinnike
polkimille/Holder til pedaler
1.Place the seat cover over the body, as shown.
2. Pass the front fork assembly from bottom to top through the front circular pipe of
the body iron frame, insert the handlebar parts into the exposed part of the square
pipe, note that the front fork spring buckle direction is consistent with the direction
of the front fork buckle hole, complete the front end installation, as shown in figure,
if the front and rear directions are not in accordance with the drawing, please press
the spring buckle on the front of the car and pull it out and reinstall it.
3. Insert the rear section of the body iron frame into the corresponding
opening of the rear wheel assembly and fix it with a bolt, as shown in fig.
(please pay attention to the direction when installing) .
PRODUCT SPECIFICATION
Children's scooter
Part list
Installation steps
body seat handle
instruction
wrench
Cover under seat
Front wheel assembly
Rear wheel assembly
MODEL NUMBER:
LC-V1322
Fast nyckel/Fastnøkkel/Kiintoavain/Fastnøgle
1.Place the seat cover over the body, as shown.
2. Pass the front fork assembly from bottom to top through the front circular pipe of
the body iron frame, insert the handlebar parts into the exposed part of the square
pipe, note that the front fork spring buckle direction is consistent with the direction
of the front fork buckle hole, complete the front end installation, as shown in figure,
if the front and rear directions are not in accordance with the drawing, please press
the spring buckle on the front of the car and pull it out and reinstall it.
3. Insert the rear section of the body iron frame into the corresponding
opening of the rear wheel assembly and fix it with a bolt, as shown in fig.
(please pay attention to the direction when installing) .
PRODUCT SPECIFICATION
Children's scooter
Part list
Installation steps
body seat handle
instruction
wrench
Cover under seat
Front wheel assembly
Rear wheel assembly
MODEL NUMBER:
LC-V1322
Ramrör/Rammerør/Runkoputki/Stelrør
1.Place the seat cover over the body, as shown.
2. Pass the front fork assembly from bottom to top through the front circular pipe of
the body iron frame, insert the handlebar parts into the exposed part of the square
pipe, note that the front fork spring buckle direction is consistent with the direction
of the front fork buckle hole, complete the front end installation, as shown in figure,
if the front and rear directions are not in accordance with the drawing, please press
the spring buckle on the front of the car and pull it out and reinstall it.
3. Insert the rear section of the body iron frame into the corresponding
opening of the rear wheel assembly and fix it with a bolt, as shown in fig.
(please pay attention to the direction when installing) .
PRODUCT SPECIFICATION
Children's scooter
Part list
Installation steps
body seat handle
instruction
wrench
Cover under seat
Front wheel assembly
Rear wheel assembly
MODEL NUMBER:
LC-V1322
Sadel/Sete/Satula
1.Place the seat cover over the body, as shown.
2. Pass the front fork assembly from bottom to top through the front circular pipe of
the body iron frame, insert the handlebar parts into the exposed part of the square
pipe, note that the front fork spring buckle direction is consistent with the direction
of the front fork buckle hole, complete the front end installation, as shown in figure,
if the front and rear directions are not in accordance with the drawing, please press
the spring buckle on the front of the car and pull it out and reinstall it.
3. Insert the rear section of the body iron frame into the corresponding
opening of the rear wheel assembly and fix it with a bolt, as shown in fig.
(please pay attention to the direction when installing) .
PRODUCT SPECIFICATION
Children's scooter
Part list
Installation steps
body seat handle
instruction
wrench
Cover under seat
Front wheel assembly
Rear wheel assembly
MODEL NUMBER:
LC-V1322
Styre/Ohjaustanko/Styr
5. Press Key 1 in the picture below, while pulling the left wheel,
press key 2, while pulling the right wheel, (key 3, key 4 for folding) .
4. Put the lower mating mouth of the car seat on the round pipe of the seat of the
body frame, tighten and fix the seat with two wrench tools, and complete the
installation. (as shown in the figure).
1. When children play with this commodity, the adult must be on the side to ensure their safety.
2.Before children can play by themselves, guardians must be around.
3. It is dangerous to bump into people or objects and make sure to play again without obstacles.
4.Please do not play in the ramp, on the concave side, in the uneven road, near the ditch, on the
stairs, on the porch, in the bevel, in the vicinity of the open fire.
5. Roads, parking lots and other places that can cause traffic accidents can't be used.
6.Do not use when weighing more than 20 kg.
7. Please be careful not to let your fingers, hair, and clothes get involved in the wheels around
and around the wheels.
8. Can't be used by two or more people at the same time.
9. Please do not use it in any other way except by riding.
10. Do not use products when products are damaged or deformed or malfunction.
11. Please don't put it in the rain.
12. The use of the product may be dangerous when the product is damaged. The guardian must
regularly check the integrity of the product.
13. Before assembly, this product is in danger of small parts and sharp edges. Only adults can
give it to children when they have finished installing.
14. After the packing box is opened, the plastic bag should be discarded in time to avoid the
children playing and causing suffocation
15.In addition to children, no other load can be placed on the vehicle, otherwise it will affect
the stability of the vehicle
Safety warning:
This product is subject to an 2-4 years old/weight limit of 30kg.
To avoid accidents, keep the following considerations in mind:
*Suitable age:2-4years old *Product Size:X36.5X48
*Main ingredients:PP and iron pipe * outer box size: 51X22.5X18CM
*Net weight: 3.26KG
*Gross weight:3.88KG
6 5 CM
Final Installation Completion Chart
3.
4. 5.

Art. 27-2101, 27-2102
3© 2020-11-10 Biltema Nordic Services AB
TREHJULSSYKKEL
TILL FÖRÄLDRAR
Som förälder ansvarar du för barnets säkerhet. Läs igenom
säkerhetsinstruktionerna i denna bruksanvisning noga och
behåll den för framtida bruk. Håll alltid uppsikt över barnet
och se till att cykel är utom räckhåll för barnet när den inte
används. Förklara riskerna för barnet och visa hur man an-
vänder cykeln på ett säkert sätt.
KOMBINERAD TREHJULING OCH BALANSCYKEL
Cykeln kan användas som trehjuling eller balanscykel genom
att man skjuter ihop bakhjulen. Pedalerna går att ta av och
sätta under sadeln när cykeln används som balanscykel.
SÄKERHETSFÖRESKRIFTER
• Lämplig för barn 2–4 år.
• Cykeln ska monteras av en vuxen.
• Låt inte barnet cykla på natten.
• Cykeln får inte användas på trakerade vägar eller där det
nns motortrak.
• Endast en åkare åt gången på cykeln.
• Se till att barnet har godkänd cykelhjälm på sig vid cyk-
ling.
• Se till att barnet håller båda händerna på styret vid cyk-
ling.
• Barnet ska alltid övervakas av en vuxen vid cykling.
• Använd inte cykeln i backar, på sluttande vägar, på
ojämna underlag, nära stup, nära diken, nära pooler, nära
trakerade vägar eller i andra områden som kan vara far-
liga för barnet.
• Cykeln är godkänd enligt EN 71:1.
• Max belastning 30 kg.
VARNING! Kontrollera alltid att alla skruvar är åtdrag-
na. Att styrstången och handtagen sitter ordentligt fast och
att hjulen inte är spruckna eller skadade innan cykeln an-
vänds.
VARNING! Denna leksak har inga bromsar.
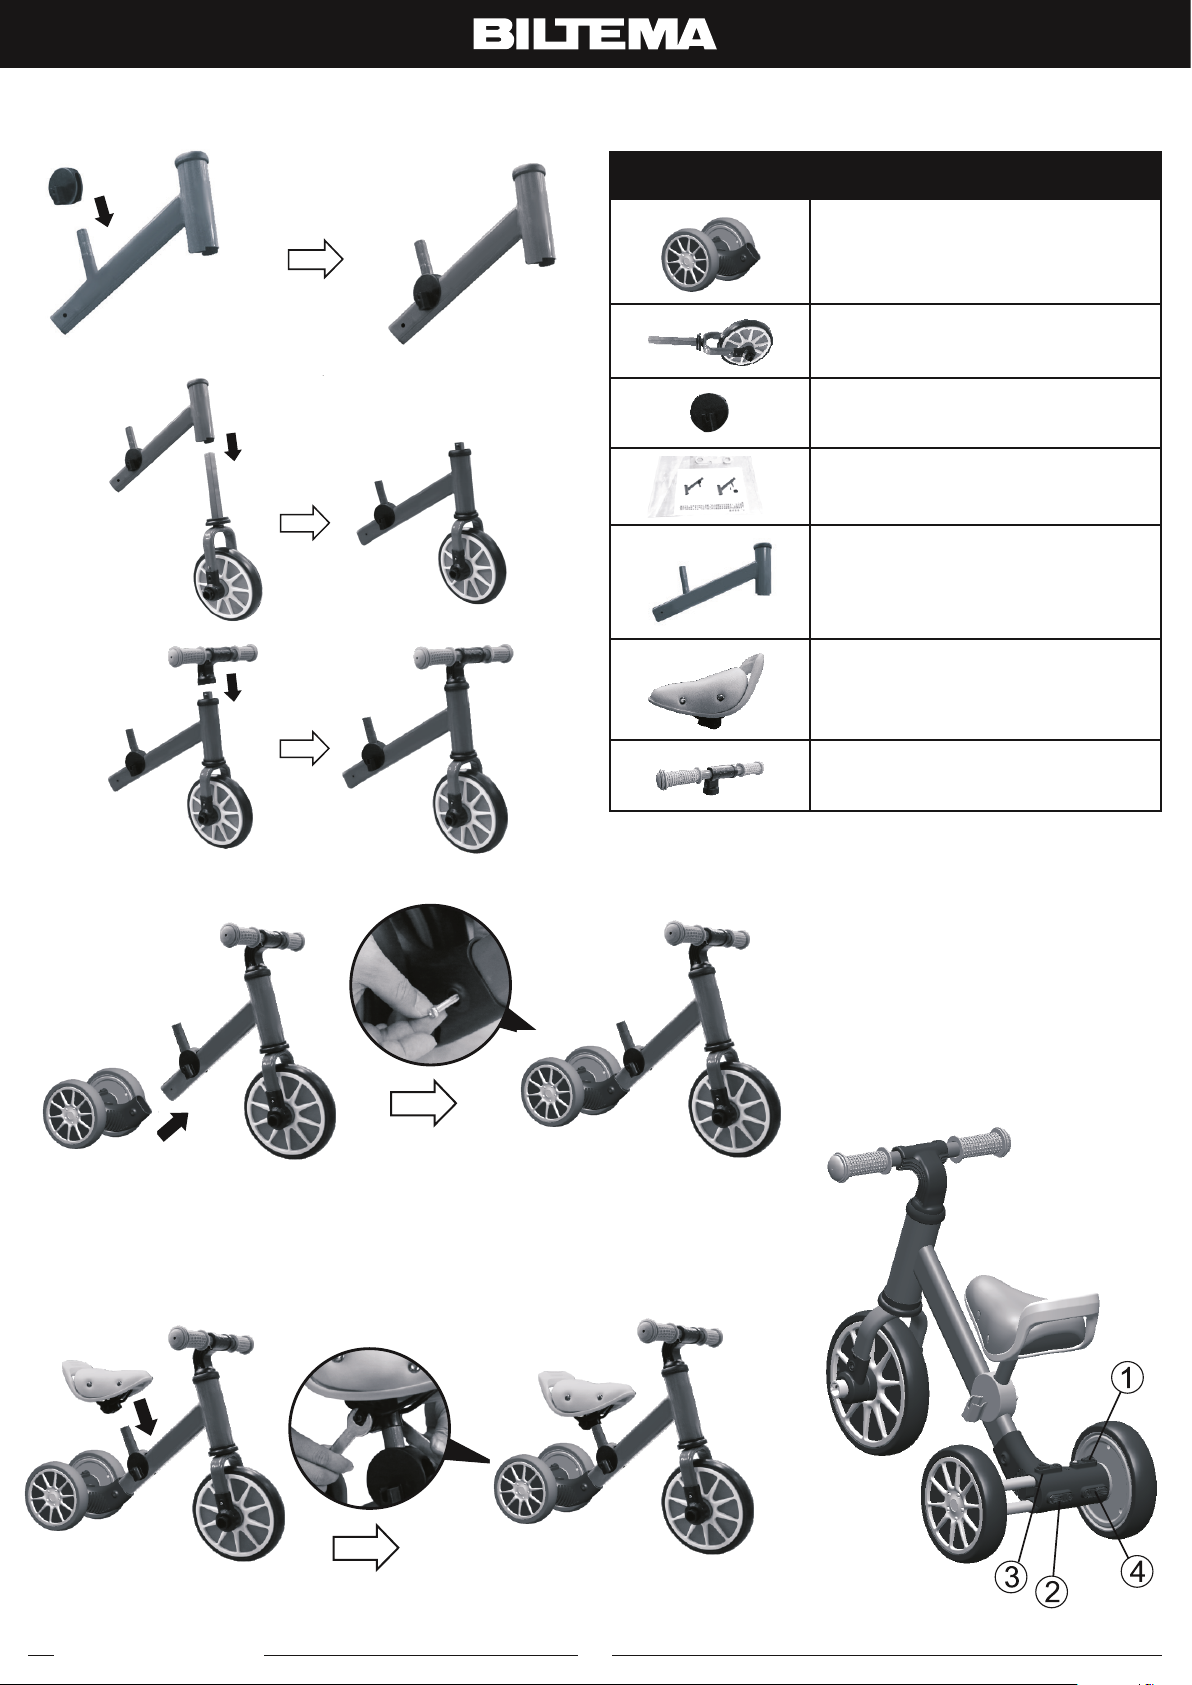
MONTERING
1. Placera skyddet över sadelstolpen mot ramröret som
bilden visar.
2. Trä ramröret över gaffelröret. Montera sedan styret
ovanpå gaffelröret genom att trycka det på plats.
3. Montera sedan bakhjulen genom att trä på dem på ram-
rörets bakre ände. Lås fast bakhjulen med låssprinten,
som visas i på detaljbilden.
4. Montera sadeln på sadelröret. Skruva åt sadelklämman
så att sadeln sitter ordentligt fast, använd en skiftnyckel.
5. För att dra isär hjulen gör så här: Håll ner knapp 1 och
dra samtidigt ut vänster hjul. Håll ner knapp 2 och dra ut
häger hjul. Lås utdraget läge med knapp 3 och 4.
FÄSTE FÖR PEDALER
Tramporna kan bara fästas under sadeln när den är i sitt
högsta läge.
TREHJULING
SE NO
TIL FORELDRE
Som forelder har du ansvaret for barnets sikkerhet. Les
grundig sikkerhetsinstruksjonene i denne bruksanvisningen,
og ta vare på den for fremtidig bruk. Hold alltid oppsikt med
barnet, og sørg for at sykkelen ligger utilgjengelig for barn når
den ikke er i bruk. Forklar risikoen for barnet, og vis hvordan
man bruker sykkelen på en sikker måte.
KOMBINERT TREHJULSSYKKEL OG
BALANSESYKKEL
Sykkelen kan brukes som trehjulssykkel eller balansesykkel
ved at man skyver sammen bakhjulene. Pedalene kan tas av
og settes under setet når sykkelen brukes som balansesykkel.
SIKKERHETSFORSKRIFTER
• Egnet for barn 2–4 år.
• Sykkelen må monteres av en voksen.
• Ikke la barnet sykle om natten.
• Sykkelen må ikke brukes på trakkerte veier eller på veier
der det er motorisert trakk.
• Bare én person om gangen på sykkelen.
• Sørg for at barnet bruker godkjent sykkelhjelm under syk-
ling.
• Sørg for at barnet har begge hendene på styret under
sykling.
• Barnet skal alltid holdes under oppsikt av en voksen un-
der sykling.
• Sykkelen skal ikke brukes i bakker, på bratte veier, på
ujevnt underlag, i nærheten av stup, i nærheten av grøfter,
i nærheten av trakkerte veier eller på andre steder som
kan være farlige for barnet.
• Sykkelen er godkjent i samsvar med EN 71:1.
• Maks. belastning 30 kg.
ADVARSEL! Kontroller alltid at alle skruer er stram-
met til. At styrestangen og håndtakene sitter godt fast, og at
hjulene ikke har sprekker eller er skadet før sykkelen brukes.
ADVARSEL! Denne leken har ikke bremser.
MONTERING
1. Plasser beskyttelsen over setepinnen mot rammerøret,
som vist på bildet.
2. Tre rammerøret over gaffelrøret. Monter deretter styret på
gaffelrøret ved å trykke det på plass.
3. Monter deretter bakhjulene ved å tre dem på bakre ende
av rammerøret. Lås bakhjulet med låsepinnen, som vist
på detaljbildet.
4. Monter setet på seterøret. Skru til seteklemmen, slik at
setet sitter godt fast. Bruk en skiftenøkkel.
5. Gjør følgende for å dra fra hverandre hjulene: Hold nede
knapp 1, og dra samtidig ut venstre hjul. Hold nede
knapp 2, og dra ut høyre hjul. Lås utdratt posisjon med
knapp 3 og 4.
FESTE FOR PEDALER
Pedalene kan kun henges under setet når det er i høyeste
posisjon.
Art. 27-2101, 27-2102
4
© 2020-11-10 Biltema Nordic Services AB
FI DK
TREHJULERKOLMIPYÖRÄ
VANHEMMILLE
Vanhempana sinä vastaat lapsen turvallisuudesta. Lue tämän
käyttöohjeen turvaohjeet huolellisesti ja säilytä ohje tulevaa
tarvetta varten. Pidä lasta aina silmällä ja varmista, ettei hän
saa pyörää käsiinsä ilman aikuisten valvontaa. Selitä lapselle
riskit ja näytä, kuinka pyörää käytetään turvallisesti.
YHDISTETTY KOLMIPYÖRÄINEN JA
TASAPAINOPYÖRÄ
Pyörää voi käyttää kolmipyöräisenä tai tasapainopyöränä ty-
öntämällä takapyörät yhteen. Polkimet voi ottaa pois ja laittaa
satulan alle, kun pyörää käytetään tasapainopyöränä.
TURVALLISUUSMÄÄRÄYKSET
• Soveltuu 2–4-vuotiaille lapsille.
• Kokoaminen vaatii aikuisen.
• Älä anna lapsen pyöräillä yöaikaan.
• Polkupyörää ei saa käyttää liikennöidyillä teillä tai alueilla,
jolla on moottoriliikennettä.
• Pyörää saa käyttää vain yksi lapsi kerrallaan.
• Varmista, että lapsella on pyöräillessään hyväksytty py-
öräilykypärä.
• Varmista, että lapsi pitää molemmat kädet ohjaustangolla
pyöräillessään.
• Lapsen tulee käyttää pyörää vain aikuisen valvonnassa.
• Pyörää ei saa käyttää mäissä, kaltevilla teillä, epätasaisilla
alustoilla, lähellä jyrkänteitä, ojia, uima-altaita tai liikennö-
ityjä teitä tai muissa paikoissa, jotka voivat olla vaarallisia
lapselle.
• Pyörä on hyväksytty standardin EN 71:1 mukaan.
• Enimmäiskuormitus 30 kg.
VAROITUS! Tarkista aina, että kaikki ruuvit ovat
kireällä. Ohjaustangon ja kahvojen on oltava hyvin kiinni, eikä
renkaissa saa olla halkeilua tai vaurioita; tarkista ennen
pyörän käyttämistä.
VAROITUS! Tässä lelussa ei ole jarruja.
ASENTAMINEN
1. Aseta suojus satulaputken päälle runkoputkea vasten
kuvan osoittamalla tavalla.
2. Pujota runkoputki haarukkaputken päälle. Kiinnitä sitten
ohjaustanko haarukkaputken päälle painamalla se paikal-
leen.
3. Asenna sitten takapyörät työntämällä ne runkoputken
takaosaan. Lukitse takapyörät lukkosokalla osakohtaisen
kuvan mukaisesti.
4. Asenna satula satulaputkeen. Kiristä satulapidike niin,
että satula on tiukasti kiinni, käytä jakoavainta.
5. Pyörät vedetään erilleen seuraavasti: Paina painiketta 1 ja
vedä samalla vasen pyörä ulos. Paina painiketta 2 ja vedä
samalla oikea pyörä ulos. Lukitse leveä asento painik-
keilla 3 ja 4.
KIINNIKE POLKIMILLE
Polkimet voi kiinnittää satulan alle, kun se on korkeimmassa
asennossa.
TIL FORÆLDRE
Som forælder er du ansvarlig for barnets sikkerhed. Læs sik-
kerhedsanvisningerne i denne brugsanvisning omhyggeligt
igennem, og opbevar den til fremtidig brug. Hold altid opsyn
med barnet, og sørg for, at cyklen er uden for barnets række-
vidde, når den ikke benyttes. Forklar risiciene for barnet, og
vis, hvordan man bruger cyklen på en sikker måde.
KOMBINERET TREHJULET CYKEL OG LØBECYKEL
Kan bruges som trehjulet cykel eller som løbecykel ved at
skyde baghjulene sammen. Pedalerne kan tages af og sæt-
tes under sadlen, når cyklen bruges som løbecykel.
SIKKERHEDSFORSKRIFTER
• Velegnet til børn på 2–4 år.
• Cyklen skal samles af en voksen.
• Lad ikke barnet cykle om natten.
• Cyklen må ikke anvendes på trakerede veje eller på ste-
der med motortrak.
• Cyklen må kun bruges af én person ad gangen.
• Sørg for, at barnet bærer godkendt cykelhjelm, når det
cykler.
• Sørg for, at barnet holder begge hænder på styret, når det
cykler.
• Barnet skal altid overvåges af en voksen, når det cykler.
• Brug ikke cyklen på bakker, på skrånende veje, på ujævnt
underlag, nær skrænter, nær grøfter, nær svømmebassi-
ner, nær trakerede veje eller i andre områder, der kan
være farlige for barnet.
• Cyklen er godkendt iht. EN 71:1.
• Maks. belastning 30 kg.
ADVARSEL! Kontroller altid, at alle skruer er
tilspændt. Kontroller også, at frempinden og håndtagene
sidder ordentligt fast, og at hjulene ikke er revnede eller
beskadigede, før cyklen anvendes.
ADVARSEL! Dette legetøj har ingen bremser.
MONTERING
1. Monter beskytteren over sadelpinden mod stelrøret som
vist på billedet.
2. Træk stelrøret over gaffelrøret. Monter derefter styret
oven på gaffelrøret ved at trykke det på plads.
3. Monter derefter baghjulene ved at trække dem på stelrø-
rets bagende. Lås baghjulene fast med låsestiften som
vist på detaljebilledet.
4. Monter sadlen på sadelpinden. Stram sadelklemmen, så
sadlen sidder ordentligt fast, ved hjælp af en skruenøgle.
5. Sådan trækkes hjulene fra hinanden: Hold knap 1 nede,
og træk samtidig ud i venstre hjul. Hold knap 2 nede, og
træk ud i højre hjul. Lås hjulene fast i udtrukket position
med knap 3 og 4.
HOLDER TIL PEDALER
Pedalerne kan kun fastgøres under sadlen, når den er i sin
højeste position.
This manual suits for next models
1


