BioGX pixl Manual

Real-Time PCR Platform
Instructions for Use Manual
For Windows® Operating Software
Version 1.0

pixl Real-Time PCR Platform
Instructions for Use Manual
Page 2 of 37 pixl Real-Time PCR Instructions for Use Manual
Rev. 01-28JUL2021
Table of Contents
SAFETY AND REGULATORY COMPLIANCE ...................................................................................................... 3
PRODUCT OVERVIEW .................................................................................................................................... 5
HARDWARE SET-UP GUIDE ............................................................................................................................ 9
PLATFORM CLEANING REQUIREMENT .......................................................................................................... 11
WARRANTY .................................................................................................................................................. 11
STEP-BY-STEP SOFTWARE GUIDE .................................................................................................................. 12
TROUBLESHOOTING GUIDE .......................................................................................................................... 21
APPENDIX A: PCR DATA PROCESSING – POSITIVE/NEGATIVE DETERMINATION AND CT CALCULATION. ....... 24
APPENDIX B: CHANNEL CROSS TALK SUPPRESSION TECHNIQUES ................................................................. 31
REVISION HISTORY ....................................................................................................................................... 35
SYMBOLS ..................................................................................................................................................... 36

pixl Real-Time PCR Platform
Instructions for Use Manual
Page 3 of 37 pixl Real-Time PCR Instructions for Use Manual
Rev. 01-28JUL2021
Safety and Regulatory Compliance
Please read these instructions before operating the pixl Real-Time PCR platform.
Packaging, Storage and Transportation Identification
Symbol
Description
Explanation
Places where
symbol is located
Handle with care
Product is a precision instrument
and should be handled with care.
On the carton
Upward
Instrument must be kept upward in
the process of handling, storage,
and use.
On the carton
Avoid Moisture or
Liquid
Instrument should not be stored in
a humid environment or exposed to
liquids.
On the carton

pixl Real-Time PCR Platform
Instructions for Use Manual
Page 4 of 37 pixl Real-Time PCR Instructions for Use Manual
Rev. 01-28JUL2021
Operation Requirements
● Operation of the BioGX pixl Real-Time PCR Platform should be limited only to skilled
personnel.
● This instrument is an electromechanical device. If not used strictly in accordance
with the provisions of the Operation Manual, instrument malfunction and/or
physical injury may occur.
● The instrument nameplate is marked with the manufacturer's name, product
name and model, product standard number, factory number, factory date,
power supply voltage, frequency, and input current.
● Operate in strict accordance with the safety instructions provided on the instrument
and within the instructions for use.
● Accessories and replacement parts must be procured from BioGX or its agent.
● Do not open the instrument during use.
● Do not touch/operate the touch screen when the instrument is in operation.
● The instrument must be placed in a clean and ventilated environment to avoid
corrosive gas and strong magnetic field interference, to avoid direct sunlight and
strong light source.
● Instrument working conditions should remain between 0°C and 35°C, with relative
humidity below 85%.
● Appropriate PPE (Personal Protective Equipment) must be worn when dealing with
toxic, corrosive, or contagious substances.
● Local safety regulations must be followed when handling or discarding such waste.
In case of spatter or leakage, disinfect immediately with appropriate disinfectant to
prevent contamination of laboratory personnel and equipment.
● Only technicians from the manufacturer are authorized to repair, replace or
otherwise reconfigure any components.
Electrical Safety
Take proper precautions when handling and electrical equipment. NEVER work on live
circuits, fixtures, receptacles, or switches. The safety design protection grade of the BioGX
pixl Real-Time PCR Platform is classified as a Class I (IEC) device.

pixl Real-Time PCR Platform
Instructions for Use Manual
Page 5 of 37 pixl Real-Time PCR Instructions for Use Manual
Rev. 01-28JUL2021
Safety rules you should follow whenever working with any electrical appliance includes:
● Connect instrument to power adapter with a three-core grounding socket
conforming to safety standards of 120V~(60Hz).
● Confirm power is off when connecting the power cord.
● Confirm the voltage and frequency of the AC power is consistent with instrument
requirements.
● Ensure hands are dry when operating the power switch.
● Power off instrument before removing the power cord.
● Do not allow power cord to touch hot surfaces of the instrument.
● Power off the instrument before cleaning.
● Power off the instrument when no longer in use.
Electromagnetic Compatibility
The BioGX pixl Real-Time PCR Platform conforms with emission and disturbance
immunity requirements specified in EN60601-1-2. It is the manufacturer's responsibility
to provide the customer or user with the electromagnetic compatibility information of
the real-time PCR platform. The user is responsible for ensuring the electromagnetic
compatibility for proper function of the real-time PCR platform.
It is recommended that the electromagnetic environment be evaluated prior to the
use of real-time PCR platform.
Do not use the real-time PCR platform next to strong radiation sources (such as unshielded
RF sources), otherwise it may interfere with the normal operation.
Product Overview
The BioGX pixl Real-Time PCR Platform is a portable, high performance real time
quantitative PCR system equipped with a 4-channel fluorescence optical system, powered
by ultra-low-light Complementary Metal Oxide Semiconductor (CMOS) bio-imaging sensor.

pixl Real-Time PCR Platform
Instructions for Use Manual
Page 6 of 37 pixl Real-Time PCR Instructions for Use Manual
Rev. 01-28JUL2021
The platform is optimally suited for applications where portability, and fast time-to-result is
required. Applications of pixl are point-of-care molecular diagnostics test (POCT; Clinical
clearance required), food safety and environment testing, agriculture, or research lab use
where bench space is limited.
Figure 1. BioGX pixl Real-Time PCR Platform.

pixl Real-Time PCR Platform
Instructions for Use Manual
Page 7 of 37 pixl Real-Time PCR Instructions for Use Manual
Rev. 01-28JUL2021
Features
● Compact and rugged design. No internal moving parts, and no need for calibration.
● Multi-wavelengths 4-channels fluorescence sensing capability.
● Equipped with ultra-low-light sensitive CMOS-based fluorescent imager.
● Cross platform software for Windows® and Android® OS, with cloud-ready
connectivity.
● Low power requirement. External supply with ~90W active power.
● Battery-backup option for outdoor use and power loss protection.
Key Parameters
Capacity (# of wells)
16
Channels (# of Fluorophores per well)
4
(FAM/SYBR Green; JOE/HEX/VIC/TET;
ROX/Texas Red; CY5/LIZ/Cy5.5)
Multiplex capability
Up to 4 targets per well
Minimum detection threshold
4 copies
Dynamic range
>1.0E9
Signal Interface
USB 2.0, Bluetooth® 2.0
Excitation Source
High endurance LED
Detector
Ultra-low-light CMOS Bio-imaging chip
Thermal system
Solid-state, Peltier-based
Tube/plate formats
8-tube strip (0.2mL)
Reaction volume
10µL – 60µL
Filters:
4 sets exchangeable*
Excitation Range
460nm – 670nm
Emission Range
510nm – 720nm
DNA probes supported*
DNA binding dyes (e.g. SYBR Green), hydrolysis
probes (e.g. TaqMan probe) and hybridization
probes (e.g. FRET probes).

pixl Real-Time PCR Platform
Instructions for Use Manual
Page 8 of 37 pixl Real-Time PCR Instructions for Use Manual
Rev. 01-28JUL2021
Temperature Uniformity
+-0.2°C
Temperature control resolution
+-0.1°C
Temperature Ramp Rate
5.5°C/s heating; 4°C/s cooling
Size and weight
247mm (L) x 188mm (W) x 133mm (H).
Weight
1350g
Power supply
DC 16V, 90W (Adapter provided that accepts
110V/240V AC)
*Wavelength characteristics may be modified by changing filter modules.
Applications
● Point-of-care molecular diagnostics (Clinical clearance required)
● Research and educational lab use
Instrument External Dimensions
Figure 2. BioGX pixl Real-Time PCR Platform Dimensions.
List of Components
● BioGX pixl Real-Time PCR Platform
● Power Cord
pixl Real-Time PCR Platform
Instructions for Use Manual
Page 9 of 37 pixl Real-Time PCR Instructions for Use Manual
Rev. 01-28JUL2021
● USB Cable
● External Battery pack (Optional accessory)
● Carrying Case (Optional accessory)
Hardware Set-up Guide
Starting the BioGX pixl Real-Time PCR Platform
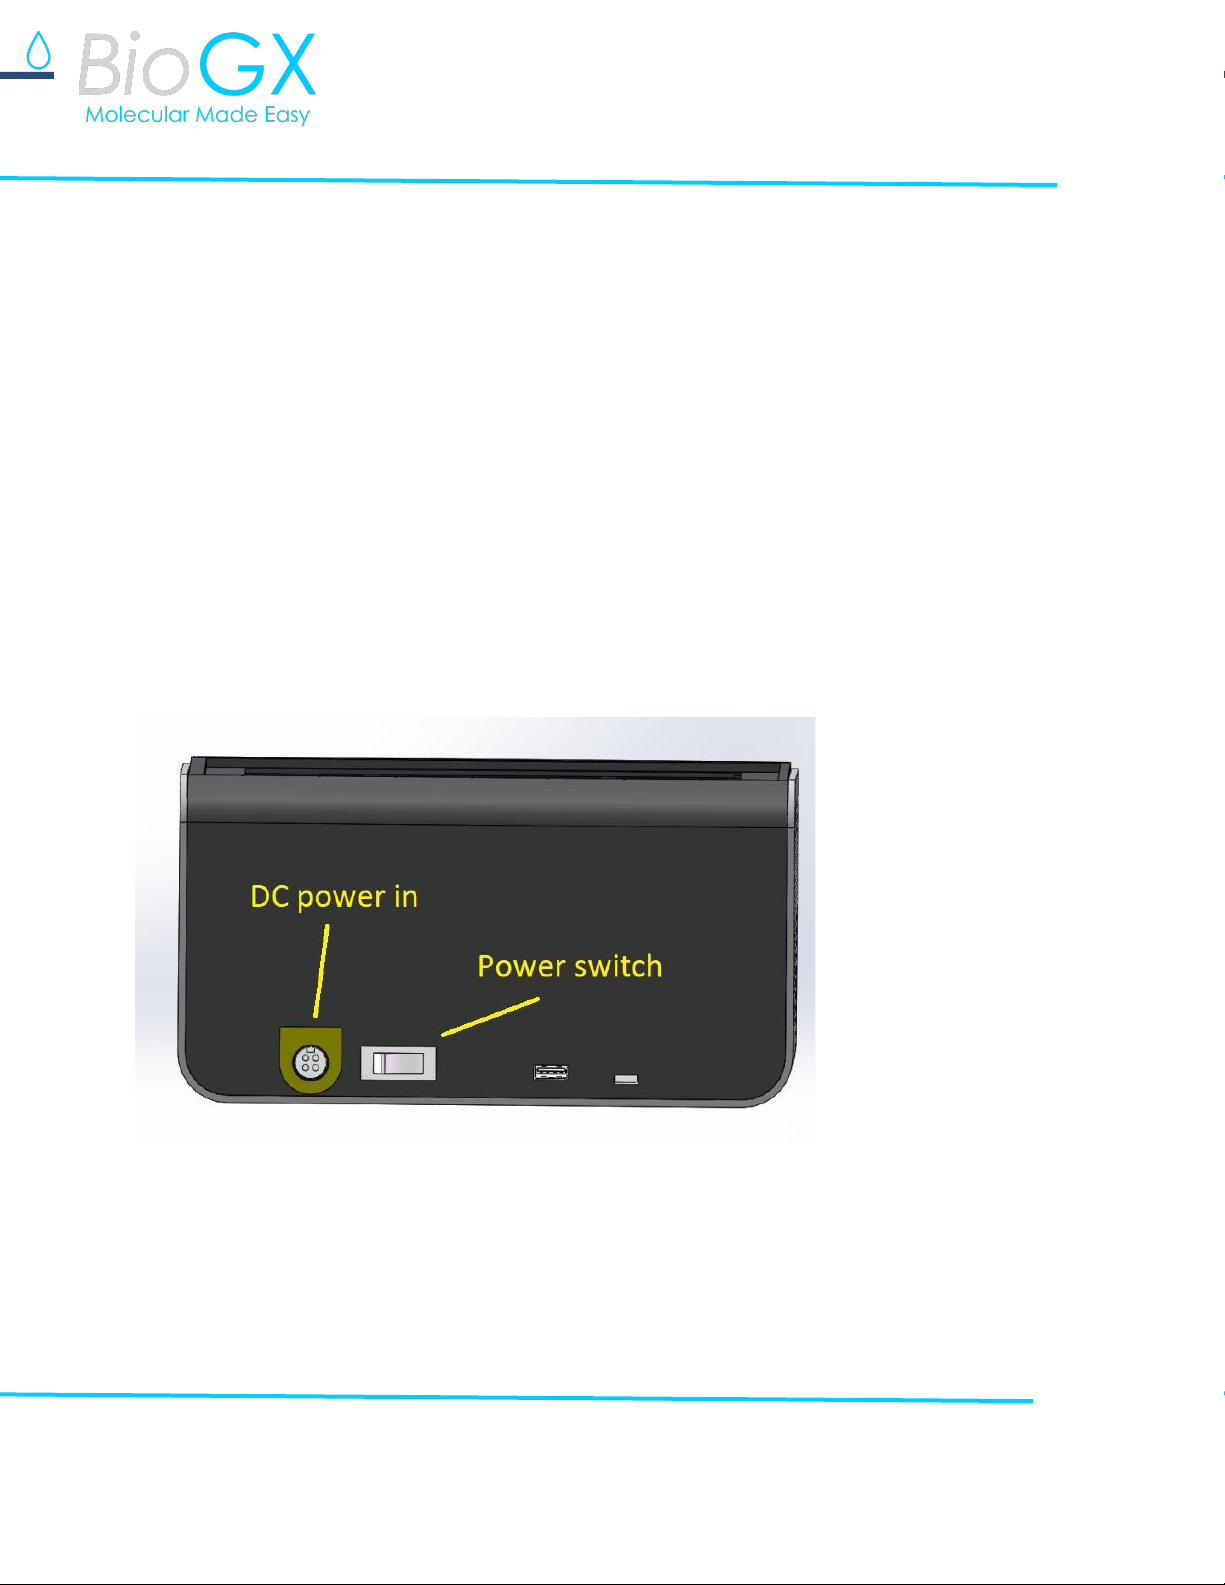
The platform is powered through an external AC/DC power adapter. The power adapter
accepts AC input ranging 110V to 240V and produces DC output of 16V.
The DC power input connector port is located at the back of the instrument. Once the
power is provided, the green power indicator light will turn on.
Figure 3. BioGX pixl Real-Time PCR Platform highlighting USB (port for computer
connection) and Power Connections (Note: rear view of instrument).

pixl Real-Time PCR Platform
Instructions for Use Manual
Page 10 of 37 pixl Real-Time PCR Instructions for Use Manual
Rev. 01-28JUL2021
Connect to personal computer (PC) via USB
The BioGX pixl Real-Time PCR Platform is equipped with an USB port that supports direct
connection to a Windows® based PC via the supplied USB cable.
Light Indicator States
There are two LED indicator lights. The green light is used to indicate power supply. As long
as the instrument is powered, the green LED indicator will stay on.
qPCR tube/plasticware requirement
BioGX pixl Real-Time PCR Platform requires the use of transparent 0.2 mL qPCR tubes with
flat optical caps. Vendors that supply compatible qPCR tubes include:
1. EasyStrip™ Plus Tube Strip with Attached Ultra Clear Caps
Thermo Fisher Product number: AB2005
2. Axygen® 0.2 mL Polypropylene PCR Tube Strips and attached Flat Cap Strips, 8
Tubes/Strip
Corning Product Number: PCR-0208-AF-C
Figure 4. Example of 0.2 mL 8-tube strip qPCR tubes compatible with BioGX pixl Real-Time
PCR Platform.

pixl Real-Time PCR Platform
Instructions for Use Manual
Page 11 of 37 pixl Real-Time PCR Instructions for Use Manual
Rev. 01-28JUL2021
Platform Cleaning Requirement
External surface cleaning
For everyday cleaning requirement, use Isopropyl Alcohol with a soft, clean cloth to wipe
down the external surfaces of your instrument while wearing latex gloves, safety glasses
and laboratory clothing. After this step, dry your instrument with another soft cloth. Avoid
abrasive cloth, towels, paper towels, and similar items that might cause damage. Before
cleaning your instrument unplug all external power sources, devices, and cables. Do not
allow liquid to penetrate instrument openings.
Reaction well cleaning
Clean the reaction wells with lint-free wipes or swabs. Use of 10% bleach solution to clean
and decontaminate by leaving solution in place for 10-15 minutes. Wipe bleach solution off
surface of reaction wells and rinse with sterile molecular grade water to completely remove
bleach residue.
Warranty
BioGX provides one year warranty from the date of installation. This warranty does
not cover damage due to improper use of the instrument (proper operating
parameters are described in the Instructions for Use Manual section, “Safety and
Regulatory Compliance”). The warranty is limited only to loss of platform function.
The warranty does not cover discoloration from exposure to chemicals or sunlight.

pixl Real-Time PCR Platform
Instructions for Use Manual
Page 12 of 37 pixl Real-Time PCR Instructions for Use Manual
Rev. 01-28JUL2021
Step-by-Step Software Guide
Install the software – For Use with Windows Operating System
The software is delivered as a pair of installation files:
1. setup.exe
2. Installer.msi
Run setup.exe and follow instructions to install the software.
If the file is one compressed file, please decompress it first
The installed application file will be in C:/BioGX/pixl by default.
To launch the BioGX pixl software, click the Windows® Start button on the left bottom
corner of the desktop and find BioGX pixl software. See Figure 5.
Figure 5. Icon for BioGX pixl software will also appear on the desktop. Launch the software
by clicking on this icon.
pixl Real-Time PCR Platform
Instructions for Use Manual
Page 13 of 37 pixl Real-Time PCR Instructions for Use Manual
Rev. 01-28JUL2021
Launching BioGX pixl Software
Before launching BioGX pixl software:
1. Ensure instrument is connected to the PC using the USB port (rear of instrument)
and ensure the lid is completely closed when initializing the instrument.
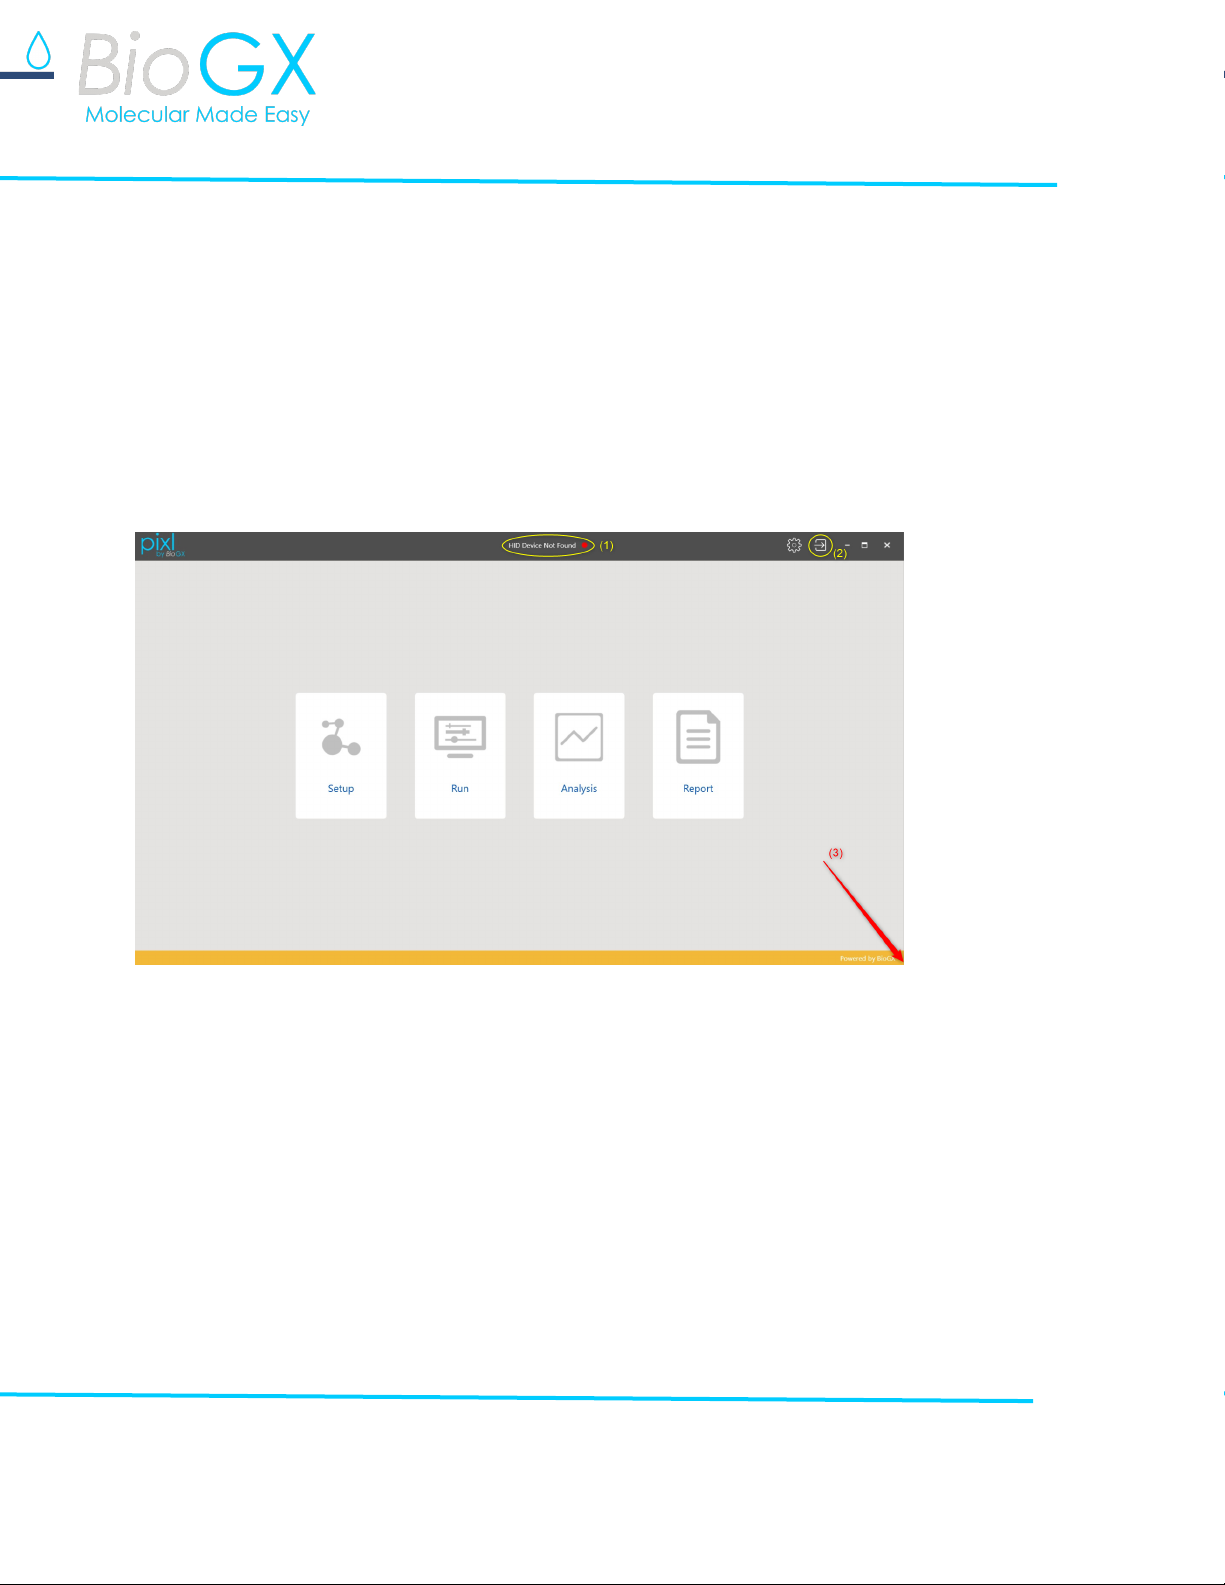
When the BioGX pixl software is launched on a PC device, the display with options will be
presented as shown in Figure 6.
Figure 6. Icon for BioGX pixl software initiation screen. The numbered highlighted sections
indicate: (1) HID Device Connected, (2) software Home button and (3) Resizing window
location to resize BioGX pixl software windows.
Real-Time PCR Setup Page
Thermocycling Programming
By selecting “Cycle Setup”, Thermal cycling parameters are programmed along with
fluorescence capture step, lid temperature, reaction volume, melt analysis and auto

pixl Real-Time PCR Platform
Instructions for Use Manual
Page 14 of 37 pixl Real-Time PCR Instructions for Use Manual
Rev. 01-28JUL2021
Integration Time (ie. optimal fluorescence exposure time) (Figure 7). To save a completed
thermocycling template (Figure 8), follow the steps below:
SAVING thermocycling template
1. Select “REPORT” button
2. Name template in “Experiment Name” section
3. Check box next to “Save as template”
4. Click “Save Experiment”
Figure 7. BioGX pixl platform real-time PCR setup screen for thermocycling programming.
Melting curve analysis
Analysis period at the end of the main thermal cycling program can be programmed by
checking the Melting curve section (Figure 7).
Lid temperature and reaction volume
The desired lid temperature and reaction volume can be programed by added the
appropriate whole number values (Figure 7).

pixl Real-Time PCR Platform
Instructions for Use Manual
Page 15 of 37 pixl Real-Time PCR Instructions for Use Manual
Rev. 01-28JUL2021
Auto Integration Time
This option allows the software to automatically choose the optical sensor integration time
(i.e. Exposure time of the fluorescence camera) according to the fluorescence strength of
the assay. This supports appropriate dynamic range of the sensors to yield the best signal to
noise ratio. It is recommended to keep this option checked (Figure 7).
Figure 8. Screen shot of “REPORT” section used to save BioGX pixl thermocycling template.
Real-Time PCR Setup Page
Naming Experiment Run File
The setup of the experiment is initiated by clicking on the “Setup” button (Figure 9). The
experiment run file and unique samples are assigned. At this screen, the targets identified in
each of optical channels can be assigned. Note: If an experiment run file name is not
assigned, a default file name with date is generated.

pixl Real-Time PCR Platform
Instructions for Use Manual
Page 16 of 37 pixl Real-Time PCR Instructions for Use Manual
Rev. 01-28JUL2021
Creating experiment file from existing template file
1. To load an existing experiment file or template file, double click on the “Open
experiment file” then click “Next step” button to continue setting the thermal
cycling program. (Figure 9).
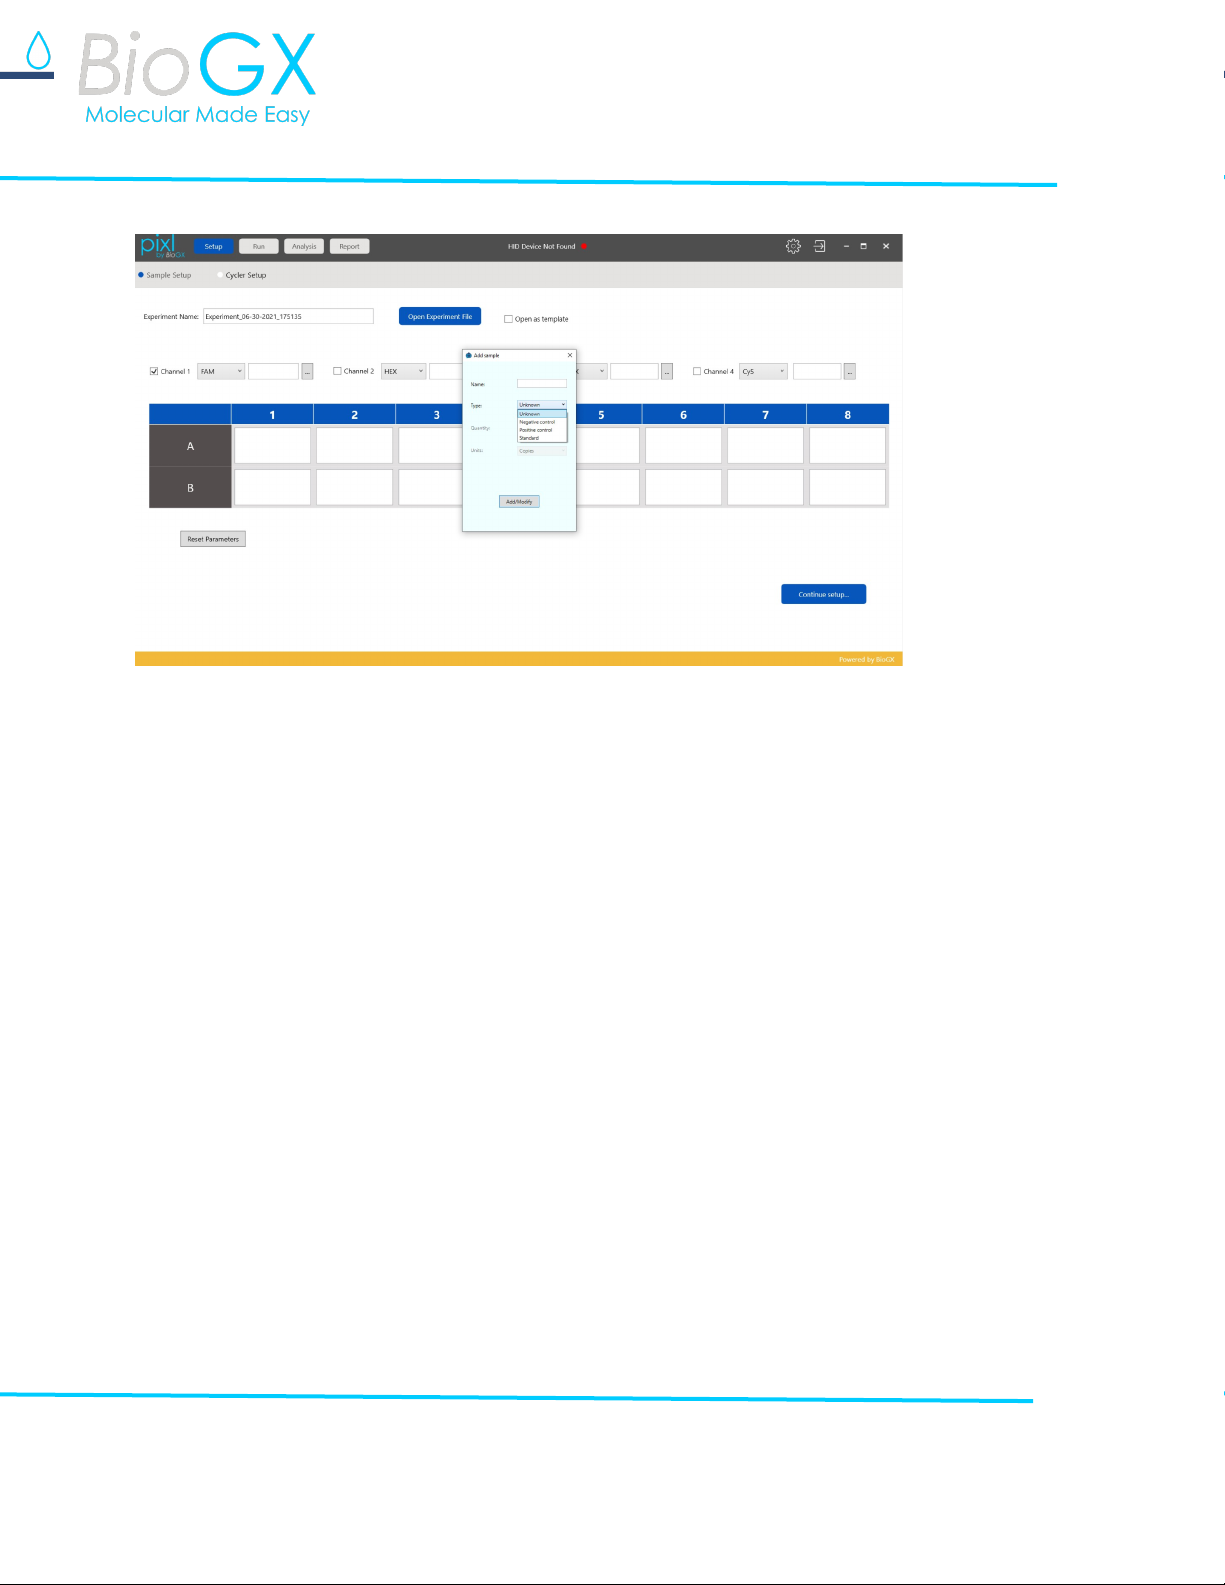
2. Double click the sample grid in the Sample setup window, each sample can be
identified (i.e. Unknown, Negative control, Positive control or Standard; Figure 10).
Figure 9. BioGX pixl platform real-time PCR set up. The numbered highlighted section
indicates: (1) Open existing experiment for template file or existing experiment file or
template file by clicking on the “Open experiment file”.
pixl Real-Time PCR Platform
Instructions for Use Manual
Page 17 of 37 pixl Real-Time PCR Instructions for Use Manual
Rev. 01-28JUL2021
Figure 10. BioGX pixl platform real-time PCR setup definition of each sample as
Unknown, Negative control, Positive control or Standard.
Running the Experiment and Monitor Status
To start a new experiment, proceed to “RUN” button, select the appropriate template
name, name sample well positions and click “Start” button.
Before the instrument starts to execute thermal cycling program, it will automatically check
to ensure the lid is closed and the main power is applied. If either of these conditions is not
met, the software will show popup windows with warnings.
When the qPCR cycler starts to run, the software will automatically switch to “RUN” page.
The first Run page will allow for monitoring of lid and reaction well temperatures.

pixl Real-Time PCR Platform
Instructions for Use Manual
Page 18 of 37 pixl Real-Time PCR Instructions for Use Manual
Rev. 01-28JUL2021
Running amplification program
When running normal qPCR amplification program, the amplification window will monitor
the real time fluorescence signal from the samples. In addition, the Run-Amplification Curve
page will also show the current run status and estimated remaining run time.
Analysis
There are two analysis pages: Amplification analysis (Figure 11) and Standard curve analysis
(Figure 12). The latter is used for determining the quantity of the DNA/RNA targets using
standard curve analysis method.
Amplification analysis
This will show the amplification curves for all samples.
Ct Threshold
The threshold for determining Ct is expressed as the percentage of the saturating level of
the amplification levels after normalization. The default Ct threshold is 8%.
Ct Low limit
The minimum value of Ct is set through this parameter. This setting is helpful in determining
the base fluorescence value for amplification curve analysis.
Normalize
When displaying amplification curve, this will allow for visualization of Ct threshold value.
This choice will not affect the result of the analysis. An automatic process of Relative
Fluorescence Unit (RFU) normalization takes place after the run is completed.

pixl Real-Time PCR Platform
Instructions for Use Manual
Page 19 of 37 pixl Real-Time PCR Instructions for Use Manual
Rev. 01-28JUL2021
Figure 11. BioGX pixl platform real-time PCR example of amplification curve presentation.
Standard Curve Analysis
Standard curve analysis is used to determine the concentration of an analyte by comparing
to a known set of samples with specific concentrations of an analyte (Figure 12). We called
the samples with known concentration of analyte “standards” and the ones with
concentration that needs to be determined “unknowns”.
For such analysis, the “standards” and “unknowns” should be in the same fluorescence
channel to ensure they are comparable. Thus, standard curve analysis is always performed
on one specific channel.

pixl Real-Time PCR Platform
Instructions for Use Manual
Page 20 of 37 pixl Real-Time PCR Instructions for Use Manual
Rev. 01-28JUL2021
Figure 12. BioGX pixl platform real-time PCR example of standard curve presentation.
Save Experiment and Print Report
From “REPORT” page, open the experiment file to print report and save completed
experiment files (Figure 13). The experiment file will contain all the settings and experiment
results. In this page, we can also enter the operator’s name and some comments. These will
be saved with the experiment file. Two report formats will be used for report generation.
The excel (.csv) file report is editable. The PDF report is easier to store and use on different
platforms.
Other manuals for pixl
1
Table of contents
Other BioGX Laboratory Equipment manuals

Popular Laboratory Equipment manuals by other brands


BPC instruments
BPC instruments BPC Blue Operation and maintenance manual

BioNano Genomics
BioNano Genomics Saphyr System Setup guide

Hermle
Hermle Z 206 A instruction manual

Malmet
Malmet ES915 Operation, maintenance and installation manual

Hettich
Hettich MIKRO 220 manual

Bio-Optica
Bio-Optica UT200 User and service manual

Fritsch
Fritsch PULVERISETTE 0 operating instructions

Unico
Unico PowerSpin C8624 Operation manual

UEBERALL
UEBERALL UBK Series Installation and operation manual

StellarNet
StellarNet zAP2 user manual

Helmer Scientific
Helmer Scientific TCR Operation and service manual

Cole Parmer
Cole Parmer Julabo 200F operating manual