BION CY-E500 Series User manual
Cadence & Speed Sensor
Cadence Magnet
(Black) (White)
Black:Cadence Magnet
Mounting
White:Sensor Mounting
Speed Magnet
English
(Clock)
(Trip Time)
(Average Speed)
(Max Speed)
(Trip Distance)
(Daily Distance)
(Total Distance Bike1)
(Total Distance Bike2)
(Total ODO)
(Average Cadence)
(Max Cadence)
E512, E516, E518T, E523A
CY-E500
or
E517C, E520C, E526AC
CY-E500
Stabling Pads
E500 Series
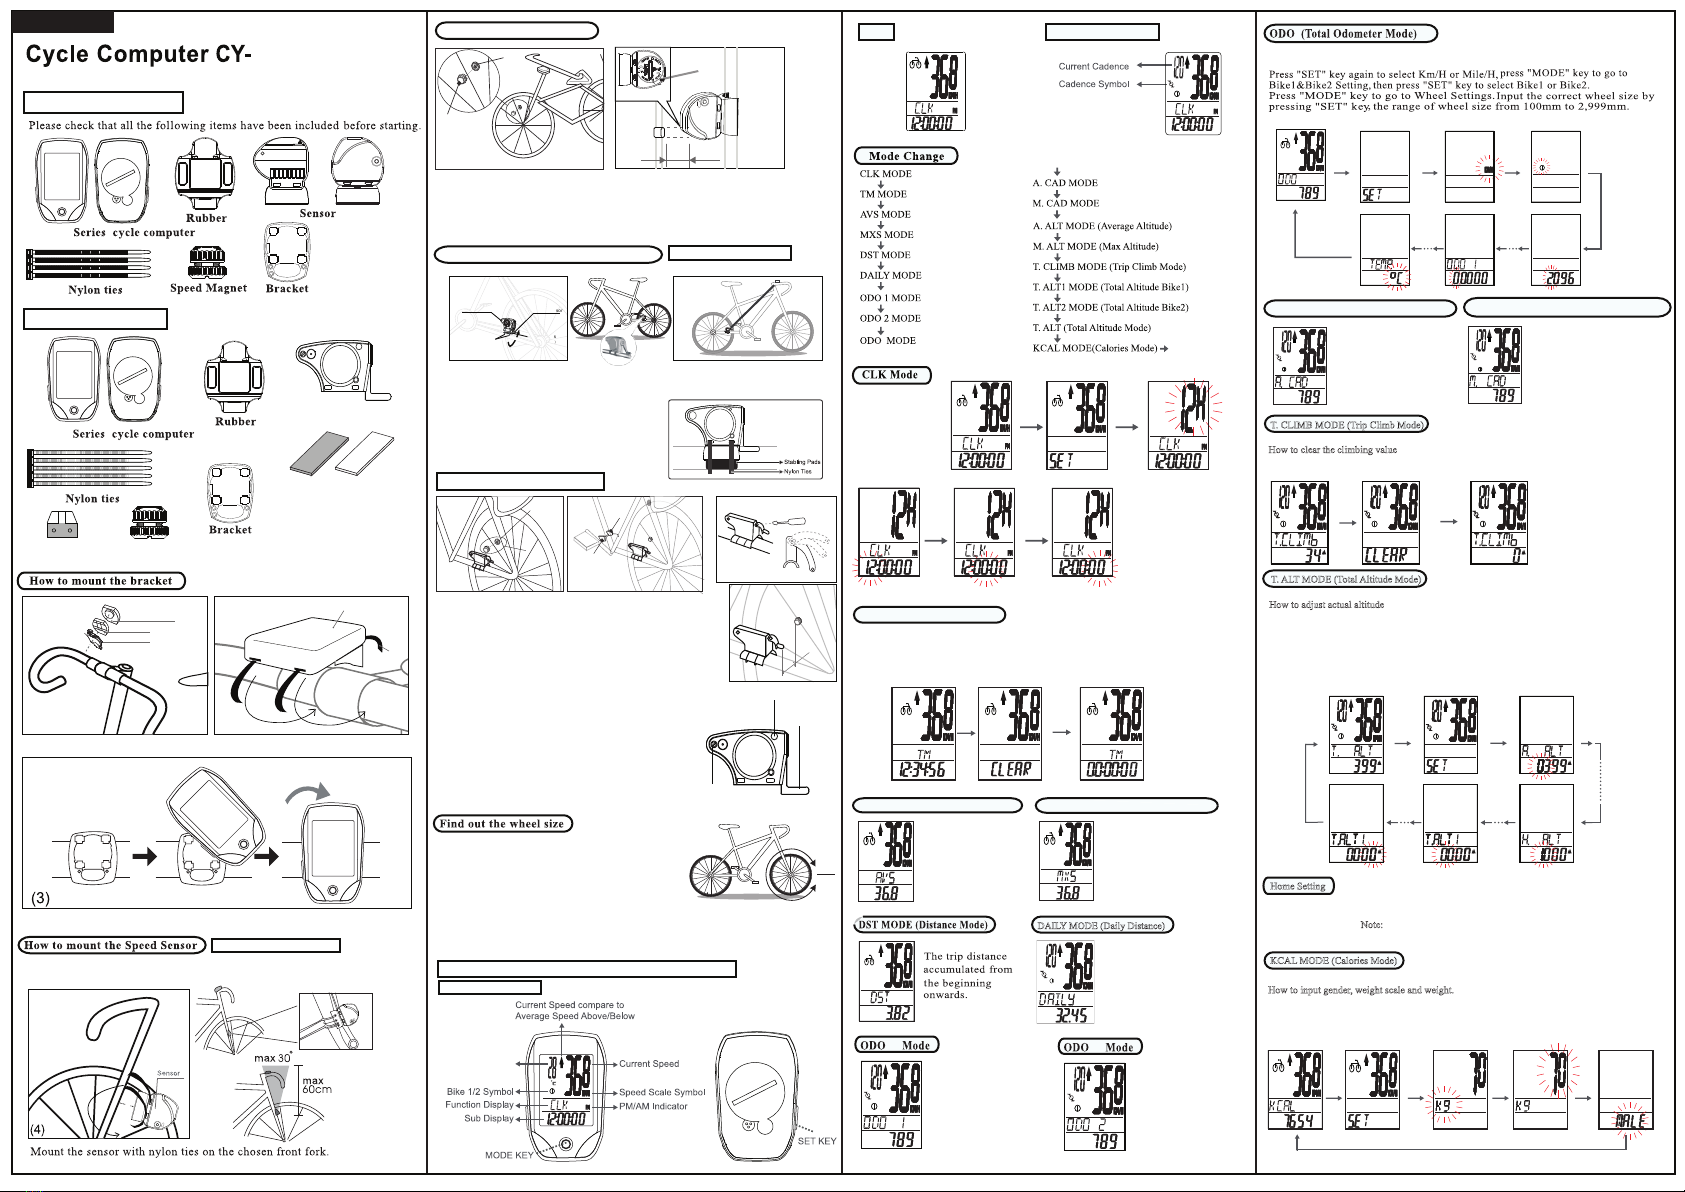
Use the rubber to tighten the bracket to the handlebar or stem with the nylon ties.
Bracket
Nylon Ties
(2)(1)
Rubber
Bracket
Cycle Computer
Rubber
Bracket
Cycle Computer
Place the cycle computer on the bracket and secure it in clockwise.
E512, E516, E518T, E523A
Check the position of the front fork to find the suitable point to attach the speed sensor.
The distance between cycle computer & the speed sensor would be with 60 cm.
Note:Please make sure everything has been setup correctly before riding the bicycle.
Secure the Speed Magnet on the spoke of the front wheel with screw.
Make sure the magnet side faces the speed sensor zone.
The maximum distance between the speed sensor and the magnet on the spok e is 5 mm.
Once above items in the right position, the user may go for a ride.
(Sensor)
(Magnet)
1~5mm
(6)
(5)
Magnet
Screw
Sensor Point
Sensor Point
How to mount the Magnet
Installing the Cadence & Speed Sensor
Mount the sensor on top of the left chain stay with long nylon ties, make sure the cadence side face
the front and speed side face the back. The distance between the sensor and the cycle computer
would approximately be 150 cm.
*NOTE: 1. The stabling pad has to be precisely
secured under the sensor.
2. Nylon ties have to be exactly and solidly bond
on the stabling pad.
3. Without proper bind, cadence sensor may be
crashed by the spoke of back freewheel.
Adjustable
1~5mm
How to mount the Magnet
Secure the Speed Magnet on the spoke of the back
wheel with screw. Make sure the magnet side faces the
speed sensor zone.The maximum distance between the
speed sensor and the magnet on the spoke is 5 mm.
Secure the Cadence Magnet on the inner side of crank
and make sure the magnet side faces the cadence sensor
zone. Please use black stabling pad for cadence magnet
mounting. The maximum distance between the cadence
sensor and the magnet on the crank is 5 mm.
Once above items are in the right position, the user
may go for a ride.
Note:
Initial flashing green light indicates the sensor
detected magnet signals normally.
Please make sure everything has been setup
correctly before riding the bicycle.
Green light
Speed
sensor
Cadence sensor
Speed Magnet
Screw
(6) (7)
Cadence Magnet
Stabling Pads
E517C, E520C, E526AC
(Black)
Wheel Circumference
To get the accurate result, the wheel size should be
correct Mark the symbol on the tire and ride one
circle. Then measure the length between two points
to get the circumference. Or the user can also get
Circumference(mm) = 2 x 3.14 x R(inch) x 2.54(1 inch=2.54 cm)
R=Radius in centimeter
The user can refer the "wheel size chart" for the wheel size
wheel circumference by the following equation:
The cycle computer main display and Key function
E516T, E518T, E523A
E512 E517C, E520C, E526AC
(Option in E517C, E520C, E526AC)
(Option in E517C, E520C, E526AC)
(Except E512)
(Except E512, E517C)
(Except E512, E517C)
Press Mode key shortly to change mode.
S>3secS
M
M
Press
and hold "SET" key
for 3 seconds to go
setting clock.
Press "SET" key once
to adjust 12/24 hours.
In clock mode
Press "MODE" key to adjust time (hour, minute and second).
Hold "MODE" key for 3 seconds to go back to Clock Mode once the setting is finished.
TM MODE (Trip Time Mode)
Trip Timer would operate automatically when the bike is in motion.
How to reset all data (Kcal, TM, AVS, MXS, DST)
Press and hold "SET" key for 3 seconds,all exercises results in displayer will return to
zero, except odometer.
Note: If trip time runs over 30 hours, the display will repeatedly flash for 5 seconds and return to zero.
S>3SEC
S
AVS MODE (Average Speed Mode) MXS MODE (Maximum Speed Mode)
The average speed
from the beginning
onwards.
The maximum speed
from the beginning
onwards.
It measures the running
distance in a day.
Note:The measurement will
automatically return to zero when
passing every 12:00 and 24:00
o’clock.
DAILY MODE (Daily Distance)
M MM M
S>3SEC M
MS
M>3SEC
It displays the accumulated calories consumed from the beginning of the trip onwards.
How to input gender, weight scale and weight.
Press “SET” key for 3 seconds to go to KCAL setting. Press “SET” key again to select Kg or Lb.
Press “MODE” key to go to weight setting, Input your weight by pressing “SET” key.
Press “MODE” key to go to gender setting, Press “SET” key to select Female or Male.
Press “MODE” key for 3 seconds back to KCAL MODE.
KCAL MODE (Calories Mode)
M M
S
M>3SEC
S>3SEC
Approx.
150cm
(5)
(4)
Nylon Ties
Speed Sensor
Stabling Pads
Cadence Sensor
(White)
E512, E516T, E518T, E517C, E520C, E523A, E526AC
(Option CY-E516T, E518T)
Temperature
AUTO SCAN
(Option in E523A, E526AC)
(Option in E523A, E526AC)
(Option in E523A, E526AC)
(Option in E523A, E526AC)
(Option in E523A, E526AC)
(Option in E523A, E526AC)
(Except E512, E516T)
It indicates the current climbing value for the trip.
How to clear the climbing value
Under the T. CLIMB mode, press “SET” for 3 seconds to clear the data.
The display will show CLEAR and automatically return to zero after 3 seconds
It displays the total altitude value of bike1 + bike2
How to adjust actual altitude
Under T. ALT. mode, press “SET” key for 3 seconds to go to altitude setting.
Input the actual altitude data by pressing “SET” key.
Press “MODE” key to go to home altitude setting,
Input the home altitude data by pressing “SET” key.
Press “MODE” key to go to altitude bike1 setting,
Input the altitude bike1 data by pressing “SET” key.
Press “MODE” key for 3 seconds back to T. ALT. Mode.
T. CLIMB MODE (Trip Climb Mode)
T. ALT MODE (Total Altitude Mode)
M M M M
M
M
S>3SEC
S
(Option in E523A, E526AC)
(Option in E523A, E526AC)
M>3sec
SS>3SEC
It features and indicates the actual altitude of your start location.
In any mode, press and hold both “SET” key and “MODE” key for 6 seconds to automatically set
default data of altitude.Note: keep pressing and hold both “SET” key and “MODE” key for another
3 seconds to automatically to go to ID scan.
Home Setting
(Option in E523A, E526AC)
Press “MODE” key to go to temperature scale setting, Press “SET” key to select ℃or ℉.
Note:Odometer mode will return to zero after changing new battery.
Under ODO Mode, press “SET” key for 3 seconds to go to setting.
1
The odo accumulated
from bike 1
(Except E512, E517C)
2
The odo accumulated
from bike 2
(Except E512, E517C)
(Except E512)
A. CAD (Average Cadence Mode)
Average cadence (pedals
revolution per minute)
from the beginning
M. CAD (Maximum Cadence Mode)
Maximum cadence (pedals
revolution per minute)
from the beginning
onwards.
onwards.
(Option in E517C, E520C, E526AC) (Option in E517C, E520C, E526AC)
CY-E500 Series computer
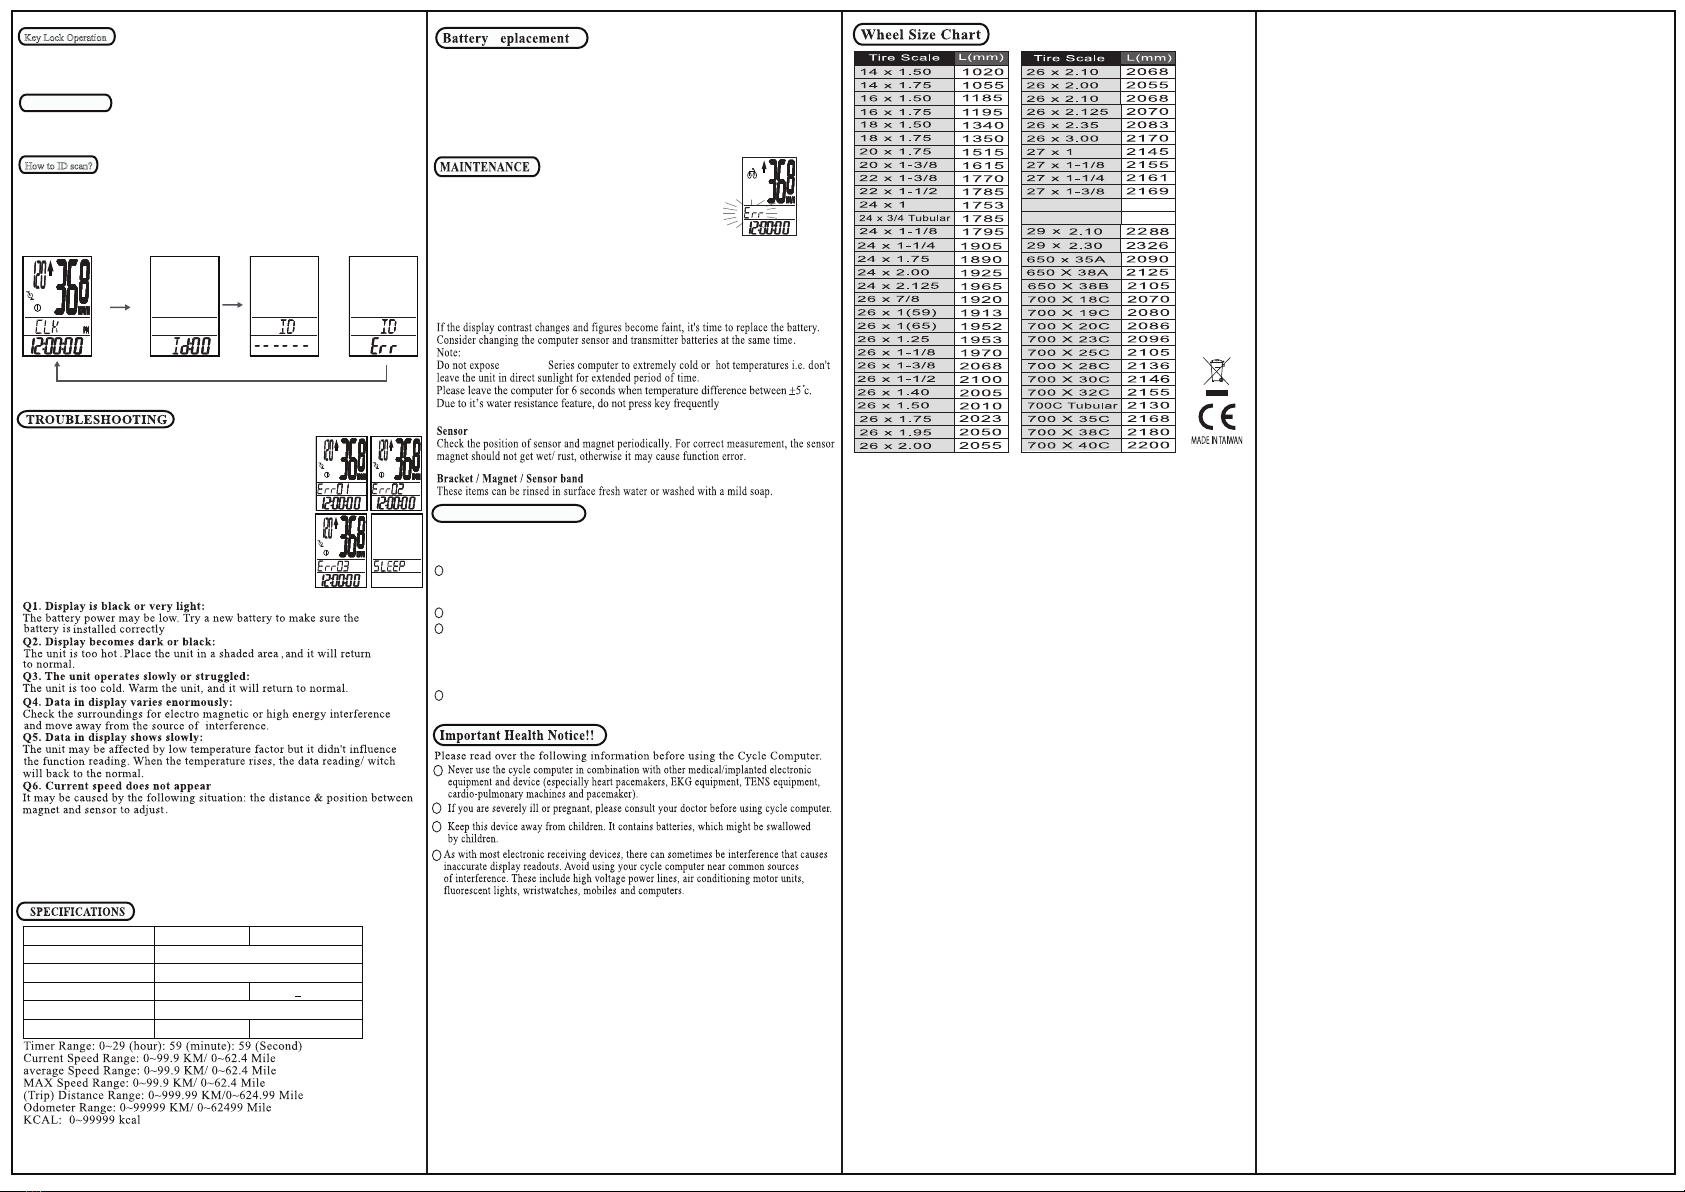
Unscrew the back cover. The (+) side should be facing up.
Gently remove the battery and replace it with a new battery model CR2032.
Sensor
Unscrew the back cover. The (+) side should be facing up.
Gently remove the battery and replace it with a new battery model CR2032.
R
When E500 faces interferences by other device. It shows Err in
the middle column.
CY-E500 Series cycle computer
CY-E500
Due to it’s Touch feature, there is a reminder for cycling with gloves. Please use the
flimsy gloves to avoid irresponsive.
There will have a rattle sound when vibrating. It is a part for Auto Start function.
It is a normal reaction.
in raining day.
Warranty does not cover the batteries, damages due to misuse, abuse or accidents,
cracked or broken cases, negligence of precautions, improper maintenance or
commercial use.
Warranty is void if the repairs are done by non authorized service technician.
During this warranty period(one year)the product will either be repaired or
replaced without charge.
LIMITED WARRANTY
This product is for one year limited warranty commencing on the date of purchase.
The product will be free from defects in material and workmanship for one year
from the date of purchase.
The warranties contained herein are expressly in lieu of any other
warrantiesincludingimplied warranty of merchantability and/ or fitness
for purpose. In no event shallmanufacturer be liable for any damages,
direct or incidental, consequential or special,arising out of or related to the
use of this manual or the products described herein.
Receiver Speed Sensor
Operating Temperature
Storage Temperature
Emitted Frequency
Battery
Weight
N/A
30.6 grams 20 grams
433M + 40KHz
0℃ ~ 40℃
-10℃ ~ 50℃
3 volt lithium 2032 cell
CAD Range : 0~255
It features avoidance of accidental activation of other functions.The cycle computer will
automatically enter into Sleep and Key Lock Mode after 6 minutes if no signals received.
Shortly press “SET” key to unlock Key Mode.
Key Lock Operation
The code of ID will be automatically stored without scanning after batteries changed.
ID scan takes place when sensors are changed or signals from sensors are not received.
In any mode, press and hold both “SET” key and “MODE” key for 3 seconds to go to ID scan mode.
Under ID scan mode, press “SET” key to automatically pair the sensor.
If the scan was unsuccessful, the display will show Err, Please press “SET” key to pair again.
Note: If cycle computers equipped with altimeter functions, please keep pressing for another 3
seconds for ID scan after home setting.
How to ID scan?
keep holding
M&S
>3SEC Sor
M>3SEC
(Option in Digital Coded Cycle Computers)
If the display appears Err01, means the cycle computer is running out of electricity
.
Please replace it with a new battery (CR2032)
Option in Digital Coded Cycle Computers
The user can press “SET” key at any time to activate the BACKLIGHT,
the BACKLIGHT will de-activate itself automatically after 4 seconds.
BACKLIGHT
If the display appears Err01, means the cycle computer is running out of
electricity. Please replace it with a new battery (CR2032)
It shows 2 seconds every minute.
If the display appears Err02, means the speed sensor is running out of
electricity. Please replace it with a new battery (CR2032)
It shows 2 seconds every minute.
If the display appears Err03, means the cycle computer and speed sensor
are running out of electricity at the same time. Please replace both with
a new battery (CR2032)
It shows 2 seconds every minute.
NO signal in 6 minutes the computer will go into rest mode. After 5
times of rest mode the 6th time the computer will go to SLEEP mode.
(Option in Digital Coded Cycle Computers)
(Option in Digital Coded Cycle Computers)
27.5 x 2.10
2170
2202
27.5 x 2.30
This manual suits for next models
7
Other BION Bicycle Accessories manuals


