BioTel Heart ePatch User manual
Gently peel off the whitecover
paper of the patch withthe pull
tab in the center.
RIGHT LEFT
QUICK START
GUIDE
Wash/shave
(if needed)
Clean skin
Scrub skin
If necessary shave chest area where
patchis to be applied. Clean area
withsoap and water. Pat dry. Gently
scrub skin with abrasion pad.
STEP 1:
Skin preparation
Snap sensor into the patch. Press
all four sides to ensure sensor is
securely connected to the patch.
You will hear several clicks.
STEP 2:
Attach sensor to the patch
Remove the clear plastic backing
to exposethe adhesive part of the
patch.
Do not touchthe adhesive.
STEP 3:
Remove patch backing
Apply patch to chest on aslight
angle as shown in the illustration
above. Press all sides of the patch
so it will adhere to your skin.
STOP: Wait 1 minutebefore
proceeding to Step 5.
STEP 4:
Apply patch to your skin
STEP 5:
Remove cover paper
Copyright © 2019. All rights reserved
LEFT
RIGHT
®
®
®
®
®
™
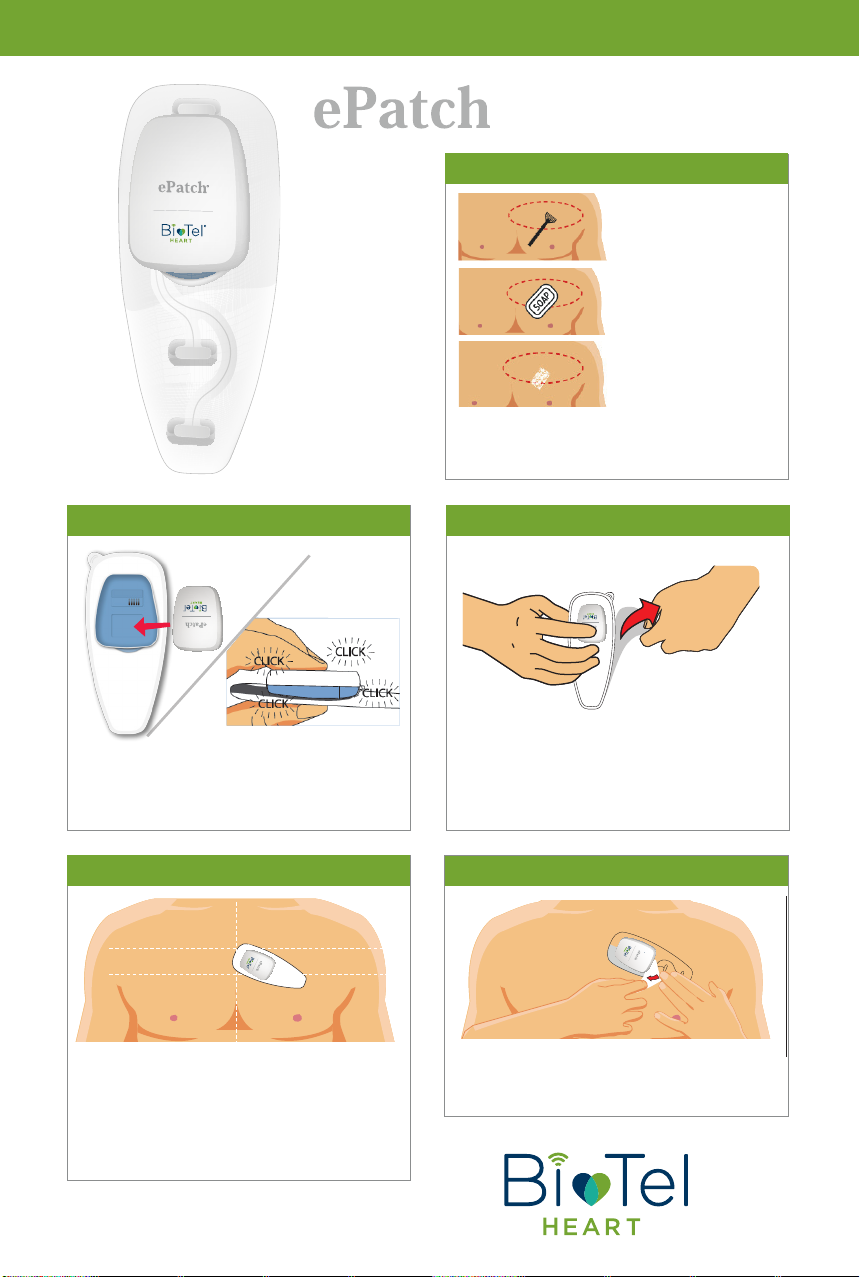
STEP 2: ATTACH SENSOR TO THE PATCH
Snap sensor into the patch. Press all four
sides to ensure sensor is securely connected
to the patch. You will hear several clicks.
STEP 4: APPLY PATCH TO YOUR SKIN
Apply patch to chest on a slight angle as
shown in the illustration above. Press all sides
of the patch so it will adhere to your skin.
STOP: Wait 1 minute before proceeding to
Step 5.
QUICK START GUIDE
STEP 1: SKIN PREPARATION
Shave:
(if needed)
Clean skin
Scrub skin
If needed, shave chest area so that it is clear
of any hair. Clean area with soap and water.
Pat dry. Gently scrub skin with abrasion pad.
STEP 3: REMOVE PATCH BACKING
Remove the clear plastic backing to expose
the adhesive part of the patch. Do not touch
the adhesive.
STEP 5: REMOVE COVER PAPER
Gently peel off the white cover paper of
the patch with the pull tab in the center.

®
™
Wear ePatch only for as long as prescribed
by your doctor.
Your prescription ends on
Quick Tips for Your
Monitoring Period
Avoid direct water contact.
ePatch is water-resistant, not waterproof.
Double-tap the middle of the sensor to record a symptom.
It will generate a green light. Then, record any and all
symptoms you are feeling into your patient diary.
When your monitoring period has ended, carefully remove
the patch from your body and return or mail back the
sensor and diary, as directed by your doctor’s ofce.
Contact us at 1.877.593.6421 if you need assistance or if you
have questions throughout your monitoring period.
Customer Service is available:
Monday – Fridays: 8:00 AM - 8:30 PM ET
Saturdays: 8:00 AM - 4:30 PM ET.
1000 Cedar Hollow Road, Malvern, PA 19355
myheartmonitor.com
CardioNet, LifeWatch, and BioTel Heart are trademarks of BioTelemetry, Inc.
Copyright © 2019. All rights reserved. Doc No. 220-0433-01 Rev. H
The sensor will display a solid green light for 15 seconds
and then a flashing green light for 30 seconds after
connection to the patch.
Other manuals for ePatch
1
Other BioTel Heart Medical Equipment manuals


Popular Medical Equipment manuals by other brands


Getinge
Getinge Arjohuntleigh Nimbus 3 Professional Instructions for use

Mettler Electronics
Mettler Electronics Sonicator 730 Maintenance manual

Pressalit Care
Pressalit Care R1100 Mounting instruction

Denas MS
Denas MS DENAS-T operating manual

bort medical
bort medical ActiveColor quick guide

AccuVein
AccuVein AV400 user manual


