BioTel Heart MCOT Patch User manual

MOBILE CARDIAC OUTPATIENT TELEMETRY
PATIENT EDUCATION GUIDE
Need help or have questions? Contact Customer Service Toll Free at 1.866.426.4401 or visit www.gobio.com/patients for online support.
CardioNet, LifeWatch, and BioTel Heart are trademarks of BioTelemetry, Inc.
Video Tutorials
Video instruction is available 24/7 to assist you with set-up.
Monitor - Select Options tab, then press the HELP button.
www.gobio.com - Select Patients tab, select "videos" under MCOT™.
Table of Contents
• About Our Service 3
• Kit Contents 4
Before You Begin
3
1
• Step 1: Turn on the Monitor 5
• Step 2: Monitor Set-Up 6
• Step 3: Attach the Sensor to the Patch 7
• Step 4: Pair the Sensor and the Monitor 11
• Step 5: Patient Consent 12
• Step 6: Placement and Skin Preparation 13
• Step 7: Apply the Patch to Your Skin 15
• Step 8: Record a Baseline 17
Getting Started
5
2
• Record a Baseline (Manual Recording Option) 18
• Record Symptoms 19
• Removing the Sensor from the Patch 21
• Replacing the Patch 24
• Deactivation/ Return the Equipment 25
• Important Information 26
• Wear & Care – Charging the Sensor 27
• Wear & Care – Charging the Monitor 28
• Wear & Care – Showering Instructions 29
• Options 30
• Troubleshooting 31
Good to Know
18
3
• ADDENDUM to the PATIENT EDUCATION GUIDE 34
• TERMS AND CONDITIONS 36
• NOTICE OF CONFIDENTIALITY AND PRIVACY PRACTICES 37
Appendix
34

gobio.com/patients
Video tutorials available at www.gobio.com/patients. For assistance, please call Customer Service at 1-866-426-4401.
3
About our Service
Your physician has prescribed the MCOT™Patch System for you. The MCOT system conducts beat-
by-beat analysis of your heart activity and transmits certain abnormal beats to the certied cardiac
technicians at BioTel Heart. Trained technicians review data and watch for unusual activity 24 hours a
day/ 7 days a week, and in some cases may contact your physician. Clinical reports are made available
to your healthcare professional during and at the end of your service.
To get started, review the important information in this guide, or view the instructional videos on the
monitor, or visit www.gobio.com/patients.
If you have any questions about your monitoring service or billing, please contact us:
Customer Service: 1-866-426-4401 (toll-free)
email: [email protected]
Hours: 24 hours a day, 7 days per week
Billing Department: 1-855-572-3999 (toll-free)
Hours: 9:00am - 5:00pm EST
The BioTelemetry Healthcare App
Before you Begin

gobio.com/patients
4
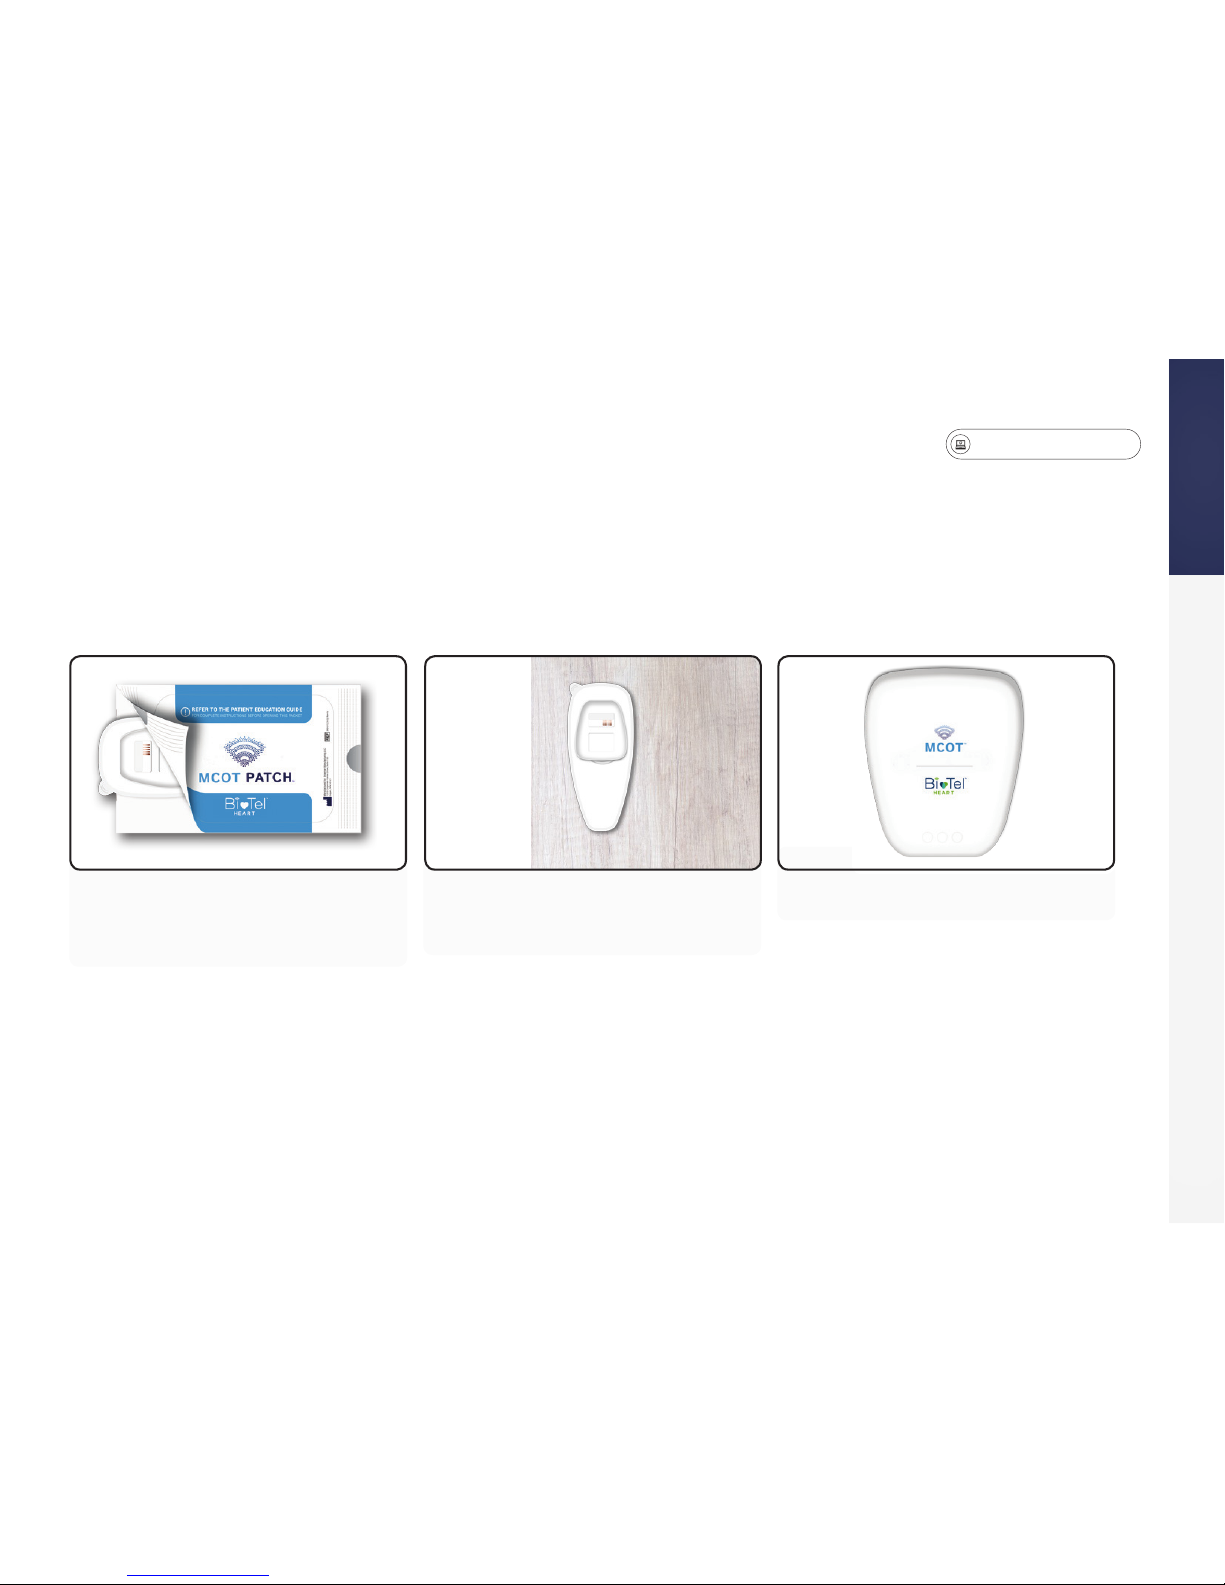
Kit Contents
Monitor Charger
Sensor
Sensor Charger
Monitor
Monitor Case
Patch Pouch
MCOT Skin Prep Pack
2
1
3
4
5
6
7
8
9
Patient Education Guide
Return Envelope
13
4
78
9
2
6
5
Before you Begin
gobio.com/patients
Video tutorials available at www.gobio.com/patients. For assistance, please call Customer Service at 1-866-426-4401.
5
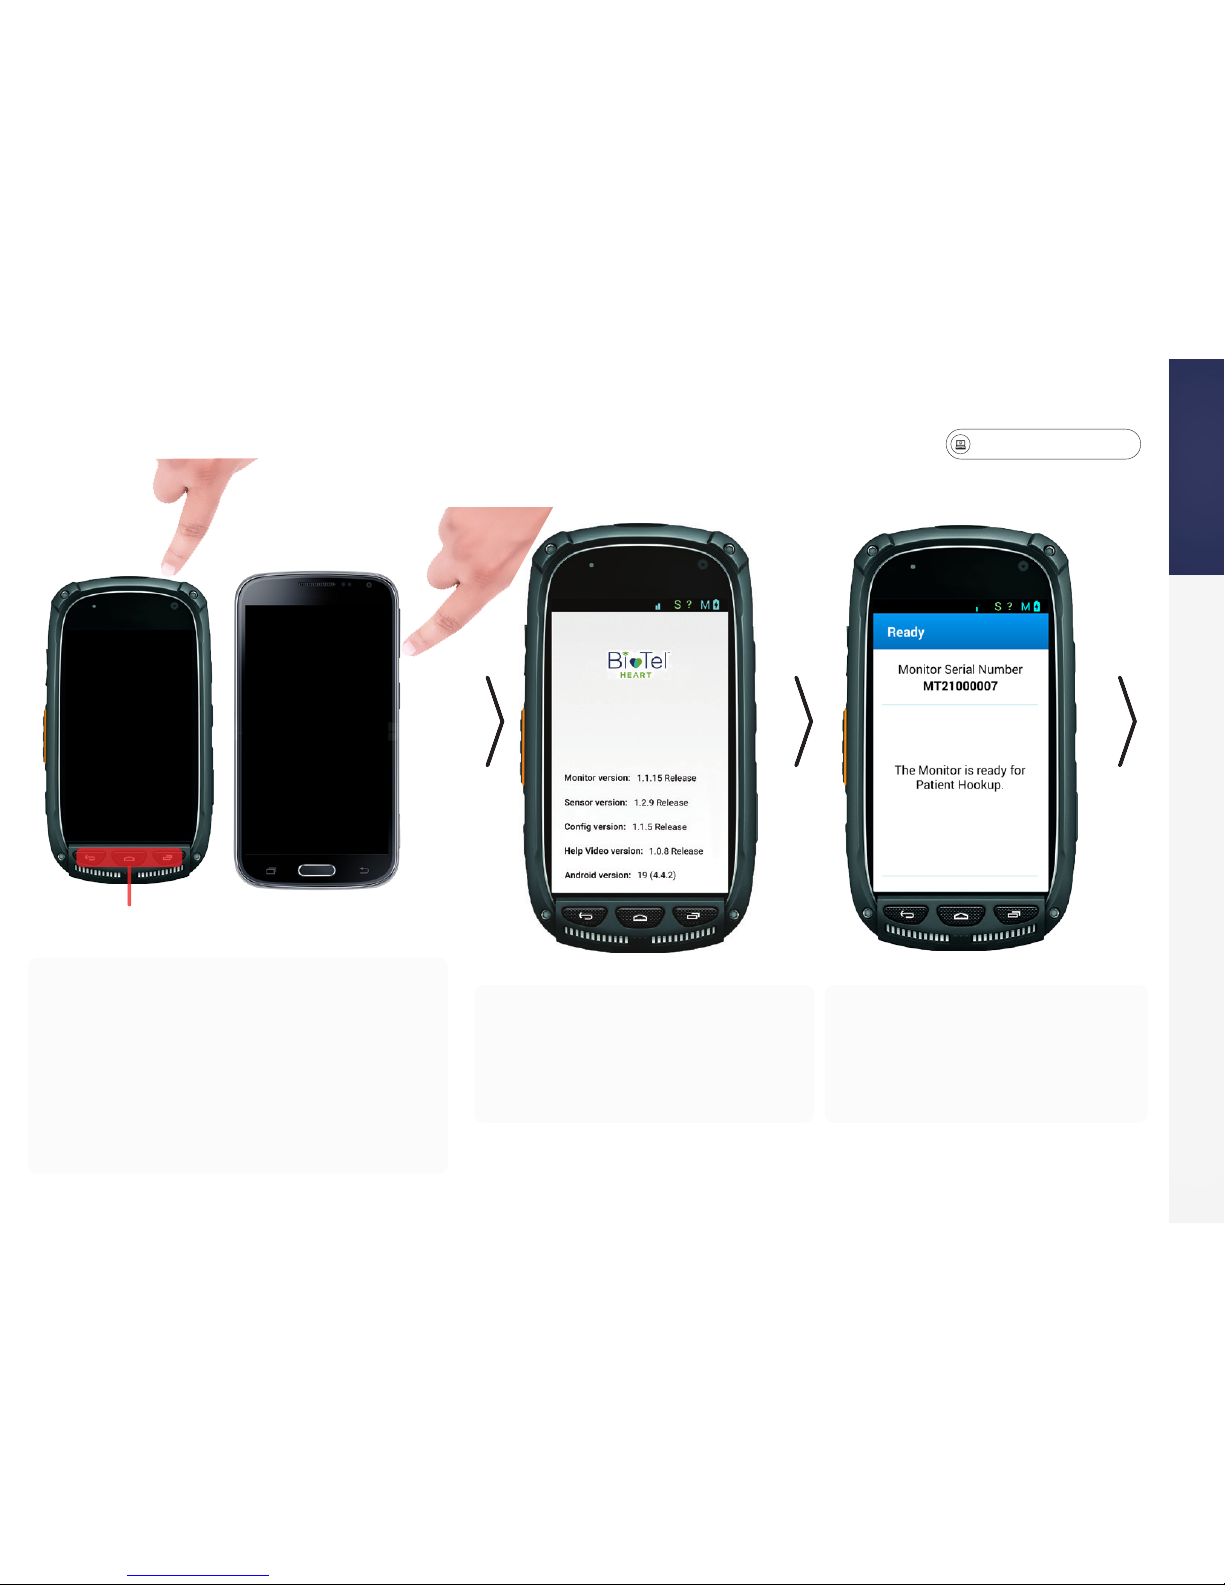
STEP 1: Turn On the Monitor
MCOT Skin Prep Pack
Patient Education Guide
Return Envelope
• Locate the monitor in your kit. Press
and hold the Power button to turn on the
monitor. Depending on the model of the
monitor, the Power button is located at
the top or on the side of the monitor.
• Depending on type of monitor, the
buttons at the bottom may be used to
wake your monitor from sleep mode.
• The monitor will run through
a few screens. It may take up
to two minutes to get to the
starting screen.
• The text on this screen
conrms the monitor is
ready for set-up.
Disabled
Power ON the Monitor
Getting Started
gobio.com/patients
6
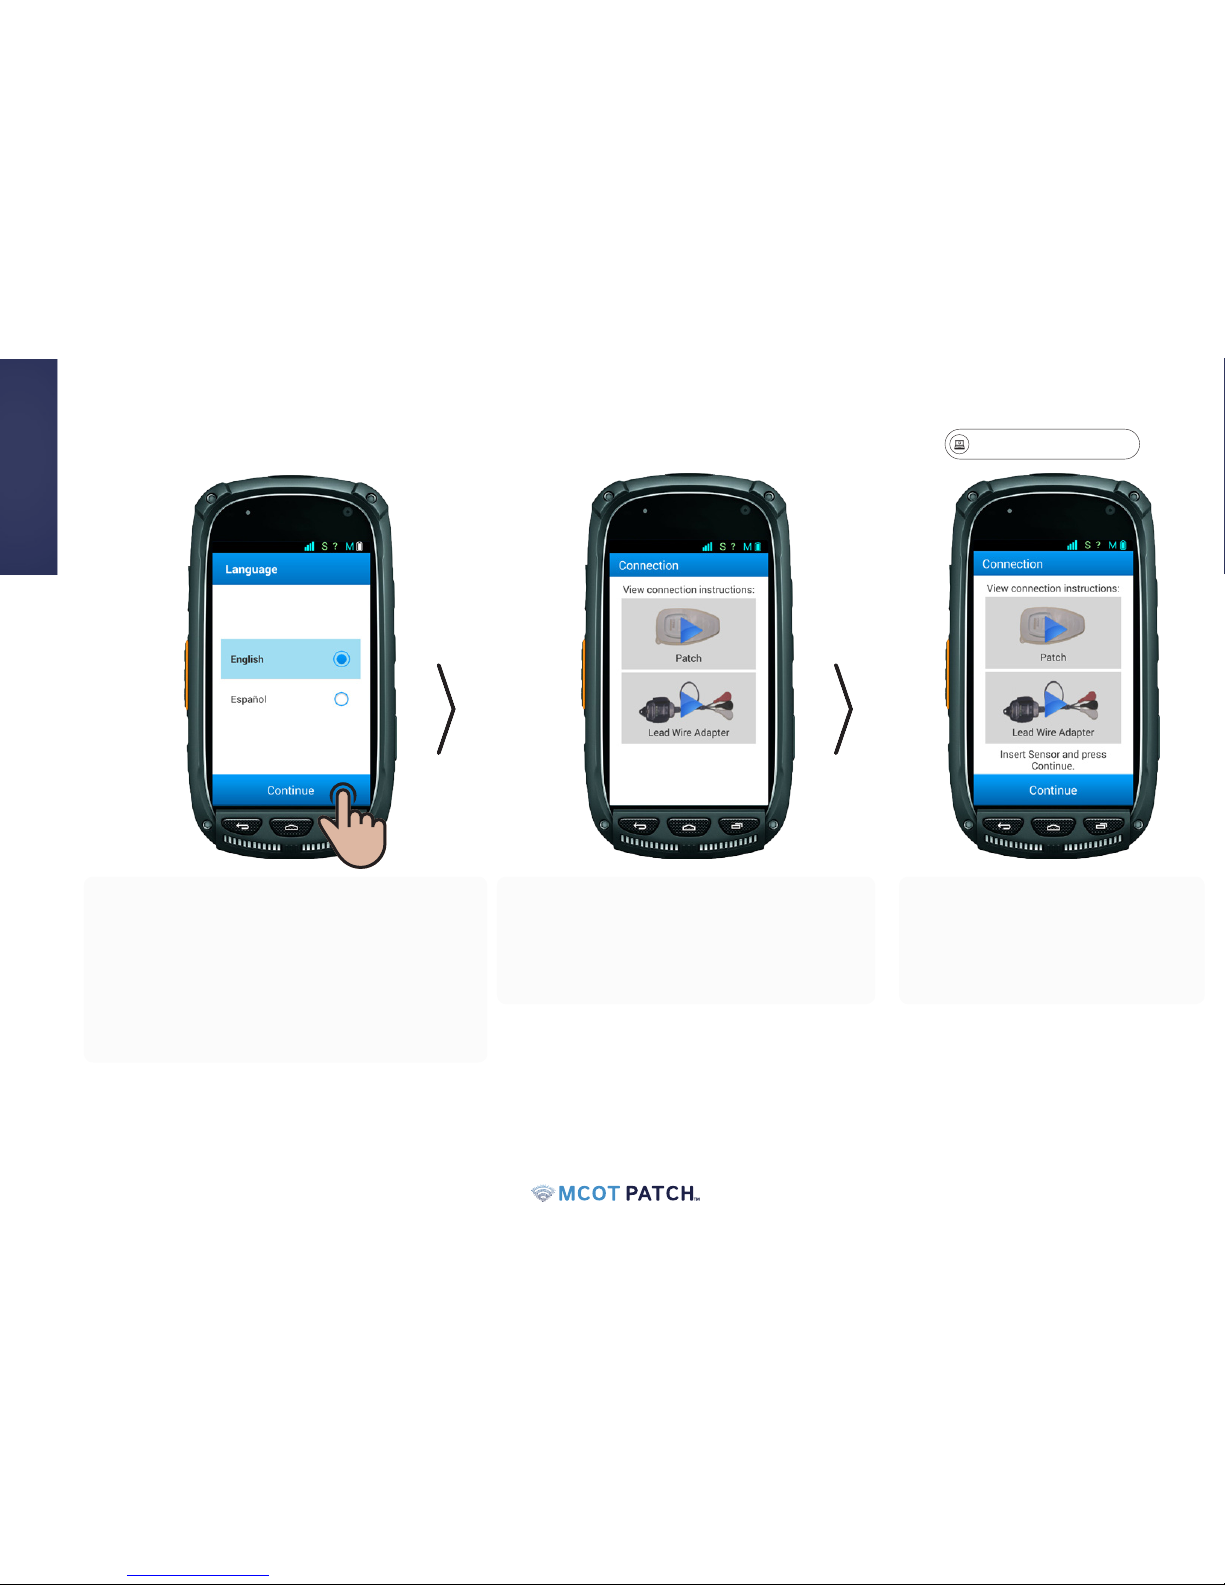
STEP 2: Monitor Set-Up
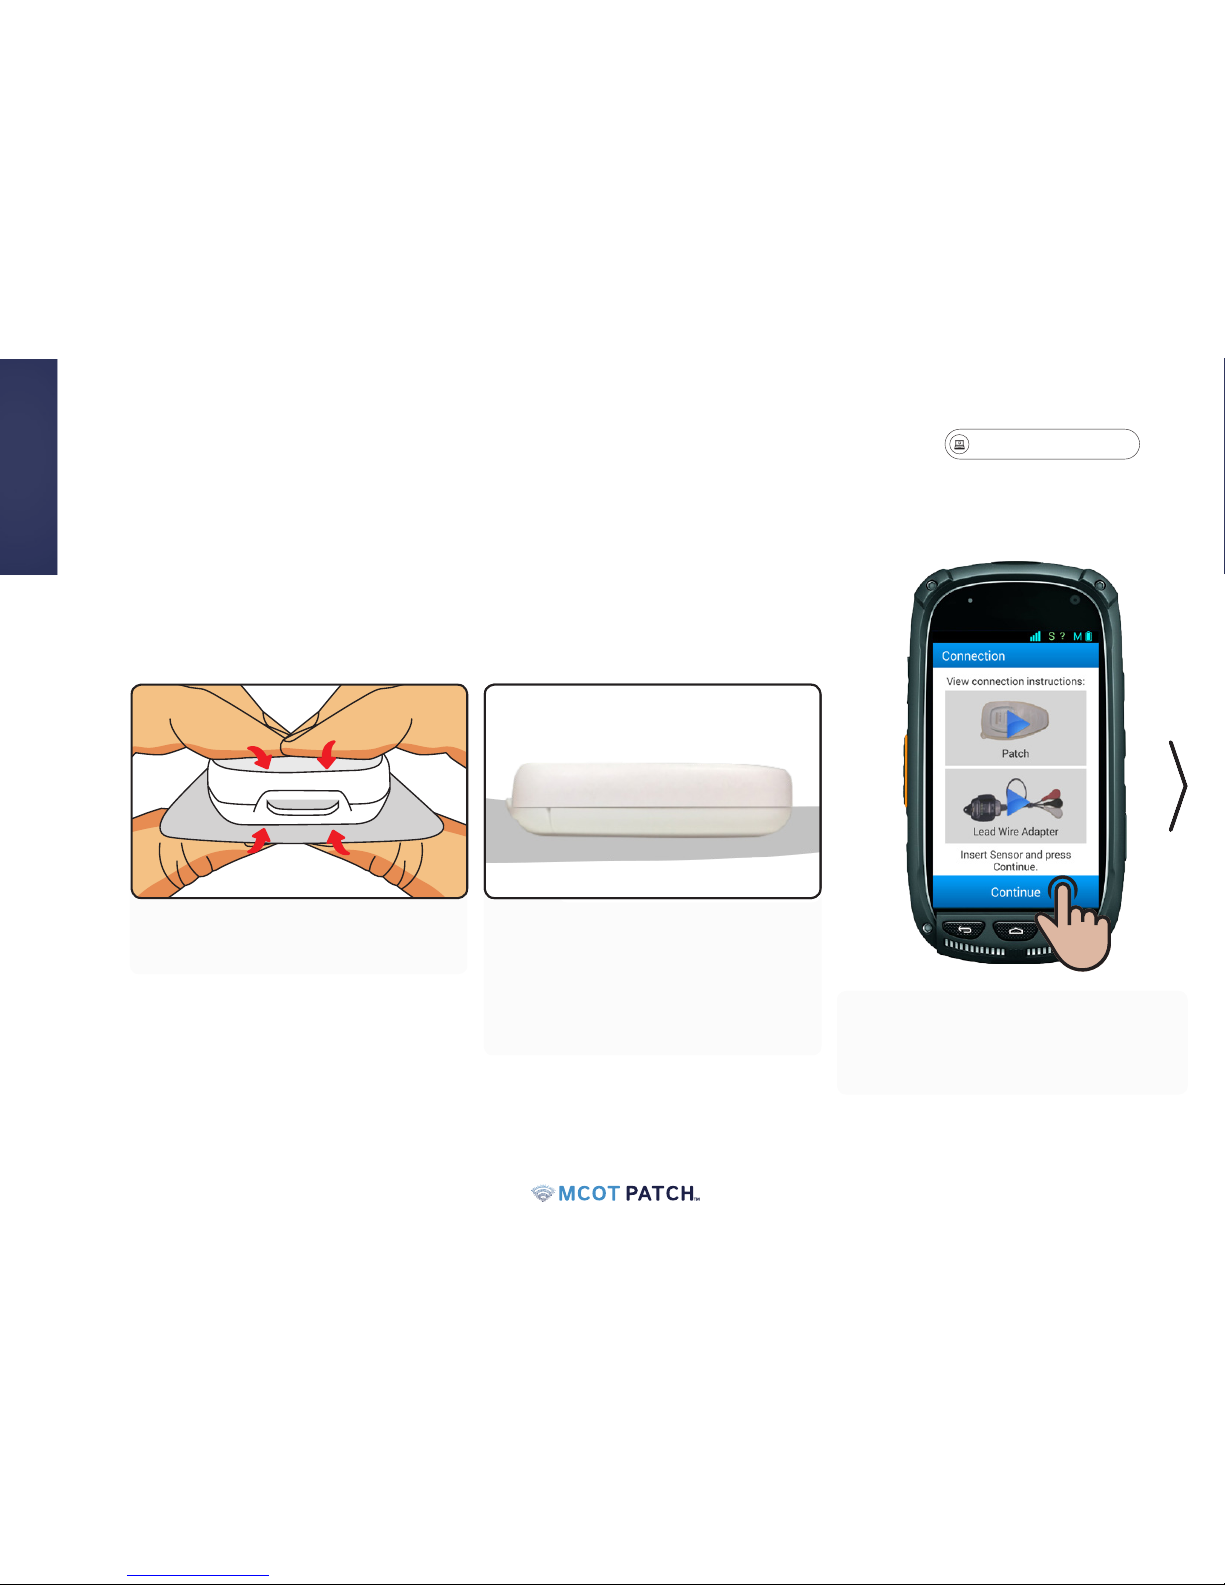
• During the set-up process, you will be
required to select a connection type. To
view the video, press the blue arrow on
the image that says "Patch".
• When you nish watching the
video, set the monitor aside
and proceed to Step 3: "Attach
Sensor to the Patch".
• Select the appropriate language option and
press continue.
• Note: If your screen goes dark now, or anytime
throughout your monitoring process, it is in
sleep mode. To wake, press and release the
power button.
Getting Started
gobio.com/patients
Video tutorials available at www.gobio.com/patients. For assistance, please call Customer Service at 1-866-426-4401.
7
STEP 3: Attach the Sensor to the Patch
Getting Started
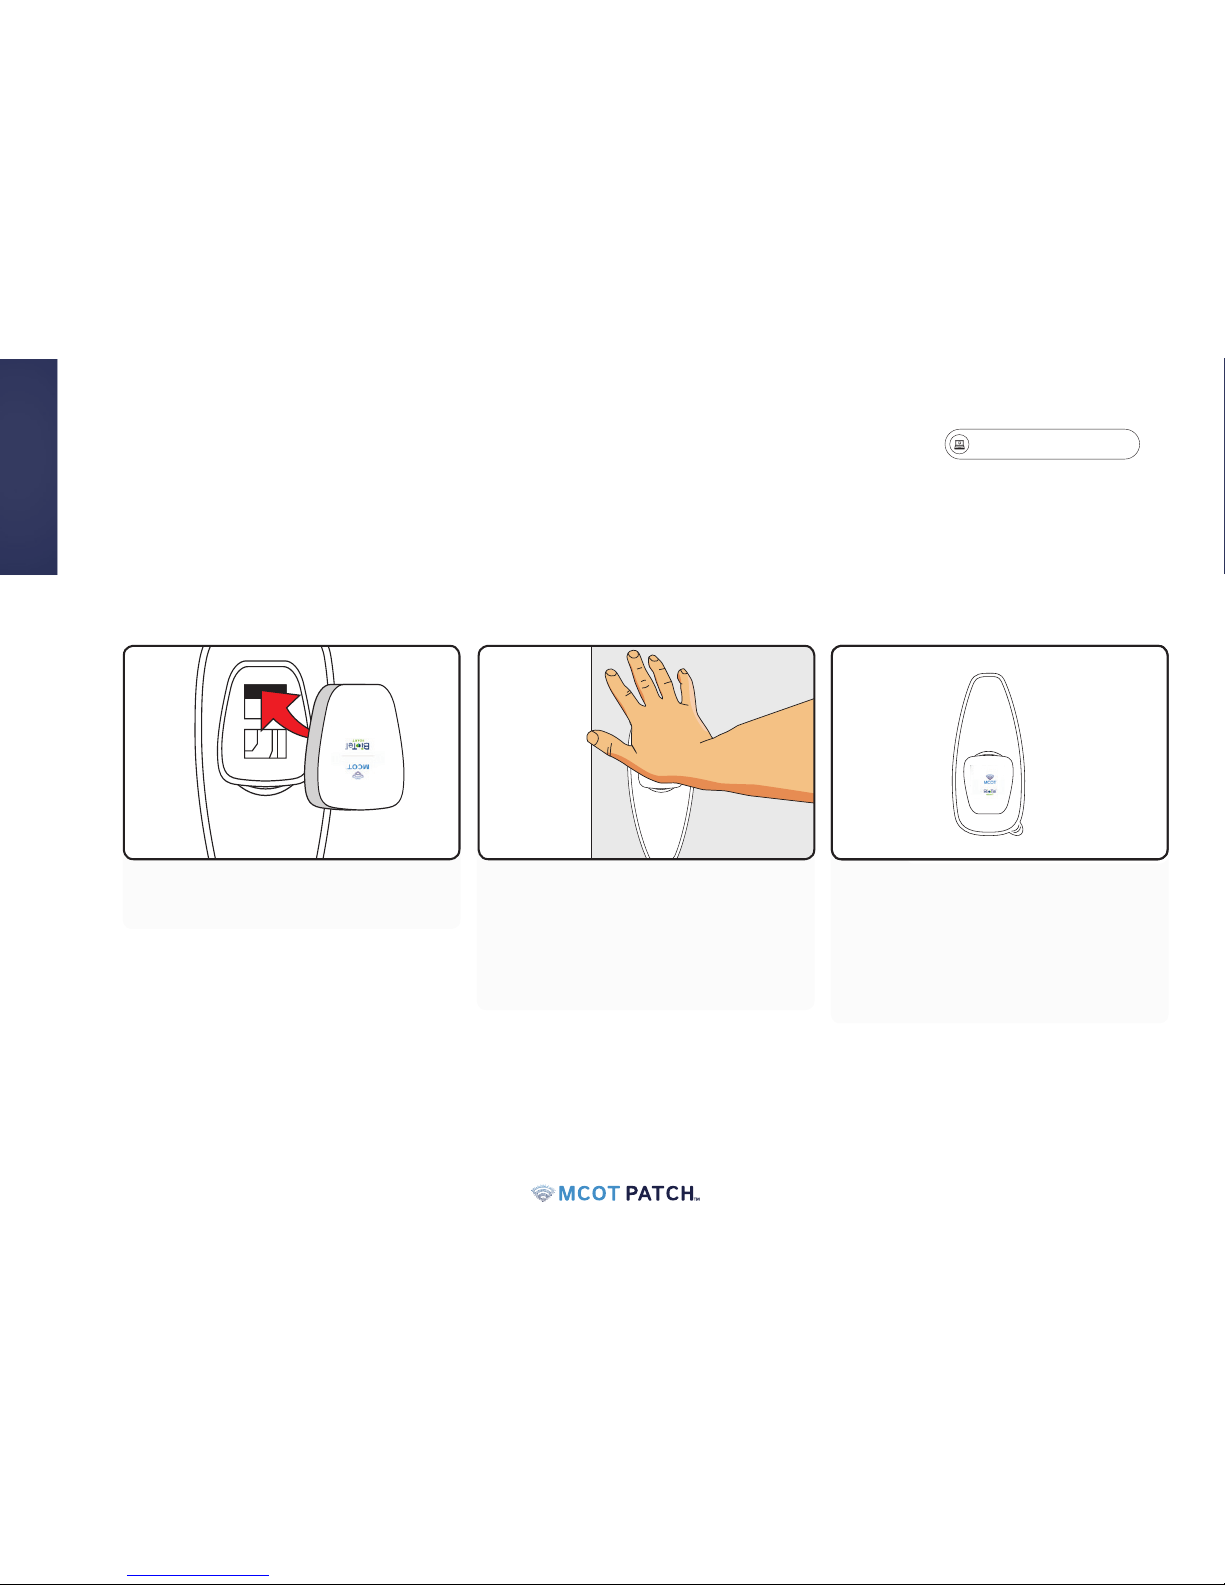
1. Open the pouch.
Tear open one of the pouches
and remove the patch.
2. Place patch on a at hard
surface.
3. Locate the sensor in your kit.
gobio.com/patients
8
Attach the Sensor to the Patch
Getting Started
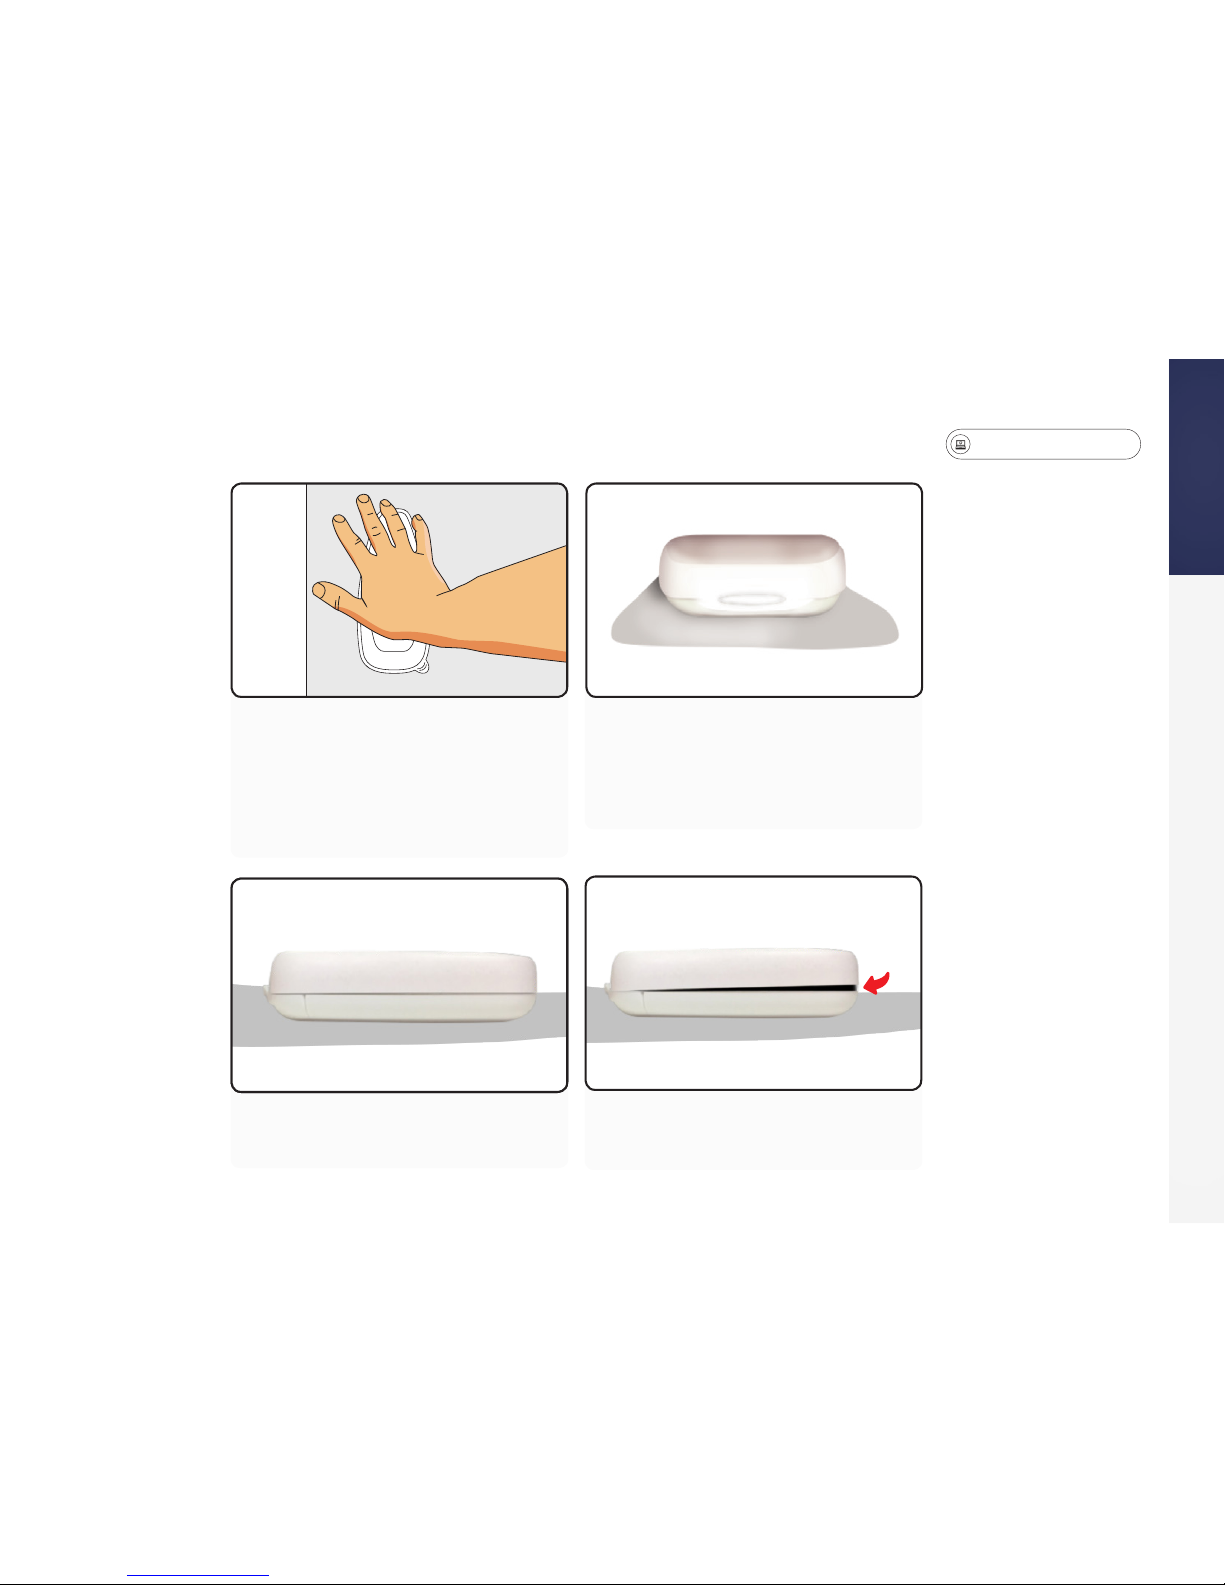
4. Place sensor in the patch.5. While standing, place the
palm of your hand on top of the
sensor and apply pressure to
snap the sensor into the patch.
You may hear several clicks.
6. Rotate patch 180 degrees.
Flashing green lights will
appear if connected properly
gobio.com/patients
Video tutorials available at www.gobio.com/patients. For assistance, please call Customer Service at 1-866-426-4401.
9
Attach the Sensor to the Patch
Getting Started
7. With the patch rotated, again
place the palm of your hand
on top of the sensor and apply
pressure to snap the sensor into
the patch.
8. Inspect all four sides of the
sensor for gaps. The sensor is
attached correctly if there are
no visible gaps.
9. Correct - No Gap 10. Incorrect - Gap
gobio.com/patients
10
• Pick up the monitor and press
Continue.
Attach Sensor to the Patch
Getting Started
11. Apply pressure to any gaps
to seal the gap.
12. Ensure that sensor is sealed
and there are no gaps. It is very
important that all gaps are closed
or damage to the sensor could
occur.
gobio.com/patients
Video tutorials available at www.gobio.com/patients. For assistance, please call Customer Service at 1-866-426-4401.
11
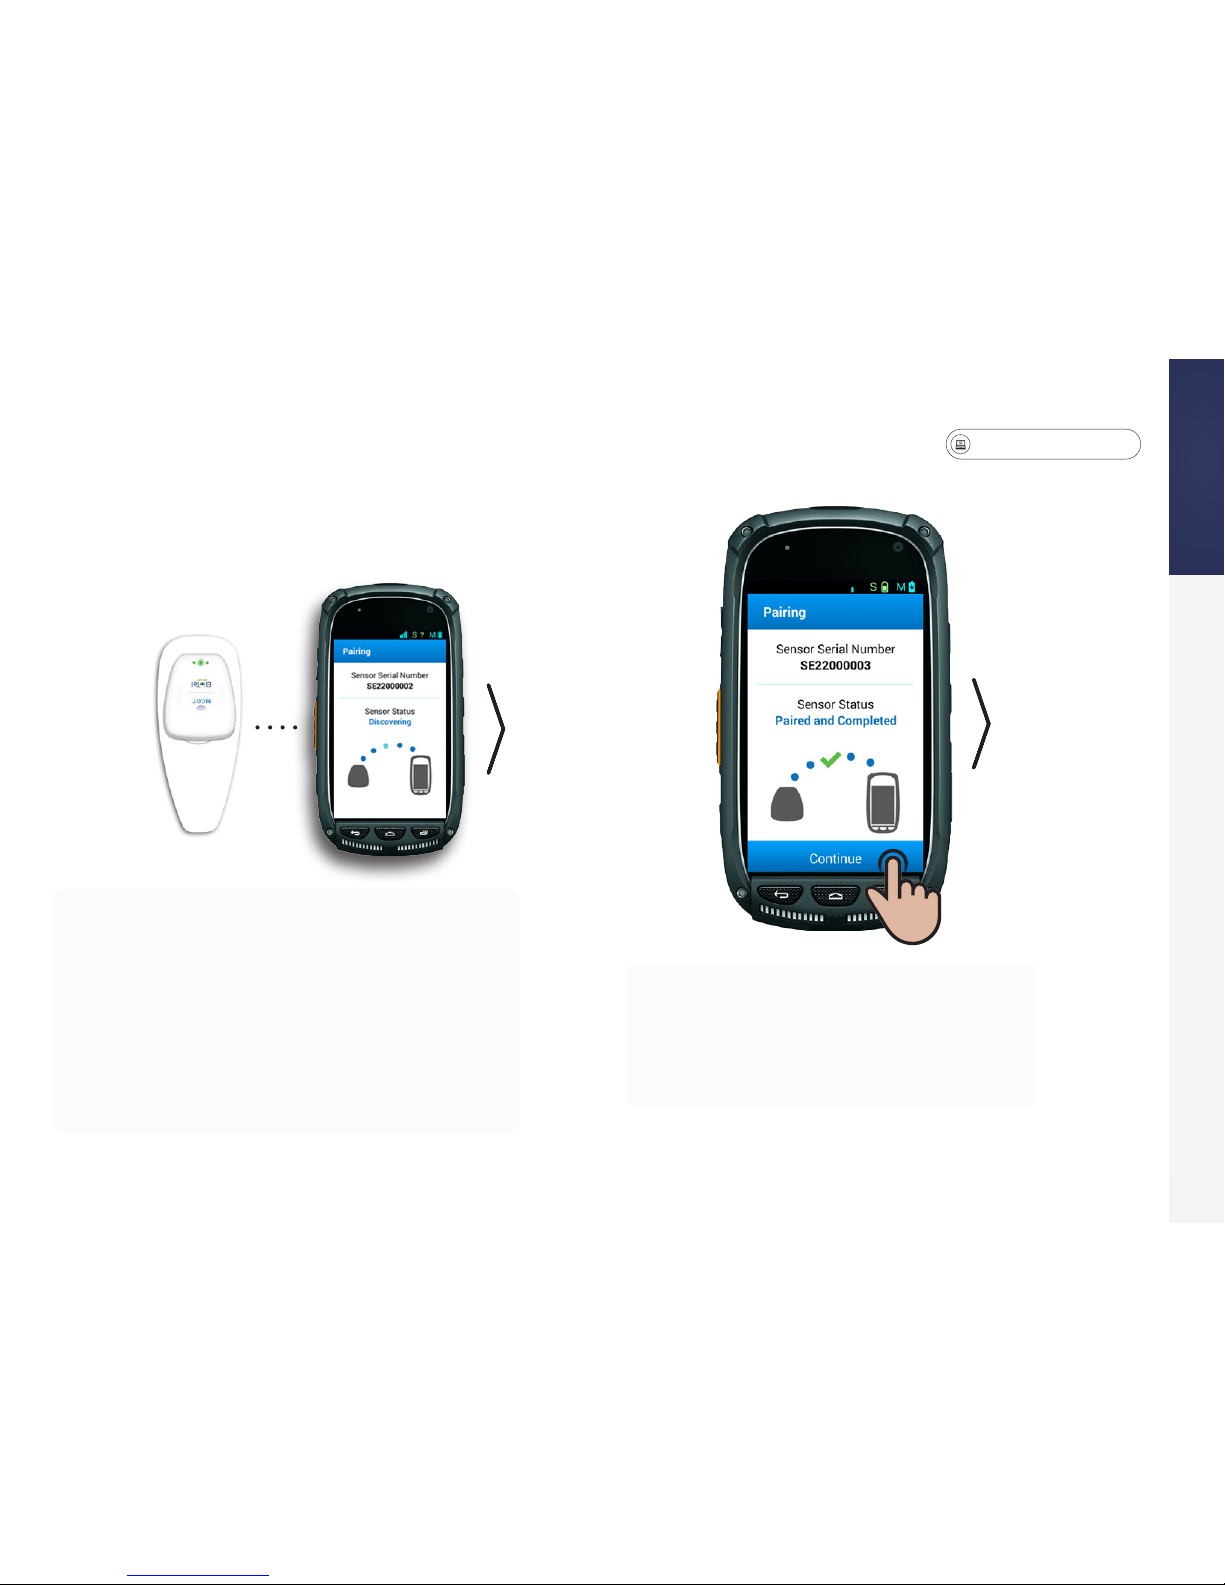
STEP 4: Pair the Sensor and Monitor
• You will need to review a series of
questions before monitoring can begin.
• Read the text on each screen and select the
appropriate response.
• Pick up the patch so it is near the monitor. The
sensor and monitor should automatically link to
each other via Bluetooth.
• Some monitor models may differ; if prompted
with a Bluetooth pairing request, tap OK to start a
connection. If the pairing process is successful, a
green checkmark will be displayed on the screen.
Press Continue to move to the next screen.
Getting Started
gobio.com/patients
12
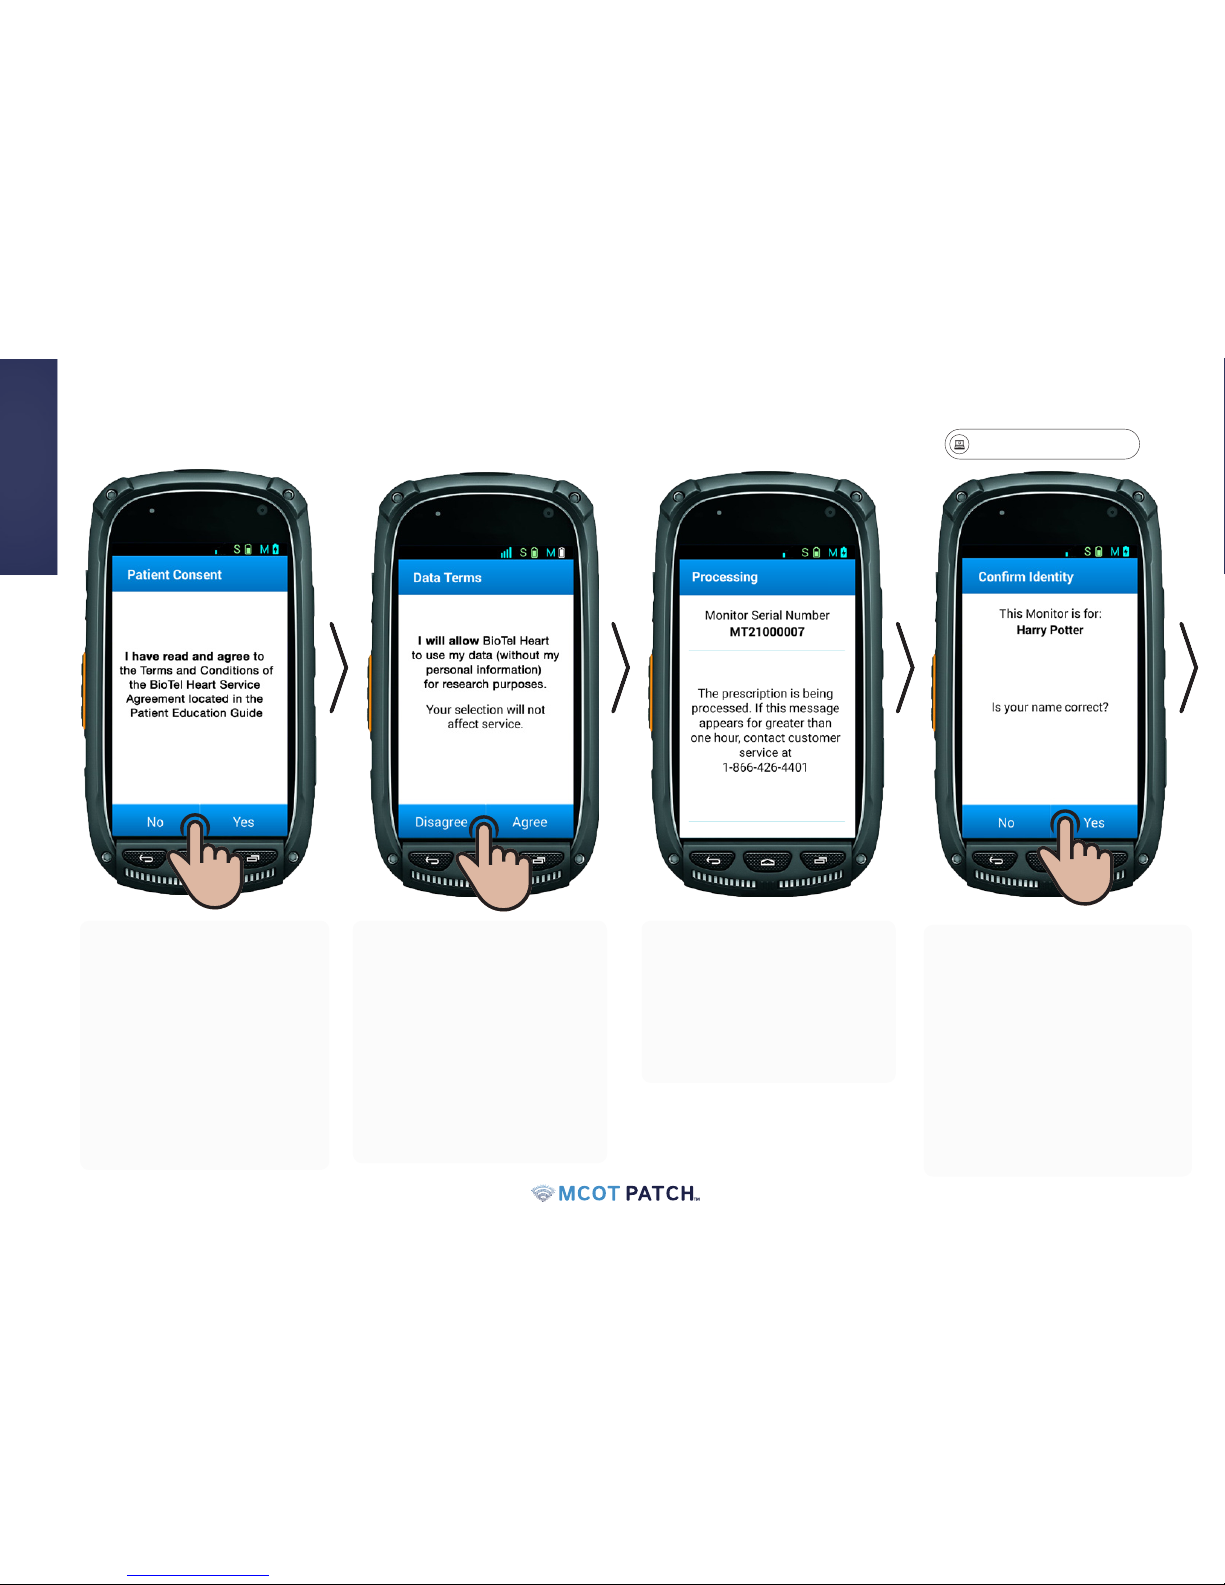
STEP 5: Patient Consent
• The "Data Terms" screen
allows BioTel Heart to
collect your ECG data for
research purposes.
• Select Agree to conrm.
If you do not agree,
select Disagree. Your
response will not impact
service.
• Consent to the Terms and
Conditions of the Service
Agreement, located on
the "Patient Consent"
screen, is required to start
monitoring.
• If you select No the
following screen will
instruct you to contact
BioTel Heart.
• The "Processing" screen
will appear while your
enrollment is being
processed through
BioTel Heart's internal
system.
• The "Conrm Identity"
screen will ask you to
conrm that the name on
the screen is yours. If your
name appears correctly,
select Yes.
• If the name is incorrect
select No. The following
screen will instruct you to
contact BioTel Heart .
Getting Started
gobio.com/patients
Video tutorials available at www.gobio.com/patients. For assistance, please call Customer Service at 1-866-426-4401.
13
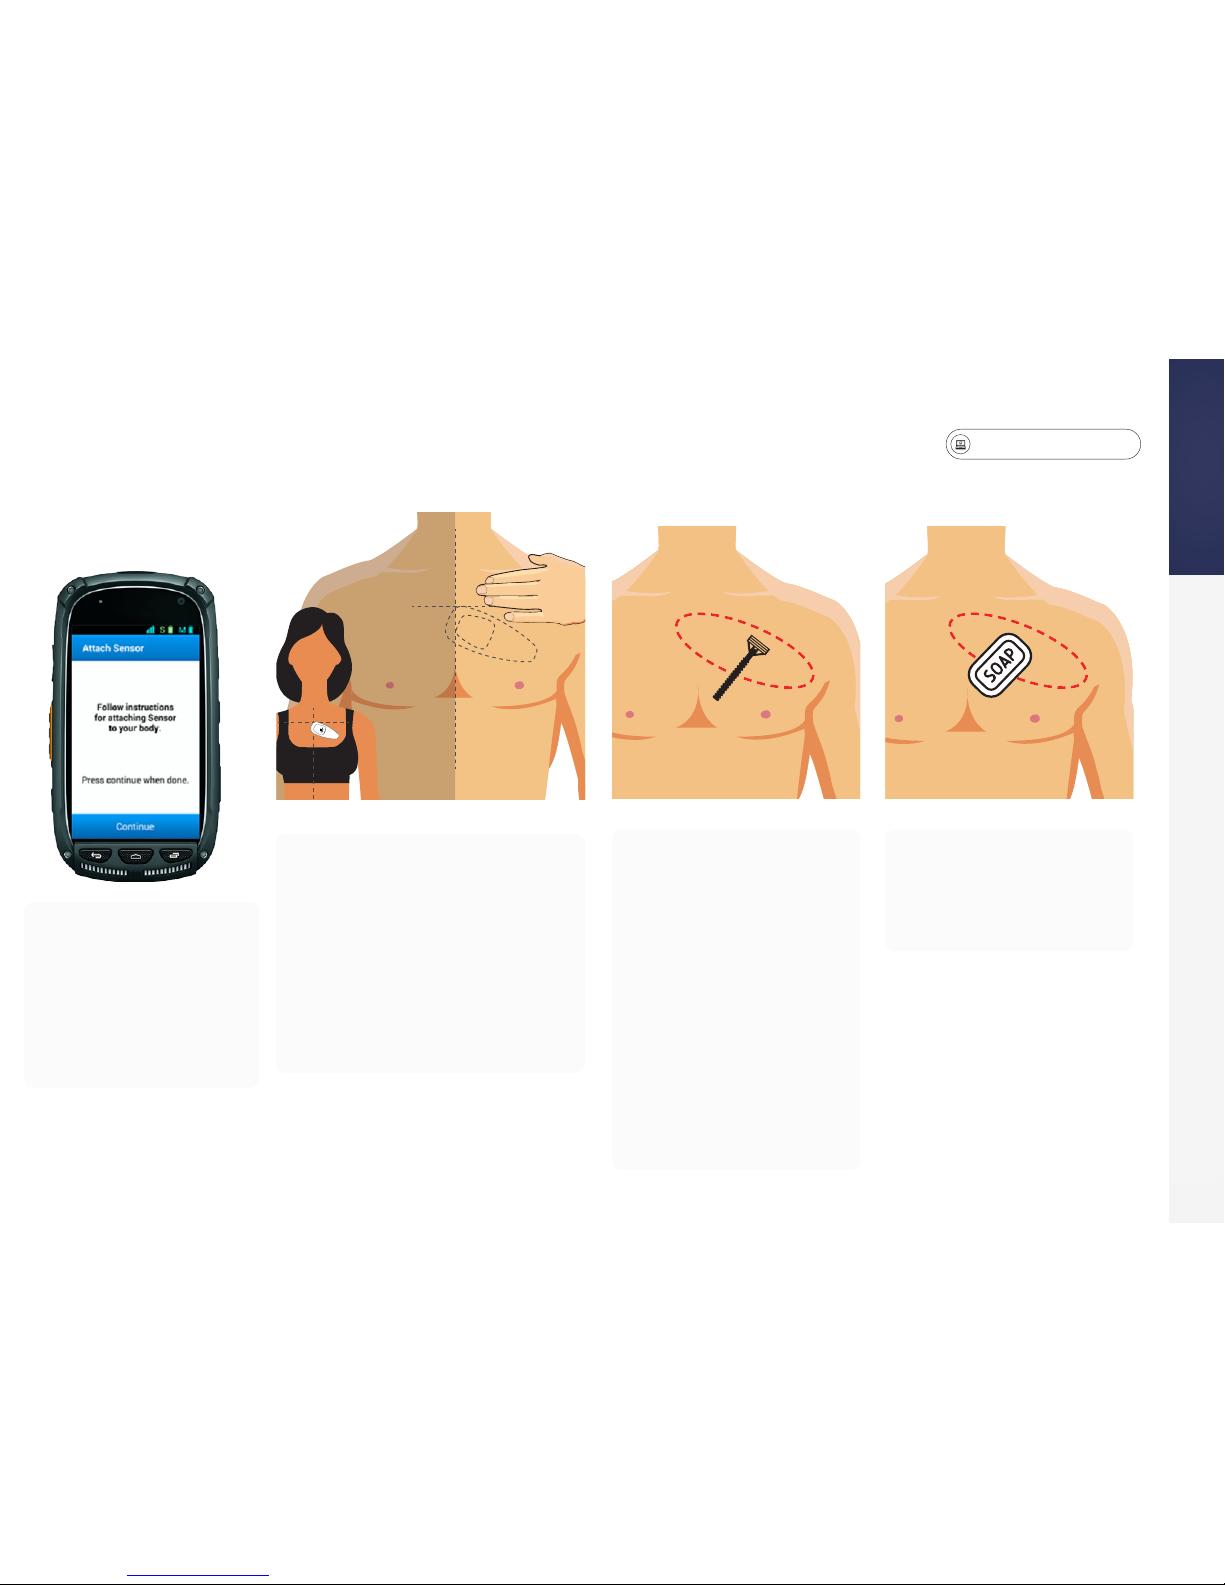
It is important to properly prepare your skin before you apply the patch to your body.
• Wash / Shave
If hair is on your
chest, shave the area
where the patch will
be placed. A razor
is available in your
MCOT Skin Prep Pack.
Start at the center of
your chest and shave
the entire area marked
in the red circle of
the diagram.
• Clean Skin
Clean the area
with soap and
water.
STEP 6: Placement and Skin Preparation
• Now that you've
nished the
questions, set aside
the monitor and
proceed to Step 6,
'Placement and Skin
Preparation'.
• Determine the area of
your chest to prepare by
referring to the diagram.
• Locate your collarbone
on the left side of your
body and measure three
nger widths.
LEFTRIGHT
Getting Started

gobio.com/patients
14
Placement and Skin Preparation
• Dry Skin
Dry skin thoroughly using a towel.
• Abrade Skin
Remove the Prep Scrub Pad from
your MCOT Skin Prep Pack. Scrub
the cleaned area with rm pressure
in a circular motion for one minute.
This important step will improve
the quality of the recording.
• Do not apply lotions or oils.
Getting Started
gobio.com/patients
Video tutorials available at www.gobio.com/patients. For assistance, please call Customer Service at 1-866-426-4401.
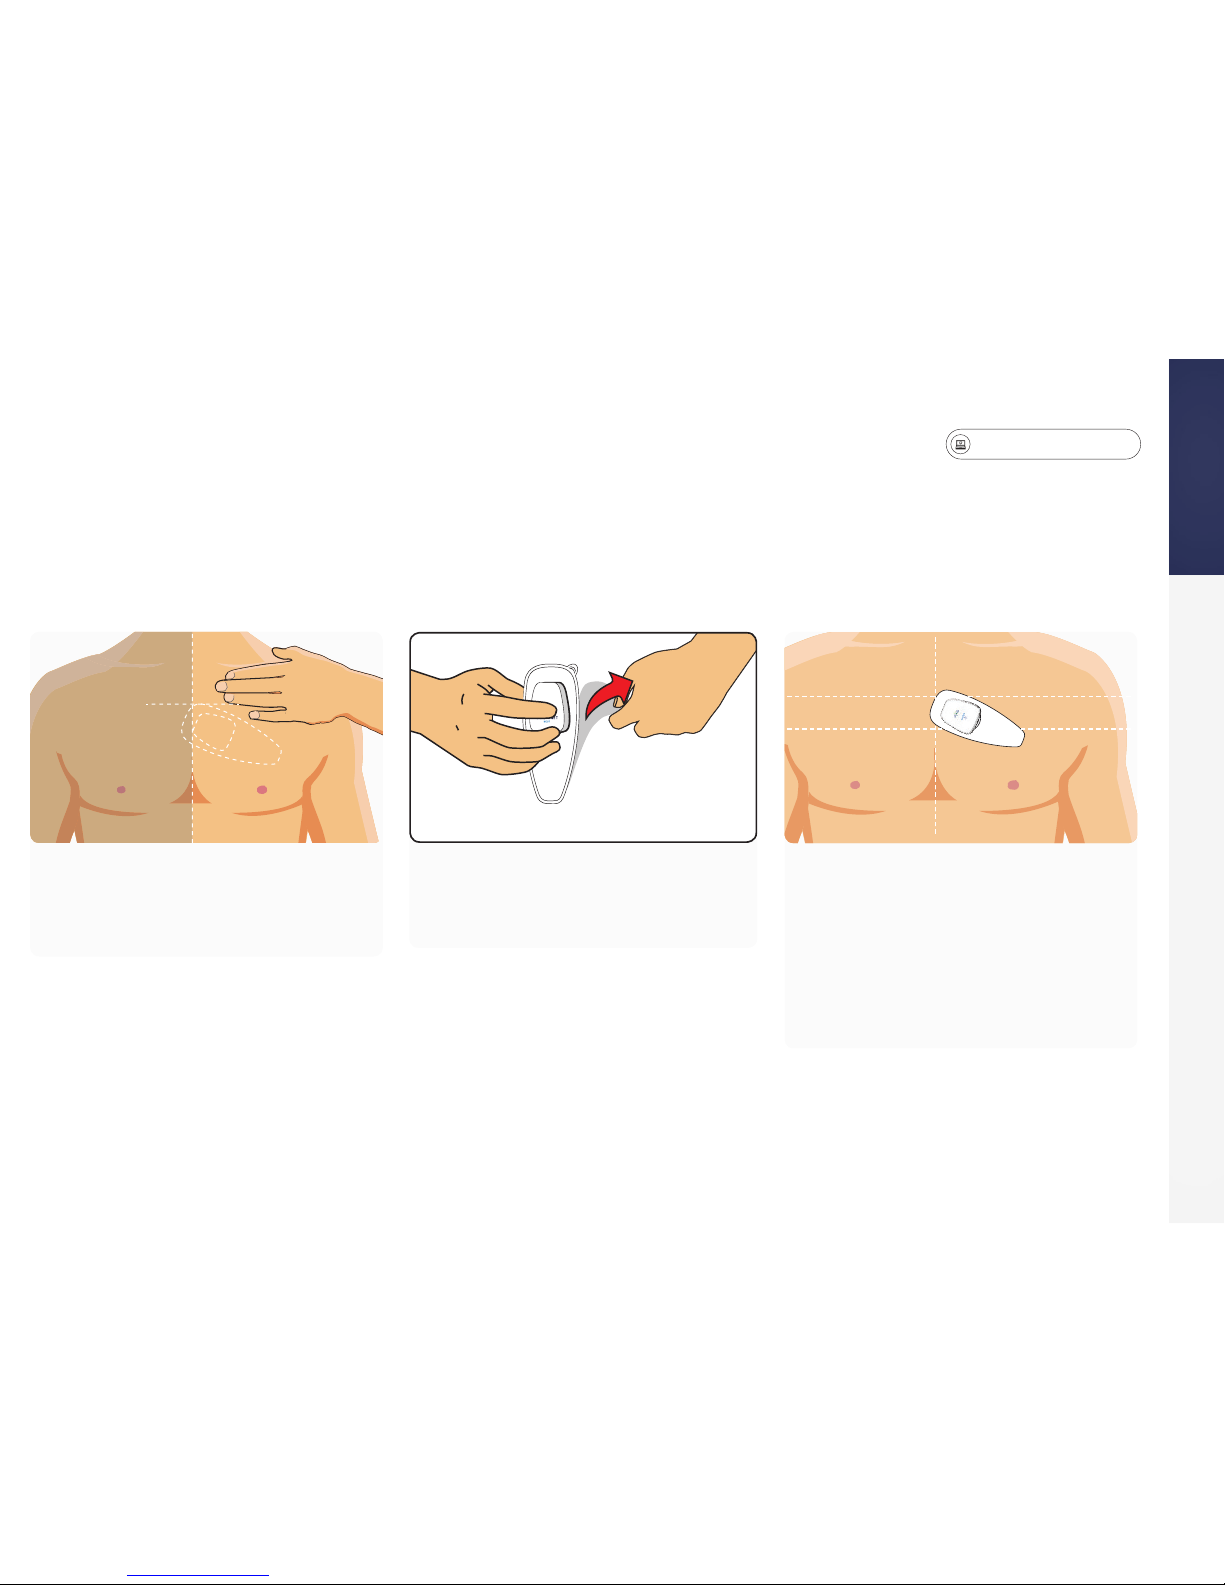
15
STEP 7: Apply the Patch to Your Skin
1. The top of the patch should be
three nger widths down from
your collarbone.
3. Place patch on a slight angle as
shown in the illustration with the
wide end of the patch slightly
over the center of your chest.
• Press all sides of the patch so it
will adhere to your skin.
Getting Started
2. Pick up the patch with the
attached sensor, peel the clear
plastic backing off.
Patch Application
LEFTLEFT RIGHTRIGHT

gobio.com/patients
16
Apply the Patch to Your Skin
4. Remove top white paper. Gently peel off the upper liner by starting with the
raised tab.
• After the liner is removed, press all the edges of the patch rmly and on the
sensor so the patch will adhere to your skin.
• Smooth out any wrinkles by pressing the patch.
• Wait 10-15 minutes to allow the patch to fully adhere to your skin before
proceeding to the next step.
Getting Started
LEFTRIGHT
Minor discomfort may occur when the patch is attached to the skin. If you have sensitive skin, this product may not be
appropriate for use.

gobio.com/patients
Video tutorials available at www.gobio.com/patients. For assistance, please call Customer Service at 1-866-426-4401.
17
STEP 8: Record a Baseline
Getting Started
•When you see this screen, a baseline ECG recording will
begin. Remain still, preferably seated, and breathe normally.
•Once complete, the main screen (Record Symptom) will
appear. This means the baseline ECG is complete and you
can go about your normal daily activities.
•The BioTel Heart Monitoring Center will send a text later in
the day to conrm that your monitoring service has begun.
Please Note: if you press Continue prior to applying the
patch to your chest, the "Activating" screen may appear
for an extended period of time. If this message appears
for greater than an hour contact Customer Service.
Now that the patch is on your body, pick
up the monitor and press Continue.

gobio.com/patients
18
Record a Baseline (Manual Recording Option)
2. Select Send ECG Test1. Select Options 4. Select OK to return to
the main screen
3. Test will be recorded
Sending a baseline should occur automatically, and the data will be sent wirelessly to BioTel Heart. If you do
not have cellular coverage, the baseline will store in the monitor until service is available. You may be asked
to transmit a baseline recording. The steps to complete a manual baseline recording are as follows:
Good to Know
gobio.com/patients
Video tutorials available at www.gobio.com/patients. For assistance, please call Customer Service at 1-866-426-4401.
19
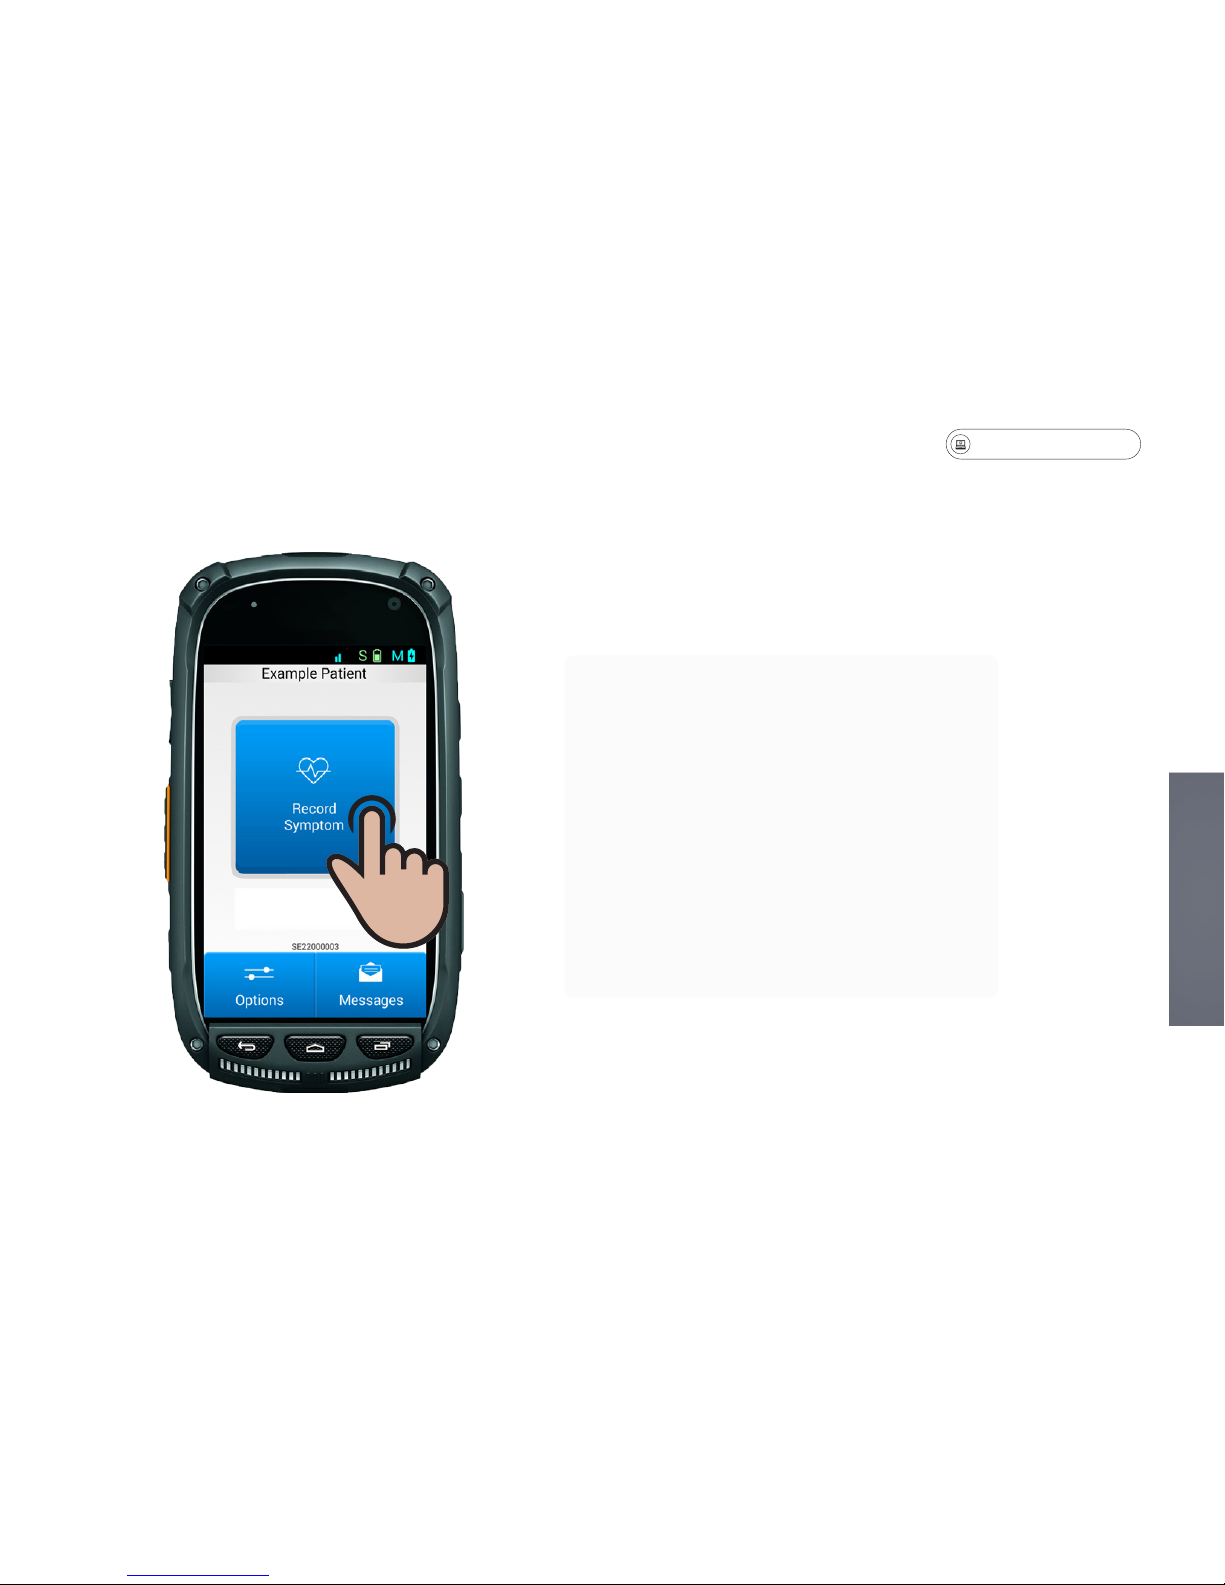
Record Symptoms
Recording a Symptom
•The MCOT Patch will monitor your
heart and send data to the Monitoring
Center. However, you can record
symptoms as you feel them and your
recordings will appear on the reports
provided to your physician.
•To record a symptom, press "Record
Symptom" on the main monitor screen
and enter the information.
Good to Know
gobio.com/patients
20
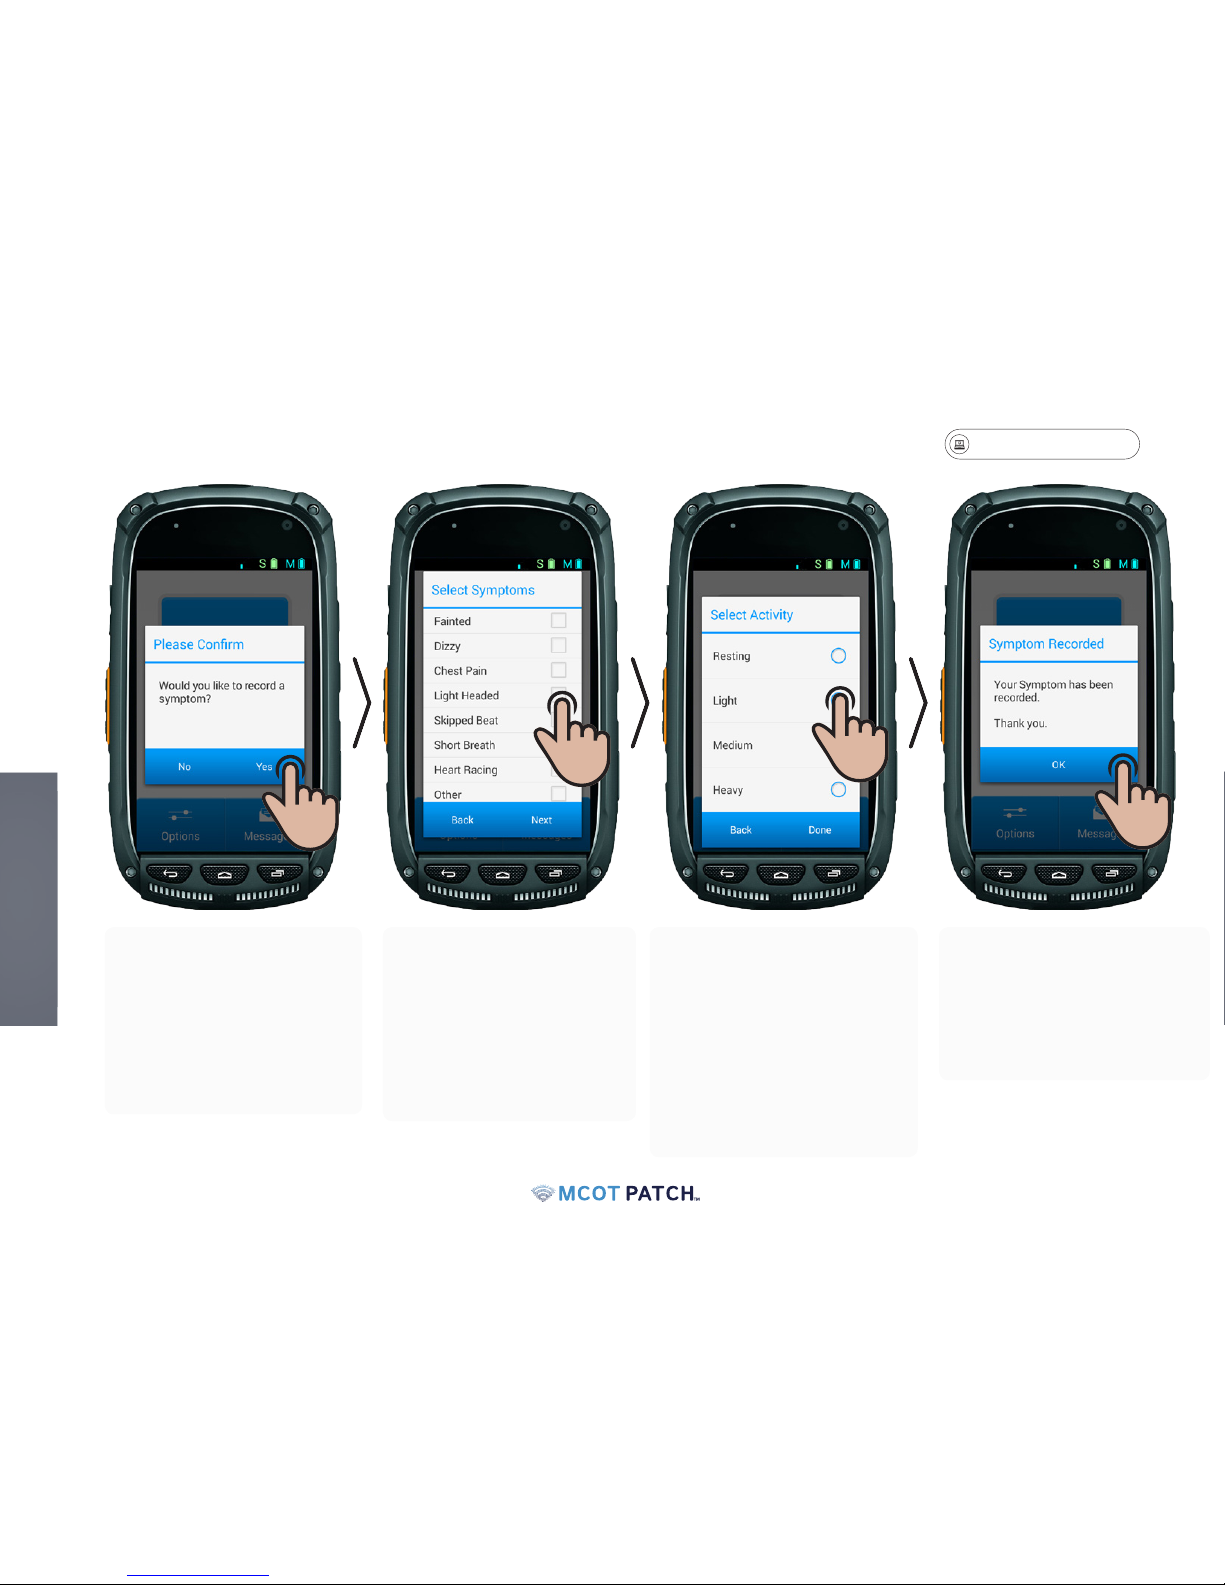
Record Symptoms
•The "Select Symptoms"
screen allows you to
select the symptom(s)
you were feeling. Select
all that may apply.
•Select Next to continue.
•A dialog box will ask if
you would like to record
a symptom. Select Yes
to continue. If you do
not wish to record a
symptom, select No.
•The "Select Activity"
screen allows you
to record your level
of activity when the
symptom occurred.
•Select your activity level
and press Done.
•The "Symptom Recorded"
screen conrms that
your symptom was
recorded. Press OK to
return to HOME screen.
Good to Know
Table of contents
Other BioTel Heart Medical Equipment manuals


