TECHNICAL DESCRIPTION AND PROPOSED CONDITIONS OF USE
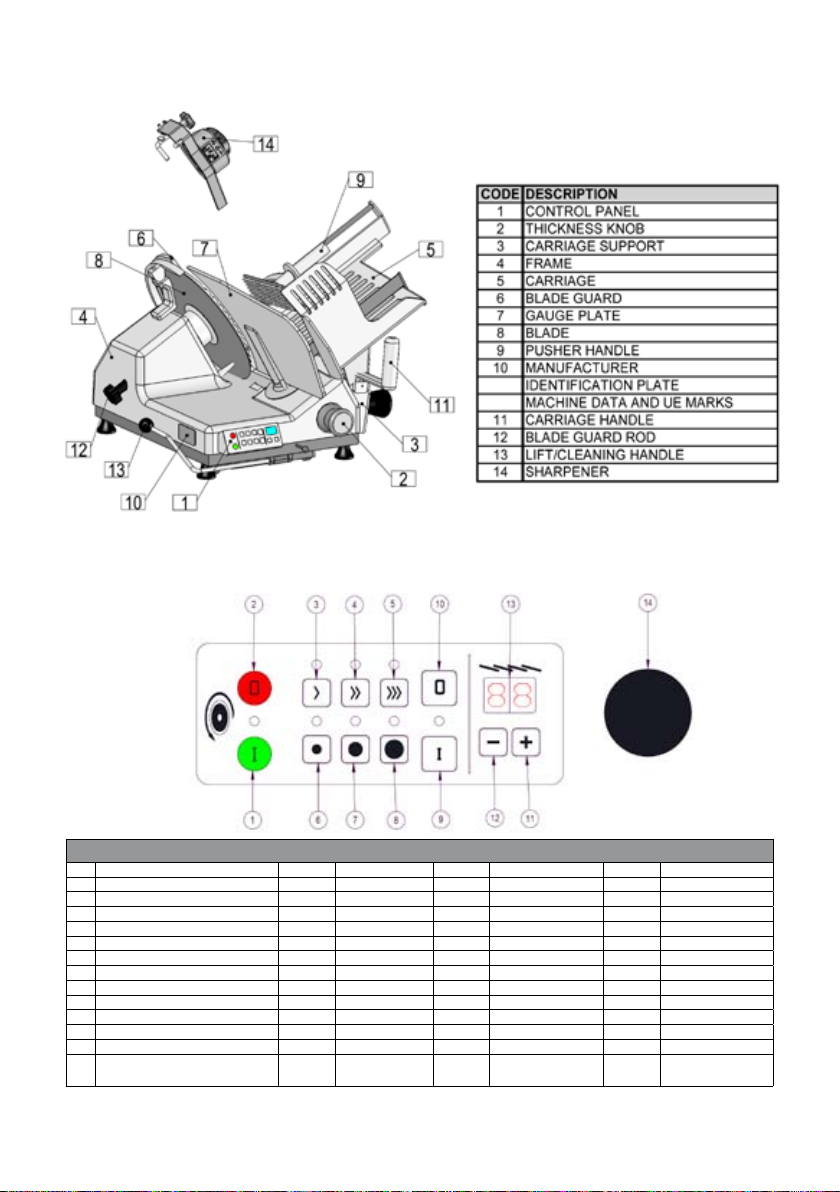
GENERAL DESCRIPTION
The machine is essentially made of a base supporting a circular blade mounted in tilted
position. This blade is driven by an electrical motor to slice food. The machine is equipped
with a carriage holding a product tray and sliding on tracks mounted under the base top,
parallel to the blade.
Slice thickness is adjusted by means of a gauge plate mounted in front of the blade. This
plate, against which rests the product to be sliced is moved transversally with respect to
the blade by a value corresponding to the desired slice thickness. The product is fed to the
machine (towards the gauge plate) by gravity.
All the machine components are made of polished and anodized oxidized aluminum alloy,
of stainless steel and food grade plastic material.
The blade is driven by an electrical motor, transmission is by means of a longitudinally
grooved belt.
The machine is started and stopped by a control button provided with auxiliary circuit pre-
venting accidental restarts after an outage.
Some of the machine models have a user-friendly and safe built-in blade sharpener.
MECHANICAL AND ELECTRICAL SAFETY DEVICES
The following mechanical safety devices were installed:
• A series of aluminum and transparent plastic guards on the product carriage.
The following electrical safety devices were installed:
• Start/stop button system requiring a voluntary restart of the machine in the case of an
outage or interruption of the power supply.
• Safety micro-switch preventing the motor from starting when the blade guard is removed
(not on the CE VERSION).
PRODUCTS THAT CAN BE SLICED
All types of cold cuts (raw, cooked, smoked);•
Meat without bone (raw or cooked, at a temperature not less than + 3 °C;•
Cheese cuts (obviously types that can be sliced such as gruyere, fontina, etc.).•
PRODUCTS THAT MUST NOT BE SLICED:
Frozen or deep-frozen food•
Food containing bones (meat or sh)•
Any other non-food product•
WARNING: RESIDUAL RISKS
Not with standing all the possible cautions taken during the design and the con-
struction of the machine, residual risks (cutting) still exist during use or during
cleaning or maintenance. Therefore be careful and PAY THE UTMOST ATTENTION to
what you are doing.
DO NOT use the machine if you are not in perfect psychological and physical con-
ditions. DO NOT ALLOW anyone near the machine when it is in use. ALWAYS wear
gloves that can resist cuts or tears when cleaning, lubricating or sharpening the
blade.
Slice only the products mentioned as sliceable. NEVER try to slice products that
have been mentioned as non sliceable.