BizLine BIZ 790 395 User manual

BIZ 790 395
SE E-nr 42 023 18
Snro 67 045 06
• EN INFRARED THERMOMETER
Instruction Manual ........................................................................................ p 2
Please reas this manual before switching the unit on. Important safety information inside.
• FR THERMOMÈTRE À INFRAROUGE
Mode d'emploi ................................................................................................ p 7
Lisez ce manuel avant d’utiliser l’appareil. Informations importantes de sécurité à l’intérieur.
• NL INFRAROODTHERMOMETER
Gebruiksaanwijzing ................................................................................... p 12
Lees deze gebruiksaanwijzing voordat u het apparaat inschakelt.
Belangrijke veiligheidsinformatie binnenin.
• DE INFRAROTTHERMOMETER
Anwendung..................................................................................................... p 17
Bitte diese Anleitung vor dem Einschalten des Geräts aufmerksam durchlesen.
Darin stehen wichtige Sicherheitsinformationen.
• SE INFRARÖD TERMOMETER
Bruksanvisning ............................................................................................ p 22
Läs den här bruksanvisningen innan du slår på enheten.
Den innehåller viktig säkerhetsinformation.
• FI INFRAPUNALÄMPÖMITTARI
Käyttöopas ..................................................................................................... p 27
Lue tämä opas ennen laitteen kytkemistä päälle. Sisällä on tärkeitä turvatietoja.
• NO INFRARØDTERMOMETER
Instruksjonshåndbok................................................................................. p 32
Les denne brukerveiledningen før du slår på instrumentet. Den inneholder viktig
sikkerhetsinformasjon..
• IT TERMOMETRO A INFRAROSSI
Manuale d’uso .............................................................................................. p 37
Si prega di leggere il presente manuale prima di accendere lo strumento.
Contiene importanti informazioni di sicurezza.
• ES TERMÓMETRO DE INFRARROJOS
Manual de instrucciones ......................................................................... p 42
Por favor, lea este manual antes de encender la unidad.
Información importante de seguridad en el interior.
EN
2
Laser Beam
Sensor Beam
200 400 800
Rapport Distance (D) / point de mesure (S = Spot)
D:S = 8:1
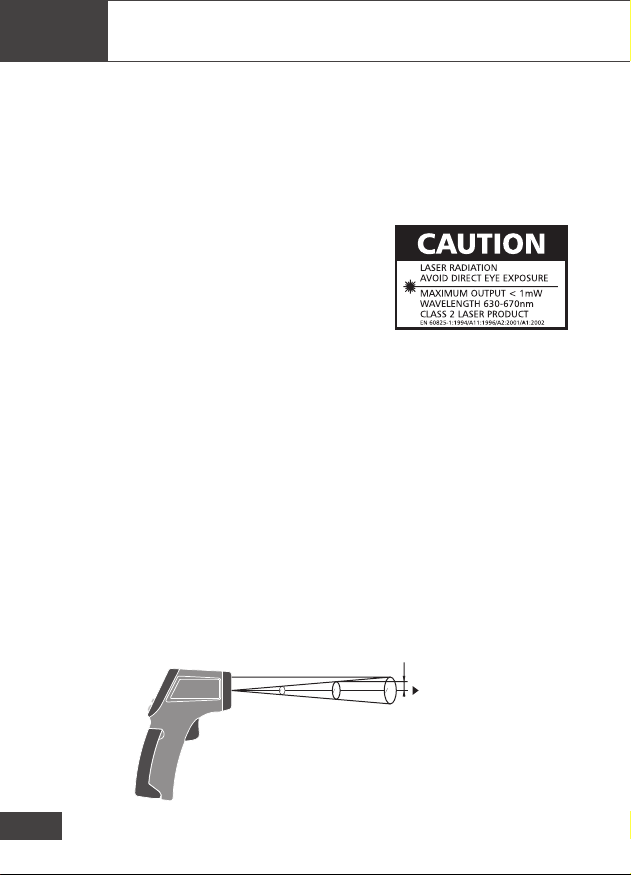
1.Safety
• Use extreme caution when the laser beam is turned on.
• Do not let the beam enter your eye, another person’s eye or the eye
of an animal.
• Be careful no to let the beam on a reective surface strike your eye.
• Do not allow the laser light beam impinge on any gas which can
explode.
2.Features
• Precise non-contact measurements
• Built-in laser pointer
• User selectable ºC or ºF
• MAX/MIN temperature displays
• Trigger lock
• Automatic Data Hold & Auto power o
• Automatic selection range and Display Resolution 0.1ºC(0.1ºF)
• The meter at 8 inches away measure 1 inch target
• Backlit LCD display
Wide range application:
Food preparation, Safety and Fire inspectors, Plastic molding,
Asphalt, Marine and screen printing, measure ink and dryer
temperature, Diesel and Fleet maintenance.
Field of View:
The InfraRed Thermometer’s eld of view is 8:1, meaning that if the InfraRed
Thermometer is 8 inches from the target, the diameter of the object under test must
be at least 1 inch. Other distances are shown below in the eld of view diagram.
Refer to the chart printed on the meter for more informationtableau imprimé sur
l’appareil.
25
050
0100
0
16mm
inch
EN
3
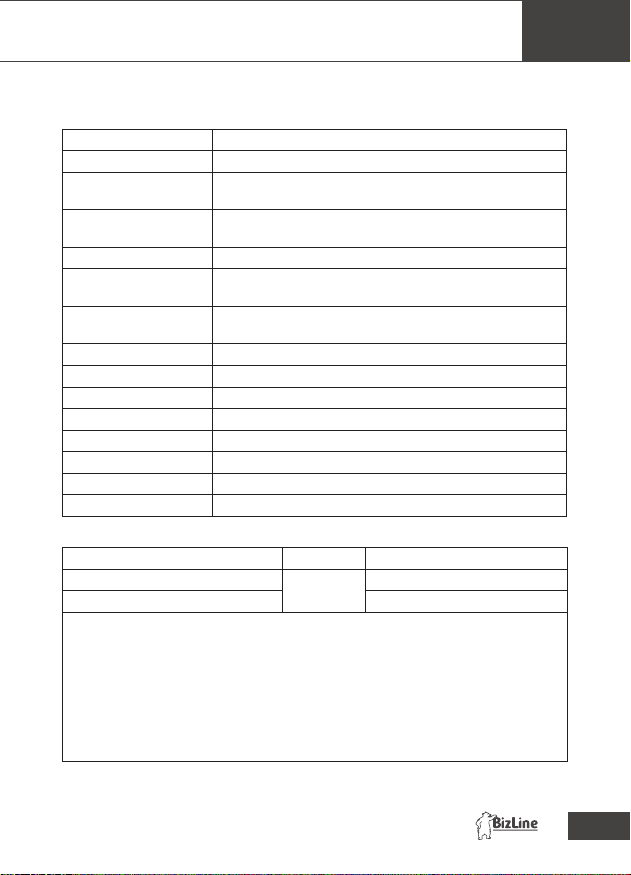
3. Specications
• General Specications
Meas. Ranges
-30°C to 260°C / -22°F to 500°F
Response Time Less than 1 second
Over Range
Indication
LCD will show “---- ”
Polarity
Automatic (no indication for positive polarity). Minus (-)
sign for negative polarity
.
Emissivity
0,95
Fixed value
Field of view
D/S = Approx 8:1 ratio (D = distance, S = spot)
(Has 90% encircled energy at the focal point)
Diode Laser
Output: < 1 mW, Wavelength : 630-670 nm,
class 2(II)
Laser product
Spectral Response
6-14 μm
Power off
Automatic shut off after 8 seconds, approx.
Operating Temp
0°C to 50°C / 32°F to 122°F
Storage Temp. -20°C to 60°C / -4°F to 140°F
Relative Humidity
10% to 90% RH operating, < 80% RH storage
Power Supply
9V battery, NEDA 1604A or IEC 6LR61
or equivalent
Weight 180 g
Size
82 x 41.5 x 160 mm
• InfraRed Thermometer Specications
Range
Resolution
Accuracy
-30°C to 0°C (-22°F to 32°F)
0,1°C/°F ±4°C/±7°F
0°C to 260°C (32°F to 500°F) ±2% of reading or
±2ºC/±4°F
Note:
Accuracy is given at 18°C to 28°C (64°C to 82°C), less than 80%RH.
Emissivity:
0.95 xed value
Field of View:
Make sure that the target is larger than the unit’s spot size.
The smaller the target, the closer you should be to it. When
accuracy is critical, make sure the target is at least twice as
large as the spot size.
EN
4
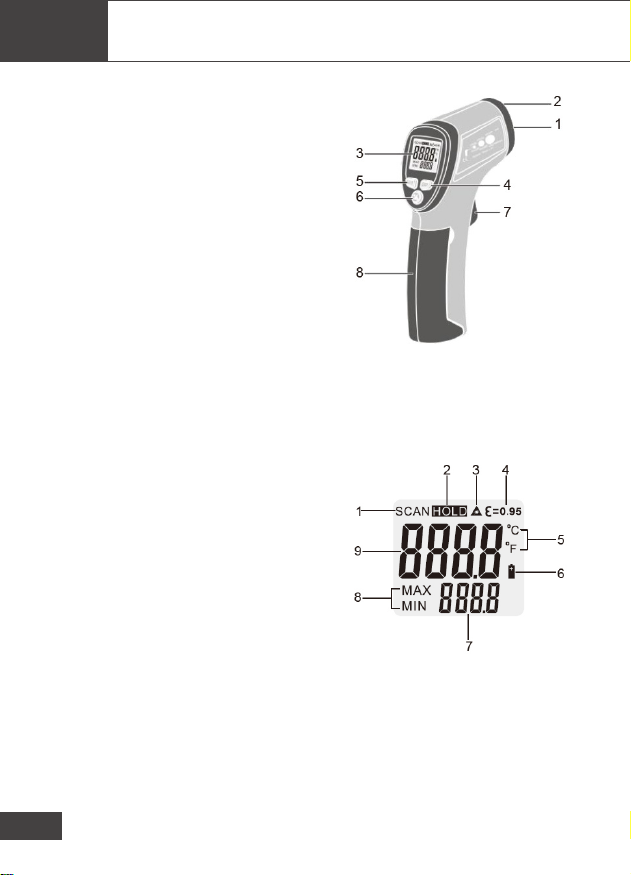
4. Front Panel Description
1-IR sensor
2-Laser pointer beam
3-LCD Display
4-°C/°F select key
5-Max/Min select key
6-Laser & Backlight select key
7-Measurement Trigger
8-Battery Cover
5. Indicator
1-Measuring indication
2-Data Hold
3-Laser Point
4-Fixed emissivity (0.95)
scan Symbol
5-Temperature
°C(Celsius)/°F(Fahrenheit)
6-LOW battery indicator
7-MAX/MIN readout
8-MAX/MIN Symbol
9-Digital readout
EN
5
6. Measurment Operation
6-1. Hold the meter by its Handle Grip and point it toward the
surface to be measured.
6-2. Pull and hold the Trigger to turn the meter on and begin
testing. The display will light if the battery is good. Replace
the battery if the display does not light.
6-3. While measuring, the SCAN display icon will appear in the
upper left hand corner of the LCD.
6-4. While continuing to pull the Trigger:
•Push the “Laser/ Backlight” button once to turn on the laser pointe.
When the laser is on, the laser icon ” ” will appear on the LCD.
Push the “Laser/ Backlight” button two times to turn on the backlight.
Push the “Laser/ Backlight” button three times to turn the laser off.
Push the “Laser/ Backlight” button four times to turn both the laser and
backlight off.
•Select the temperature units (°C or °F) using the ”°C/ °F” buttons.
•Select the Max/Min mode using the ”Max/Min” buttons.
6-5. Release the Trigger and the HOLD display icon will appear on
the LCD indicating that the reading is being held.
6-6. The meter will automatically power o on approximately 8
seconds after the trigger is released.
Note: Measurement Considerations
Holding the meter by its handle, point the IR Sensor toward the object whose
temperature is to be measured. The meter automatically compensates for
temperature deviations from ambient temperature. Keep in mind that it will take up
to 30 minutes to adjust to wide ambient temperatures are to be measured followed
by high temperature measurements, some time (several minutes) is required after
the low (and before the high) temperature measurements are made.
This is a result of the cooling process which must take place forthe IR sensor.
This manual suits for next models
2
Table of contents
Languages:


