BLACK DECKER BDXPA0031 User manual

1
Thank you for choosing BLACK+DECKER!
PLEASE READ BEFORE RETURNING THIS PRODUCT FOR ANY REASON.
If you have a question or experience a problem with your BLACK+DECKER
purchase, go to http://www.blackanddeckerelectrical.com
If you can’t find the answer or do not have access to the Internet, call
1-844-746-6688 from 9 a.m. to 5 p.m. EST Mon.-Fri. to speak with an agent.
Please have the catalog number available when you call.
INSTRUCTION MANUAL
CATALOG NUMBERS
Grounded Outdoor Countdown
Outlet Timer
BDXPA0031
SSAVE THI MANUAL FOR FUTURE REFERENCE.

2
ENGLISH
English (original instructions) 3
Español (traducido de las instrucciones originales) 8

3
Important Safety Guideline
SAVE THESE INSTRUCTIONS FOR FUTURE REFERENCE.
Definitions: Safety Alert Symbols and Words
This instruction manual uses the following safety alert symbols and words to alert you to
hazardous situations and your risk of personal injury or property damage.
DANGER: Indicates an imminently hazardous situation which, if not avoided, will
result in death or serious injury.
WARNING: Indicates a potentially hazardous situation which, if not avoided, could
result in death or serious injury.
CAUTION: Indicates a potentially hazardous situation which, if not avoided, may
result in minor or moderate injury.
(Used without word) Indicates a safety related message.
NOTICE: Indicates a practice not related to personal injury which, if not avoided, may
result in property damage.
WARNING: PLEASE READ THIS INSTRUCTION MANUAL THOROUGHLY AND
COMPLETELY BEFORE INSTALLATION & USE. FAILURE TO DO SO COULD
CAUSE DAMAGE TO PROPERTY, SERIOUS INJURY OR DEATH, AND VOID YOUR
WARRANTY.
For California residents
/
Pour les résidents de la Californie
/
Para residentes en California
WARNING:Cancerand ReproductiveHarm -
www.P65Warnings.ca.gov.
AVERTISSEMENT: Cancer et Troubles de l'appareil reproducteur -
www.P65Warnings.ca.gov.
ADVERTENCIA:Cáncer y Daño Reproductivo-
www.P65Warnings.ca.gov.
s

4
Grounded Outdoor Countdown Outlet Timer
125 VAC, 60 Hz
15A General purpose
1875W General purpose
1000W Tungsten
1/3 HP
Ratings
Store indoors when not in use.
WARNING
:
RISK OF ELECTRIC SHOCK:
Do not use with an extension cord.
Plug directly into a GFCI electrical outlet.
Fully insert the plug.
Unplug timer before cleaning, use dry brush or duster to clean.
Keep away from children.
Safety Information
NOTE: This product is suitable for use with outdoor appliances. This is a grounded device.
It has a grounded plug and three grounded outlets.
WARNING
:
RISK OF FIRE:
Do not use to control appliances that contain heating elements such as cooking
appliances, heaters, irons, etc.
Do not exceed electrical ratings.
WARNING
:
Suitable for outdoor location. Not for water immersion or for use where directly
exposed to water. When used for controlling pool pump, receptacle must not be less than
10 ft. from the inside walls of a pool.
CAUTION:
Installation
Mount the timer onto a wall near a GFCI receptacle
with the timer's light sensor (B) facing outward.
Install a nail or screw head (not included) into a wall.
The nail or screw must extend at least 7/8 in. out
from the wall and allow the timer to be 3 ft. (0.9 m)
above ground level.
NOTE: To ensure proper operation of the automatic function, ensure the light sensor is
shielded from all night time sources of light, such as floodlights.
1. Mounting the timer
Hang the timer from the eyelet on the top right of the
unit with the receptacle (D) facing downward so that
moisture does not accumulate in the outlet.
Plug the grounded power cord (A) into a GFCI
outlet.
Plug the device you wish to be on a timer into the
receptacle (D).
2. Installing the timer
B
D
A
When using in outdoors, plug only into a GFCI protected receptacle. Ensure
the receptacle is mounted in an approved “weatherproof" type outside box.

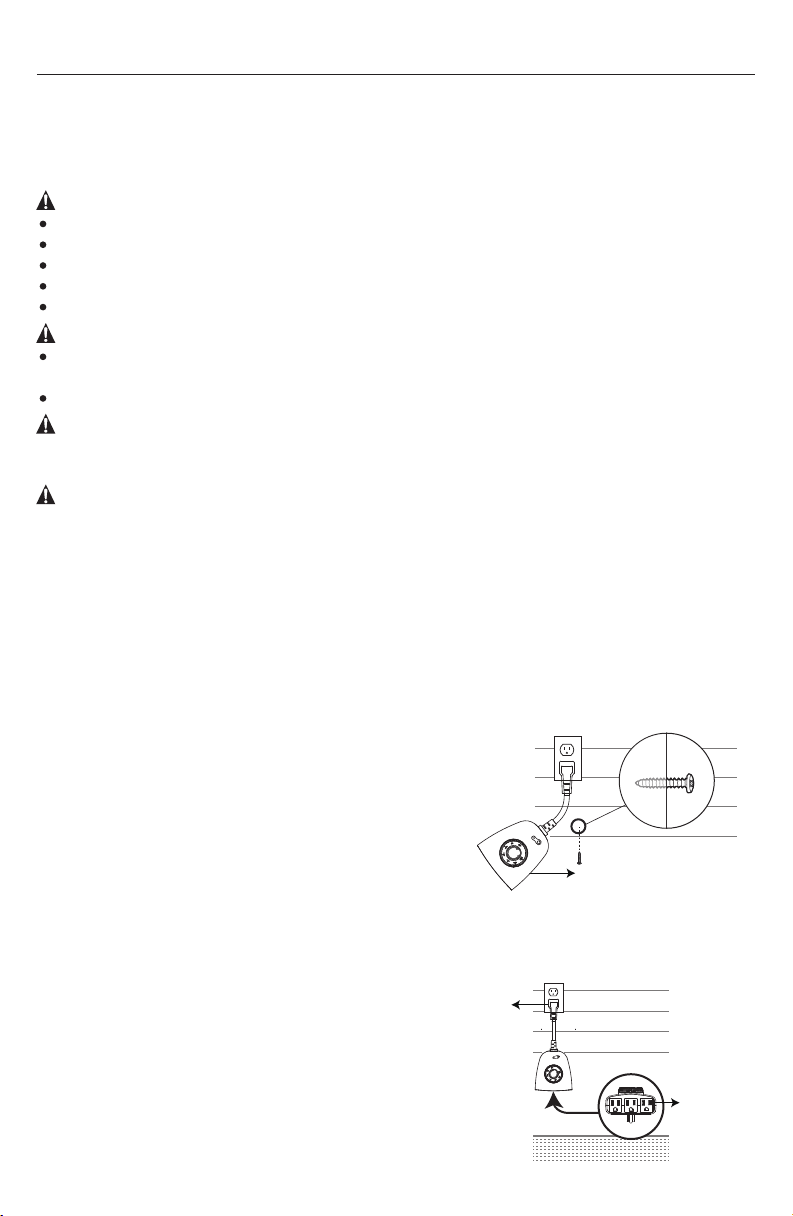
A. Power Cord/Plug: Plug this into a GFCI outlet to power
the timer.
B. Light Sensor: The timer must be mounted in a location
that allows for direct sunlight to ensure proper
functionality for the dusk-to-dawn feature.
C. Timer Dial: Rotate to one of the following settings:
OFF: Turns the timer off.
ON: Turns the timer on.
2Hr, 4Hr, 6Hr, or 8Hr: Timer turns on at dusk and off
after the selected time 2, 4, 6, or 8 hours later.
Dusk-Dawn: Timer turns on at dusk and off at dawn.
D. Receptacle: Plug in the device you wish to be on a timer.
5
Grounded Outdoor Countdown Outlet Timer
Product Description
Troubleshooting
A
B
C
D
The lights do not
turn on at dusk. Move the timer to another location
where there is no ambient light.
Problem Possible Cause Corrective Action
The lights do not
turn on, even when
the timer is in the
ON position.
The lights are not in the
ON position, the lights
are not functioning, or
the timer is not receiving
power.
Ensure that lights are functional by
plugging them directly into the outlet.
Ensure that lights are in the ON position
if they have their own switch. Ensure
that the timer is receiving power - the
LED should light up when plugged into
an outlet and put in the ON position.
The lights on the
timer are flashing
(turning on and off).
The timer is in Dusk-
to-Dawn mode and the
light from the plugged-in
lights is affecting the light
sensor.
Move the lights away from the timer,
or reposition the timer so that it does
not face the lights.
The timer is not in a good
area for the light sensor
to function as there is too
much ambient light to
detect darkness.
Instructions:
1. Lift the protective cover to access timer dial.
2. To set the current time: rotate the dial clockwise until the time lines up with the TIME NOW
arrow.
3. To program the timer: begin with all segment pins pulled up. Push the segment pins down
for the periods of time you want the timer to be ON. Each segment pin represents 30
minutes: 2 segment pins = 1 hour. Repeats daily.
4. To connect the timer: slide the switch down to TIMER ON position. Plug device into
the timer and turn the device on. Plug timer into wall outlet.
5. To override the timer: slide the switch down to set timing periods. When in the l position, it
means OUTLET ON, the plugged-in device is switched on permanently.
6. In case of power failure: reset the timer as explained in step 2.
7. To mount timer to vertical surface (wall), attach using mounting hole located on the back of
timer.

6
Grounded Outdoor Countdown Outlet Timer
In the event of malfunction or breakdown, grounding provides a path of least resistance for
electric current to reduce the risk of electric shock. The timer must be connected to a cord
having an equipment-grounding conductor and a grounding plug. The plug must be plugged
into an appropriate outlet that is properly installed and grounded in accordance with all local
codes and ordinances.
Improper connection of the equipment grounding conductor can result in a risk
of electric shock. The conductor with insulation having an outer surface that is green with or
without yellow stripes is the equipment grounding conductor. If repair or replacement of the
cord or plug is necessary, do not connect the equipment-grounding conductor to a live
terminal. Check with a qualified electrician or service person if the grounding instructions are
not completely understood, or if in doubt as to whether the timer is properly grounded. Do not
modify the plug connected to the timer – if it will not fit the outlet, have a proper outlet
installed by a qualified electrician.
FOR GROUNDED, CORD-CONNECTED TIMER RATED LESS THAN 15A AND INTENDED
FOR USE ON A NOMINAL 125V SUPPLY CIRCUIT
The timer is for use on a nominal 125V circuit, and should be connected to a grounding
outlet that looks like that illustrated in sketch a. A temporary adaptor, which looks like the
adaptor illustrated in sketch b, may be used to connect this plug to a 2-pole receptacle as
shown in sketch b if a properly grounded outlet is not available. The temporary adaptor
should be used only until a properly grounded outlet can be installed by a qualified electri-
cian. The green colored rigid ear, lug, and the like, extending from the adaptor must be
connected to a permanent ground such as a properly grounded outlet box cover. Whenever
the adaptor is used, it must be held in place by the metal screw.
Grounding Instructions
DANGER
:
NOTE: IN CANADA, THE USE OF A TEMPORARY ADAPTOR IS NOT PERMITTED BY
THE CANADIAN ELECTRICAL CODE. Ensure that the timer is connected to an outlet
having the same configuration as the plug.

1 YEAR LIMITED WARRANTY
IMPORTANT: Proof of Purchase is required to obtain warranty service.
Paragon Group USA Inc. warrants to the original owner that our products will be free from
defect in workmanship and material for a period of ONE YEAR from the date of purchase.
Should any unit(s) prove to be defective during this period, Paragon Group USA Inc. will be
responsible for replacement of the defective unit(s) only. Paragon Group USA Inc. is not
responsible for labor charges or any incidental or consequential expenses.
Not Covered – Batteries are not covered by this warranty. Repair service, adjustment and
calibration due to misuse, abuse or negligence are not covered by this warranty. Unautho-
rized service or modification to this product or of any furnished components will void this
warranty in its entirety.
This warranty does not include reimbursement for inconvenience, installation, set-up time,
loss of use, postage, unauthorized service, or other products used in conjunction with
BLACK+DECKER
products.
Copyright 2021 Black&Decker
BLACK+DECKER and the BLACK+DECKER Logo are
trademarks of Stanley Black Decker, Inc. or
an affiliate thereof and are used under license.
Ph: 1-844-746-6688
www.blackanddeckerelectrical.com
E-mail: [email protected]
Imported by:
Paragon Group USA,
Englewood, NJ, 07631
USA
C
7
Grounded Outdoor Countdown Outlet Timer

8
MANUAL DE INSTRUCCIONES
NÚMEROS DE CATÁLOGO
Temporizador para tomacorriente con cuenta
regresiva y conexión a tierra para exteriores
BDXPA0031
CONSERVE ESTE MANUAL PARA REFERENCIA FUTURA.
LEA ANTES DE DEVOLVER ESTE PRODUCTO POR CUALQUIER RAZÓN.
Si tiene alguna pregunta o problema con su compra de BLACK+DECKER,
diríjase a http://www.blackanddeckerelectrical.com.
Si no puede encontrar la respuesta o no tiene acceso a internet, llame al
1-844-746-6688 de 9a.m. a 5p.m. (EST), de lunes a viernes para hablar con un agente.
Tenga a mano el número de catálogo cuando llame.

9
3
8
Español (traducido de las instrucciones originales)
English (original instructions)
ESPAÑOL

Definiciones: Símbolos y palabras de alerta de seguridad
For California residents/Pour les résidents de la Californie/Para residentes en California
WARNING:CancerandReproductiveHarm
www.P65Warnings.ca.gov.
AVERTISSEMENT: Cancer et Troubles de l'appareil reproducteur -
www.P65Warnings.ca.gov.
ADVERTENCIA:Cáncer y Daño Reproductivo
www.P65Warnings.ca.gov.
Este manual de instrucciones utiliza los siguientes símbolos y palabras de alerta de
seguridad para alertarlo de situaciones peligrosas y del riesgo de lesiones personales o
daño a la propiedad.
PELIGRO: Indica una situación peligrosa inminente que, si no se evita, resultará en la
muerte o en una lesión grave.
ADVERTENCIA: Indica una situación peligrosa potencial que, si no se evita, podría
resultar en la muerte o en una lesión grave.
PRECAUCIÓN: Indica una situación peligrosa potencial que, si no se evita, es posible
que resulte una lesión menor o moderada.
(Utilizado sin palabra) Indica un mensaje relacionado con la seguridad.
AVISO: Indica una práctica no relacionada con una lesión personal que, si no se evita,
es posible que resulte en daño a la propiedad.
ADVERTENCIA: LEA ESTE MANUAL DE INSTRUCCIONES MINUCIOSA Y COM-
PLETAMENTE ANTES DE LA INSTALACIÓN Y EL USO. EN CASO DE QUE NO LO
HAGA PODRÍA CAUSAR DAÑO A LA PROPIEDAD, LESIONES GRAVES O LA
MUERTE, Y DEJAR SIN EFECTO LA GARANTÍA.
CONSERVE ESTAS INSTRUCCIONES PARA REFERENCIA FUTURA.
Guía de seguridad importante
10

11
Temporizador Para Tomacorriente Con Cuenta Regresiva Y
Conexión A Tierra Para Exteriores
125 V de CA, 60 Hz
15 A de uso general
1875W de uso general
Tungsteno 1000 W
1/3 HP
Calificaciones
Guarde el producto en interiores cuando no esté en uso.
Información De Seguridad
NOTA: Este producto es adecuado para el uso con aparatos de exterior. Este es un
dispositivo con conexión a tierra. Cuenta con un enchufe con conexión a tierra y tres
tomacorrientes con conexión a tierra.
Instalación
Monte el temporizador en una pared cerca de un
receptáculo protegido con ICFT, con el sensor de luz
(B) del temporizador hacia afuera.
Instale un clavo o tornillo (no incluido) en la pared. El
clavo o tornillo debe salir de la pared en unas 7/8 in
(2.22 cm) y permitir que el temporizador se encuen-
tre a 3 ft (0.9 m) sobre el nivel del suelo.
Nota: Para asegurarse de que la función automática funcione bien, verifique que el sensor
de luz esté protegido de las fuentes de luz nocturnas, como los reflectores.
1. Montar el temporizador
Cuelgue el temporizador del ojal en la parte superior
derecha de la unidad con el receptáculo (D) hacia
abajo para que la humedad no se acumule en el
tomacorriente.
Enchufe el cable de alimentación con conexión a
tierra (A) en un tomacorriente protegido con ICFT.
Enchufe el dispositivo que desea controlar con el
temporizador en el receptáculo (D).
2. Instalar el temporizador
B
D
A
ADVERTENCIA:
RIESGO DE DESCARGA ELÉCTRICA:
No utilice el producto con un alargue.
Enchúfelo de forma directa en un tomacorriente eléctrico protegido con ICFT.
Inserte el enchufe por completo.
Desenchufe el temporizador antes de limpiarlo y use un cepillo seco o una aspiradora para la limpieza.
Mantenga el producto alejado de los niños.
ADVERTENCIA:
RIESGO DE INCENDIO:
No lo use para controlar los aparatos que contienen elementos que se calientan, como
electrodomésticos de cocina, calentadores, planchas, etc.
No exceda las calificaciones de electricidad.
ADVERTENCIA: Adecuado para una ubicación en exteriores. No es adecuado para la
inmersión en agua o para el uso en lugares donde esté expuesto de forma directa al
agua. Cuando se utilice para controlar la bomba de la piscina, el receptáculo no debe
estar a menos de 10 ft (3 m) de las paredes internas de dicha piscina.
PRECAUCIÓN: Cuando lo use en exteriores, enchúfelo únicamente a un receptáculo
protegido con ICFT. Asegúrese de que el receptáculo está montado en una caja externa
de tipo “impermeable”.

A. Cable de alimentación/enchufe: Enchúfelo en un tomacorriente
protegido con ICFT para alimentar el temporizador.
B. Sensor de luz: El sensor debe estar montado en una ubicación que
permita el acceso de la luz solar para asegurar un funcionamiento
adecuado de la función nocturna.
C. Dial del temporizador: Gírelo a una de las siguientes configuraciones:
APAGAR:Apaga el temporizador.
ENCENDER:Enciende el temporizador.
2Hr (2 h), Hr (4 h), 6Hr (6 h) u 8Hr (8 h): El temporizador se
enciende al anochecer y se apaga después de las horas indicadas
(2, 4, 6, u 8 h).
Nocturno: El temporizador se enciende al anochecer y se apaga al
amanecer.
D. Receptáculo: Enchufe el dispositivo que desea controlar con el
temporizador.
5
Descripción Del Producto
Solución de problemas
A
B
C
D
Problema Acción correctivaCausa posible
Instrucciones:
1. Levante la tapa protectora para acceder al dial del temporizador.
2. Para establecer la hora actual: gire el dial hacia la derecha hasta que la hora se alinee con la flecha
TIME NOW (hora actual).
3. Para programar el temporizador: comience con todas las clavijas de los segmentos hacia arriba.
Empuje hacia abajo las clavijas de los segmentos que corresponden a los períodos en los que usted
desea que el temporizador esté ENCENDIDO. Cada clavija de segmento representa 30 minutos: 2
clavijas de segmento = 1 hora. Se repite a diario.
4. Para conectar el temporizador: deslice el interruptor hacia la posición TIMER ON (temporizador
encendido). Enchufe el dispositivo en el temporizador y enciéndalo. Enchufe el temporizador en el
tomacorriente de pared.
5. Para anular el temporizador: deslice el interruptor hacia abajo para configurar los períodos. Cuando
se encuentre en la posición l, significa que el TOMACORRIENTE ESTÁ ENCENDIDO, el dispositivo
enchufado estará encendido de forma permanente.
6. En caso de falla de electricidad: reinicie el temporizador tal como se explica en el Paso 2.
7. Para montar el temporizador en una superficie vertical (pared), colóquelo usando el orificio de
montaje ubicado en la parte posterior del temporizador.
El temporizador no está en
una buena área para que el
sensor de luz funcione, ya
que hay demasiada luz
ambiente para detectar la
oscuridad.
Las luces no se
encienden al
anochecer.
Las luces no están en la
posición ON (encendido);
no están funcionando; o el
temporizador no está
recibiendo alimentación de
corriente eléctrica.
El temporizador está en el
modo nocturno, y la luz de
las luces enchufadas está
afectando el sensor de luz.
Las luces no se
encienden, incluso
cuando el temporiza-
dor está en la
posición ON
(encendido).
Las luces del
temporizador se
encienden y se
apagan.
Mueva el temporizador a otra ubicación en
la que no haya luz ambiente.
Aleje las luces del temporizador o
reubique el temporizador para que no esté
enfrentado a las luces.
Verifique que las luces funcionan enchufán-
dolas de forma directa a un tomacorriente.
Asegúrese de que las luces estén en la
posición “ON” (encendido) si tienen su propio
interruptor. Controle que el temporizador está
recibiendo alimentación de corriente eléctrica
(la luz LED debe encenderse cuando se
enchufa en un tomacorriente y se pone en la
posición ON [encendido]).
Temporizador Para Tomacorriente Con Cuenta Regresiva Y
Conexión A Tierra Para Exteriores

13
En caso de mal funcionamiento o avería, la toma a tierra brinda un camino de menor
resistencia para la corriente eléctrica para reducir el riesgo de descarga eléctrica. El
temporizador debe estar conectado a un cable que tenga un equipo conductor y un enchufe
con conexión a tierra. El enchufe debe estar conectado a un tomacorriente adecuado, que
esté instalado de manera correcta y que tenga conexión a tierra conforme a los códigos y
normas locales.
La conexión incorrecta del conductor de conexión a tierra del equipo puede
generar riesgo de descarga eléctrica. El conductor aislado que tiene una superficie externa
color verde con o sin rayas amarillas es el conductor de conexión a tierra del equipo. Si es
necesario reemplazar o reparar el cable o el enchufe, no conecte el conductor de conexión a
tierra del equipo a una terminal en vivo. Si no comprende completamente las instrucciones
de conexión a tierra o si tiene dudas acerca de que el temporizador tiene la conexión a tierra
correcta, verifíquelo con un electricista o una persona de reparación. No modifique el
enchufe que está conectado al temporizador. Si no entra en el tomacorriente, haga que un
electricista calificado instale un tomacorriente adecuado.
PARA TEMPORIZADOR CON CONEXIÓN A TIERRA Y CABLE CALIFICADO EN MENOS
DE 15 A Y QUE ESTÁ DESTINADO AL USO EN UN CIRCUITO DE ALIMENTACIÓN
NOMINAL DE 125 V.
El temporizador es para el uso en un circuito de voltaje nominal de 125 v y debe conectarse
a un tomacorriente de conexión a tierra que luce como la imagen ilustrada a. Se puede
utilizar un adaptador temporal, que luce como el adaptador que se muestra en la imagen
ilustrada b para conectar dicho enchufe a un receptáculo bipolar, tal como se muestra en la
imagen b, en caso de que el tomacorriente con conexión a tierra adecuado no esté
disponible. El adaptador temporal solo debe utilizarse hasta que un electricista calificado
instale un tomacorriente con conexión a tierra adecuado. La pestaña, la oreja o el elemento
parecido de color verde que se extiende desde el adaptador debe estar conectado a tierra
de forma permanente, como, por ejemplo, a la tapa de la caja del tomacorriente conectado a
tierra de forma correcta. Siempre que se utilice el adaptador, debe fijarse en su lugar
mediante un tornillo de metal.
Instrucciones De Conexión A Tierra
PELIGRO:
NOTA: EN CANADÁ, CONFORME AL CÓDIGO ELÉCTRICO DE CANADÁ NO SE
PERMITE EL USO DE UN ADAPTADOR TEMPORAL. Asegúrese de que el temporizador
esté conectado a un tomacorriente que tenga la misma configuración que el enchufe.
CLAVIJA DE CONEXIÓN
A TIERRA
CAJA DE
TOMACORRIENTE
CON CONEXIÓN
A TIERRA
ADAPTADOR
Temporizador Para Tomacorriente Con Cuenta Regresiva Y
Conexión A Tierra Para Exteriores

14
GARANTÍA LIMITADA DE UN AÑO
IMPORTANTE:
Se requiere el comprobante de venta para obtener el servicio de garantía.
Paragon Group USA Inc. garantiza al dueño original que nuestros productos no tendrán
defectos de mano de obra ni en los materiales durante un período de UN AÑO desde la
fecha de compra.
Si cualquier unidad resulta defectuosa durante este período, Paragon Group USA Inc. será
responsable únicamente del reemplazo de la unidad defectuosa. Paragon Group USA Inc.
no se hace responsable por los costos de los beneficios laborales o gastos incidentales o
consecuentes.
Sin cobertura: Esta garantía no cubre las baterías. Esta garantía no cubre los servicios de
reparación, ajuste y calibración debido al mal uso, al abuso o a la negligencia. La reparación
o modificación no autorizada de este producto o de cualquier componente suministrado
dejará completamente sin efecto esta garantía.
Esta garantía no incluye reembolso por inconvenientes, instalación, tiempo de armado,
pérdida de uso, envío, reparación no autorizada u otros productos utilizados junto con los
productos
BLACK+DECKER.
Todos los derechos reservados a Black & Decker, 2021©
BLACK+DECKER y el logotipo de BLACK+DECKER son
marcas registradas de Stanley Black Decker, Inc. o
una filial de dicha empresa, y se utilizan con licencia.
Tel.: 1-844-746-6688
www.blackanddeckerelectrical.com
Importado por:
Paragon Group USA,
Englewood, NJ, 07631
EE. UU.
Temporizador Para Tomacorriente Con Cuenta Regresiva Y
Conexión A Tierra Para Exteriores
Table of contents
Languages:
Other BLACK DECKER Timer manuals
Popular Timer manuals by other brands

OEZ
OEZ MAE-D16-001-A230 Instructions for use

Autonics
Autonics LE7M-2 product manual

Pioneer
Pioneer DT-555 operating instructions

Grasslin
Grasslin thermio eco BI1S operating manual

Pentair Pool Products
Pentair Pool Products Fleck SXT Supplemental service manual

Glen Dimplex Nordic AS
Glen Dimplex Nordic AS timer user manual