Blackbird 24180 User manual

4K 8x8 HDMI®Matrix
PN 24180 USER'S MANUAL

2
CONTENTS
SAFETY WARNINGS AND GUIDELINES...........................................................................................................................................4
INTRODUCTION ..................................................................................................................................................................................................... 5
FEATURES.................................................................................................................................................................................................................... 6
CUSTOMER SERVICE......................................................................................................................................................................................... 6
PACKAGE CONTENTS .......................................................................................................................................................................................7
PRODUCT OVERVIEW.......................................................................................................................................................................................7
Front Panel ...........................................................................................................................................................................................................7
Rear Panel.............................................................................................................................................................................................................8
IR Remote Control........................................................................................................................................................................................ 9
SAMPLE CONNECTION DIAGRAM.....................................................................................................................................................10
CONTROL...................................................................................................................................................................................................................10
Front Panel Buttons..................................................................................................................................................................................10
IR Remote Control........................................................................................................................................................................................11
WEB GUI CONTROL...........................................................................................................................................................................................13
Switching Tab.................................................................................................................................................................................................14
Audio Tab............................................................................................................................................................................................................ 15
Configuration Tab........................................................................................................................................................................................17
CEC Tab................................................................................................................................................................................................................. 19
RS232 Tab............................................................................................................................................................................................................ 21
Interface Tab................................................................................................................................................................................................... 22
Network Tab ....................................................................................................................................................................................................23
Access Tab........................................................................................................................................................................................................24
WEB GUI UPGRADE ........................................................................................................................................................................................25
RS-232 CONTROL ..............................................................................................................................................................................................26

3
System Commands....................................................................................................................................................................................27
Control Commands ...................................................................................................................................................................................27
Status Commands ..................................................................................................................................................................................... 29
Lock/Unlock Commands......................................................................................................................................................................32
Audio Commands .......................................................................................................................................................................................33
HDCP Commands....................................................................................................................................................................................... 34
EDID Commands ......................................................................................................................................................................................... 35
CEC Control.......................................................................................................................................................................................................39
SYSTEM FIRMWARE UPGRADE............................................................................................................................................................41
TECHNICAL SUPPORT ...................................................................................................................................................................................42
SPECIFICATIONS................................................................................................................................................................................................ 43
REGULATORY COMPLIANCE..................................................................................................................................................................45
Notice for FCC...............................................................................................................................................................................................45
Notice for Industry Canada..............................................................................................................................................................46

4
SAFETY WARNINGS AND GUIDELINES
Please read this entire manual before using this device, paying extra attention to these
safety warnings and guidelines. Please keep this manual in a safe place for future reference.
•This device is intended for indoor use only.
•Do not expose this device to water or moisture of any kind. Do not place drinks or
other containers with moisture on or near the device. If moisture does get in or on
the device, immediately remove it from its power source and allow it to fully dry
before reapplying power.
•Do not touch the device, the power cord, or any other connected cables with wet
hands.
•Do not expose this device to excessive vibration, extreme force, shock, or
fluctuations in temperature or humidity.
•Do not expose this device to excessively high temperatures. Do not place it in, on,
or near a heat source, such as a fireplace, stove, radiator, etc. Do not leave it in
direct sunlight.
•Do not place or install this device in an area where it can be exposed to excessive
amounts of dust, humidity, oil, smoke, or combustible vapors.
•Prior to operation, check the unit and power cord for physical damage. Do not use if
physical damage has occurred.
•Before plugging the unit into a power outlet, ensure that the outlet provides the
same type and level of power required by the device.
•Unplug this device from the power source when not in use.
•Take care to prevent damage to the power cord. Do not allow it to become
crimped, pinched, walked on, or become tangled with other cords. Ensure that the
power cord does not present a tripping hazard.
•Never unplug the unit by pulling on the power cord. Always grasp the connector
head or adapter body.
•Ensure that power is turned off and disconnected before making any electrical
connections.

5
•Remove the batteries from the controller if it will go unused for a lengthy period of
time.
•Clean using a soft, dry cloth only. Do not use chemical cleaners, solvents, or
detergents. For stubborn deposits, moisten the cloth with warm water.
•This device has no user serviceable parts. Do not attempt to open, service, or
modify this device.
INTRODUCTION
This Blackbird™ 4K 8x8 HDMI® Matrix allows you to independently distribute any of up to
eight HDMI sources to any or all of eight HDMI displays. It is compliant with the HDMI 2.0
and HDCP™ 2.3 standards and supports video resolutions up to 4K@60Hz with YCbCr 4:4:4
color space with support for HDR10 and Dolby Vision™. Four of the eight outputs support
video downscaling to 1080p and all 16 HDMI ports can provide 5 VDC, 500mA of power for
use with Active Optical Cables (AOC).
It features eight sets of audio outputs, each of which has a digital optical S/PDIF connector
and a stereo pair of RCA jacks. Each audio output channel can be independently assigned
to output audio de-embedded from any of the HDMI inputs or outputs. It has advanced
EDID® management and advanced HDCP handling for broader compatibility with a wide
range of video source devices and output displays. It can be controlled using the front
panel buttons, the included IR remote control, or with a computer using the built-in web
GUI or with RS-232 control commands.

6
FEATURES
•Independently distributes any of eight HDMI® inputs to any of eight HDMI outputs
•Compliant with the HDMI 2.0 and HDCP™ 2.3 standards
•Supports input and output video resolutions up to 4K@60Hz with YCbCr 4:4:4 color
space
•Supports up to 18 Gbps video bandwidth
•Supports HDR10 and Dolby Vision™
•Includes eight audio output channels, each of which has a digital optical S/PDIF
connector and a stereo pair of RCA jacks
•Each audio output channel can be independently assigned to output audio de-
embedded from any of the HDMI inputs or outputs
•It has advanced EDID® management and advanced HDCP handling
•Four of the eight outputs support video downscaling to 1080p@60Hz
•Each HDMI input and output port provides 5 VDC, 500mA of power for use with
Active Optical Cables (AOC)
•It can be controlled using the front panel buttons, the included IR remote control, or
with a computer using the built-in web GUI or with RS-232 control commands
CUSTOMER SERVICE
The Monoprice Customer Service department is dedicated to ensuring that your ordering,
purchasing, and delivery experience is second to none. If you have any problem with your
order, please give us an opportunity to make it right. You can contact a Monoprice
Customer Service representative through the Live Chat link on our website
support times and links.
7
PACKAGE CONTENTS
Please take an inventory of the package contents to ensure you have all the items listed
below. If anything is missing or damaged, please contact Monoprice Customer Service for a
replacement.
1x Blackbird™ 4K 8x8 HDMI® Matrix
1x IR Remote Control
1x AC Power Adapter
1x RS-232 Cable (3-pin Euroblock to DE-9/DB-9)
1x IR Receiver
2x Mounting Brackets
6x Mounting Screws
4x Plastic Feet
1x User's Manual
PRODUCT OVERVIEW
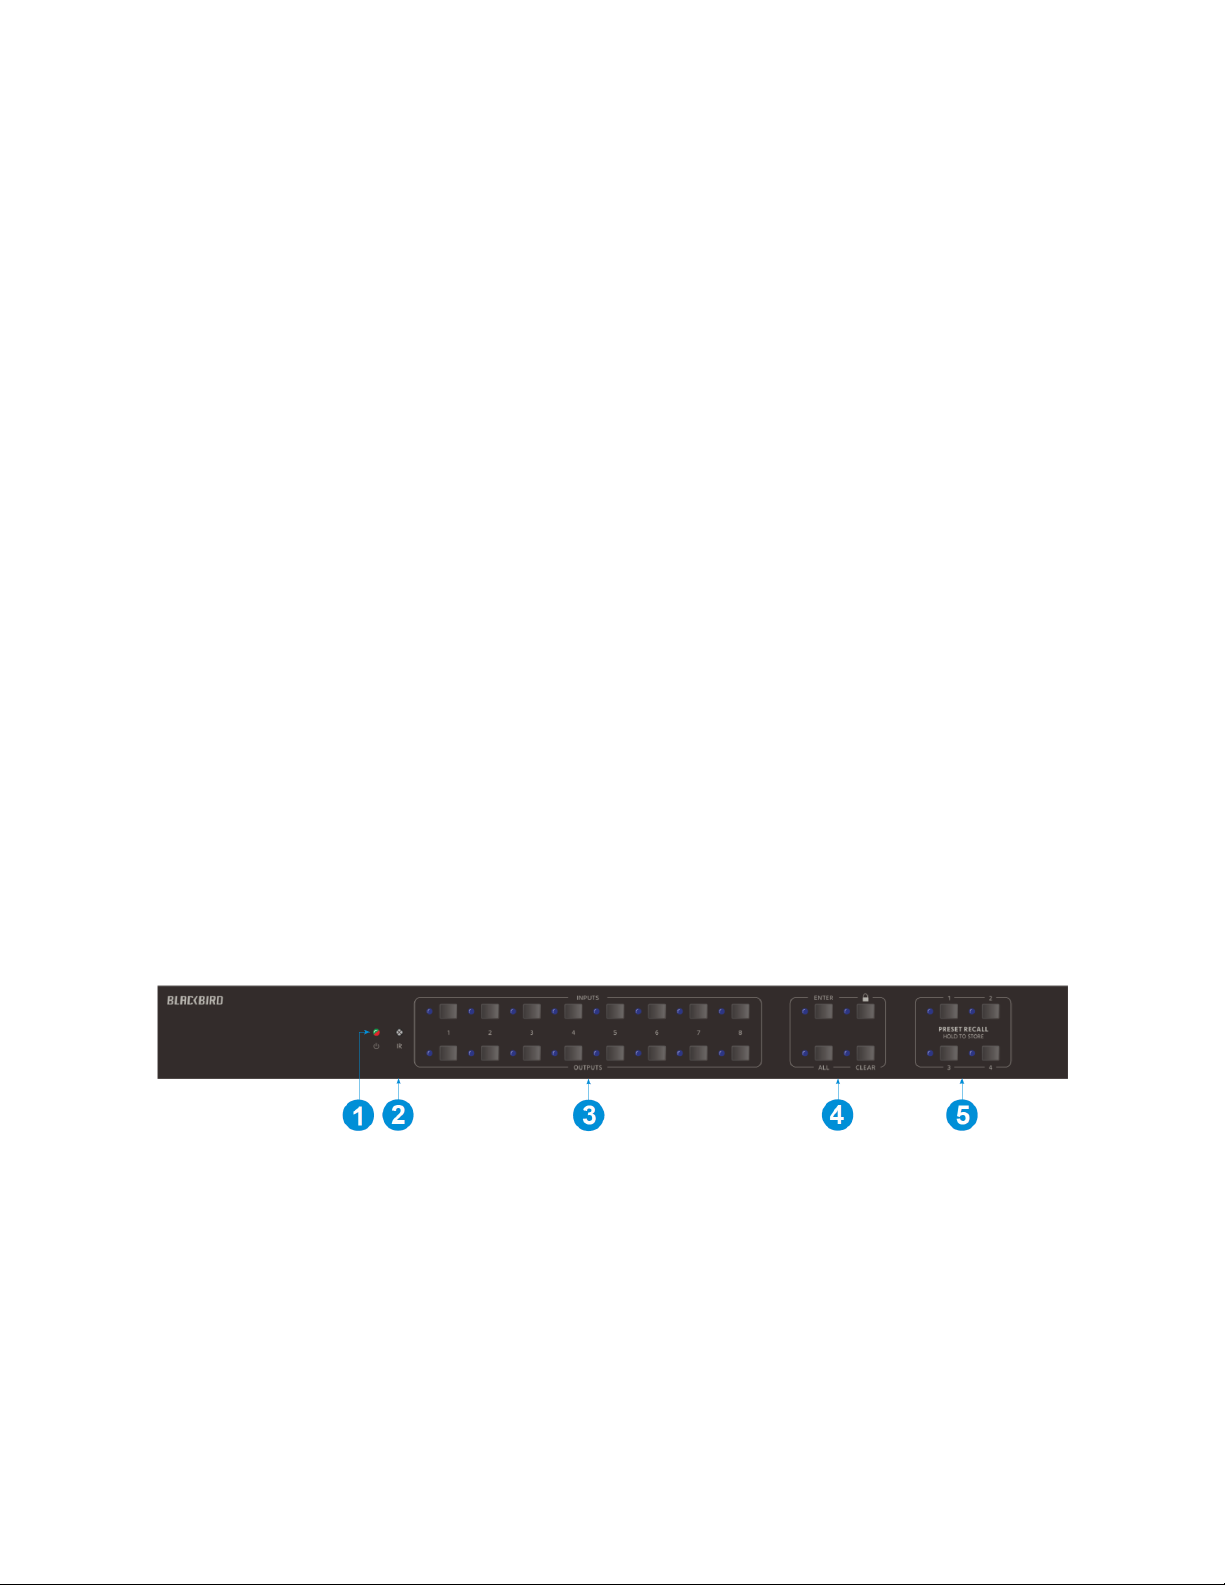
Front Panel
1. POWER LED: The LED illuminates green when the matrix is powered on and
illuminates red when it is in standby.
2. IR: IR "eye" for receiving signals from the included IR remote control.
3. INPUTS/OUTPUTS: Eight buttons for selecting the inputs and eight buttons for
selecting the outputs. Each button has a corresponding blue LED, which illuminates
to indicate the selected inputs and outputs.
8
4. MENU: Four buttons for performing various menu related functions.
•ENTER: Press the button to accept the changes.
•LOCK: Press the button to lock or unlock the other buttons on the front panel.
•ALL: Press the button to select all inputs for EDID® management or all outputs
for switching.
•CLEAR: Press the button to cancel pending changes.
5. PRESET RECALL: Momentarily press one of the 4 buttons to select a previously
saved preset. The LED to the left of the button illuminates to indicate that the
preset is active. Press and hold one of the 4 buttons to save the current input
selections for each output channel to a preset. Note that the matrix supports 6
presets, but only presets 1~4 can be controlled using the front panel buttons.
Presets 5~6 can be saved or recalled using the built-in web GUI or RS-232 computer
control.
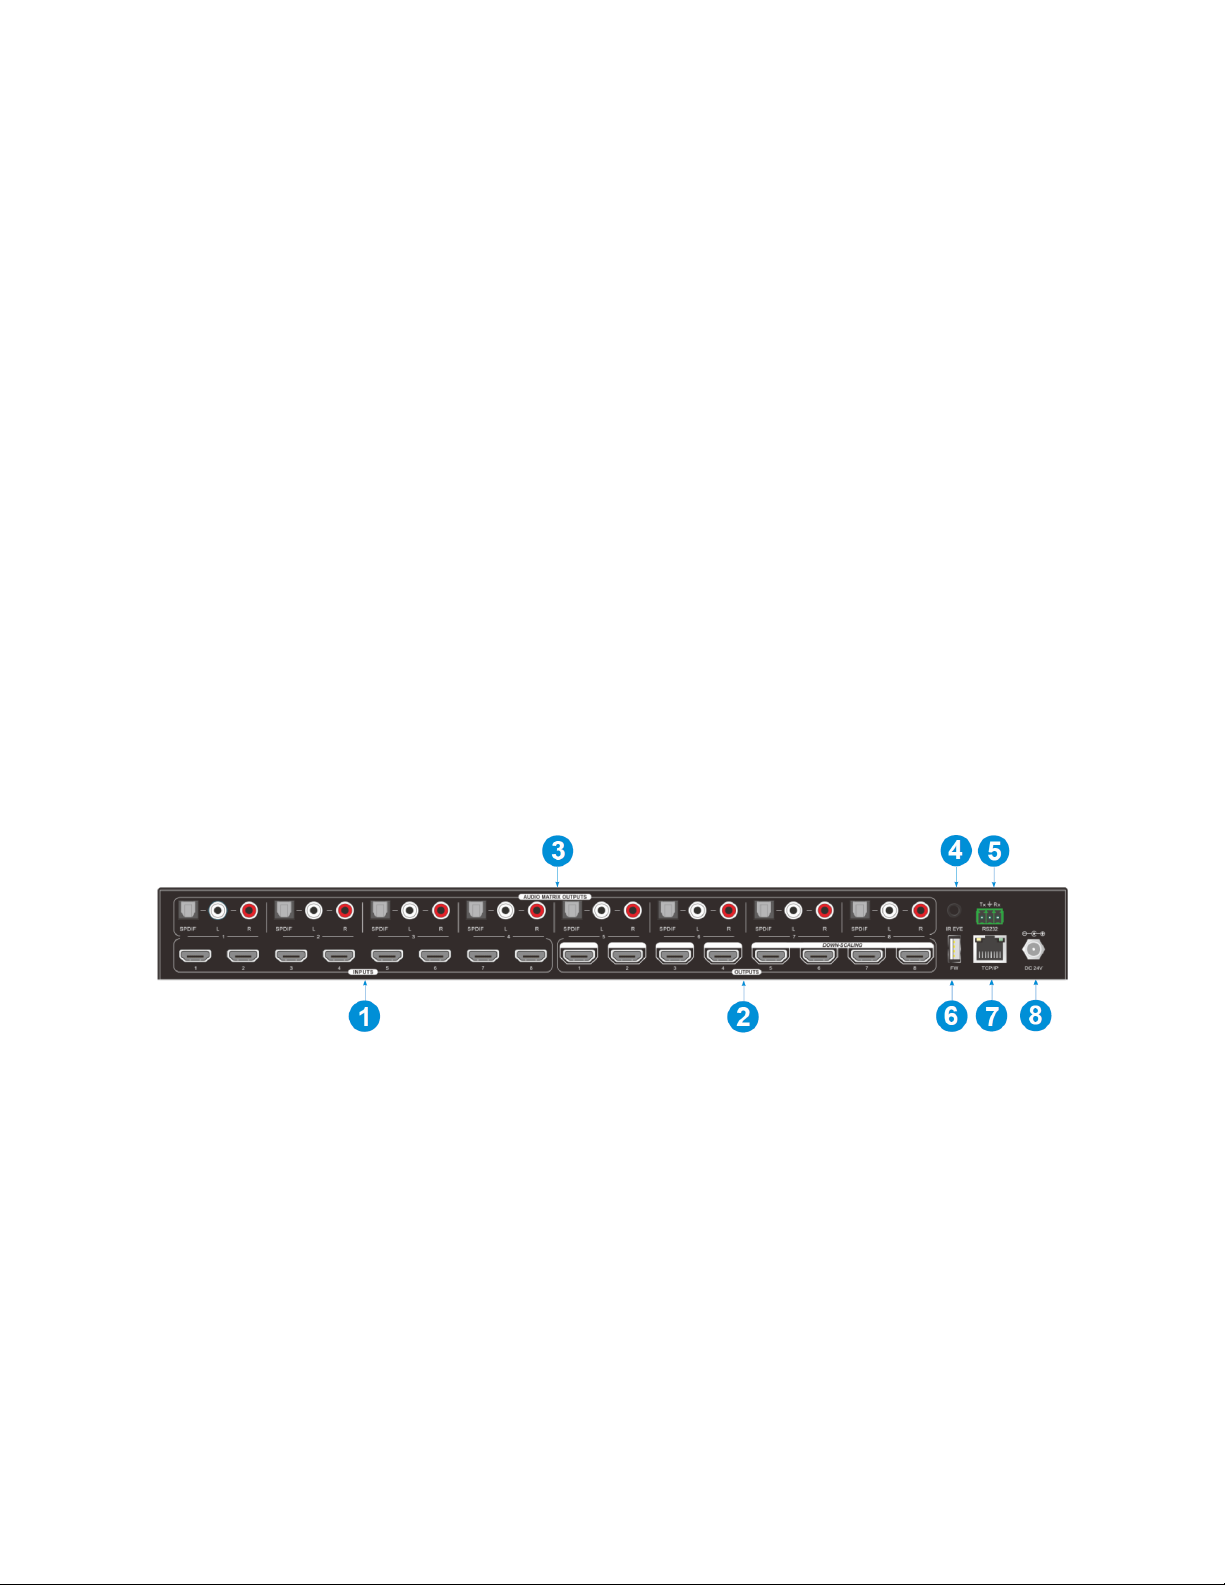
Rear Panel
1. INPUTS: Eight HDMI® ports for connecting video source devices (e.g., Blu-ray Disc™
player, DVD player, game console, etc.).
2. OUTPUTS: Eight HDMI ports for connecting HDMI displays. Note that outputs 5~8
support downscaling to 1080p.
3. AUDIO MATRIX OUTPUTS: Eight audio output channels, each of which has a digital
optical S/PDIF connector and a stereo pair of RCA jacks. Each audio channel can be
independently set to output audio de-embedded from any of the eight HDMI inputs
or eight HDMI outputs.
4. IR EYE: 3.5mm jack for connecting the included IR receiver.

9
5. RS232: 3-pin Euroblock connector for connecting the included RS-232 cable. You can
connect to a computer to issue RS-232 commands to the matrix or can connect a
third party device and send RS-232 commands to that device. Refer to the
RS-232
CONTROL
section for details.
6. FW: USB Type-A connector for connecting a computer to perform firmware
updates. See the
FIRMWARE UPGRADE
section for details.
7. TCP/IP: RJ45 jack for connecting the matrix to your home network using an Ethernet
cable (available separately) for computer control using the built-in web GUI. See the
WEB GUI CONTROL
section for details.
8. DC 24V: DC barrel connector for connecting the included AC power adapter.
IR Remote Control
1. STANDBY: Press the STANDBY button to turn the matrix on
or to put it into standby mode.
2. INPUTS: Eight numbered buttons corresponding to the eight
inputs.
3. OUTPUTS: Eight numbered buttons corresponding to the
eight outputs.
4. MENU:
•ALL: The ALL button can be used to select all INPUTS for
EDID® management or all OUTPUTS for switching.
•EDID: The EDID button is used to set the EDID for one or
more INPUTS to the EDID capabilities of the selected
OUTPUT.
•CLEAR: The CLEAR button is used to cancel a change in
progress.
•ENTER: The ENTER button is used to accept the change.
10
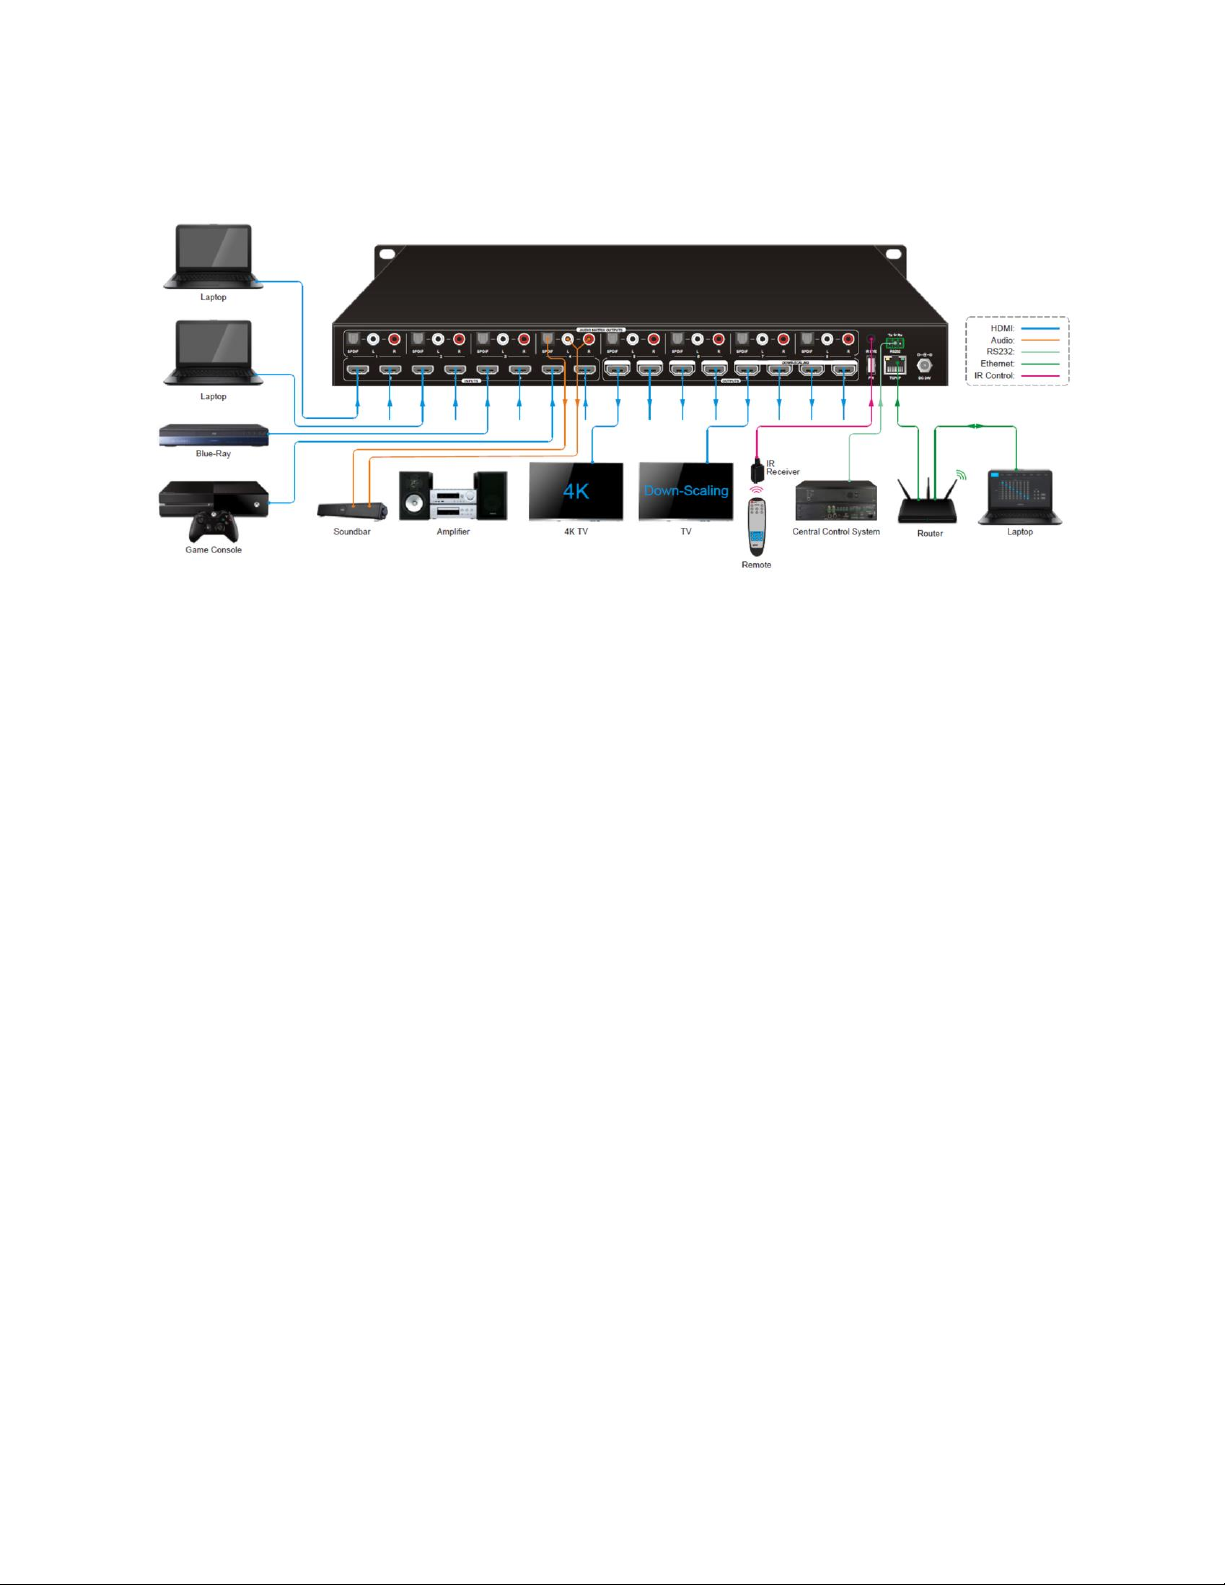
SAMPLE CONNECTION DIAGRAM
Notes:
•Ensure that all equipment to be connected is powered off and unplugged from its
power source before making any connections.
•For best results, use Premium High Speed HDMI® Cables (available separately) rated
for 18 Gbps video bandwidth.
CONTROL
Front Panel Buttons
The matrix can be controlled using the buttons on the front panel. Whenever a command is
accepted, the LEDs of all buttons pressed will blink three times, then turn off. If the ENTER
or CLEAR button is not pressed after initiating a change, the LEDs will turn off after eight
seconds.
•To switch an input to one or more outputs, press one of the INPUTS buttons, then
press one or more OUTPUTS buttons or the ALL button for all outputs, and finally
press the ENTER button to execute the change.
•To see which input is assigned to a given output, press the OUTPUTS button you
want to query. The LEDs of the assigned inputs illuminate blue.

11
•Press and hold the LOCK button for about 3 seconds to lock or unlock the other
front panel buttons. The LED next to the LOCK button illuminates blue when the
front panel buttons are locked.
•Press and hold one of the PRESET buttons to save the current switching layout to
the corresponding preset. Momentarily press one of the PRESET buttons to load the
corresponding preset. The LED next to the selected PRESET button illuminates blue
to indicate that it is selected.
Note: The matrix supports six presets, but only presets 1~4 can be accessed using
the front panel controls. Presets 5~6 can be managed using the built-in web GUI or
RS-232 control commands.
•Press the ENTER button to execute any pending commands.
•Press the CANCEL button to clear any pending commands.
IR Remote Control
•Press the STANDBY button to turn the matrix on or to put it
into standby mode.
•To switch the selected input for one or more of the outputs,
first press the number button in the INPUTS section
corresponding to the desired input, then press one or more
number buttons in the OUTPUTS section or the ALL button in
the MENU section for all outputs, and finally press the ENTER
button in the MENU section to execute the change.
•To set the EDID® for one or more source devices to the EDID
capabilities of a specific output, press the EDID button, then
press one or more number buttons in the INPUTS section
corresponding to the desired input(s) or the ALL button in
the MENU section for all inputs, then press a number button
corresponding to the OUTPUT with the desired EDID settings,
and finally press the ENTER button in the MENU section to
execute the change.

12
•At any time prior to pressing the ENTER button to execute the change, you can
press the CANCEL button in the MENU section to cancel the pending change.
Following are some examples:
•To send input 3 to output 2, first press the INPUTS 3 button, then press the
OUTPUTS 2 button, and finally press the ENTER button to execute the change.
•To send input 2 to outputs 3 and 4, first press the INPUTS 2 button, then press the
OUTPUTS 3 and OUTPUTS 4 buttons, and finally press the ENTER button to execute
the change.
•To send input 4 to all outputs, first press the INPUTS 4 button, then press the ALL
button, and finally press the ENTER button to execute the change.
•To send the EDID® from output 3 to inputs 1 and 2, first press the EDID button, then
press the INPUTS 1 and INPUTS 2 buttons, press the OUTPUTS 3 button, and finally
press the ENTER button to execute the change.
•To send the EDID from output 4 to all inputs, first press the EDID button, then press
the ALL button to select all inputs, press the OUTPUTS 4 button, and finally press
the ENTER button to execute the change.
13
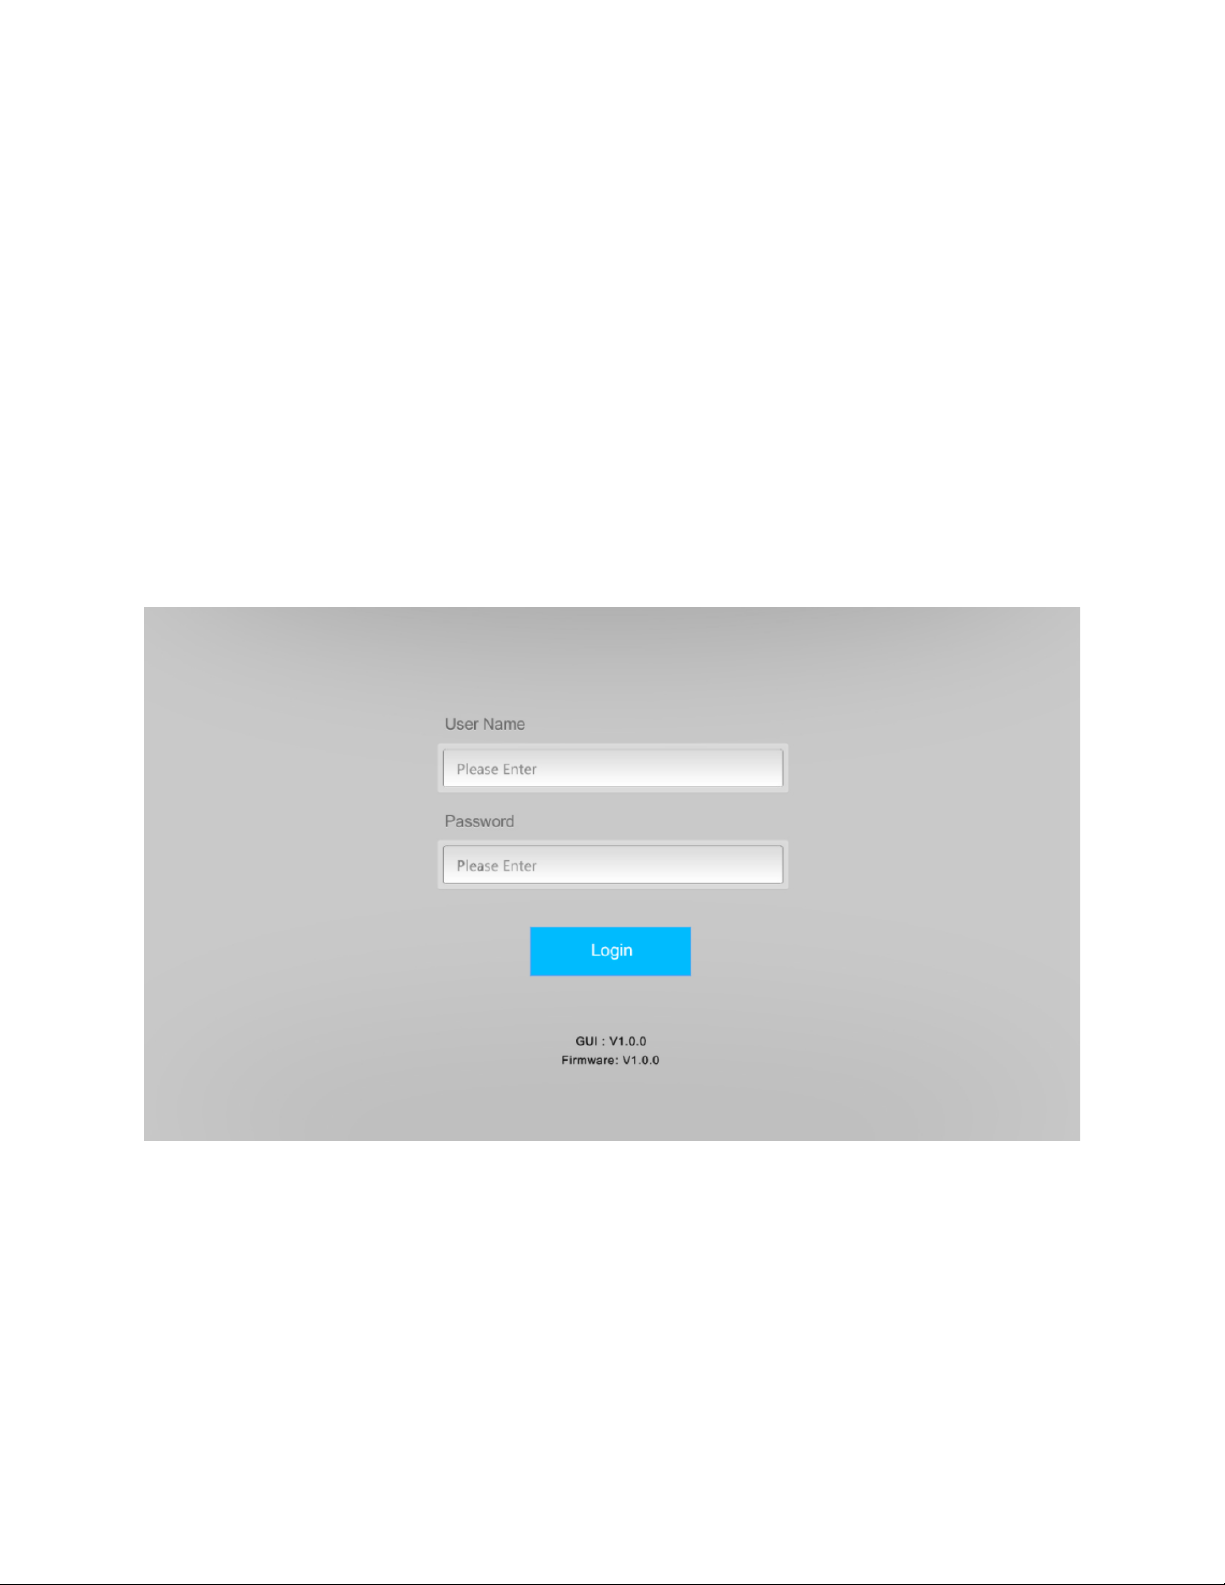
WEB GUI CONTROL
This matrix features a built-in web GUI interface, which allows you to control it using a web
browser on your computer. The default address information for the web GUI is as follows:
IP Address: 192.168.0.178
Subnet Mask: 255.255.255.0
To use the web GUI, you first need to connect the matrix to your local area network by
plugging one end of an Ethernet cable (available separately) into the TCP/IP jack on the
matrix, then plugging the other end into your router or Ethernet switch. Next, you need to
open a web browser and type the IP address 192.168.0.178 into the browser's address bar.
You will see the following screen.
Enter the User Name and Password into the appropriate fields. The default User Name and
Password are:
User Name: admin
Password: admin
You can change the defaults using the web GUI. After logging in, you will be presented
with the full menu.

14
Switching Tab
The Switching Tab allows you to select which input is assigned to each output. To do so,
click on a button in the 8x8 grid to match an Input in the left column with an Output in the
top row.
This screen also allows you to manage the Presets. The Presets allow you to quickly select
different configurations of Input and Output selections. The matrix supports six Presets.
Presets 1~4 can be accessed and managed using the front panel controls, but Presets 5~6
can only be managed from this screen or using RS-232 control commands.
To create or update a Preset, first click a number button in the group of six numbers, then
click the Save button.
To load a previously saved Preset, first click one of the numbered buttons, the click the
Recall button.
15
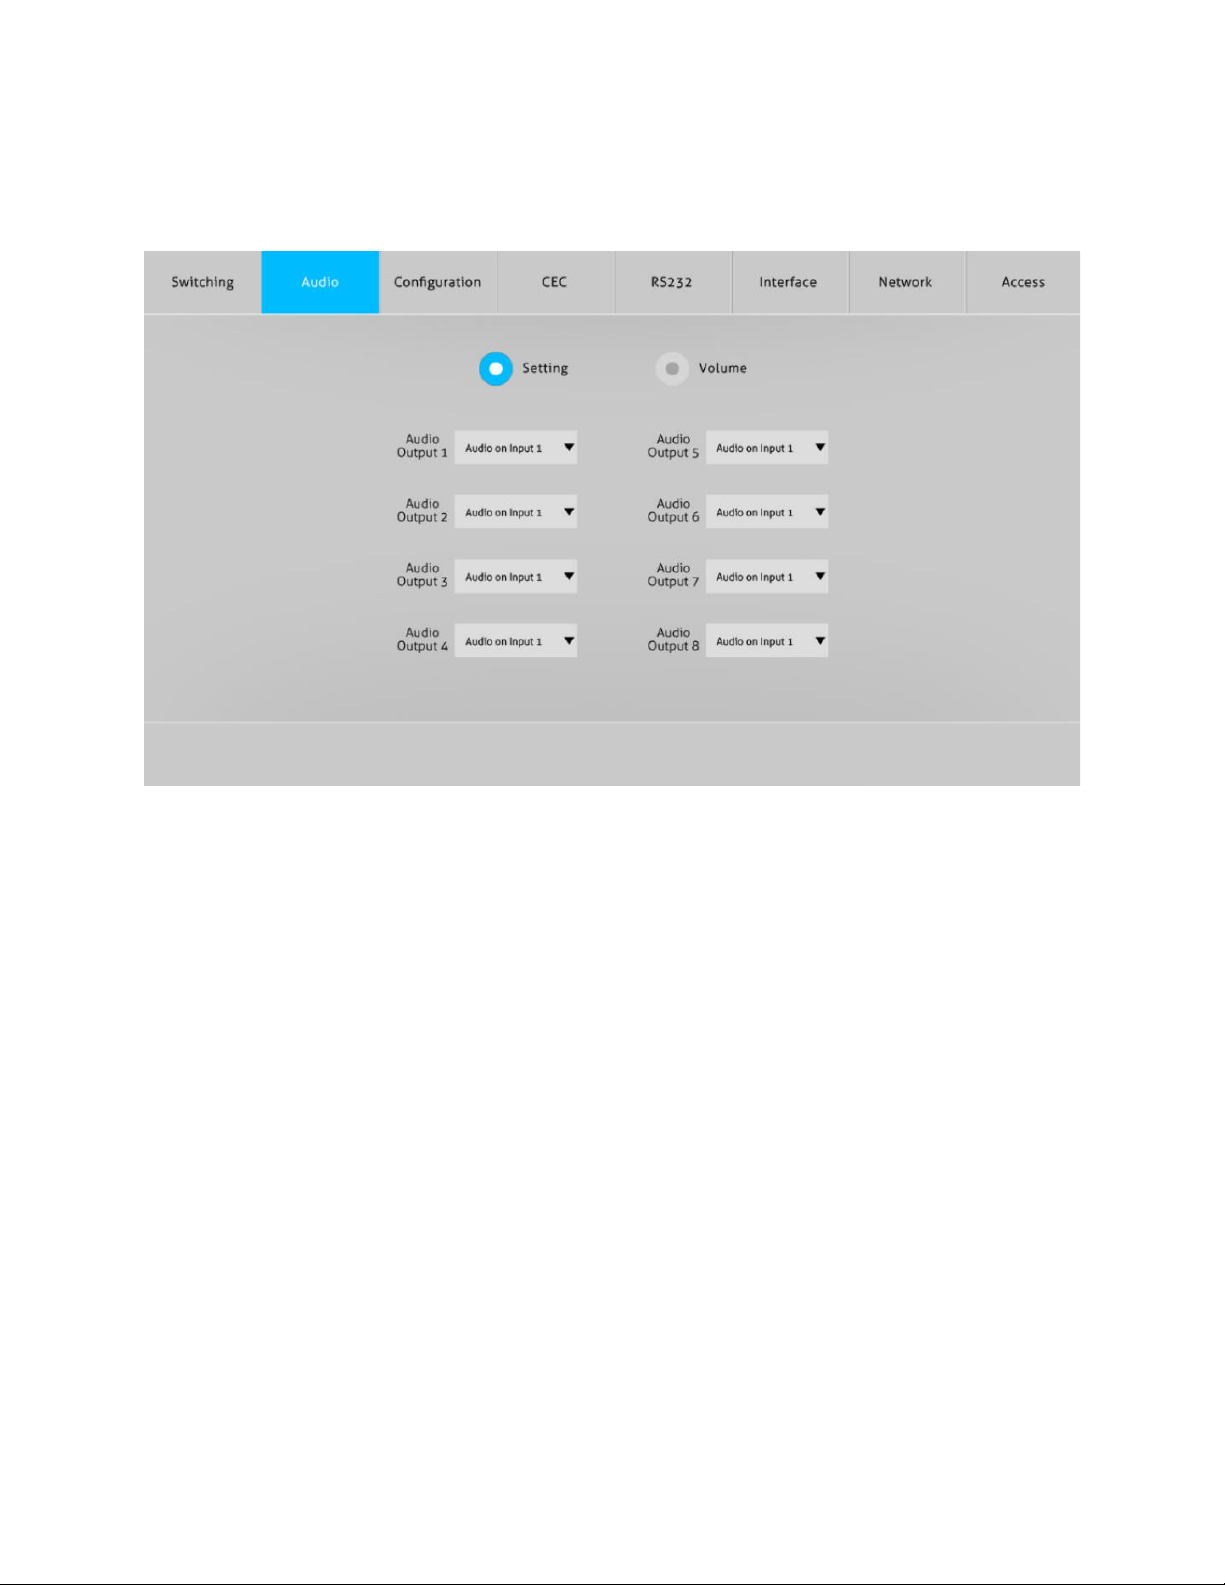
Audio Tab
Setting Screen
The Setting screen of the Audio Tab allows you to assign the source of de-embedded
audio for each of the paired S/PDIF and RCA outputs in the AUDIO MATRIX OUTPUTS
section. Each of the paired outputs can be assigned to use audio de-embedded from any of
the eight inputs and eight outputs. Use the pull-down list menu to set the source for an
Audio Output. You can select any of the following sources:
Audio on Input 1 Audio on Output 1
Audio on Input 2 Audio on Output 2
Audio on Input 3 Audio on Output 3
Audio on Input 4 Audio on Output 4
Audio on Input 5 Audio on Output 5
Audio on Input 6 Audio on Output 6
Audio on Input 7 Audio on Output 7
Audio on Input 8 Audio on Output 8

16
Volume Screen
The Volume screen of the Audio Tab allows you to set the output volume for each of the
audio outputs in the AUDIO MATRIX OUTPUTS section.
Use the sliders to set the volume level for each of the outputs.
Use the first icon on each row to decrease the volume level for that output.
Use the middle icon on each row to increase the volume level for that output.
Use the right most icon on each row to turn audio mute on or off for that output.
17
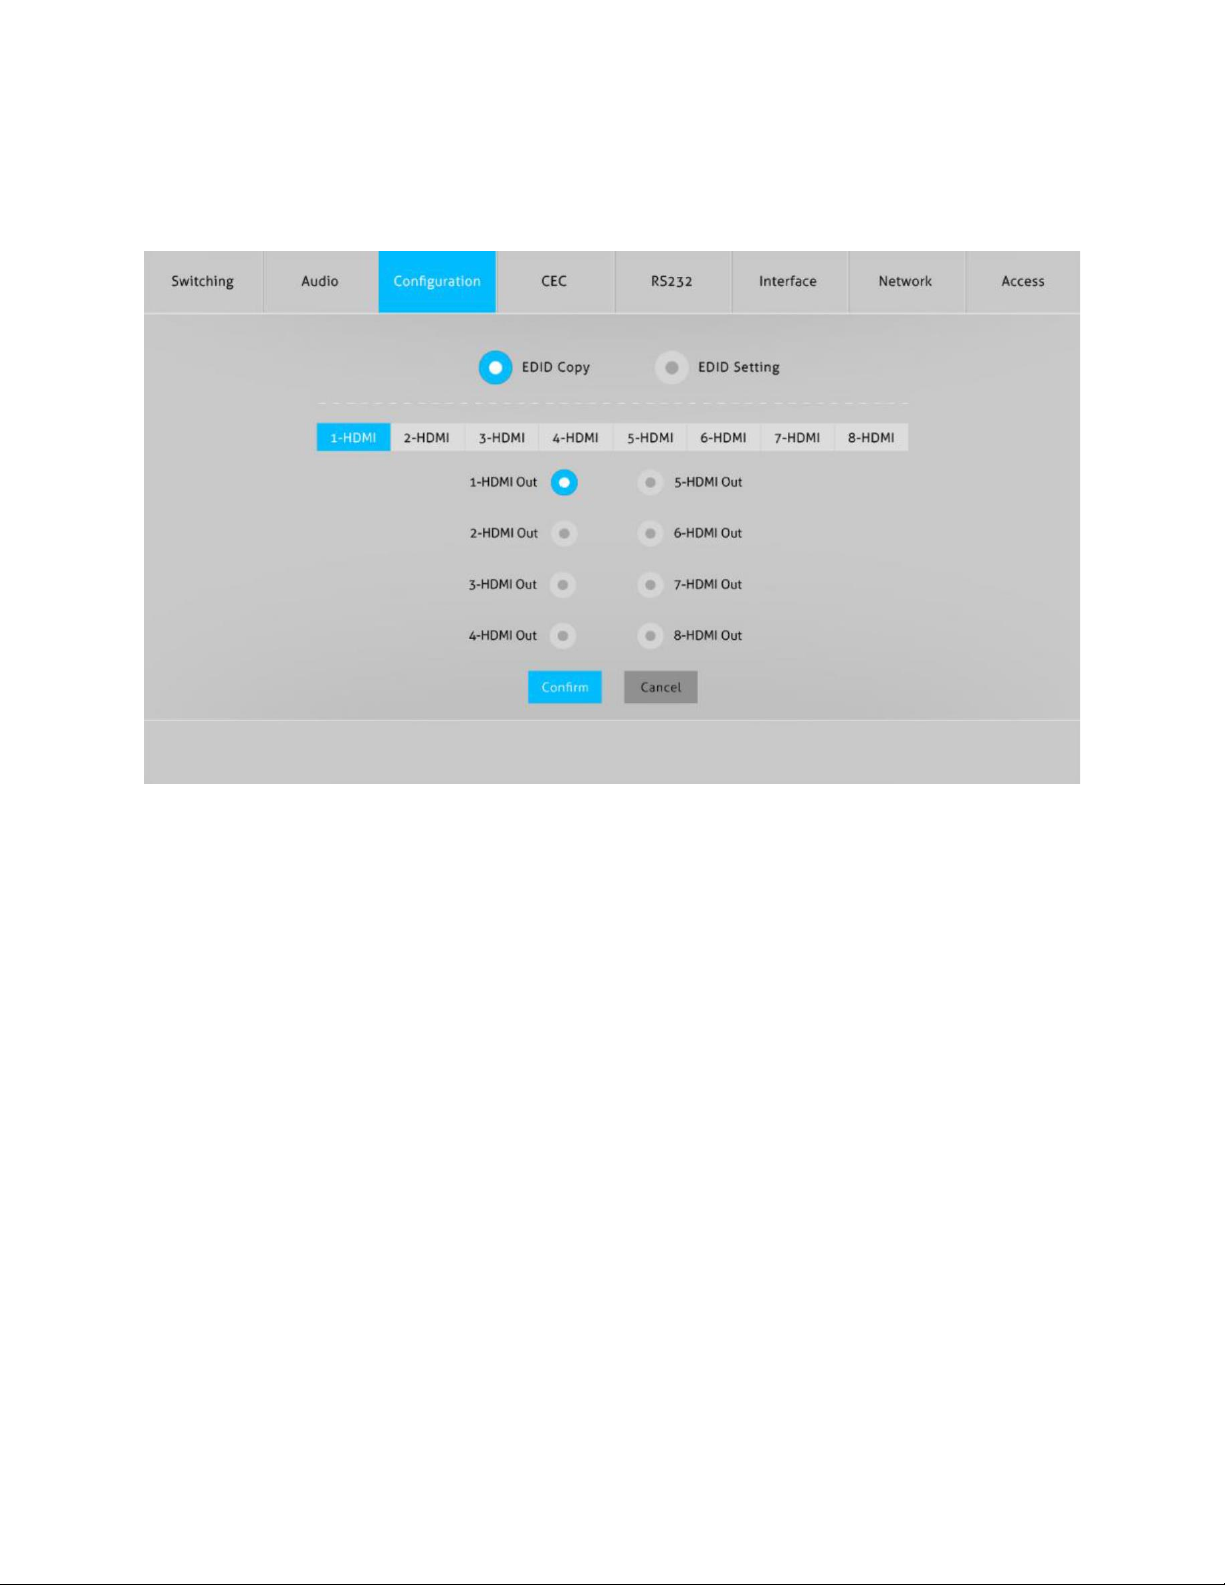
Configuration Tab
EDID Copy Screen
The EDID Copy screen of the Configuration Tab allows you to assign the EDID® settings of
any one of the eight outputs to each of the eight inputs.
To copy the EDID settings of an output to an input, first click one of the eight HDMI® input
tabs, then click the radio button next to one of the eight HDMI outputs, and finally click
the Confirm button.
18
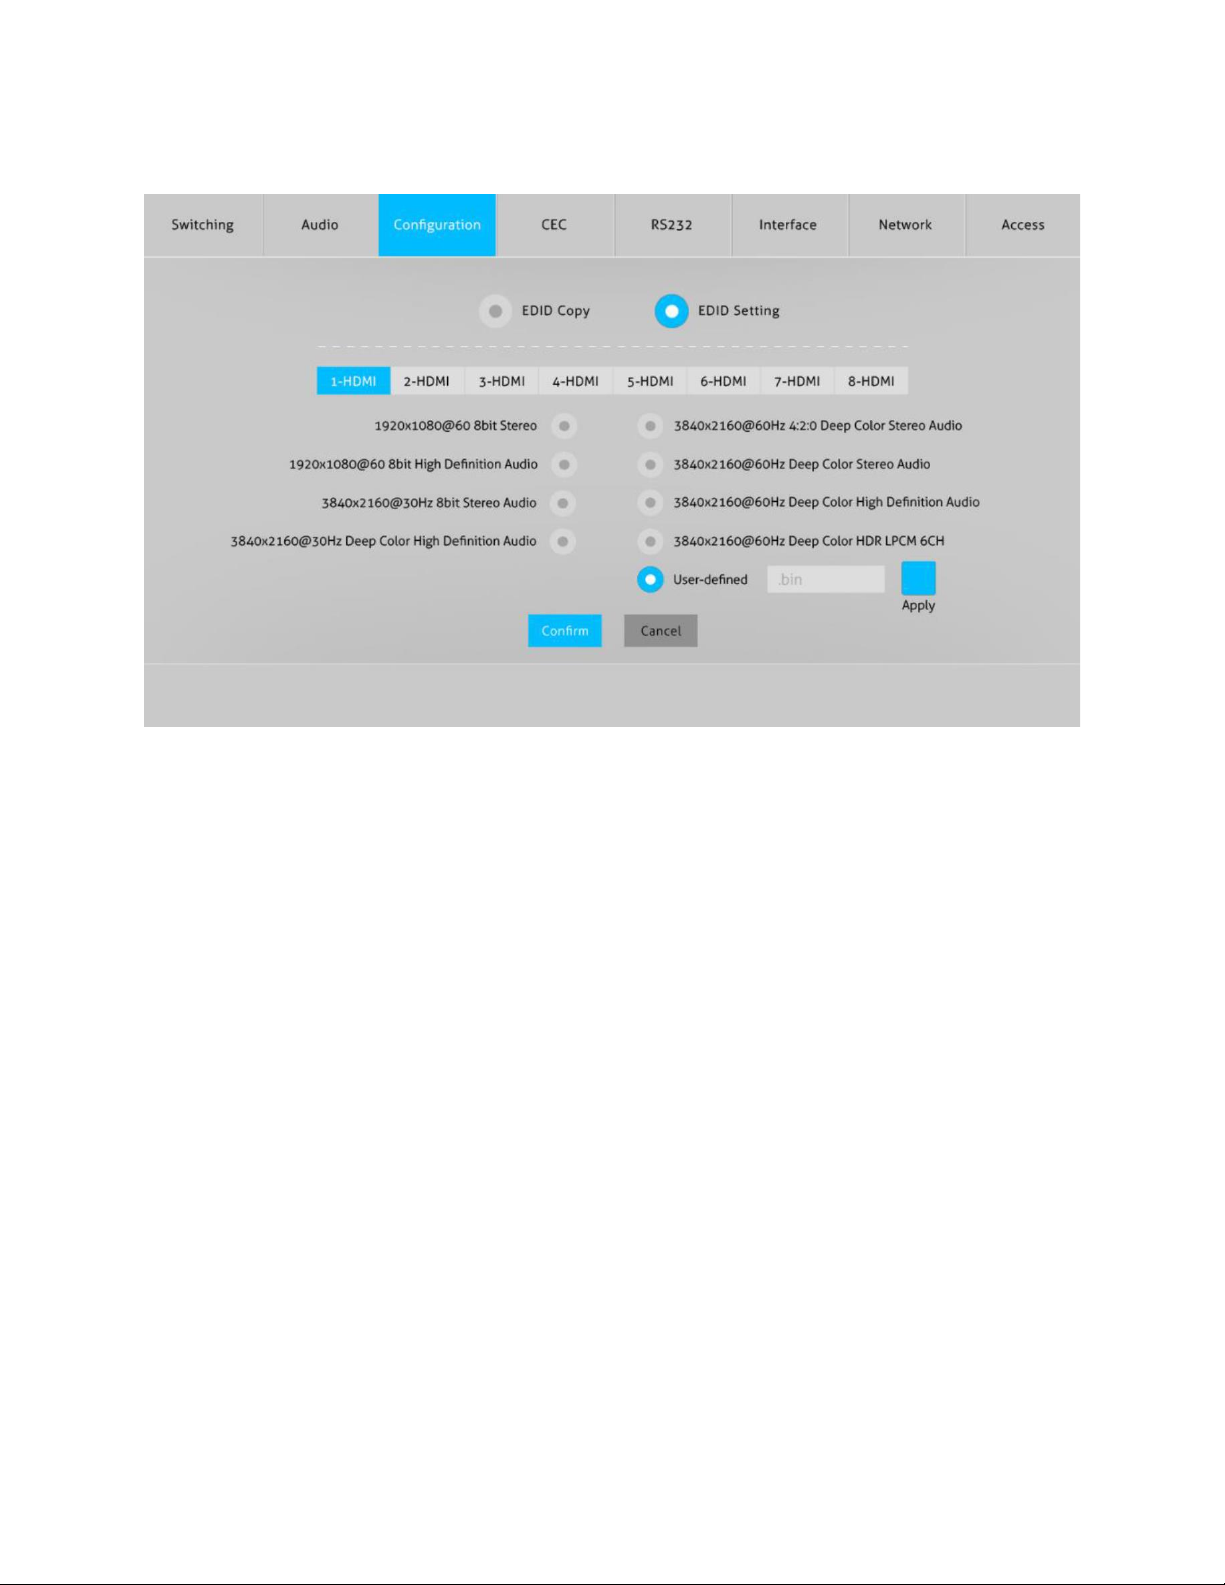
EDID Setting
The EDID Setting screen of the Configuration Tab allows you to assign a specific EDID
setting to each of the eight inputs. The EDID setting can be one of the eight fixed, built-in
EDID settings or custom settings contained in a file you create.
To assign a fixed, built-in EDID setting to one of the inputs, first click one of the eight
HDMI® input tabs, click one of the radio buttons next to one of the eight fixed, built-in
EDID settings, and finally click the Confirm button.
To assign custom EDID settings from a file you create, first click one of the eight HDMI
input tabs, then click the radio button next to the User-defined entry. Next, click the field
with the .bin label and use the file browser to select your custom EDID file with a .bin
extension. Finally, click the Apply button to assign your custom EDID settings to the
selected input.
Note that if the display on an output is connected to an input that is assigned EDID
settings beyond its capabilities (e.g., 4K video on a 1080p display), it will be unable to show
video and/or play audio. For best results, each input should have EDID settings that will
work with the least capable display.
19
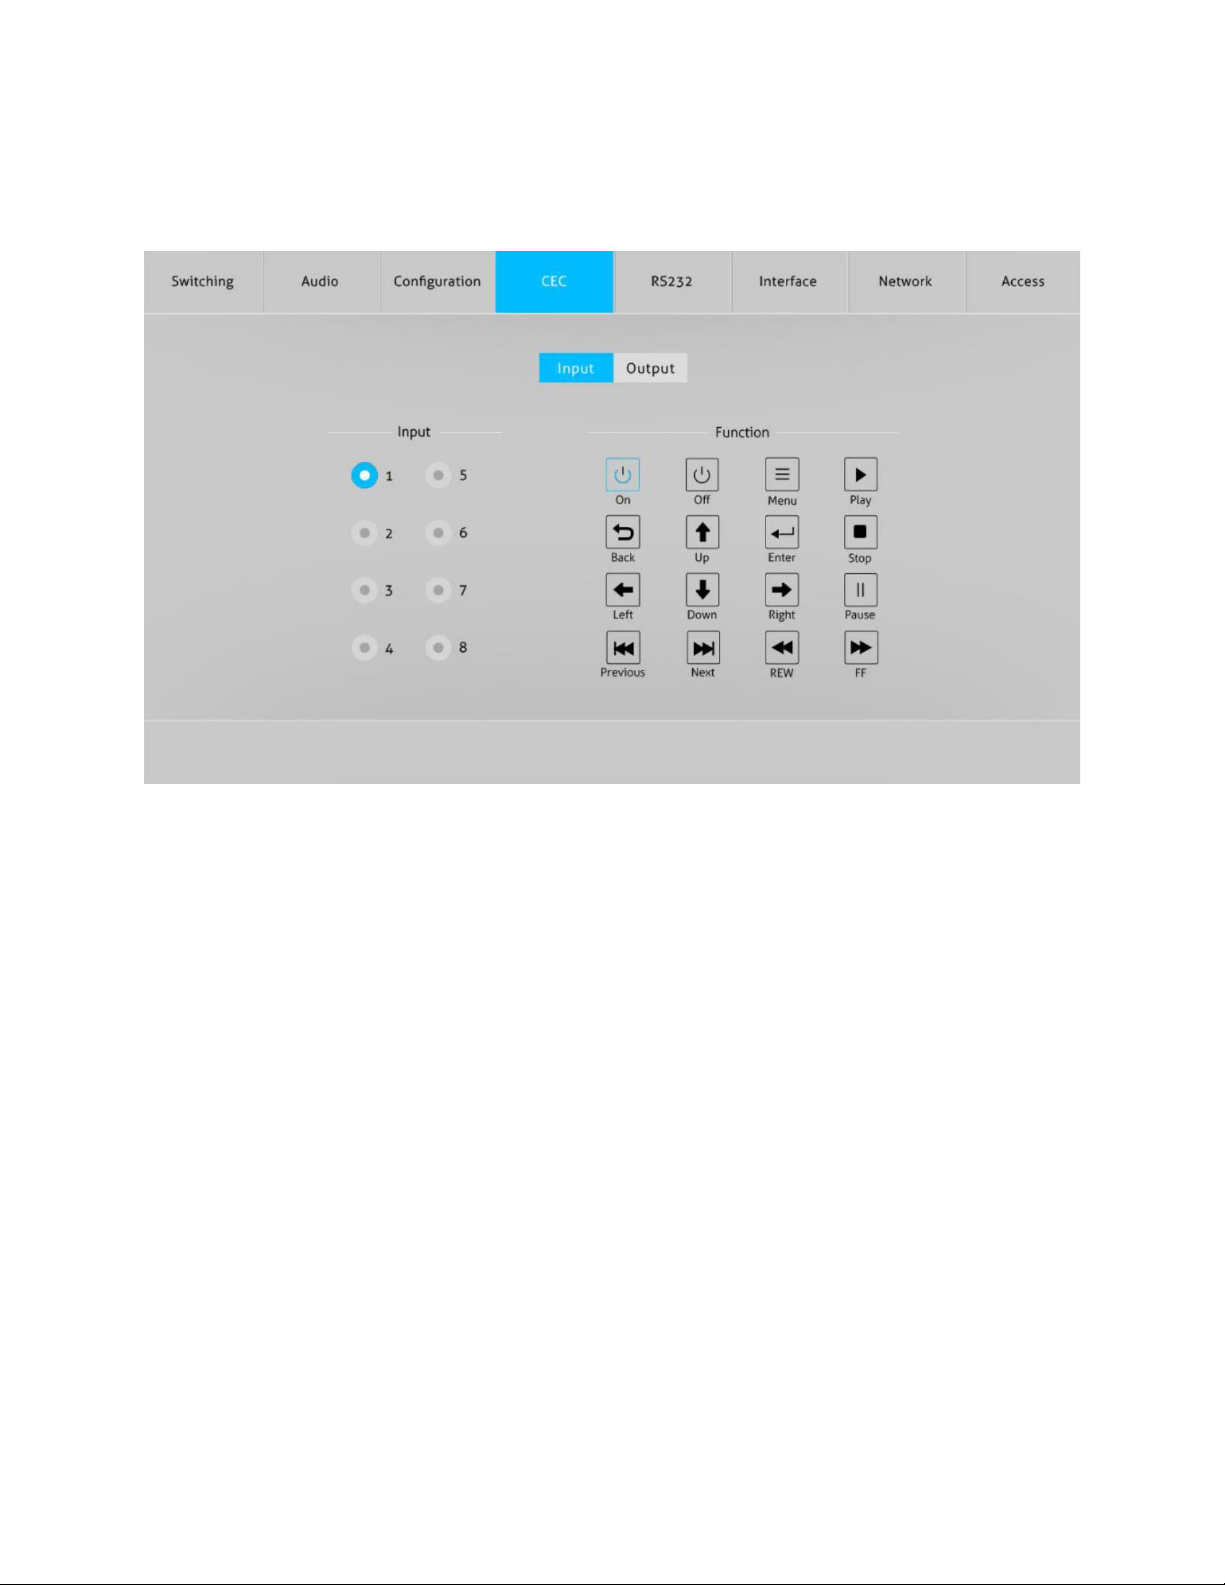
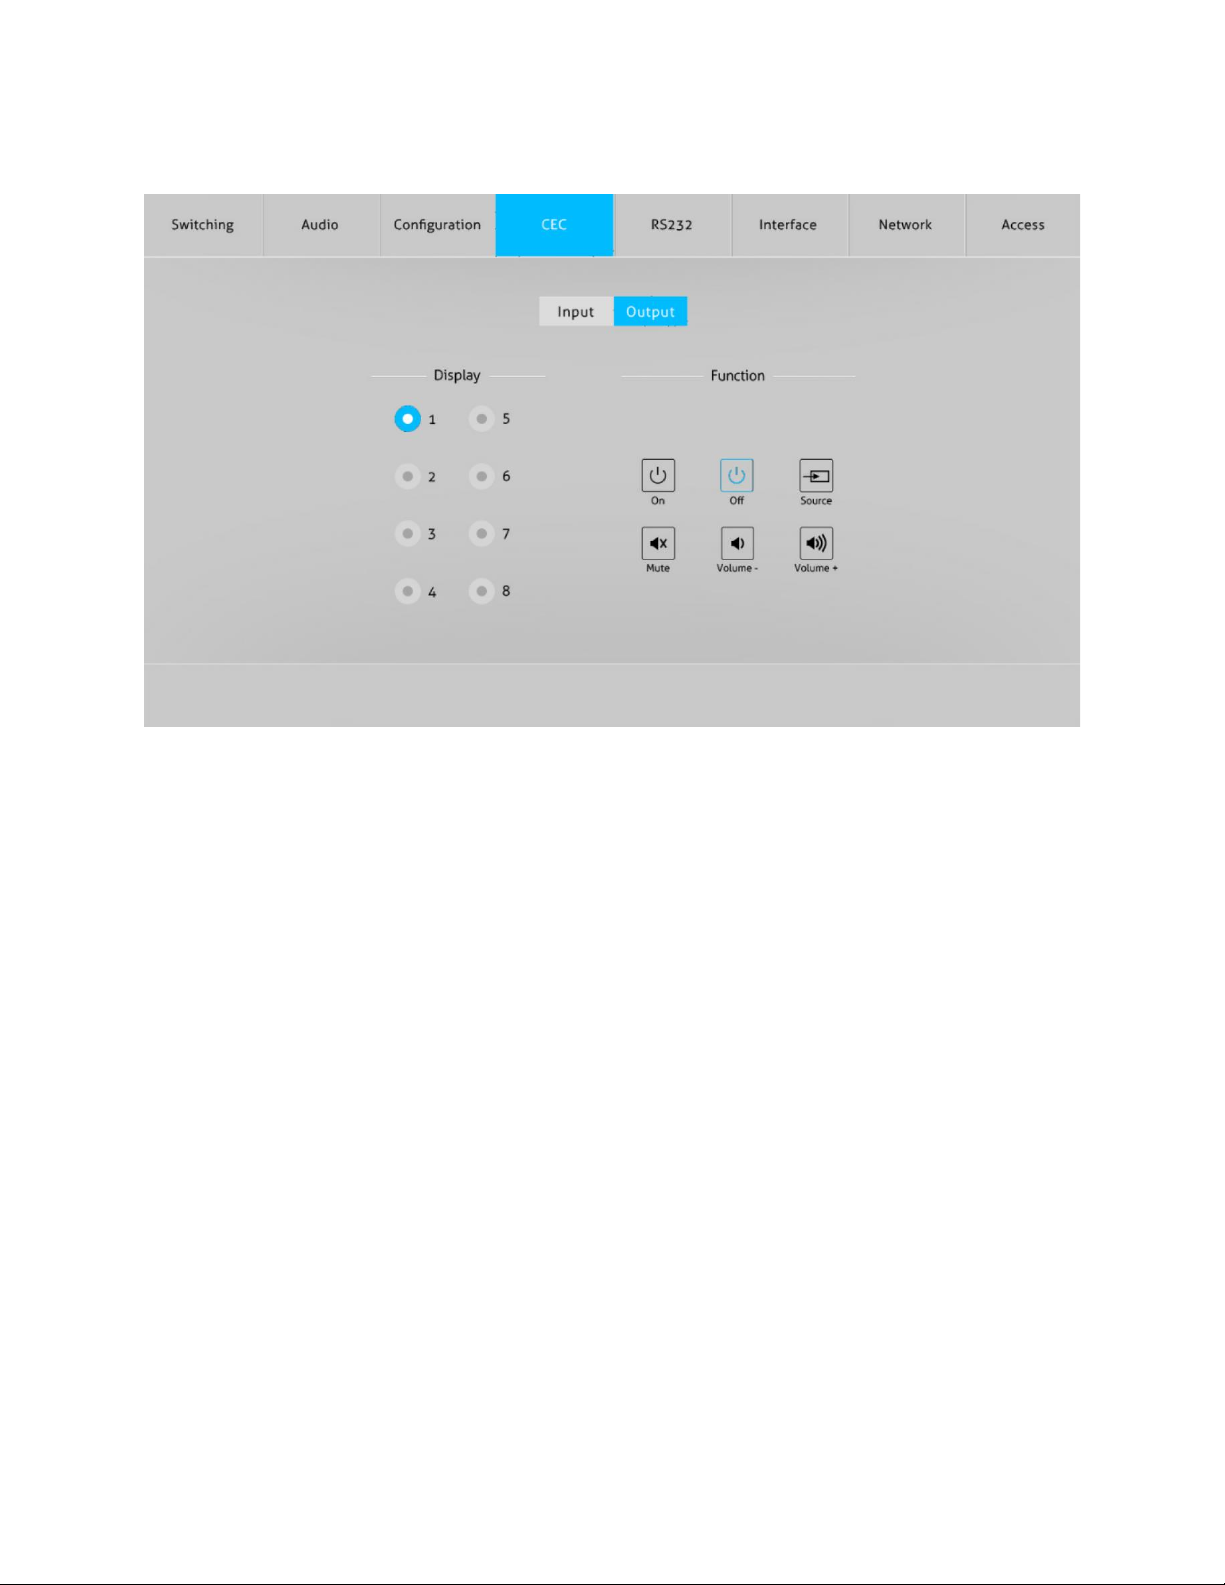
CEC Tab
Input Screen
The Input screen of the CEC Tab allows you to issue control commands to the selected
input device, similar to how you use an IR remote control.
To send a control command to an input device, first click the radio button in the Input
column corresponding to the device you want to control, then click one of the Function
buttons.
20
Output Screen
The Output screen of the CEC Tab allows you to issue control commands to the selected
output device, similar to how you use an IR remote control.
To send a control command to an output device, first click the radio button in the Output
column corresponding to the device you want to control, then click one of the Function
buttons.
Table of contents
Other Blackbird Matrix Switcher manuals


