Blackboxav VideoClip-HD16 User manual
contents
VideoClip-HD16
user manual v3
Oct 2015
hd video - photo -audio
1. WHAT IS THE VC-HD16................................................................
2. SUPPORTED MEDIA FORMATS................................................
3. IN THE BOX.....................................................................................
4. SETUP INSTRUCTIONS................................................................
5. REMOTE CONTROL......................................................................
6. SETTINGS OPTIONS.....................................................................
7. ADDITIONAL VIDEO & SLIDESHOW OPTIONS....................
8. CONTENT ACTIVATION OPTIONS...........................................
9. PROGRAMMING CONTENT.......................................................
LOOPING...............................................................
BUTTON................................................................
PIR............................................................................
1
1
1
1
2
3
4
5
5
5
6
7
WELCOME
Thank you for purchasing the VideoClip HD16.
The VC-HD16 is one of a range of products we oer specic to the heritage
marketplace. We are condent that we have other products you will nd useful and
look forward to dealing with you again soon.
T: +44 (0) 1639 767007
W: www.blackboxav.co.uk
3
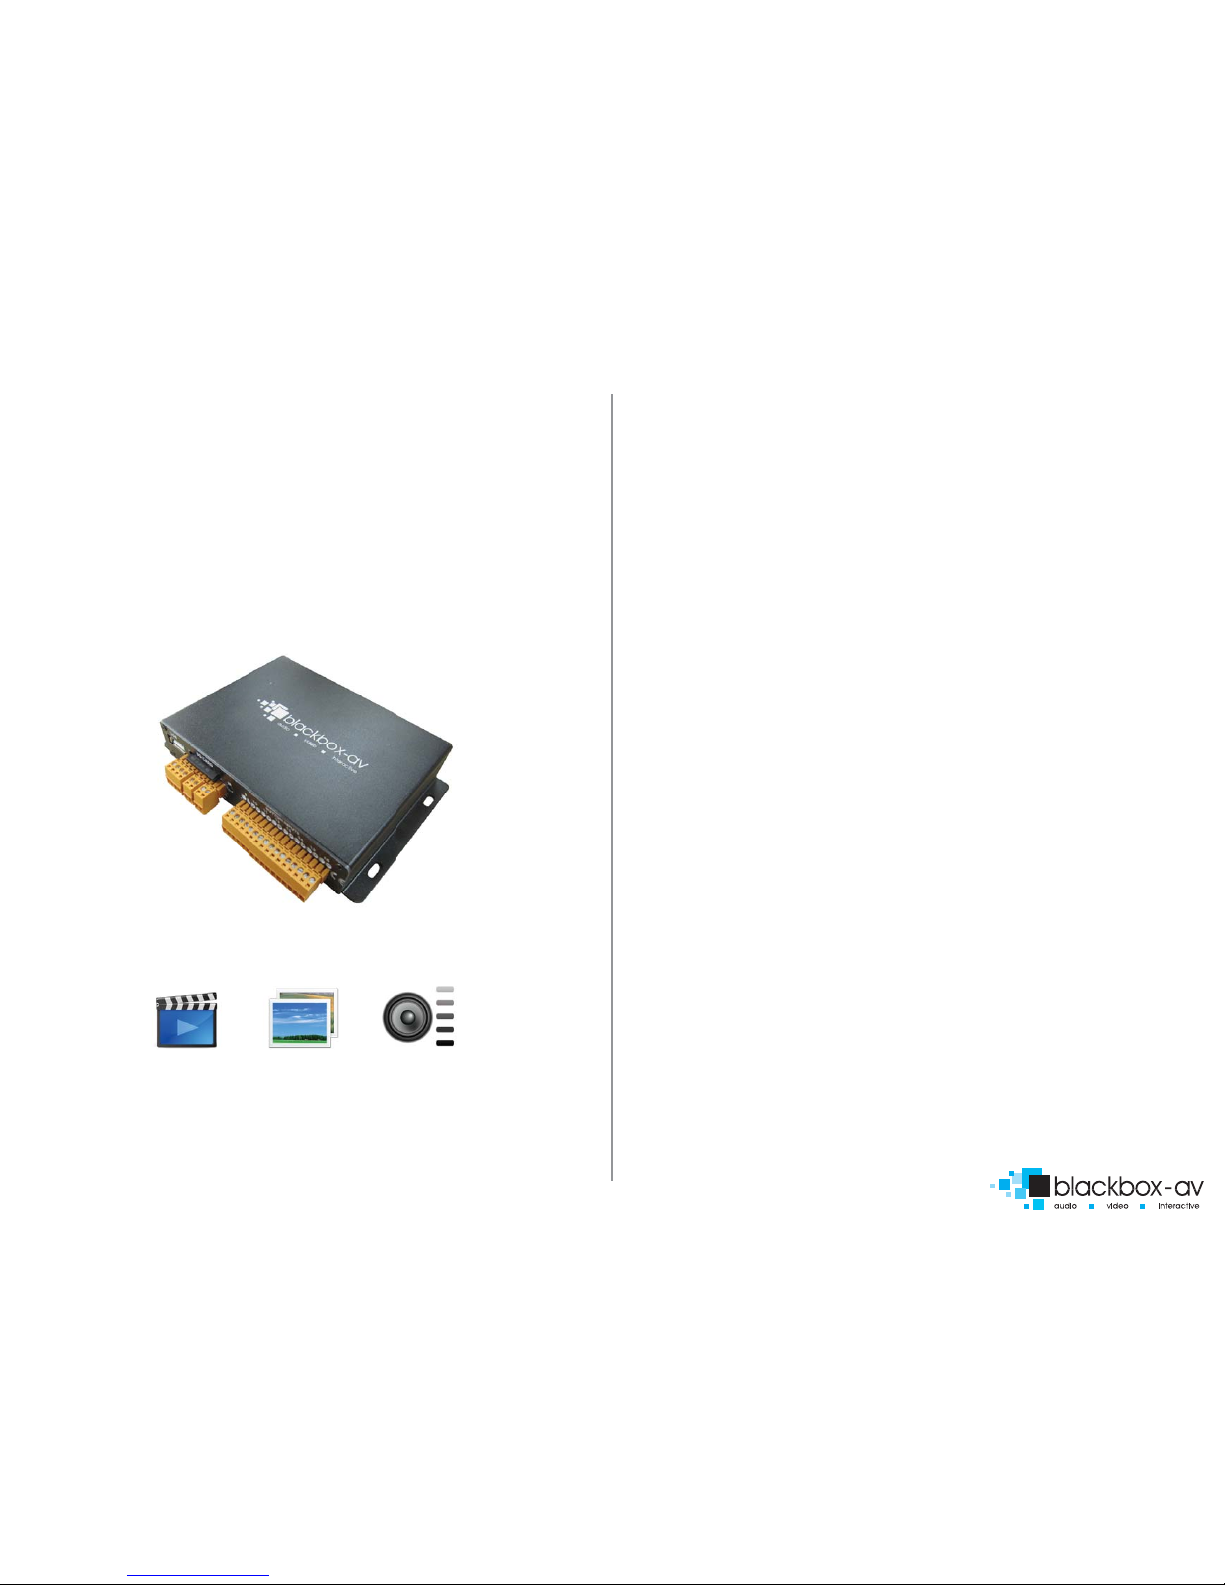
1.WHAT IS THE VC-HD16?
VideoClip HD16 is a compact, stand-alone, high denition digital media player. It can be
used to display and distribute videos, images and audio over a screen/monitor that is
connected to the device via HDMI input. The VC-HD16 supports a wide range of digital
media les which can be stored on a SD card or USB stick. A remote is also supplied for
easy player control and access to settings. It supports up to 16 programmable buttons
not including
4.SETUP INSTRUCTIONS
Connecting your VC-HD is simple and straight forward. You will need the
following:
1) The VideoClip HD16 Player
2) 12V DC Power Adapter
3) HDMI Cable
4) HDMI Compatible Monitor or TV (not included)
5) SDHC Card (included) or USB Stick (not included)
6) Terminal block button connections (included)
7) Buttons (not included)
2.SUPPORTED MEDIA FORMATS
Page 1
Video codecs supported
MPEG1/2/4, H.264, AVC, VC1, WMV,
RM/RMVB, DivX3/4/5/6, Xvid3/4/5/6
Video formats supported
RM/RMVB, AVI, TS, M2TS, MTS, MKV, MOV,
FLV, DVD-ISO, BD-ISO, VOB, MPG, DAT,
ASF, TP, TRP, WMV, IFO, SWF, 3GP, EVO,
DIVX, MP4, OGM
Audio codecs supported
HE, LPCM, AC3, DTS, DTS-HD MA(DTS
output can be down-mixed), Dolby Digital AC3 5.1
stereo
Audio formats supported
MP3, WMA, WAV, OGG, FLAC, AAC, LC-AAC,
APE(Under 128KHz)
Image formats supported JPEG, BMP, GIF, PNG, TIFF
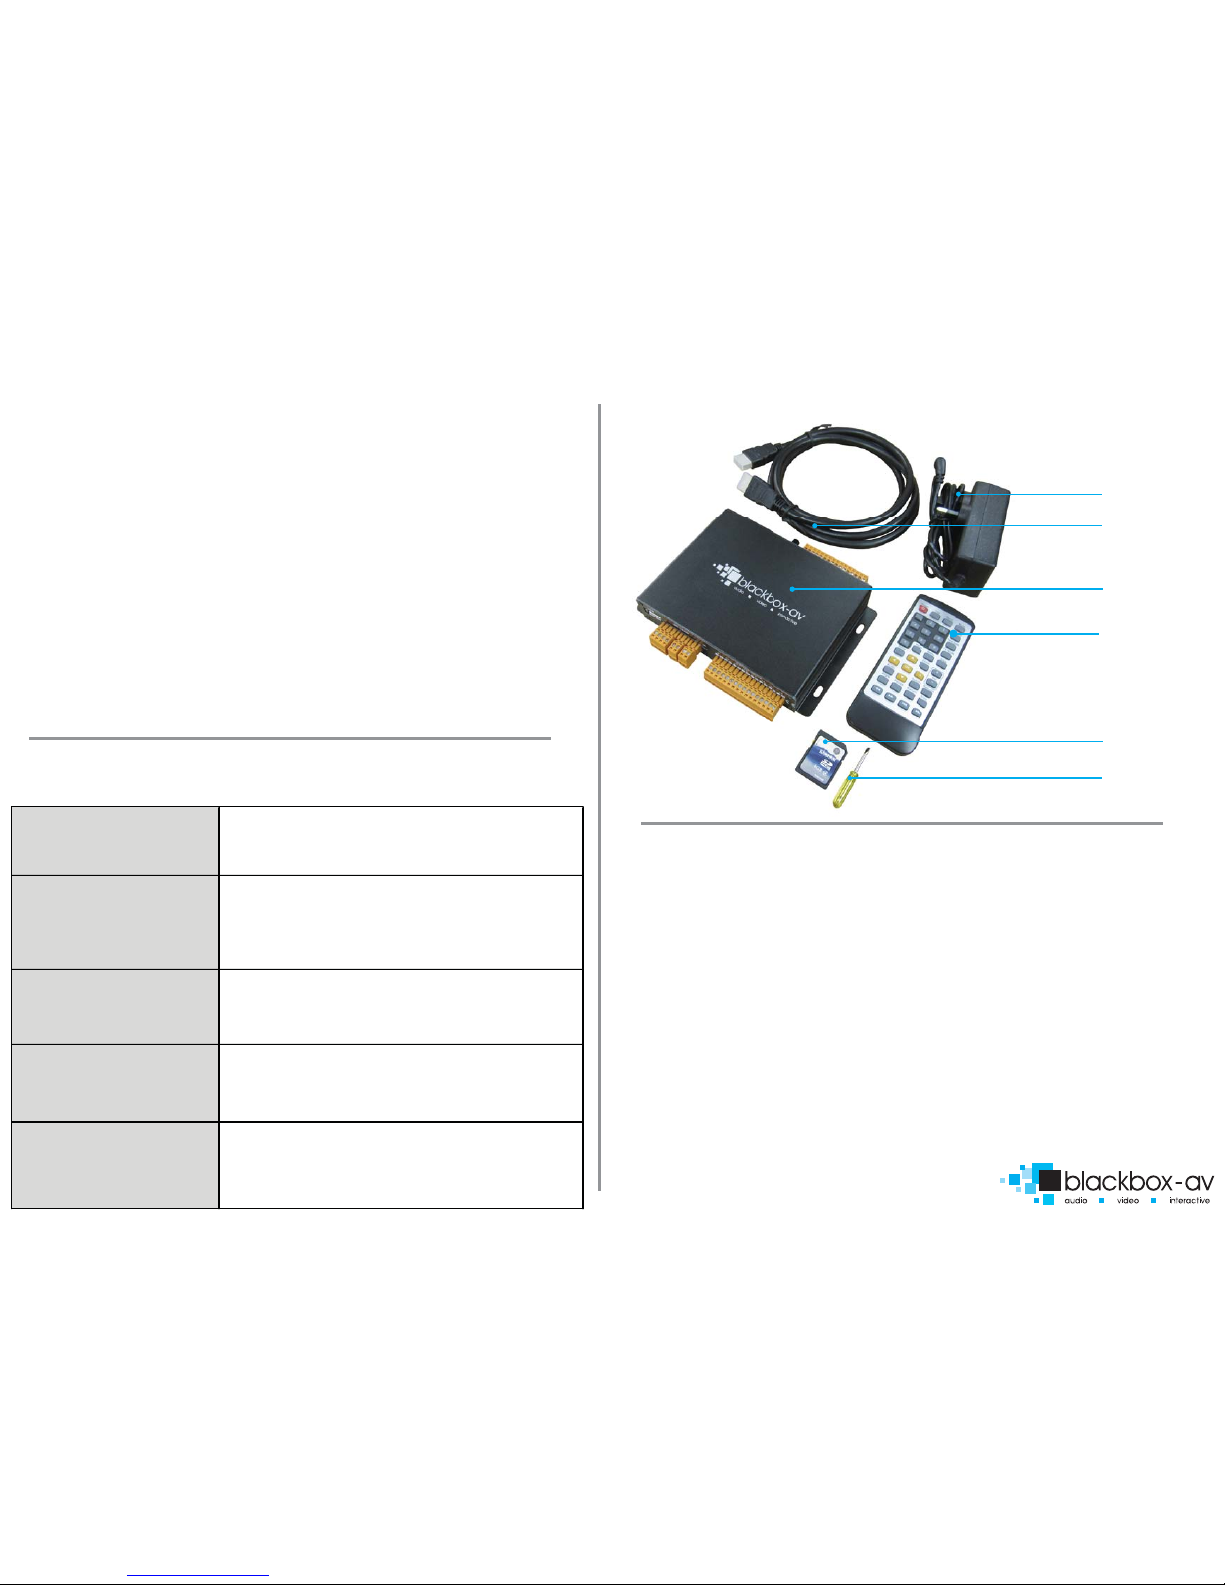
3.IN THE BOX
Power Supply
HDMI Cable
VC-HD16 Player
Remote Control
SDHC Card
Screwdriver

Page 2
FRONT VIEW
USB Slot Button input
9-16
REAR VIEW
12V DC in
Master Volume 12v Supply
1.Powering Your VC-HD16
Connect the supplied 12V DC Adapter to the‘12V DC in’to give power to
the device - it will power on automatically.
2.Connecting Your VC-HD16 to a TV or Monitor
Connect one end of the HDMI cable to the ‘HDMI out’ on the back of your
VC-HD, connect the remaining end to the HDMI slot of your device.
3.Connect Buttons
Connect buttons via available screw terminals . Using the provided
screwdriver screw wire ends in place, note the approrpiate + / -. To provide
users with volume control connect buttons to the volume up/down
terminals.
4. Insert Content
View‘9.Programming Content’section for programming instructions. Insert
either an SDHC card or USB stick with uploaded content into USB or SDHC
slot.
5. Optional Speakers
The VC-HD16 provides audio via HDMI, however you can also connect
speakers to the available terminals if required.
5.REMOTE CONTROL
Power: Press to power VC-HD on/o
Press to view information for content currently playing
Press to mute audio output, press to unmute
Press to play content in corresponding folder (folder 1, 2, 3 etc.)
Press while video le is playing to select repeat options, repeat
all, repeat title, repeat o
Press to jump to specic time point on video
Press to switch between NTSC Interlaced, NTSC Progressive, PAL
Interlaced and PAL Progressive
Press to open main menu and access File Manager, Movies,
Music, Photo and System Setup
Press to access letype menu setings, i.e when video plays you
access video settings, when images are playing you access slide
options
This button has been disabled for the VC-HD
Press this to access core system settings - System, Audio, Video,
Misc
Press to zoom in/out when playing photos or video
Navigation: Press to navigate menus
Press to increase/decrease volume levels
Press to display video audio track information
Press to activate subtitles if available
Press to resume play
This button is disabled on the VC-HD
Press to pause playback
Press to return to previous navigation menu
Press to stop playback
Press to fast forward or rewind current le
Press for previous or next le in list
INFO
Mute
Repeat
Time Seek
TV MODE
HOME
MENU
SLOW
SETUP
ZOOM
VOL +/-
AUDIO
SUBTITLE
RESUME
ANGLE
PAUSE
RETURN
STOP
<< >>
|<< >>|
v
e
ls
r
mation
menu
t
le
Speaker
L | R
Volume
Up | Down
SDHC Card Slot Infrared
(for PIR or Lighting)
HDMI Output
Button input
1-8

Page 3
6.SETTINGS OPTIONS
Using the Remote Control you can access a number of settings options for the
VC-HD16 by pressing the‘Setup’ button. Here you have access to‘System, Audio,
Video and Misc’ settings. Navigate between options using the‘< ^ > v ok’buttons.
SYSTEM
AUDIO
VIDEO
Page 4
MISC
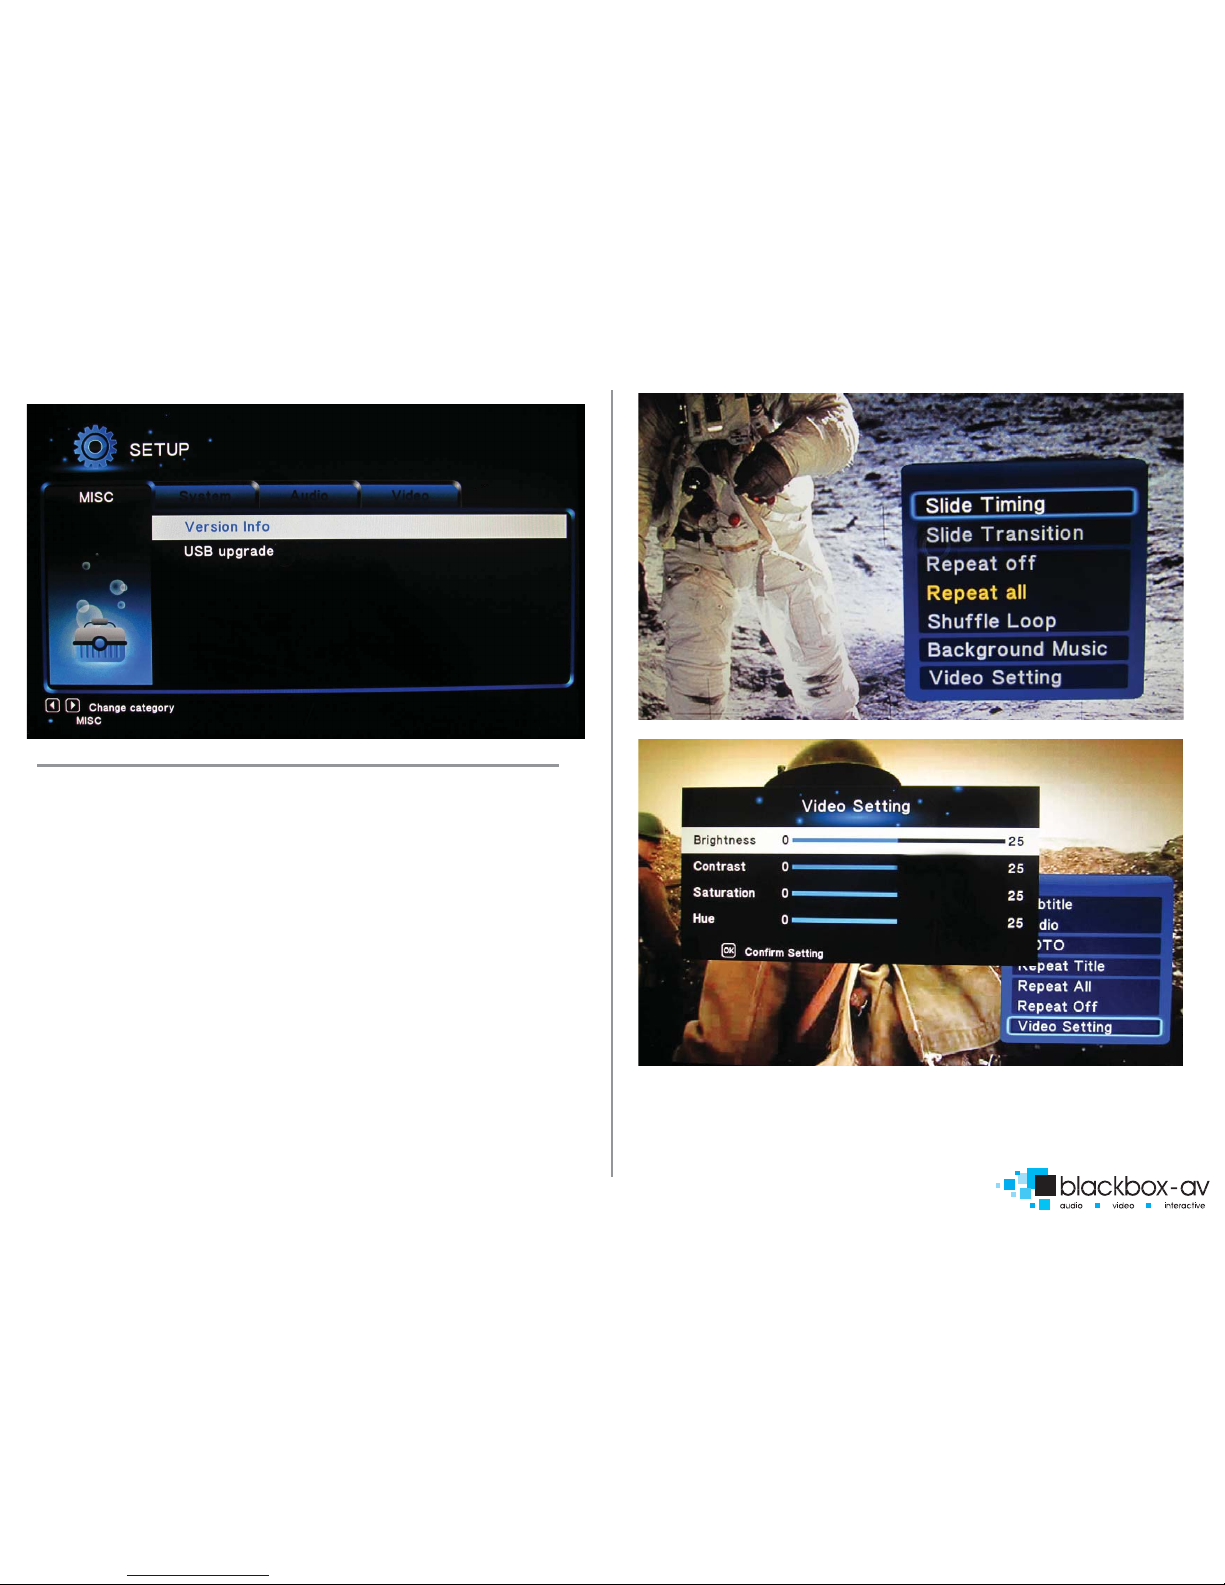
7.ADDITIONAL VIDEO & SLIDESHOW
OPTIONS
To access additional Video & Slideshow options the player must be currently playing
either a video (for video options) or image (for slideshow and image options). Whilst
playing either a video or image press the‘Menu’ button.
SLIDESHOW
Here you can access slideshow options including repeat, transition and timing (see
image i);
Repeat - Set repeat mode: O/all/shue
Slide Timing - Set length of time each slide is displayed: 2/5/10/30 seconds
Slide Transition - Set transition mode: Shue all/ip/quartet/slide/centre
extend/2D 3D expand/dissolve/fade in out/cross fade kenburn
VIDEO
Here you can access video options, including subtitle, audio, repeat options and
video settings (see image ii);
Repeat - Set repeat mode: All/o/title (Title repeats rst video in folder only)
Video Settings - Set video brightness/contrast/saturation/hue
image i
image ii
NOTE: These settings will be saved on your SD card or USB stick in a ‘.part’ le and
‘.Theatre’ folder created by the VC-HD16. If this le is deleted or new content is
added these settings will be reset.
This manual suits for next models
1
Table of contents
Other Blackboxav Media Player manuals


