Blastrac BMP-215 E/B User manual

Original instructions in English language
OPERATING INSTRUCTIONS BMP-215 E/B
VERSION 2.4

2
Inspection comments
Recurring inspections / maintenance log
*Competent person
Date / Hour counter
Findings
Repairs / Cleaning
Test
on
By*
Inspection before initial operation on: __________________________________________
By: __________________________________________
Date of initial operation: __________________________________________
Serial number & Year of manufacture: __________________________ _____________

3
Table of contents
Maintenance log 2
1. Introduction 4
2. Machine description 4
Accessories 5
3. Safety 6
3.1 Work area safety 6
3.2 Personal safety 6
3.3 Machine safety 7
3.4 Electrical safety 7
3.5 Petrol version safety 8
3.6 Dust collector safety 8
3.7 Maintenance safety 8
3.8 Transport safety 9
3.9 Signs on the machine 10
4. Initial operation 11
4.1 Checkpoints of electrical power supply 11
4.2 Checkpoints of the petrol engine 11
4.3 Checkpoints of the machine 12
4.4 Manual moving of the machine 12
4.5 Removing the drum 12
4.6 Mounting the drum 12
4.7 The scarifying drum 13
4.8 The scarifying flails and cutters 13
4.9 Control devices 14
5. Operating 15
5.1 Before starting up 15
5.2 Procedure to start work 15
5.3 Operating during scarifying 15
5.4 Switch off the machine 16
6. Maintenance 17
6.1 The scarifying drum 18
6.3 Belt drive 18
7. Troubleshooting 19
8. Technical data 20
Contact

4
1. Introduction
Before use, operators must be provided with information, instruction and training for the use of the machine
and the substances for which it is to be used, including the safe method of removal and disposal of the
material collected. All persons who are working with or maintaining this machine must read the manual
carefully and understand it fully. In case you sell the unit, hand it on to the next owner.
Keep this manual always with the machine, to enable it to be referred to at any time.
Any other work not covered by this operating manual must not be carried out.
This machine is designed for industrial use by professionals. Only authorized and trained personnel may
operate this machine. This machine is not intended for use by persons (including children) with reduced
physical, sensory or mental capabilities, or lack of experience and knowledge. Blastrac BV offers a course on
the use of the machine in order to make the operating and maintenance personnel familiar with all elements of
the machine. Always use common sense when working with machines.
2. Machine description
The Blastrac scarifier BMP-215 can be supplied with a 110V, 230V or 400 volt electric motor or with a
combustion engine. The intended use of this scarifier is to roughen up existing horizontal surfaces and
removing coatings. It can be used on almost any surface (concrete, asphalt, stone and steel). The machine
may not be used for other purposes. The manufacturer will not be liable for damage resulting from incorrect
usage, in these cases the user assumes all risks.
The drum of the scarifiers revolves at +/- 1700 revolutions per minute. (RPM)
The depth of scarifying can be adjusted by the fine adjustment control on the handle of the machine; by this
means it is possible to treat the surface with light or heavy cuts as is required.
The machine may not be used without an adequate dust extraction system. A specially designed Blastrac dust
collection system ensures dust-free operation of the machine and clean air at the workspace.
Application
The scarifier is a very versatile machine and with the appropriate cutters it may be used for the following
applications.
To roughen concrete
To clean most horizontal surfaces
To remove coatings
To corrugate concrete surfaces
To remove road markings
To make non-slip surfaces
The force of impact of a cutter is controlled by the depth
adjustment. With the right depth adjustment, the best performance
is obtained to give the desired result.
With a suitable Blastrac dust collector work can be carried out
without causing excessive dust in the work area, this raises the life
span of the machine and protects the health of the personnel.
1
Lifting point
2
Electrical connection
3
Quick lift lever
4
Dust hose connection
5
Fine adjustment
6
Brake

5
For the BMP-215 B (Petrol engine)
Please read the enclosed OWNER’S MANUAL of the petrol engine before operating the machine.
The OWNER’S MANUAL contains important information about getting the best performance and safe operation
of the petrol engine.
The OWNER’S MANUAL should be considered a permanent part of the engine and should remain with the
engine if resold.
Accessories
The cutters for the BMP-215 are:
MPD 215L 212S Drum complete with MPL212 cutters.
MPD 215L 42SX Drum complete with MPL42 cutters.
MPL 212S 215 Refill set MPL212 cutters.
MPL 42S 215SX Refill set MPL42-1 cutters.
MPL 212 Cutter 5pt.
MPL 42-1 Milling cutter 7pt.
MPL212
MPL 42-1

6
3. Safety
Warning!
Read all safety warnings and all instructions. Failure to follow the warnings and
instructions may result in electric shock, fire, explosions and / or serious injuries.
Only authorized and trained personnel may operate this machine. This machine is not intended for use by
persons (including children) with reduced physical, sensory or mental capabilities, or lack of experience and
knowledge.
It is the responsibility of the user to analyse the surface to be treated. The surface may not contain any
substances which could pose a fire-, explosion- or health risk when treated. The user should make a risk
assessment on the basis of the information obtained about the surface to be treated and take proper
precautions for the work to be performed.
In case of any inappropriate usage, improper operation or repair, the producer shall be exempt from liability.
3.1 Work area safety
a) Do not use the machine in rain, damp or wet locations.
b) Avoid dangerous environments: do not work in the presence of explosive atmospheres, in the presence of
flammable liquids, gases or dust. Remove materials or debris that may be ignited by sparks.
c) In some cases sparks could be created by scarifying or milling.
d) The surface to be treated must be clean, make sure to remove all stones, screws etc..
e) Do not use on wood.
f) Make sure there is enough ambient light on the work area. Cluttered or dark areas invite accidents.
g) Keep children and bystanders away while operating the machine. They are likely not to foresee the
potential dangers of the machine. Distractions could cause you to lose control of the machine.
h) Persons who are not operating the machine must not be permitted to stay in the surrounding area of at
least 5 meter from the machine.
i) Never use the machine when the surface is not clear and if there is a risk of stumbling or tripping.
j) Remove electrical cables and dust hose(s) from the surface to be treated.
k) Make sure that there are no cables or hoses in the driving direction of the machine.
l) Make sure that there is nothing standing or situated on the surface to be treated.
m) Make sure the machine can travel over all inequalities on the surface, small inequalities like weld seams or
(floor) joints are no barriers for the machine.
n) Never stay in the rain with the machine.
o) Check if there are any obstacles that can snag the cables when the machine is moving.
p) Remove all objects from the surface that can damage the machine. Remove reinforcing steel or other
objects protruding from the surface in order to prevent damage to the machine.
q) Warning! Make sure that the surface to be treated does not contain dangerous materials such
as: - combustible or explosive dusts or substances.
- carcinogenic or pathogenic substances.
r) It is necessary to provide for an adequate air change rate L in the room if the exhaust air from the dust
collector is returned to the room. Comply with the National regulations.
s) Secure the work area around the machine in public areas providing an adequate safety distance from the
machine. Use a red and white safety chain and danger sign to enclose the work area.
3.2 Personal safety
a) Always wear Personal Protective Equipment while working with the machine.
-Dust mask class FFP3 or higher
-Ear protection
-Safety glasses with lateral protection
-Protecting gloves
-Safety shoes

7
b) Dress properly. Do not wear loose clothing or jewellery. Keep your hair, clothing and gloves away from
moving parts.
c) Personnel must tie back long hair and not wear loose clothing or jewellery including rings.
d) Stay alert, watch what you are doing and use common sense when operating the machine.
e) Always seek professional medical attention immediately in case of injury.
f) All persons surrounding the machine should wear Personal Protective Equipment.
3.3 Machine safety general
a) Safety functions and operating functions must work correct.
b) No loose bolts and nuts permitted.
c) Never operate machine without the guards and/or safety devices in place.
d) Never change anything on the safety devices on the machine!
e) Do not use the machine when it is damaged.
f) Do not open or remove protective guards while driving gears are running.
g) The temperature of the machine can be above 37° C.
h) The machine, specially the handle grips and control devices must be dry and free of fats/oils.
i) All repair work has to be done by qualified Blastrac personnel, this guarantees a safe and reliable
machine.
j) Always use original Blastrac spare parts and cutters. This will ensure the best performance.
Only original parts meet the factory specifications and quality. Otherwise Blastrac BV cannot guarantee
the safety of the machine. The part numbers can be found in the Service Manual.
k) Check the rotating direction of the motor before operation. The correct direction is given with an arrow on
the housing of the motor.
l) Make sure the drum with picks/cutters is in good condition and the picks/cutters can turn free in the
drum.
m) In some cases sparks could be created by milling / scarifying.
n) If safety-critical changes occur to the machine or its working method, the machine must be shut down
immediately! The cause of the fault must be established, and rectified.
o) In the event of operational malfunctions the machine must be shut down immediately and secured!
p) Never use the machine without a suitable (Blastrac) dust collector!
3.4 Electrical safety
a) Use only extension cables for extending the main cable that are sized and marked in accordance with the
overall power consumption of the machine. Do not use damaged extension cables.
b) Electrical cables must be rolled entirely off of the reels.
c) Any damage to the electric cables and/or electrical components is not permitted.
d) If the power supply cable or plug is damaged, it must be replaced immediately. Only use original Blastrac
parts.
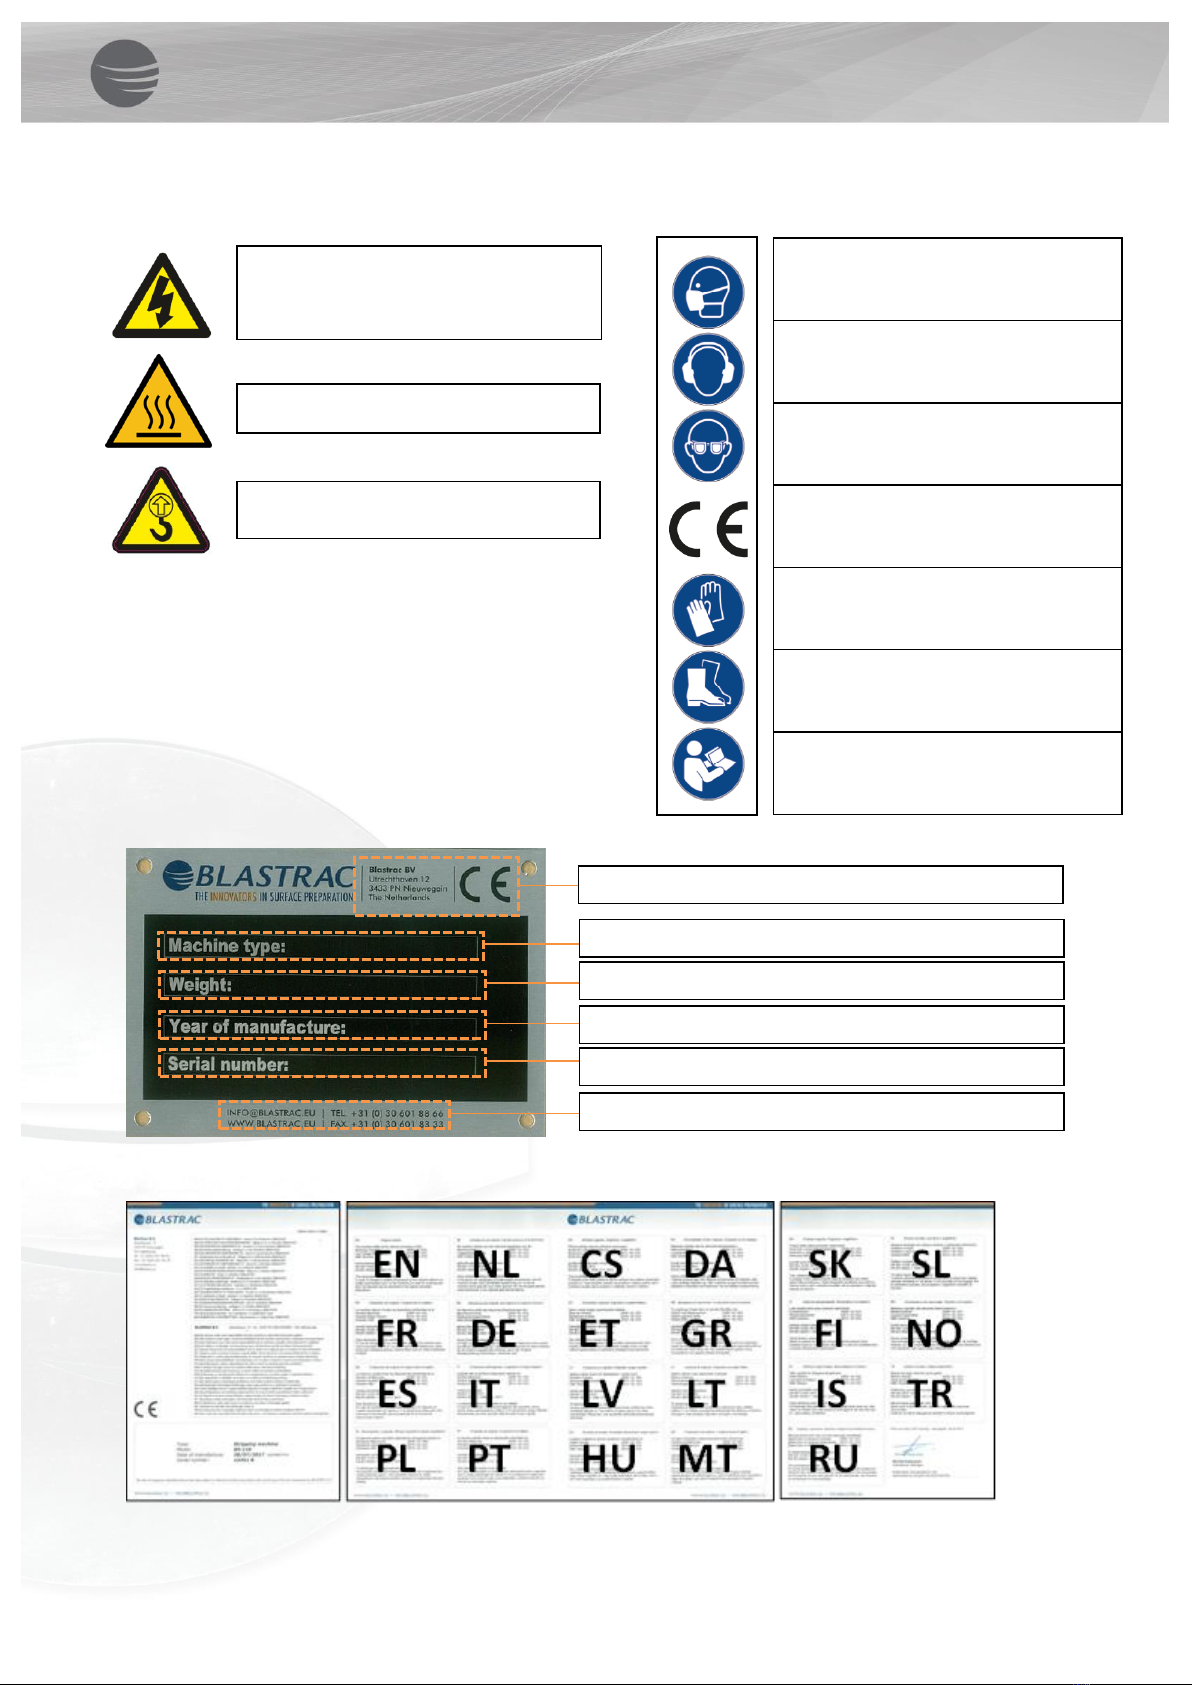
e) The voltage on the identification plate must comply with the power supply.
f) Use an electrical power supply connection with earth connection and earth leakage circuit breaker.
g) The circuit breaker of the power supply must have a ‘’D’’ characteristic. Circuit breakers with a “C” or “B”
characteristic can give problems when switching the machine on.
h) Keep the machine original; The machine is always equipped with an earthed connection, do not
change this and always use earthed cables with an earthed plug.
i) Inspect and test the electrical components regularly. The electrical components have to satisfy with the
requirements set out in the harmonised norm EN60204-1.
j) Always call a skilled electrician or your distributor when you have questions about the safety of the
electrical components.
k) Work on electrical equipment or operating materials may only be undertaken by a skilled electrician or by
trained persons under the guidance and supervision of a skilled electrician as well as in accordance with
the electrical engineering regulations.
l) Always use tools that are insulated against voltages.
m) Do not abuse the cables. Never use the cables for carrying, pulling or unplugging the machine. Keep
cables away from heat, oil, sharp edges or moving parts. Damaged or entangled cables increase the risk
of electric shock. Do not fold the cable or clamp it.
n) Don’t pull out the power supply cable out by the wire, but by the connector.
o) Be careful with water on the treated surface. Electrical cables must not come into contact with water.
p) During a long standstill of the machine, pull out the main plug.
q) If the machine is to be operated using power from a generator, the generator must be operated in
accordance with the current legal regulations and directives in force. (this applies to the protective earth

8
conductor in particular) in order to ensure that all safety devices are functioning and to eliminate possible
damage to electrical components.
3.5 Petrol version safety
a) Read the enclosed Operating Instructions of the petrol engine before using it.
b) Make sure there is no oil or petrol leaking out of the petrol engine.
c) Always make a pre-operation inspection before you start the engine. You may prevent an accident or
equipment damage.
d) Look for signs of damage and remove any excessive dirt or debris.
e) To prevent fire hazards and to provide adequate ventilation, keep the engine at least 1 meter
(3 feet) away from buildings and other equipment during operation.
Do not place flammable objects close to the engine.
f) Anyone who is not operating this machine must be kept away from the area of operation due to a
possibility of burns from hot engine components. Parts will remain hot for a while after stopping the
engine. Let the engine cool before transporting it or storing it indoors.
g) When transporting or storing the engine, turn the fuel valve OFF and keep the engine horizontal.
h) Know how to stop the engine quickly, and understand the operation of all controls. Never permit anyone
to operate the engine without proper instructions.
i) Do not place flammable objects such as gasoline, matches, etc., close to the engine while it is running. Do
not place anything on the engine.
j) Refuel in a well-ventilated area with the engine turned OFF. Gasoline is highly flammable and explosive
under certain conditions. Let the engine cool before refueling.
k) Do not overfill the fuel tank. There should be no fuel in the filler neck.
l) Do not smoke or allow flames or sparks where the engine is refueled or where gasoline is stored.
m) ! Exhaust gas contains poisonous carbon monoxide ! Avoid inhalation of exhaust gases. Never run
the engine in a closed garage or confined area! Always wear a dust mask.
Breathing carbon monoxide can cause unconsciousness or death.
n) If any fuel is spilled, clean it up completely and allow petroleum vapours to dissipate before starting the
engine.
o) Make sure the fuel and oil level are correct and that the filler cap is closed securely.
p) Don’t leave the machine laying backwards for a long time, because this may result in fuel spillage.
3.6 Dust collector safety
a) Always use a Blastrac dust collector to ensure a dust-free operation of the machine and clean air at the
workspace. Also the airflow helps to cool the machine and prevents overheating.
b) Read the operating instructions of the dust collector before using it.
c) The dust container/bag of the dust collector must be emptied regularly. Comply with the local waste
treatment regulations considering the removed material.
d) The dust hose must be connected properly with a hose clamp and industrial tape.
e) The dust hose must be undamaged and free of obstructions.
f) Always switch on the dust collector first!
3.7 Maintenance safety
a) Pull out the main plug and place it in sight, before changing the drum or starting inspections and repairing
on the machine.
b) Wait for a standstill of all drives before any inspections, adjustments and/or maintenance work is started.
c) Block the machine in a stable position before doing any maintenance work.
d) Failures due to inadequate or incorrect maintenance may generate very high repair costs and long
standstill periods of the machine. Regular maintenance therefore is imperative.
e) Operational safety and service life of the machine depends, among other things, on proper maintenance.
f) Prevent premature wear by keeping the machine as dust free as possible. Clean the machine for this
reason regularly with a dust collector and non-aggressive materials. Never use a high pressure water
cleaner to clean the machine.
g) Do not use any aggressive cleaning materials!
h) Use lint-free cleaning cloths!
i) Please advise the OWNER’S MANUAL of the petrol engine for additional information.
j) It is advisable to stock all spare parts or wear parts that cannot be supplied quickly. As a rule, production
standstill periods are more expensive than the cost for the corresponding spare part.

9
k) The suitable precautions include decontamination before disassembling the machine, adequate filtered
ventilation of the exhaust air from the room in which it is disassembled, cleaning of the maintenance area
and suitable personal protection equipment.
3.8 Transport safety
a) Be aware of your surroundings and machine operating level. Do not side hill, do not run on steep incline,
this could cause machine to tip over.
b) The weight of the BMP-215 is 58 kg. Use a crane or lift when transporting the machine, use the lifting
eyes on the machine.
c) Before every use check the lifting eyes and welds for: deformation, damages, cracks, corrosion and wear.
d) When lifting the machine from the ground, always use the lowest lifting speed. The cables must first be
tensioned at this speed; they must not be slack when the machine is lifted from the ground.
e) During hoisting make sure to be at a safe distance from the machine with the most optimal view on the
machine and working environment.
f) Never stand directly below the machine.
g) When transporting the machine do so in such a manner that damage due to the effects of the use of force
or incorrect loading and unloading is avoided.
h) The lifting eyes can also be used to fasten the machine on a pallet or during transport.
i) Always drive backwards when driving up to a ramp or grade, and forwards when driving of the ramp.
j) Chock wheels for transport and keep control handle in neutral position. use the brakes on the wheels.
k) Don’t leave the machine unsecured on jobsites.
l) Park the machine always on a flat horizontal and levelled surface.
m) Remove the dirt, dust and debris from the machine before transport.
n) Make sure the electrical cable and dust hose are disconnected before transport.
o) Store the cleaned and dry machine in a humid free room. Protect the motor from moisture, heat dust and
shocks.
p) Never use the machine for lifting persons or items.
q) Only lift the machine as shown in the picture below.

10
3.9 Signs on the machine
The following stickers are placed on the machine. Meanings of these symbols are:
Type plate:
EU Declaration of Conformity:
Wear a dust mask class FFP2 or
higher.
Hearing protection is obliged.
Safety glasses with lateral protection
are obliged.
CE-mark on this machine.
Wear protecting gloves.
Safety shoes obliged.
Consult the manual before operating
the machine.
Name, address and CE mark.
The machine type.
The net weight of the machine in kilogram.
The year of manufacture.
The serial number of the machine.
Email address, Website, Telephone & fax number.
! Danger Hazardous voltage in motor
even when solid state controller is OFF.
Disconnect main power before servicing
motor, controller or associated wiring.
Lifting point.
Warning! Hot surface

11
4. Initial operation
Before using the machine it is of great importance to inspect the machine.
It is not permitted to use the machine if the machine safety is not according the checkpoints below.
4.1 Checkpoints electrical power supply
Use only extension cables for extending the main cable that are sized and marked in accordance with
the overall power consumption of the machine.
Electrical cables must be fully unwind of their reels.
No damage is permitted for electrical cables.
Use an electrical power supply connection with earth connecting.
Make sure the power supply is in accordance with the machine specifications.
The circuit breaker of the power supply must have a ‘’D’’ characteristic. Circuit breakers with a “C” or
“B” characteristic can give problems when switching the machine on.
If the machine is to be operated using power from a generator, the generator must be operated in
accordance with the current legal regulations and directives in force. (this applies to the protective
earth conductor in particular) in order to ensure that all safety devices are functioning and to eliminate
possible damage to electrical components.
4.2 Checkpoints of the petrol engine
Make sure there is enough petrol in the engine.
Make sure there is enough oil in the engine.
Check the engine for leakages of oil or petrol.
4.3 Checkpoints of machine
Safety functions and operating functions must work correct.
Check all screws and other fasteners for tightness. No loose bolts and/or nuts are permitted.
Check the electrical components, cables and connections for wear and/or damages.
Dust hose connections must be reliable: use hose clamps and industrial tape.
Dust hose must be undamaged and free of obstructions.
Make sure the drum is in good condition.
Make sure the drum is assembled as shown in the service manual.
Check, when using non symmetric cutters, if the direction of turning is like the figure below.
The tools must hit the floor by centripetal force and not because the axle pushes the tool
(see drawing below).

12
4.4 Manual moving of the machine
To move the machine manually make sure the quick lift lever is in position 1
(see picture) Squeeze in the handles of the quick lift lever and pull it
towards you until it clicks into place. The drum is now free from the surface.
Release the brake from the left wheel with your foot and the machine can
now be pushed around on its wheels.
The machine should only be moved around when the dust hose, and power
supply cable are disconnected.
WARNING! Always make sure all rotating parts have come to a complete
standstill before moving around the machine.
Be careful! Make sure nobodies feet get under the wheels. Wear appropriate
safety shoes when you drive the machine to or from the work area.
Make sure that no vehicles, such as forklift trucks and other equipment run over the electric cable and the dust
hose.
4.5 Removing the drum
Make sure all moving parts of the machine have come to a
complete standstill before changing the drum.
Warning!
Always wear Personal Protective Equipment!
The dust can be hazardous to the health!
Wear a dust mask! Wear protective gloves!
1. Loosen the 2 bolts of the side plate.
2. Remove the side plate.
3. Pull the drum from the axle, and support the drum.
4.6 Mounting the drum
Clean the hexagon axle inside the machine and lubricate it over the whole length.
Slide the drum over the axle until it will not go any further.
Mount the side plate. A side plate which is incorrectly mounted or mounted with force, will shorten the
lifetime of the drum bearings.
Never use the machine without a side plate or with an incorrect mounted side plate!

13
4.7 The scarifying drum
The heart of the scarifier is the scarifying drum. The assembly of the scarifying drum is very easy.
Each tool will be pushed on the axle together with spacers according to the enclosed assembly plans (Service
manual). The spacers ensure the necessary distance between the flails or cutters. The enclosed assembly
plans take into account the required lateral clearance of the flails or cutters, approximately 3 - 5 mm.
4.8 The scarifying flails and cutters
Through the use of a few different flails or cutters, and with a few
alterations, it is possible to adjust the Blastrac scarifier for the applications
or rather for the requirements of the specific surfaces. All the machines
work according to the principle of a loose tool seated on an axle. The
rotation of the scarifying drum generates a centrifugal force on the flails or
cutters which are kept by the lateral axles. The flails will be thrown
outwards as far as the clearance between flail and axle allow it. When
striking the surface, particles will be taken off of the surface and the flail
will rebound in the max inner position. So to avoid significant wear on the
axles as well as on the drum, it is required that the flails still have enough
clearance on the axle when striking the surface.
1
M6x20 countersunk head screw
2
Retaining plate
4
Drum
5
Drum axle
6
Cutter 5pt.
7
Spacer ring
Complete drum with
MPL42-1 milling cutters.
Order nr. MPD215L42SX
Complete drum with
MPL212 cutters.
Order nr. MPD215L212S
The tools must hit the floor by
centripetal force and not because
the axle pushes the tool
(see drawing below).

14
4.9 Control devices
1. Lifting point
Used for lifting the machine with a crane or lift.
2. Control box
The control box has a connection for electrical power, a green start-button and a red stop-button.
Pressing the green start-button will start the electrical motor, and the drum will start rotating.
Pressing the red stop-button cuts off the power to the motor, and the drum will stop rotating.
3. Quick lift lever
In the upright position the drum is lifted off of the ground, in the downwards position, the drum is put
on the ground. The quick lift lever enables the operator to lift the complete drum without changing the
fine adjustment of the working depth, or for easy transport. The lever must be in the upright position
before start-up, in order to prevent a run out of the motor under full load.
Squeeze in the handles of the quick lift lever and pull or push it in the desired position until it clicks
into place.
4. Dust hose connection
The dust hose to the dust collector must be connected here. Use hose clamps and industrial tape for a
reliable connection.
5. Fine adjustment
The working depth can be adjusted by turning the fine adjustment wheel. The scarifying depth must be
adjusted considering the surface to be treated. The flails or cutters must be unhindered thrown up
through the centrifugal force and they must turn free over the lateral axle. When the depth adjustment
is correctly selected, the scarifier will run quiet and constant. Oval worn flails or cutters as well as
broken drum axles indicate a too "high" scarifying depth adjustment.
6. Brake
The brake is foot operated. Use your left foot to click it on or off the left wheel.
1
Lifting point
2
Control box
3
Quick lift lever
4
Dust hose connection
5
Fine adjustment
6
Brake

15
5. Operating
During operating the BMP-215, the following additional safety instructions must be followed closely.
Before switching on the machine make sure that no-one can be endangered when the machine starts up.
5.1 Before starting up
Make sure that the drum doesn’t hit the ground. The quick lift lever must be in upper position and the
fine adjustment must be turned up.
Connect the scarifier and the dust collector with the dust hose. Make sure there is a good and airtight
connection, use hose clamps and industrial tape.
Connect the scarifier and the dust collector with the power supply. Make sure the right connection is
available for the machines. (only BMP-215E)
5.2 Procedure to start work
Turn on the dust collector.
Start the machine by pushing the green start-button (BMP-215E) or by
pulling the start cord of the petrol motor. (BMP-215B)
The throttle lever of the petrol engine is fixed to run at the correct RPM.
Check if the drum turns the right direction. (Only BMP-215E)
Slowly let down the quick lift lever.
Turn the fine adjustment clockwise until the desired scarifying depth is
reached.
5.3 Operating during scarifying
During scarifying there has to be a light pressure on the steering handle. This will ensure maximum grip on the
back wheels. Do not pull on the steering handle because this will cause the rear wheels to skid, and also
increases the change of operator fatigue.
Pull the brake handle only when the machine progress is obstructed, by for example sandy subsoil.
Carry out work in parallel tracks in such a way that the dust hose and electric cable do not become twisted.
The next figure shows the recommended working paths leading away from the dust collector.
1
Dust collector
2
Dust hose and
electric cable
3
Scarifying / milling
machine
All persons in the proximity of the machine must wear safety glasses with lateral
protection as well as safety shoes and ear protection. The operator is obliged to wear
close-fitting protective clothing and a dust mask.

16
Make sure that no vehicles, such as forklift trucks and other equipment run over the electric cable and the dust
hose.
The selection of the correct advancing speed of the machine is important for a good result. In the case that the
surface has different characteristics (e.g. different hardness or different coating thicknesses), a uniform result
can be achieved by varying the advancing speed during scarifying / milling.
The advancing speed depends on the material of the surface to be treated and the desired profiling.
The correct advancing speed can be found out by observing the treated surface and varying the speed during
the scarifying / milling process.
Slight profiling on concrete requires a higher speed than coarse profiling.
5.4 Switch off the machine
Pull the quick lift lever up and turn the fine adjustment till the drum does not hit the ground anymore.
Push the red button (BMP-215E) or switch the On-Off button at the front of the petrol motor to Off.
(BMP-215B)
Switch off the dust collector.
Disconnect the power supply.
Pay attention that all twisting and turning machine parts have reached a standstill before inspection or
maintenance duties are carried out.

17
6. Maintenance
Please read the OWNER’S MANUAL of the petrol engine for the proper maintenance schedules.
Pay attention to Chapter 3 "Safety" during maintenance and repair works.
Failures due to inadequate or incorrect maintenance may generate very high repair costs and long standstill
periods of the machine. Regular maintenance therefore is imperative.
Operational safety and service life of the machine depends, among other things, on proper maintenance.
The following table shows recommendations about time, inspection and maintenance for the normal use of the
machine.
Operating hours/
time period
Inspection points, maintenance instructions
12 h after repairing
Check all accessible screw connections for tight seat.
Daily and prior to
starting work
Check that all safety devices working adequate.
Check whether there is any foreign matter in the scarifying drum.
Clean the scarifying drum specially in case of moist surfaces.
Check the scarifying drum, lateral axles, tools and housing for wear.
Check the tension of the belt, stretch again if necessary.
Check the electric connections for sediments of dirt or foreign bodies.
Check the electric motors for dirt and other contaminants.
Check all safety devices working adequate.
Check the function of the residual current operated device.
Check the hose connections for tightness and fixed seat.
Make sure that the dust bin is emptied
Annually
Full overhaul and cleaning of the complete machine.
The time indications are based on uninterrupted operation. When the indicated number of working hours is not
achieved during the corresponding period, the period can be extended. However a full overhaul must be
carried out at least once a year.
Due to different working conditions it can’t be foreseen how frequently inspections for wear check’s,
inspection, maintenance and repair works ought to be carried out. Prepare a suitable inspection schedule
considering your own working conditions and experience.
Pay attention to unusual noises or strong vibrations. Check for the cause of every big change. Call a technician
if you have doubts about the cause or when a repair without a technician seems not possible without damages.
Only use genuine Blastrac spare parts.
Our specialists will be happy to assist you with more advice.
Prior to any repair works on the machine and its drives, secure the machine against
unintentional switching on. Put the machine to its safety off position.
The machine is in a safe condition when it cannot generate any hazard.
Follow additional operating and maintenance instructions of Original Equipment Manufacturers if
included during your service and maintenance work.
Further is advised:
Store the cleaned and dry machine in a dry and humid free room. Protect the electrical motors from moisture,
heat, dust and shocks.

18
All repair work must to be done by qualified Blastrac personnel, this to guarantee a safe and reliable machine.
Any guarantee on the machine is expired when:
Non original Blastrac parts have been used
Repair work is not done by qualified Blastrac personnel
Changes, add on’s or conversions are undertaken without written permission of Blastrac BV
Screws, bolts etc. that have been removed must be replaced with those of the same quality, strength, material
and design.
Do not weld, flame cut or perform grinding works on or near the machine. Danger of fire or explosion exists!
Provide adequate ventilation when working in a confided space.
Secure the maintenance area if necessary.
Prevent premature wear by keeping the machine as dust free as possible. Clean the machine for this
reason regularly with a dust collector
Clean the machine every day with air and non-aggressive materials. Never use a high pressure water cleaner
to clean the machine.
6.1 The scarifying drum
The scarifying drum is a very important component of your scarifier, so you should pay special attention while
maintaining and repairing.
The main shaft has to be cleaned and lubricated when you replace the scarifying drum, so that any rust or
sediment can’t complicate your work when you change the drum the next time.
If the scarifier drum should be disassembled in order to rearrange it in a different way or to replace wear
parts, it is absolute necessary to observe the quantity and quality of flails / cutters and spacers as described in
the assembly plans shown in the service manual. Also, pay attention that the bores on the cover plate for the
lateral axle are not worn out and all screws are tightened. In order to obtain a uniform and perfect scarifying
pattern on the surface , you need to adjust the correct scarifying working depth, check the correct assembly of
the scarifying drum as well as the appropriate selection of tools for the surface to be treated.
If the scarifying drum is not uniformly assembled the machine will become unbalanced and excessive wear,
will arise. Blastrac will not feel responsible for any faulty parts, that are damaged caused by inappropriate
assembly.
6.2 Belt drive
The tension of the synchronous belt will be carried out through the
motor plate. the motor can be lifted and let down with the 4 hexagon
nuts, which are located above and under the motor plate. The
synchronous belt will be stretched and loosened by lifting and letting
down the motor.
Pay attention that the synchronous belt lies parallel and has the
correct tension. The belt has the correct tension If you could
press it in for approx. 5mm.

19
7. Troubleshooting
Fault
Possible cause
Remedy
Excessive vibration
or/and Unusual noises
Imbalance due to worn or broken tools.
Defective bearing.
Wrong tension of the belt.
Defective motor
Replace all worn or broken parts.
Check the bearing on the axle drive
shaft and replace if necessary.
Check the tension of the belt, replace
the belt if necessary.
Replace the motor
Reduced or no scarifying
performance
Tools have reached the maximum
permissible wear.
Inappropriate tools for the application.
In case of internal combustion engine, follow
the information of the manufacturer
Replace the worn parts.
Replace the tools with appropriate tools
for the surface to be treated.
Motor does not switch on
Missed phase
Defective Component.
Check the mains power supply and try
to switch on again.
Find fault and replace defective
component.
Follow the enclosed information of the
manufacturer
Motor triggers while
running
Motor protections switch triggered because
of overload .
Motor has a defect.
Reduce additional load .
Check the motor.

20
8. Technical data
BMP-215E
400V
BMP-215E
230V
BMP-215E
110V
BMP-215B
Power consumption
1.8 kW
1.8 kW
1.8 kW
4 kW at 3600 min-1
Electrical connection / fuel
400V / 50 Hz
For CEE plug 5-
pol. Fuse
protection 16A
230V / 50 Hz
For shock proof plug.
Fuse protection 16A
110V / 50 Hz
For shock proof
plug. Fuse
protection 31A
Unleaded petrol
Octane 86 or higher
Lubricant:
SAE 10W-30
Working width
215 mm
215 mm
215 mm
215 mm
Rotation speed drum
1700 min-1
1700 min-1
1700 min-1
1700 min-1
Length
900 mm
900 mm
900 mm
900 mm
Width
380 mm
380 mm
380 mm
380 mm
Height
1160 mm
1160 mm
1160 mm
1160 mm
Weight
58 kg
58 kg
58 kg
58 kg
Sound at operators pos.
Uncertainty
LpA 98 dB(A)
K 5 dB(A)
LpA 98 dB(A)
K 5 dB(A)
LpA 98 dB(A)
K 5 dB(A)
LpA 98 dB(A)
K 5 dB(A)
Sound power level
Uncertainty
LwA 111 dB(A)
K 5 dB(A)
LwA 111 dB(A)
K 5 dB(A)
LwA 111 dB(A)
K 5 dB(A)
LwA 111 dB(A)
K 5 dB(A)
Vibration level
Uncertainty
ahv 5,8 m/s²
K 0,9 m/s²
ahv 5,8 m/s²
K 0,9 m/s²
ahv 5,8 m/s²
K 0,9 m/s²
ahv 5,8 m/s²
K 0,9 m/s²
Ambient temperature
-5°C ~ 40°C
-5°C ~ 40°C
-5°C ~ 40°C
-5°C ~ 40°C
Dust hose connection
Ø50 mm
Ø50 mm
Ø50 mm
Ø50 mm
Suitable filter unit
Contact Blastrac BV
We will assist you with a good advice
Design and specifications are subject to change without notice by Blastrac BV
IMPORTANT NOTES:
Noise and vibration measurements were taken during heavy operation on concrete. The noise and vibration
levels depend on the working depth, which is in turn determined by the unevenness of the surface. The impact
force of the tools onto the surface is the biggest factor in both noise and vibration levels.
The indicated values are measured on new machines. Noise and vibration levels will vary in different
circumstances. Area influences like open outside or closed inside space, ambient temperature, different
surfaces to be treated, daily use, different tools or accessories, poor maintenance, etc. will give different
values at all time and could increase the exposure level over the total working period.
The declared vibration and noise emission levels represent the main applications of the machine. The values
may be measurements from a representative sample of technically comparable machinery. The values may be
used for a preliminary assessment of exposure.
A precise estimation of the level of exposure to vibration and noise should also take in account the times when
the machine is switched off or even running, but not actually in use. This may significantly decrease the
exposure level over the total working period.
Table of contents
Other Blastrac Lawn And Garden Equipment manuals