Blaupunkt BPK-VCBB1XW User manual

BLUEBOT XWIN VIBRATE INSTRUCTION MANUAL
Robot Window Cleaner BPK-VCBB1XW
Enjoy it.

Congratulations! And thank you for buying a great new product from Blaupunkt.
The BLAUPUNKT BLUEBOT XWIN VIBRATE is a wonderful helper to clean both framed and
frameless windows “because of its gap sensors”. Its Unique and patented Vibrating-
mopping pad removes stains and dirt easier and can be compared with the movements
of a human hand. Its strong suction power gets rid of dirt. And in case the dirt is
excessive you can spray cleaning liquid on the window and/or its mopping pad for even
better results. It can be controlled easily with the remote control or by ONE button on
the robot itself. The XWIN is fun to work with and can help you to reduce the moments
that you need to climb ladders in case of tall or hard to reach windows. Mechanical
Obstacle detect sensors makes it possible to operate the robot in sunlight. The XWIN
makes cleaning your windows a pleasure! Its fun to operate and can take care of a big
part of the window clean job for you. Of course a window clean robot also brings some
manual work for its users. You have to attach the robot to the window, connect its
power-and fix its safety cord and in case of excessive dirt its recommended to spray
cleaning liquid on your mopping pad or the window or surface firstly to get better
results.
This manual is specific to the BLAUPUNKT BLUEBOT XWIN VIBRATE robot window cleaner
Intended use. Hereafter the Blaupunkt Bluebot XWIN VIBRATE robot window cleaner will
be referred to as ‘the robot’. This manual is intended to help the user to set up and
operate the robot. We kindly ask you to carefully read the information in this manual
before using the robot, to familiarize yourself with its intended use and potential dangers
and risks.
Support information
support.blaupunktrobotics.eu
+31 (0)20 894 33 15
support@blaupunktrobotics.eu
We also have a live chat feature on our website!
© 2018 Blaupunkt XWin UM
All rights reserved. No parts of this work may be reproduced in any
form or by any means – (graphic, electronic, or mechanical, including
photocopying, recording, taping, or information storage and retrieval
systems) – without the written permission of the publisher.

Contents
1. Important Safety Instructions.....................................................................1
2. Package Contents and Technical Specifications.................................2
2.1 Package Contents........................................................................................2
2.2 Specifications..............................................................................................2
2.3 Product Diagram.........................................................................................3
3. Operating XWIN .............................................................................................4
3.1 Notes before Cleaning................................................................................4
3.2 Attach Cleaning Pad....................................................................................5
3.3 Assemble Power Adapter............................................................................5
3.4 Install Safety Tether.....................................................................................5
3.5 Place Safety Pod.........................................................................................6
3.6 Spray Cleaning Solution..............................................................................6
3.7 Start............................................................................................................7
3.8 Pause..........................................................................................................8
3.9 Stop............................................................................................................9
4. Maintenance........................................................................................................10
4.1 Cleaning Pad...............................................................................................10
4.2 Fan, Sensors and Squeegees.......................................................................10
4.3 Driving Treads.............................................................................................11
5. Status Indicator Light and Sounds...................................................................12
6. Troubleshooting...............................................................................................13

1
When using the Robot, basic precautions should always be followed, including the following:
READ ALL INSTRUCTIONS BEFORE USING THIS ROBOT. SAVE THIS INSTRUCTION MANUAL.
1. This Robot is not intended to be used by children or anyone lacking knowledge on proper use.
Supervision may be necessary. Do not allow children to play with the robot.
2. Do not use the robot in extremely hot or cold environments (below 0˚C/32˚F or above40˚C/104˚F). The Appliance
can be used to clean outside windows if it is properly tethered to the Safety Pod, winds are calm, and it is not
raining or snowing.
3. Please ensure that the robot is plugged in while it is cleaning. The robot has a Back-Up Battery that charges during
use. The Back-Up Battery powers the robot if it becomes unplugged or the electricity fails.
4. Do not leave the robot unattended when it is plugged in.
5. For household use ONLY. Do not use the robot in commercial or industrial environments.
6. Do not use the robot on cracked glass.
7. Only use accessories recommended or supplied by Blaupunkt Robotics. Only use the Power Adapter supplied
by Blaupunkt Robotics. Please make sure your power supply voltage matches the power voltage marked on the
Power Adapter.
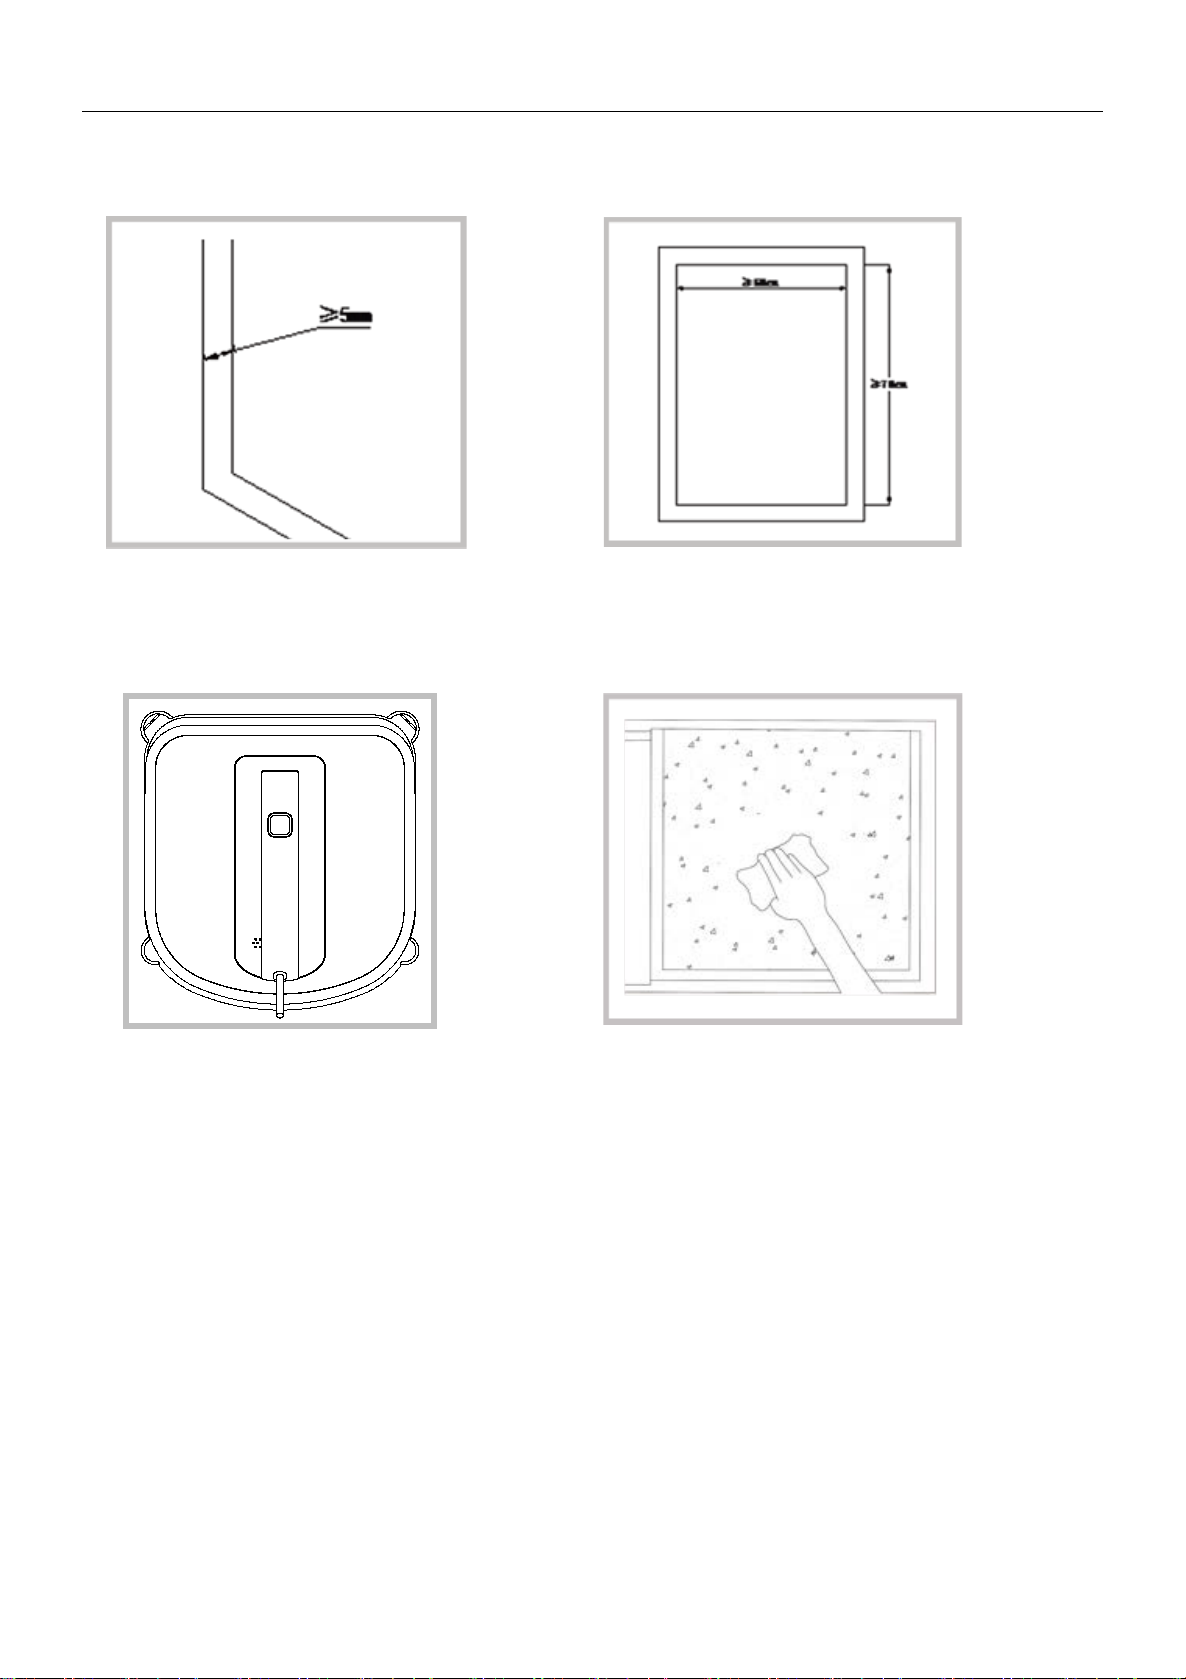
8. Do not use the robot on a framed window with a frame smaller than 5mm (0.2 inches).
9. Do not use the robot on wet or greasy windows.
10. Store the robot away from heat and flammable materials.
11. Do not use the robot if it does not firmly attach to the glass or has visible signs of damage.
12. To reduce the risk of electrical shock, do not put the robot in water or other liquid. Do not place or store the robot
where it can fall or be pulled into a tub or sink.
13. Do not touch power plug or the robot with wet hands.
14. Do not charge the robot in extremely hot or cold environments, or it may affect battery life span.
15. When charging the robot, do not place it on other electrical appliances and keep it away from fire and liquid.
16. Take care not to damage the power cord. Do not pull on or carry the robot by the power cord, use the power
cord as a handle, close a window on the power cord, or put heavy weights on the power cord. Keep power cord
away from hot surfaces.
17. Do not use with a damaged power cord or receptacle. Do not use the robot if it is not working properly, has been
dropped, damaged, or come in contact with water. It must be repaired by the manufacturer or its service agents
In order to avoid a hazard.
18. If the supply cord is damaged, it must be replaced by the manufacturer or its service agent in order to avoid a hazard.
19. The plug must be removed from the receptacle before cleaning or maintaining the robot. Do not unplug the
Power Adapter by pulling on the power cord.
20. The Back-Up Battery must be replaced by the manufacturer or its service agent in order to avoid a hazard.
21. The Back-Up Battery must be removed and discarded according to local laws and regulations before disposal of
the robot.
22. The robot must be disconnected from the receptacle before removing the battery for disposal of the robot.
23. Please dispose used batteries according to local laws and regulations.
24. Do not incinerate the robot if it is severely damaged. The battery can explode in a fire.
25. The robot must be used in accordance with the directions in this Instruction Manual.
Product manufacturer cannot be held liable or responsible for any damages or injuries caused by improper use.
1. Important Safety Instructions

2
2.1 Package Contents
2.2 Unit Specification
Model No BPK-VCBB1XW
Working Voltage 24V DC Rated Power 75W
Remote Control
Rated output voltage 3V DC
Power Adapter: GQ90-240375-E2
Input:100-240v~50/60Hz 2.0A Max Output:24V DC 3.75A
* Technical and design specifications may be changed in the course of continuous product improvement.
2. Package Contents and Technical Speci
XWIN Power Adapter Instruction Manual Extension Cord (1.5m/4’11
Safety Pod and Tether Remote Control Cleaning Pads Cleaning Solution

3
2.3 Product Diagram
XWIN Robot
XWIN Remote Control
1. Direction Control Stick
2. START/PAUSE Button
3. Wheel Clean Button
4. Right Part Clean Button
5. N Cleaning Mode Button
6. Z Cleaning Mode Button
7. Repeat Clean Button
8. Undefined
2. Package Contents and Technical Specific
1、前档
2、状态指示灯
3、开始/暂停开关
、手柄
、升级端口(售后专用)
6、音孔
7、后档
8、电源线
9、防跌落感应器
10、前擦布
11、刮条
12、擦窗布
13、风机
14、驱动轮
15、吸力传感器
16、底部电源开关
17、滑轮
18、底部状态指示灯
1、前档
2、状态指示灯
3、开始/暂停开关
、手柄
、升级端口(售后专用)
6、音孔
7、后档
8、电源线
9、防跌落感应器
10、前擦布
11、刮条
12、擦窗布
13、风机
14、驱动轮
15、吸力传感器
16、底部电源开关
17、滑轮
18、底部状态指示灯
1. Front Bumper
2. Status Indicator Light
3. START/PAUSE Button
4. Handle
5. Upgrade port(for after-sale service)
6. Speaker
7. Rear Bumper
8. Power Cord
9. Edge Detection Sensors
10. Cleaning Pad
11. Squeegees
12. Cleaning Pad
13. Fan
14. Driving Treads
15. Suction Sensor
16. Bottom Power Switch
17. Side Rollers
18. Status Indicator Light

4
3.1 Notes Before Cleaning
3. Operating XWIN
D
o not use XWIN on a framed window
with
a frame smaller than 5mm (0.2").
XWIN
can clean framed or frameless
g
lass, larger than 50 x 50cm (19.7’’ x
19.
7
’’).
If
the window is covered with
e
xcessive dirt, clean a small area on
the
glass before usage and place
XWIN
there.
If XWIN ’s Status Indicator Light flashes
RED
after powering ON, please connect
The power cord to
the robot
and pow
er
on.
If the blue lights flashes, the
Back-Up
Batte
ry requires charging. Keep XWIN
plugged
in to charge the Back-Up Battery
until
the Status Indicator Light turns to
solid BLUE(a
bout 2 hours).
XWIN
will not clean
when the RED light
flashes
.

5
Please ensure there is a 13cm (5.1") clearance between the glass and obstacles in the room like curtains or furniture.
The robot can clean horizontally mounted glass but only when using the Direction Control Buttons on the Remote
Control.
The robot can clean glass mounted at an angle but may not operate normally; in such a case, a person should be
in the vicinity to assist should there be a problem.
Do not use the robot upside down.
Please refer to the manufacturer's care and cleaning instructions before using robot on glass with an uneven
surface, such as frosted, textured, patterned, or coated glass. Blaupunkt Robotics cannot be responsible for
damage due to improper use on these surfaces.
3.2 Attach the Cleaning Pad
3.3 Assemble the Power Adapter
3.4 Install the Safety Tether
A: Power Cord B: Power Adapter Power Cord C: Safety Pod D: Safety Tether
Turn the robot over and attach the Cleaning Pad to the bottom of
the robot smoothly. The white side of the Cleaning Pad attaches to
the Velcro and the gray microfiber side faces out. Make sure the
Cleaning Pad does not cover the Edge Detection Sensors, front
bumper sensor and rear bumper sensors.
A
B
C
D
3. Operating XWIN

6
CAUTION:
* If the length of the power cord restricts robots movement, a robot Extension Cord can be used. Disconnect end A
and end B, and connect them with both ends of the Extension Cord respectively and tight.
* Only one Extension Cord can be used for the robot.
3.5 Place the Safety Pod
Wipe the surface of the Safety Pod’s suction cup clean with the provided Finishing Cloth.
3.6 Spray Cleaning Solution
CAUTION:
* The robot is recommend to be used with XWIN Cleaning Solution. Using other cleaners may reduce robots
performance.
* Spray the upper and lower sides of the Cleaning Pad with the provided XWIN cleaning Solution. After
spraying, wipe the bottom of the robot with a dry cloth.
B
A
1Loop one end of the
Safety Tether to end A
on the robot Power
Cord and tight.
2
Connect end A and end B and tight.
3
Loop the other end of the Safety Tether
around the Safety Pods channel and
pull it tight.
If the robot is being used to clean an inside window:
Press the Safety Pod FIRMLY on the top corner of the inside
window. Make sure the Safety Pod is attached securely in place.
If the robot is being used to clean an outside window:
Press the Safety Pod FIRMLY on the inside of the window being
cleaned. Make sure the Safety Pod is attached and securely in place.
3. Operating XWIN

7
3.7 Start
1. Plug in Robot
2. Power ON
Move the Power Switch to the "--" position. Robot is powered
ON when the Status Indicator Light flashes BLUE.
3.3Place on the Glass
Place robot on the window at least 10cm(4") from window
corners or other obstacles. Robot is successfully attached to
the window when the Status Indicator Light glows continuous BLUE.
4. Start
Start the robot using one of the methods below.
Press the START/PAUSE button on robot or on the Remote
Control to begin cleaning. The robot will automatically
Chooses “ N ” or " Z " cleaning path.
Choose your own cleaning path by pressing the “ N ” or " Z "
Cleaning Mode Button on the Remote Control to begin cleaning.
CAUTION: * Do not unplug the Robot while it is cleaning.
CAUTION: * Keep objects away from robot Fan to avoid
blockage.
CAUTION: * Please make sure there is a 13cm (5.1") c
learance between the glass and obstacles in the room li
ke curtains or furniture.
3. Operating XWIN

8
Follow above preparation steps and stick the robot onto window glass.
1. Press the robots left rear bumper without release, at the same time press the START/PAUSE button on
robot handle. The START/PAUSE button will begin to twinkle between blue and red light. Then release your
two hands.
2. Press the “ Z ” and "Repeat Clean" button on the remote control at the same time.
3. The START/PAUSE button will turns to solid red light. At the same time the speaker will buzz. It means
the remote control successfully matched code with the robot.
3.8 Pause
" N " Cleaning Mode is Best
for tall windows robot cleans in an "
N " path.
" Z " Cleaning Mode is best
for wide windows. Robot
cleans in a " Z " path.
CAUTION: If the remote control is not able to command the robot. Please check below steps match
code for robot and the remote control.
Direct robot to move forward, backward,
left and right using the Direction Control
buttons on the Remote Control when
Paused. Robot cleans when the direction
control buttons are used. Switch to a
different Cleaning Mode using the Cleaning
Mode Buttons on the Remote Control
when Paused.
Pause robot during cleaning by pressing the
START/PAUSE button on the robot or on the
Remote Control.
3. Operating XWIN

9
3.9 Stop
When the robot completes its cleaning cycle, it returns to the place it started and beeps.
CAUTION: If the Robot has a problem and the alarm Light flashes RED, please firstly check if the powerc
ord connected well and if the robot is powered on. The LED light should be in blue color if the p
ower connection is good, and it will automatically start cleaning. If the RED light keeps flashing
though power connection is good, please use remote control direction button to operate robot to
leave current position. When the blue light turns solid, press START/PAUSE button to restart.
2Power OFF
Move the Power Switch to the "o"
position.
3Remove the Safety Pod.
Polish away any marks left on the glass
from the Safety Pod’s removal with the
provided Finishing Cloth.
4Unplug Robot
1Remove Robot
Grasp robot’s Handle. Press and hold for
approximately 5 seconds and the fan will
stop. Remove robot from the window.
Polish away any marks left on the glass
with robot’s removal with a mopping
cloth.
3. Operating XWIN

10
Before performing cleaning and maintenance on robot, Power OFF and unplug robot from the glasses.
4.1 Cleaning Pad
Turn Robot over and remove the Cleaning Pad. Soak the Cleaning Pad in 20℃, clean water for 2 minutes. Hand wash
with mild detergent and lay flat to dry. Allow it to dry completely before re-attaching it to robot.
CAUTION :
Do NOT use a wet Cleaning Pad on robot or it may slip on the window. Washing the Cleaning Pad regularly can
extend its service life. If the Cleaning Pad becomes worn or no longer fits properly within the Velcro area, replace it
with a new one to achieve best cleaning performance.
4.2 Unit Bottom Maintenance
4. Maintenance
Fan
Turn
robot over and wipe any debris from
the
Fan with a dry cloth to maintain suction
power
well.
Side Rollers
Turn
robot over and wipe the four Side
Rollers
with dry cloth to maintain their
best
effect.
Edge
Detection Sensors
Turn
robot over and wipe the five Edge
Detection
Sensors clean with a dry cloth to
maintain
their effect.
Squeegees
Turn
robot over and wipe the squeegees
with
a dry cloth to maintain their effect.

11
4.3 Driving Treads
Turn robot over and move the Power
Switch
to "--" position. The fan motor
will shut down about 8 seconds later.P
ress
the "Wheel Clean" button on
remote control
to start to clean the
wheels.
Inspect the Driving
Treads
by using the START/PAUSE button
on
the Remote Control. Stop the Driving
Treads
and use dry cloth clean it if dirt
is seen on the Treads.
Move the Power
Switch
to the "O" position.
4. Maintenance

12
Twinkles Blue (slowly) Robot will not clean until the Back-Up Battery is properly charged.
Flashes Blue (quicker) Robot is powered ON and ready to be placed on the glass.
Solid Blue Robot has successfully adhered itself to the glass and is ready to clean.
Flashes Red Robot power connection has a problem or the vacuum is not good enough. Please refer to section 6.
Circle Running LED light
Running LED lights will be lights on in counterclockwise sequence while Robot was turned on.
Running LED lights turns to solid when vacuum is enough and ready.
Only partial Running LED lights on when vacuum is not enough and not ready.
5. Status Indicator Light and Sounds

13
No
Malfunction
Possible Causes
Solutions
1
Status Indicator light flashes
BLUE when Robot adhered
to glass
Cleaning pads are installed
not properly Remove the cleaning pad and adhere neatly onto the Velcro.
Edge detection sensors with
problem
Check if the edge detection sensors are stuck by cleaning pad or dirt.
There is too much dirt and debris on
the window.
Clean the window by hand to have a clean area for the robot to adhere
to firstly.
2
Status Indicator light flashes
RED
Interruption of electricity while
robot was cleaning due to power
failure, plug displacement, or loose
Connection to the Power Adapter.
A. Connect Robot to the Power Adapter and plug into the wall outlet.
Press Start/Pause button on robot or on the remote Control. Robot will
resume cleaning.
B. In case of power failure, and the above solution does not work, please use
The Direction Stick on the Remote Control to direct robot to a position on the
Window where you can safely reach it, turn off the fan and remove it from
the window. If power has resumed, place robot on the window again and
restart.
CAUTION: *It is risky to use direction stick command unit, please make
sure that you are standby close to the robot
3
Robot has moved over a problem
area and is losing suction.
Please use the Direction Stick on the Remote Control to direct robot to a
Safety position .
CAUTION: *It is risky to use direction stick command unit, please make
sure that you are standby close to the robot
Edge Detection Sensors are with
problem
Please check if edge detection sensors are stuck and clean the dirt on it. If
it still does not work, please contact customer service.
4 Robot moves in an irregular
Pattern during cleaning.
There is too much dirt and debris on
glass window.
A. Clean the Driving Treads as described in section 4.
B. Replace the Cleaning Pad and restart the cleaning cycle.
5 Remote control does not
work
While the robot is in cleaning
mode, only the "START/PAUSE"
button works
Press "START/PAUSE" button to stop cleaning first, then press other
buttons to command the robot.
Unit didn’t matched code with
Remote control
6. Troubleshooting
Table of contents
Other Blaupunkt Ultrasonic Jewelry Cleaner manuals
Popular Ultrasonic Jewelry Cleaner manuals by other brands

Flexco
Flexco U-Type Secondary Cleaner Installation, operation and maintenance manual

Makita
Makita CL108FD instruction manual

Tower Hobbies
Tower Hobbies AQUAJETPLUS TSC10 quick start guide

Harbor Freight Tools
Harbor Freight Tools Hydrostar Drain Monster Owner's manual & safety instructions

Eye Vac
Eye Vac EYE-VAC HOME user manual

Makita
Makita DCL142 instruction manual

Strend Pro
Strend Pro W05 instruction manual

Virax
Virax VAL 95 Instructions for use

Lippert Components
Lippert Components Flow Max 40V Portable Power Cleaner Installation and owner's manual

ASONIC
ASONIC PRO 150MF user manual

AL-KO
AL-KO MB 2010 Translation of the original instructions for use

IRIS
IRIS IC-FAC2U user manual