Blue Seal Evolution Series User manual

Blue Seal Evolution Series E43 / E44 Electric Fryers Service Manual © Copyright Moffat Ltd. June 2016.
Amendment 7
Service Manual
Electric Fryers
E43 / E43E and E44 / E44E

Blue Seal Evolution Series E43 / E44 Electric Fryers Service Manual © Copyright Moffat Ltd. June 2016.
Amendment 7
ALL INSTALLATION AND SERVICE REPAIR WORK MUST BE CARRIED OUT BY QUALIFIED PERSONS
ONLY.
WARNING:
MAKING ALTERATIONS MAY VOID WARRANTIES AND APPROVALS.
IMPORTANT:

Blue Seal Evolution Series E43 / E44 Electric Fryers Service Manual © Copyright Moffat Ltd. June 2016.
Amendment 7
This manual is designed to take a more in depth look at the E43 and E44 electric fryers for the purpose of making the units more
understandable to service people.
There are settings explained in this manual that should never require to be adjusted, but for completeness and those special cases
where these settings are required to change, this manual gives a full explanation as to how, and what effects will result.
Section Page Number
1. Specifications ........................................................................................................................... 3
2. Installation ............................................................................................................................... 8
3. Operation ................................................................................................................................ 10
4. Maintenance ........................................................................................................................... 12
4.1 Preventative Maintenance
5. Fault Finding Guide ................................................................................................................ 13
5.1 E43 - Single Tank Fryer - Manual Control
5.2 E44 - Double Tank Fryer - Manual Control
5.3 E43E - Single Tank Fryer - Electronic Control
5.4 E44E - Double Tank Fryer - Electronic Control
5.5 Fault Diagnosis
6. Service Procedures ................................................................................................................. 19
6.1 Access
6.2 Replacement
6.3 Adjustment / Calibration
7. Accessories ............................................................................................................................. 27
8. Replacement Parts ................................................................................................................. 28
8.1 E43 - Single Tank Fryer - Manual Control
8.2 E43E - Single Tank Fryer - Electronic Control
8.3 E44 Double Tank Fryer - Manual Control
8.4 E44E - Double Tank Fryer - Electronic Control
9. Wiring Diagrams..................................................................................................................... 45
10. Service Contacts ..................................................................................................................... 49
Appendix A: Controller Programming ............................................................................................. 50
Contents

Blue Seal Evolution Series E43 / E44 Electric Fryers Service Manual © Copyright Moffat Ltd. June 2016.
Amendment 7

3
1
Specifications
Blue Seal Evolution Series E43 / E44 Electric Fryers Service Manual © Copyright Moffat Ltd. June 2016.
Amendment 7
LEGEND
- Electrical connection entry point
Dimensions shown in millimetres.
External Dimensions: E43 Fryer

1
Specifications
4
Blue Seal Evolution Series E43 / E44 Electric Fryers Service Manual © Copyright Moffat Ltd. June 2016.
Amendment 7
External Dimensions: E44 Fryer
LEGEND
- Electrical connection entry point
Dimensions shown in millimetres.

5
1
Specifications
Blue Seal Evolution Series E43 / E44 Electric Fryers Service Manual © Copyright Moffat Ltd. June 2016.
Amendment 7
External Dimensions: E43E Fryer
LEGEND
- Electrical connection entry point
Dimensions shown in millimetres.

1
Specifications
6
Blue Seal Evolution Series E43 / E44 Electric Fryers Service Manual © Copyright Moffat Ltd. June 2016.
Amendment 7
External Dimensions: E44E Fryer
LEGEND
- Electrical connection entry point
Dimensions shown in millimetres.

7
1
Specifications
Blue Seal Evolution Series E43 / E44 Electric Fryers Service Manual © Copyright Moffat Ltd. June 2016.
Amendment 7
Electrical Supply
E43 E44
Oil capacity 27l
21.6kg
12l (per tank)
10kg (per tank)
Useable internal
dimensions of tank
(width x length)
365mm x 380mm 175mm x 380mm
Useable depth of oil 95mm 95mm
Tank Capacity
Model
Power Supply Total Power
Input
Amps
Voltage Type Frequency L1 L2 L3
E43 400-415 Vac 3 P+N+E 50 / 60 Hz 17 kW 23.6 23.6 23.6
E43E 400-415 Vac 3 P+N+E 50 / 60 Hz 17 kW 23.6 23.6 23.6
E44 400-415 Vac 3 P+N+E 50 / 60 Hz 17 kW
14 kW (Option)
23.6
19.4
23.6
19.4
23.6
19.4
E44E 400-415 Vac 3 P+N+E 50 / 60 Hz 17 kW
14 kW (Option)
23.6
19.4
23.6
19.4
23.6
19.4

2
Installation
8
Blue Seal Evolution Series E43 / E44 Electric Fryers Service Manual © Copyright Moffat Ltd. June 2016.
Amendment 7
Installation Requirements
NOTE: It is most important that this appliance is installed correctly and that operation is correct before
use. Installation shall comply with local electrical and health and safety requirements.
Blue Seal Deep Fryers are designed to provide years of satisfactory service, and correct installation is
essential to achieve the best performance, efficiency and trouble-free operation.
This appliance must be installed in accordance with National installation codes and in addition, in
accordance with relevant National / Local codes covering electrical, fire safety and health and safety.
Australia / New Zealand AS/NZS3000 - Wiring Rules.
United Kingdom: BS 7671 - Requirements for Electrical Installations.
Installations must be carried out by authorised persons only. Failure to install equipment to rele-
vant codes and manufacturers specifications in this section will void warranty.
Unpacking
Remove all packaging and transit protection from the appliance including all protective plastic
coating from the door outer panel and exterior stainless steel panels.
Check equipment and parts for damage. Report any damage immediately to the carrier and
distributor.
Report any deficiencies to the distributor who supplied the appliance.
Check that the available electrical supply is correct to that shown on the rating plate located on the inside
of the access door.
Check that the following parts have been supplied with the appliance:
E43 / E43E E44 / E44E
Baskets 2 2
Sediment Trays 1 2
Lid 1 1
Adjustable Legs 4 4
Drain Stick 1 1
Drain Extension 1 2
Location
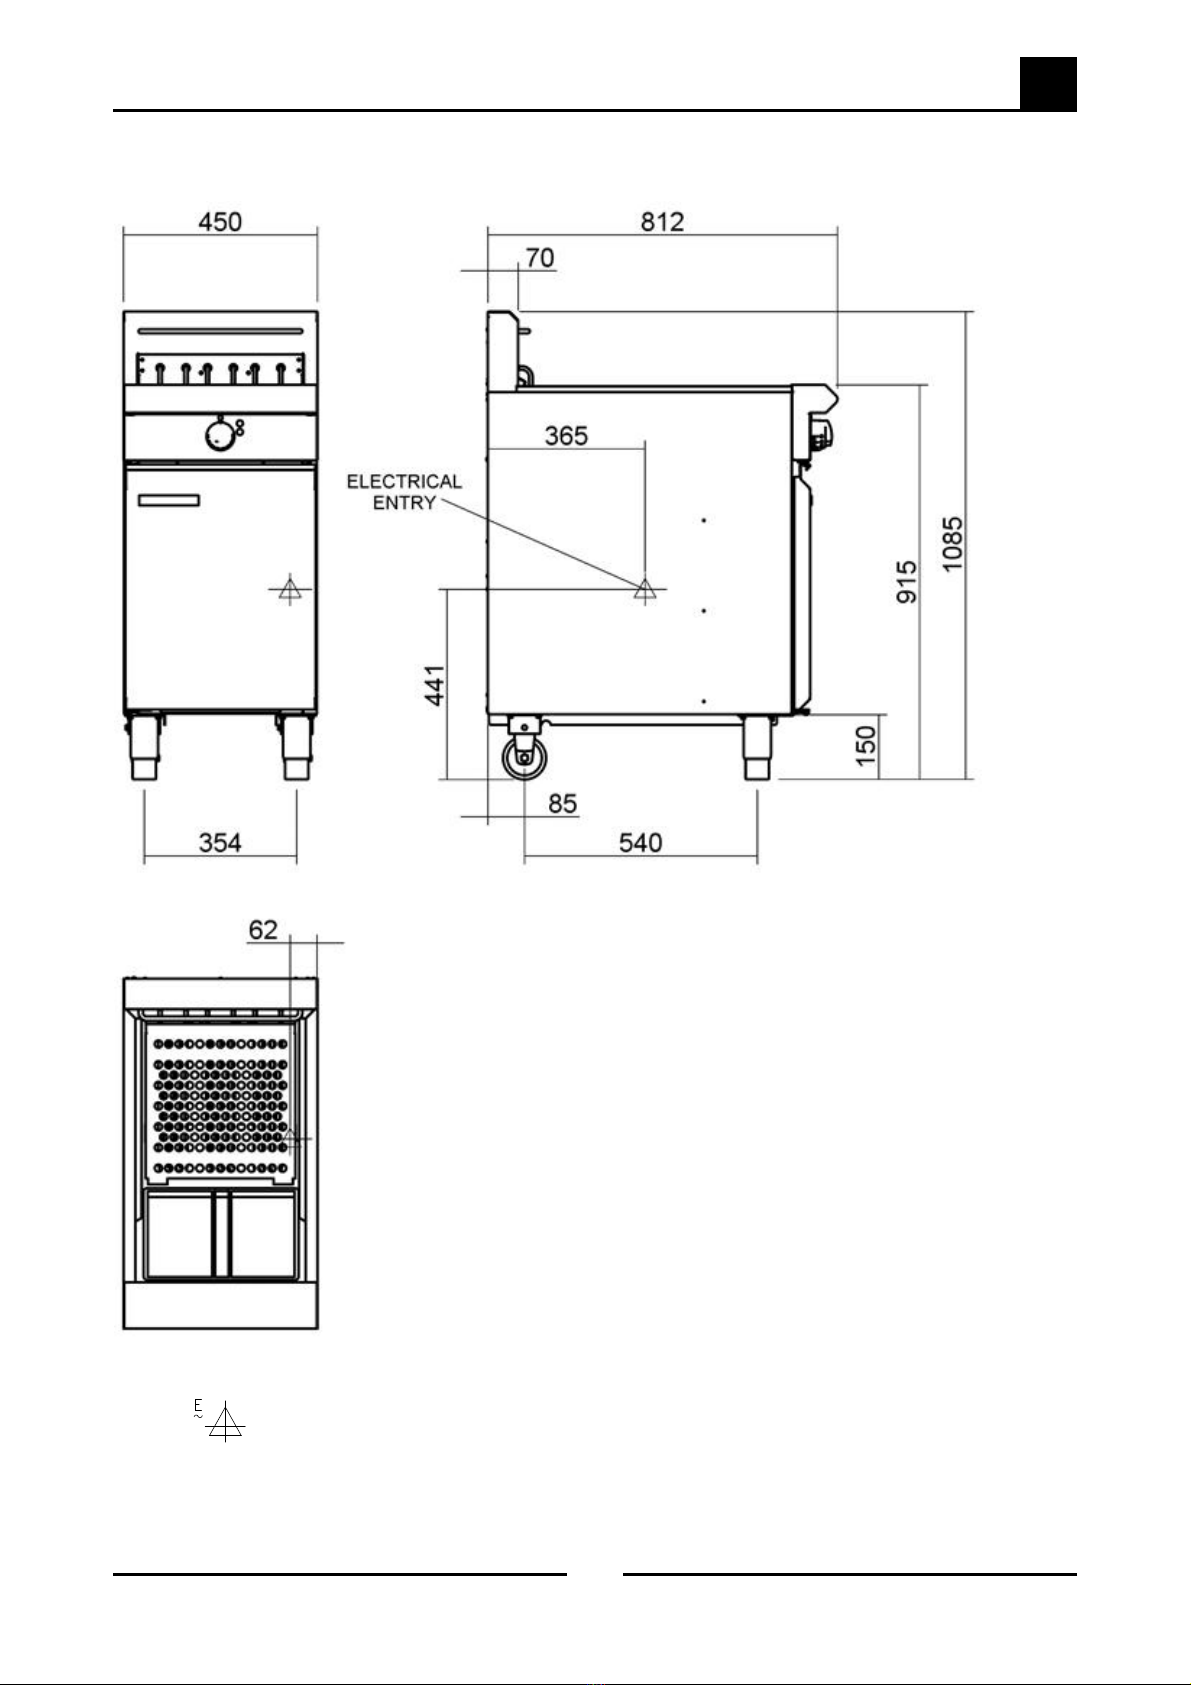
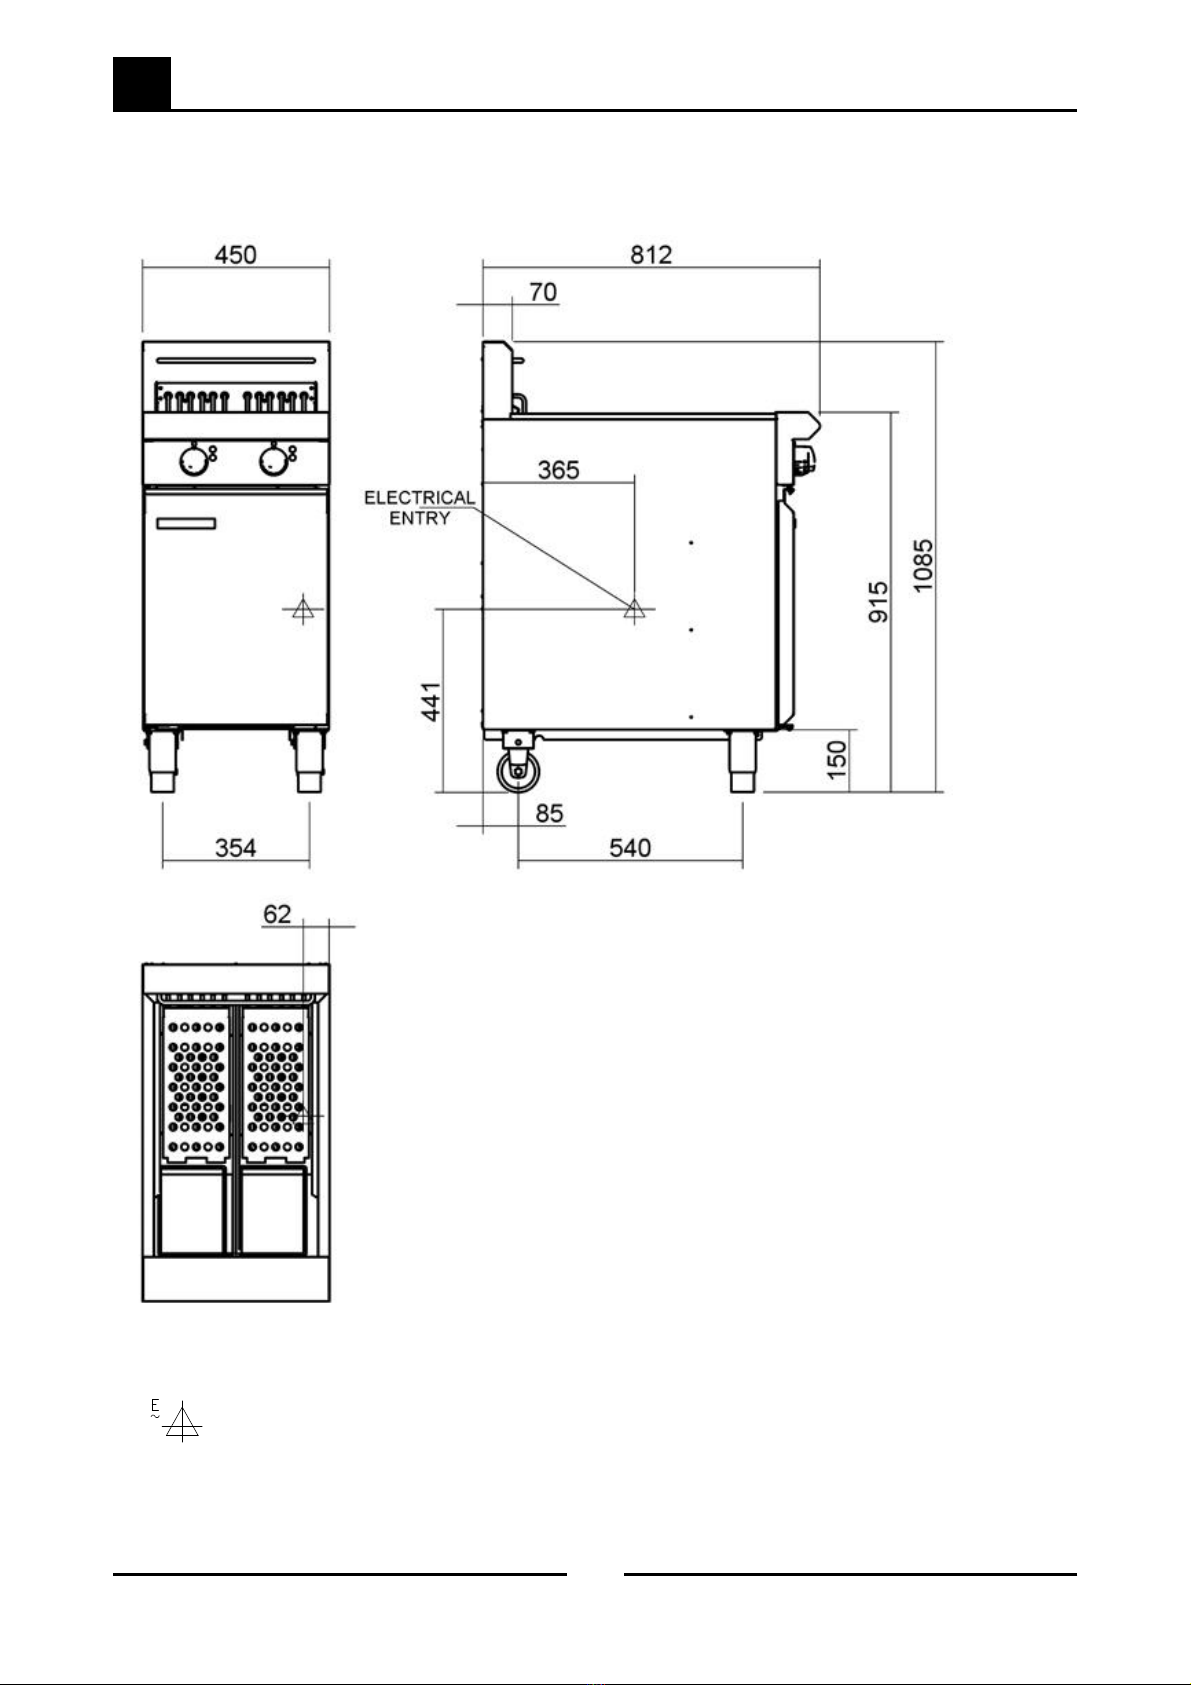
1. Any appliance requires adequate clearance and ventilation for optimum and trouble-free operation. The
minimum installation clearances shown below are to be adhered to.
2. Position the Deep Fryer in its approximate working position.
3. The legs must always be fitted. Ensure that the legs are securely attached.
Clearances
NOTE:
Only non-combustible materials can be used in close proximity to this appliance.
In order to facilitate easy operation, drainage and servicing of the appliance, a minimum
of 600mm clearance should be maintained at the front of the appliance.
Assembly
This model is delivered completely assembled. Ensure that the legs are securely attached.
NOTE:
This appliance is fitted with adjustable feet to enable the appliance to be positioned
securely and level. This should be carried out on completion of the electrical connection. Refer to
the “Electrical Connection” section below.
Combustible Surface Non Combustible Surface
Left/Right hand side 50 mm 0 mm
Rear 25 mm 0 mm

2
Installation
9
Blue Seal Evolution Series E43 / E44 Electric Fryers Service Manual © Copyright Moffat Ltd. June 2016.
Amendment 7
Electrical Connection
NOTE: ALL ELECTRICAL CONNECTIONS MUST ONLY BE CARRIED OUT BY A QUALIFIED
PERSON.
Each fryer should be connected to an adequately protected power supply and isolation switch mounted adjacent
to, but not behind the fryer. This switch must be clearly marked and readily accessible in case of fire.
1. Check that the electricity supply is correct as shown on the Rating Plate attached to the inside of the
access door.
2. The supply terminal connections are located at the lower front of the fryer.
3. Open the door and remove the service panel (6 screws) located behind the drain valve(s) to allow
connection access for the electrical supply.
4. Bring the supply cable up through the grommet at the back of the fryer, and through the compression
type gland provided on the rear of the main electrical switchgear panel.
5. Connect the mains supply to L1, L2 and L3 switch connections for 3 phases.
6. Connect neutral and earth conductors to neutral stud and earth stud respectively.
7. For all connections ensure that conductors are secure and appropriately terminated.
8. Tighten the cable gland to secure against tension on the cable.
NOTE:
This appliance must be grounded / earthed.
Fixed wiring installations must incorporate an all-pole disconnection switch.
Commissioning
1. Before leaving the new installation;
a. Check the following functions in accordance with the operating instructions specified in the “Operation”
section of the User manual.
Check the current draw and loading for the equipment. Refer specification section for correct
electrical requirements.
Check that all the connections are correct and that all cover panels have been re-fitted.
Check that the unit functions in accordance with the operating instructions.
Ensure that the tank drain extension and this instruction manual are left with the appliance.
Ensure that all the relevant details and contacts have been added to the front of the User manual.
b. The thermostat operation check should be carried out by filling the fryer with oil/shortening to the
appropriate oil 'FILL LEVEL' mark at the rear of the tank and setting the thermostat to 180°C. Light the
pilot burners and turn on the elements in accordance with “Operation Instructions” found in the User
manual.
c. The calibration of the thermostat should be checked once the oil is up to temperature. If a discrepancy
is found, the thermostat calibration should be referred to the supplier.
d. Ensure that the operator has been instructed in the areas of correct operation and shutdown procedure
for the appliance.
NOTE:
If for some reason it is not possible to get the unit to operate correctly, turn off the
electrical power supply and contact a qualified service person. The supplier of this unit
will be able to recommend a suitable person.
Make sure that the electrical supply is turned off before any service or maintenance work
is carried out.

3
Operation
10
Blue Seal Evolution Series E43 / E44 Electric Fryers Service Manual © Copyright Moffat Ltd. June 2016.
Amendment 7
Electronic controls - E43E and E44E
3.1 Description of controls
Electronic Controller
See description of Electronic Controller
overleaf.
Operating the reset switches resets
the elements.
(One switch for each element. Press
to operate).
Turns power ‘ON’ and ‘OFF’ to the
unit. (Green LED Indicator illuminates
when switched ‘ON’).
Temperature
Cut-Out Reset
Switches
Located Behind Main Access Door
Mains Isolation
Switch
Manual controls - E43 and E44 Temperature Control Knob
Temperature Graduations
60°C to 200°C.
Power ‘ON’ Indicator. (When main
power switch is ‘ON’).
Heating ‘ON’ Indicator. (When
thermostat is turned to a selected
temperature.
Operating the reset switch resets the
element.
(Press to operate).
Turns power ‘ON’ and ‘OFF’ to the
unit. (White LED Indicator illuminates
(Green) when switched ‘ON’).
Neon Indicator
(White)
Neon Indicator
(Orange)
Temperature
Cut-Out Reset
Switches
Located Behind Main Access Door
Mains Isolation
Switch
NOTE: A full user’s operation manual is supplied with the product and can be used for further referencing of installation, operation
and service.

3
Operation
11
Blue Seal Evolution Series E43 / E44 Electric Fryers Service Manual © Copyright Moffat Ltd. June 2016.
Amendment 7
Description of the Controls (E43E and E44E)
Control Panel Functions
Each control panel comprises the following:-
One 4 digit, seven segment display with a 0.5” high, bright green LED display.
Three green LED indicator lights located under each of the 3 Timer Controls.
6 Touch Control Keys;-
‘ON’/’OFF’ Key.
Programme Key (P).
Left Timer - ‘UP’ Key and LED indicator light.
Centre Timer - and LED indicator light.
Right Timer - ‘DOWN’ Key and LED indicator light.
Temperature Key (Thermostat).
Modes of Operation
The Fryer has the following Modes of Operation:-
Power Up Mode.
Melt Cycle Modes (Programmable in the Programming Mode).
Idle Mode.
Cook Mode.
Temperature Display Mode.
For Controller Programming refer to the 'System Programmable Default Settings' in the ‘Controller Programming’ section at the rear of
this manual, to access the following options:-
Basic Programming Mode.
- Programming the Password Protection - (Unlock Lock).
- Programming the Timers.
- Programming the Temperature.
Advanced Programming Mode.
- Timing Mode (straight or flexi time cooking).
- Temperature Offset (calibration setting) - 14 to +14°.
- Temperature Display Mode Setting (Temp display or prompt display).
- Programming the Melt Cycle.
- Setting the Temperature Units (either °C or °F).
The 3 Timer keys on each control panel can
be used to program 3 different cook times
for each tank.
NOTE: Only one temperature setting applies
to all 3 timers.
ON/
ON/OFF

4
Maintenance
12
Blue Seal Evolution Series E43 / E44 Electric Fryers Service Manual © Copyright Moffat Ltd. June 2016.
Amendment 7
4.1 Preventative Maintenance
BLUE SEAL ELECTRIC FRYERS - MAINTENANCE SCHEDULE
Business Name and Address:
Date: Service Report No.
Phone: Fax:
Serial No:
Clients Order No. Serviceman:
Model: Remarks
1 Inspect exterior condition of unit.
2 Inspect supply leads and connections.
3 Inspect elements/element connections.
4 Check for arcing or loose screws on connections and contactors.
5 Check current draw of each element.
6 Check element microswitch adjustment.
7 Check operation / calibration of temperature controller (thermostat).
8 Check function of indicator lights.
Service Comments:
Additional work/repairs required:
Customers approval:
Name (print): Title:
Customers signature: Date:
It is recommended that this form is photocopied and kept on file for continued use.

5
Fault Finding
13
Blue Seal Evolution Series E43 / E44 Electric Fryers Service Manual © Copyright Moffat Ltd. June 2016.
Amendment 7
ALL INSTALLATION AND SERVICE REPAIR WORK MUST BE CARRIED OUT BY QUALIFIED
PERSONS ONLY.
WARNING:
5.1 E43 - Single Tank Fryer - Manual Control
Fault Possible Cause Remedy
The fryer does not operate (Power ‘On’
indicator not lit).
The mains isolating switch on the wall,
circuit breaker or fuses are ‘Off’ at the
power board.
The power switch on the unit is turned
‘Off’.
Power switch on unit is faulty.
(Refer Fault Diagnosis 5.5.1).
Elements have been left in the raised
position (
fryer only operates when
elements are in the lowered position
).
Element microswitch out of adjustment or
faulty. (Refer Fault Diagnosis 5.5.1).
Over temperature thermostat tripped or
faulty. (Refer Fault Diagnosis 5.5.1).
Safety contactor faulty.
Turn ‘On’ mains isolating switch / circuit
breaker. Check fuses.
Turn ‘On’ unit power switch.
Replace power switch on unit.
(Refer Service Section 6.2.8).
Lower elements down into the tank.
Adjust or replace microswitch.
(Refer Service Section 6.2.13).
Allow fryer to cool down, then press the
reset button on the fryer control panel.
Replace if necessary. (Refer Service
Section 6.2.6).
Replace safety contactor.
(Refer Service Section 6.2.9).
Power indicator lit, but fryer does not
operate (heating indicator not lit).
Power indicator lit, but fryer does not
operate (heating indicator lit).
Main thermostat faulty.
(Refer Fault Diagnosis 5.5.2).
Heating contactor faulty.
(Refer Fault Diagnosis 5.5.2).
Two or three elements faulty.
(Refer Fault Diagnosis 5.5.3).
Replace thermostat.
(Refer Service Section 6.2.1).
Replace heating contactor.
(Refer Service Section 6.2.9).
Replace.
(Refer Service Section 6.2.11).
Fryer slow to heat up / recover. One element faulty.
(Refer Fault Diagnosis 5.5.3).
Replace faulty element.
(Refer Service Section 6.2.11).
Indicator not working. Indicator faulty. Replace indicator.
Oil too hot or too cool. Thermostat out of calibration.
(Refer Fault Diagnosis 5.5.4).
Recalibrate thermostat.
(Refer service section 6.3.1)
Overtemp thermostat button repeatedly
tripping.
Overtemp thermostat out of calibration.
(Refer Fault Diagnosis 5.5.5).
Thermostat faulty.
(Refer Fault Diagnosis 5.5.5).
Overtemp thermostat out of calibration.
(Refer Fault Diagnosis 5.5.5).
Heating contactor faulty.
(Refer Fault Diagnosis 5.5.5).
Recalibrate overtemp thermostat.
(Refer Service Section 6.3.1).
Replace thermostat.
(Refer Service Section 6.2.1).
Replace overtemp thermostat.
(Refer Service Section 6.2.6).
Replace heating contactor.
(Refer Service Section 6.2.9).
Elements will not stay hinged up when
lifted for cleaning.
Spring tension incorrectly adjusted.
Element tensioning spring broken.
Adjust spring tension.
(Refer Service Section 6.3.3).
Replace element tensioning spring.
(Refer Service Section 6.2.12).

5
Fault Finding
14
Blue Seal Evolution Series E43 / E44 Electric Fryers Service Manual © Copyright Moffat Ltd. June 2016.
Amendment 7
5.2 E44 - Twin Tank Fryer - Manual Control
Fault Possible Cause Remedy
The fryer does not operate (Power ‘On’
indicator not lit).
The mains isolating switch on the wall,
circuit breaker or fuses are ‘Off’ at the
power board.
The power switch on the unit is turned
‘Off’.
Power switch on unit is faulty.
(Refer Fault Diagnosis 5.5.1).
Elements have been left in the raised
position (
fryer only operates when
elements are in the lowered position
).
Element microswitch out of adjustment or
faulty. (Refer Fault Diagnosis 5.5.1).
Over temperature thermostat tripped or
faulty. (Refer Fault Diagnosis 5.5.1).
Safety contactor faulty.
Turn ‘On’ mains isolating switch / circuit
breaker. Check fuses.
Turn ‘On’ unit power switch.
Replace power switch on unit.
(Refer Service Section 6.2.8).
Lower elements down into the tank.
Adjust or replace microswitch.
(Refer Service Section 6.2.13).
Allow fryer to cool down, then press the
reset button on the fryer control panel.
Replace if necessary. (Refer Service
Section 6.2.6).
Replace safety contactor.
(Refer Service Section 6.2.9).
Power indicator lit, but fryer does not
operate (heating indicator not lit).
Power indicator lit, but fryer does not
operate (heating indicator lit).
Main thermostat faulty.
(Refer Fault Diagnosis 5.5.2).
Heating contactor faulty.
(Refer Fault Diagnosis 5.5.2).
Two or three elements faulty.
(Refer Fault Diagnosis 5.5.3).
Replace thermostat.
(Refer Service Section 6.2.1).
Replace heating contactor.
(Refer Service Section 6.2.9).
Replace.
(Refer Service Section 6.2.11).
Fryer slow to heat up / recover. One element faulty.
(Refer Fault Diagnosis 5.5.3).
Replace faulty element.
(Refer Service Section 6.2.11).
Indicator not working. Indicator faulty. Replace indicator.
Oil too hot or too cool. Thermostat out of calibration.
(Refer Fault Diagnosis 5.5.4).
Recalibrate thermostat.
(Refer service section 6.3.1)
Overtemp thermostat button repeatedly
tripping.
Overtemp thermostat out of calibration.
(Refer Fault Diagnosis 5.5.5).
Thermostat faulty.
(Refer Fault Diagnosis 5.5.5).
Overtemp thermostat out of calibration.
(Refer Fault Diagnosis 5.5.5).
Heating contactor faulty.
(Refer Fault Diagnosis 5.5.5).
Recalibrate overtemp thermostat.
(Refer Service Section 6.3.1).
Replace thermostat.
(Refer Service Section 6.2.1).
Replace overtemp thermostat.
(Refer Service Section 6.2.6).
Replace heating contactor.
(Refer Service Section 6.2.9).
Elements will not stay hinged up when
lifted for cleaning.
Spring tension incorrectly adjusted.
Element tensioning spring broken.
Adjust spring tension.
(Refer Service Section 6.3.3).
Replace element tensioning spring.
(Refer Service Section 6.2.12).

5
Fault Finding
15
Blue Seal Evolution Series E43 / E44 Electric Fryers Service Manual © Copyright Moffat Ltd. June 2016.
Amendment 7
5.3 E43E - Single Tank Fryer - Digital Control
Fault Possible Cause Remedy
The fryer does not operate. (Controller not
illuminated).
The mains isolating switch on the wall,
circuit breaker or fuses are turned ‘Off’ at
the power board.
The power switch on the unit is turned off.
Power switch on unit is faulty.
(Refer Fault Diagnosis 5.5.1).
Elements are in the ‘Up’ position (
fryer only
operates when elements are in the lowered
position
).
Element microswitch out of adjustment or
faulty. (Refer Fault Diagnosis 5.5.1).
Over temperature thermostat tripped or
faulty.
Safety contactor faulty.
24V transformer faulty.
Controller fuse blown.
Controller faulty.
Turn ‘On’ mains isolating switch / circuit
breaker or fuses.
Turn ‘On’ power switch on the unit.
Replace power switch on unit.
(Refer Service Section 6.2.8).
Lower elements down into the tank.
Adjust or replace microswitch.
(Refer Service Section 6.2.13).
Allow fryer to cool down, then press the
reset button on the fryer control panel.
Replace if necessary.
(Refer Service Section 6.2.6).
Replace safety contactor.
(Refer Service Section 6.2.9).
Replace 24V transformer.
(Refer Service Section 6.2.14).
Replace controller fuse.
(Refer service section 6.2.4).
Replace controller.
(Refer Service Section 6.2.3).
Controller operates, but no heat in fryer. Heating contactor faulty.
(Refer Fault Diagnosis 5.5.2).
24V relay faulty.
Controller faulty.
Two or three elements faulty.
(Refer Fault Diagnosis 5.5.3).
Replace heating contactor. (Refer
Service Section 6.2.9).
Replace 24V relay. (Refer Service
Section 6.2.10).
Replace controller. (Refer Service
Section 6.2.3).
Replace faulty elements. (Refer Service
Section 6.2.11).
Fryer slow to heat up. One element faulty.
(Refer Fault Diagnosis 5.5.3).
Replace faulty element.
(Refer Service Section 6.2.11).
Oil too hot or too cool. Temperature controller out of calibration. Re-calibrate temperature controller.
(Refer Appendix A).
Overtemp thermostat button repeatedly
tripping
Temperature controller out of calibration.
(Refer Fault Diagnosis 5.5.5).
Controller faulty.
Overtemp thermostat out of calibration.
(Refer Fault Diagnosis 5.5.5).
24V relay faulty.
Heating contactor faulty.
(Refer Fault Diagnosis 5.5.5).
Re calibrate temperature controller.
(Refer Appendix A).
Replace faulty controller. (Refer Service
Section 6.2.3).
Replace. (Refer Service Section 6.2.6).
Replace faulty relay. (Refer Service
Section 6.2.14).
Replace heating contactor. (Refer
Service Section 6.2.9).
Elements will not stay hinged up when
lifted for cleaning
Spring tension incorrectly adjusted.
Spring broken.
Adjust spring tension. (Refer Service
Section 6.3.3).
Replace spring. (Refer Service Section
6.2.12).

5
Fault Finding
16
Blue Seal Evolution Series E43 / E44 Electric Fryers Service Manual © Copyright Moffat Ltd. June 2016.
Amendment 7
5.4 E44E - Twin Tank Fryer - Digital Control
Fault Possible Cause Remedy
Neither side of fryer will operate (both
controllers not illuminated).
The mains isolating switch on the wall,
circuit breaker or fuses are turned ‘Off’ at
the power board.
The power switch on the unit is turned off.
Power switch on unit is faulty.
(Refer Fault Diagnosis 5.5.1).
Elements are in the ‘Up’ position (
fryer only
operates when elements are in the lowered
position
).
Element microswitch out of adjustment or
faulty. (Refer Fault Diagnosis 5.5.1).
Turn ‘On’ mains isolating switch / circuit
breaker or fuses.
Turn ‘On’ power switch on the unit.
Replace power switch on unit.
(Refer Service Section 6.2.8).
Lower elements down into the tank.
Adjust or replace microswitch.
(Refer Service Section 6.2.13).
One side fryer only does not operate (one
controller not illuminated).
Over temperature thermostat tripped or
faulty.
Safety contactor faulty.
24V transformer faulty.
Controller fuse blown
Controller faulty.
Allow fryer to cool down, then press the
reset button on the fryer control panel.
Replace over temperature thermostat if
necessary. (Refer Service Section
6.2.6).
Replace. safety contactor. (Refer service
section 6.2.9).
Replace faulty transformer. (Refer
Service Section 6.2.14).
Replace.
(Refer service section 6.2.4)
Replace faulty controller.
(Refer Service Section 6.2.3).
Controller operates, but no heat in one
side of fryer.
Heating contactor faulty.
(Refer Fault Diagnosis 5.5.2).
24V relay faulty.
Controller faulty.
Two or three elements faulty.
(Refer Fault Diagnosis 5.5.3).
Replace heating contactor. (Refer
Service Section 6.2.9).
Replace faulty relay. (Refer Service
Section 6.2.10).
Replace faulty controller. (Refer Service
Section 6.2.3).
Replace faulty elements.
(Refer Service Section 6.2.11).
One side of fryer slow to heat up. One element faulty.
(Refer Fault Diagnosis 5.5.3).
Replace faulty element.
(Refer Service Section 6.2.11).
Oil too hot or too cool. Temperature controller out of calibration. Re-calibrate temperature controller.
(Refer Appendix A).
Overtemp thermostat button repeatedly
tripping.
Temperature controller out of calibration.
(Refer fault diagnosis 5.5.5)
Controller faulty.
Overtemp thermostat out of calibration.
(Refer Fault Diagnosis 5.5.5).
24V relay faulty.
Heating contactor faulty.
(Refer Fault Diagnosis 5.5.5).
Re-calibrate temperature controller.
(Refer Appendix A).
Replace faulty controller.
(Refer Service Section 6.2.3).
Replace overtemp thermostat.
(Refer Service Section 6.2.6).
Replace faulty relay.
(Refer Service Section 6.2.14).
Replace heating contactor.
(Refer Service Section 6.2.9).
Elements will not stay hinged up when
lifted for cleaning
Spring tension incorrectly adjusted.
Spring broken.
Adjust spring tension. (Refer Service
Section 6.3.3).
Replace spring. (Refer Service Section
6.2.12).

5
Fault Finding
17
Blue Seal Evolution Series E43 / E44 Electric Fryers Service Manual © Copyright Moffat Ltd. June 2016.
Amendment 7
5.5 Fault Diagnosis
Power switch on unit faulty
Check voltage to the input side of the power switch. If no
voltage then check wiring. If voltage then (with power switch
turned on) check power out of switch. If there is no voltage
out of switch then the switch is faulty - replace.
Element microswitch out of adjustment
Remove the overtemp panel from the unit, and manually push
the microswitch actuator arm. If this activates the fryer (the
power indicator illuminates) then the microswitch positioning
requires adjustment.
Element microswitch faulty
Check for voltage from microswitch terminals to neutral.
With the element down there should be power to the com
terminal and the n.o. terminal.
With the element up there should be power to the com terminal
and the n.c. terminal.
If not then microswitch is faulty - replace. If there is no power
to the com terminal at all then check wiring to the microswitch.
Overtemp thermostat faulty
Check voltage to the input terminal of the overtemp thermostat.
If no voltage then check wiring to overtemp.
If input voltage is correct then check voltage to output terminal
of overtemp. If there is no voltage (and the oil is below 150°C,
with the reset button not tripped) then the overtemp is faulty -
replace.
One element faulty
Remove wires from elements and check the resistances across
each element.
FN8127 element resistance: 10.2 ohms ±5%.
FN8224 element resistance: 20.4 ohms ±5%.
Alternatively a current check can be performed on each of the
phases. With the elements on and heating, each phase should
draw approximately 23.6A.
Thermostat out of calibration
Place an accurate digital thermometer in the oil. Set thermostat
to 170°C.
Allow the fryer thermostat to cycle once, and then record the oil
temperature for the next thermostat on/off cycle. The
thermostat should cycle within 10°C of the set temperature (i.e.
between 160 and 180°C), with an average cycle temperature of
approximately 170°C.
If oil temperature is outside these ranges then the thermostat
requires recalibration.
5.5.1 Fryer Does Not Operate
(Power Indicator / Controller
Not Illuminated)
5.5.2 Fryer Does Not Operate
(Power Indicator / Controller
Illuminated)
5.5.3 Fryer Slow To Heat Up
Figure 5.5.1
Microswitch
5.5.4 Oil Too Hot / To Cool
Main thermostat faulty
Check voltage into thermostat (terminal 2). If no voltage check
wiring.
Set thermostat to 180°C. Check for voltage out of thermostat
(terminal 1). If no voltage then the thermostat is faulty.
Heating contactor faulty
Check for voltage across terminals A1 and A2 of the heating
contactor. If there is no voltage then check wiring.
If voltage is correct then check for voltage at input side of
contactor (terminals 2, 4, and 6). If no voltage at any of these
terminals then check wiring.
Check voltage at output side of contactor (terminals 1, 3, & 5).
With the contactor energised, there should be voltage at all of
these terminals. If not then the contactor is faulty - replace.

5
Fault Finding
18
Blue Seal Evolution Series E43 / E44 Electric Fryers Service Manual © Copyright Moffat Ltd. June 2016.
Amendment 7
Overtemp thermostat out of calibration
Place an accurate digital thermometer in the oil and set the
thermostat to its maximum position. Record the temperature at
which the overtemp trips.
If the oil reaches 225°C before the overtemp trips then the
main thermostat is either faulty or out of calibration, or the
heating contactor is faulty - refer below.
If the overtemp thermostat trips at a lower temperature, then it
is out of calibration and must be replaced.
Thermostat out of calibration
Place an accurate digital thermometer in the oil. Set the
thermostat to 180°C.
Allow the fryer thermostat to cycle once, and then record the oil
temperature for the next thermostat on/off cycle.
The thermostat should cycle within 10°C of the set temperature
(i.e. between 170 and 190°C), with an average cycle
temperature of approximately 180°C.
If oil temperature is outside these ranges then the thermostat
requires recalibration.
Thermostat faulty
With thermostat in the off position, the ‘cook’ indicator should
be off. If not then the thermostat is faulty - replace.
Heating contactor faulty
With power isolated from the unit, check for continuity through
the poles of the heating contactor. If there is continuity then
the contactor is faulty - replace.
5.5.5 Overtemp Repeatedly Tripping
Other manuals for Evolution Series
10
This manual suits for next models
4
Table of contents
Other Blue Seal Fryer manuals

Blue Seal
Blue Seal E603 User manual

Blue Seal
Blue Seal GT45E User manual

Blue Seal
Blue Seal Fast-Fri E43 User manual

Blue Seal
Blue Seal Evolution GT18 Series User manual

Blue Seal
Blue Seal Evolution Series User manual

Blue Seal
Blue Seal GT60HPO User manual

Blue Seal
Blue Seal Evolution GT45 User manual

Blue Seal
Blue Seal E603 User manual

Blue Seal
Blue Seal Fast-Fri E43 User manual

Blue Seal
Blue Seal Evolution GT45 User manual