BlueSky Mast AL350G Series User manual

Do Not Duplicate, Alter, or Copy without the Express Written Consent
of BlueSky Mast, Inc. Copyright 2016 Allendale LLC All Rights Reserved
AL350G Lift Series
Quick Reference Sheet - Primary Guying
DEPLOYMENT
Refer to detailed instructions in the
AL350G Lift Series Manual at all times
01/17
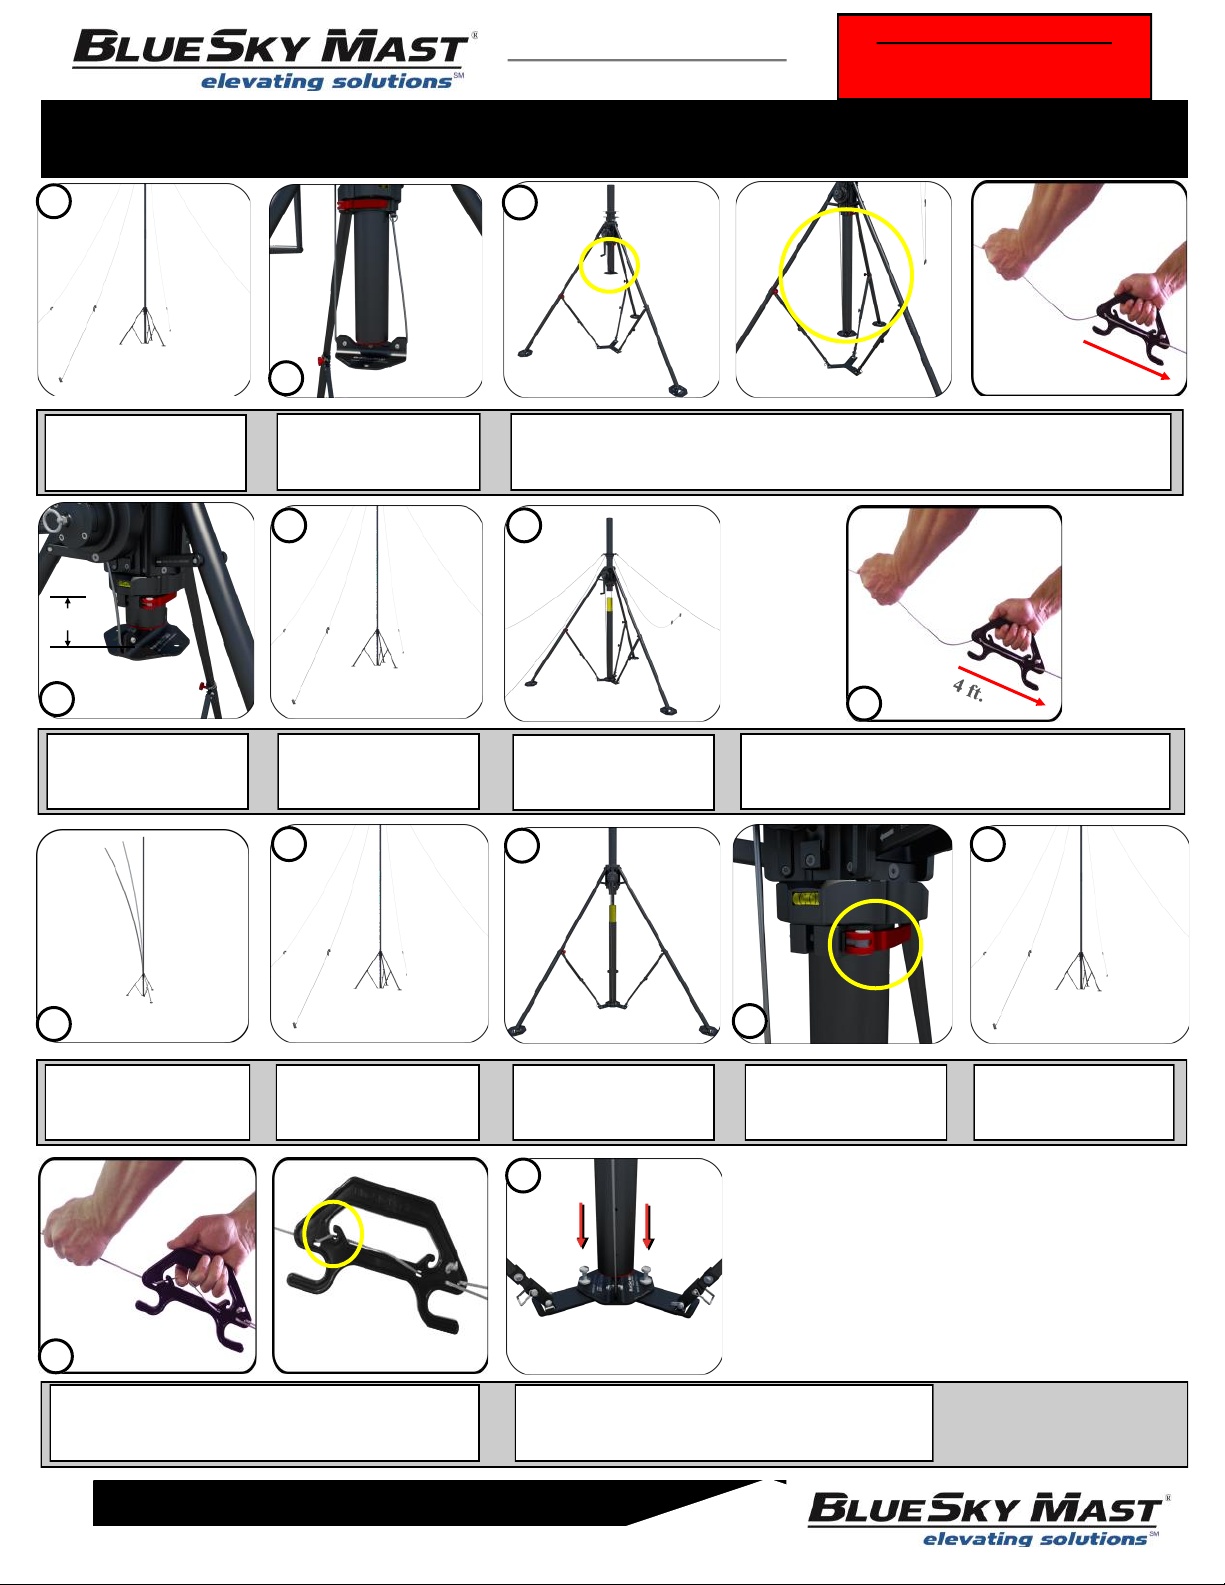
Stand the tripod up and release
the large Velcro Strap at the
bottom.
Open the tripod legs and lock
the cross bars. Push them all
the way down to fully engaged.
Stake ONLY the LEFT HOLES
on the base plates of the 2
extended tripod legs.
Extend and tighten the 2 tripod
legs adjacent to the winch.
DO NOT extend the tilt leg.
1234
Locate the mounting pole. It’s
the only pole without a gold
insert.
Insert the mounting pole until 1
hole is showing below the cam
lock and lock the cam lock.
Level the tripod by adjusting the
tripod legs. Make sure all 3
bubble levels read level.
Add Red Primary Guy Ring.
DO NOT secure it at this time.
Mount your equipment to the
mounting pole, connect and
secure all cables.
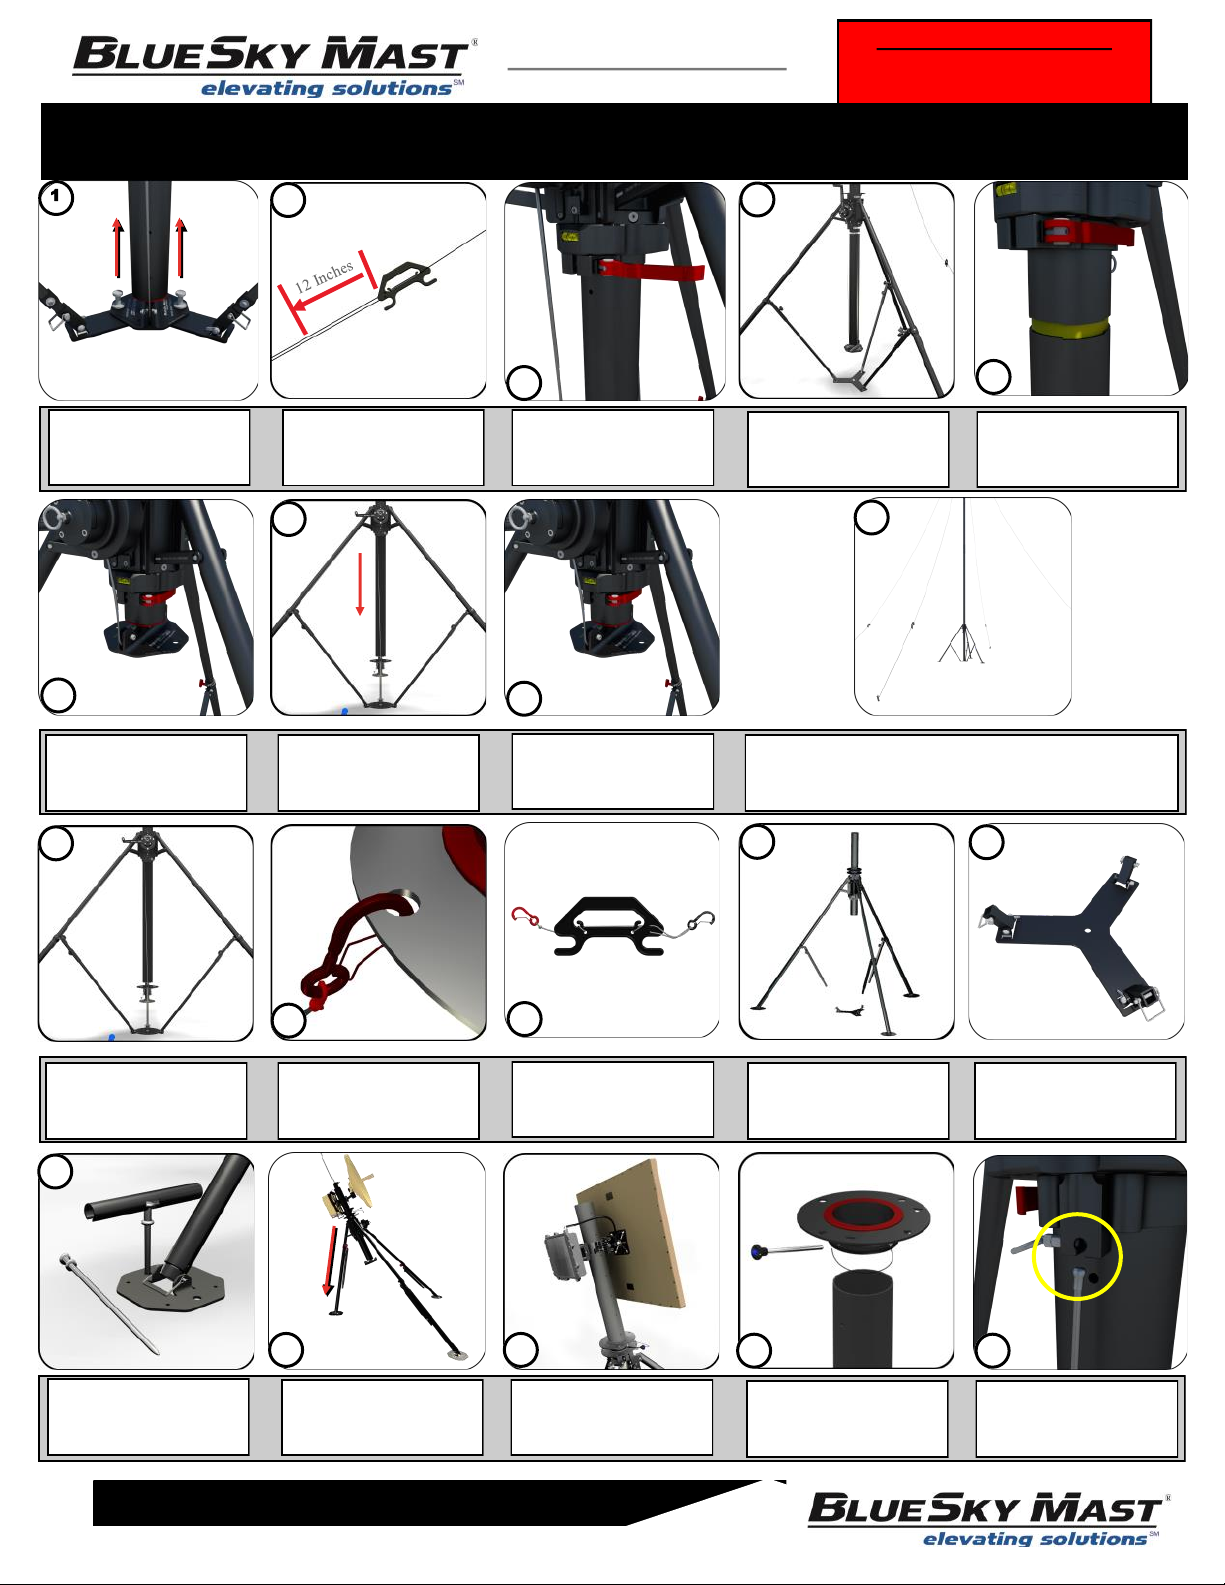
Extend the tilt leg and tighten
the turn knob. Make sure all 3
tripod struts are facing inward.
5
678
109
12 13 14 15
11
Attach the winch handle. Pay
out the cable by turning the
winch handle counter clockwise
The cable should hang freely on
the left side of the winch and
should not hang over anything.
Stake the remaining holes on all 3
tripod legs.
Locate the LIFT BASE PLATE .Insert the lift base plate into the
bottom of the mounting pole.
Center the strut base plate
under the tripod and align with
the 3 tripod legs..
Release the Velcro straps
holding the tripod struts on each
of the 3 tripod legs.
Pass the cable through the 2
rollers on the lift base plate and
back up to the ball stop holder.
Pull the pin to secure the ball
stop. Confirm the cable is taut
and the lift base plate is secure.
Locate the STRUT BASE
PLATE.
16 19
17
18 20

Do Not Duplicate, Alter, or Copy without the Express Written Consent
of BlueSky Mast, Inc. Copyright 2016 Allendale LLC All Rights Reserved
AL350G Lift Series
Quick Reference Sheet - Primary Guying
DEPLOYMENT
Refer to detailed instructions in the
AL350G Lift Series Manual at all times
01/17
Guy Stake #1 - At the 15M
mark drive a stake into the
ground at an angle.
Guy Stake #2 - make sure it is
staked directly opposite and
inline with guy stake #1.
Loosen the turn knobs on the
tripod struts and extend them
towards the strut base plate.
DO NOT loosen the turn knobs
on the tripod legs.
Confirm the cable is taut and
the lift base plate is secure.
31
29
37
32
34 36
33
21 22 23 24 24
25 26
27 28
One at a time, align the tripod strut to the strut base plate receiver and
secure with hitch pin. Pull on the strut to adjust it to the right or left.
DO NOT loosen the turn knobs on the tripod leg to adjust the strut.
Make sure the strut base plate
is centered under the tripod and
tighten all 3 strut turn knobs.
Locate the RED TIPPED strut
base plate stake and hammer
it into the strut base plate.
Reconfirm ALL tripod legs and
tripod strut turn knobs have
been tightened.
Leave 1 inch of the mounting
pole visible below the cam lock
and lock the cam lock.
1”
Release the cam lock on the
tripod and raise the mounting
pole by turning the winch.
Pin the Red Primary Guy Ring
to the Mounting Pole BELOW
your devices.
30
31
Person #1 Locate the GUY LEADER with orange guy rope and clip it
into the Round Hole on the primary guy ring. Walk away from the
mast unwinding the guy leader rope until you reach the 15M mark.
Deploy Primary Guying
4 Guy Configuration
2 ppl.
Person #2 - Locate the 4 Large
Guy Stakes and Hammer and
follow behind person #1.
NOTE: If you have lost or do not have a GUY LEADER to mark your
guy stakes. Start at the center of the tripod and take one “NORMAL”
step per meter of system height. Example: 15M = 15 NORMAL steps.
Repeat this process until all 4
primary guy stakes have been
deployed 90 degrees apart.
35
1
2

Do Not Duplicate, Alter, or Copy without the Express Written Consent
of BlueSky Mast, Inc. Copyright 2016 Allendale LLC All Rights Reserved
AL350G Lift Series
Quick Reference Sheet - Primary Guying
DEPLOYMENT
Refer to detailed instructions in the
AL350G Lift Series Manual at all times
01/17
Locate the 4 Primary Guy
Ropes with the red clips.
Remove the guy leader and clip
a primary guy rope to the round
hole on the primary guy ring.
Walk away from the mast and
unwind ALL of the guy rope off
of the guy handle.
Clip the primary guy rope into
the top hole on the guy stake.
Slide the guy handle towards
the mast approx. 7 feet. Repeat
process on all 4 Guy Ropes.
38 39 40
Make sure the cam lock is
LOCKED and lower the lift base
plate to the ground.
Release the cam lock and raise
until 1 inch is showing below the
cam lock. Lock the cam lock.
43 45
55
Repeat steps 43 - 47 until the
primary guy ropes go taut.
Always monitor your guy wires
during deployment and use
Velcro Straps to secure cabling.
WARNING: If at any point the
mast begins to slip while the
cam lock is locked - STOP
Use the 7/16 wrench provided
with the system to make adjust-
ments to the cam lock.
Tighten the nut on the cam lock
a quarter turn until slipping no
longer occurs.
42
48 49
50
46 47
53
52
Insert a center mast pole onto
the lift base plate.
Raise the center mast pole
until it nest together with the
mounting pole.
Make sure the castle cuts nest
firmly together and there is no
gold insert showing.
44
54
7 ft.
41
51
1”
When the primary guy ropes go taut or if the mast begins to lean exces-
sively - Stop and Lock the Cam Lock. Now adjust all 4 PRIMARY GUY
ROPES and make sure the mast is straight and perpendicular.
Adjusting the Primary Guy Ropes
Hold the rope in front of the guy handle and slide the handle back to
loosen or forward to tighten.
Raise the mast until the primary
guy ropes go taut. Incremental
guying may be required.
Do Not Duplicate, Alter, or Copy without the Express Written Consent
of BlueSky Mast, Inc. Copyright 2016 Allendale LLC All Rights Reserved
AL350G Lift Series
Quick Reference Sheet - Primary Guying
DEPLOYMENT
Refer to detailed instructions in the
AL350G Lift Series Manual at all times
01/17
Confirm that the cable is taut
and the cam lock is locked.
Incremental Guying: Loosen the guy ropes based on the length of the pole below the cam lock. See examples
above. If the length of the pole under the cam lock is 1 foot - slide the handle back 1 foot on each of the 4
primary guy ropes. This will allow you enough room to raise the mast and prepare to deploy the next pole.
Confirm the mast is straight and
the primary guy ropes are taut.
56
Raise the mast until 1 inch is
showing below the cam lock
and LOCK THE CAM LOCK.
Make sure all 4 primary guy
ropes are taut and the mast is
straight.
Lower the lift base plate, insert
a mast pole and raise it until the
poles nest together.
One at a time, slowly loosen the primary guy ropes by holding the guy
rope in front of the handle and sliding the handle back approx. 4 ft.
Doing this will give you enough slack to add another mast pole.
NOTE: The mast will lean, but
will straighten up as you raise
the next mast pole.
1”
Release the cam lock and raise
the mast until the 4 primary guy
ropes go taut.
Lower the last center mast pole
to the ground and lock the cam
lock.
Adjust the 4 primary guy ropes
and make sure the mast is
straight and perpendicular.
Repeat this process until you
reach the last center mast pole.
57
58
59
60 61
62
63
64 65
66
67
Use your foot to gently tap the lift base plate (so it will rotate) into
position and allow you to drive 2 stakes into the 2 holes.
Lock the primary guy ropes by pulling a small amount of slack in. Use
your finger and loop the guy rope over the front lip of the guy handle.
Pull the guy handle towards the mast to remove any slack in the rope.
68
69
Do Not Duplicate, Alter, or Copy without the Express Written Consent
of BlueSky Mast, Inc. Copyright 2016 Allendale LLC All Rights Reserved
Refer to detailed instructions in the
AL350G Lift Series Manual at all times
AL350G Lift Series
Quick Reference Sheet - Primary Guying
LOWERING / RECOVERY
Raise the mast up enough to
remove the 1st mast pole .
Lock the cam lock and lower
the lift base plate and remove
the 1st mast pole.
Raise the lift base plate until it
nests firmly into the next mast
pole.
Release the cam lock and
SLOWLY lower the mast to the
ground. Remove the mast pole.
Raise the lift base plate until it
nests firmly into the next mast
pole.
12
3
4
5
6
9
8
7
Unlock the ALL guy ropes and
slide the guy handles toward
the guy stakes 12 inches.
Release the cam lock.
Remove the stakes from the Lift
Base Plate by using the stake
remover.
Adjust all 4 PRIMARY Guy Ropes so the mast is straight and perpen-
dicular. You should only have to adjust the primary guy ropes for the
first 2 - 3 center mast poles, unless you are experiencing high winds.
Repeat this process until the
red primary guy ring is within
reach.
Remove the 4 primary guy
ropes and unpin the primary
guy ring.
Pull the slack in from all primary
guy ropes, wind them up and
stow them.
Remove the tripod leg struts
from the strut base plate and
secure the struts to the legs.
Remove the red tipped strut
base plate stake and stow the
strut base plate.
10
11 12
13 14
Remove red primary guy ring
and stow it with the guy ropes.
Release the ball stop from the
holder and wind up the cable on
the winch.
Loosen the turn knob on the tilt
leg and kneel the tripod.
Remove all equipment from the
mounting pole.
Remove both stakes from the
tripod tilt leg and the left stakes
from the other tripod legs.
15
16 17 18 19
Do Not Duplicate, Alter, or Copy without the Express Written Consent
of BlueSky Mast, Inc. Copyright 2016 Allendale LLC All Rights Reserved
Refer to detailed instructions in the
AL350G Lift Series Manual at all times
AL350G Lift Series
Quick Reference Sheet - Primary Guying
LOWERING / RECOVERY
Remove and stow the winch
handle.
Release the cam lock and
remove and stow the mounting
pole.
Remove all remaining tripod
stakes and stow them.
23
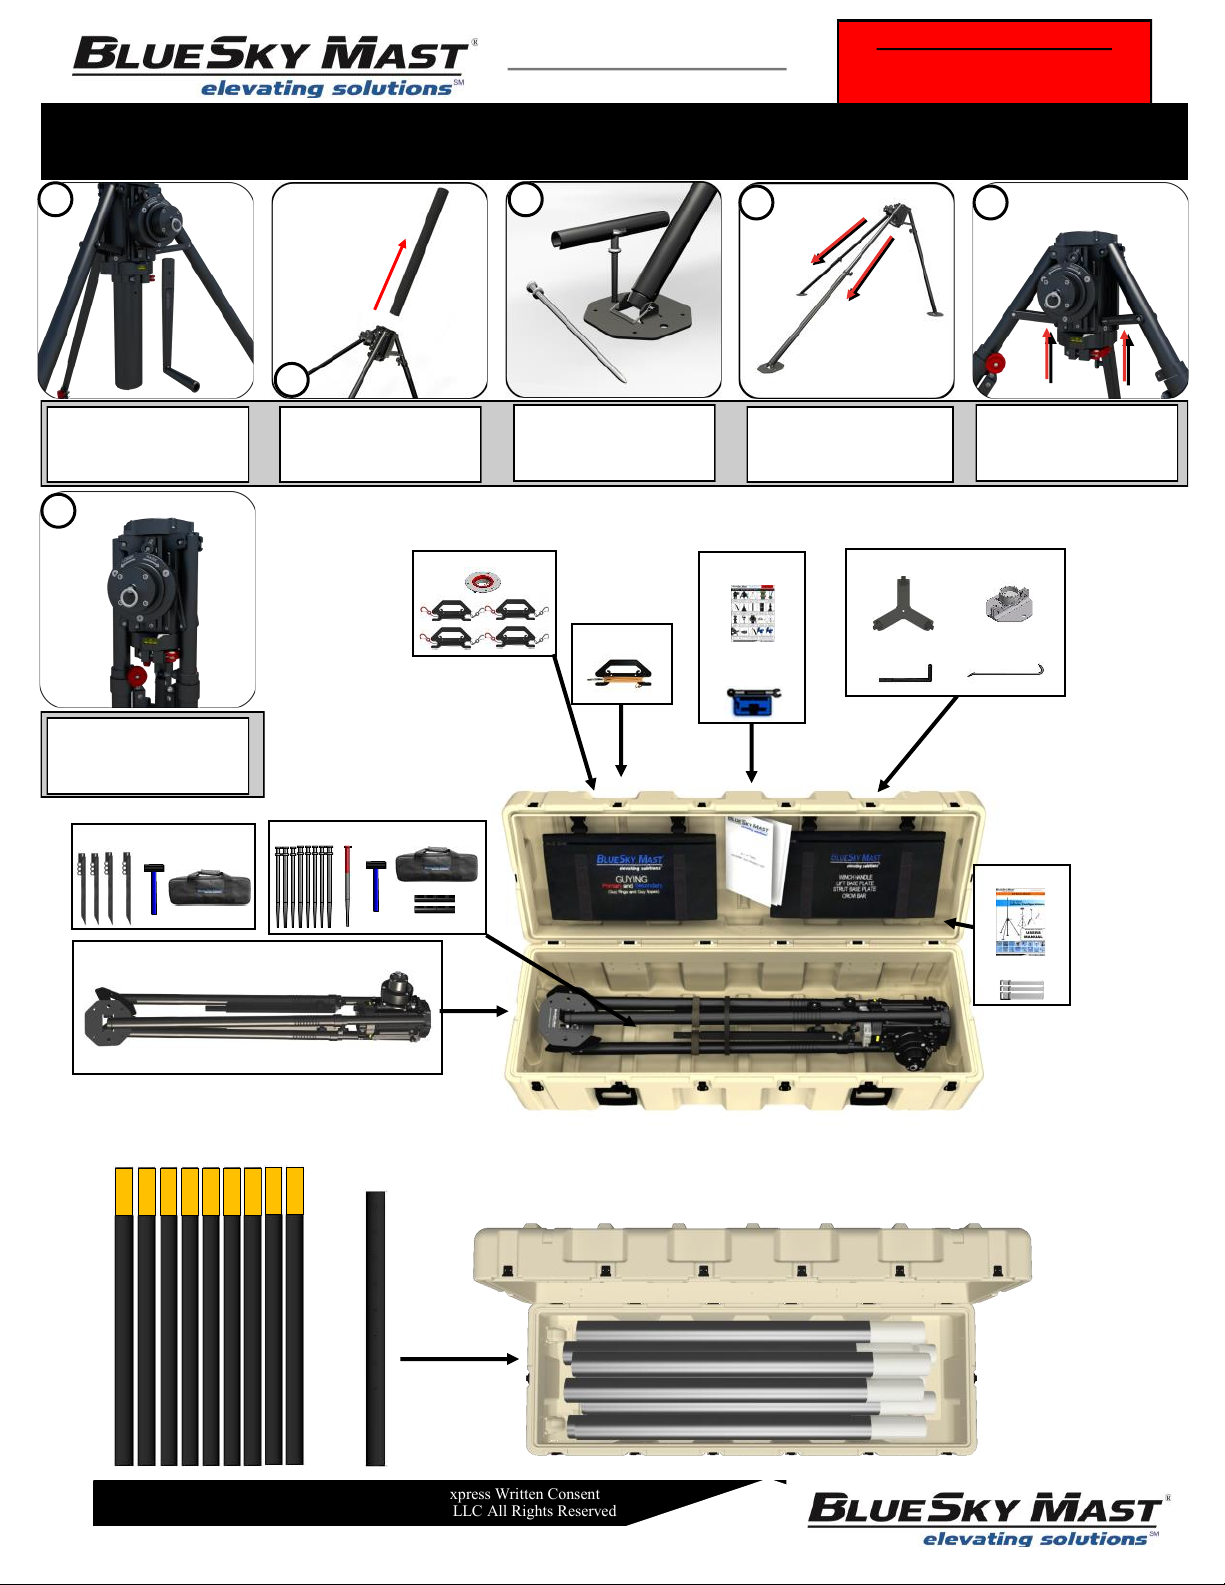
Collapse the two extended tripod
legs,
Collapse the tripod legs and
secure them with the Velcro on
the tilt leg.
Slowly push up on the cross
bars to fold the tripod legs.
WARNING: Pinching Hazard.
20
21
22 24
25
PRIMARY GUY KIT
STAKING KIT - GUY-
STAKING KIT - TRIPOD
QUICK REFERENCE
SHEET
7/16 Wrench
(Cam Lock)
USER MANUAL
VELCRO STRAPS
GUY LEADER
STRUT BASE PLATE
WINCH HANDLE CROWBAR
LIFT BASE
TRIPOD
10M System - HARD CASE #1
10M System - HARD CASE #2
CENTER MAST MOUNTING POLE
Other BlueSky Mast Lifting System manuals


Popular Lifting System manuals by other brands


Challenger Lifts
Challenger Lifts E10 Installation, operation & maintenance manual

Pressalit
Pressalit R8572318 Mounting instruction

Schmalz
Schmalz VacuMaster Multi Series operating manual

Braun
Braun 07 Series Installation & service manual

Autoquip
Autoquip American Lifts P-25-005 Installation, operation and service manual

Advance Lifts
Advance Lifts P Series owner's manual


