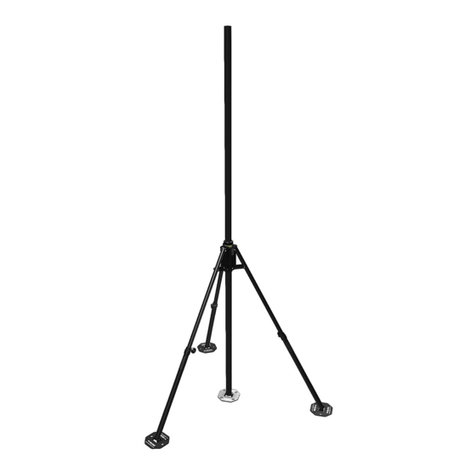
BlueSky Mast AL3 Series User manual

Do Not Duplicate, Alter, or Copy without the Express Written Consent
of BlueSky Mast, Inc. Copyright 2013 Allendale LLC All Rights Reserved
AL3 Lift Series - Deployment Quick Reference Sheet
Refer to detailed instructions in the
AL3 Lift Series Manual at all times
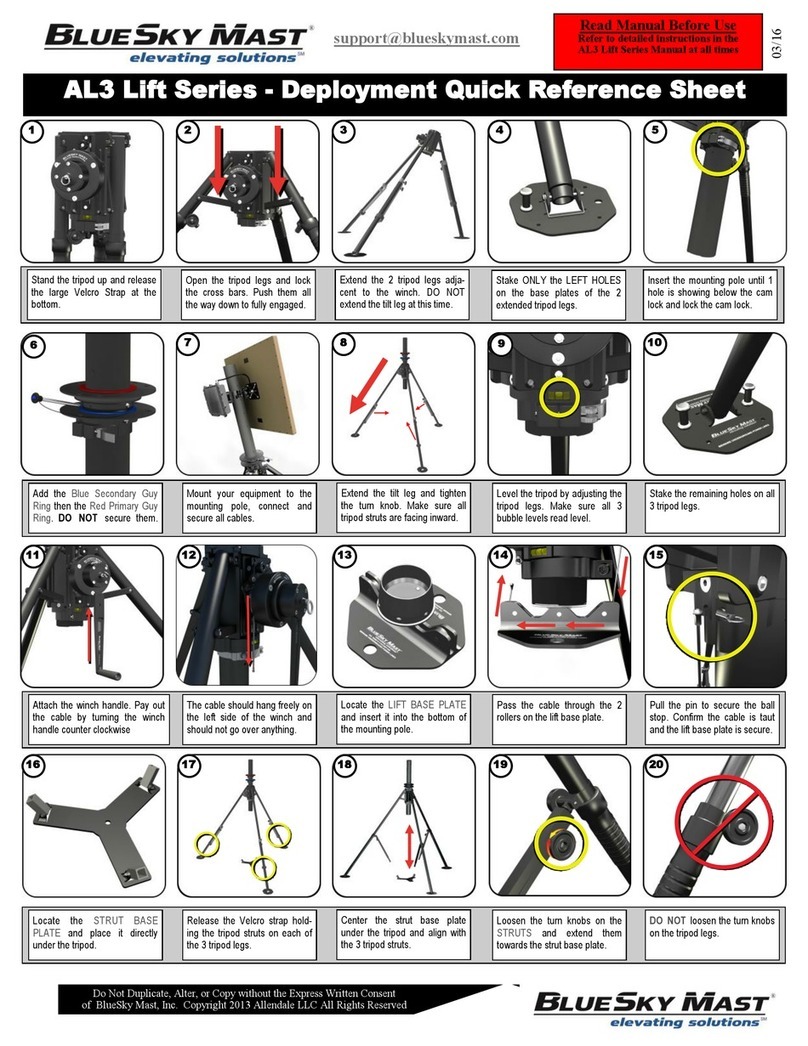
Pull the pin to secure the ball
stop. Confirm the cable is taut
and the lift base plate is secure.
Locate the strut base plate and
place directly under the tripod.
Attach the winch handle. Pay out
the cable by turning the winch
handle counter clockwise
Locate the lift base plate and
insert it into the bottom of the
mounting pole.
Pass the cable through the 2
rollers on the lift base plate.
Insert all 3 struts into the
receivers on the strut base plate
and secure the hitch pins.
Make sure the strut base plate
is centered under the tripod and
tighten all turn knobs.
Release the Velcro strap hold-
ing the tripod strut on each of
the 3 tripod legs.
Center the strut base plate
under the tripod and align with
the 3 tripod struts.
Loosen the turn knobs on the
struts and extend them towards
the strut base plate.
Stand the tripod up and release
the large Velcro Strap at the
bottom.
Open the tripod legs and lock
the cross bars. Push them all
the way down to fully engaged.
Stake ONLY the Left Holes on
the base plates of the 2 ex-
tended tripod legs.
Insert the mounting pole until 1
hole is showing below the cam
lock and lock the cam lock.
Level the tripod by adjusting the
tripod legs. Make sure all 3
bubble levels read level.
Stake the remaining holes on all
3 tripod legs.
Add the Blue Secondary Guy
Ring then the Red Primary Guy
Ring. Do not secure them.
Mount your equipment to the
mounting pole, connect and
secure all cables.
Extend the tilt leg and tighten
the turn knob. Make sure all
tripod struts are facing inward.
Extend the 2 tripod legs adja-
cent to the winch. DO NOT
extend the tilt leg at this time.
1 2 3 4 5
6 7 8 9 10
11 12 13 14 15
16 17 18 19 20
9

Do Not Duplicate, Alter, or Copy without the Express Written Consent
of BlueSky Mast, Inc. Copyright 2013 Allendale LLC All Rights Reserved
AL3 Lift Series - Deployment Quick Reference Sheet
Refer to detailed instructions in the
AL3 Lift Series Manual at all times
Lock the cam lock on the Blue
Secondary Guy Ring.
Make sure the cam lock is
locked and lower the lift base
plate to the ground.
Insert a center mast pole onto
the tapered cone on the lift base
plate.
Raise the center mast pole until
it nest together into the bottom
of the mounting pole.
Walk away from the mast and
unwind all the guy rope. DO
NOT stake it at this time.
Repeat this process until all
secondary guy ropes are de-
ployed. DO NOT stake them.
Release the cam lock and raise
until 1 inch is showing below the
tripod. Lock the cam lock.
Continue this process until you
have reached 1/2 the total mast
height.
Attach the blue clip from the
secondary guy rope to the
round hole on the guy ring.
Locate the RED TIPPED strut
base plate stake and hammer
it into the strut base plate.
Confirm the cable is taut and
the lift base plate is secure.
Release the cam lock on the
tripod and raise the mounting
pole by turning the winch.
Leave 1 inch below the cam
lock and lock the cam lock.
Pin the Red Primary Guy Ring
to the Mounting Pole below your
devices.
Slide the handle towards the
mast approx 7 feet and drop on
the ground.
Continue this process until all 4
primary guy ropes have been
deployed 90 degrees apart.
Attach the red clip from the
primary guy rope to the round
hole on the guy ring.
Unwind the guy rope and take
one normal step per meter of
height. 15 Meters = 15 Steps
Unwind the remaining guy rope
and drive 2 stakes through the
dual stake plates.
Raise the mast until the primary
guy ropes go taut. Incremental
guying may be required.
7 Feet
1”
31 32 33 34 35
36 37 38
39
40
21 22 23 24 25
26 27 28 29 30
1”

Do Not Duplicate, Alter, or Copy without the Express Written Consent
of BlueSky Mast, Inc. Copyright 2013 Allendale LLC All Rights Reserved
AL3 Lift Series - Deployment Quick Reference Sheet
Refer to detailed instructions in the
AL3 Lift Series Manual at all times
1”
Leave 1 inch of the last center
mast pole showing under the
tripod and lock the cam lock.
Lower the lift base plate and
insert the Base Pole. Raise until
it nest into the center mast pole.
Release the cam lock and lower
the mast to the ground. Lock
the cam lock.
Adjust the primary guy ropes
and make sure the mast is
straight and perpendicular.
Lock the primary guy ropes by
pulling a small amount of slack
in. Continued next step -
41 42 43 44 45
Then grab the guy rope and
wrap it up and over the front
rope lock.
Extend all 4 secondary guy
ropes out and stake them into
the ground.
Make sure all primary and
secondary guy ropes are
locked.
Drive 2 stakes into the 2 holes
on the lift base plate.
Deploy the BlueSky Surface
Wire Grounding Kit at this time
(if required).
46 47 48 49 50

Do Not Duplicate, Alter, or Copy without the Express Written Consent
of BlueSky Mast, Inc. Copyright 2013 Allendale LLC All Rights Reserved
AL3 Lift Series - Deployment Quick Reference Sheet
Refer to detailed instructions in the
AL3 Lift Series Manual at all times
AL3 Lift Series - Lowering Quick Reference Sheet
Replace the winch handle if it
was removed after deployment.
Replace the Lift Base Plate and
run the cable through and
secure it in the holder.
Remove the stakes from the Lift
Base Plate by using the stake
puller.
Unlock the ALL guy ropes and
slide the guy handles toward
the stakes 12 inches.
Release the cam lock, raise the
base pole up 12 inches and lock
the cam lock.
Lower the base pole and lift
base plate to the ground &
remove the base pole.
Raise the lift base plate until it
inserts into the pole. Release
the cam lock.
Lower the mast until 2 inches of
the next pole is visible below
the cam lock.
Lock the cam lock. Remove the pole & place it in
Hard Case #2.
12 Inches
1
2
3 4 5
7 8 9 10
6
Repeat process 7, 8, 9 and 10
until the secondary guy ring is
within reach.
Release the cam lock on the
secondary guy ring & remove
the guy ropes.
Repeat process 7, 8, 9, and 10
until the primary guy ring is
within reach.
Remove the primary guy ropes
and wind all ropes onto their
handles.
Remove the tripod leg struts
from the strut base plate and
secure the struts to the legs.
Remove all equipment and
accessories.
Remove the primary guy ring.Remove the red tipped strut
base plate stake and stow the
strut base plate.
Remove both stakes from the
tilt leg and the left stakes from
the other legs.
Loosen the turn knob on the tilt
leg and kneel the tripod.
11 12 13 14 15
16 17 18 19 20

Do Not Duplicate, Alter, or Copy without the Express Written Consent
of BlueSky Mast, Inc. Copyright 2013 Allendale LLC All Rights Reserved
AL3 Lift Series - Lowering Quick Reference Sheet
Refer to detailed instructions in the
AL3 Lift Series Manual at all times
Remove the secondary guy
ring.
Release the ball stop from the
holder, wind up the cable and
stow the winch.
Remove the mounting pole. Remove all of the remaining
tripod stakes and any guy
stakes.
Collapse the two extended legs.
Push up on the cross bars.
WARNING: Pinching Hazard.
Collapse the tripod legs and
secure them with the Velcro on
the tilt leg.
21 22 23 24 25
26 27
HARD CASE ONE - SEE PACK OUT INSTRUCTIONS ON NEXT PAGE HARD CASE TWO INCLUDES (12) CENTER MAST POLES ONLY

Do Not Duplicate, Alter, or Copy without the Express Written Consent
of BlueSky Mast, Inc. Copyright 2013 Allendale LLC All Rights Reserved
AL3 Lift Series - Packing Quick Reference Sheet
Refer to detailed instructions in the
AL3 Lift Series Manual at all times
PRIMARY GUY KIT SECONDARY GUY KIT STRUT BASE PLATE
WINCH HANDLE
LIFT BASE PLATE
CROWBAR
STAKING KIT - TRIPOD
STAKING KIT - GUYING
AL3 TRIPOD
BASE POLE
MOUNTING POLE
Other BlueSky Mast Lifting System manuals
