BMW TSARAVision HMT-1 User manual

TSARA Vision
situation
Please refer to attachment for full details
Attachments
SI B04 03 19
Tools and Equipment
June 2019
Technical Service
[ Copyright ©2019 BMW of North America, Inc. ]

Service Information
Page 1 of 2
May 2019
Tools and Equipment
B04 03 19
Technical Service
TSARAVISION
This Service Information bulletin replaces SI B04 03 19 dated May 2019.
What’s New:
•Updated Order Form
•Updated Quick Start Guide
•Program terms and conditions
MODEL
All
INFORMATION
GRUSB0419-06
As announced in our National Aftersales Conference (NAC) earlier this year and after several months
of successful testing, we are excited to release TSARAVision. We have partnered with Ubimax to
provide this service for all of our centers.
TSARAVision is the latest technology which enables technicians to demonstrate certain types of
diagnostic and repair situations in real time with our support teams and Product Engineers in
Technical Service. Showing us what you are hearing and seeing can allow you to diagnose and repair
vehicles in less time.

2
In conjunction with a TSARA case we can have an interactive discussion with audio and video. During
the call we can also-
•Take high resolution photographs based off the TSARAVision camera
•Provide document images
•Record a video
saving you time and making your workshop more efficient and productive as well.
Some potential scenarios for TSARAVision usage are:
•Noise diagnosis
•Leak diagnosis
•Specific video recordings/photos
•Various kinds of live measurements
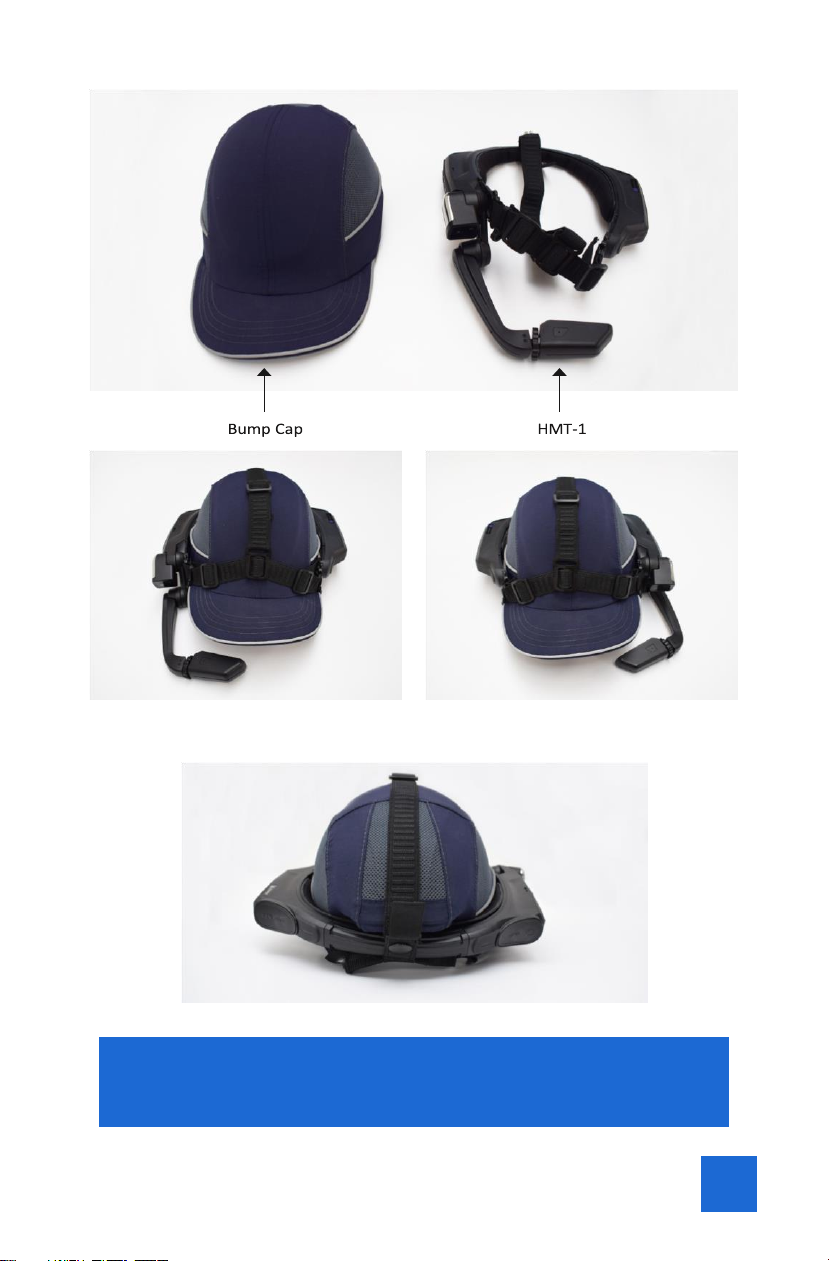
Components-
Assembled, ready to use-
GRUSB0419-07
GRUSB0419-08
OPERATING INSTRUCTIONS
Refer to the Quick Start Guide (Attachment 1) for detailed instructions on how to use the device. It will
contain information on:
•Step 1: How to properly use the hardware
•Step 2: How to perform the initial setup (needed for Step 3)
•Step 3: How to perform a TSARA Vision remote support call
For questions, concerns or feedback regarding this specific program please email us at
ORDERING INSTRUCTIONS
The devices will be automatically shipped to all BMW centers from Ubimax. One device will be
shipped per center, and only to the primary location. Satellite locations are not included. All centers
have the option to order additional devices by utilizing the attached order form.
The devices will come as a lease / rental program for an initial period of 24 months. The cost of the
lease will be $774 every 6 months per device,billed as miscellaneous billing. There is also a
onetime shipping and handling fee of $50 per device. This fee also applies to additional devices
ordered. Please see attached “Program terms and conditions” attachment below.
WARRANTY/SUPPORT INFORMATION

3
Service and Warranty of these units are not covered by the BMW Group.
If you have any question regarding the solution, hardware or warranty please contact the Ubimax
Service desk:
Call: +1 312-728-3368 (Mo-Fr: 8am – 8pm EST)
Attachments
Quick Start User Guide Rev.2
Quick Reference Card
Order Form Rev.1
Terms and Conditions

Attachment 1 to B040319
May 2019

Dear Service Manager,
Welcome to the next generation of TSARA support with TSARA Vision. The
TSARA Vision solution will make the support process easier, faster and
cheaper by utilizing the remote support software from Ubimax and the
latest generation of RealWear HMT-1 smart glasses. With the head
mounted camera and display the TSARA service desk member can give
you real-time support and see what you see. Your hands will be free to
immediately start to perform tasks and to solve issues without the need
to hold a display or instructions.
If you need support or you have any questions you can schedule a
personal call with one of our TSARA Vision experts here:
https://bmwna.ubimax.com

ii
Table of Contents
CHAPTER 1: INITIAL SETUP HARDWARE................................................... 4
1.1 Familiarize yourself with the HMT-1 .................................................. 4
1.2 Check your eye dominance ................................................................ 6
1.3 Put the HMT-1 on ............................................................................... 6
1.4 Charging the HMT-1 ........................................................................... 7
1.5 Spare battery...................................................................................... 8
1.6 Turn the HMT-1 on ............................................................................. 9
CHAPTER 2: INITIAL SETUP SOFTWARE .................................................... 9
2.1 Welcome Process ............................................................................... 9
2.2 Troubleshooting Welcome Process & Login..................................... 11
CHAPTER 3: HOW TO START A REMOTE SUPPORT CALL........................ 12
3.1 Create a case in TSARA..................................................................... 12
3.2 Get ready for the call........................................................................ 13
3.3 Conducting a remote support call.................................................... 14
3.4 Functionalities within a support call ................................................ 14
3.5 Finish the call and wrap up............................................................... 15
3.6 Settings Menu................................................................................... 16
iii

4
CHAPTER 1: INITIAL SETUP HARDWARE
1.1 Familiarize yourself with the HMT-1
5
Attach the HMT-1 to the Bump Cap. Depending on your dominant eye, attach it either to the right
or the left side. To check your eye dominance, refer to the next page.
For detailed instructions on how to handle the device please follow
this link: https://vimeo.com/329121165/aa37e592d3. You can also
find this video in the “Support” section of the Dealership Portal.

6
1.2 Check your eye dominance
Eye dominance is the tendency to prefer visual input from one eye to the
other. Most people are right-eye dominant; however in a small portion of
the population neither eye is dominant. It is best to use your dominant
eye when viewing the display. To determine which eye is dominant:
1. Form a triangle with your hands placed together at arms length.
2. With both eyes open, focus on any distant object centered in the
triangle.
3. Maintaining focus on the object centered in the triangle, close your
right eye. If the object is still in the triangle, you are left eye dominant.
4. Maintaining focus on the object centered in the triangle, close your left
eye. If the object is still in the triangle, you are right eye dominant.
5. If the object is in the triangle with either eye then you are dominant
eye neutral.
6. Repeat test to confirm.
1.3 Put the HMT-1 on
Do not extend the display too far from your eye. Keep the display as close
to the eye as possible for the best viewing experience. Position the
shoulder and elbow joints into a “Z” shape, below the line of sight, left or
right eye.
The HMT-1 comes pre-installed on the Bump Cap. The display will be on
the right side. If your dominant eye is on the left side you will need to
remove the device and turn it so the display will be on the other side.
Table of contents


