BN Thermic Ltd,
34 Stephenson Way, Three Bridges,
Crawley, RH10 1TN
Tel: +44 (0) 1293 547361
Email: sales@bnthermic.co.uk
Web: www.bnthermic.co.uk
This product conforms to EU Directive 2002/96/EC.
This appliance bears the symbol of the crossed waste bin. This indicates that, at the end of its useful life, it must not be disposed of as
domestic waste, but must be taken to a collection centre for waste electrical and electronic equipment. It is the user's responsibility to
dispose of this appliance through the appropriate channels. Failure to do so may incur penalties established by laws governing
waste disposal.
3. MOUNTING / INSTALLATION
IMPORTANT!
Ensure that the mounting surface is capable of supporting the weight of the heater.
IMPORTANT!
The heater should only be mounted horizontally.
3.1 ELECTRICAL CONNECTION
IMPORTANT!
Ensure
you have read the Safety instructions and you are a suitably qualified electrician before continuing.
IMPORTANT!
The voltage marked on the heater must correspond to the supply voltage.
IMPORTANT!
To comply with the I.E.E. Wiring Regulations, the appliance must be
earthed; the supply circuit must be
adequate for the input of the
appliance, and the circuit protected by a suitable fuse.
If the heater is to be connected to a fixed
electricity supply, a suitable termination must be provided adjacent to the final position of the appliance. In this instance, such
a termination must be a double pole switch with a contact separation of at least 3mm in all poles.
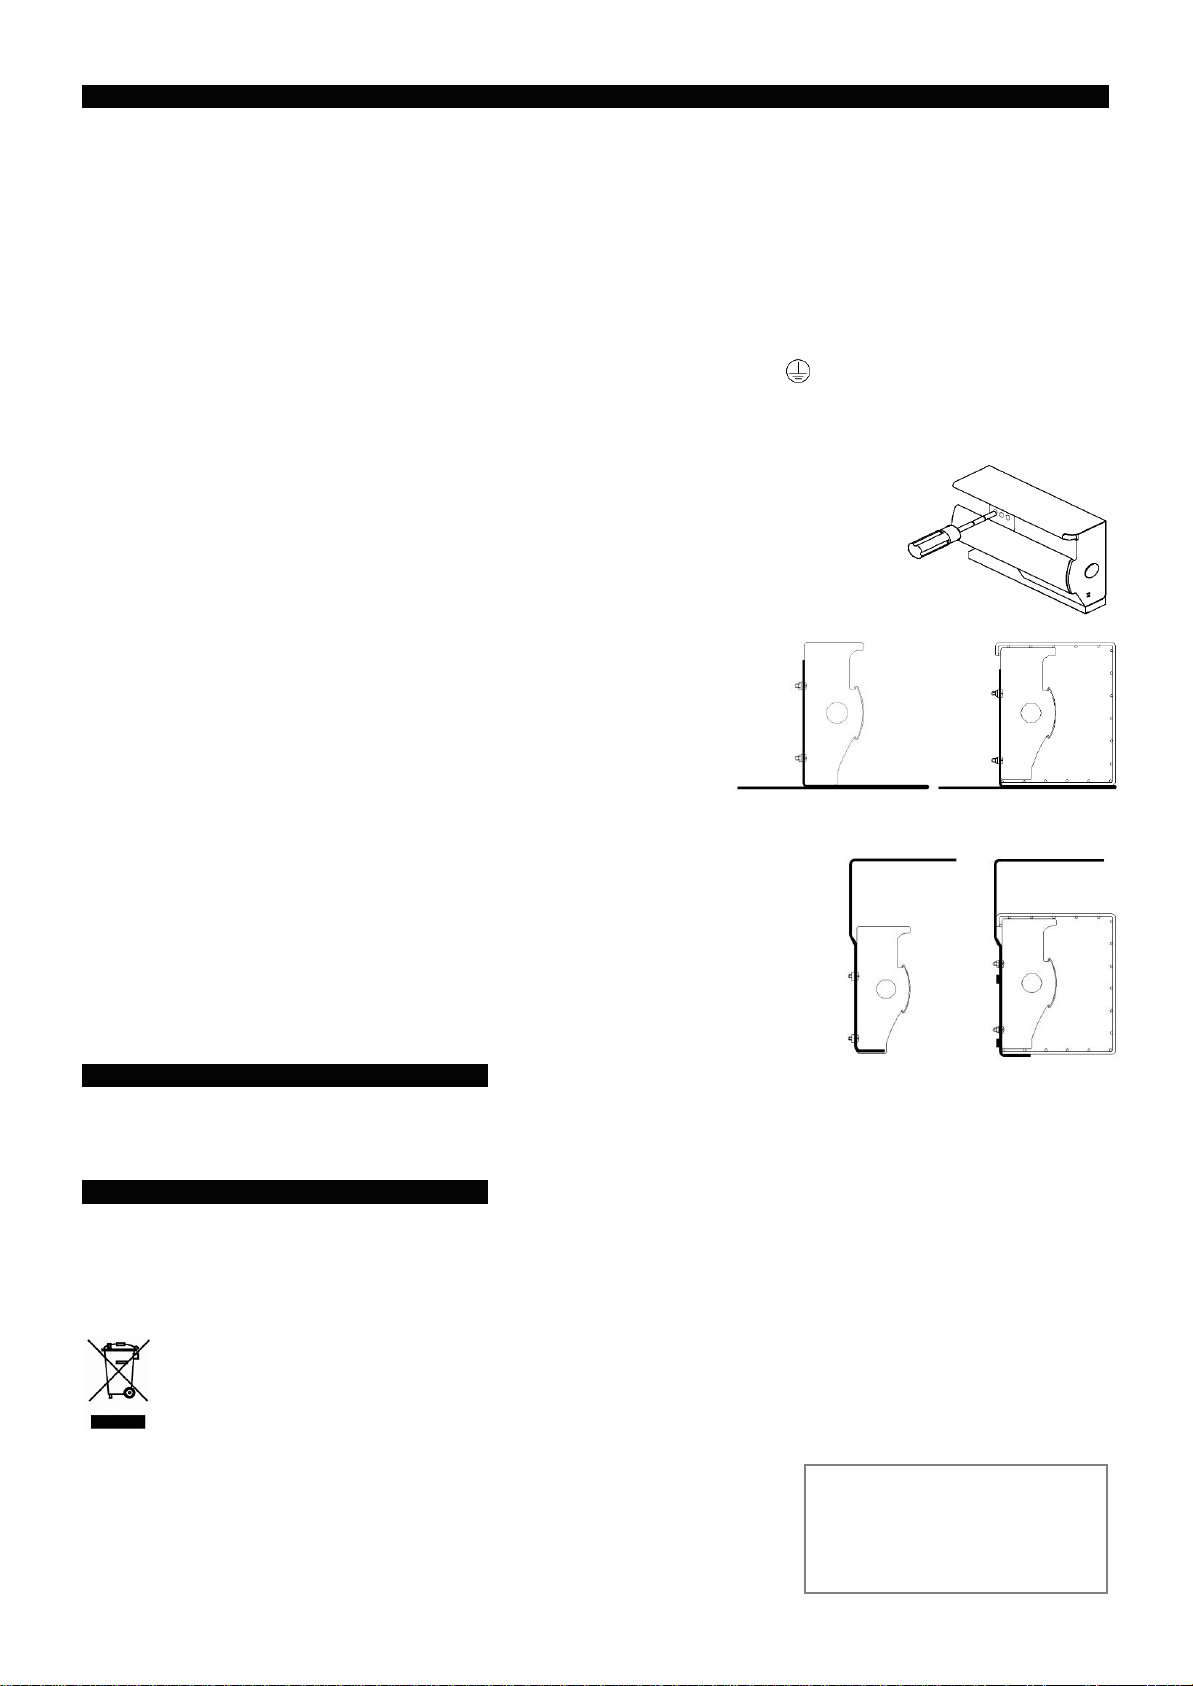
3.1.1
The terminal connection block is located under the cover on the right hand end of the heater. To access this cover unclip the
semi-circular cover that runs the length of the heater
3.1.2
A full length wire way is provided for use if you wish to have the cable entering from the left hand end.
3.1.3 Connect the Earth wire normally GREEN/YELLOW to the earth terminal having the symbol -
Connect the Live wire normally BROWN to the live terminal ‘L’.
Connect the Neutral wire normally BLUE neutral wire to the neutral terminal ‘N’.
3.1.4 After wiring, check that there are no bare wires, that all wires have been correctly connected and then replace electrical cover ensuring
screws are correctly tightened. Now replace the
semi-circular cover.
3.2
PEW MOUNTING
.
3.2.1The Heater must be mounted horizontally using 4 screws.
3.2.2Before drilling any holes ensure there are no wires or pipes in the area you are fixing the heater.
3.2.3After tightening the 4 screws loosen each by one half a turn to allow for expansion of the metal
case.
3.2.4If mounting on church
pews unless you use optional brackets they should be mounted on the back board
under the seat in as low a position as possible and with the air inlet and outlet pointing forwards.
3.3 FLOOR MOUNTING (using BLC-FB brackets)
3.3.1 Screw the brackets to the floor ensuring that they have been set at the correct
pitch to line up with the mounting holes in the back of the heater.
3.3.2 Without Guard –Using the screws supplied attach the heater to the bracket
set level and secure in place.
3.3.3 With Guard –Loosely attach heater to brackets. Locate guard over the top of the
heater, then slide bottom of guard under heater. Making sure bottom of the guard
is against the back of the bracket, gently push heater down and then tighten
screws holding heater to bracket.
3.3.4 After tightening the 4 screws loosen each by one half of a turn to allow for expansion of the metal case and guard if used.
3.4
HANG MOUNTING (using BLC-HB brackets)
3.4.1 Screw the brackets to underneath of the Pew ensuring that they have been set at the correct
pitch to line up with the mounting holes in the back of the heater.
3.4.2
Without Guard
–Using the screws supplied, screw the heater to the brackets. The
screws should be tightened into the clench nuts in the bracket and not put through the
slots. Dispose of the nuts as these are not required.
3.4.3 With Guard –Loosely attach heater to bracket through the slots using the screws and nuts
supplied. Locate guard over the top of the heater, then slide bottom of guard between bottom of
the heater and the bracket. Making sure bottom of the guard is against the back of the bracket,
gently push heater down and then tighten screws holding heater to the bracket.
3.4.4 After tightening the 4 screws loosen each by one half of a turn to allow for expansion of the
metal case and guard if used.
4. OPERATION
When energised the heater will provide its maximum output. Should the unit register an abnormal rise in temperature anywhere
along the element the over temperature safety device will shut the heater down. In these circumstances isolate the heater and
ensure that there is no obstruction to the air inlet or outlet. If the over temperature safety device operates repeatedly isolate the
heater and consult a qualified electrician.
5. MAINTENANCE
BN Thermic Electric Heaters are factory assembled, tested and are non-user serviceable. They are designed to operate for many years, problem
free. Maintenance is limited to the keeping of both inlet and exhaust areas free from any accumulation of dust and other foreign materials. This is
especially important immediately before a heating season. Any dust build-up can be loosened with a brush and a vacuum cleaner applied to the
airways to ensure complete removal of dust materials. An unusual odour may be noted on the initial turn-on period as any dust particles may have
been disturbed and will be burnt off from the element. Note: Before examining or carrying out any maintenance ensure the heater has cooled
down and is disconnected from the mains supply.
NOTE:
It is our policy to continually improve products and as such we reserve the right to alter data, specifications and component parts
without prior notice.
IMPORTANT:
No liability is accepted for incorrect use of this product.
WARRANTY:
Your BN Thermic product is guaranteed for one year from date of purchase. We
will repair or replace at our discretion any part found to be defective. We cannot assume any
consequential liability. This guarantee in no way prejudices your rights under common law and is
offered as an addition to consumer liability rights.
REGISTER:
Activate your warranty by registering online at www.bnthermic.co.uk and retain this
installation data for future reference.
BLCINS-v04


