Bodi-Tek Ab Core Trainer Pro BT-ABTR3 User manual

for the ultimate six pack
1-IN-BT-ABTR3-UK/1.0
Use
1 Remove any excess oil or moisture from the skin.
2 Ensure the control unit is switched o and attach to the pad.
3 Remove the plastic protective sheet from the back (orange side). Avoid
touching the gel pads with your ngers as this will reduce tackiness.
4 Place the Ab Core Trainer Pro onto your body, with the gel pads placed
directly over the targeted muscles.
5 Press the on/o button on the control unit/remote control to start
training. The blue LED indicates that programme 1 is activated. To
increase or reduce the workout intensity press the “+” or “- “ buttons. The
control unit will automatically switch o at the end of the 25 minute
workout programme.
6 To change between workout programmes press the “M” button. When
Programme 2 is selected the LED light will turn green. When switching
between programmes the intensity level resets to level 1.
7 Once nished, replace the plastic protective sheet and store
in a cool dry place.
Note: The control unit will ash either blue or green for 30 seconds
(depending on which programme is selected) and then turn o if the pads
are not in contact with the body.
Pad aftercare
You may extend the life of the pads by briey wetting the orange adhesive
side in cold running water and allowing them to air dry (do not heat).
Over-saturation with water will reduce the adhesive properties of the pads.
Alternatively apply to slightly damp skin and allow 1 minute for the adhesive
to anchor to the skin. Do not continue using a pad once the adhesive no
longer sticks or the pad has become damaged.
Important: Ensure the control unit is removed from the pad when
wetting the orange adhesive side.
Auto Training Programmes
Programme 1 -
This 25 minute programme progressively increases
exercise intensity and muscle contractions in stages as time elapses.
Programme 2 - This 25 minute toning workout integrates short interval
training with intensive spurts of activity.
Note: Both programmes automatically stop when the workout is complete.
!
Warnings
• Please read all instructions thoroughly
before use and retain for future
reference.
Not for use:
• On areas of skin with disorders such as
rosacea, pustular acne, abraded skin,
sensitive skin, or over scars, moles or varicose
veins.
• In the following cases: benign and malignant
tumours, hemorrhages, inflammations of
the skin, open and fresh wounds, bruises or
broken skin.
• If you have an electronic implant (e.g.
heart pacemaker).
User Guide
Customer Care
If you have any questions, or if you experience any difficulties please call
To register your two year guarantee online visit:
www.bodi-tek.co.uk/warranty
Specication
Model BT-ABTR3
Control Unit Input DC 5V 200mA
Control Unit Power USB rechargeable battery
Control Unit Pulse Rate 1 – 116Hz
Control Unit Output Voltage: 130Vp-p across 500 Ohm load
Remote Control Power CR2032 3V battery
Environment
Operating Temperature
10–30 degrees Celsius
Humidity 20%–65% RH
Atmospheric Pressure 700–1060 hPa
Storage & Transport
Temperature 5–40 degrees Celsius
Humidity 10%–90% RH
Read these instructions carefully before use and then retain for future use.
This means that the unit complies with current product legislation
Bodi-Tek, Bodi-Tek Technology for Life, Dezac and Ab Core Trainer Pro are trademarks of The
Dezac Group Ltd 2018. ©The Dezac Group Ltd 2018. Manufactured by The Dezac Group Ltd.
Dezac House, Montpellier St., Cheltenham, GL50 1SS, UK. www.bodi-tek.co.uk
Disposal
The Waste of Electrical and Electronic Equipment (WEEE) Directive
(2012/19/EU) has been put in place to recycle products using best
available recovery and recycling techniques to minimise the impact on
the environment, saving energy and resources and avoiding hazardous
materials from going to landfill. The product is classed as Electrical or
Electronic equipment so please ensure that at the end of the life of this
product it is disposed of in the correct manner in accordance with local authority
requirements. It must NOT be disposed of with household waste.
Intensity Adjustment
Intensity levels range from 1 to 15. Press the “+” button
to increase and the “-” button to decrease.
Strong
Weak
Ab Core Trainer Pro
™
Control Unit Charging
1 Use the USB charging cable (included) to connect
to a USB port. It takes 1 hour to fully charge.
2 The central LED light will show a consistent red
while charging.
3 When fully charged, the LED light will turn blue.
Note: The LED will ash either blue or green
(depending on which programme is selected) when
charging is required.
Remote Control
Remove battery cover on back of controller.
Insert CR2032 3V battery and close battery cover.
* To use the remote control, rst switch the main
control unit on, then turn on remote control. To turn
o the remote control, press the on/o button for
3 seconds.
2
1
1.5
MIN
1.5
MIN
11
MIN
1
MIN
3
MIN
7
MIN
2
MIN
2
MIN
21
MIN
Interval Training
Short interval training with intensive spurts of activity
Relaxation Relaxation
1.5
MIN
1.5
MIN
11
MIN
1
MIN
3
MIN
7
MIN
2
MIN
2
MIN
21
MIN
Toning
increasing
Toning
decreasing
Relaxation
with soft
toning
Relaxation
with soft
toning
Toning with
intervals
Toning with
intervals
Warm-up Relaxation
• Near the heart, around the mouth or on
diseased skin.
• In places with high humidity such as the
bathroom.
• While sleeping, driving or in the bath or
shower.
• If you suffer from high/low blood pressure
or from any other heart problems.
• If you are pregnant.
• Over the abdominal area during your
menstrual cycle.
Get your doctor’s permission before using
the Ab Core Trainer Pro if:
• You have a history of heart disease or cardiac
condition.
• You have an orthopedic implant.
• You suffer from epilepsy, multiple sclerosis,
phlebitis in its active phase (inflammation of
a vein), inflamed tissue through disease or
injury or varicose veins in its later stage.
• You have suffered acute trauma, fracture or
are recovering from recent surgery.
• You have swollen, inflamed or injured parts
of the body.
• You have diabetes and it affects the sensory
perception of your extremities.
• If you are in any doubt about using the
Ab Core Trainer Pro for any reason, please
consult your doctor before use.
Do NOT place the Ab Core Trainer Pro:
• Over sore or broken skin, scars, moles,
infected areas or parts of the body where
normal sensation is limited. In very rare
cases, skin irritation occurs around the
electrode area. If this happens discontinue
use.
• Over metal objects such as belt buckles or
jewellery.
Precautions
• Keep out of reach of children and pets.
• NOT for use on or by children under 14 years
old.
• Do NOT use if you are under the influence of
alcohol.
• Do NOT use whilst driving or operating
machinery.
• Do NOT touch the conductive side of the
belt during operation.
• Do NOT clean with solvents or abrasives.
• If the gel comes into contact with the
eyes, rinse thoroughly with water. If irritation
persists, consult a doctor.
• Should you experience any discomfort,
firstly reduce the intensity, if discomfort
persists discontinue use and contact our
Customer Care line.
• Always consult your doctor and obtain a
diagnosis if you do not know what is causing
your pain.
• Bodi-Tek will not accept responsibility if the
guidelines and instructions supplied with
the unit are not followed
General Care
• Do NOT immerse in water.
• Do not place close to excessive heat.
• Do NOT dissemble or repair.
• There are no user serviceable parts inside
the unit. If you have any problems using
the product, contact our Customer Care
Department.
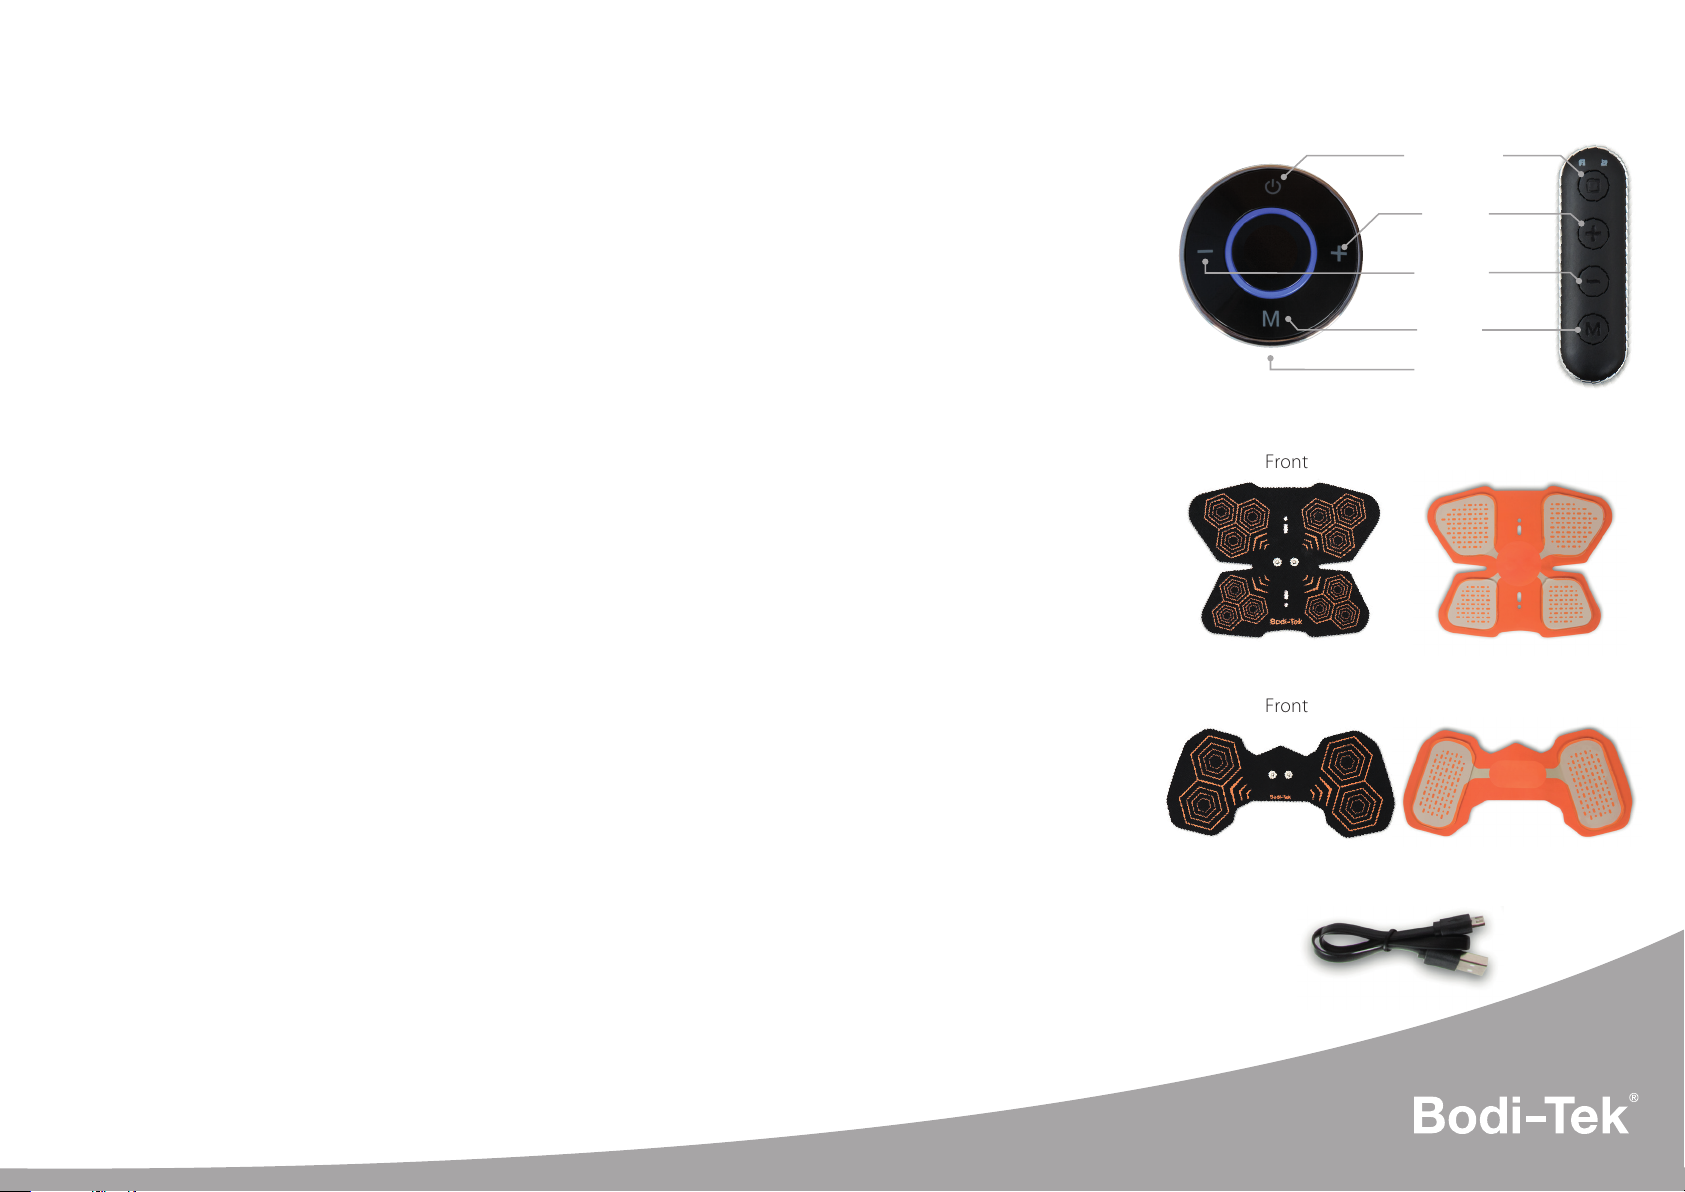
Know your Ab Core Trainer Pro
Control unit
USB Charging Cable
On/O button
“+” Intensity
increase
“–” Intensity
decrease
“M” Program
button
USB port
Front Back
Pecs & Bottom Pad
Front Back
Abs Pad
Remote control
Other Bodi-Tek Fitness Equipment manuals


Popular Fitness Equipment manuals by other brands


Huffy
Huffy M790054 owner's manual

Stairmaster
Stairmaster StepMill 5 Assembly manual

Titan Fitness
Titan Fitness LEGEXTCRL Operator's manual

Crivit
Crivit 93268 Assembly, operating and safety instructions

Vision Fitness
Vision Fitness R10 owner's guide

Huffy
Huffy Single Electronic Basketball System owner's manual