BOJ W-1285X User manual
USER MANUAL - MANUAL DE USO - MANUAL DE INSTRUÇÕES -
MANUEL D’UTILISATION - دليل المستخدم
WINE COOLER
Vinoteca - Refrigerador de vinho - Caves À Vin -
ﺬﻴﺒﻧ دﱪﻣ
W-1285X / W-1285B
W-0455X / W-0455B
W-0595X / W-0595B
W-0820X / W-0820B
W-0821X / W-0821B

English
- 2 -
NOTE: Thank you for your purchase and use our compressor wine coole!
Our product will create perfect temperature and humidity environment to store your collection of
wine quietly and peacefully.
CONTENT
Safety instructions & warnings
Installation
Description of the appliance
Operation
Troubleshooting
Maintenance and cleaning
Technical parameters
English
- 3 -
SAFETY INSTRUCTIONS & WARNINGS
Your safety is of the utmost importance to our company. Please make sure that you read this
instruction booklet before attempting to install or use the appliance. If you are unsure of any
of the information contained in this booklet, please contact the Technical Department.
• This appliance can be used by children aged from 8 years and above and persons with
reduced physical, sensory or mental capabilities or lack of experience and knowledge
if they have been given supervision or instruction concerning use of the appliance in a
safe way and understand the hazards involved. Children shall not play with the appliance.
Cleaning and user maintenance shall not be made by children without supervision.
• Children aged from 3 to 8 years are allowed to load and unload refrigerating appliances.
Children should be supervised to ensure that they do not play with the appliance.
• This appliance is intended for HOUSEHOLD USE ONLY and not for commercial or
industrial use.
• Keep ventilation openings, in the appliance enclosure or in the built-in structure, clear of
obstruction.
• Do not use mechanical devices or other means to accelerate the defrosting process,
other than those recommended by the manufacturer.
• Do not damage the refrigerant circuit.
• Do not use electrical appliances inside the storage compartments of the appliance,
unless they are of the type recommended by the manufacturer.
• Make sure that the appliance is connected to power supply in accordance with the rating
label.
• Use an independent grounded socket with 10A or higher, do not connect to transformer
or socket with multiple outlets.
• Make sure socket is grounded properly and do not modify power cord & plug.
• Connect power plug with socket rmly in case of possible risk of re.
• Plug should be within reach for easy disconnection after the appliance positioned in
case of accidents occurred.
• Do not store or burn gasoline or other inammbales near the appliance in case of
possible re.
• Do not store inammbales, explosives, acid & alkaline liquids etc.in the compartment of
the appliance.
• Do not operate other appliances in the compartment.
Caution
Prohibition Warning Caution
Warning

English
- 4 -
Child Safety
• Do not allow child play inside the appliance in case of entrapment.
• Do not allow child hang on the door to play in case of falling of the appliance.
• Do not allow child reach into compressor compartment or touch metal components at
rear of the appliance in case of possible injury.
Keep away from water
• Do not spray water on the appliance or wash the appliance by pouring or lling water in
case of invalid insulation and possible electric shock.
Be careful of freezing
• Do not touch surface of the liner inside the compartment, especially with wet hand, in
case of frozen injury while the appliance is in operation.
Do not open the door for long periods
• Opening the door for long periods can cause a signicant increase of the temperature in
the compartments of the appliance.
Modication on the appliance not allowed
• Do not reconstruct the appliance by yourself which might cause damages to the
appliance.
Unplug the appliance under certain conditions
• Unplug the appliance before cleaning & maintenance.
• Unplug the appliance when power cut occurred.
Disposal of the appliance
• Please according to local regulations regarding disposal of the appliance for its
ammable refrigerant and blowing gas.
• Before you scrap the appliance, please take off the doors to prevent children trapped.
• Send the appliance to the designated disposal location.
Do not damage the power cord
• Do not disconnect the appliance by pulling power cord rather than pulling the plug.
• Do not set the appliance above the power cord or step on the cord intentionally.
• Put the power cord at right place when moving the appliance.
When the power cord is damaged
• Do not use damaged power cord, and get it replaced immediately by manufacturer
service agent or by qualied electrician.
• If needed, extend the power cord with cord of 0.75mm2 or bigger by qualied electrician.
Prohibition

English
- 5 -
INSTALLATION
Position
Do not lean the appliance over 45°when moving it to position.
The appliance must be put on at,rm & dry oor or similar noncombustible pad; do not use
the package foam pad.
Do not put the appliance in the wet place.
Do not use the appliance in the frozen place.
Do not use the appliance outdoor in case of sunlight or rain.
The appliance (Free standing models) must be set with 10 cm wider space around for good
ventilation; it is normal for the housing of the cabinet getting heat when it’s in operation.
Wine bottles could be stored when you feel cooling inside after the appliance operates around
1 hour.
PRODUCT CATEGORY
Models Free Standing Built-in Built-under
W-1285X
W-1285B
W-0455X
W-0455B
W-0595X
W-0595B
W-0820X
W-0820B
W-0821X
W-0821B
English
- 6 -
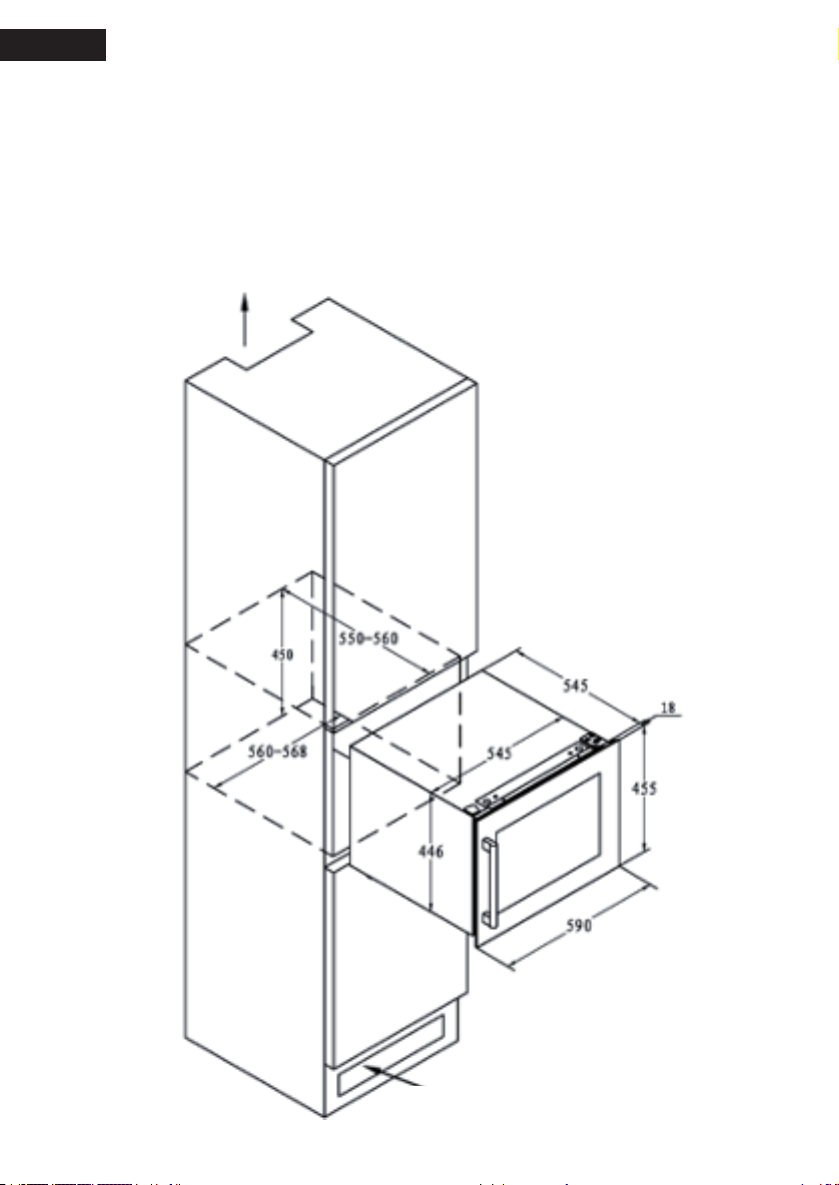
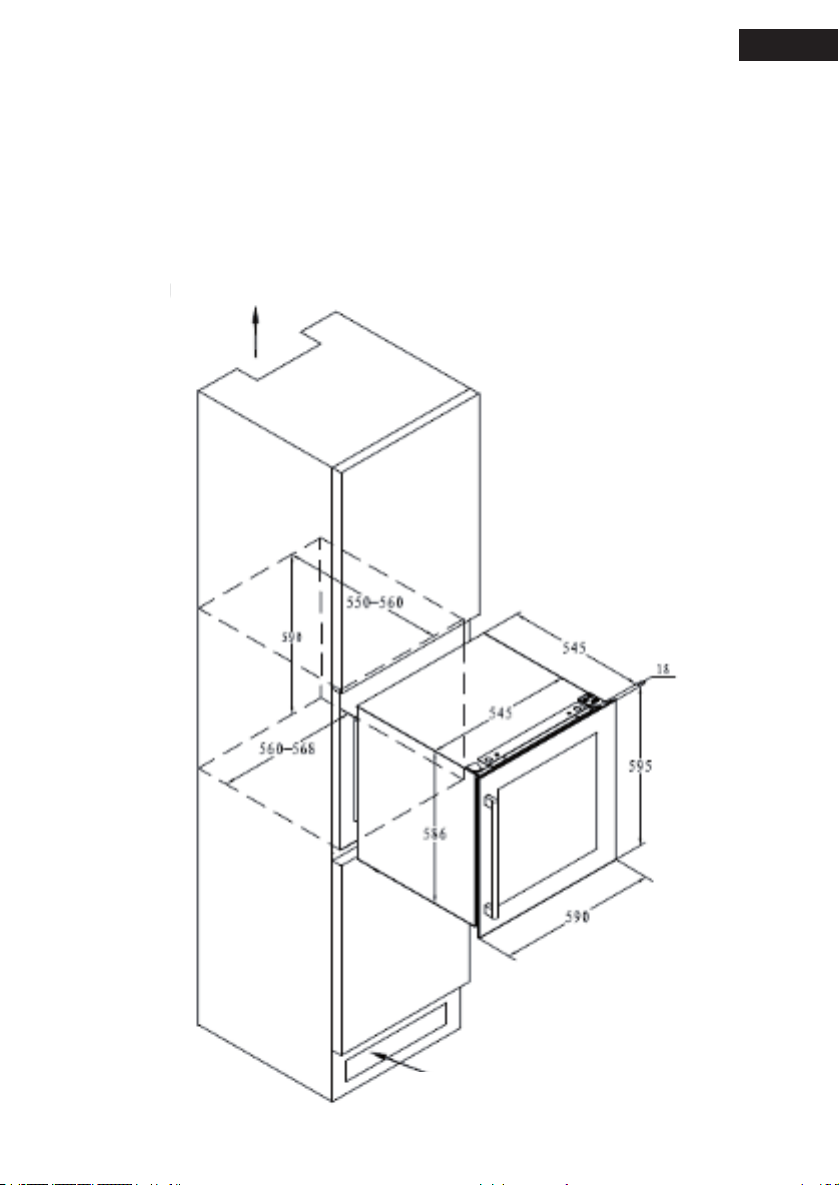
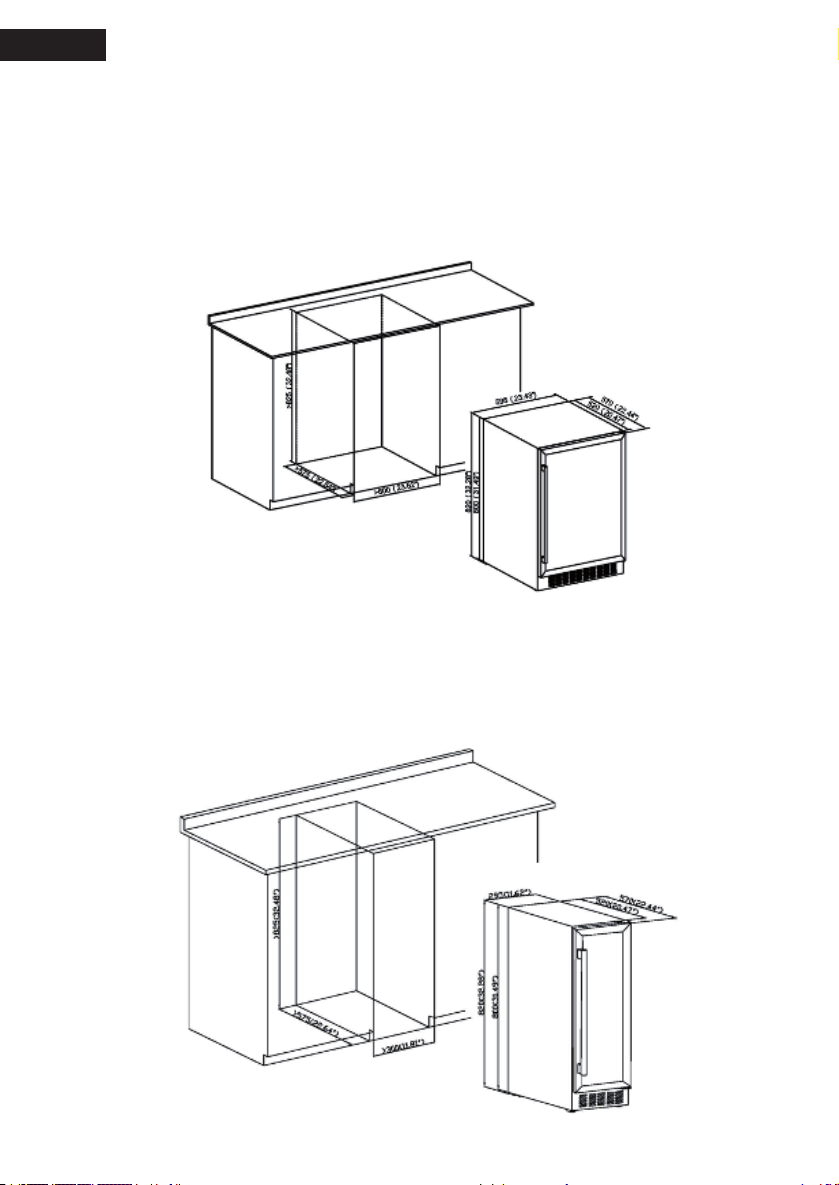
INSTALLATION OF FULL BUILT-IN MODELS.
The appliance is designed to fully build into the cabinet.
Demonstration for building into the cabinet:
W-0455X
W-0455B
Min 200cm2
Min 200cm2
English
- 7 -
W-0595X
W-0595B
Min 200cm2
Min 200cm2
English
- 8 -
INSTALLATION OF BUILT-UNDER MODELS.
The appliance is designed to either build under the counter or stand alone on the oor.
Demonstration for building under the counter:
W-0820X
W-0820B
W-0821X
W-0821B

English
- 9 -
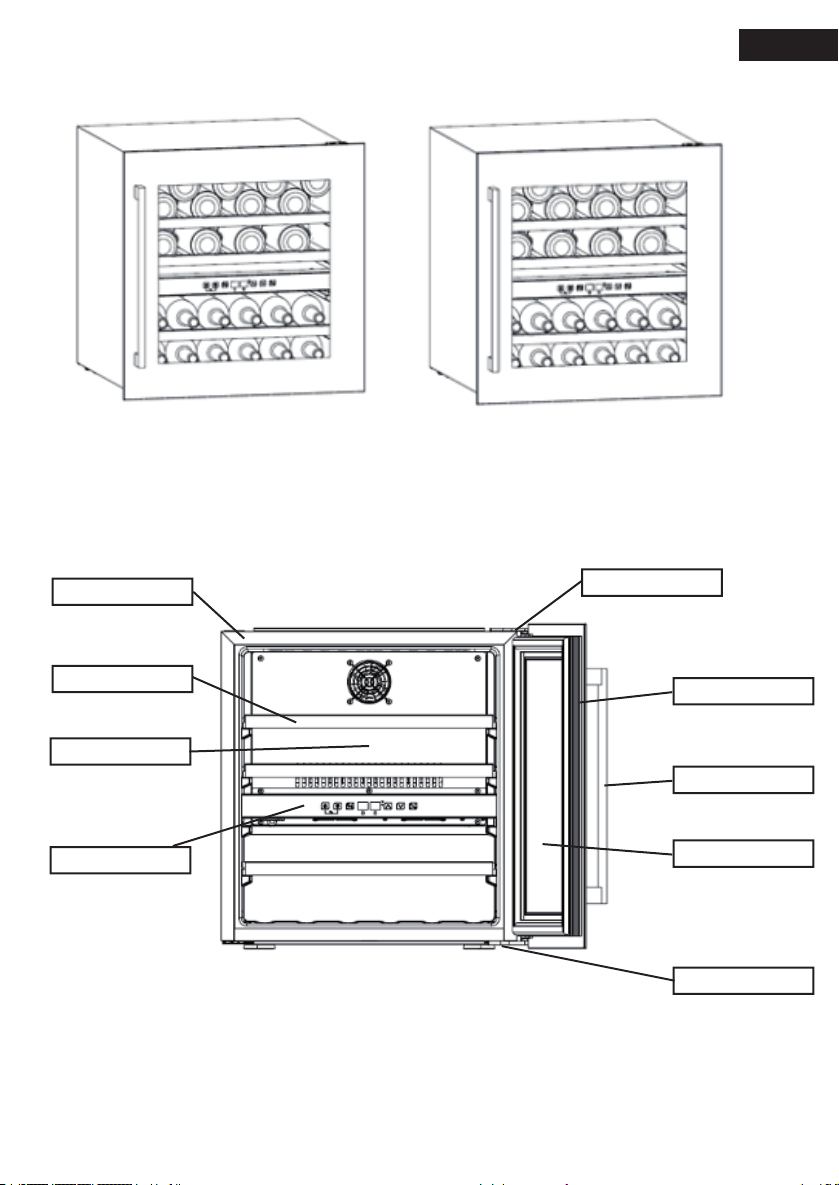
DESCRIPTION OF THE APPLIANCE
Overall image
W-1285X W-1285B
1. Housing
3. Shelf
2. Cover board
11. Upper hinge
10. Door seal
9. Handle
8. Door
7. Lower hinge
4.Control panel
12. Upper hinge cover
5. Sensor shield
6. Adjustable foot

English
- 10 -
W-0455X
W-0455B
8. Door seal
7. Handle
6. Door
5. Lower hinge
9. Upper hinge
1. Housing
2. Control panel
3. Cover board
4. Shelf
English
- 11 -
W-0595X W-0595B
1. Housing
2. Shelf
3. Cover board
4. Control panel
6. Door seal
7. Handle
8. Door
9. Lower hinge
5. Upper hinge

English
- 12 -
W-0820X W-0820B
1. Housing
2. Shelf
3. Control panel
5. Grill
4. Cover board
10. Door seal
9. Handle
8. Door
7. Lower hinge
6. Adjustable foot
11. Upper hinge

English
- 13 -
W-0821X W-0821B
10. Door seal
9. Handle
8. Door
7. Lower hinge
11. Upper hinge
1. Housing
2. Shelf
3. Control panel
5. Grill
4. Cover board
6. Adjustable foot

English
- 14 -
Note:
Shelves, door frame, handle and other accessories could be different according to different
models and conguration.
All photos in this manual are for reference. The appliance you buy might not be exactly the same
as shown here.
Please refer to the actual product.
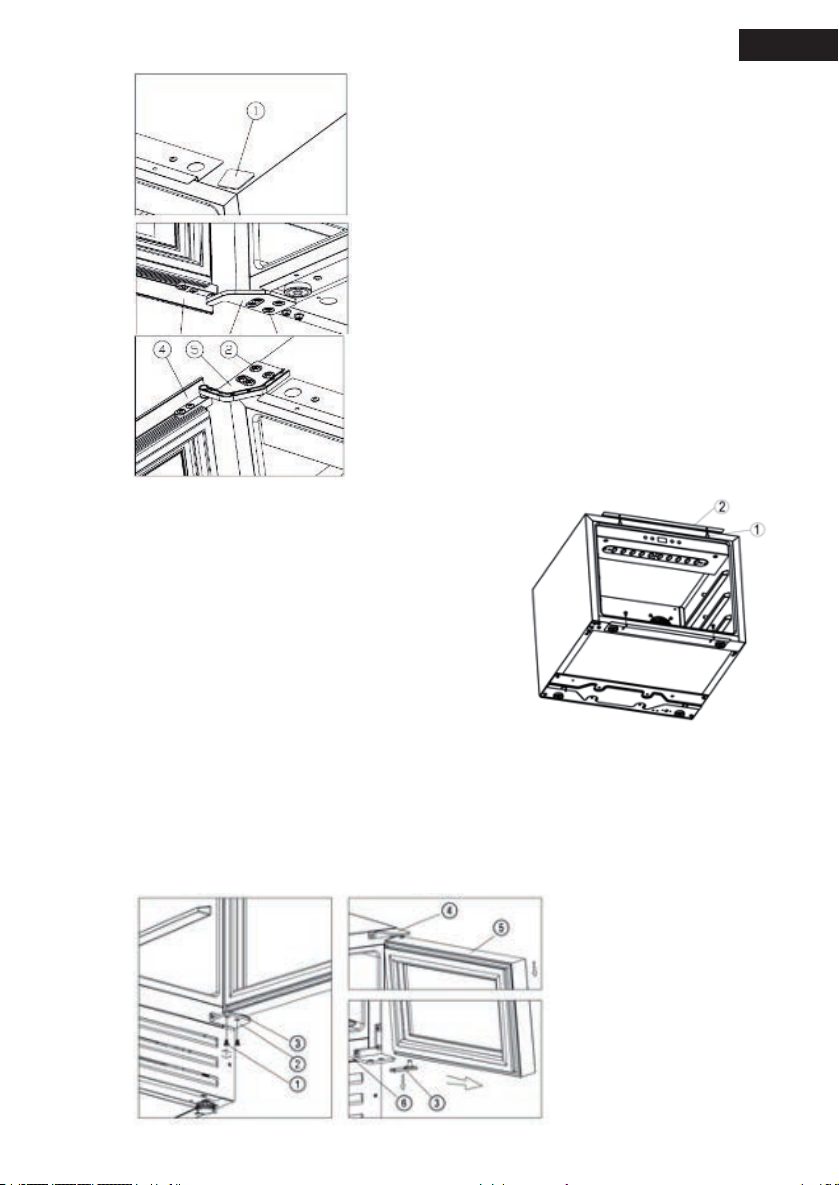
Installing handle and reversing the door
1. Handle installation
Our wine cooler is delivered with the handle in a separate package.
The handle is delivered in a separated package with screws
together inside the carton.
Reveal two small holes on the door frame from inner side by
pulling out a bit the door seal.
Aim the handle to the holes and insert the screws from inside.
Screw them up with screw-driver.
Put back door seal to cover the screws.
2.Reversing the door
Our wine cooler is delivered with the door opening from left to right. To reverse the
opening direction:
W-0455X, W-0455B, W-0595X, W-0595B
Figure 1
• Open the door at 90 degrees and keep it steady.
• Unscrew the M5*16screws , dismantle the right
upper hinge , and remove the door.[Figure 1].
Figure 2
• Unscrew the M5*16screws ,dismantle the right lower
hinge .[Figure 2]
Figure 3
• Remove the lid .[Figure 3]
English
- 15 -
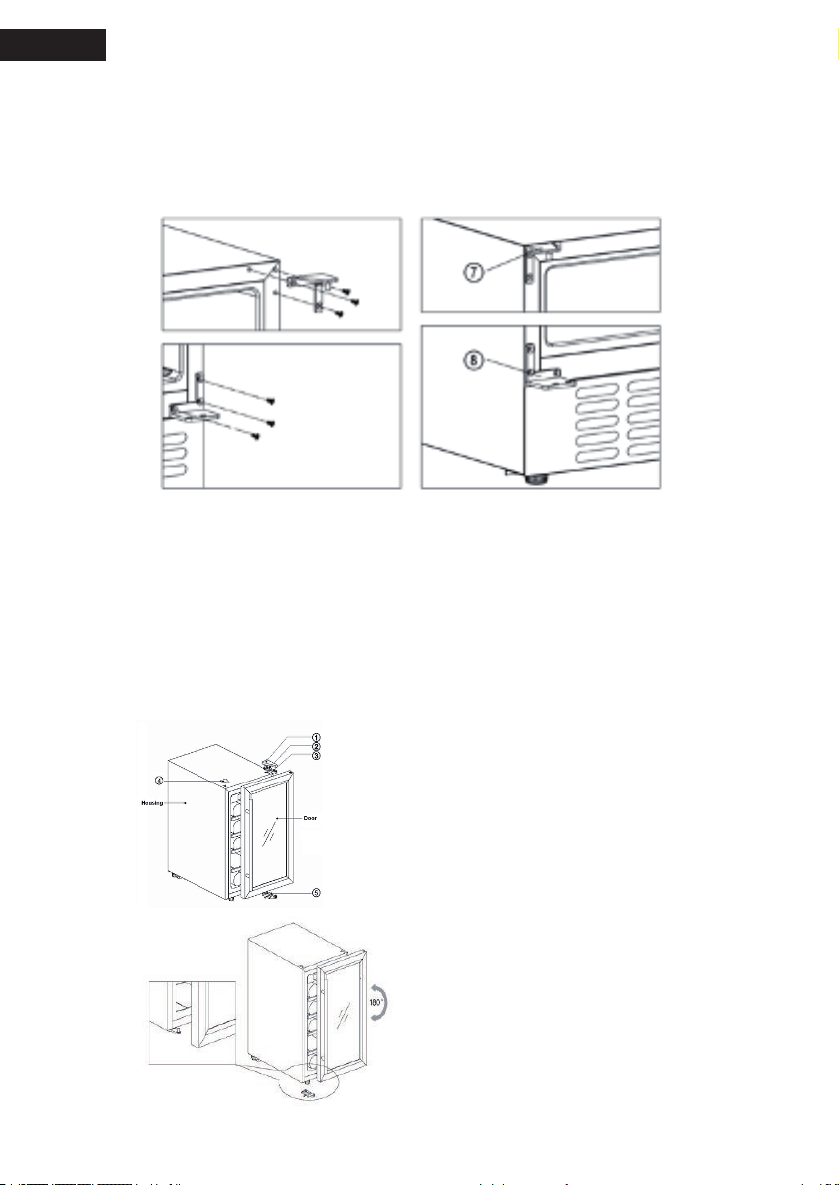
Figure 4
• Install the lid .[Figure 4]
Figure 5
• Install the right upper hinge and screw tight
theM5*16 screws .[Figure 5]
Figure 6
• Turn the door 180 degrees, and insert the right lower
hinge , screw tight M5*16 screws . [Figure 6] Door
reversing is nished.
3. Bracket installation
The appliance is equipped with a pair of brackets at
the top() and at the bottom.
This pair of brackets might not be needed and can
be removed as per your actual installation situation
when you build the appliance into your closet.
If the opening size of your closet is bigger than
the appliance, you could x 4 screws(,ST4.0*13)
(packed separately in a plastic bag) into the inner
wood plate of closet. In this way, the appliance will be
built-in and xed tight with your closet.
Note: Seller should not bear responsibility for any damages to the door or other parts
during operation if the end-user does not follow this instruction to x the appliance with
closet when needed.
W-0820X, W-0820B,W-0821X, W-0821B
Open the door at 90 degrees and keep it steady.
Figure 1 Figure 2
English
- 16 -
• Unscrew the two screwsfrom the right lower hinge [Figure 1].
• Pull the door outwards slowly [follow the arrow direction in Figure 2] to get off the
lower hinge and continue to pull the door downwards slowly until getting off from
the top right hinge , and take off the lower hinge plate from the door axis hole
[Figure 2].
• Screw top right hinge& right lower hingeoff from the cabinetand keep them in the
polybag for needs if you want to change back left opening door in the future.[Figure 3]
• Install the top left hinge& left lower hingeto the left side of the cabinet.(&
delivered in a separated polybag inside the packing carton).[Figure 4]
• Turn the door 180 degrees upside down and insert the lower hinge plateto the
bottom door axis hole. Fit the top door axis hole to the top left hingeand put lower
hinge plateslowly on the left lower hingeand keep the door steady. Screw up the left
lower hinge with the plate. Door reversing is nished.
W-1285X, W-1285B
1) Close the door.
2) Take off the door hinge cover on the up right corner;
Unscrew the ange screws; Take off door hinge;
Remove the up left side cap.
3) Lift the door up until the door gets off the lower door
hinge.
4) Unscrew the lower door hinge.
5) Fit the lower door hinge to the down left corner;
Put the door above and insert into the lower door
hinge.
6) Fit the door hingeto the up left corner and
Figure 3 Figure 4
English
- 17 -
screw the ange screws; Put on the door hinge
cover; Put the cap to the up right side.
Operation
Start operation
1. Cleaning the compartment
Before power on, clean inside of the appliance and check the drainage pipe in good
connection. (For details, please refer to the “Maintenance and cleaning”)
2. Put the appliance still
Before power on, level the appliance on the rm & dry oor for at least 30 minutes.
3. Power on
The appliance start operation and it will cool down inside after 1 hour, otherwise you
should check the power connection.
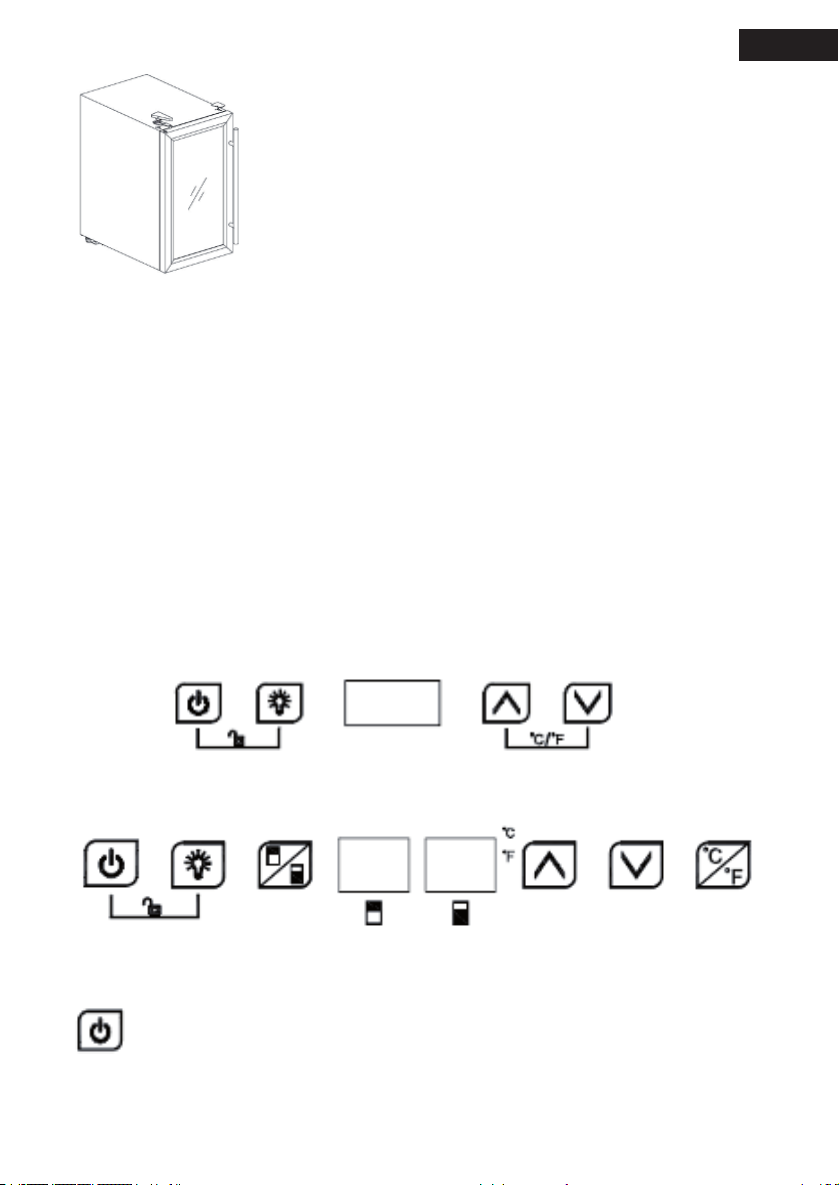
Control panel
Single Zone model: W-0455X, W-0455B
Dual Zones models: W-1285X, W-1285B, W-0595X, W-0595B, W-0820X, W-0820B,
W-0821X,W-0821B
All keys would be invalid in lock mode. Please unlock rst.
ON/OFF
1. Keep pressing the key 3 seconds, power down, goes to stand-by mode.
2. Keep pressing the key again 3 seconds to return back to normal working.

English
- 18 -
Light
Press the key, turn on or turn off the LED lights inside. In stand-by mode, the key is
invalid.
Zone switch (Dual zones models only)
Press the key to switch between upper zone and lower zone for choosing which zone
to set temperature. Press the key once, the LED display in chosen zone ash regularly.
Press up and down key to set temperature. Press the key again; switch the zone to set
temperature.
UP
Press the key once, LED Display in regular ash showing current set temperature.
Continue pressing to adjust set temperature, one press increase 1ºC. Regular ash quit
after 5 seconds detecting no press and new set temperature save. LED display return to
show actual temperature inside.
Down
Press the key once, LED Display in regular ash showing current set temperature.
Continue pressing to adjust set temperature, one press reduce 1ºC. Regular ash quit
after 5 seconds detecting no press and new set temperature save. LED display return to
show actual temperature inside.
Child Lock (Combination key)
1. Lock: Press both keys at the same time for 3 seconds to lock.
2. Unlock: Press both keys at the same time for 3 seconds to unlock.
Fahrenheit/Celsius display interchange (Dual zones models only)
Switch temperature display between Fahrenheit and Celsius by pressing and holding the
key for 2 seconds.
Fahrenheit/Celsius display interchange (Single zone models only)
Switch temperature display between Fahrenheit and Celsius by pressing both keys.
Attention
1. For both upper and lower zone, the cooling temperature could be set from 5ºC to
22ºC for Dual Zones models and from 5 to 20ºC for single zone models. And lower
zone set temperature will equal to or be higher than that of upper zone.
2. Alarm sound: when the system malfunction occur and alarm sound, press any key on
the control panel to cancel the alarm sound.

English
- 19 -
3. Error code:
When the temperature sensor of upper zone failure occur, error code displays: E1 for
open circuit; E2 for short circuit.
When the defrost sensor failure occur, error code displays: E3 for open circuit; E4 for
short circuit.
When the temperature sensor of lower zone failure occur, error code displays: E5 for
open circuit; E6 for short circuit.
Wine storage
• The appliance equips with sufcient shelves to store your collection of wine.
Models
No. of
wooden
shelves
Standard
Bordeaux
with 750ml
Storage
W-1285X
W-1285B 9 77 bottles
W-0455X
W-0455B 228 bottles
English
- 20 -
Models
No. of
wooden
shelves
Standard
Bordeaux
with 750ml
Storage
W-0595X
W-0595B 3 36 bottles
W-0820X
W-0820B 546 bottles
W-0821X
W-0821B 417 bottles
This manual suits for next models
10
Table of contents
Languages:
Other BOJ Kitchen Appliance manuals


Popular Kitchen Appliance manuals by other brands


BORETTI
BORETTI BBA99 user manual

Vulcan-Hart
Vulcan-Hart VSX24D Installation, operation & service parts manual

Back to Basics
Back to Basics Milkshake Maker instruction manual

Gaggenau
Gaggenau VP 414 610 use and care manual

Bestron
Bestron ACF300M instruction manual

Domo
Domo PIET HUYSENTRUYT DO9076KR Instruction booklet