BOJ MC-2000 User manual

USER MANUAL - MANUAL DE USO - MANUAL DE INSTRUÇÕES -
MANUEL D’UTILISATION - دليل المستخدم
MC-2000
MULTIFUNCTIONAL KITCHEN MACHINE
Robot de cocina multifunción - Aparelho de cozinha
multifuncional - Appareil de cuisine multifonction
ﻒﺋﺎﻇﻮﻟا دﺪﻌﺘﻣ مﺎﻌﻃ ﴬﺤﻣ

English
- 2 - - 3 -
IMPORTANT
1. Before using the appliance, Read these instructions and illustrations carefully.
2. Keep these instructions for use for future reference.
3. Check if the voltage indicated on the appliance corresponds to the local mains voltage before
you connect the appliance.
4. Never use any accessories of parts from other manufactures. Your guarantee will become
invalid if such accessories or parts have been used.
5. Don’t use the appliance if the mains cord, the plug or other parts is damaged.
6. Thoroughly clean the parts that will come into contact with food before you use the appliance
for the rst time.
7. Always put the main appliance on a at, dry and clean surface.
8. Don’t touch the blade especially they are running. They are very sharp. Only hold the upper part
of the blade while removing or re-inserting it.
9. Don’t use your attachment and/or appliance if it has been damaged. You should contact an
approved service centre.
10. This appliance shall not be used by children. Keep the appliance and its cord out of reach of
children.
11. Never let the appliance run unattended.
12. Switch the appliance off before detaching and install any accessory.
13. Wait until moving parts have stopped running before you remove the parts of the appliance.
14. Never immerse the main appliance in water or any other liquid, nor rinse it under the tap. Use
only a moist cloth to clean the appliance.
15. Unplug the appliance immediately after use.
16. Switch off the appliance and disconnected from supply before changing accessories or
approaching parts which move in use.
17. Appliances can be used by persons with reduced physical, sensory or mental capabilities
or lack of experience and knowledge if they have been given supervision or instruction
concerning use of the appliance in a safe way and if they understand the hazards involved.
18. Children shall not play with the appliance.
19. When processing hot food (for temperature at or above 60℃) , don’ t touch the measuring cup.
20. Be sure to place the appliance on a clean, solid, even and non-heatable surface, particularly
when using the steam tool.
21. The Spatula is only used for moving the food out of the bowl. Don’t use it while the blade is
running.
22. This appliance is intended to be used in household and similar applications such as:
-Staff kitchen areas in shops, ofces and other similar working environments;
-in agricultural working environments;
-by customers in hotels, motels etc. and similar establishments;
-in bed-and breakfast type environments.
23. Be careful if hot liquid is poured into the food processor as it can be ejected out of the
appliance due to a sudden steaming.
24. Caution: “Hot surface” logo marked on the bowl: To indicate that the marked item can be
hot and should not be touched without taking care!
25. When the current temperature of the bowl temperature is at or above 60ºC, you will nd:
1) The working speed will be limited at speed 1-4.
2) The appliance will automatically switch the working speed to speed 4, Even through
the current working speed is set at speed 5-10.
26. While using heating function, the max quantity of food to be processed can’t be higher than
the mark on the bowl ( ).
27. There is a potential injury from misuse. Please handle it with care.
28. CAUTION: Ensure that the blender is switched off before removing it from the stand.
29. If the appliance is overlled, boiling water may be ejected.
30. Do not immerse the appliance in water or any other liquid.

English
- 2 - - 3 -
PRODUCTION INTRODUCTION:
The product is a new design multifunctional kitchen machine. Fashionable features as below:
1. 7 inches color screen display.
2. WIFI function.
3. Touching screen operation.
It can help you make delicious food and enjoy your life easy.
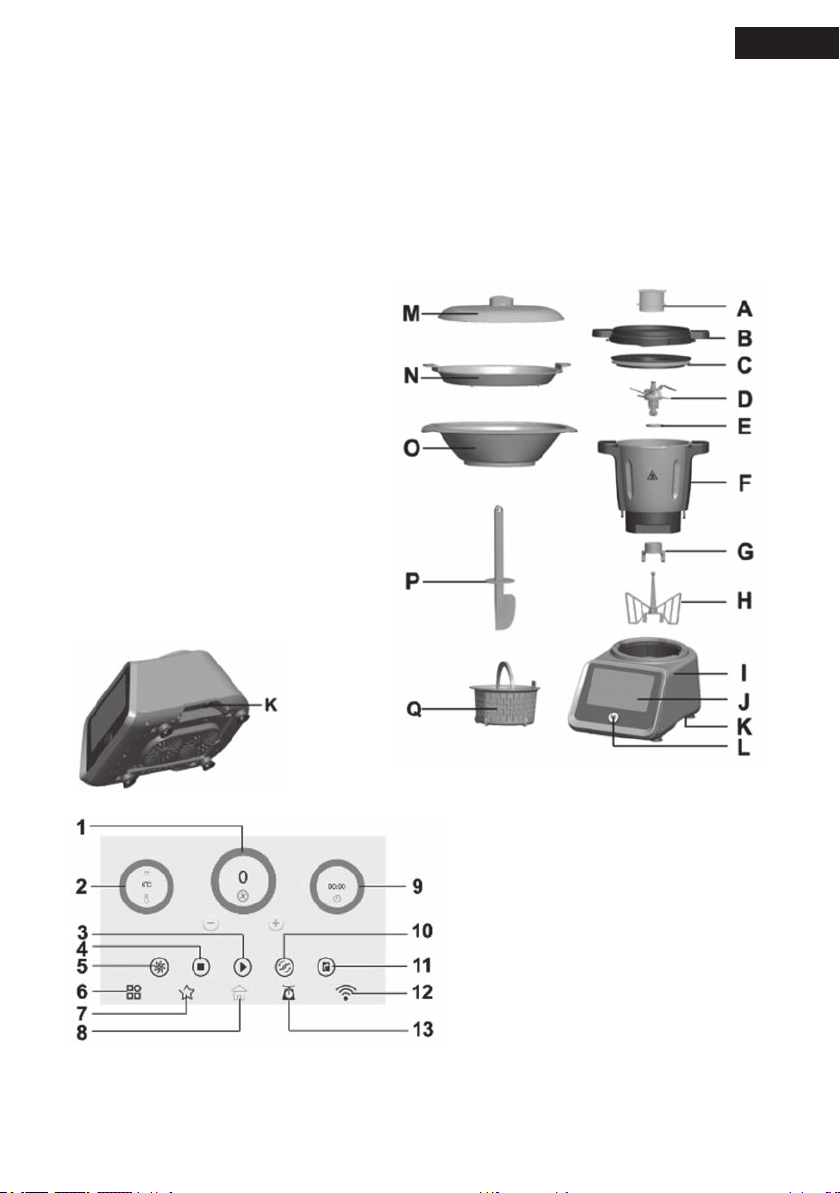
PARTS NAME:
A. Measuring cup (Max. 100ml)
B. Bowl lid
C. Inner lid with airproof ring
D. Blade
E. Airproof ring
F. Bowl (Max.2L )
G. Nut
H. Stirring attachment (Buttery)
I. Main appliance
J. LCD
K. “On/Off” button
L. ”Start/stop” button
M. Lid
N. Food steamer (Tray)
O. Steamer
P. Spatula
Q. Inner basket
R. Blade sleeve
LCD:
1: denotes the blade running in the forward
direction (Speed: 1-10).
Tips: You may click “+”/”-” or slide the
circle to set the speed you need.
2: denotes the temperature. (Temperature
range: 30-120ºC. From 30-120ºC,
temperature increases by 5ºC.)
Tips:
1) You may click “+”/”-” or slide the circle
to set the temperature you need.
2) It will show real-time temperature if
the bowl is installed, and will show
0ºC if the bowl is removed.

English
- 4 - - 5 -
3: “Start/stop”. Click it to start or stop the appliance.
4: Clear key. Click it to clear all the previous settings and go back to “stand-by state”.
5: “Pulse” key. You may use it to let the appliance instantly start to run at the highest speed 10. If
you don’t touch the key, the appliance will recover to the previous working speed soon.
Tips: When the temperature of the bowl is at or above 60ºC, or the blade is running in the
reversal direction, or at “stop” state, it can’t be used.
6: Recipe. Click it to select the recipes you need.
7: Favorites. You may collect your favorite recipes here.
8: DIY.
Tips: When the working temperature is set between 105ºC and 120ºC, to avoid the dangerous
situation of spilling food, we recommend that the maximum quantity of the food processed is
no more than 1.5L.
9: Denotes the time. (Time range: 0second-99minutes)
0-60 seconds: From “-” to “+”, the time increases by 1 second.
1-10minutes: From “-” to “+”, the time increases by 30 seconds.
10minutes-99mintes: From “-” to “+”, the time increases by 1 minute.
Tips:
1) You may click “+”/”-” or slide the circle to set the time you need.
2) If you don’t set the working time, the longest work time of the appliance is 99 minutes at
each time!
10: Denotes the blade running in the reversal direction (Speed: 1 -3).
11: Shortcut menu. They are “JAM”,” STEAMING”, ”SOUP”, “KNEADING 1” and “KNEADING 2”.
1) “JAM”
The recommended recipe as below:
Fruits: 500g
Default setting:
Step 1: working time is 15 seconds, speed is 6. Once this step start, you may increase the
working time during the operation.
Step 2: pause for 2 seconds.
Step 3: working time is 10 minutes, speed is 1 and target temperature is 100ºC. Once this step
start, you may reset the time and temperature.
Tips: Sound “Beep” will be heard while the working time is left 2 seconds. At last, the appliance
goes back to stand-by state.
2) ” STEAMING”
The recommended recipe as below:
Broth or water: 500-600ml
Default setting:
Working speed is 1, time is 17 minutes and target temperature is 120ºC.
Tips:
(1) You may reset the time before the operation and during the operation.
(2) Sound “Beep” will be heard while the working time is left 2 seconds. At last, the appliance goes
back to stand-by state.

English
- 4 - - 5 -
3) “SOUP”
The recommended recipe as below:
Soup: 1L (400g Vegetable and 500ml water).
Default setting:
Step 1: The blade runs in the reversal direction at speed 1, working time is 20 minutes and
target temperature is 100ºC.
Step 2: pause for 2 seconds.
Step 3: working time is 2 minutes, speed is 4 and target temperature is 100ºC.
Step 4: pause for 2 seconds.
Step 5: working time is 8 minutes, speed is 4 and target temperature is 100ºC.
Tips: Sound “Beep” will be heard while the working time is left 2 seconds. At last, the appliance
goes back to stand-by state.
4) “KEADING 1”
The recommended recipe as below:
Flour: 500g, water: 285g, sugar: 10g, butter: 10g, salt: 10g, dry yeast: 15g.
Default setting:
Step 1: working time is 30 seconds, speed is 4.
Step 2: pause for 3 seconds.
Step 3: The blade runs in the reversal direction at speed 3, working time is 25 seconds.
Step 4: pause for 3 seconds.
Step 5: working time is 30 seconds, speed is 4.
Step 6: pause for 4 seconds.
Step 7: The blade runs in the reversal direction at speed 2, working time is 25 seconds.
Tips: Sound “Beep” will be heard while the working time is left 2 seconds. At last, the appliance
goes back to stand-by state.
5) “KEADING 2”
The recommended recipe as below:
Flour: 500g, water: 285g, sugar: 10g, butter: 10g, salt: 10g, dry yeast: 15g.
Default setting:
Step 1: working time is 45 seconds, speed is 4.
Step 2: pause for 3 seconds.
Step 3: The blade runs in the reversal direction at speed 3, working time is 40 seconds.
Step 4: pause for 3 seconds.
Step 5: working time is 45 seconds, speed is 4.
Step 6: pause for 4 seconds.
Step 7: The blade runs in the reversal direction at speed 2, working time is 40 seconds.
Tips: Sound “Beep” will be heard while the working time is left 2 seconds. At last, the appliance
goes back to stand-by state.

English
- 6 - - 7 -
12: “WIFI” key.
You may follow the steps to use it:
1) Install APP on your mobile phone.
2) Click “WIFI” touch key to pop up account and password.
3) Open APP on your mobile, and then input the account and password. If “WIFI” logo changes
color, which means WIFI is well connected. Now you may operate the appliance via your
mobile phone.
Tips:
1. The appliance is only allowed to connect one mobile phone at each time.
2. Frequency range: 2.4-2.5GHz.
3. Software version: V1.0
4. Hardware version: V1.0
5. Maximum RF output power of the product: 12.5dbm
13: “weigh” key. (Weighing range: 0-5000g)
You may follow the steps to use it:
1. Click “weigh” key.
2. When LCD shows “0000”, put the food in bowl.
3. Read the number shows on the LCD. That is the net weight (Unit: g) of the food added.
4. Click “ ” on pop-up dialog, the read number is cleared. And you may continue weighing the
food to be added.
14: Stand-by state.
Plug in and press “On/Off button (K)” to start the appliance, and
the appliance goes into stand-by state.
If you don’t do any operation to the appliance in 5 minutes under
stand-by state, the appliance will go into “sleep mode (black
screen)”. You may press “Start/Stop” button (L) to wake the
appliance.
If you don’t do any operation to the appliance in 10 minutes under the pause status, the appliance
will go into “sleep mode (black screen)”. You may press “Start/Stop” button (L) to wake the
appliance.

English
- 6 - - 7 -
15. “Start/Stop” button (L).
Press this button to start/stop the appliance, or recover the appliance back to stand-by state.
If you hold this button longer than 3 seconds at any time, the appliance will exit any current
working condition instantly and go back to stand-by state. That means clearing all the settings.
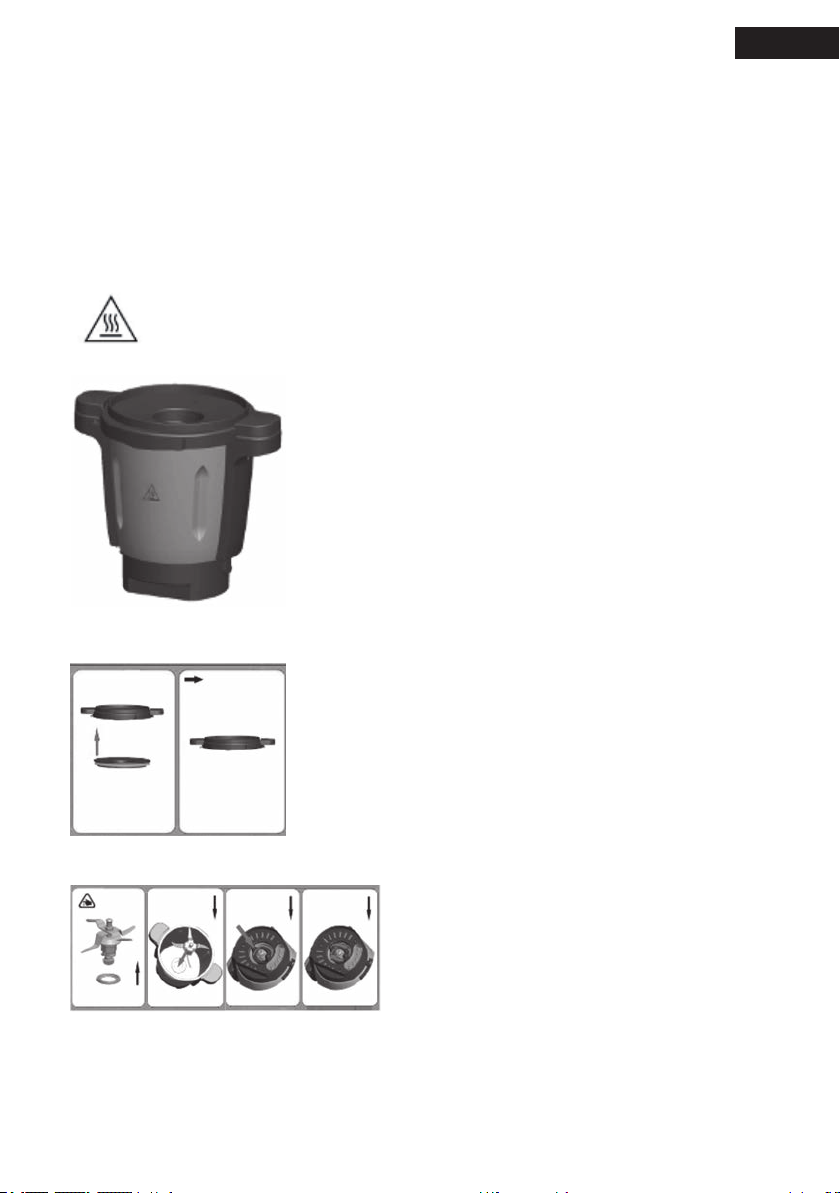
THE SCALE ON THE BOWL
The Maximum capacity of the bowl is 2 liters. Don’t process the food more than 2 liters.
Caution:
“Hot surface” logo marked on the bowl
To indicate that the marked item can be hot and should not be
touched without taking care!
HOW TO INSTALL THE AIRPROOF RING
Please install “airproof ring” according to the above gure.
HOW TO INSTALL/REMOVE THE BLADE:
1. Put the airproof ring (E) on the blade. Push the
blade through the opening at the bottom of the
bowl. (See above gure)
2. Rotate the nut clockwise to install it tightly on the
blade.
3. Rotate the nut anti-clockwise slightly to remove
the blade from the bowl:

English
- 8 - - 9 -
While removing the blade from the bowl, you need hold the
upper part of the blade with one hand, and release the nut with
the other hand.
Caution:
1. The blade is very sharp. Handle it with care. Only hold the
upper part of the blade!
2. The airproof ring must to be tted on the blade. If there is no
airproof ring, the food to be chopped or cooked may leak out
and damage the appliance.
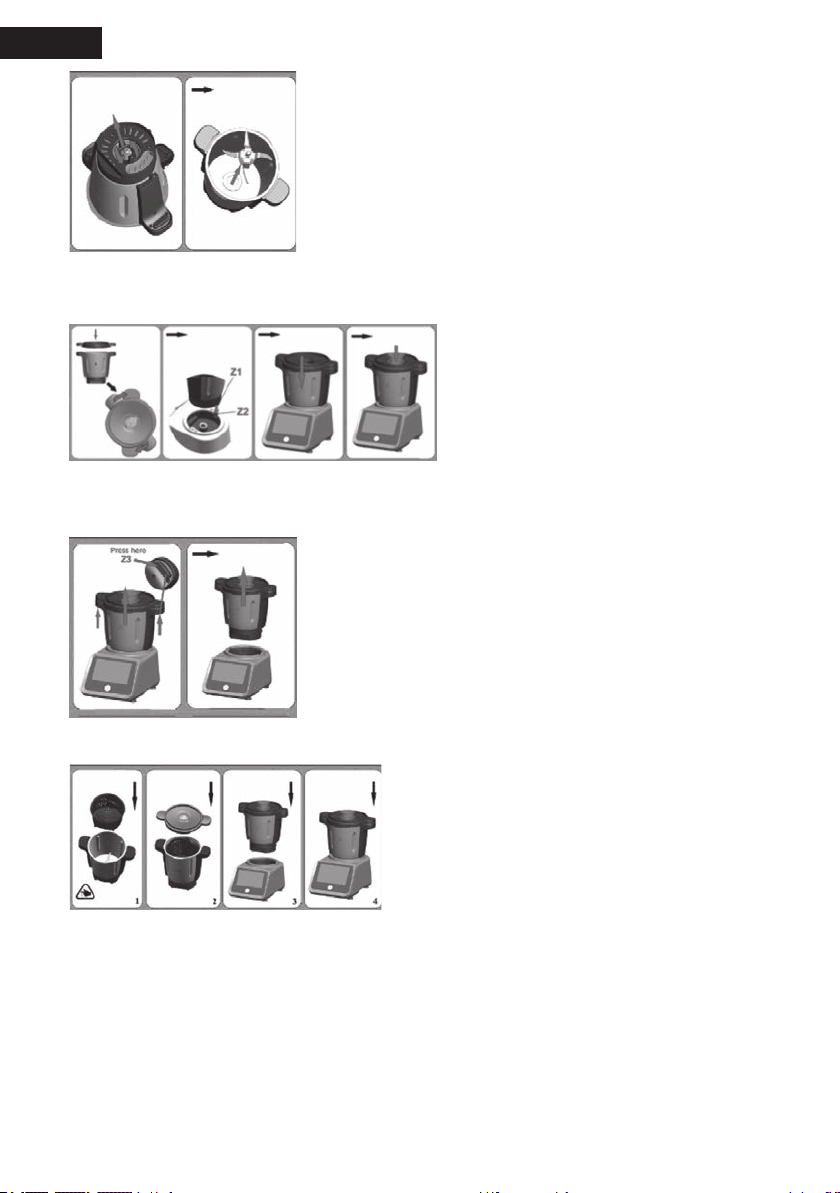
HOW TO INSTALL/REMOVE THE BOWL:
To install the bowl:
1. Put the bowl lid on the bowl. And rotate
the bowl lid clockwise to lock it on the
bowl. (See above gure).
2. Insert the bowl onto the bowl socket.
Be sure to make place Z1 point to place
Z2. Press the bowl lid slightly to ensure
the bowl is well tted.
3. Insert the measuring cup.
To remove the bowl:
Please follow the steps:
1. Press the button “Z3” of each handle.
2. Draw the bowl out of the main appliance.
HOW TO INSTALL THE INNER BASKET:
The inner basket is suitable for cooking small
quantity food, such as rice, sh and meat. Please
follow the steps:
1. Install the blade on the bowl.
2. Add the water in the bowl.
3. Put the inner basket in the bowl, and add the
food in the basket.
4. Then cover the bowl lid.
5. Turn the bowl lid until it is locked in position. And put the measuring cup on the bowl lid.
Caution:
1. The maximum water added in the bowl should be 800ml and with the level under the basket!
2. Danger of scalding by hot steam and hot condensed water.
3. The hot steam and hot condensed water is dangerous. Please handle it carefully.
4. Don’t touch the metal part of the bowl while it is hot. Only hold the handle of the bowl to move it.

English
- 8 - - 9 -
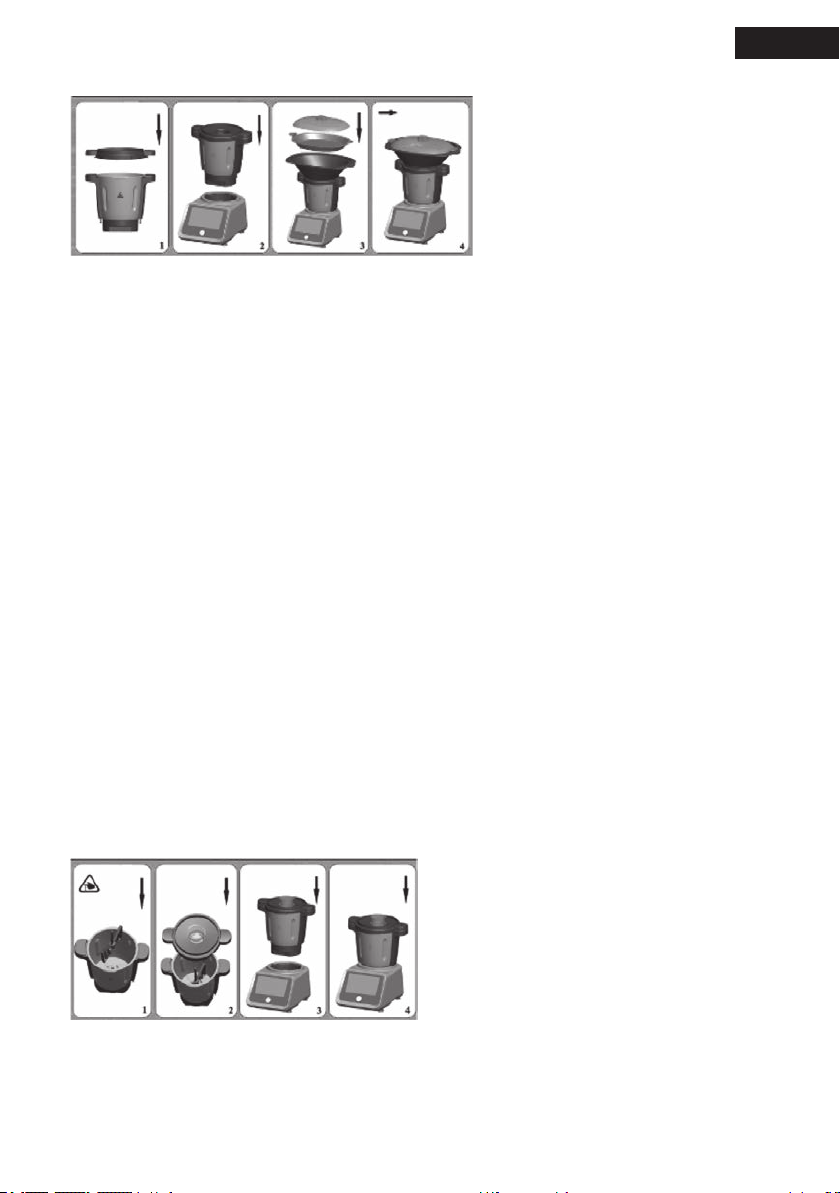
HOW TO INSTALL THE STEAMER:
The steamer is perfectly suited
for preparing some food such as
vegetables with meat, sausages,
steamed bread, steamed sh etc.
You can use the steamers in either of
the following two combinations:
Combination 1: Lid (M) + steamer (Tray) (N) + Steamer (O)
Use this combination for cooking different foods.
Combination 2: Lid (M) + Steamer (O)
Use this combination for larger amount of the same food, e.g. vegetables, potatoes or large pieces
of meat or sausages.
Please follow the steps:
1. Install the blade, and then install the bowl on the main appliance.
2. Add the water (0.5L≤water≤2L) in the bowl. (Caution: The water in the bowl should be more
than 0.5 liter. 0.5L water can be used for steaming food about 30 minutes.)
3. Put the airproof ring on the bowl lid, and then cover the bowl lid.
4. Turn the bowl lid until it is locked in position.
5. Put the steamers on the bowl lid.
6. Put the food on the steamer, and then cover the lid.
Caution:
1. Danger of scalding by hot steam and hot condensed water. Never use the steamer without lid.
2. If the lid is not tted properly, the steam will escape and food inside steamer will not cook
properly.
3. Never leave the measuring cup on the bowl lid when using the steamer!
4. The hot steam and hot condensed water is dangerous. Please handle it carefully!
5. 30 minutes steam cooking requires 0.5 liter (500ml) of water, you need add around 250ml of
water for each additional 15 minutes.
HOW TO INSTALL THE BUTTERF LY:
The buttery will help you to achieve the best results while whisking cream, beating mayonnaise
or egg white.
1. Hold the ball-shaped end of the buttery.
2. Insert the buttery on the upper part of the
blade, a sound “click” will be heard. That
means the buttery is well installed on the
blade. (See the above gure)
If you want to remove the buttery from the
blade, just hold the ball-shaped end and pull it
out with rotations in both directions.
Caution:
1. Only switch on after the buttery has been positioned into place.
2. Don’t add ingredients that might damage or block the buttery when the blade is in motion and
the buttery is tted.

English
- 10 - - 11 -
HOW TO USE THE BASIC FUNCTION:
You may set the working time, speed and temperature according your requirement. Please follow
the steps:
1. Set the working speed (1-10), the time (0-99minutes) and the temperature (30-120ºC).
Remarks:
1) If you set the working speed and time, or only set the working speed, the appliance
will work under mixing food status.
2) And if you set the working speed, time and temperature, the appliance will work
under mixing & heating status.
2. Click “Start/Stop” button, then the appliance starts to work and the timer is counting down.
(Remarks: If you don’t set the working time, the timer of appliance will be count up.).
3. Sound “Beep” will be heard while the working time is left 2 seconds. At last, the appliance goes
back to stand-by state.
4. After use, turn the main appliance off. Remove the bowl from the main appliance, and take off
the bowl lid.
5. Take out the processed food from the bowl.
Caution:
1. Don’t touch the metal part of the bowl while it is hot.
2. Only hold the handle of the bowl to move the bowl.
3. Never heat up the bowl when it is empty.
4. You may halfway change the working time (between 0-99minutes) and working speed (between
1-10) and working temperature (between 30-120ºC).
FAULT CODE
CODE EXPLANATION SOLUTION
E1 “E1” was shown on LCD, meanwhile the
light color of “Start/Stop” button (L)
changes from green to red.
The appliance needs to be sent to the
approved service centre for repair.
E2 “E2” was shown on LCD, meanwhile the
light color of “Start/Stop” button (L)
changes from green to red.
Take out the bowl and reinstall it
according to the operating instruction. It
needs to be sent to the approved service
centre if it still doesn’t work.
E3 “E3” was shown on LCD, meanwhile the
light color of “Start/Stop” button (L)
changes from green to red.
Take out the bowl, and reinstall it
according to the operating instruction. It
needs to be sent to the approved service
centre if it still doesn’t work.
E4 “E4” was shown on LCD, meanwhile the
light color of “Start/Stop” button (L)
changes from green to red.
Firstly power off, and then restart the
appliance after 1 hour. It needs to be sent
to the approved service centre if it still
doesn’t work.

English
- 10 - - 11 -
CLEANING
1. Before you clean the appliance, switch the appliance off and remove the plug from the socket.
2. Unscrew the screw ring and remove all parts of the attachment.
3. All the accessories can be cleaned in the dishwasher!
4. While using the appliance, always keep the contact pins at the bottom of the bowl clean and
dry! Wipe the contact pins at the bottom of the bowl with a dry cloth!
5. Never use pointed or sharp objects for cleaning as this may damage functional parts or affect
the safety of the appliance.
6. The blade is very sharp! Handle it with care!
7. Wash all parts in hot soapy water. Clean them immediately after use. Rinse them with clear hot
water and dry them immediately.
8. We advise you to lubricate the blade with some vegetable oil.
9. Only wipe the main appliance with a damp soft cloth!
10. If the bowl and blade is hard to clean. You may add some hot soapy water in the bowl and run
the appliance at speed 1 for few seconds.
PROCESSING GUIDE
At the end of its service life, this product may not be disposed of in the
normal household waste, but rather must be disposed of at a collection
point for recycling electrical and electronic devices. The materials are
recyclable according to their labelling. You make an important contribution
to protecting our environment by reusing, recycling or utilising old
devices in other ways. Please ask the municipal administration where the
appropriate disposal facility is located.
The device complies with the European Directives 2014/35/EU, 2014/30/
EU and 2009/125/EC.
Accessory Food Maximum Operation time Speeds
Buttery (H) Egg white 3pcs 3 minutes 5
Blade (D) Flour 500g 2 minutes 3
Water 300g

Español
- 12 - - 13 -
IMPORTANTE
1. Antes de utilizar este aparato, lea las instrucciones y las ilustraciones atentamente.
2. Guarde estas instrucciones para futuras consultas.
3. Compruebe si el voltaje indicado en el aparato coincide con el voltaje de la toma de corriente
antes de conectar el aparato.
4. Nunca utilice accesorios de otros fabricantes. Su garantía dejará de tener valor si se han
utilizado dichos accesorios.
5. No utilice el aparato si el cable, el enchufe u otras piezas están dañados.
6. Antes de utilizar el aparato por primera vez, limpie a fondo las piezas que vayan a estar en
contacto con alimentos.
7. Coloque siempre el aparato sobre una supercie plana, seca y limpia.
8. No toque la cuchilla, especialmente cuando esté en funcionamiento. Está muy alada. Sujete
únicamente la parte superior de la cuchilla cuando la esté quitando o instalando.
9. No utilice el accesorio y/o el aparato si está dañado. Debe ponerse en contacto con un centro
de servicio autorizado.
10. Los niños no deben utilizar este aparato. Mantenga el aparato y el cable fuera del alcance de
los niños.
11. Nunca deje el aparato sin supervisión cuando esté en funcionamiento.
12. Apague el interruptor antes de desmontar o añadir cualquier accesorio.
13. Espere hasta que las piezas móviles se hayan detenido para retirar las piezas del aparato.
14. Nunca sumerja el aparato en agua o en otro líquido ni lo enjuague bajo el grifo. Utilice solo un
paño húmedo para limpiar el aparato.
15. Desenchufe el aparato inmediatamente tras su uso.
16. Apague el aparato y desconéctelo de la corriente antes de cambiar accesorios o de acercarse
a piezas que se muevan durante su funcionamiento.
17. Los electrodomésticos pueden ser utilizados por personas con capacidades físicas,
sensoriales o mentales reducidas o con falta de experiencia y conocimiento siempre que
tengan supervisión y se les proporcionen las instrucciones de uso seguro del aparato y
entiendan los riesgos.
18. Los niños no deben jugar con el aparato.
19. Cuando procese alimentos calientes (temperaturas de 60º C o más), no toque el vaso
medidor.
20. Asegúrese de colocar el aparato sobre una supercie limpia, sólida, uniforme y que no se
caliente, sobre todo cuando utilice la función de vapor.
21. La espátula debe utilizarse únicamente para extraer los alimentos del recipiente. No lo utilice
cuando la cuchilla esté en marcha.
22. Este aparato está destinado a ser utilizado en el hogar y con aplicaciones similares como:
-Cocinas de empleados en tiendas, ocinas y entornos laborales similares;
-en entornos de trabajo agrícolas;
-por clientes en hoteles, moteles, etc. y establecimientos similares;
-en entornos del tipo pensión.
23. Tenga cuidado si vierte líquido caliente en el procesador de alimentos, ya que podría ser
expulsado del aparato debido a un vapor repentino.
24. Precaución: Logo de «supercie caliente» en el recipiente: ¡Indica que el elemento marcado
puede estar caliente y debe tocarse con cuidado!
25. Cuando la temperatura del recipiente sea de 60ºC o más, podrá ver que:
1) La velocidad se limitará a 1-4.
2) El aparato cambiará automáticamente a la velocidad 4 aunque la velocidad de
trabajo esté ajustada a 5-10.
26. Cuando utilice la función calentar, la cantidad máxima de alimentos que puede procesar no
debe superar la marca del recipiente ( ).
27. El uso indebido puede causar lesiones. Utilícelo con cuidado.
28. PRECAUCIÓN: Asegúrese de que la licuadora está apagada antes de retirarla del soporte.
29. Si el aparato se llena en exceso, el agua hirviendo podría salir disparada.
30. No sumerja el aparato en agua ni en ningún otro líquido.
Español
- 12 - - 13 -
PRESENTACIÓN DEL PRODUCTO:
Este producto es un robot de cocina multifunción de nuevo diseño. Modernas características:
1. Pantalla de 7 pulgadas a color.
2. Función WIFI.
3. Pantalla táctil.
Le ayudará a preparar deliciosos platos y a disfrutar de la vida.
NOMBRE DE LAS PIEZAS:
A. Vaso medidor (Máx. 100 ml)
B. Tapa del recipiente
C. Tapa interior con aro hermético
D. Hoja
E. Aro hermético
F. Recipiente (Máx. 2L)
G. Tuerca
H. Accesorio de mezcla (Mariposa)
I. Aparato principal
J. Pantalla LCD
K. Botón On/Off
L. Botón de «Start/Stop»
M. Tapa
N. Vaporera (Bandeja)
O. Vaporera
P. Espátula
Q. Cesta interior
R. Funda de la cuchilla
Pantalla LCD:
1: Indica que la cuchilla funciona hacia
adelante (Velocidad: 1-10).
Consejos: Puede pulsar «+»/«-» o deslizar
el círculo para ajustar la velocidad que
necesite.
2: Indica la temperatura. (Rango de
temperatura: 30-120ºC. De 30ºC a
120ºC, la temperatura aumenta de 5 en
5 grados.
Consejos:
1) Puede pulsar «+»/«-» o deslizar el círculo para ajustar la temperatura que necesite.
2) Si el recipiente está instalado, mostrará la temperatura en tiempo real, y si este se ha
retirado, la temperatura que mostrará será 0ºC.

Español
- 14 - - 15 -
3: «Start/Stop». Púlselo para iniciar o detener el aparato.
4: Tecla de borrado. Púlsela para eliminar todos los ajustes anteriores y volver al estado de
espera.
5: Tecla «Pulse». Con esta función, el aparato empezará a funcionar al instante a la mayor
velocidad (10). Si deja de pulsar esta tecla, el aparato recuperará pronto la velocidad de trabajo
anterior.
Información: Cuando la temperatura del recipiente sea de 60ºC o más, cuando la cuchilla
funcione en dirección inversa o cuando el aparato esté en «stop», no podrá utilizarse.
6: Receta. Pulse aquí para seleccionar las recetas que desee.
7: Favoritos. Aquí puede recopilar sus recetas favoritas.
8: DIY (personalizado).
Información: Cuando la temperatura de funcionamiento esté ajustada entre 105ºC y 120ºC,
para evitar peligrosos derrames de alimentos, recomendamos que la cantidad máxima de
alimentos procesados no sea de más de 1,5 L.
9: Indica el tiempo. (Rango de tiempo: 0 segundos-99 minutos)
0-60 segundos: De «-» a «+», el tiempo aumenta de 1 segundo en 1 segundo.
1-10minutos: De «-» a «+», el tiempo aumenta de 30 en 30 segundos.
10 minutos- 99 minutos: De «-» a «+», el tiempo aumenta de 1 minuto en 1 minuto.
1) Puede pulsar «+»/«-» o deslizar el círculo para ajustar el tiempo que necesite.
2) Si no establece el tiempo de trabajo, el funcionamiento máximo del aparato es de 99
minutos cada vez.
10: Indica que la cuchilla funciona en dirección inversa (Velocidad: 1-3).
11: Menú abreviado. Son «MERMELADA», «VAPOR», «SOPA», «AMASADO 1» y «AMASADO 2».
1) “MERMELADA”
Receta recomendada:
Fruta: 500 g
Conguración predeterminada:
Paso 1: El tiempo de funcionamiento es de 15 segundos y velocidad 6. Una vez que se inicie
este paso, puede aumentar el tiempo de funcionamiento durante el proceso.
Paso 2: Pausa durante 2 segundos.
Paso 3: El tiempo de funcionamiento es de 10 minutos, a velocidad 1 y temperatura objetivo de
100ºC. Una vez que se inicie este paso, puede restablecer el tiempo y la temperatura.
Información: Cuando queden 2 segundos del tiempo de funcionamiento, se oirá un pitido. Al nal,
el aparato volverá al modo «espera».
2) «VAPOR»
Receta recomendada:
Caldo o agua: 500-600 ml
Conguración predeterminada:
La velocidad de trabajo es 1, el tiempo es de 17 minutos y la temperatura objetivo es de 120ºC
Consejos:
(1) Puede restablecer el tiempo antes de o durante el funcionamiento.
(2) Cuando queden 2 segundos del tiempo de funcionamiento, se oirá un pitido. Al nal, el aparato
volverá al modo «espera».

Español
- 14 - - 15 -
3) «SOPA»
Receta recomendada:
Sopa: 1 L (400 g de verduras y 500 ml de agua).
Conguración predeterminada:
Paso 1: La cuchilla gira en sentido inverso a velocidad 1, el tiempo de funcionamiento es de 20
minutos y la temperatura objetivo es de 100ºC.
Paso 2: Pausa durante 2 segundos.
Paso 3: El tiempo de funcionamiento es de 2 minutos, a velocidad 4 y temperatura objetivo de
100ºC.
Paso 4: Pausa durante 2 segundos.
Paso 5: El tiempo de funcionamiento es de 8 minutos, a velocidad 4 y temperatura objetivo de
100ºC.
Información: Cuando queden 2 segundos del tiempo de funcionamiento, se oirá un pitido. Al nal,
el aparato volverá al modo «espera».
4) «AMASADO 1»
Receta recomendada:
Harina: 500 g, agua: 285 g, azúcar: 10 g, mantequilla: 10 g, sal: 10 g, levadura seca: 15 g.
Conguración predeterminada:
Paso 1: El tiempo de funcionamiento es de 30 segundos y velocidad 4.
Paso 2: Pausa durante 3 segundos.
Paso 3: La cuchilla gira en sentido inverso a velocidad 3 y el tiempo de funcionamiento es de
25 segundos.
Paso 4: Pausa durante 3 segundos.
Paso 5: El tiempo de funcionamiento es de 30 segundos y velocidad 4.
Paso 6: Pausa durante 4 segundos.
Paso 7: La cuchilla gira en sentido inverso a velocidad 2 y el tiempo de funcionamiento es de
25 segundos.
Información: Cuando queden 2 segundos del tiempo de funcionamiento, se oirá un pitido. Al nal,
el aparato volverá al modo «espera».
5) «AMASADO 2»
Receta recomendada:
Harina: 500 g, agua: 285 g, azúcar: 10 g, mantequilla: 10 g, sal: 10 g, levadura seca: 15 g.
Conguración predeterminada:
Paso 1: el tiempo de funcionamiento es de 45 segundos y velocidad 4.
Paso 2: pausa durante 3 segundos.
Paso 3: La cuchilla gira en sentido inverso a velocidad 3 y el tiempo de funcionamiento es de
40 segundos.
Paso 4: pausa durante 3 segundos.
Paso 5: el tiempo de funcionamiento es de 45 segundos y velocidad 4.
Paso 6: pausa durante 4 segundos.
Paso 7: La cuchilla gira en sentido inverso a velocidad 2 y el tiempo de funcionamiento es de
40 segundos.
Información: Cuando queden 2 segundos del tiempo de funcionamiento, se oirá un pitido. Al nal,
el aparato volverá al modo «espera».

Español
- 16 - - 17 -
12: Tecla «WIFI».
Debe seguir los pasos siguientes para utilizarla:
1) Instale la aplicación en su teléfono móvil.
2) Pulse la tecla táctil «WIFI» para que aparezcan la cuenta y la contraseña.
3) Abra la aplicación en su teléfono móvil y después introduzca la cuenta y la contraseña. Si
el logo de «WIFI» cambia de color, signica que se ha conectado correctamente. Ahora
puede utilizar el aparato a través de su teléfono móvil.
Información:
1. El aparato solo puede conectarse a un teléfono móvil a la vez.
2. Rango de frecuencia: 2,4-2,5 GHz.
3. Versión del software: V1.0
4. Versión del hardware: V1.0
5. Potencia máxima de salida de radiofrecuencia del producto: 12.5 dBm
13: Tecla de «peso». (Rango de pesaje: 0-5000 g)
Debe seguir los pasos siguientes para utilizarla:
1. Pulse la tecla de «peso».
2. Cuando en la pantalla LCD aparezca «0000», coloque los alimentos en el recipiente.
3. En la pantalla aparecerá una cantidad. Este es el peso neto (unidad: g) de los alimentos.
4. Pulse “ ” en el diálogo emergente y se eliminará la cantidad. Ahora podrá seguir pesando
alimentos.
14: Estado de espera.
Enchufe el aparato y pulse el botón On/Off (K) para encenderlo y
este pasará al estado de espera.
Si no realiza ninguna acción en el aparato en los 5 minutos
siguientes mientras sigue en estado de espera, el aparato entrará
en «modo de suspensión» (pantalla en negro). Para encender el
aparato, pulse el botón de «Start/Stop» (L).
Si no realiza ninguna acción en el aparato en los 10 minutos
siguientes mientras sigue en estado de pausa, el aparato entrará en «modo de suspensión
(pantalla en negro)». Para encender el aparato, pulse el botón de «Start/Stop» (L).
Español
- 16 - - 17 -
15. Botón de «Start/Stop» (L).
Pulse este botón para encender/apagar el aparato o para sacar al aparato del estado de espera.
Si presiona este botón durante más de 3 segundos, el aparato saldrá inmediatamente de cualquier
estado de funcionamiento y volverá al estado de espera. Eso signica eliminar todos los ajustes.
DIMENSIONES DEL RECIPIENTE
La capacidad máxima del recipiente es de 2 litros. No procese alimentos en cantidades
superiores a 2 litros.
Precaución:
Logo de «supercie caliente» en el recipiente
¡Indica que el elemento marcado puede estar caliente y debe
tocarse con cuidado!
CÓMO INSTALAR EL ARO HERMÉTICO
Instale el «aro hermético» siguiendo la imagen superior.
CÓMO INSTALAR/RETIRAR LA CUCHILLA:
1. Coloque el aro hermético (E) sobre la cuchilla.
Presione la cuchilla sobre la abertura del fondo
del recipiente. (Vea la imagen superior).
2. Gire la tuerca en el sentido de las agujas del reloj
para ajustarla rmemente sobre la cuchilla.
3. Gire ligeramente la tuerca en sentido contrario a
las agujas del reloj para retirar la cuchilla del recipiente:
Mientras retira la cuchilla del recipiente, debe sujetar la parte superior de la cuchilla con una mano
y retirar la tuerca con la otra mano.
Español
- 18 - - 19 -
Precaución:
1. La cuchilla está muy alada. Manéjela con cuidado. ¡Sujete
únicamente la parte superior de la cuchilla!
2. El aro hermético debe colocarse sobre la cuchilla. Sin el aro
hermético, el alimento que haya que picar o cocinar podría
salirse y dañar el aparato.
CÓMO INSTALAR/RETIRAR EL RECIPIENTE:
Instalar el recipiente:
1. Coloque la tapa sobre el recipiente.
Y gire la tapa en el sentido de las
agujas del reloj para encajarla sobre el
recipiente. (Vea la imagen superior).
2. Inserte el recipiente en el hueco
previsto para él. Asegúrese de que
elpunto Z1 encaja en el Z2. Presione
la tapa del recipiente ligeramente para asegurarse de que está bien colocada.
3.¡Introduzca el vaso medidor.
Retirar el recipiente:
Siga los pasos siguientes:
1. Pulse el botón «Z3» de cada asa.
2. Extraiga el recipiente del aparato principal.
CÓMO INSTALAR LA CESTA INTERIOR:
La cesta interior es adecuada para cocinar
pequeñas cantidades de comida como arroz,
pescado y carne. Siga los pasos siguientes:
1. Instale la cuchilla sobre el recipiente.
2. Añada agua al recipiente.
3. Coloque la cesta interior en el recipiente y añada
los alimentos a la cesta.
4. Después coloque la tapa del recipiente.
5. Gire la tapa del recipiente hasta que se bloquee. Y coloque el vaso medidor sobre la tapa del
recipiente.
Precaución:
1. La cantidad máxima de agua que debe añadirse al recipiente es de 800 ml y debe quedar por
debajo del nivel de la cesta.
2. Peligro de quemaduras con el vapor caliente y el agua caliente condensada.
3. El vapor caliente y el agua caliente condensada son peligrosos. Manéjelo con cuidado.
4. No toque la parte metálica del recipiente mientras esté caliente. Para mover el recipiente, cójalo
únicamente por el asa.
Español
- 18 - - 19 -
CÓMO INSTALAR LA VAPORERA:
La vaporera es ideal para preparar
comida como verduras con carne,
salchichas, pan al vapor, pescado al
vapor, etc.
Puede utilizar las vaporeras en
cualquiera de las siguientes dos
combinaciones:
Combinación 1: Tapa (M) + Vaporera (bandeja) (N) +Vaporera (O)
Utilice esta combinación para cocinar distintos alimentos.
Combinación 2: Tapa (M) + Vaporera (O)
Utilice esta combinación para cantidades más grandes de los mismos alimentos. Por ejemplo
verduras, patatas o trozos grandes de carne o salchichas.
Siga los pasos siguientes:
1. Instale la cuchilla y después coloque el recipiente sobre el aparato principal.
2. Anstale la cuchilla y después coloque el recipien (Precaución: Debe haber más de 0,5 litros
de agua en el recipiente. Con 0,5 litros de agua pueden cocinarse alimentos al vapor durante
unos 30 minutos).
3. Coloque el aro hermético sobre la tapa del recipiente y después cúbrala.
4. Gire la tapa del recipiente hasta que se bloquee.
5. Coloque las vaporeras sobre la tapa del recipiente.
6. Coloque el alimento sobre la vaporera y después cubra la tapa.
Precaución:
1. Peligro de quemaduras con el vapor caliente y el agua caliente condensada. Nunca utilice la
vaporera sin tapa.
2. Si la tapa no se ajusta bien, el vapor se saldrá y los alimentos no se cocinarán correctamente.
3. ¡No deje nunca el vaso medidor sobre la tapa del recipiente cuando utilice la vaporera!
4. El vapor caliente y el agua caliente condensada son peligrosos. Tenga cuidado.
5. Para cocinar al vapor durante 30 minutos necesita 0,5 litros de agua (500 ml) y debe añadir
unos 250 ml de agua por cada 15 minutos adicionales.
CÓMO INSTALAR LA MARIPOSA:
La mariposa le ayudará a conseguir mejores resultados cuando monte nata, bata mayonesa o
monte claras de huevo.
1. Sujete el extremo redondo de la mariposa.
2. Introduzca la mariposa sobre la parte
superior de la cuchilla; escuchará un «clic».
Ese sonido le indicará que la mariposa
se ha instalado correctamente sobre la
cuchilla. (Vea la imagen superior)
Si desea retirar la mariposa de la cuchilla,
sujete el extremo redondo y tire hacia arriba
haciendo rotaciones en ambas direcciones.
Precaución:
1. Ponga en marcha el aparato únicamente cuando haya colocado la mariposa en su sitio.
2. No añada ingredientes que puedan dañar o bloquear la mariposa cuando la cuchilla esté en
movimiento y la mariposa esté instalada.

Español
- 20 - - 21 -
CÓMO UTILIZAR LA FUNCIÓN BÁSICA:
Puede ajustar el tiempo de funcionamiento, la velocidad y la temperatura según lo que necesite.
Siga los pasos siguientes:
1. Ajuste la velocidad (1-10), el tiempo (0-99 minutos) y la temperatura (30-120º C).
Observaciones:
1) Si ajusta el tiempo y la velocidad de funcionamiento o solo la velocidad de
funcionamiento, el aparato funcionará en el modo mezcla de alimentos.
2) Y si ajusta la velocidad, el tiempo y la temperatura de funcionamiento, el aparato
funcionará en el modo mezcla y calor.
2. Pulse el botón de «Start/Stop», el aparato empezará a funcionar y el temporizador empezará
la cuenta atrás. (Observaciones: Si no ajusta el tiempo de funcionamiento, el temporizador del
aparato irá contando.)
3. Cuando queden 2 segundos del tiempo de funcionamiento, se oirá un pitido. Al nal, el aparato
volverá al modo «espera».
4. Después de usarlo, apague el aparato. Retire el recipiente del recipiente principal y quite la tapa.
5. Retire los alimentos procesados del recipiente.
Precaución
1. No toque la parte metálica del recipiente mientras esté caliente.
2. Para mover el recipiente, cójalo únicamente por el asa.
3. Nunca caliente el recipiente cuando esté vacío.
4. A mitad del proceso, puede cambiar el tiempo de funcionamiento (entre 0-99 minutos), la
velocidad (entre 1-10) y la temperatura (entre 30ºC - 120ºC).
CÓDIGO DE FALLO:
CÓDIGO EXPLICACIÓN SOLUCIÓN
E1 «E1» ha aparecido en la pantalla
mientras el color de la luz del botón de
«Start/Stop» (L) cambia de verde a rojo.
Debe enviar el aparato a un centro de
servicio autorizado para que lo reparen.
E2 «E2» ha aparecido en la pantalla
mientras el color de la luz del botón de
«Start/Stop» (L) cambia de verde a rojo.
Retire el recipiente y vuelva a colocarlo
según las instrucciones de uso. Si sigue
sin funcionar, envíe el aparato a un centro
de servicio autorizado.
E3 «E3» ha aparecido en la pantalla
mientras el color de la luz del botón de
«Start/Stop» (L) cambia de verde a rojo.
Retire el recipiente y vuelva a colocarlo
según las instrucciones de uso. Si sigue
sin funcionar, envíe el aparato a un centro
de servicio autorizado.
E4 «E4» ha aparecido en la pantalla
mientras el color de la luz del botón de
«Start/Stop» (L) cambia de verde a rojo.
Primero, apague el aparato y después de
1 hora reactívelo. Si sigue sin funcionar,
envíe el aparato a un centro de servicio
autorizado.
Table of contents
Languages:
Other BOJ Kitchen Appliance manuals


