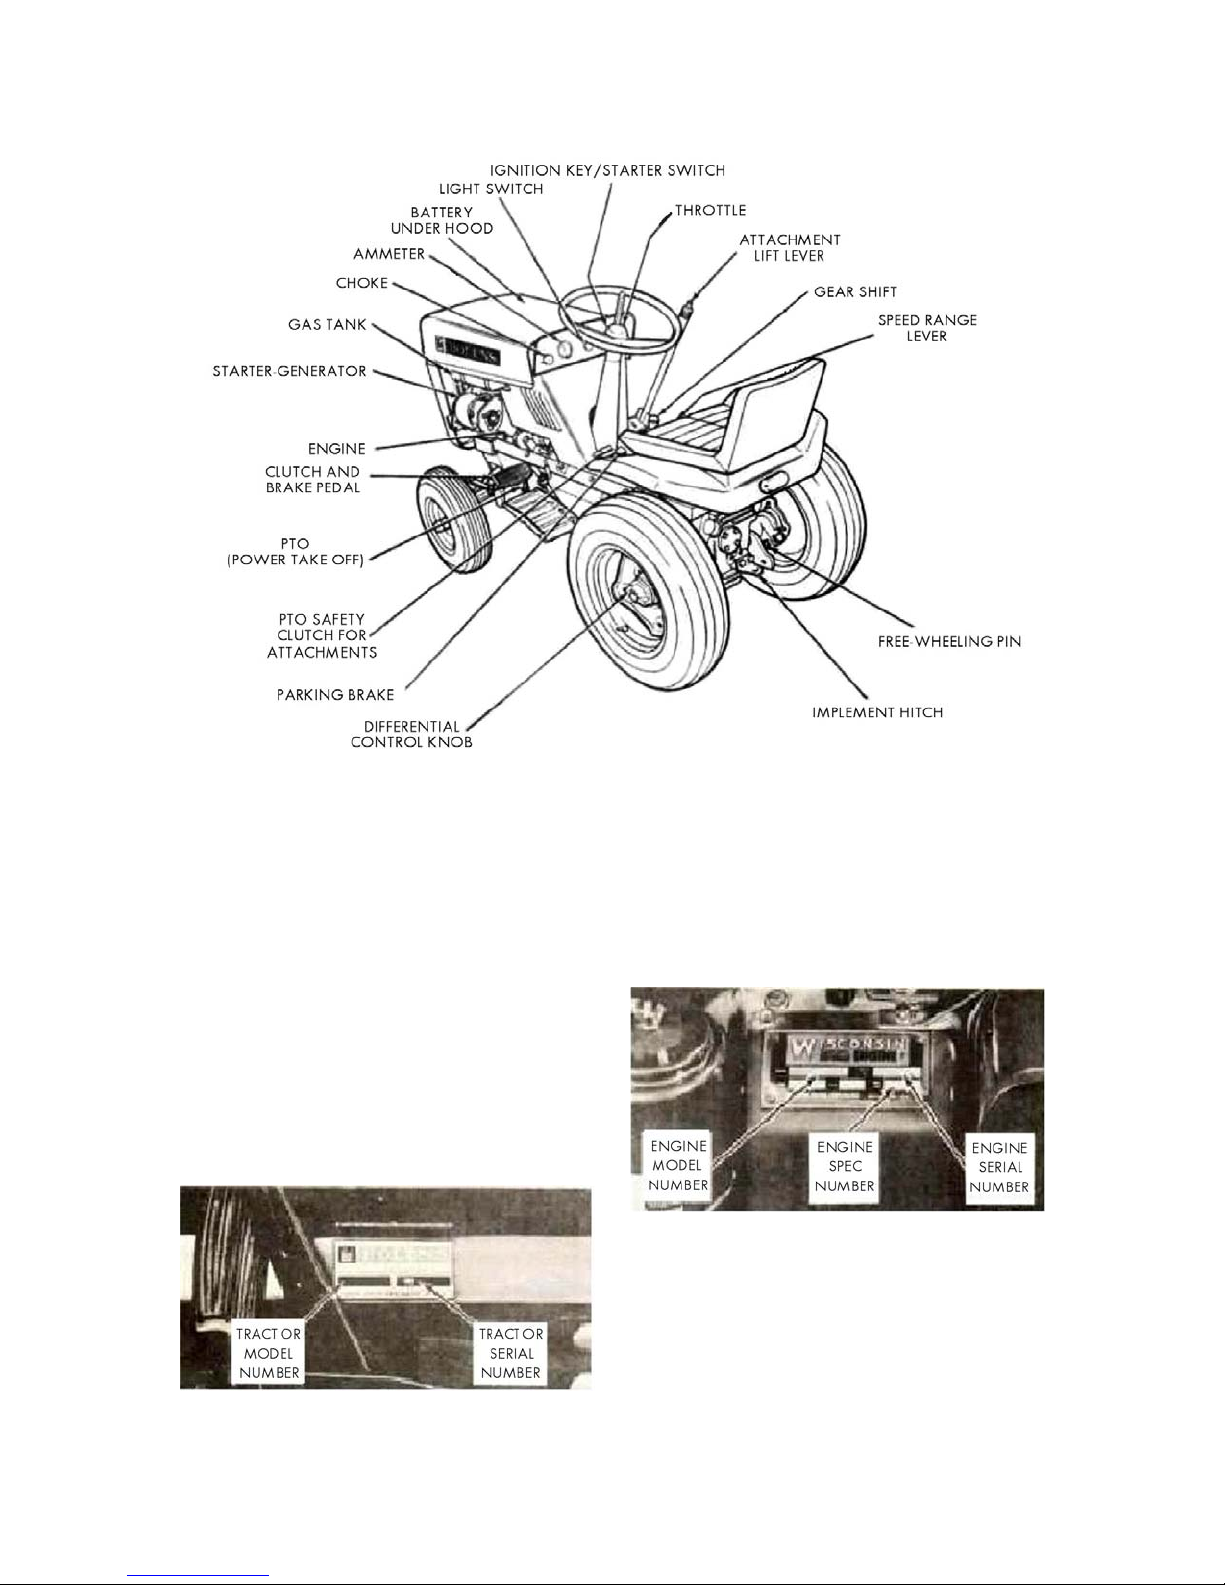
Bolens TEN-FIFTY 192-02 Installation guide

“TEN-FIFTY”
owner operation
and
maintenance
manual
MODEL 192-02


1
Serious accidents can be prevented. Every operator
should approach the following safety practices
with
serious intentions of conforming to them. An acci
-
dent prevention program can be successful only with
wholehearted co-operation.
1.
Never allow children, teenagers, or inexperienced
adults to operate tractor without supervision.
2.
Never fill gas tank while engine is running. Allow
several minutes for engine to cool, and avoid spilling
gasoline on the engine.
3.
Never smoke when refueling, or allow others to
smoke close by.
4.
Keep fuel containers in locked storage to prevent
children from playing and tampering with them.
5.
Place transmission gear shift in "neutral", lock
parking brake, and "stop" engine whenever vehicle
is
to be left unattended.
6.
Be sure you know how to stop unit and shut off
attachments at a moments notice.
7.
Do not mount or leave vehicle while it is in motion
or
in actual operation.
8. Do not carry passengers.
9.
Never attempt to adjust or repair tractor while it
is moving or with engine running.
10. Be sure to remove or block attachment when
servicing tractor.
11. Study your manual. Know your tractor before
operating it. Take time to operate the unit in the
safest
manner.
12.
Always disconnect ground (-) battery cable from
battery before doing any work on the electrical sys-
tem
.
13.
Keep tractor and attachments free of excessive
grease and oil.
14.
Keep your engine free from accumulations of
grass, leaves, excessive grease, etc. An accumula
-
tion of these combustible materials may result in a
fire.
15.
Do not start or operate vehicle in an enclosed
area
unless steps have been taken for sufficient
ventilation.
16. Study your manual. Know your tractor before
operating it.
17.
Give complete and undivided attention to the job
at hand. BE ALERT! !
SAFE OPERATING PRACTICES

2
Safe Operating Practices . . . . . . . . . . . . . . 1
Serial
Number
. . . . . . . . . . . . . . . . . . . . . . 3
Specifications . . . . . . . . . . . . . . . . . . . . . . 4
Break –In Period . . . . . . . . . . . . . . . . . . . . 4
Instruments and Controls . . . . . . . . . . . . . 4
Pre-Operational Checks . . . . . . . . . . . . . . 5
Starting
the
Engine . . . . . . . . . . . . . . . . . . 5
Stopping the Engine . . . . . . . . . . . . . . . . . 6
Run–In Period
. . . . . . . . . . . . . . . . . . . . .
6
Preventative Maintenance . . . . . . . . . . . . . 6
Maintenance Guide
. . . . . . . . . . . . . . . . . . 7
Three-Speed Transmission . . . . . . . . . . . . 8
Lubrication
. . . . . . . . . . . . . . . . . . . . . . . .
9
Adjustments . . . . . . . . . . . . . . . . . . . . . . . 10
Power Take - Off (P.T.O) . . . . . . . . . . . . . 12
Minor Trouble Shooting Guide
. . . . . . . .
12
Storing Your Husky Tractor . . . . . . . . . . 13
Warranty . . . . . . . . . . . . . . . . . . . . . . Back Cover
INTRODUCTION
Back in 1919 Bolens engineered, manufactured and introduced the first garden tractor …
your new HUSKY represents years of research, engineering and manufacturing know-how.
It’s the finest HUSKY ever built. The information and suggestions contained in this manual
can help you enjoy, efficient, trouble free performance and to know the advantages and features
built
into your HUSKY.
Your Bolens dealer has been carefully chosen, well trained and equipped to inspect and
service
your equipment for top performance through all the years you use it. Take your HUSKY to
him at regular intervals (see maintenance guide on page 6) for inspection and servicing.
Thank you for choosing the HUSKY tractor. Our continued interest will be to increase
your
satisfaction in Bolen products.
TABLE OF CONTNETS
Page Page
TO THE OWNER
This is an operational and general maintenance manual only and does not cover major
repair.
All major repair work must be performed by an authorized BOLENS DEALER or the
factory
warranty is void. Bolens equipment is carefully engineered to give trouble-free
performance
if properly operated and maintained. Keep your equipment clean and lubricate it as prescribed
in this manual. Periodically inspect your unit and perform any upkeep maintenance
necessary.
Your dealer is obligated by the factory to completely assemble and service new equipment
prior to delivery, and thoroughly explain and demonstrate its operation. He will repair or
re-
place any parts which fail due to defective material and/or workmanship during the
warranty
period, and also provide future repair service and supply genuine factory repair parts.

3
SERIAL NUMBER
To ensure prompt service when repairs or adjust-
ments are required, your Bolens Dealer must have
the following information:
1. Model number of unit.
2. Serial number of unit.
3. Model number of engine.
4. Serial and Spec. number of engine.
Your Bolens dealer has available a master Parts
List for your unit. He can identify any parts you
may
require and furnish genuine factory replace-
ments.
When ordering engine component parts, consult the
Engine Manufacturer's Manual.
For your own personal reference, fill in the spaces
provided below.
Model Number of Unit ______________________
Serial Number of Unit ______________________
Engine Model Number ______________________
Engine Serial Number ______________________
Engine Spec. Number ______________________
Figure 2
Figure 3
Figure 1

4
SPECIFICATIONS
Engine . . . . Wisconsin, electric starting, 10 HP
@ 3800 RPM
Type . . . . 4 cycle - single cylinder - air cooled
Fuel capacity . . . . . . . . . . .
. . .
5 quarts
Oil capacity . . . . . . . . . . . . . . . 2 pints
Air cleaner . . Heavy duty dry type (See Engine
Manual)
Drive . . . . Geared transmission and controlled
differential (Transaxle)
Speed . . .
3 forward and 1 reverse in two
ranges for a total of 6 forward and
2 reverse. Lowest speed: less than
3/4 mph. Highest speed: 6 mph.
Power to attachments . . Farm tractor type (PTO)
direct drive with universal
joints and splined shaft.
Tires . . Extra-wide terra-tires. Front: 16 x 6.50-8.
Rear: 8 x 8.50-12. With lawn and garden
tread.
Height . . . . . . . . . . . . . . . . . . 40 inches
Width . . . . . . . . . . . . . . . 34 inches
Length . . . . . . . . . . . . . . 63 inches
Wheelbase . . . . . . . . . . . . . . . . 43 inches
Turning radius . . . . . . . . . . . . . 40 inches
Ground clearance . . . . . . . .
. . . . 7 inches
Shipping weight . . . . . . . .. . 645 pounds
Standard equipment . . PTO assembly, controlled
differential, two speed
ranges, tool box, fenders
and seat cushion.
Location of tractor model
and serial number . . . On tractor frame by clutch-
brake pedal.
Location of engine model
and serial number . . Wisconsin Engine, top front
of engine
BREAK – IN PERIOD
As with a new car your new tractor should
receive
special attention. In the first few hours of
operation
it is best to vary the engine speed
between 3/4 and
full throttle .. avoid full - throttle driving, quick
starts and stops until you've become well
acquainted
with your tractor. IMPORTANT: THE TRACTOR IS
SHIPPED FROM THE FACTORY WITHOUT OIL IN
THE ENGINE CRANKCASE. SEE LUBRICATION
GUIDE, PAGE 9 AND ENCLOSED ENGINE FOLDER,
FOR PROPER GRADE OIL AND QUANTITY TO BE
USED.
For your satisfaction:
Both the tractor and engine have been tested by
the factory and your dealer prior to its delivery.
However, so that you may become familiar with your
unit before operating it, READ THIS MANUAL care-
fully ... if you have any questions that are not an-
swered in the manual, ask your dealer.
INSTRUMENTS AND CONTROLS
For efficient operation of the tractor, study the ac-
companying illustrations (Figure 4), together with the
brief descriptions given here, until you are thor-
oughly familiar with the location and function of each
control.
1. GEAR SHIFT LEVER - 3 speeds ahead, 1 in re-
verse. See instructions on page 8.
2. TWO SPEED RANGE LEVER - Provides a
total of 6 speeds ahead, 2 in reverse from less than 3/4
mph to 6 mph. See instructions on page 8.
3. PTO (POWER TAKE OFF) CLUTCH - Always
be sure to lock lever in slots provided when P.T.O.
is engaged or disengaged.
4. THROTTLE - Turn knob counterclockwise to un-
lock. Pull out to increase engine speed, push in to
decrease. Turn knob clockwise to lock at desired
RPM.
NOTE
Do not operate tractor below half throttle for
prolonged periods of time under load.
5. CLUTCH-BRAKE PEDAL - To shift gears, de-
press clutch pedal fully. This disengages the clutch,
and fully applies the brake. Relax brake tension slightly,
and shift gears.
Never allow gears to clash while shifting.
Hasty shifting will result in gear grinding and
premature gear failure.
Figure 4

5
6. CHOKE - When starting engine, pull knob out to
close the choke, pushing knob gradually in as engine
warms up. A warm engine requires less choke when
starting.
7. IGNITION KEY - STARTING SWITCH - Insert key
and turn clockwise to energize the ignition cir-
cuit. Turn key slightly past the "Ignition On" point,
against spring tension, to actuate the starter. See
instructions on pages 5 and 6.
8. AMMETER - Indicates level of charge or dis-
charge to or from the battery.
9. LIGHT SWITCH - Pull knob out to turn lights
on, push in to turn them off. Dual light kit optional.
NOTE
Ignition key must be turned on for lights to
work.
10. ATTACHMENT LIFT LEVER - Push down
thumb button to unlock before adjusting height of at-
tachments. Six (6) positions available.
11. PARKING BRAKE - To apply parking brake, pull
knob up and move it to the right. To release, pull
knob up and move it to the left.
PRE-OPERATIONAL CHECKS
The operator should become familiar with the fol-
lowing pre-operational check list prior to starting or
operating the HUSKY.
1, Check for proper level of engine oil. See Engine
Manufacturer's Manual.
2. Refer to battery manufacturer's recommendations
for:
A: Proper water level.
B. Clean cables.
C. Clean terminals.
3. Check gasoline tank for sufficient gas supply.
4. Check that air cleaner screen is free of debris.
Check and clean regularly.
5. Clean flywheel screen. Check and clean regu-
larly.
6. Visually check for loose nuts, screws, and elec-
trical wiring.
7. Check for 8 lbs. tire inflation. TIRE INFLATION
SHOULD NOT BE LESS THAN 8 LBS.
STARTING THE ENGINE
IMPORTANT: READ THE SEPARATE, ENCLOSED ENGINE
FOLDER TO BECOME ACQUAINTED WITH ITS OPERA-
TION AND MAINTENANCE REQUIREMENTS.
ELECTRIC STARTING
1. Check PTO safety clutch (should be in OFF posi-
tion) and gear shift (should be in NEUTRAL).
2. Pull choke knob all the way out (to fully close
choke). Experience will indicate need for more or
less choking due to variations in temperature, grade
of fuel, etc.
3. Turn throttle knob counterclockwise to unlock
if necessary. Pull throttle knob out about half - way
until after engine has started, then adjust to desired
RPM and lock at this setting, if desired, by turning
knob clockwise.
4. Insert ignition key and turn clockwise, against
spring tension, to actuate starter. Release key when
engine starts.
5. Choke should be partially opened (knob pushed
forward) as soon as engine starts and then gradually
pushed all the way forward as the engine warms up.
In normal operation, choke knob should be in OPEN
(forward) position for best engine efficiency and fuel
economy.
Figure 5
Figure 6

6
6. To stop engine, turn key OFF (counterclockwise)
and place gear shift lever in NEUTRAL, setting
brake if necessary. Remove ignition key when trac-
tor is not in use.
EMERGENCY STARTING
In the event of electrical failure, remove the genera-
tor belt and proceed as follows:
1. Check PTO safety clutch (should be in OFF posi-
tion) and gear shift (should be in NEUTRAL). Turn
ignition key clockwise.
2. Pull choke knob all the way out (to fully close
choke). Experience will indicate need for more or
less choking due to variations in temperature, grade
of fuel, etc.
3. Turn throttle knob counterclockwise, if necessary,
to unlock it. Pull throttle knob out about half-way
until after engine has started, then adjust to desired
RPM and lock at this setting, if desired, by turning
knob clockwise.
4. Wind the starter rope around the starter pulley.
Give a quick, steady pull on starter rope. Repeat,
if necessary, until engine starts.
5. Choke should be partially opened (knob pushed
forward) as soon as engine starts and then gradually
pushed all the way forward as the engine warms up.
In normal operation, choke knob should be in OPEN
(forward) position for best engine efficiency and fuel
economy.
6. To stop engine, turn key OFF (counterclockwise)
and place gear shift lever in NEUTRAL, setting brake
if necessary. Remove ignition key when tractor is
not in use.
7. If engine fails to start, recharge or replace bat-
tery.
STOPPING THE ENGINE
1. If the engine has been operating under a heavy
load and is hot, do not stop it suddenly. Allow the
engine to idle for approximately three to five min-
utes. This will reduce the engine temperature more
quickly and evenly than stopping the engine.
2. Turn ignition switch off.
RUN – IN PERIOD
Before operating the tractor at full load, it should
be operated at one-half throttle for approximately one-
half hour with no load applied. After the first half
hour of operation, run the tractor at full throttle with
no load applied for an additional one-half hour.
Attach a light load to the tractor. Operate the trac-
tor with light load for a period of three hours at full
throttle. The tractor is now ready for maximum
load operation.
NOTE
Always operate the tractor at full throttle
when heavy and light work loads are applied.
Use gear ratios to obtain safe and desirable
ground speeds. The governor will control
for any increase or decrease in power re-
quirement.
PREVENTATIVE MAINTENANCE
Operational maintenance and preventative mainte-
nance are synonymous. When neglected, unneces-
sary down time and costly repairs can result. A
little time spent each day by the operator on pre-
ventative maintenance will lead to longer operating
life of the HUSKY.
The removal of debris, dirt and grease accumula-
tions are considered normal maintenance practices
and can help discover minor difficulties before they
become troublesome.
BATTERY (Fig. 7) - Keep cables and terminals clean
and apply a light coat of vaseline or oil for protec-
tion. Check battery bracket for corrosion and keep
clean. Check water for proper level. Never loosen
hold down clamps until you have removed battery
cables from the battery post. Always remove ground
(-) cable first.
FUEL TANK (Fig. 8) - Fill with clean, fresh gaso-
line of regular grade. DO NOT MIX OIL WITH GAS-
OLINE! Check to see that vent hole in fuel tank cap
is not plugged.
AIR CLEANER (Fig. 9) - Dry Type - Refer to en-
closed Engine booklet for instructions.
SPARK PLUG - Clean area around spark plug
before removing plug. The correct gap setting is .025 inch.
Figure 7

7
Refer to enclosed Engine booklet for replacement
specifications.
PNEUMATIC TIRE PRESSURES - Maintain pressure
in tires as recommended here. Ideal pressure will
depend upon load carried. Heavier loads require
higher inflation. Check pressures with a low pres-
sure gauge having one-pound graduations. Operating
with pressures below pressures given here may
damage tires.
Tire pressure must be the same on one side as the
other, or else the tractor will ride unevenly and at-
tachments such as the rotary mower will not cut
level. Remember, also, that tire pressure, weight
of the operator, or a combination of the two will af-
fect the riding height of the tractor and this, in turn,
will affect the cutting height of the rotary mower.
A WISCONSIN ENGINE IS USED WITH YOUR HUSKY
1050. A separate book, prepared by the engine man-
ufacturer, is supplied with your HUSKY tractor,
giving detailed instructions on operation, mainte-
nance and repair of the engine. It is important that
the engine book be studied thoroughly and its in-
structions carefully carried out since proper care of
the engine is vital to the efficient operation and long
life of your HUSKY tractor.
MAINTENANCE GUIDE
AFTER EVERY
10 HOURS
OF OPERATION
AFTER EVERY
25 HOURS
OF OPERATION
AFTER EVERY
50 HOURS
OF OPERATION
Check battery water level X**
Check air in tires (page 5) X
Check engine crankcase oil X**
Drain engine crankcase oil X
TIRE SIZE
PRESSURE (lbs./sq. in.)
FRONT
REAR 16x6.50-8
8x8.50-12 8 PSI
8 PSI
Figure 8
Figure 9
Figure 10

8
THREE – SPEED TRANSMISSION
The Husky 1050 features a 3-speed geared trans-
mission plus a second range to give you a wide
choice of operating speeds. To prevent damage
to the gears, do not shift gears while the tractor is
in motion. Avoid clashing gears when shifting. HIGH
speed range is most practical for transport, average
mowing or pulling light attachments. LOW speed
range is best for heavy jobs such as tilling, plowing,
snow casting or mowing tall or lush grass.
The High - Low speed range change lever is located on
the transmission cover just to the right of the shift
lever. To change range, depress the clutch and
move lever (as directed on adjacent instruction
plate), move lever forward to place in low range,
move lever back to place in high range. Be sure
clutch is depressed when changing speed ranges.
*Approximate speed at full throttle adjustment. The
speed will decrease in each gear as the throttle is
adjusted toward idle. Speeds will also vary de-
pending on road or ground conditions and load at-
tached to tractor.
IMPORTANT
ALWAYS START OUT IN THE GEAR IN
WHICH YOU INTEND TO DRIVE OR OPER-
ATE. IF YOU WISH TO CHANGE GEARS --
BRING THE TRACTOR TO A FULL STOP.
DO NOT SHIFT GEARS WHILE TRACTOR IS
IN MOTION!
CONTROLLED DIFFERENTIAL
By turning the control knob, located on the hub of the
left rear wheel as shown in figure 11, you can vary
the degree of differential traction up to nearly
straight axle drive. For jobs such as plowing, or
snow casting, turn the knob clockwise (as viewed
from left side of tractor, facing end of axle) until de-
sired degree of drive to both wheels is obtained. For
mowing, or other lighter jobs, be sure to have con-
trol knob in standard differential position (that is,
turn the control knob counterclockwise until it stops).
AFTER EVERY
10 HOURS
OF OPERATION
AFTER EVERY
25 HOURS
OF OPERATION
AFTER EVERY
50 HOURS
OF OPERATION
Check SAE-90 gear oil in transmission
and add to level of upper filler plug as
needed X
Check cooling air screen X
Lubrication points (see lubrication
guide) X
Brake adjustment X
Rear axle adjustment X
Air cleaner – service as instructed in
separate Engine manual. X*
* More often under extreme dusty conditions
** More often under extreme load conditions
GEAR LOW SPEED
RANGE HIGH SPEED
RANGE
1st
2nd
3rd
3/4 mph*
1-1/4 mph*
2 mph*
2 mph*
3-1/2 mph*
6 mph*
Figure 11

9
This is necessary to avoid gouging or scuffing the
tires, which would be caused by having both wheels
driving on turns. The differential can be adjusted
from the driver's seat.
1. Do not adjust control knob while tractor is
in motion.
2. NEVER TIGHTEN WITH A WRENCH!
LUBRICATION
Proper lubrication and regular maintenance will in-
crease the operating life of your HUSKY and attach-
ments. Negligence on the part of the operator in
regard to lubrication or general maintenance can
depreciate the dependability of this rugged, durable
vehicle. It is suggested that the lubrication recom-
mendations in this manual be followed. A lubrica-
tion schedule prepared by the operator would be
beneficial.
1. Front wheel grease fitting 10. Brake linkage. Oil at all
on outside of wheel hub bearing points
2. Front wheel spindle 11. Attachment lift lever
3. Front axle pivot
12. Clutch – a few drops at
4. PTO Housing rear of clutch plate hub
5. Idler pulleys (yearly) at end of spring
6. Transmission (SAE #90)
13. Lower steering shaft –
7. Air cleaner (see Engine
grease below tractor –
manual) above steering pinion
8. Engine crankcase
(Numbers within each symbol
9. Hood hinge designate lubrication area)
See separate engine folder for amount and type of oil for
various temperatures.
Oil with can
Change oil Grease with low
pressure
or hand gun Check gear lube
Figure 12
Figure 13
Figure 14
Figure 15

10
ADJUSTMENTS
BELT ADJUSTMENT AND REPLACEMENT
TO REMOVE PTO BELTS
1. Loosen belt guides from PTO support and remove
PTO belts from pulley.
2. Loosen the two capscrews that hold the belt guide
to the engine, and remove the guide.
3. Use wire hook to pull the idler pulley away from
the belt.
4. Remove the drive belts from the engine pulley.
5. Remove the PTO belt or belts.
To install the PTO belts, reverse the above procedure.
Be sure all parts removed are replaced in their
original position.
TO REMOVE DRIVE BELTS
1. Follow steps 1, 2, and 3 listed previously
2. Remove nut and washers from front end of the
drive shaft. (To keep drive shaft from turning while
removing nut, hold it with a wrench across T bar
welded to back end of drive shaft.)
3. Remove the four capscrews and washers that hold
bearing support to the mounting plate assembly.
4. Remove bearing support by sliding it off front end
of drive shaft.
5. Remove drive belts.
To install new belts reverse the above procedure.
Be sure belt guides are properly positioned on the
engine. Locator on back of belt guide should fit into
groove on face of engine.
PTO BELT ADJUSTMENT
The PTO belts can be adjusted by loosening the three
capscrews that hold the PTO support casting to axle sup-
port casting. Raise or lower PTO support casting to
proper adjustment.
If belts are properly adjusted (as described above)
and still drag, check adjustment of lower belt guide.
There should be approximately 1/8" clearance be-
tween pulley and belt guide all the way around.
TRANSMISSION DRIVE BELT ADJUSTMENT
The transmission dual drive belts require no adjust-
ment. There is constant belt tension applied at all
times.
GENERATOR-STARTER DRIVE BELT ADJUST-
MENT
The generator-starter drive belt can be adjusted by
loosening the capsrew on the adjustment bracket
and moving the generator-starter. The belt is prop-
erly adjusted when it can be depressed approximately
1/4 inch under slight thumb pressure.
CLUTCH-BRAKE PEDAL
As you familiarize yourself with the tractor, you
will notice that when you depress the Clutch-Brake Pedal
approximately two-thirds, the clutch is disengaged.
This Clutch-Brake Pedal position also serves as a
brake to stop the vehicle when in gear. Pedal ad-
justment is set at the factory and should not require
frequent attention unless the linkage has been dis-
turbed. Should clutch slippage become evident or
brake shoe lining is worn, see your Bolens dealer.
However, to prevent the vehicle from moving when
transmission is in NEUTRAL or when shifting into
another gear, particularly on inclines, it is neces-
sary to further depress the Clutch-Brake Pedal to
apply the main transmission Brake.
The Transmission Brake, being the main brake,
must be checked frequently and adjusted as follows:
1. Depress Clutch-Brake pedal approximately
two-thirds (until rear clutch flange has moved back
to touch stationary plate). At that time the adjusting
rod has moved up to top of brake rod slot. (See
Figure 17.)
2. Exert additional pressure on pedal to move brake
shoe shown in Figure 17, toward Main Brake drum.
3. Brake shoe must contact drum when CLUTCH-
BRAKE pedal is approximately 1" to 1-1/2" from
pedal stop on frame. (See Figure 18.)
4. Adjust nuts on adjusting rod to insure adequate
brake shoe pressure. (See Figure 17.)
Figure 16

11
NOTE
REGULARLY LUBRICATE ALL BRAKE
LINKAGES TO INSURE FREE ACTION.
PARKING BRAKE
Always apply Parking Brake whenever leaving trac-
tor unattended or on inclines. Do Not operate trac-
tor with Parking Brake on.
Always use Main Brake when shifting on inclines.
SEAT ADJUSTMENT
To adjust seat, remove two nuts from beneath tractor
seat and reposition in other holes provided. Replace
nuts and tighten to secure seat in new position. Tool
box is conveniently located under seat.
FREE WHEELING
Free wheeling is provided solely for maneu-
vering tractor by hand on level ground. DO
NOT USE FREE WHEELING ON SLOPING
GROUND because brake is inoperable when in
free wheeling!
Free wheeling pin is located on the inside hub of the
right rear wheel. Pull pin out for free wheeling or
push pin into socket for normal operation, securing
pin in either position with spring cotter provided.
Turn the differential control knob counterclockwise
as far as it will go. DO NOT USE A WRENCH. Lo-
cation of differential control knob is shown in illus-
tration on page 8. "Counterclockwise" is as viewed
from left of tractor facing the end of the axle.
NOTE
The controlled differential must be disen-
gaged, as described in the preceding para-
graph, in order for tractor to free wheel.
DO NOT ATTEMPT TO TOW VEHICLE OVER
3 MPH.
REAR AXLE END PLAY
The rear axle may develop end play which should be
corrected. Check approximately every 50 hours of
operation and adjust if necessary.
ADJUSTMENT PROCEDURE FOR REAR AXLE END
PLAY
With both rear wheels off the ground:
1. Remove cotter pin and loosen R. H. castellated
nut several turns.
Figure 17
Figure 18
Figure 19

12
2. Remove cotter pin from L. H. castle nut (under
posi-traction hand wheel), and turn castle nut hand
tight. Temporarily install cotter pin and turn wheels
to determine if differential gears are binding. Con-
tinue this L. H. procedure until a slight binding is de-
tected. At this point back off castle nut to first
cotter pin hole and lock castle nut permanently with
cotter key. IMPORTANT: This L. H. adjustment
must be performed first.
3. Then proceed with R. H. castle nut adjustment, to
eliminate all end-play. Recheck for excessive bind-
ing before locking R. H. castle nut with cotter pin.
NOTE
When making this axle end play adjustment,
DO NOT USE A WRENCH.
POWER TAKE-OFF (P.T.O.)
FAST-SWITCH POWER-LOCK HITCH (NOT BELTS)
Drive shaft delivers power directly from power-
take-off (PTO) to attachment-front, rear and center-
mounted. Switching powered attachments takes only
a few minutes. Slide universal joint over end of
splined power-take-off shaft, aligning holes in joint
and shaft and secure with special cotter pin, then
slide attachment drive and PTO drive shaft universal
joint together, slip pins into hitch points and connect
attachment lift lever with pin and hitch point. The
PTO (power-take-off) drive shaft is located under
the front of the tractor frame and is connected to the
engine by a drive belt. This assembly has a drive
shaft which is splined at both ends so that front,
center and rear power attachments can be coupled
directly to it. Universal joints on the attachments
are equipped with needle-bearings allowing you to
raise or lower attachments (with lift lever) while the
tractor is under full power.
Your HUSKY Tractor has the fastest attachment
switch system in the industry. No belts to adjust . . .
no tools needed.
Always remove universal joint from power-
take-off shaft when attachments are removed
from tractor. If the joint is not removed and
the power-take-off is engaged, damage will
result from whipping action of the free joint.
Figure 20
MINOR TROUBLE SHOOTING GUIDE .
CHECK FOR POSSIBLE CAUSES
IF TRACTOR ACTS IN
FOLLOWING MANNER:
FAULTY
IGNITION
FAULTY
SPARK PLUG
EMPTY
FUEL TANK
BATTERY
CARBURETOR
IDLE
ADJUSTMENT
OIL
AIR CLEANER
CHOKE
SEE YOUR
BOLENS DEALER
Engine will turn over but won’t start
X X X X X X
Engine will not turn over X X
Starts only after repeated tries X X X
Stalls in a few seconds X X X
Stalls when hot X X
Idles rough X X X
Engine overheats X X
*Also see enclosed Engine Manual for additional troubleshooting information.

13
Always keep your HUSKY tractor in a dry, protected
place when not in use to prolong its usefulness and
appearance. With year 'round use, it is not neces-
sary to "store" the tractor but when it is not to be
used for some time, it should be prepared for stor-
age in the following manner:
1. Completely clean all accummulated dirt or trash
from all parts of tractor.
2. Wipe oil or a rust preventative on any parts that
may be damaged by rust.
3. Drain gas tank and carburetor.
4. Remove spark plug and put a small amount of oil
(S.A.E. 30) in cylinder head.
5. Without starting the tractor, crank the engine to
fully lubricate the cylinder walls, valve seats and
valve stems.
6. Keep tractor covered.
7. Battery - see separate Battery folder.
STORING YOUR HUSKY TRACTOR

WARRANTY
Bolens equipment is carefully engineered to give efficient and trouble free performance if
properly operated and maintained. To help assure delivery of equipment in proper operating
condition, we have obligated our dealers to completely assemble and service the tractor before
delivery and thoroughly explain its operation to you. To take advantage of the owner's war-
ranty issued with each tractor, you must fill out and return the Warranty Card to Bolens Di-
vision. With the warranty in effect, the Bolens dealer is authorized to repair or replace any
p
arts which fail due to defective material or workmanship during the prescribed warranty
period. However, all repair work must be performed by an authorized Bolens dealer or the
warranty is void and all claims for warranty are subject to approval by the factory. The en-
gine, battery, and other trade accessories are warranted separately by their respective manu-
facturers. Service can be obtained through your Bolens dealer.
FORM NO. 551778 - 1
10 -
66
LITHO IN U. S. A. KEN COOK INTERNATIONAL
P O R T W A S H I N G T O N , W I S C O N S I N U. S. A.

This Document was created from a PDF
downloaded from “My Tractor
Forum.com” - my thanks to them and
Robert Wirsing for making this
information available.
Table of contents
Other Bolens Tractor manuals

Bolens
Bolens G-14 User manual

Bolens
Bolens QS Series User manual

Bolens
Bolens 1463 Guide

Bolens
Bolens nolens 1250 Installation instructions

Bolens
Bolens HT-20 User manual

Bolens
Bolens Husky 1476 User manual

Bolens
Bolens Husky 1253-02 Installation guide

Bolens
Bolens Husky 1476 Guide

Bolens
Bolens 15FE-01 User manual

Bolens
Bolens Husky 600 User manual

Bolens
Bolens Husky 900 User manual

Bolens
Bolens 184 Instruction Manual

Bolens
Bolens 600 Series Installation and operating manual

Bolens
Bolens H-14 Guide

Bolens
Bolens 1253-01 Installation guide

Bolens
Bolens 1886s-05 User manual

Bolens
Bolens 1053 User manual

Bolens
Bolens 13048 Owner's manual

Bolens
Bolens TX1502 Guide

Bolens
Bolens DuraTrac 5117H User manual