Bolt VD-420 User manual

VD-420
WIRELESS MANUAL FLASH
User Manual

2 |Introduction
Thank you for choosing Bolt.
The Bolt VD-420 Wireless Manual Flash puts creative control in your hands with manually adjustable power
output settings. It can be used for wireless operation with up to sixteen individual channels, or as an optical
slave. Use the flash on camera, or connect the included wireless transmitter to trigger it remotely. With eight
power levels, up to 270° rotation, and -7° to +90° tilt, the Bolt VD-420 can help you get the perfect lighting for
the perfect shot.

Table of Contents |3
Table of Contents
Precautions ................................................................4
Overview ................................................................... 6
Installing Batteries....................................................10
Powering the Transmitter..........................................11
Setting the Wireless Channel...................................12
Mounting the Flash and Transmitter ........................ 13
Turning On the Flash and Firing a Test..................... 14
Testing Wireless Sync Between the Flash and
Transmitter ............................................................... 14
Automatic Power-Saving Function...........................15
Extended Interface................................................... 16
Using the Flash......................................................... 18
Bouncing Your Flash................................................ 20
Optical Slave Mode ................................................. 23
Positioning Remote Flash Units............................... 25
Wired Camera Triggering ........................................ 26
Specifications ...........................................................27
Troubleshooting ...................................................... 28
FCC Compliance...................................................... 29
One-Year Limited Warranty...................................... 30

4 |Precautions
⚠⚡
• Before using this product, thoroughly read the following
safety notices to ensure safe use and help prevent
damage to your flash or injury to yourself and others.
• Do not fire the flash at close range directly into the eyes
of people or animals. This can cause damage to the
retina and may even lead to blindness.
• To avoid overheating and damaging your flash unit,
please wait for at least ten minutes after twenty-five
continuous flashes at full power.
• Do not disassemble or attempt to repair this product
yourself. There are high-voltage components inside that
can produce a hazardous electric shock.
• Keep this product and its batteries out of the reach of
children.
• Use only the power sources specified in this manual.
• Always switch the flash o before changing the batteries.
• Always install batteries of the same type, brand, and
age. Do not combine dierent types or brands, or old
and new batteries. This can cause the batteries to leak,
overheat, or explode. Install the batteries in the proper
orientation, according to the indicator in the battery
chamber. Installing batteries in the reverse orientation
may cause them to leak, overheat, or explode.
• Do not use or store this product in flammable conditions
(such as environments containing flammable gases or
liquid chemicals). This can damage the flash, start a fire,
or cause an electric shock.
• Do not clean this product with agents containing
corrosive or flammable substances such as paint thinner,
benzene, or nail-polish remover.
Precautions

Precautions |5
• This product is not water resistant. Keep it away from
rain, snow, humidity, and general moisture.
• Should the product sustain physical damage, do not
touch any exposed interior metal parts. If touched, they
may generate an electric shock or cause a malfunction.
Promptly remove the batteries and take the product to
an authorized service center for repair.
• If you detect a burning smell, smoke, or excessive heat
coming from the flash, immediately stop operation
and remove the batteries to prevent the product from
igniting or melting.
• Do not drop or otherwise cause a strong physical impact
to this product, as this can cause a malfunction that may
cause it to explode or ignite.
• For long-term storage, remove all batteries from this
product to prevent the product from igniting or leaking
corrosive liquids.
• Do not store or use this product at temperatures above
104°F (40°C).
• Keep the metal contacts in the battery compartment
clean and free of corrosion and dirt. Do not touch them
with your fingers. Corrosive elements on the contacts
can damage this product and prevent it from functioning
properly. Contacts may be cleaned with isopropyl
alcohol on a cotton swab.
• Dispose of used batteries properly. Never heat them or
throw them into a fire, as this can cause the batteries to
leak corrosive liquids, generate heat, or explode.
• Images are for illustrative purposes only.

6 |Overview
Overview
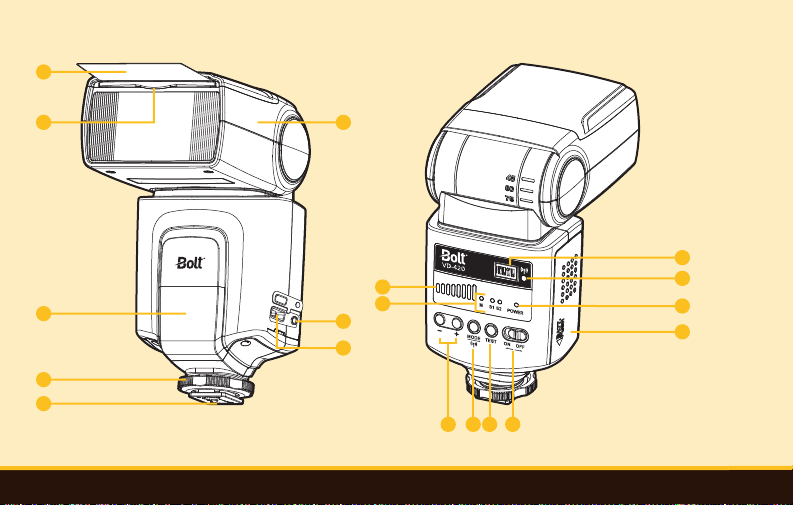
Flash
1 Reflection panel
2 Diuser panel
3 Flash head
4 Wireless optical sensor
5 Locking wheel
6 Mounting foot
7 3.5 mm sync socket
8 HV power socket
9 Output level indicator
10 Mode indicator
11 Flash power level button (+/−)
12 Mode select button / wireless (on/o)
13 Test button
14 On/O switch
15 Channel selector
16 Wireless indicator
17 Power/ready indicator
18 Battery compartment cover
Overview |7
3
7
15
16
17
18
8
11 12 1413
1
2
4
9
10
5
6

8 |Overview
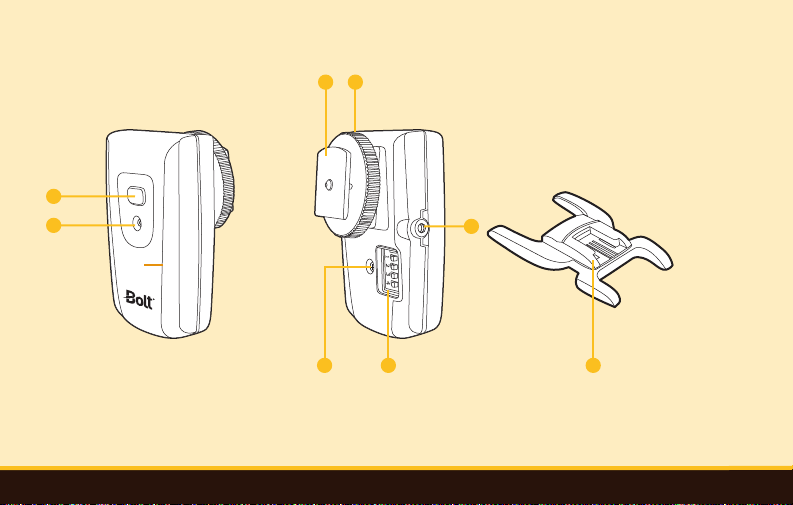
Transmitter
1 Trigger button
2 LED indicator
3 Mounting foot
4 Locking wheel
5 Battery compartment screw
6 Channel selector
7 2.5 mm sync input
Stand
8 Stand / tripod mount
Also included
• Drawstring pouch
Overview |9
43
1
2
85 6
7

10 |Installing Batteries
Installing Batteries
The VD-420 can be powered by four AA batteries:
• Nickel-metal hydride (1.2 V)
• Alkaline (1.5 V)
• Lithium (1.5 V)
To install batteries, make sure the VD-420 is turned o, and follow
these steps:
1. Press down on the battery compartment cover and slide it in the
direction of the arrow to open.
2. Insert batteries in the correct orientations.
3. Replace the battery compartment cover.
Important! Replace all four batteries at the same
time. Do not mix battery types or brands, or use old
and new batteries together.
1
2
Powering the Transmitter |11
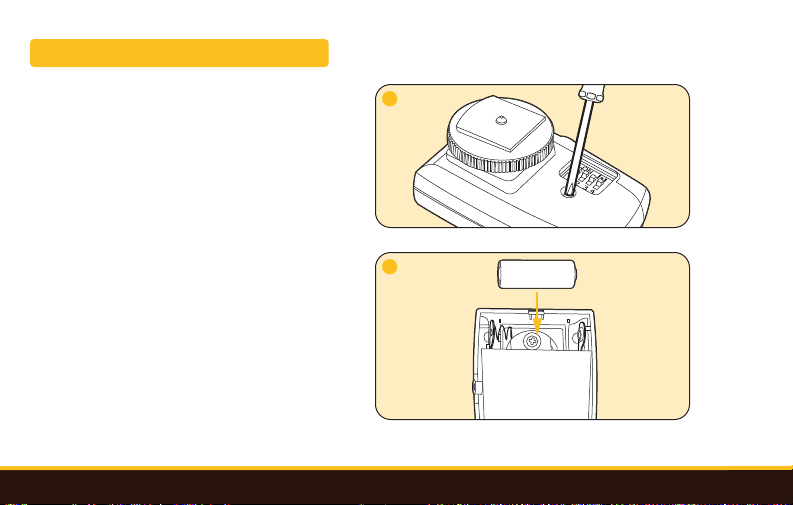
Powering the Transmitter
The transmitter uses an included 23 A 12 V alkaline
battery that is user replaceable and can last up to two
years.
To change the battery:
1. Use a Phillips screwdriver to unscrew the
battery compartment screw on the back of the
transmitter.
2. Remove the old battery, and replace it with a
fresh one. Make sure to install the new battery
with the correct polarity.
3. Close the compartment, and tighten the screw on
the back of the transmitter.
1
2

12 |Setting the Wireless Channel
Setting the Wireless Channel
The flash and transmitter can be set using the on-body channel selector switches. There are 16 individual
channels available. Refer to the following chart to choose the channel and synchronize both the transmitter and
flash by setting them to the same channel.
Adjust to the same channel
1 2 3 4 5 6 7 8
1 2 3 4 5 6 7 8
1 2 3 4 5 6 7 8
9 10 11 12 13 14 15 16

Mounting the Flash and Transmitter |13
Mounting the Flash and Transmitter
To mount the flash or transmitter on your camera, make sure the
VD-420 is turned o, and follow these steps:
1. Rotate the locking wheel counterclockwise to loosen it.
2. Slide the mounting foot all the way into your camera’s hot shoe.
3. Rotate the locking wheel clockwise until snug, but don’t overtighten.
Mounting the VD-420 on the included stand:
You can mount the VD-420 on the included stand in the same way you
would mount it on your camera. This allows you to set up the flash on a
flat surface or attach it to a tripod head, light stand, or clamp that has a
compatible 1/4-20 screw mount.
1
2
3

14 |Turning On the Flash and Firing a Test
Turning On the Flash and
Firing a Test
To turn on the flash, slide the power switch to the On
position.
When the flash is ready to fire, the ready indicator will
glow red.
To fire a test flash, press the Test button.
Testing Wireless Sync
Between the Flash and
Transmitter
Make sure the flash’s wireless mode is turned on with
the indicator lit blue. If not, press and hold the Mode
button for about two seconds until the indicator turns
on.
Press the Test button on the transmitter to trigger the
flash.

Automatic Power-Saving Function |15
Automatic Power-Saving Function
After 30 minutes of inactivity, the flash will automatically enter a power-saving mode to conserve battery life.
The Ready indicator light will blink every three seconds, and other indicator lights will turn o.
To reactivate the VD-420, press any button on the control panel. When in S1/S2 modes (see Optical Slave Mode
below), the flash will enter power-saving mode after 60 minutes of inactivity. During long periods of inactivity,
use the power switch to turn the flash o completely.

16 |Extended Interface
Extended Interface
You can connect your VD-420 to an external power source or PC sync via the extended interface on the side
of the flash.
External power source
An external power source, such as the Bolt Cyclone Battery Pack, can greatly increase the number of flashes and
reduce the recycle time in between flashes. You will need a CZ type cable (not included).
Note: When the VD-420 is used with an external power source, the AA batteries must still be in the flash in
order to operate.

Extended Interface |17
3.5 mm sync
You can trigger your VD-420 via a PC cord between your camera and the VD-420’s 3.5 mm sync socket. This lets
you position the flash o-camera for more lighting options.
Note: The 3.5 mm sync socket on the VD-420 is only for synchronous signal input.
To access the extended interface, follow these steps:
1. Pull back the contact cover on the side of the flash.
2. Plug the cable into the corresponding socket.
a. For an external power source, plug the appropriate power cable into the external power-source socket.
b. For wired sync, plug a 3.5 mm cord into the sync socket.

18 |Using the Flash
Using the Flash
The VD-420 oers manual flash output adjustment.
You can set the VD-420’s flash output level to 1/1, 1/2, 1/4, 1/8, 1/16, 1/32, 1/64, 1/128.
The 1/1 setting is the full-power flash, and each successive setting halves the light output.
To use the manual mode, turn the flash and camera on, and follow these steps:
1. Make sure the Mode indicator is set to M.
2. Press the flash power level buttons (+/-) to set the desired flash output.
3. Set the exposure on your camera.
4. Take a test shot, and then check the exposure on your camera’s LCD.
5. Adjust your camera’s exposure settings and the flash output as needed.

Using the Flash |19
To avoid overheating the VD-420 and damaging it, wait at least 10 minutes after 20 continuous flashes at full
power. The flash will automatically shut o if the internal circuit overheats. It will also alter the recycle time from
10 to 25 seconds until the flash bulb cools down.

20 |Bouncing Your Flash
Bouncing Your Flash
Using flash to directly illuminate a subject often
creates harsh, unattractive shadows. To avoid this, tilt
or swivel the flash to aim it at a large white or neutral-
colored surface, such as a ceiling, wall, or reflector.
The light will bounce o the larger surface before
striking your subject for softer illumination. The VD-
420 flash head can tilt up at 45°, 60°, 75°, and 90°
angles from the lens. It can also swivel horizontally
180° to the left and 90° to the right.
When bouncing your flash, you may need to adjust
your exposure settings, since the level of light falling
on your subject will decrease. The farther away the
bounce surface and your subject are, the more power
you will need.
Tip: Bouncing your flash o colored surfaces can
create a color cast in your images. Bouncing o a
white or neutral-colored surface will not alter the
color of the light, while bouncing o a gold-toned
surface can give portraits a warmer look. Other colors
can be used for creative eects.
Table of contents
Other Bolt Batteries Pack manuals


Popular Batteries Pack manuals by other brands

Xtreme Power Conversion
Xtreme Power Conversion BP-XR4U480A User & installation manual

Aegis
Aegis ALF-036050A user manual

Jackery
Jackery Explorer 2000 Plus user manual

CyberPower
CyberPower CS150U48V3 Installation & operation manual

Lenz
Lenz LITHIUM PACK INSOLE RCB 1200 operating instructions

Growatt
Growatt WIT 28-55K-HU-US L2 quick guide


