Boly BG962-K30W User manual

Hunting Camera
BG962 Series/ BG960 Series

Contents
1.Basic........................................................................................ 1
1.1General Discription....................................................... 1
1.2 Camera at a Glance......................................................2
1.3 Shooting Information Display...................................4
1.4 Cautions........................................................................ 4
2.Quick Start Guide............................................................. 6
2.1Power Supply................................................................ 6
2.2 Insert The SD Card..................................................... 6
2.3 Do The Camera Common Operation....................... 7
3.Advanced Operation....................................................... 8
3.1 Work Mode...................................................................8
3.2Trigger Mode................................................................ 8
3.3 Item Settings................................................................9
3.4Default Setting............................................................ 13
3.5 Power Off.................................................................... 14
4.Mounting The Camera..................................................15
PIR Detection Zone........................................................... 16
Technical Specifications..................................................17
Parts List................................................................................19

1.Basic
-1-
1.Basic
1.1General Discription
Thanks for your purchase of Boly Scouting camera.
This camera is a surveillance device working
automatically. It can be triggered by any movement
of human or animal in a certain region of interested
monitored by a highly sensitive Passive Infra-Red
(PIR) motion sensor ,and then take high quality
pictures (up to 30 mega pixels) or video clips. It can
take clear, black and white pictures or videos in the
dark night.
BG962-X30W:This camera integrates 40 940nm
LEDs and xenon flash. The xenon flash as
supplement light at night turns to infrared light
after filter as a result of which it can reduce time of
exposure. This own function leads to no motion blur
in the video clips.
BG962-K30W/BG960-K18W:This is a digital
infrared surveillance camera with 50 940nm
LEDs.There is a 2" color LCD display screen on the
camera. The device is designed for outdoor use and
resistant against water and snow. Furthermore, the
camera can be used as a portable digital camera.
Pictures or videos can be taken manually by
pressing on the operation panel.Maximum pixel
of BG960-K18 is 18MP.
BG960-I18W:This is a digital infrared surveillance
camera with 50 850nm LEDs. High quality pictures
with long distance light range can be got.

1.Basic
-2-
1.2 Camera at a Glance
1
2
3
4
5
6
⑦
Fig. 1: Front view of BG962-X30W Fig. 2: Front view of BG962-K30W/BG960 Series
⑧
⑨
⑩
○
11
Fig. 3: Inner panel view

1.Basic
-3-
○
12
○
13
○
14
○
15
○
16
○
17
Fig. 4: Bottom view
①
Lens
②
Mic
③
Indication LED
④
PIR
⑤
Flash
⑥
Lock
⑦
Speaker
⑧
LCD display
⑨
Battery bays
○
10
Operation Panle
○
11
Power Switch
○
12
DC 6V
○
13
TV out
○
14
USB port
○
15
SD card slot
○
16
Bottom Screw
○
17
DC hole and
Stopper
MENU
Enter/Exit the menu
DEL
Delete photos or videos
Exchange between preview
and playback state
▲▼
Select option(left ,right)
Change the photo size
▲
Select Item(UP),
Increase vaule
▼
Select Item(DOWN),
Decrease vaule
OK
Make selection (OK)
Capture photos or videos
OFF:turn off the power.
SET UP:change camera settings.
ON:enter into hunting mode or security mode

1.Basic
-4-
1.3 Shooting Information Display
When the camera is turned on (power switch is slid
to SETUP position), the current settings will be
displayed on the screen.
Fig. 5: LCD Display
1.4 Cautions
★The camera is supplied by 8 AA batteries or DC
power adapter with output of 6V (recommended)
though the range of voltage can be 5V to 12V.
Please install batteries according to shown
polarity. (The voltage of a single battery need
higher than 1.5V)
★Please insert the SD card when the power switch
is in OFF position before testing the camera. The
camera has no internal memory for saving images
or videos. If no SD card is inserted, the camera

1.Basic
-5-
will shut down automatically after an indication
beep.
★Please do not insert or take out the SD card when
the power switch is in the ON position.
★It is recommended to format the SD card by the
camera when used for the first time.
★The camera will be in USB mode when connected
to a USB port of a computer. In this case, the SD
card functions as a removable disk.
★In SETUP mode, the camera will shut down
automatically after 3 minutes if no operation is
done. Please turn on the power again if you want
to continue to work with the camera.

2.Quick Start Guide
-6-
2.Quick Start Guide
What You Need
To use camera ,you need:
An unlocked SD card;
4 or 8 AA batteries,High-density and high-
performance alkaline batteries are recommended
A PC with a USB 2.0 port and the Internet access;
2.1Power Supply
★1)Battery Power:Load 4 or 8 AA batteries
according to shown polarity. (The voltage of a
single battery need higher than 1.5V)
2)External Power:Insert 6V DC external power
adapter.
When in a low-battery state,the camera will be
automatically shut down after indication sounds.
Please change the batteries in this case.
NOTE:
The battery can be just a backup for emergency when
using external power or solar charging.
There will be risk of explosion if battery is replaced by an
incorrect type.
Please deal with waste battery according to the local rule.
2.2 Insert The SD Card
Insert a new SD card into the card slot. Please note
that the SD card is on the “write” (not locked)
position otherwise the camera will not function
correctly.
2.Quick Start Guide
-7-
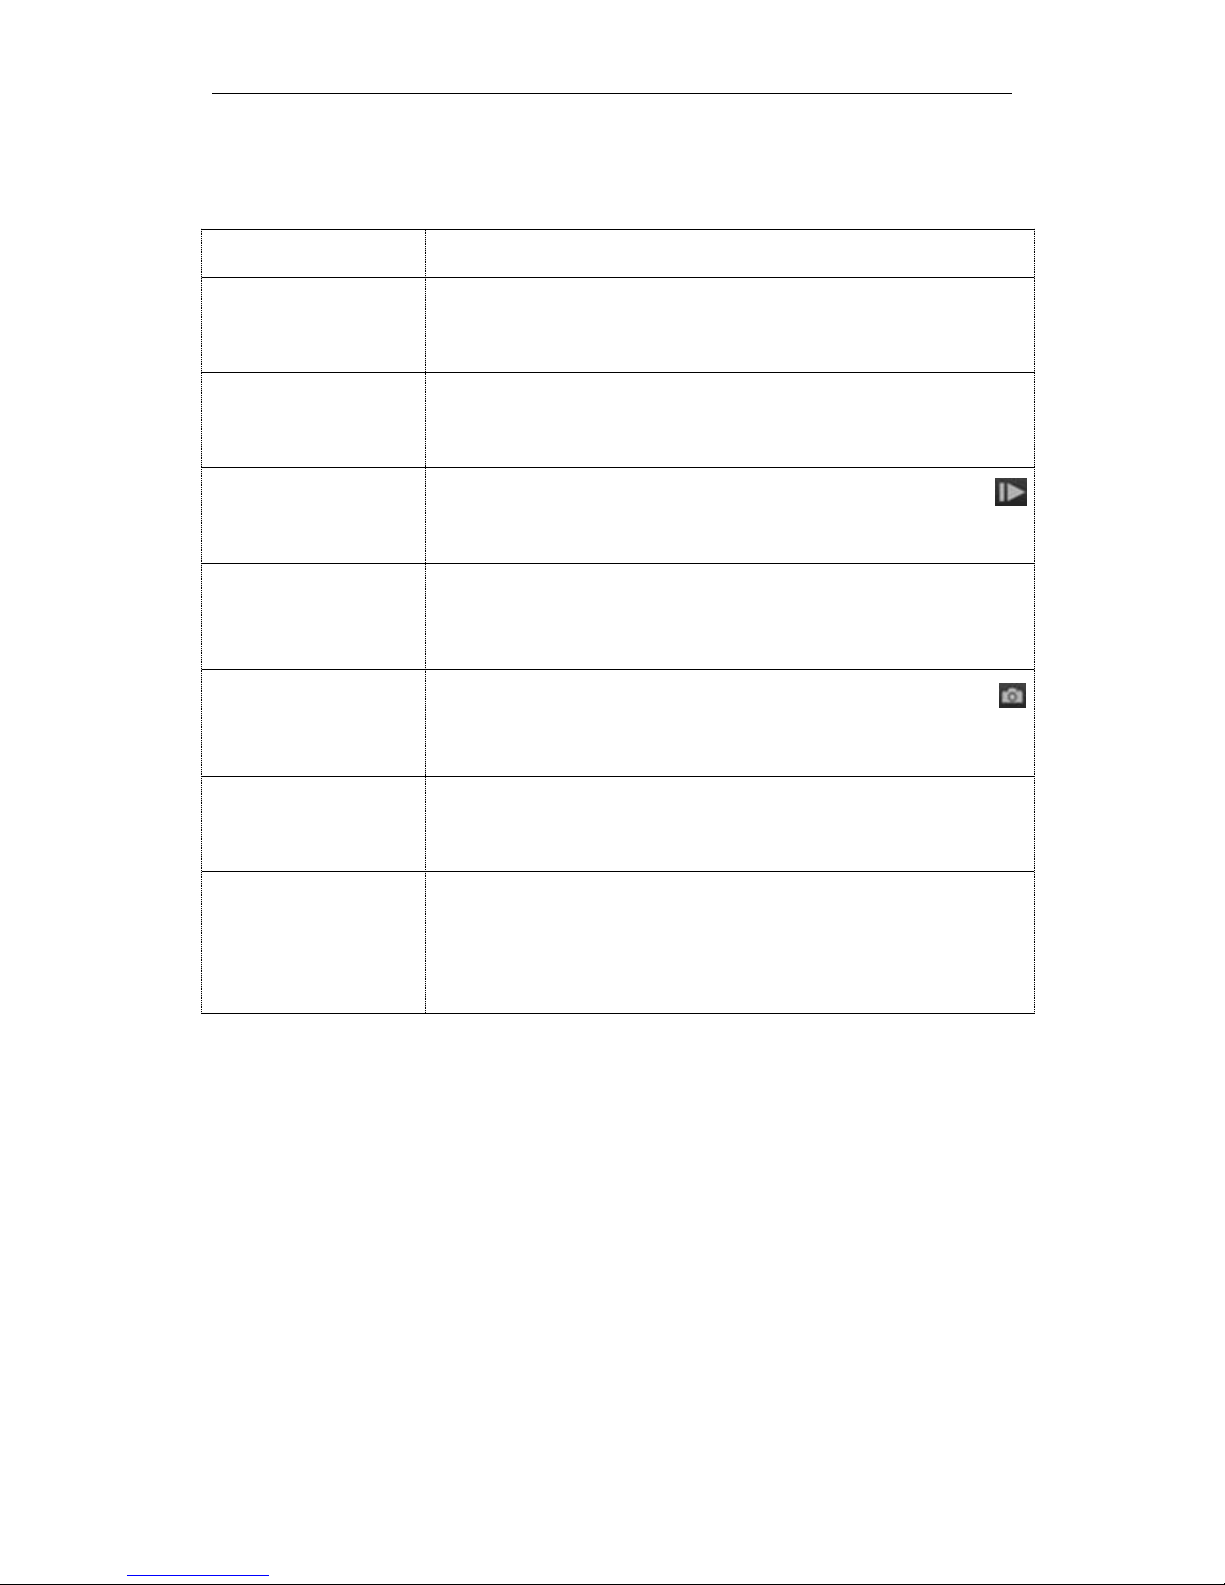
2.3 Do The Camera Common Operation
To
Do This
Preview state
Flip the power switch on SETUP into
Homescreen.
Setting state
Flip the power switch on SETUP,Press MENU
into Setting state.
Playback state
Flip the power switch on SETUP,Press
into playback state.
Switch photo
and video mode
When in Homescreen,Press▲▼to change
between the photo,video and Pic+video mode.
Manual capture
a photo
When in Homescreen(photo mode),Press
to capture a photo.
View photos
and videos
When in playback state,Press▲▼ to view
photos and videos.
Delete photos
or videos
When in playback state,Press ▲▼ to select
DELETE Item,Press DEL to delete a photo or
all.

3.Advanced Operation
-8-
3.Advanced Operation
3.1 Work Mode
SETUP mode:Switch the camera to SETUP
position to set camera ,manual capture ,playback
the photos and video clips or send MMS manually.
Hunting mode:Switch the camera to ON position
to hunt or monitor animals.When the animal or
human intrudes into the monitoring region,the
camera will take pictures or videos automatically
according to the previous programmed settings.
After switching the camera to ON position, the
motion indication LED (red) will blink for about 10
seconds. This time interval is for you to position the
camera for automatic surveillance operation,e.g. to
close the camera and lock it, to fix the camera on a
tree and walk away.
Off mode:Switch the camera to OFF position to
power off the camera.
3.2Trigger Mode
PIR Triggering:PIR triggering is the default
setting. The camera works only when motions get
detected, while, if PIR sensitivity is set as PIR OFF,
the camera stops PIR triggering.
Timer Triggering:The Timer Triggering is OFF
which means the timer triggering is disabled. While
changing the timer triggering interval to a non-zero
value, the camera starts to work at a preset interval.

3.Advanced Operation
-9-
PIR&Timer Triggering:For both PIR triggering
and Timer triggering, the user need go to PIR
sensitivity to set “normal, high or low” sensitivities
according to the external environments, and set the
Timer interval to a desired non-zero value. The
camera will capture pictures or videos in a preset
time interval even there is no motions detected, the
camera will also capture pictures and videos if
motions get detected.
3.3 Item Settings
Flip the power switch on SETUP,Press MENU into
SETUP Mode. You can set menu according to the
actual needs.The following table shows the camera
setting items.
Camera Setting Items
Setting
Items
Description
Camera
Mode
Choose capturing photos, recording
videos or photo with a video clip.
Photo Size
Choose the photo size, e.g. 30MP, 20MP
or 14MP.
Video Size
Choose the video size :1920x1080,
1280x720 or 640x480.
Photo Burst
Choose the continuous shooting numbers
after each triggering.
Video
Length
Choose duration of recording video. This
parameter is effective and can be
adjusted only when the device in the
video mode under ON mode. Its value
extends from 5 to 180 seconds. The

3.Advanced Operation
-10-
default value is 10 seconds. Press LEFT
and RIGHT to decrease or increase the
value by 10 seconds.
Set Clock
Set camera date and time. You can
change the date and time of the device by
setting this parameter when necessary,
e.g., after every battery change. The date
format is month/day/year, the time
format is hour:minute:second. The
valid value for year is between 2016 and
2050.
Time Lapse
Time lapse means the camera can
capture images or videos at a preset time
interval regardless of whether motions
are detected. The default parameter is
Off, which means the timer function is
disabled. Changing this parameter to a
non-zero value turns on the Time Lapse
mode, and camera will take photos at
given time interval.
Please note that if PIR Trigger is set
to Off, then Time Lapse can’t be set
to Off.
Choose sensitivity of the PIR sensor.
This parameter defines the sensitivity of
the PIR: High, Normal, Low and Off. The
default value is “Normal”. The higher
sensitivity indicates that the camera is
more easily to be triggered by motion,
taking more pictures or recording more
videos. It is recommended to use high

3.Advanced Operation
-11-
PIR Trigger
sensitivity in room or environment with
little interference, and to use lower
sensitivity for outdoor or environment
with lots of interference like hot wind,
smoke, near window etc. Furthermore,
the sensitivity of the PIR is strongly
related to the temperature. Higher
temperature leads to lower sensitivity.
Please note that if Time Lapse is set
to Off, then PIR Trigger can’t be set
to Off.
PIR Interval
This parameter indicates how long the
PIR (Passive Infrared motion sensor) will
be disabled after each triggering in ON
mode. During this time the PIR of the
device will not react to the motion of
human (or animals). The minimum
interval is 0 second, it means the PIR
works all the time. The maximum
interval is 1 hour. It means the PIR will
be disabled for 1 hour after each
triggering. Press LEFT or RIGHT to
decrease or increase the value.
Work Hour
This parameter defines a certain time in a
day when the camera can be triggered,
while in the rest of the time the device is
shut off. The effective value ranges from
00:00 to 23:59.
The default set is Off which means the
camera works all along. Timer switch On
means the camera works only during the

3.Advanced Operation
-12-
time according to the preset settings.
Work Day
Choose the days of the week the camera
works on.
Game Call
It means this camera can play audio file
at a preset time clock of a day. The audio
file must be saved in the directory of
\DCIM\100BMCIM\ with a name of
AUDIxxxx(from 0000 to 9999).WAV
after format the SD card and setting the
game call as on mode. It is better that the
length of the audio file less than 2
minutes, otherwise it will consume much
more power. (Only for BG962 Series)
Language
Choose the menu language you need.
Beep Sound
Enable or disable the beep sound.
Camera
Posit
It means camera position. You can set
A-Z position for your camera, so that you
can distinguish which photo is taken by
which camera.
Recycle
Storage
In hunting mode, when the SD card is
full, the first images or videos will be
covered by new getting pictures or
videos. So that you don't need to retrieve
your memory card manually. But in
SETUP mode, SD can’t recycle storage.
Format SD
All images and videos in the SD card will
be deleted, so make sure that you have
made a backup of important data.
Default Set
Restore all customer settings to default
values.
Version
Version information.

3.Advanced Operation
-13-
*After changing each setting in SETUP mode you must
press “OK”, otherwise the camera will stay at the default
setting .
3.4Default Setting
Setting Items
Default
Options
Camera Mode
Photo
Video ,Pic+Video
Photo Size
30M(BG962
Series/18M(B
G960 Series)
20M/14M(BG962
Series,12M/5M(BG960
Series)
Video Size
1920x1080
1280x720/640x480
Photo Burst
1 Photo
1-5 photos
Video Length
10 Sec
5–180 sec
Set Clock
Enter
Time Lapse
Off
5-55Min / 1-8H
PIR Trigger
Normal
High /Low
PIR Interval
10Sec
0–55 Sec / 1–60 Min
Work Hour
Off
On
Work Day
All
Monday,Tuesday,Wedne
sday,Thursday,Friday,Sa
turday,Sunday
Game Call
Off
On (Only for BG962 Series)
Language
English
Deutsch / Suomi
Svenska / Norsk
Dansk/Italiano/Russian
/Cestina
Beep Sound
On
Off
Camera Posit
Off
A-Z Position
Recycle Storage
On
Off

3.Advanced Operation
-14-
Format SD
Enter
Default Set
Save
Version
Enter
3.5 Power Off
Switch the camera to OFF position to power off the
camera. Please note that even in OFF mode, the
camera still consumes certain power at μA level.
Therefore, please remove the battery if the camera
will not be used for a long time.
4.Mounting The Camera
-15-
4.Mounting The Camera
When use the camera in outdoor environment, such
as hunting or monitoring the living habits of wild
animals, you need to mount the device on a certain
place properly. It is recommended to mount the
camera on a tree, to get the optimal picture quality,
the recommended distance is 16ft from the tree to
the target monitoring area and recommended
height from the ground is 4.9ft~6.5ft. Adjust the
viewing angel properly (view angle of this camera is
110°).
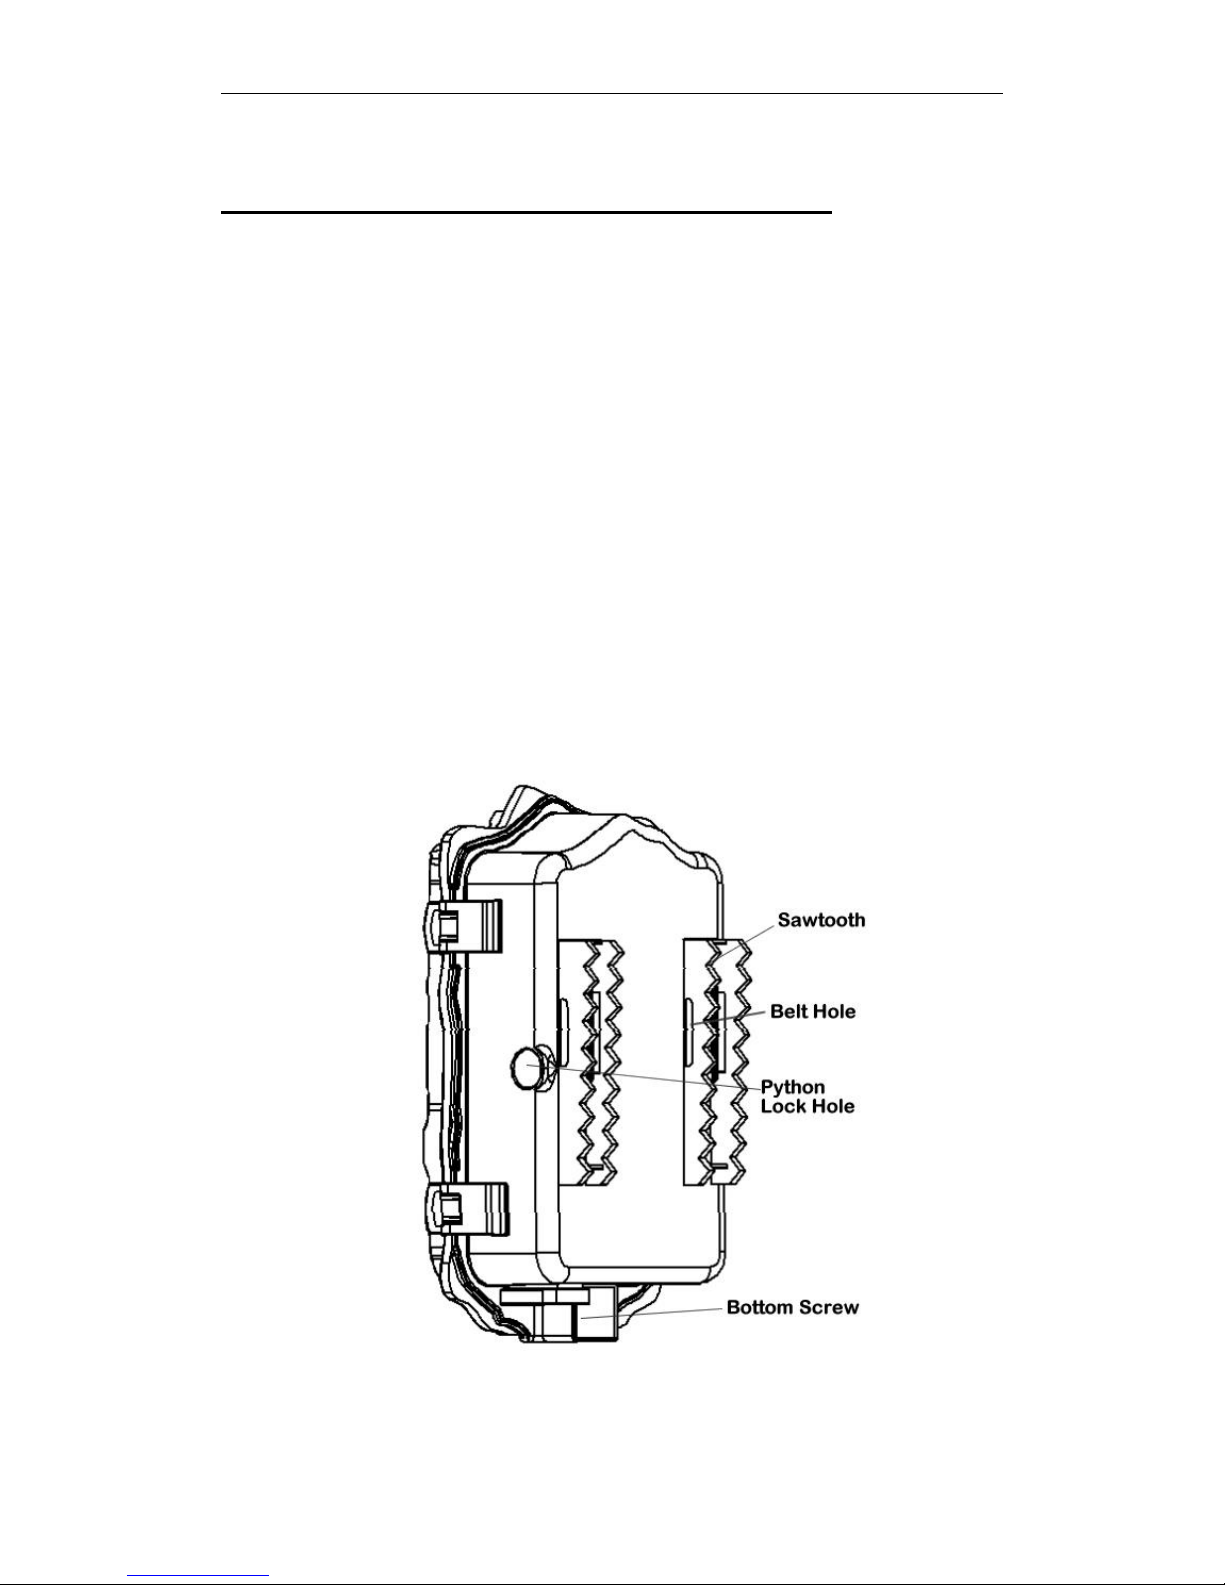
There are three ways to mount the camera: using
a band shaped belt, python lock or mounting
bracket.
Fig. 6: The back panel of the camera

PIR detection Zone
-16-
PIR Detection Zone
This camera has a new design of PIR and the new
PIR is patented. The new patented PIR’s detection
range can reach to 100ft in good environments.
Following picture shows the compared detection
zone between normal PIR and the new patented
PIR.
Fig. 7: PIR Detection Zone
The PIR detection angle (α) is just smaller than the
field of view (FOV) angle (β). The advantage of this
design is to reduce empty picture rate and capture
most, if not all, motions.
Fig.8: Detection angle vs. FOV angle

Technical Specifications
-17-
Technical Specifications
Image Sensor
14MP Color CMOS(962-K/X)
5MP Color CMOS (960-K/I)
Lens
F/NO=2.4
FOV(Field of View)=110°
PIR detection
range
100ft
Display Screen
2.0″ LCD
Memory Card
From 8MB to 32GB
Picture
Resolution
30MP/20MP /14MP(962-K/X)
18MP/12MP /5MP(960-K/I)
Video Resolution
1920x1080
1280x720
640x480
PIR Sensitivity
Adjustable (High/Normal/Low)
Trigger Time
<1s(962-K/X)
<0.7s(960-K/I)
Weight
0.35 kg(without battery)
Operation/Storag
e Tem.
-20 - +60°C
Photo Burst
1–5
Video Length
5–180s
Power Supply
8×AA or 4×AA
External DC 6V,2A
Stand-by Current
<300uA
Low Battery Alert
LED Indicator
Sound Recording
Available
Mounting
Rope/Belt/Python lock
Dimensions
160 x 90 x 75 mm

Technical Specifications
-18-
Operation
Humidity
5% - 90%
Security
Authentication
FCC, CE, RoHS
This manual suits for next models
3
Table of contents
Other Boly Scouting Camera manuals

Boly
Boly MG984G Series User manual

Boly
Boly BG320 User manual

Boly
Boly BG636 Series User manual

Boly
Boly BG962 Series User manual

Boly
Boly SG520 User manual

Boly
Boly MG984G Series User manual

Boly
Boly SG2060 Series User manual

Boly
Boly BG410 Series User manual

Boly
Boly MG984G-30M User manual

Boly
Boly SG560X-8mHD User manual


