Boly MG984G Series User manual
Boly Trail Cameras – MG984G Series
MG984G Series
User Manual

Boly Trail Cameras – MG984G Series
Table of Contents
1. Getting Started......................................................................1
2. Camera Operations............................................................3
2.1 Batteries / Power Supply................................................... 3
2.2 SD Card Information......................................................... 3
2.3 SIM Card Information....................................................... 4
2.4 Camera Modes.................................................................... 5
2.5 Manual Image / Video Capturing.................................... 6
2.6 Manage Images and/or Videos........................................ 6
2.7 Sending via MMS/GPRS/Molnus.................................... 7
2.8 Trigger Modes.....................................................................8
2.9 Password Setup.................................................................10
3. Camera Setup Settings & Display...............................11
3.1 Settings Interface & Display.............................................11
3.2 Mobile Communication................................................... 12
3.3 Camera Setup Software....................................................13
3.4 Cloud Service - Molnus....................................................15
3.5 Mobile Applications..........................................................17
3.5.1 User Level........................................................................18
3.5.2 BG Tools Usage Instructions for Android App.........18
3.6 Camera Setup Options.....................................................23
4. Detection Ranges – PIR Detection Zones............. 29
5. Technical Specifications............................................... 30
Appendix : Parts List........................................................ 31
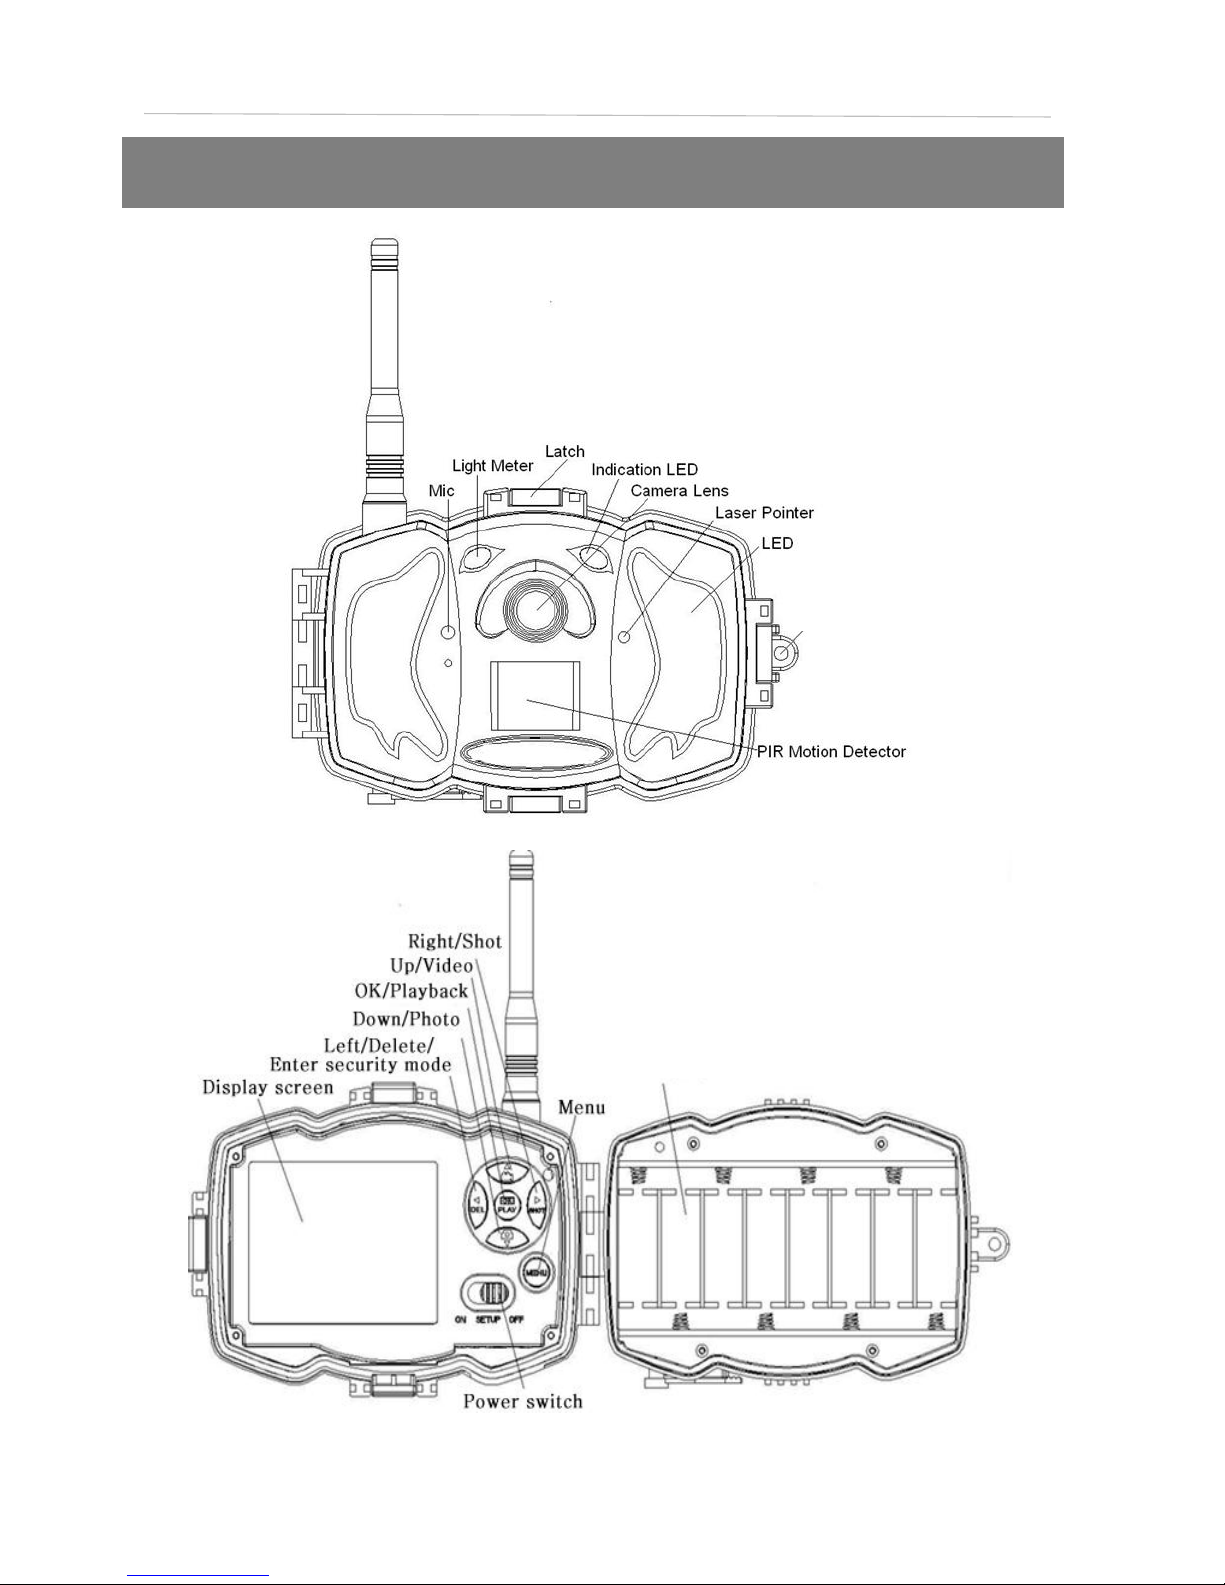
1. Getting Started
Battery Tray
Lock Loop

This camera, is a digital scouting and infrared surveillance
camera with communication functionalities. It can be
triggered by any human or animal movement, and is
monitored by a highly sensitive Passive Infrared (PIR) motion
sensor. After triggered, the camera automatically captures
high quality pictures (up to 36M pixels) or records video clips
(1080 FHD).
MG984G-36M: This model sends pictures or videos (less than
10M) instantly to your mobile device or e-mail via GPRS
network.
MG984G-V: This camera model can only send pictures to your
e-mail via GPRS network.
You will only be notified when the camera is triggered unless
otherwise set in custom settings. This camera takes color
pictures and videos with sufficient daylight. The built-in
infrared LEDs help take clear night pictures and videos.
DC Port

2. Camera Operations
2.1 Batteries / Power Supply
This camera is powered by 8 AA batteries. High-density,
high-performance rechargeable or non-rechargeable
Alkaline batteries are recommended. NiMH batteries
can be used as well. When the camera’s battery levels are
low, the indication LED light will blink twice, then the
camera will automatically shut down. (Each battery
should be above 1.5V)
A DC 6-Volt, 2 A external power supply adapter can also
be used to power the camera (not included).
2.2 SD Card Information
To take full advantage of the latest technologies, we
recommend Class 10 SD cards or better, which have
faster transfer speeds and longer durability for
extensive shooting in extreme outdoor conditions.
Some SD cards are deemed Secure Digital High
Capacity (SDHC) PRO cards, which only work with
SDHC compatible devices only. Please check that your
product is compatible with SDHC cards.
Insert the SD card into the camera before
turning on the camera
This camera supports up to a 32GB capacity SD card
and has no built-in internal memory. The camera will
not function without the SD card properly inserted into
the camera.

Make sure the SD card is unlocked before
inserting it into the camera
The camera will power off with a code stating that the
SD card is locked when inserted.
If you experience any problems with an
inserted SD card
Try reformatting the SD card, by using the camera’s
main settings options.
2.3 SIM Card Information
Insert the SIM card into the camera before
turning on the camera
The camera SIM card slot is sized for a standard SIM
card. If you have a nano or micro size SIM card,
utilizing a SIM card adapter (included with most of our
cameras) will be required to connect your camera to the
cellular network via SIM card.
NOTE: The camera will still function without a SIM
card. The SIM card is needed only for the
wireless/cellular messaging capabilities.

2.4 Camera Modes
The different modes are accessed by sliding the power
switch to the different positions marked on the camera.
The power switch is located inside the camera on the
bottom right of the LCD screen.
The different camera modes are as follows:
OFF Mode
Turns the camera off. The camera will still consume a
small amount of power while in OFF mode. It is
recommended to remove the batteries if the camera
will not be used for a long period of time.
TEST/SETUP Mode
In this mode, the camera allows you to customize the
camera settings or play back pictures and videos the
camera has taken on the LCD display.
ON Mode [ Hunting Mode ]
Camera will take pictures or video when motion is
detected and/or at specific time intervals, according
to the programmed settings. After switching the
camera to the ON position, the red LED motion
indicator will blink for about 10 seconds and then
turn off. This preset time allows you to adjust the
cameras position if needed, before the camera
becomes active.

2.5 Manual Image / Video Capturing
Place the camera in TEST/SETUP mode and press the
“►/SHOT” button on the right of the control pad to
manually capture photos or record video. Press “►/SHOT”
again to stop video recording.
2.6 Manage Images and/or Videos
Put the camera in TEST/SETUP mode and press the
“OK/Play” button to view images or videos. The latest
image or video will be shown on the LCD screen.
To view:
Press ▲or ▼to view the next or previous image or
video. Press OK to start a video.
To delete:
Press OK in Test/Setup Mode to enter into Playback
mode and access the pictures and videos. Press the ▲
or ▼to toggle between photos to find the photo(s) to
delete. Once selected, press the “/DEL” button and
the options Del One and Del All will appear. Press OK
when the Del One option is selected. Press OK again
to confirm you want to delete the selected picture or
video.

2.7 Sending via MMS/GPRS/Molnus
Images can be sent directly to your wireless
device/email/Molnus, based on the Send Mode settings.
1) Insert the SD & SIM card into the camera before turning
on the camera.
2) Turn on the camera in TEST/SETUP mode. Make sure
the SIM card is recognized and signal strength is adequate.
3) Select the send mode setting and fill in the correct
parameters.
You have the options of Molnus (default setting), Phone
MMS, Email MMS, or Email GPRS. Videos will be sent in
less than 10MP.
(The MG984G-V support option: Email GPRS/Molnus)
To manually send a photo:
Put the camera in TEST/SETUP mode
Wait for the camera to acquire a network signal and
the SIM card to be recognized
indicates the SIM card is recognized by the camera.
indicates the SIM card is not recognized by the
camera or the SIM card is not working due to
connection/activation issues.
Take a manual photo by pressing the “SHOT/►”
button, or press OK to view the photos stored on the
camera
Find the picture you want to manually send
Press the MENU button to pull up the Send To
option

Press OK again to send the picture via the
messaging option chosen in your camera settings
2.8 Trigger Modes
There are 3 different trigger modes for the camera: PIR
Trigger/Sensitivity, Time Lapse, and a combined
PIR/Time Lapse mode. These modes are activated by
three different menu options (PIR Trigger/Sensitivity,
PIR Interval, and Time Lapse).
PIR Trigger/Sensitivity
In this trigger mode, the camera will activate when
motion is detected. If the PIR Trigger/Sensitivity option is
set to OFF, the camera will not respond to any motion
within the camera’s trigger detection range.
Time Lapse
In this camera mode, the camera will activate at the set
time interval regardless of motion detection. If the Time
Lapse option is set to OFF, this trigger function will be
disabled.
Combined PIR/Time Lapse
For the combination of both PIR and Time Lapse
triggering, the following settings must be set correctly:
PIR Trigger/Sensitivity must NOT be set to OFF
The Time Lapse interval must be set to a
non-zero value.

The camera will capture pictures or video when motion is
detected and at the preset time(s), regardless of motion
detection.
● If PIR Trigger/Sensitivity and Time Lapse options are
BOTH OFF, the camera will not capture any photos or videos.
Additional PIR settings to note:
PIR Interval
This setting indicates how long the PIR sensor will be
disabled after each camera triggering. During this
interval time, the camera will not react to any
detected motion or activate at the scheduled Time
Lapse interval.
Further detailed information about the trigger modes
can be found in Camera Setup Options section of the
manual.
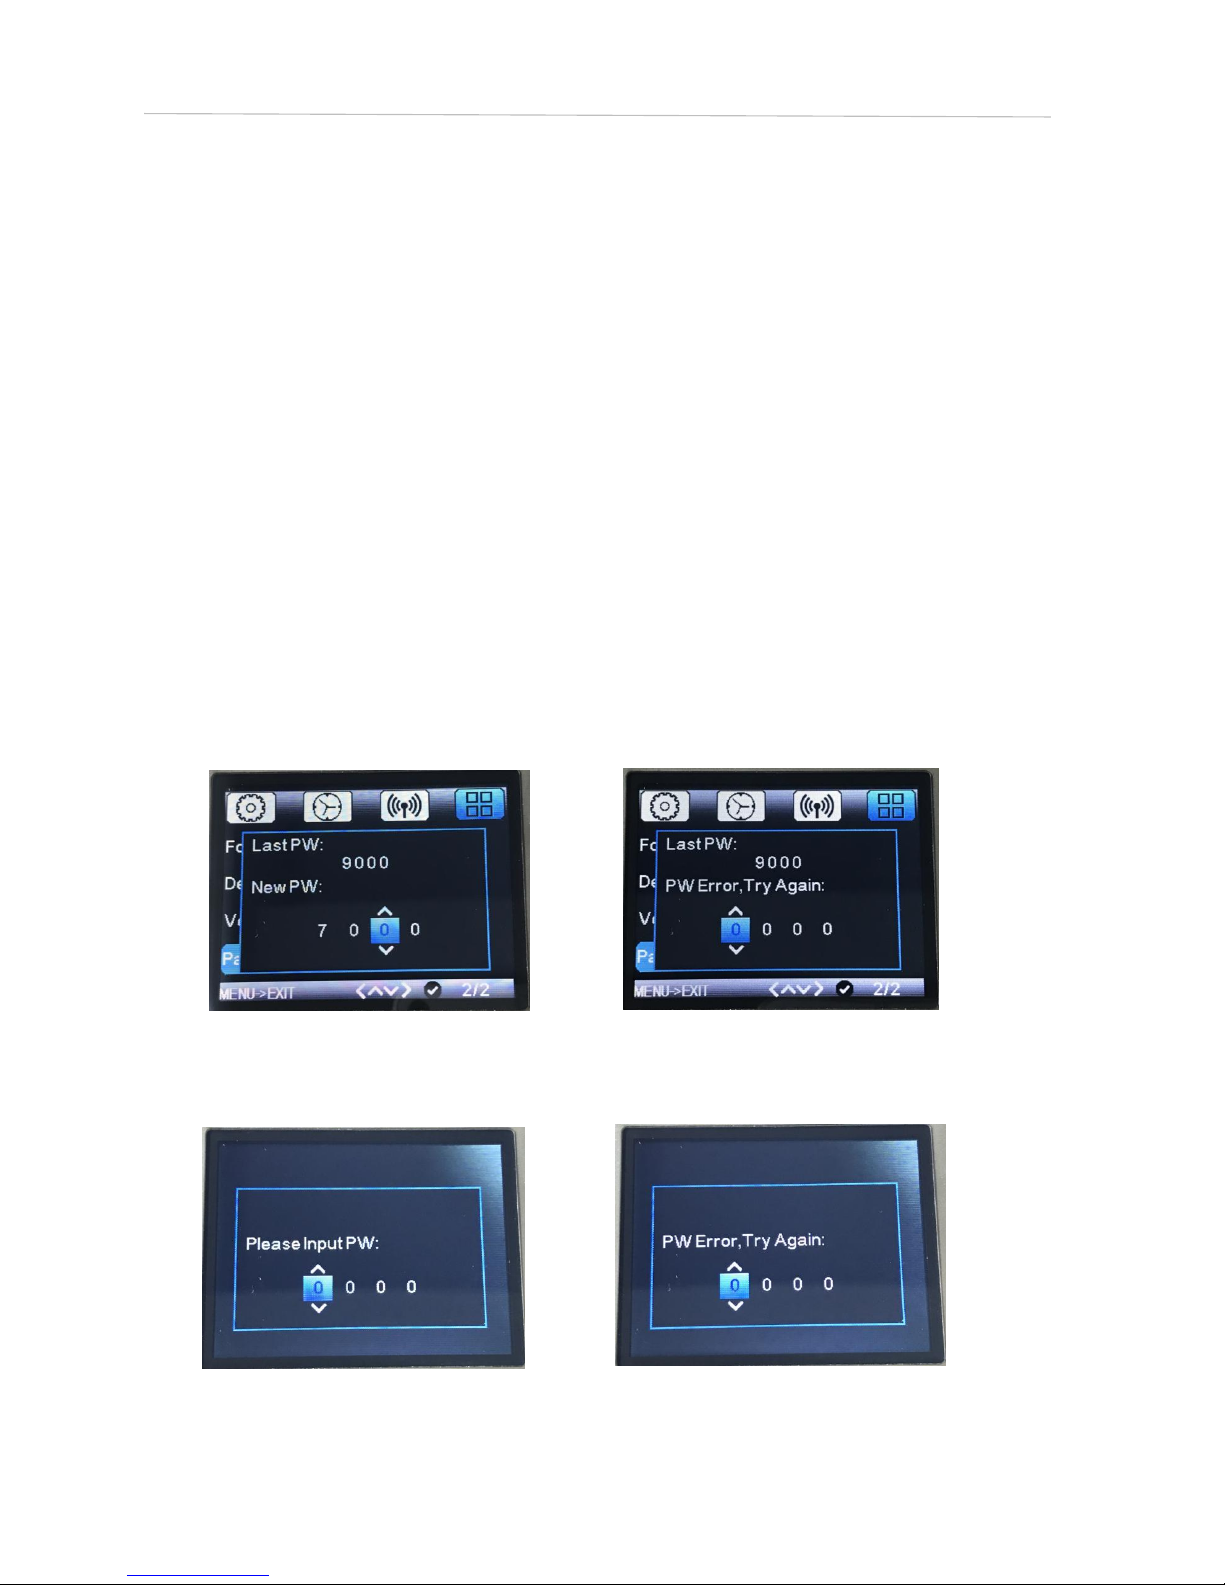
2.9 Password Setup
For encryption settings, enter your four digit pre-set
password to enter the camera. This function helps
protect your privacy.
This function is off by default. To use this function:
2.9.1 Press ▲/▼to adjust the number from 0~9, and
/► to change the password
2.9.2 The same password must be entered twice in order
to take effect.
2.9.3 After the password is set up, you will be required to
enter the same password on the next boot to enter the camera.
If you forgot your password, please contact us for
assistance
Above is the password settings interface. You will need to
enter the same password two twice.
After the password is successfully set, the next boot will need
to enter the correct password to enter the camera.

3. Camera Setup Settings & Display
3.1 Settings Interface & Display
To update the camera settings, place the power switch to
the TEST/SETUP position.
To navigate the menus, utilize the following built-in
buttons:
MENU: Enter the program menu in Preview Mode
▼►: Move between menu options (OK to select)
OK / PLAY: Save parameter settings and play videos
DEL / : Delete an image/video when viewing them
SHOT / ►: Capture a photo or record a video manually
When the camera is in TEST/SETUP Mode, the screen
will activate and display the following:
indicates the SIM card is recognized by the camera.
indicates the SIM card is not recognized by the
camera or the SIM card is not working due to
connection/activation issues.
China- Unicom-4G
SD card icon
Available space
Battery level
Number of image
36M

3.2 Mobile Communication
The camera can receive and respond to commands sent
via SMS, MMS, GRPS, Molnus and the Apple or Android
application, as long as the camera is correctly connected
to a wireless carrier.
To enable the SMS functionality using the mobile
application, you must complete the following steps:
Place the camera in Test/Setup Mode and go into
the menu Setup options
Set SMS control to ON in the second tab from the
right in the camera menu.
For MMS/GPRS/Molnus functionality, the following
menu Setup options will need to be set:
MMS network settings (varies depending on carrier)
(not available for MG984G-V)
GPRS network settings (varies depending on
carrier)
Molnus (varies depending on carrier)
Send to Phone option :
MG984G-36M:MMS/GPRS/Molnus
MG984G-V:GPRS/Molnus
*The MMS functionality is not available for MG984G-V.
The settings for the network options vary between service
providers. You will need to contact your SIM service
provider for specifics on these settings.

3.3 Camera Setup Software
For assistance with the camera setup, download the camera
setup application (BMC_config.zip), along with the basic
instructions both found from our website
www.bolymedia.com/index/Support.
Open the software and select camera model:
STEP 1: Select your country and carrier.
STEP 2: Check WAP/Internet Parameters:
Fill out the required fields (marked with an asterisk).
Input Email server such as “smtp.gmail.com” or
“smtp.bolymedia.com.”
NOTE: If your email uses encryption techniques, please
select the corresponding protocol. For example, when
using Gmail as the sending email you should select SSL to
ensure the success of sending mail.
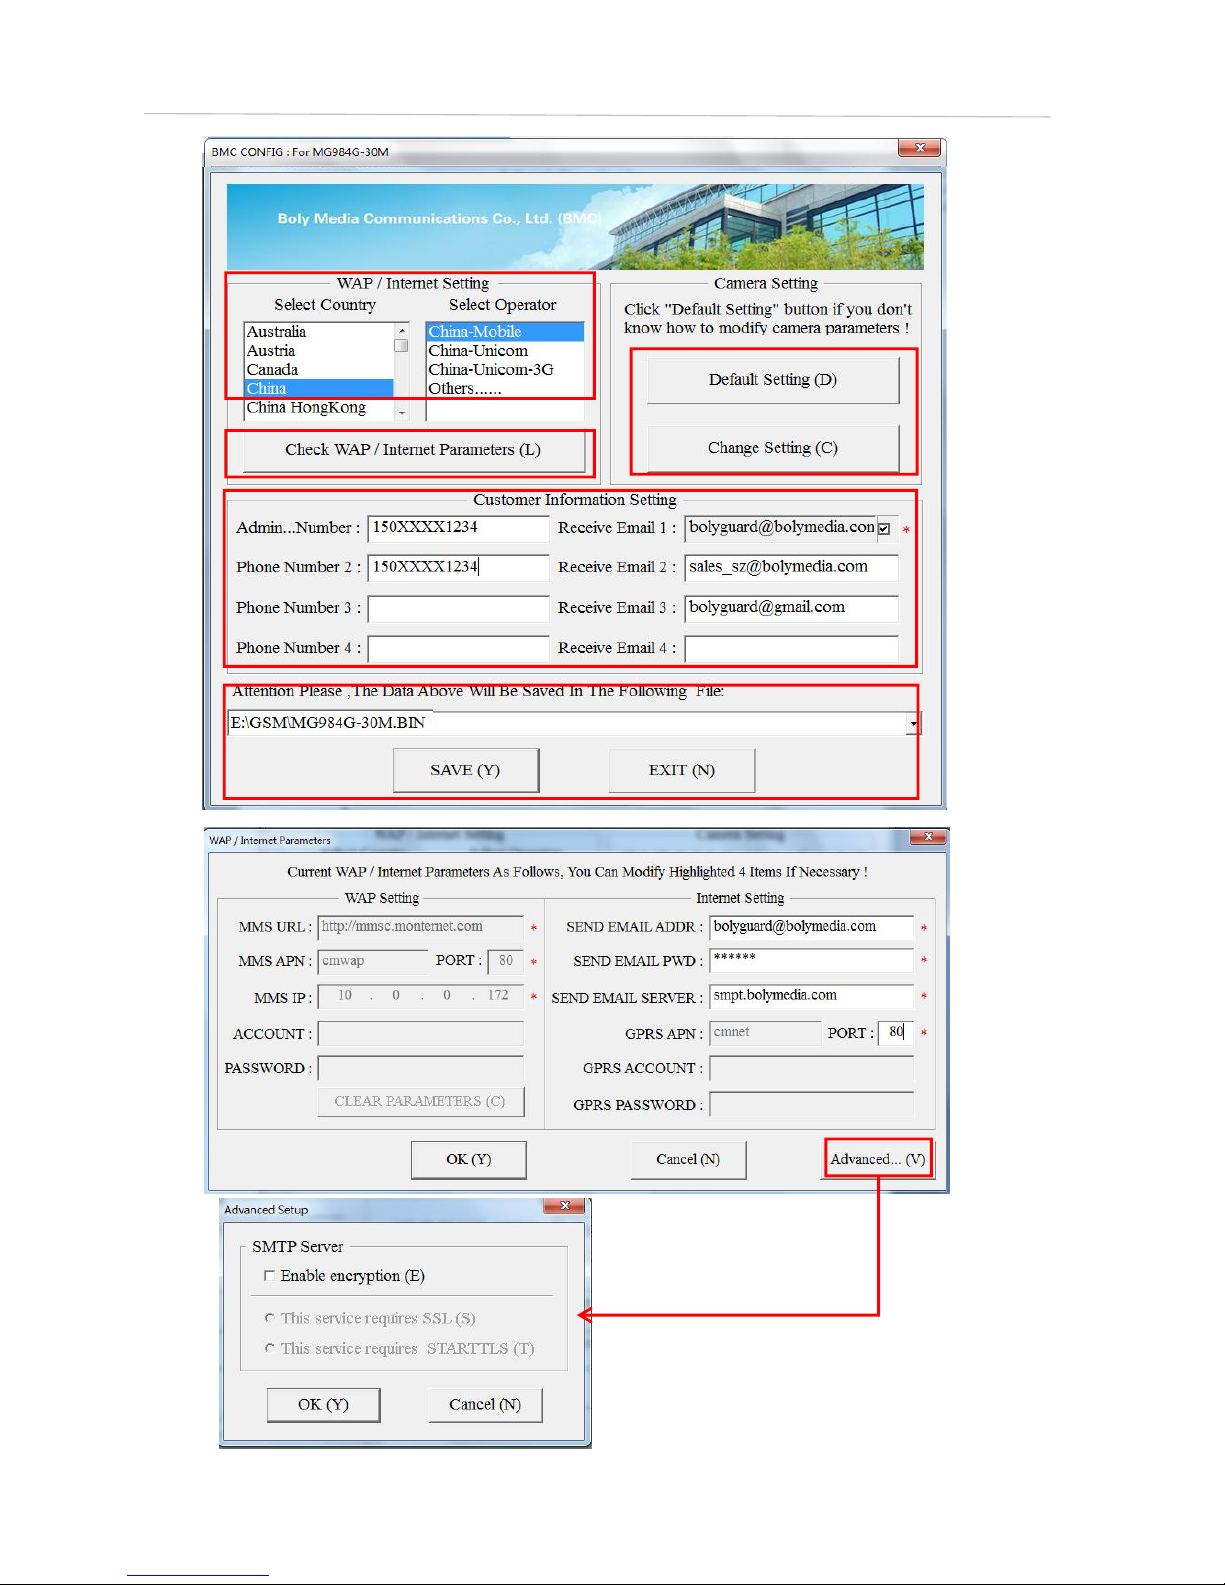
Step 2
Step 1
Step 3
Step 4
Step 5

STEP 3: Choose between default or manual settings. For
first time users, we suggest using the default settings.
STEP 4: Input the phone number of the phone to
receive/send the remote commands and images in the
“administrator number” field and email address in “Receive
Email 1” field (This is NOT the phone number of the
inserted SIM card that resides in the camera).
STEP 5: Save the .txt file in the GSM folder of SD card after
all settings are complete. The program names the .txt file.
The txt file must be loaded into the specific camera’s GSM
folder.
If your country or SIM card provider is not listed, select
“Others”. You will need to ask the SIM card provider for
their specific MMS URL, MMS APN, Port, MMS IP, Account,
Password, GPRS APN, GPRS account, GPRS password. For
sending emails, your email service provider will be able to
provide the send email server and port settings.
Note: Once the SD card is inserted in the camera and the
camera is turned on, this file will automatically be uploaded
to the camera and be deleted from the SD card.
3.4 Cloud Service - Molnus
Molnus is a cloud service that allows users to accessibility to
transfer and store images taken through the cameras with
the use of compatible devices or a computer.
To get started, you need to supply the camera with batteries
and a SIM-card that has internet access.
You also need to have the phone number and the APN name
to the SIM-card you will use for the camera.

The APN name is provided by the operator of the SIM
card. Each operator has their own APN name. If not present
in any documents sent along with the SIM-card, then please
check the operator’s homepage for APN settings.
IMEI, Control Code can be found on your camera. You
will need a SIM-card that has internet access. Start the
camera in SETUP mode, look for the operator’s name in
camera display, then check the Version.
Step1 Register your Molnus account. (In Molnus)
Step2 Log in to your Molnus account and go to the My
Cameras page. (In Molnus)
Step3 Slide the functions switch to SETUP position on
your camera, and make sure Send mode is “Molnus”. (On
camera)
Step4 Press the Register camera button to register
your camera. (In Molnus)
Step5 Slide the functions switch to ON position on your
camera. Quickly place the device with the camera facing an

area with no movement, for example against the wall. (On
camera)
Step6 Press the Register button in Molnus, and wait for
about 5 minutes. (In Molnus)
The registration should now be done, and camera should
now be able to upload images to Molnus.
Test the function by making movement in front of camera.
Within a few seconds to a minute, the images will show up
in the gallery in Molnus.
If you would like to use Molnus on your smartphone, please
download the app on Google Play or Apple's App Store.
For more details please refer to the Molnus website:
https://www.molnus.com/
3.5 Mobile Applications
When the camera is switched to the ON mode, you can
change some of the basic camera settings through the
mobile application. There are currently apps supported by
Android and Apple devices. Charges or fees may apply
when sending text messages to the camera depending on
your cellular provider.
For Android, you can search BGTools from the
Google store or download the application directly
from our website, under the Downloads section:
http://www.bolymedia.com/index/Support
For Apple, search BGTools in the official Apple Apps
store.

3.5.1 User Level
There are two user authorization levels for this feature:
administrator and normal users.
3.5.2 BG Tools Usage Instructions for Android App
The Android APP makes it easy to communicate with the
camera, so you don’t need to edit the SMS.
STEP 1: Open the BG Tools app and click on the icon to
add a new device.
STEP 2: ①Input the model of your camera ②Input your
SIM card number which is inserted in your
camera ③Select your camera model number,
then click “Add” to finalize.
Functions
User Level
Set administrator phone
number
Only administrator’s
password
Set administrator’s
password
Administrator
Set camera parameters
Administrator
Set normal user
Administrator
Receive emergency calling
Administrator, normal user
Send SMS for on spot
picture
Administrator
Receive MMS when
triggered
Administrator, normal user
Other manuals for MG984G Series
2
This manual suits for next models
2
Table of contents
Other Boly Scouting Camera manuals

Boly
Boly BG710 Series User manual

Boly
Boly BG636 Series User manual

Boly
Boly SG520 User manual

Boly
Boly BG410 Series User manual

Boly
Boly SG2060 Series User manual

Boly
Boly BG320 User manual

Boly
Boly BG962-K30W User manual

Boly
Boly MG984G-30M User manual

Boly
Boly SG560X-8mHD User manual

Boly
Boly BG962 Series User manual


