BonsenKitchen MF3901 User manual

MF3901
www.bonsenkitchen.com

IMPORTANT SAFEGARDSREAD ALL INSTRUCTIONS BEFORE USING
1. Please read all instructions before using.
2. WARNING! This appliance must be connected to grounded outlets.
3. Do not immerse the machine, power cord, power plug in water or in any
other liquids to protect against electric shock.
4. Do not place the appliance on a polished wood surface, it could damage
the wood.
5. Never touch live parts.
6. Operate appliance only through a professionally installed socket supplying
the correct voltage.
7. Do not use extension cables.
8. Never let main cable hang loose, nor remove plug with wet hands, nor lay
or hang on hot surfaces, nor let it come into contact with oils.
9. Unplug the appliance after each use, or when the appliance is not in use
before changing accessories or cleaning the appliance.
10. Do not touch the metal parts, or the filter holder, or its housing when the
appliance is in use, as this may cause burning or scalding.
11. This appliance is not intended for use by persons (including children) who are
with reduced physical, sensory or mental capabilities, or lack of experience
and knowledge, unless they have been given supervision or instruction
concerning use of the appliance by a person responsible for their safety.
12. Children should be supervised to ensure they do not play with the milk frother.
13. Do not use the appliance outdoors.
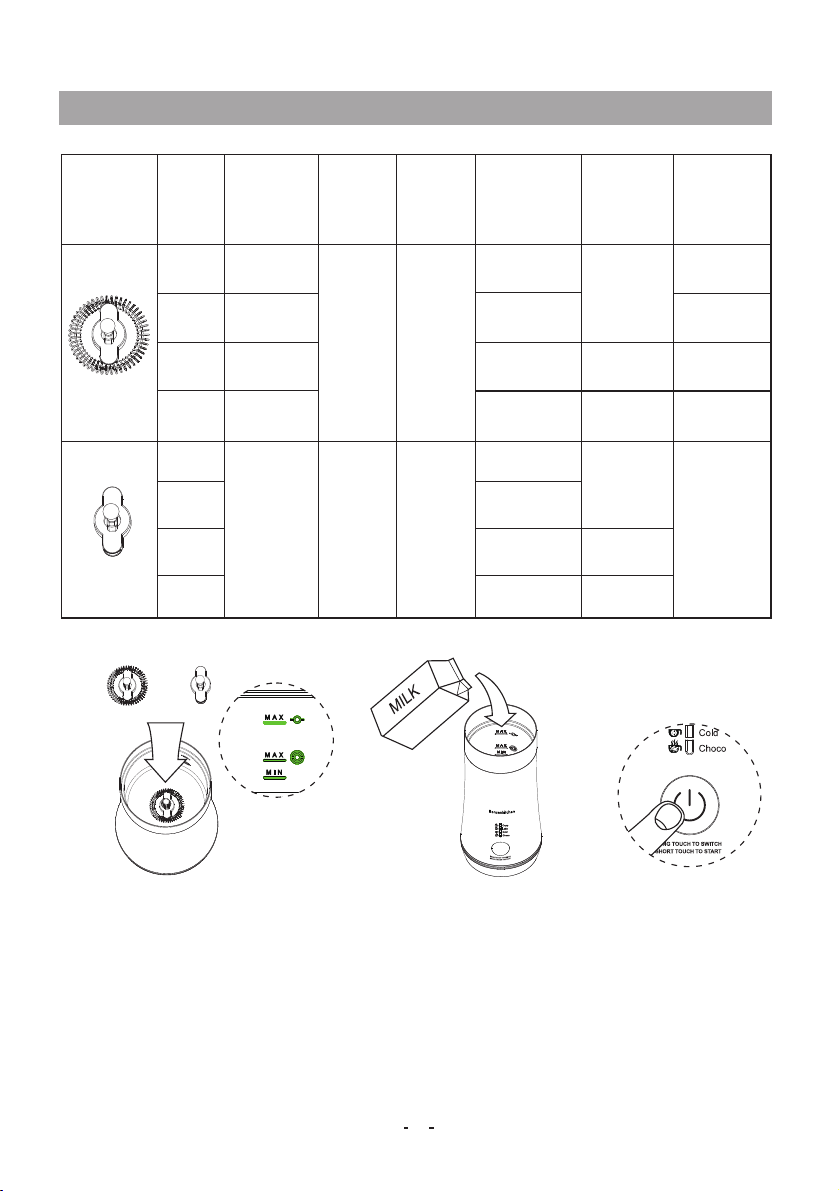
14. Do not operate without milk in the jug.
15. Turn the appliance and main power off when not in use.
16. Never touch rotating parts. Risk of injury!
17. By exceeding the filling capacity the jug may overflow.
18. Appliance to be used only in conjunction with the basic unit provided.
19. Please ensure the appliance connect to the bottom base properly before using.
20. Never operate appliance on uneven surfaces.
1

21. The appliance is not designed for commercial or industrial use; it is for
household use only.
22. Do not insert any objects and/or fingers in the appliance apertures.
23. Disable appliances prior to disposal, cut off mains cable and take to an
official refuse site.
24. Do not attempt to modify the plug in any way.
25. Do not touch hot surfaces.
26. Unplug from outlet when not in use and before cleaning. Allow to cool
before putting on or taking off parts, and before cleaning the appliance.
27. Do not operate any appliance with a damaged cord or plug or after the
appliance malfunctions, or has been damaged in any manner. Return
appliance to the nearest authorized service facility for examination, repair
or adjustment.
28. The use of accessory attachments not recommended by the appliance
manufacturer may result in fire, electric shock or injury to persons.
29. Do not let cord hang over edge of table or counter, or touch hot surfaces.
30. Do not place the appliance on or near a hot gas or electric burner, or in a
heated oven.
31. Always attach plug to appliance first, then plug cord into the wall outlet.
Touch the “ ” to turn the machine off, then remove plug from wall outlet.
32. Do not use appliance for other than intended use.
33. Scalding may occur if the lid is removed during the brewing cycles.
Unpack the box with care, keeping all the packaging materials until youare
satisfiedeverything is present and in working order.
Remove all packaging and foils and store it for later use. Check if the
appliance hasbeen deliveredcompletely and that it is in perfect order.
Before using the appliance for the first time please clean the jug and the
accessories as described under the chapter "Cleaning and Care"to remove
dust or productionresidues.
SAVE THESE INSTRUCTIONSBEFORE THE FIRST USE
2

KNOW YOUR FROTHER
1.Transparent lid
2.Seal ring
3.Max heating level line
4.Max frothing level line
5.Jug
6.Housing body
7.Indicator lights
8.Touch switch
9.Power base
10.Plug
11.Whisk 1 (For frothing milk)
12.Whisk 2 (For heating milk)
10
5
9
1
2
11
12
6
8
7
3
4
PACKAGE CONTENTS
1 milk frother
1 whisk for frothing milk
1 whisk for heating milk
1 cleaning brush
1 power base with cord
1 operating instructions
3

or
1.
2.
3.
1.Choose the appropriate whisk and set it inside the jug.
(See the functions abovefor reference)
2.Pour the milk into the jug below the max. level line.
(See the max capacities above for reference)
Frothing cold
milk
Frothing and
Heating
Frothing and
Heating
Frothing and
Heating
Cold
unheated
1/2
1/3
Capp 2/3
60ml 125ml
80s
80s
80s
80s
120s
120s
Choco
Latte 1/3
Foam acco-
unts for milk
after work
149°F
(±9°F)
149°F
149°F
149°F
149°F
149°F
Heating
(with a small
amount of
froth)
unheated
Cold
60ml 250ml /
Capp
Choco
Latte
HOW TO USE
Whisks Functions Temperature
Switches Min
capacities
Max
capacities Completion
Time
4

After frothing or heating, allow the thermostat to reset for 2 minutes before
using the machine again. To shorten this time, rinse with water and wipe dry
after each use.
The frother is designed to heat and froth milk. If you add flavorings, coffee
granules or chocolate powderinto the frother, ensure it is cleanedimmediately
and thoroughly afteusing.
HINTS AND TIPS
Here are some handy hints to help you get the best out of your frother.
Please prepare your coffee or hot chocolate well before the frothed milk is
ready, then pour the milk into your drinks soon.
Use whole milk ( fat content > 3.0 % ) for best frothing foam.
Cold milk can be frothedwith this frother. But it doesn't mean you can cool
down the milk with it. The frother works in normal temperature in this condition.
Milk heats to approximately 158°F which is the ideal temperature to ensure
the flavor of your coffee.
Keep the whisks in a safe place. They are small and can easily be lost.
3.Touch switch to start the machine:
1)To switch one function to another, please touching the switch for a while ( 2-3
seconds ) until it changes, it will change from one to another every 2 seconds
with indicator changing. Stop touching the switch when the indicator lights at
the demanded function. The indicator light will keep on when the appliance
is in use.
2)Shortly touch the switch again to start the milk frother, and the light keeps
flashing. After 80 or 120 seconds, the frothing is finished and the indicator
light stops flashing.
3)Touch control instruction: once connect to power, the milk frother enters into
standby state, shortly touch the switch to start the machine, it will stop
working automatically after finishing; shortly touch the switch to restart work.
5

CLEANING AND CARING
Remove the jug from the power base before Cleaning. Never immerse the jug
and the base into water or any other liquids.
1. THE JUG: Clean immediately after each use. Flush and clean the inner walls
with using warm soapy water and a non-abrasive cloth. Then wipe dry with a
soft cloth.
2. THE LID: Take down the lid from the jug, washing it with water directly.
3. THE BODY: Clean with a soft cloth.Never use harsh cleaning solvents, hard
nylon brush or metal brush to avoid scratches on the stainless steel surface!
Never clean with metal objects and never use abrasives.
4. THE WHISKS: Remove from the jug and wash with warm water. Dry and store
in a safe place.Do not use the dishwasher.
SERVING SUGGESTIONS
Here is a selection of quick and easy drinks you can make with the frother.
FROTHED MILK
Cappuccino
1/3 espresso
Add 2/3 frothed milk
Top with cocoa powder.
Latte Macchiato
Pour frothed milk in a tall glass
Add espresso carefully
along rim of the glass.
Instant frothy coffee
Make instant coffee
Add frothed milk
Instant milky coffee
Place instant coffee granules in a cup
Add hot milk and stir to mix.
Hot Chocolate
Pour heated milk in to a large mug
Add chocolate powder and stir to mix.
Caffe Latte
1/3 espresso shot
Add 2/3 heated milk and stir.
HOT MILK
6

VOLTAGE
120V, 60Hz, 500W
Soft brush:
1) Pour the proper amount of water into the milk frother
( just immerse the axle sleeve )
2) Insert the brush into the bottom of axle sleeve.
3) Revolve the brush and clean the residual milk
Cleaning instruction:
123
WATER
5. Unplug the power cord before cleaning.
6. Take out the spiral whisk, fill with water, use a small brush to clean the Inside
walls and axle sleeve.
7. Set back the whisk, pour water into jug without exceeding the top water level
line, touch the switch to “Cold” and start the machine for one turn, about 65s
( time has set.) to clean the residual milk in the jug.
8. Use sponge or nonmetal soft brush to clean the inside and outside of the jug,
then wipe dry with a soft cloth.
9. When cleaning the jug, never immerse the jug fully in water. There are
electronic components in the body of the jug which will be damaged.
10. The appliance can't be cleaned in the dishwasher.
11. Use the soft brush to clean the bushing, the cleaning instruction is as
following.
7

WARRANTY CLAIM PROCEDURE
To ensure quick processing of your case, please observe the following instructions:
Please have the till receipt and the item number (S/N: 12345) available as proof
of purchase.
You will find the item number as a sticker on the rear or bottom of the appliance.
If malfunctions or other defects occur, please contact our customer service listed
either by telephone or by email.
If you request any further assistance, please contact us:
USA Customer service: 1-888-965-8032
support@bonsenkitchen.com
TROUBLESHOOTINGS
Item Reason
1
3
4
2
5
2. Jug and power base has poor contact.
3. No power in the jack
4. Problem with components
1. Plug is not inserted properly.
1. Jug temperature is toohigh
2. Jug damaged withimmersion in water
1. Dosage of milk either toolittle or too much
2. Jug reused withoutcleaning
2. Motor damaged
Check the power supply
Contact customer service
Re-insert
Issue Solution
Indicatorlight
doesn't work,
jug doesn't work
Jug ceases to
workafter
startingoperation
Charring
Motor doesn't
work
No heating 1. Machine damaged
3. Actual voltage much lower than
rated voltage
Rinse cold water insidethe
jug to reduce tem-perature
Remove the jug and place it on
the bottom base properly again
Use the dosage of milk
according to the dial
Use rated voltage
Cleaning in time after use
Clean and move theshaft sleeve
of motor byhand to loosen it.
1. Jug not cleaned in goodtime after use,
milk locks themechanism.
Contact customer service
8

FCCSTATEMENT
Thisdevicecomplieswithpart15oftheFCCRules.Operationissubjecttothe
followingtwoconditions:
(1)Thisdevicemaynotcauseharmfulinterference,and(2)thisdevicemust
acceptanyinterferencereceived,includinginterferencethatmaycause
undesiredoperation.Changesormodifificationsnotexpresslyapprovedbythe
partyresponsibleforcompliancecouldvoidtheuser'sauthoritytooperatethe
equipment.
NOTE:Thisequipmenthasbeentestedandfoundtocomplywiththelimitsfor
aClassBdigitaldevice,pursuanttopart15oftheFCCRules.Theselimitsare
designedtoprovidereasonableprotectionagainstharmfulinterferenceina
residentialinstallation.Thisequipmentgenerates,usesandcanradiateradio
frequencyenergyand,ifnotinstalledandusedinaccordancewiththe
instructions,maycauseharmfulinterferencetoradiocommunications.
However,thereisnoguaranteethatinterferencewillnotoccurinaparticular
installation.Ifthisequipmentdoescauseharmfulinterferencetoradioor
televisionreception,whichcanbedeterminedbyturningtheequipmentoffand
on,theuserisencouragedtotrytocorrecttheinterferencebyoneormoreof
thefollowingmeasures:
—Reorientorrelocatethereceivingantenna.
—Increasetheseparationbetweentheequipmentandreceiver.
—Connecttheequipmentintoanoutletonacircuitdifferentfromthattowhich
thereceiverisconnected.
—Consultthedealeroranexperiencedradio/TVtechnicianforhelp.
9

Register your product at www.bonsenkitchen.com
to get more perks!
: 5805C Peachtree Corners East
Norcross, GA, 30092
: 1-888-965-8032
Follow us @bonsenkitchen
Bonsen Electronics Inc.
Table of contents
Other BonsenKitchen Kitchen Appliance manuals

BonsenKitchen
BonsenKitchen MF3902 User manual

BonsenKitchen
BonsenKitchen PM8901 User manual

BonsenKitchen
BonsenKitchen VS3802 User manual

BonsenKitchen
BonsenKitchen VS3000 User manual

BonsenKitchen
BonsenKitchen MF8001 User manual

BonsenKitchen
BonsenKitchen HB8901 User manual

BonsenKitchen
BonsenKitchen VS3004 User manual

BonsenKitchen
BonsenKitchen VS3911 User manual

BonsenKitchen
BonsenKitchen MF3902 User manual