BOOCAX BKS-ST-180A User manual

BooCax Terminal Disinfection Robot
BKS-ST-180A
Product Manual
V 1.0.0
BOOCAX ROBOTICS
400 -161- 8661
Better Robot, Better Life.

BKS Terminal Disinfection Robot Product Manual v1.0
BooCax Robotics 1/ 24 www.boocax.com
Safety and Use Precautions
Please follow the operation instructions of the product when using the robot. It
is forbidden to use beyond the scope!The company will not assume any responsibility
for the loss caused by improper operation beyond the standard.
01/ Instructions on safety matters in use of robots
1) Behaviors below are prohibited,
①Stay in the space where the robot is disinfecting;
②Robots are used in flammable gases and similar hazardous environments;
③Add any disinfectant not suitable for this product to the tank;
④Cleaning, wiping and other non-necessary operations when the robot is on;
⑤Unauthorized disassembly of the robot for repair or debugging;
⑥Touch the circuit terminal while the robot is charging;
⑦Replace any parts without authorization (If necessary, please do so under the company's
approval and guidance);
⑧To transport the robot while its tank is still with hydrogen peroxide disinfectant
2) Safety instructions for use
①The robot should be parked and run as far as possible in a flat, solid, normal
temperature condition;
②When adding hydrogen peroxide, do not splash to other parts of the robot;
③If abnormal sound is found during the disinfection work, please immediately turn off the
power of the robot and report to the after-sales service for treatment;
④Before starting the robot, please check whether the safety device (sensor, emergency
stop switch, etc.) is normal;
⑤If discover the road with water and greasy, please clean the road, to remove greasy;
⑥When to maintain the robot, it must be carried out by trained professionals;
⑦If the robot is not to use for a long time, it must keep the tank out of any liquid and
promote it to a cool and dry place for preservation。
02/ Safety instructions for using hydrogen peroxide
Please strictly comply with all requirements of hydrogen peroxide.
03/ Daily maintenance instructions
When cleaning the tank, please use the matching cleaning detergent, make sure the robot is
power off and unplugged or away from the charging pile!Otherwise, electric shock or serious
failure may occur.
It is strictly prohibited to flush the robot and charging pile directly with tap water, which may
lead to the accumulation of water vapor or water inside the equipment and cause serious
irreparable failure.

BKS Terminal Disinfection Robot Product Manual v1.0
BooCax Robotics 2/ 24 www.boocax.com
1) Cleaning
① Please refer to the use method and attention of detergent for cleaning the tank;
② Regularly brush the surface of the driving wheel and universal wheel;
③Use neutral detergent and dust-free cloth to gently wipe the outer surface of the
robot regularly
④Regularly contact after-sales for maintenance services such as lubrication, dust-
cleaning at the damping spring and universal wheel bearing;
⑤Lidar sensor, as the expensive precision component in robot, should be wiped
regularly with a non-dust cloth. Do not wipe with force or other detergent, which may
be easy to cause functional damage.
⑥If the robot will not be used for a long time, store it in a dry and cool place.。
2) Check whether the screw is loose
Shake the components gently on a regular basis to observe whether they are loose. If
there is any abnormal sound, please check the screws at the installation position of relevant
components. All the screws of the robot have undergone anti-loosening treatment. However,
for the sake of safety, please contact "BooCax After-sales" if any screw is found loose。
04/Disclaimer
BooCax company owns multiple patents related to this robot product. No organization or
individual may use these patents without authorization.
The robot has precise internal structure. For the sake of safety, no one is allowed to
disassemble the robot without permission except the authorized personnel of BooCax,
otherwise the warranty will be invalid. BooCax will not assume any responsibility for any
damage, breakdown and property/personal injury caused by unauthorized disassembly. The
identification of unauthorized disassembly will be subject to the anti-disassembly mark on the
robot body.
05/ After-sales
If you have any questions about maintenance, safety and other issues during use of BooCax
robot, please contact us by phone or email provided on the back of this manual. We are very
willing to provide you with product-related services.
06/About “Terminal Disinfection”
Refer to Article
"11.2.1.5"
in the
"Health Industry Standards of the People's Republic of
China" -WS/T 367-2012
Technical Specifications for Disinfection in Medical Institutions,
Terminal disinfection is performed after surgery, patient discharge, transfer, or death.
The
terminal disinfection can be fumigated with 3% hydrogen peroxide or peracetic acid,to aerosol
spray by 3% hydrogen peroxide per 20mL/m³,to heat and fumigate by Peracetic acid at 1g/
m³,humidity70%-90%,make it airtight for 24H. Or to aerosol spray by 5% peracetic acid per
2.5mL/ m³, humidity20%-40%.

BKS Terminal Disinfection Robot Product Manual v1.0
BooCax Robotics 3/ 24 www.boocax.com
目录
1. Introduction to Terminal Disinfection Robot............................................................... 4
1.1. Product Features.....................................................................................................................................4
1.2. Product Specification.............................................................................................................................5
1.3. Appearance Size......................................................................................................................................6
1.4. Function Modules...................................................................................................................................7
2. Assembly................................................................................................................................ 8
3. Install the charging pile ...................................................................................................11
4. QR code deployment........................................................................................................12
5. Clean up barriers................................................................................................................13
6. Download mobile App .....................................................................................................14
7. Turn on, connect the robot.............................................................................................14
8. Build map........................................................................................................................................................ 16
9. Deploy Route/Area setting ....................................................................................................................... 17
9.1 Deploy route setting................................................................................................................................. 17
10 Schedule setting............................................................................................................................................ 21
11. Other settings.......................................................................................................................................... 21
12. Start to work ...............................................................................................................22
12.1 Add liquid............................................................................................................................................... 22
12.2 Start spraying ........................................................................................................................................... 22
Attachment: Upgrade.................................................................................................................23
BKS Terminal Disinfection Robot Product Manual v1.0
BooCax Robotics 4/ 24 www.boocax.com
1. Introduction to Terminal Disinfection Robot
1.1. Product Features
①Atomizing the disinfectant into dry mist, the atomized particle is as small as 5μmin diameter.
②Atomizing rate reaches 3200ml/hour,
③The spray diameter is 5~6 m(maximum), leaving no dead corners in the spraying area,
④16 L ultra large-capacity tank,
⑤By mobile App control and supports two spraying modes: regular spraying, immediate
spraying, and record the disinfection log automatically,
⑥With functions of autonomous navigation, disinfection route(area) setting and schedule
setting,
⑦Applicable to multi-area (room), layout complex environment, ensure the uniformity and
consistency of disinfection,
⑧Automatic obstacle-detect function with APP and voice prompt function,
⑨Support auto-charging, free users from the cable trouble,
⑩When the liquid is lower than the warning level, the robot will automatically close the spray
device and returns to the charging pile.
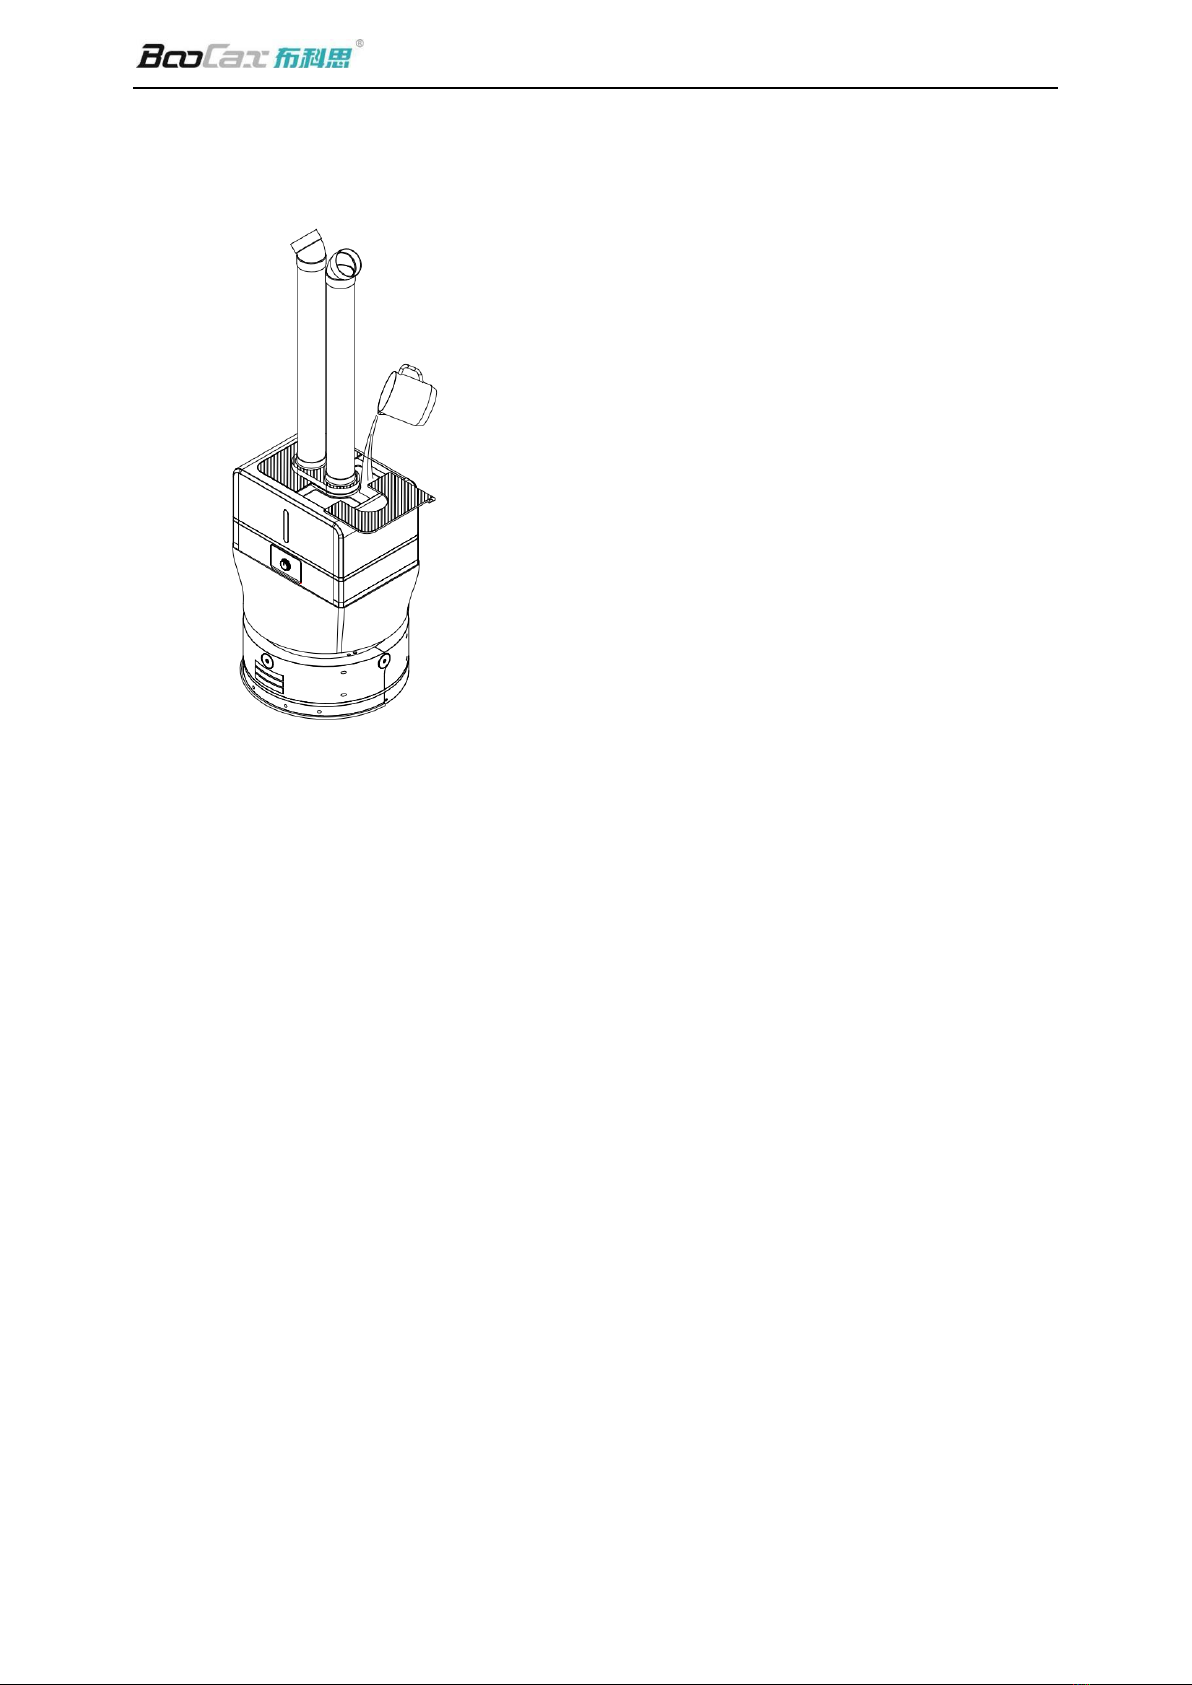
BooCax BKS-ST-180A terminal disinfection robot is
designed to purify the air by rapidly atomizing the
Hydrogen peroxide or similar terminal disinfectant and
automatically spraying the indoor area.
This robot can automatically navigate to the area for
full-coverage spraying, and supports mobile App control to
achieve man-machine separation and minimize personnel
exposure, so that the use safety is greatly improved. With
simple structure, it is easy to maintain and manage
This robot is applicable to the indoor area where need
Hydrogen peroxide or similar terminal disinfectant for
terminal disinfection.

BKS Terminal Disinfection Robot Product Manual v1.0
BooCax Robotics 5/ 24 www.boocax.com
1.2. Product Specification
Item
Name
BooCax Terminal Disinfection Robot
Model No.
BKS-ST-180A
Basic data
Application
Auto terminal disinfection by hydrogen peroxide and similar
disinfectant solution
External Size
Diameter 600mm, Height 1660mm(with 500mm spray tube)
Net weight
52.5kg(exclude disinfectant)
Spray
Function
Spray rate
Maximum 3200 ml/h
Tank Volume
18L maximum
Spray diameter
≤ 6 m
disinfectant
Hydrogen peroxide and similar disinfectants for terminal
atomization disinfection
Spray mode
Multiple directions(single-nozzle/dual-nozzle for choice)
Motion
Performance
Movement mode
Can plan route and set area,with auto-navigation
Moving speed
0.3 m/s
Driving
Differential drive
Obstacle surmounting
≤10 mm
Gradeability
≤8°
Gradeability
Travel lane width
≥750 mm
Endurance
Endurance
≥3小时(by max spray rate continuously)
Battery
28Ah(The full battery voltage is 29.4V)
Charging Way
Auto-charging、10-90% by 3 hours
Charging pile
Support 110V ~ 240V wide voltage input
Rated output: voltage 29.4V, current 8.0A
Safety
Safety protection
low water alarm
Emergency stop
yes
Bumper Strip
yes
Noise
≤60dB
Working temperature
10℃~40℃
BKS Terminal Disinfection Robot Product Manual v1.0
BooCax Robotics 6/ 24 www.boocax.com
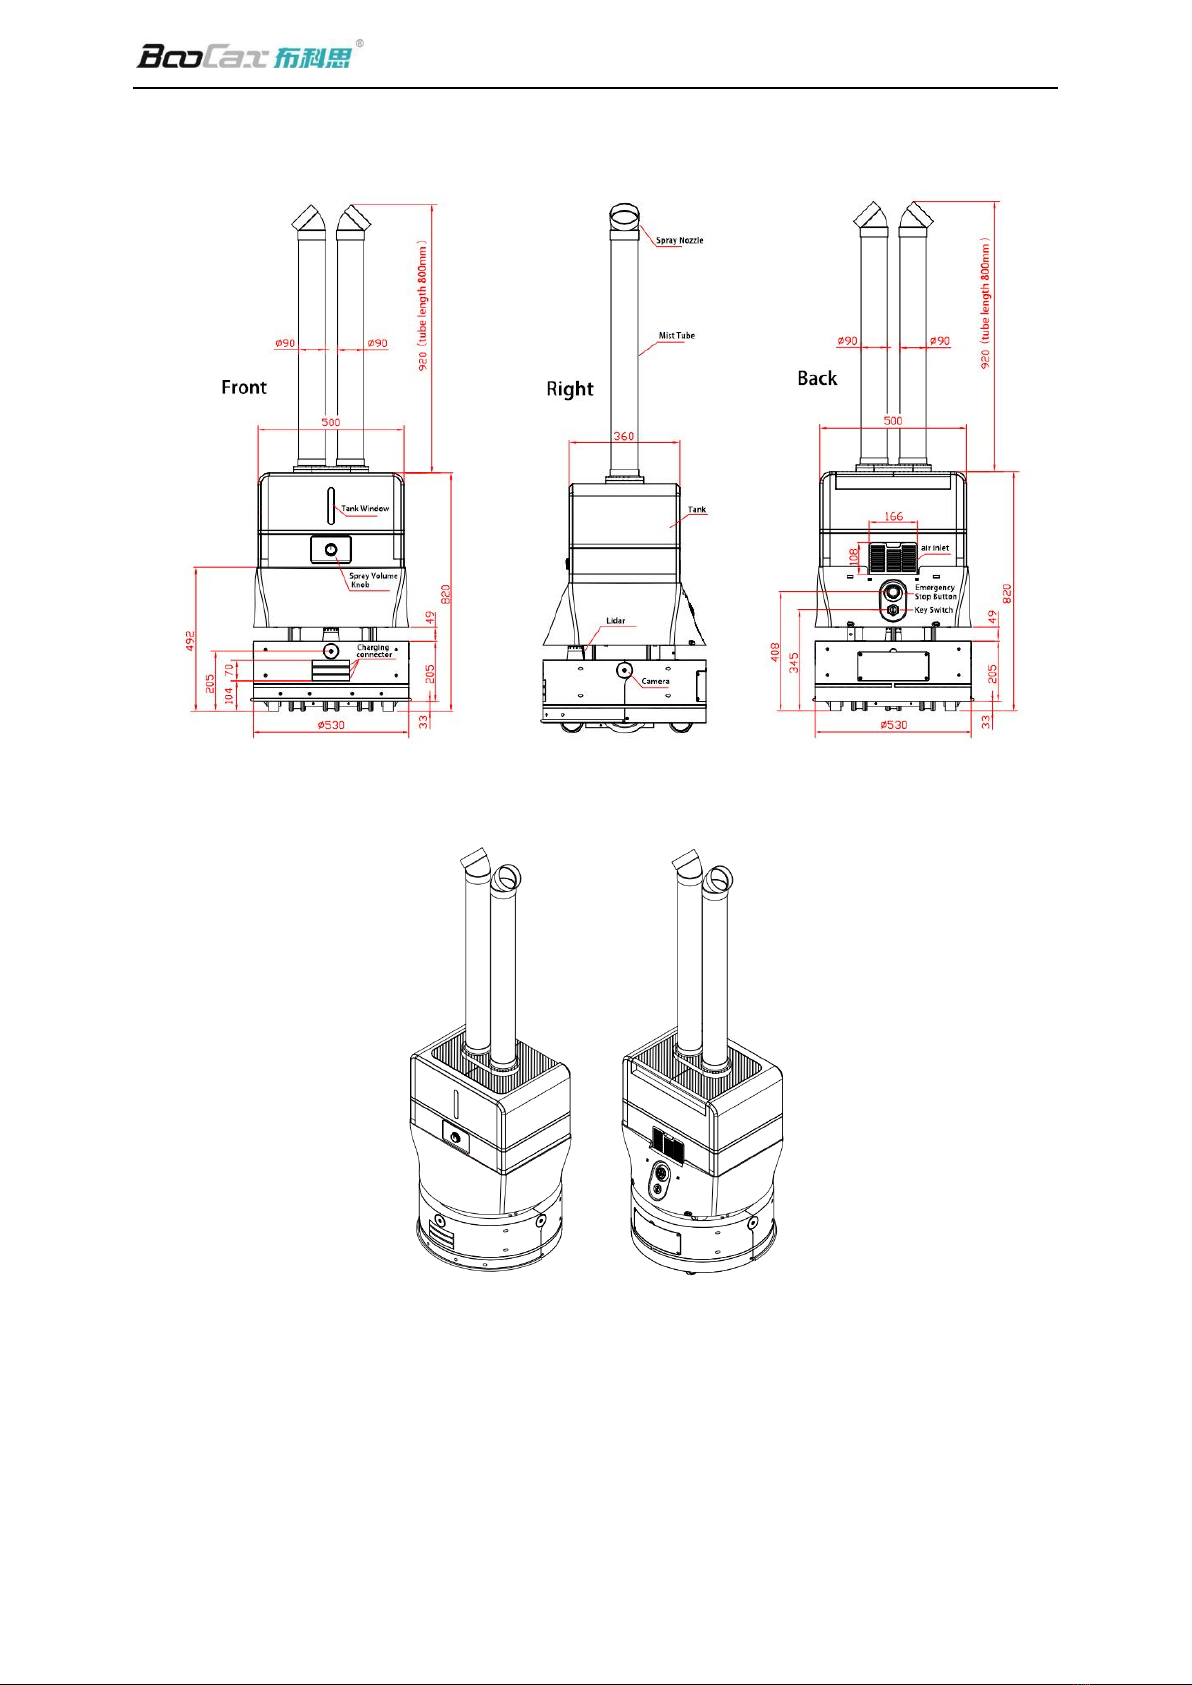
1.3. Appearance Size
前
后
Back
Front
BKS Terminal Disinfection Robot Product Manual v1.0
BooCax Robotics 7/ 24 www.boocax.com
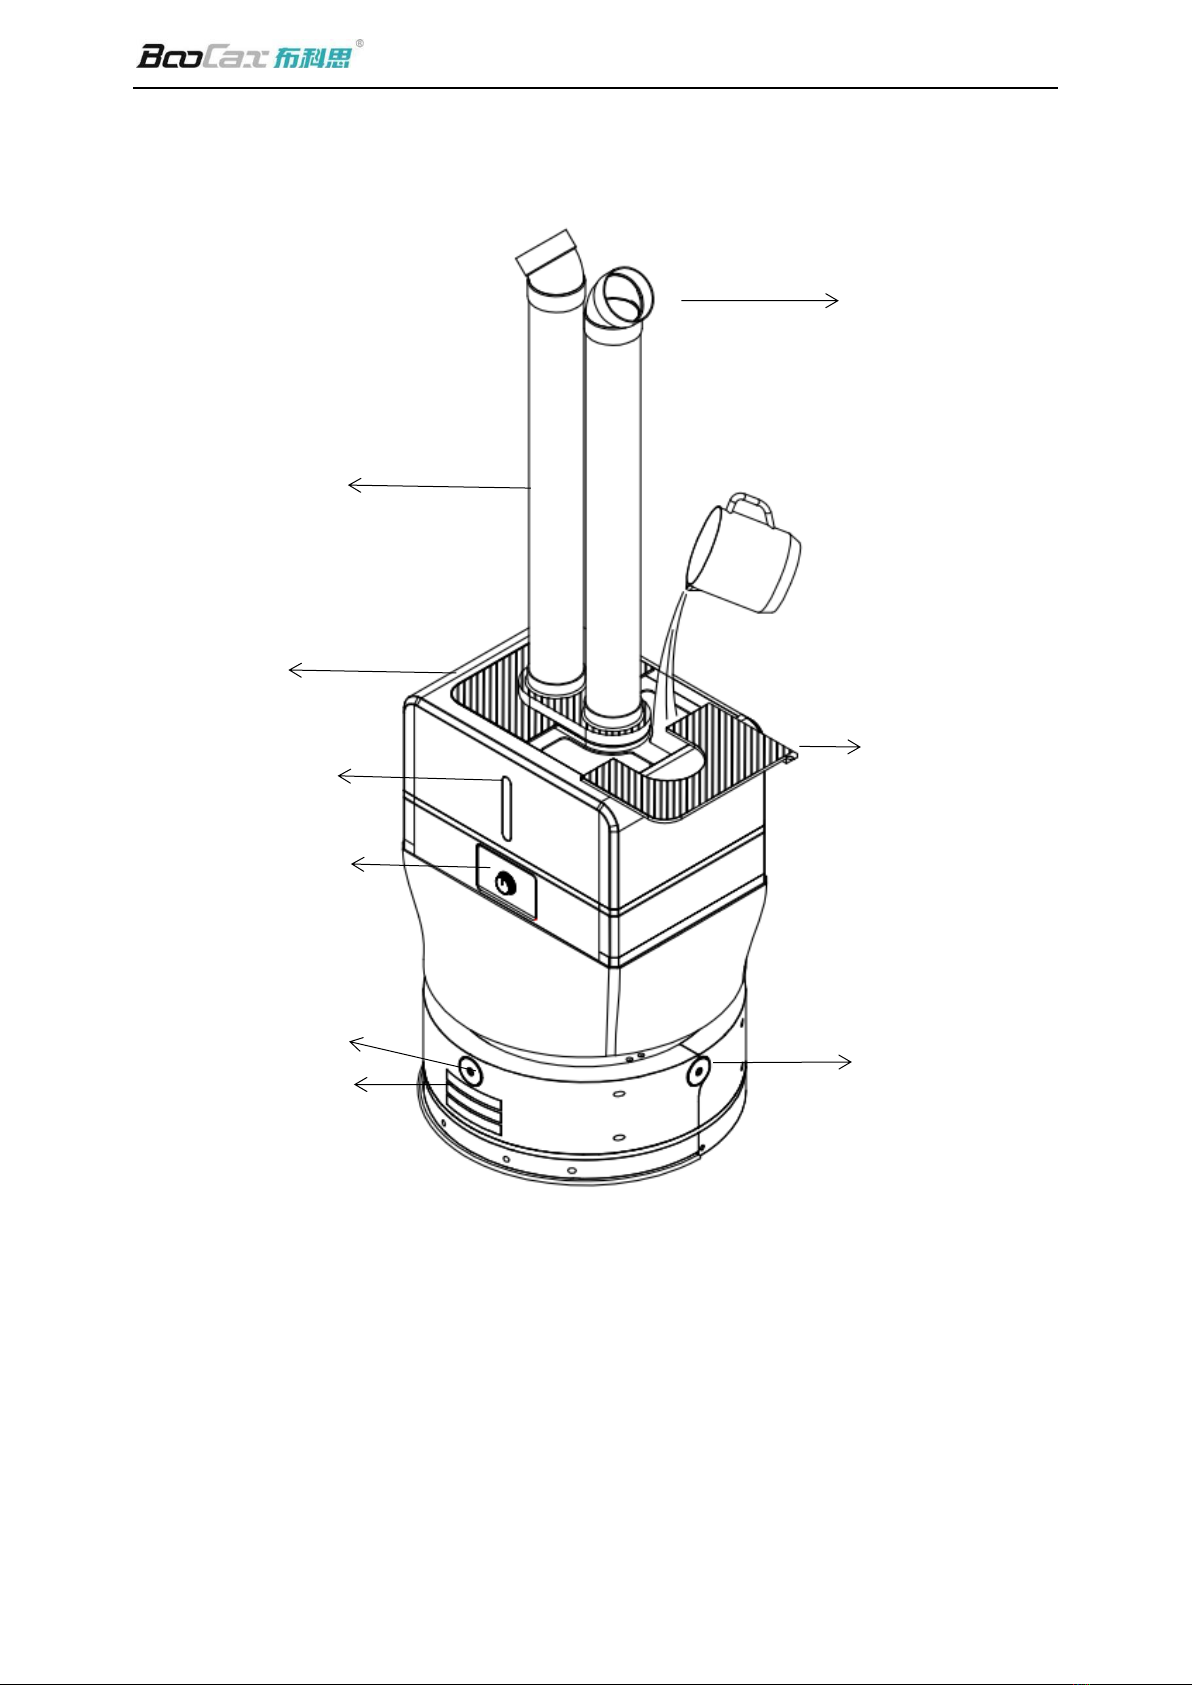
1.4. Function Modules
nozzle
Mist tube
Tank
Tank window
Spray volume knob
Charging interdace
Vision sensor
(Camera)
Laser Radar
Tank lid

BKS Terminal Disinfection Robot Product Manual v1.0
BooCax Robotics 8/ 24 www.boocax.com
2. Assembly
Step 1:Unpack and check materials
The packaging of this product consists of two boxes, with the larger box for the chassis
and charging pile (①-③), and the smaller box for the robot body(④-⑧). After unpacking,
check the materials and accessories against the Nos.1-8 in the figure below for any missing or
damage (Package concludes two one-way nozzles, and two mist tubes).
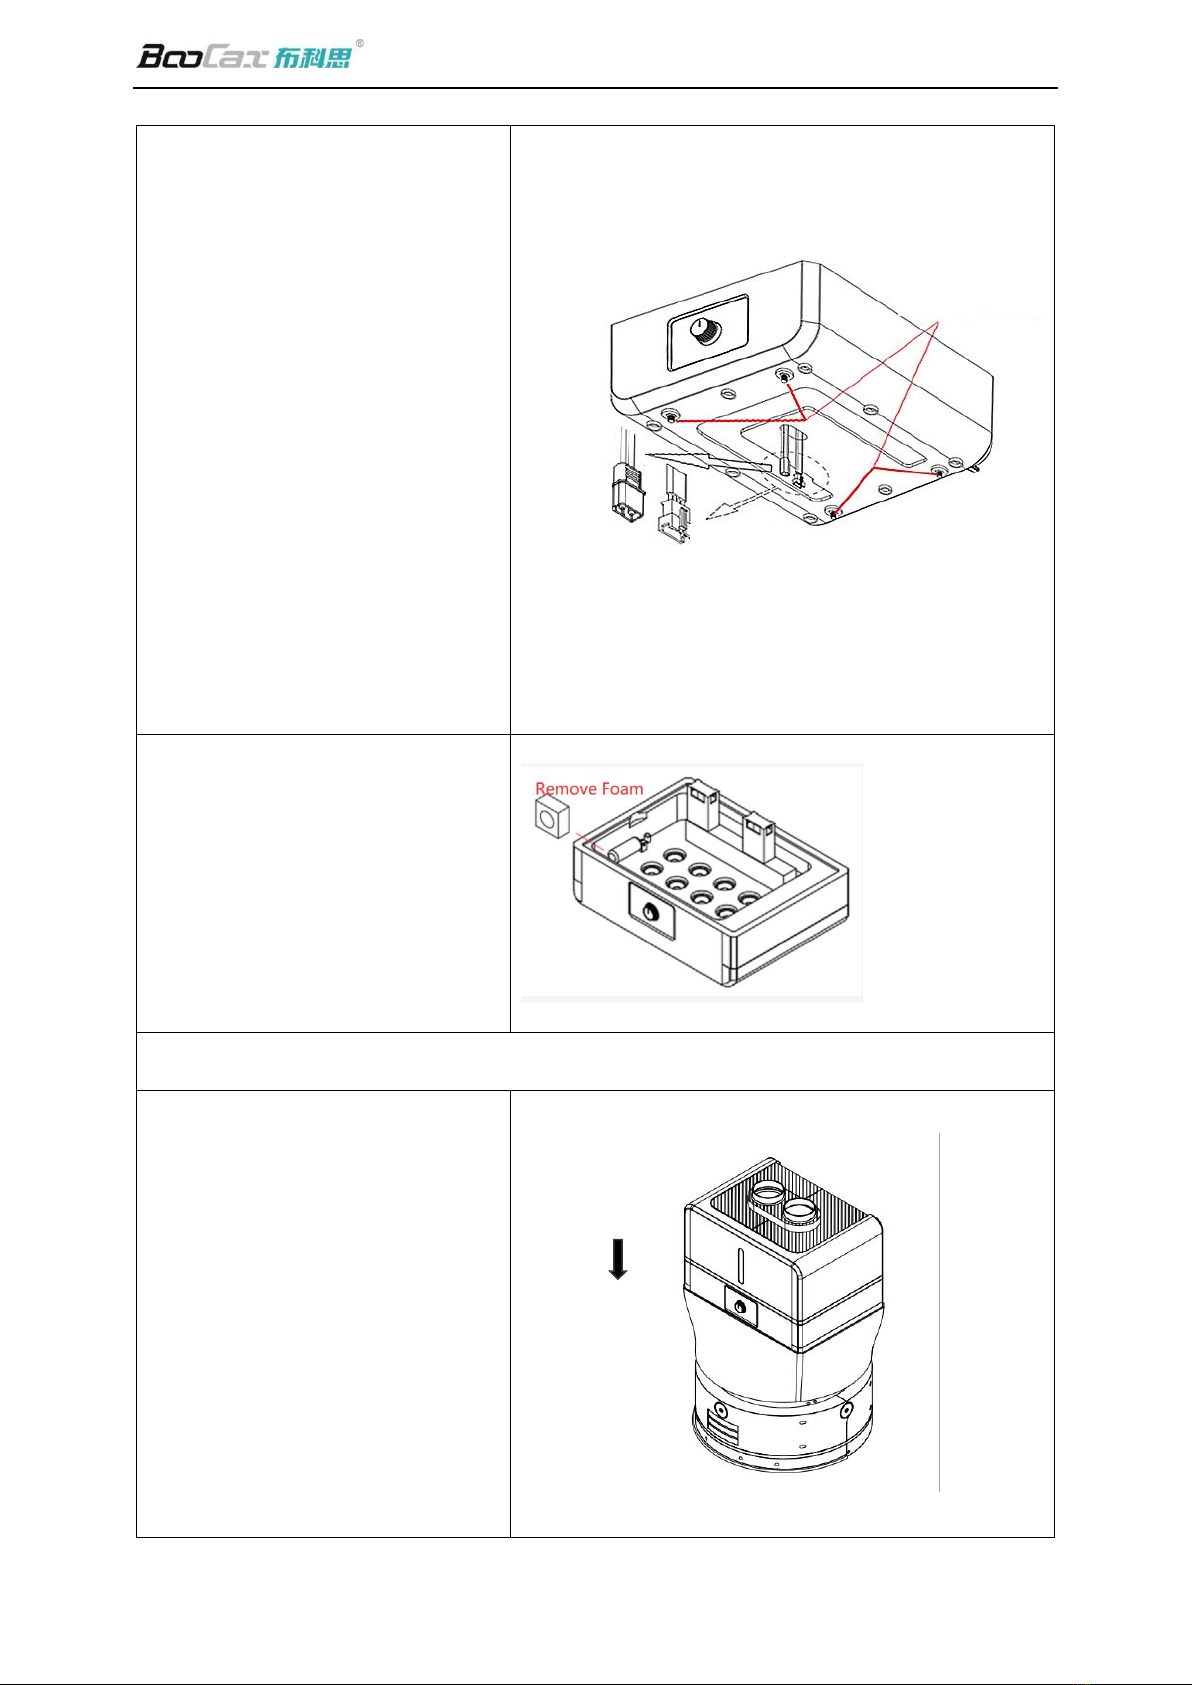
Step 2:Install the Sprayer
①Take out the chassis and place it
on the floor stably, make sure
that the lower charging mouth is
facing forward, pull out the two
connectors (Terminal 1: signal
wire, Terminal 2: power wire),
and visually find the four
positioning holes on the iron
plate →
Terminal 2
Power Wire
Terminal 1
Signal Wire
①
Chassis
Charging Pile
Adapter, power cord
Sprayer base
Tank lid
Mist Tube
Tank
One-way nozzle
②
③
④
⑧
⑦
⑥
⑤
BKS Terminal Disinfection Robot Product Manual v1.0
BooCax Robotics 9/ 24 www.boocax.com
②Turn the direction of knob on
the sprayer base forward, and
then pull out the two connectors
(Terminal 1, Terminal 2 as
shown) at the bottom to match
the male and female connectors
on the chassis. Four dowels are
aligned with the four positioning
holes on the chassis (attention
that the lower charging mouth
of the chassis is also facing
forward).Make it fall smoothly,
buckle in place →
③Remove the protective foam
from the water control valve on
the sprayer base to ensure that
the next step of placing tank is
not hindered
Step 3:Dock the tank and robot Chassis
Lift the water tank stably,
stack it on top of the
sprayer base. Relying on the
positioning steps that sink
around, it can be freely in
place from top to bottom
under the action of gravity
→
Terminal 2
Power wire
Terminal 1
Signal wire
Four dowels

BKS Terminal Disinfection Robot Product Manual v1.0
BooCax Robotics 10 / 24 www.boocax.com
Step 4: Install mist tube and nozzle
Take out the mist tube, insert one end
into the circular outlet at the center
of the water tank,and then connect
the other end on the top with nozzles
(for tight connection, it is
recommended to wrap it with
waterproof tape before putting it
in, single-tube mode or dual-tube
mode is optional to switch) →
Note:To reach the maximum
spray rate, you may select the
single-tube mode with one-way
nozzle.
BKS Terminal Disinfection Robot Product Manual v1.0
BooCax Robotics 11 / 24 www.boocax.com
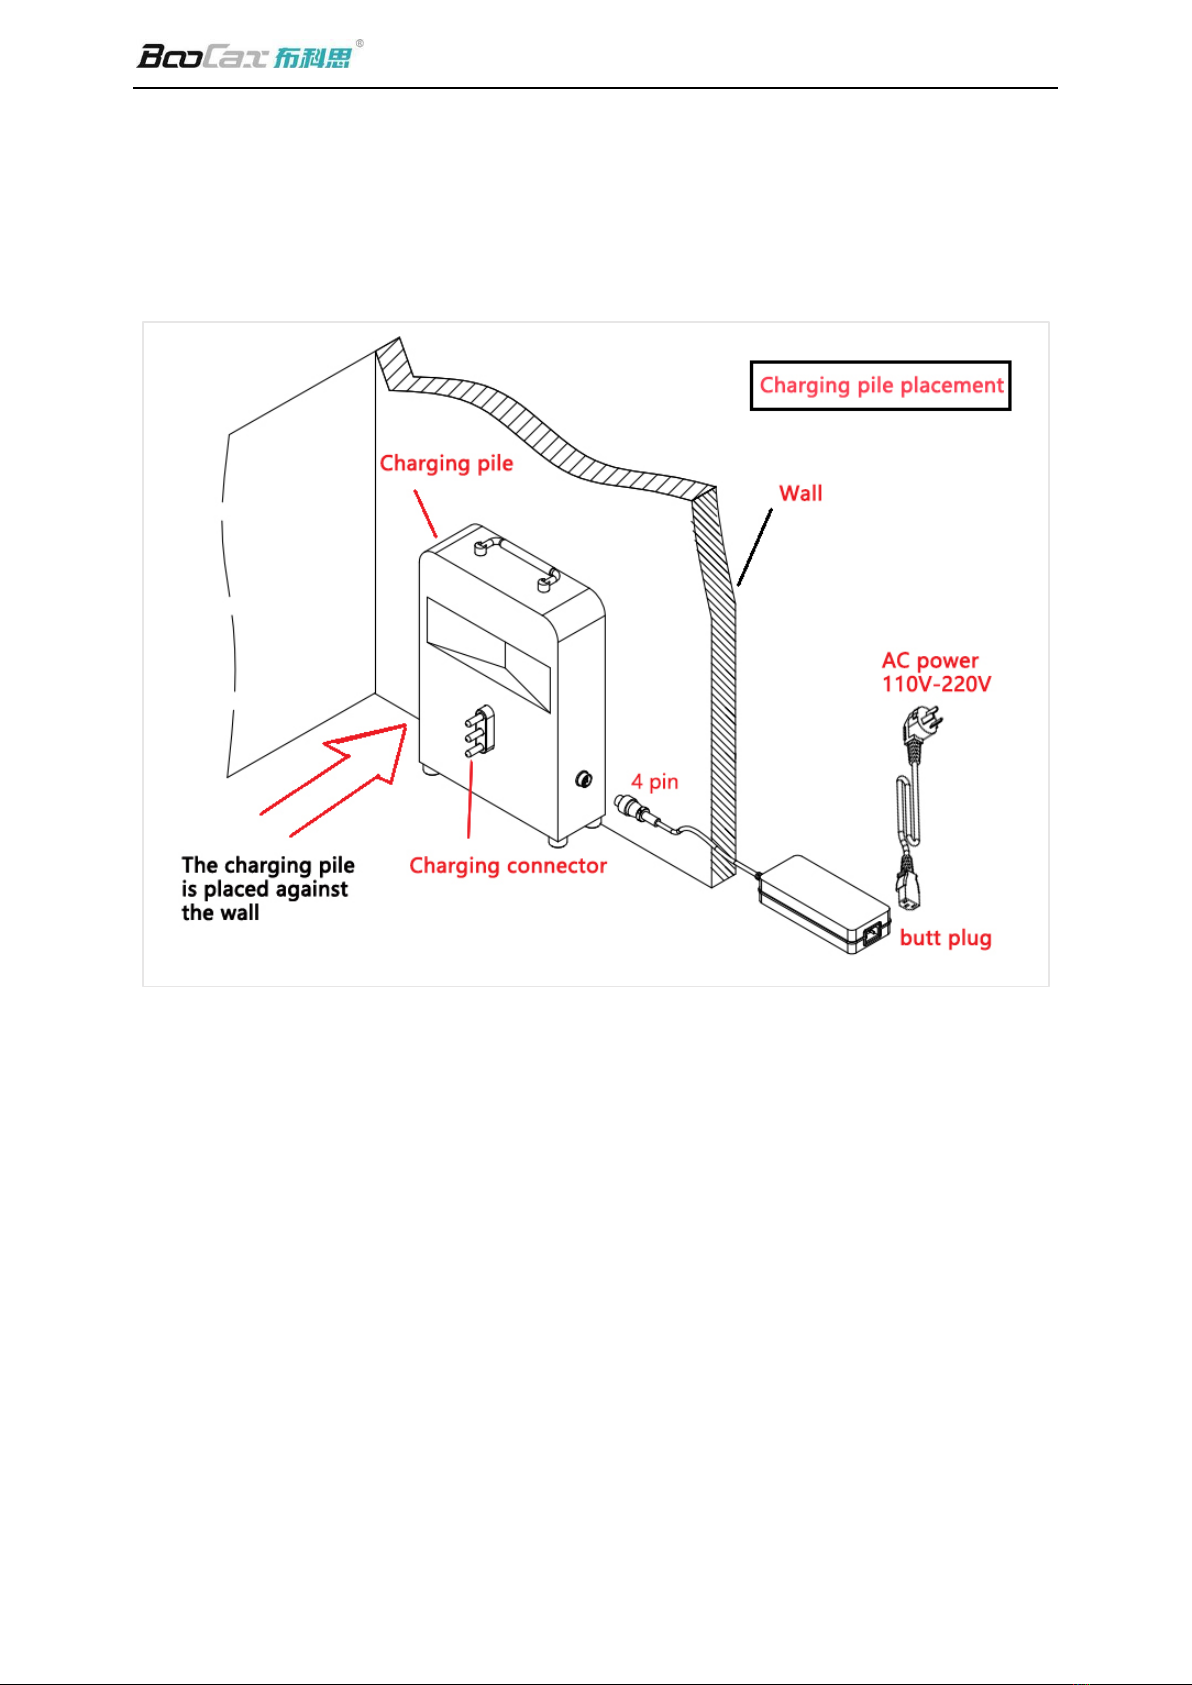
3. Install the charging pile
The charging pile of the spray robot should be placed in a safe and tidy place. It should
be on the flat ground with its back against the flat wall。As shown in the below figure:
①Place the back of the charging pile against the wall, and then turn the foot pads at the
bottom to adjust the charging pile.
②Connect the power cord, adapter, and charging pile as shown above, and finally connect the
end of the power cord to the 110V / 220V AC socket to formally complete the boot preparation.

BKS Terminal Disinfection Robot Product Manual v1.0
BooCax Robotics 12 / 24 www.boocax.com
4. QR code deployment
In order to enhance the positioning accuracy of the robot, we designed a QR code scheme
to ensure that the robot's long-term running position is not lost.
The QR code is generally used where the robot positioning is prone to deviation, for example, the
two ends of a long corridor, for example, the two ends of a long corridor, in which case, a QR code
can be pasted at a distance of 15m from the two ends to assist positioning.
Also, In relatively empty scenes, QR Code is also need to assist positioning.
1) Standard of QR code pasting
•Avoid deploying at a place with strong light, incase the strong light will affect the camera
to capture the QR code image;
•The QR code should be pasted at the same level as the camera;
•Paste the QR code per the direction of the arrow pointed (marked in below picture)
•Replace the QR Code once it is damaged.
Referenced to below:
2) Precautions for QR code
a) Two same QR codes are not accepted in same environment,
b) When mapping, the robot stops at the QR code board for 1-2 seconds to ensure that the
QR code is saved,
Same level
Parrel to the
ground

BKS Terminal Disinfection Robot Product Manual v1.0
BooCax Robotics 13 / 24 www.boocax.com
c) The QR code of the charging pile should be identified by the robot’s front-facing camera,
whereas the QR code of a corridor can be identified by the lateral cameras of the robot.
d) When incrementally mapping, it is necessary to ensure that the robot's positioning is
accurate before identifying and saving the QR code。
5. Clean up barriers
1) Before using the spray robot, remove the barriers in the aisle to avoid affecting the working
and charging of the robot,
The minimum walking width of the robot is 750mm
2) Make sure that there is no vertical step over 10mm within the spraying area,and no objects
(books, boards, stones, etc.) over 10mm in height on the working path;
3) Make sure that there is no large slope on site
The maximum gradeability of the robot is 8°.

BKS Terminal Disinfection Robot Product Manual v1.0
BooCax Robotics 14 / 24 www.boocax.com
6. Download mobile App
Android 8.0 and above mobile phone Scan the QR code below download the corresponding App
and install:
Android mobile browser scan to download the App
7. Turn on, connect the robot
1) Turn on the switch to initiate the working mode of the robot;
2) Turn on the phone wifi, search the wifi network beginning with "BKS-ST-180A", and enter the
assigned password “robot123”to connect the robot
BKS Terminal Disinfection Robot Product Manual v1.0
BooCax Robotics 15 / 24 www.boocax.com
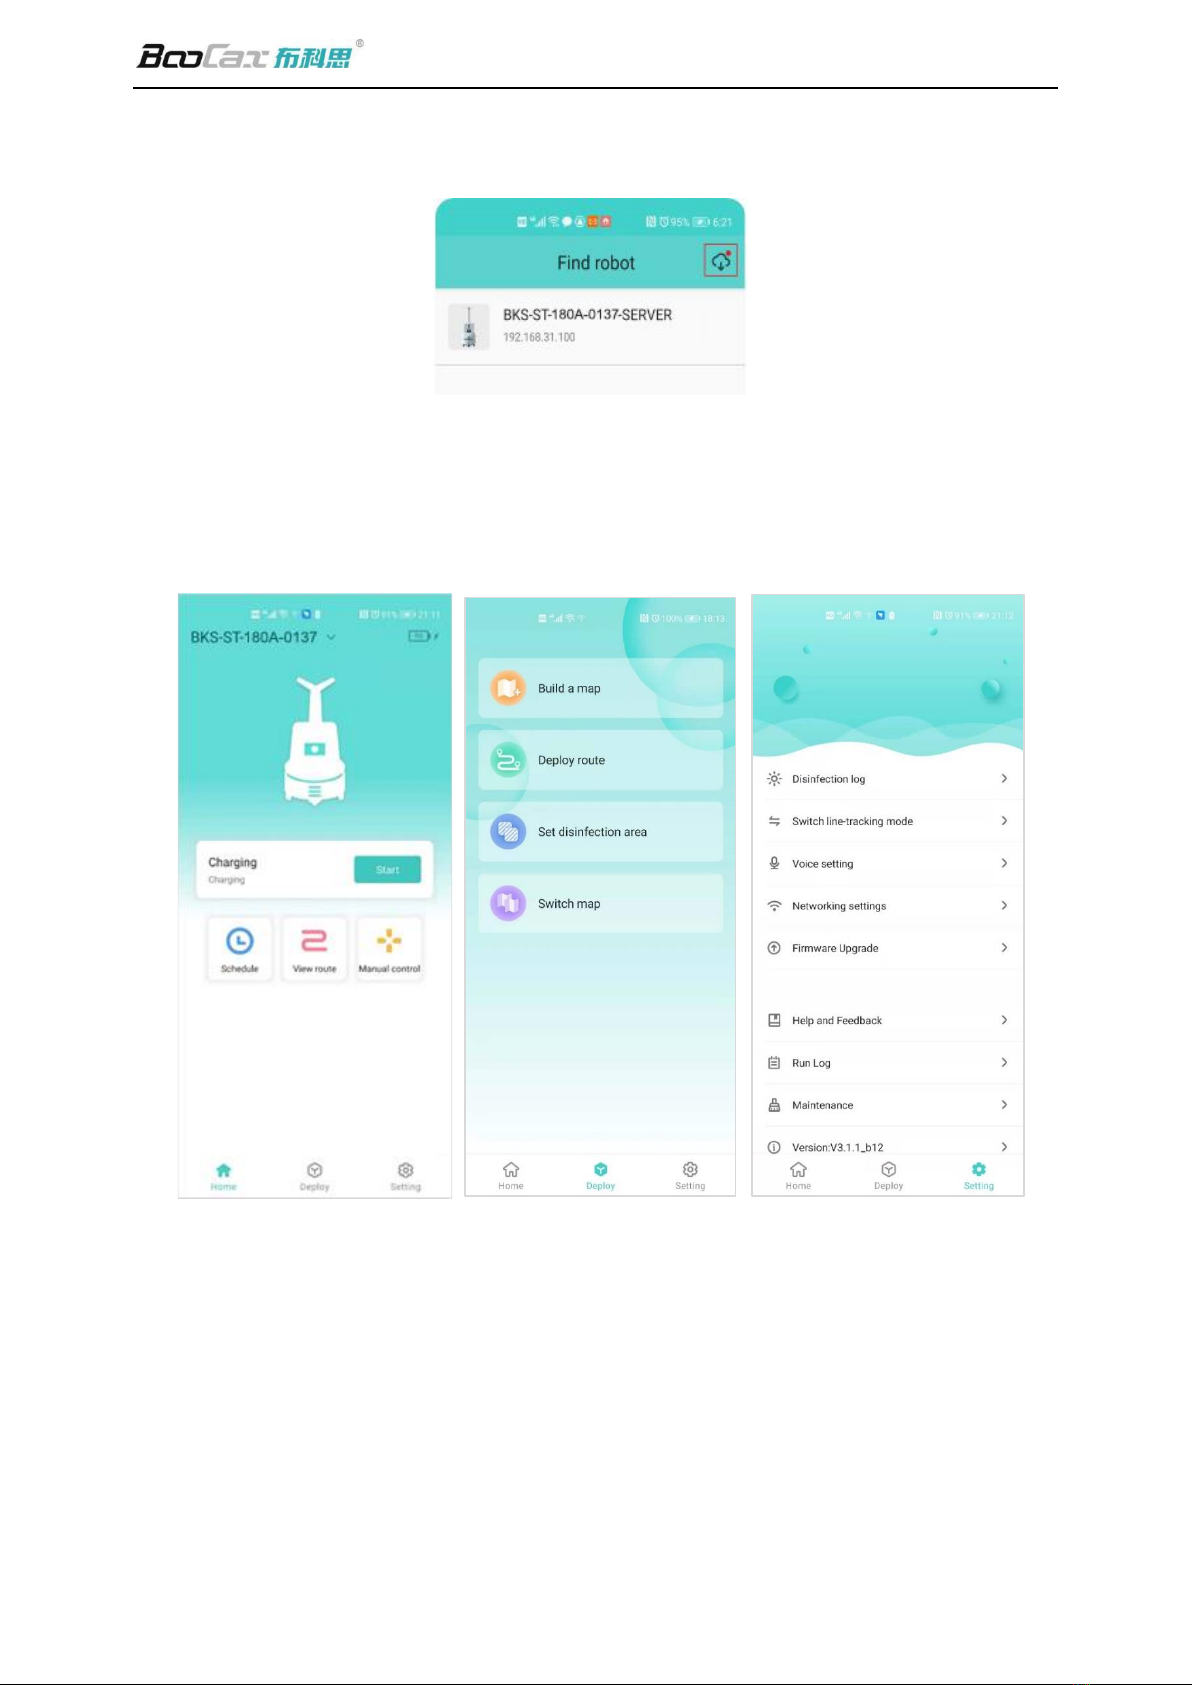
3) Click into the App, you will find the robot beginning with "BKS-ST-180A" (as shown in the
following figure), click login;
4) Open the App, which shows the interface as below then forward to deploy map,
Screenshots of App interface and function buttons:
App homepage:
•Robot name and
battery
•Robot status
•Scheduled
disinfection
View route
Manual control
App deployment:
•Build map
•Deploy route
•Set disinfection
area
Switch map
App setting:
•Disinfection log
•Switch loop mode
•Volume
•Networking setting
•Firmware update
•Help and feedback
•Run log
•Maintenance
•App version information
BKS Terminal Disinfection Robot Product Manual v1.0
BooCax Robotics 16 / 24 www.boocax.com
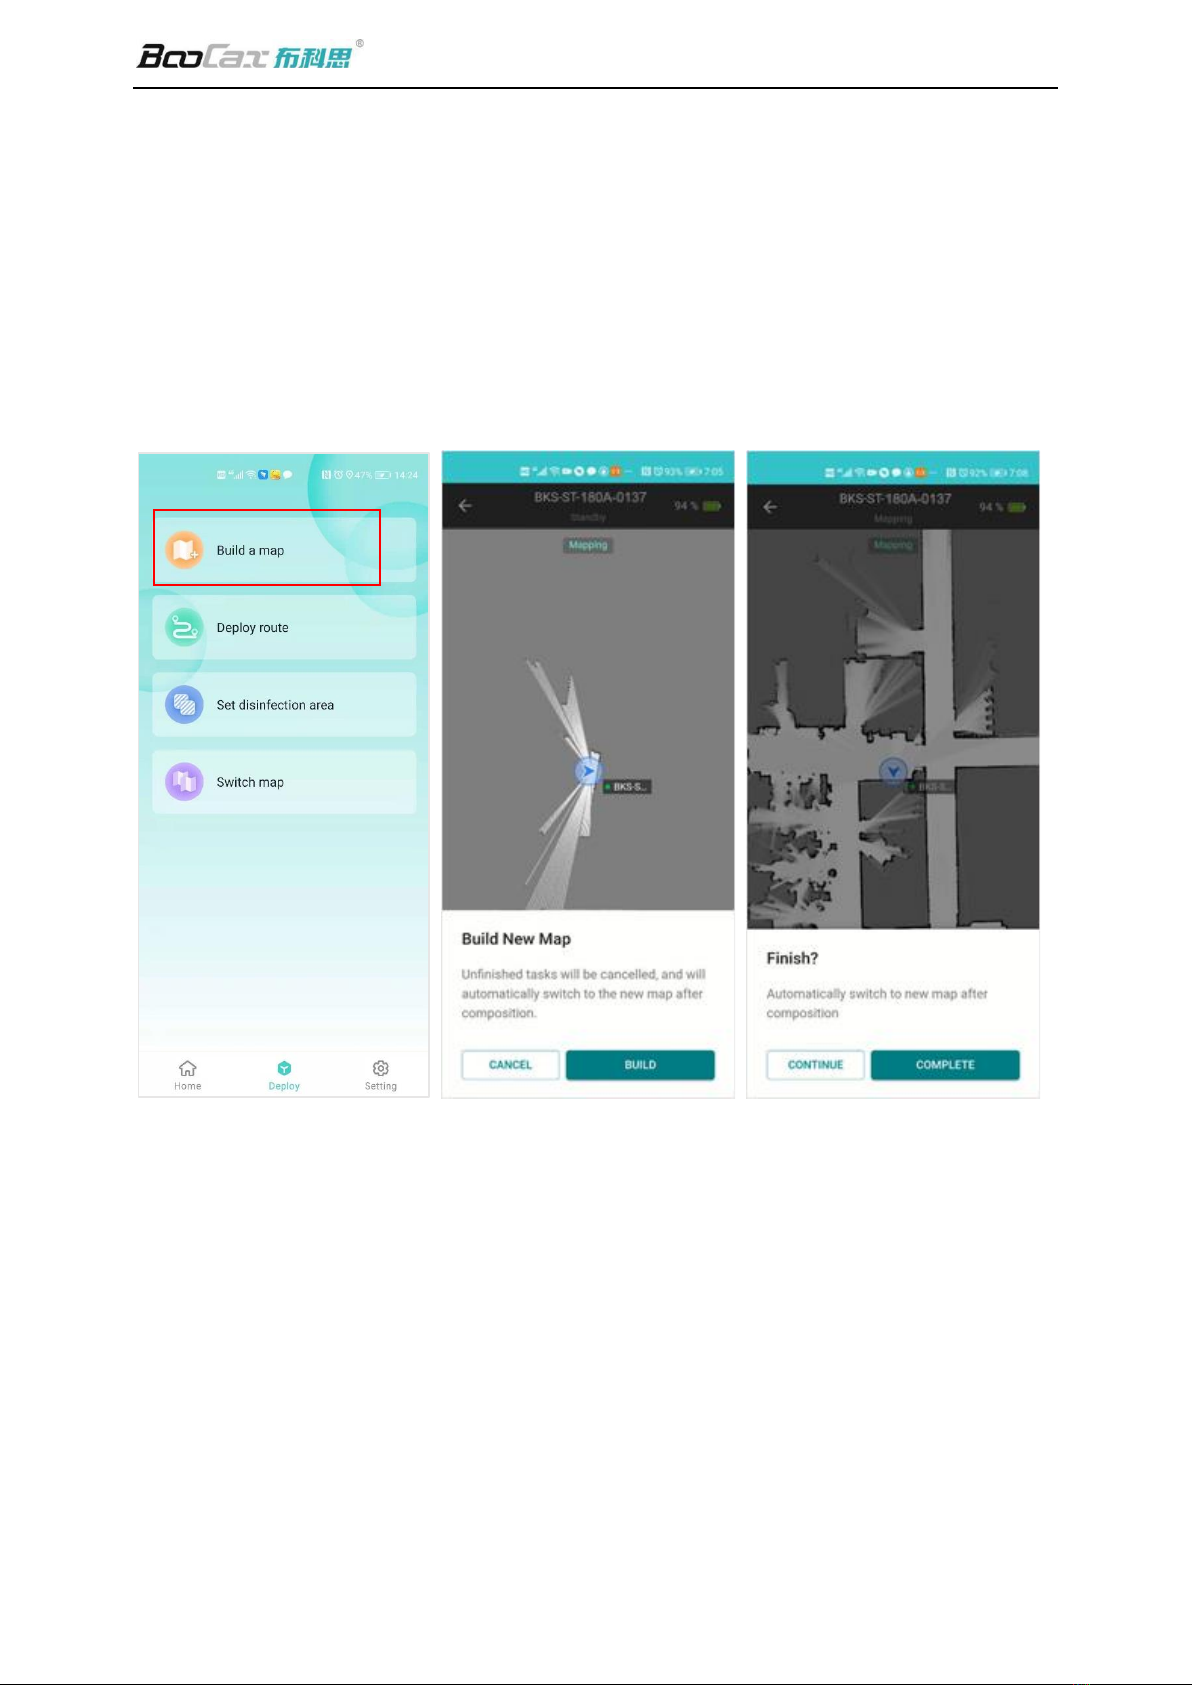
8. Build map
1) Preparation before building the map
·Push the robot 0.5-1m in front of the charging pile
·Robot power >50%
2) Start building the map
Click "Deploy" on the homepage of App to show the "Build Map" button. Click the button to
build a two-dimensional spraying map, as shown in the following figure (Push the robot by
hand to build the map):
Notifications:
•White radius—the range scanned by the laser;
•Black thick line—the scanned obstacles (special objects such as transparent glass may not be
identified)
•Gray area: Area that has not been scanned.
⚠Attention:
①When mapping by hand, push the robot forward slowly in the scene from the charging
pile as the starting point, and finally return to the charging pile to form a large circle;;
②When mapping, don't be too close to the wall and keep a distance of at least 0.5m;;
③The operator must stand behind the robot to avoid leaving noise on the map;
④When turning, walk slowly so that the robot can collect as much characteristic point data
as possible;
⑤As laser radar does not recognize accurately in abnormal environment (glass, mirror, pure

BKS Terminal Disinfection Robot Product Manual v1.0
BooCax Robotics 17 / 24 www.boocax.com
black object, grid, etc.), it is recommended to carry out appropriate treatment, such as
pasting frosted sticker, gray adhesive tape, etc.;
⑥If the working scene is too large/noise, you can use "Incremental composition" to
enlarge/repair the map;
⑦When passing the QR code, stay in front for more than 1 second, and there will be a voice
prompt after the entry is successful.
9. Deploy Route/Area setting
9.1 Deploy route setting
The working path of robot consists of the starting point, path points and the disinfection points in
series.
Specific setting procedures follow the instructions of App, as shown below:
1) Rapid deployment
➢Charging point: The position of the robot docking the charging pile 。
Click "Deploy route" to enter the route setting mode; push the robot to the charging pile for
docking as guided, and click Next to complete the setting.
➢Path points and disinfection points: deploy the points by pushing robot /dragging map
Mark the required location on the map, and then set the corresponding path

BKS Terminal Disinfection Robot Product Manual v1.0
BooCax Robotics 18 / 24 www.boocax.com
point/disinfection point ( The small blue icon is the corresponding location point)
Path points need to be set for the route that the robot passes through, such as turns and
gates, which must be marked (as shown in Figure 2 below: gray points are path
points).
Disinfection points are set as required for the environmental site (as shown in Figure 3 below:
purple icons are disinfection points).
Button “Change“ and ”Connect" function:Mainly used to connect button "nearby points" in
series.
Change “is to switch point, that is, changing the current point of the robot to the selected
nearby point. After this operation, you can click "Connect " to connect the robot's previous
path point or disinfection point with the current point.
“Change” and “Connection”, these two functions are mainly designed to facilitate route editing.
2)Free editing-adjust path
➢If the route by rapid deployment is not applicable, click "Free Edit" to adjust the route. The
robot supports adding/deleting/moving points, changing running route, changing disinfection
points, etc.

BKS Terminal Disinfection Robot Product Manual v1.0
BooCax Robotics 19 / 24 www.boocax.com
⚠ Attention:
When mapping,the turning should be deployed with waypoints which cannot pass through the
wall, as shown in the figure below:
As shown in the figure above, when the robot has to move from A to C, but is obstructed by a
wall or an unmovable obstacle in between, the correct path deployment should be A-B-C. B
must be set as it is the key node of the turning. The figure on the right shows the wrong
deployment, in which the path will go through the wall directly, causing the robot unable to walk.
Table of contents
Other BOOCAX Robotics manuals


