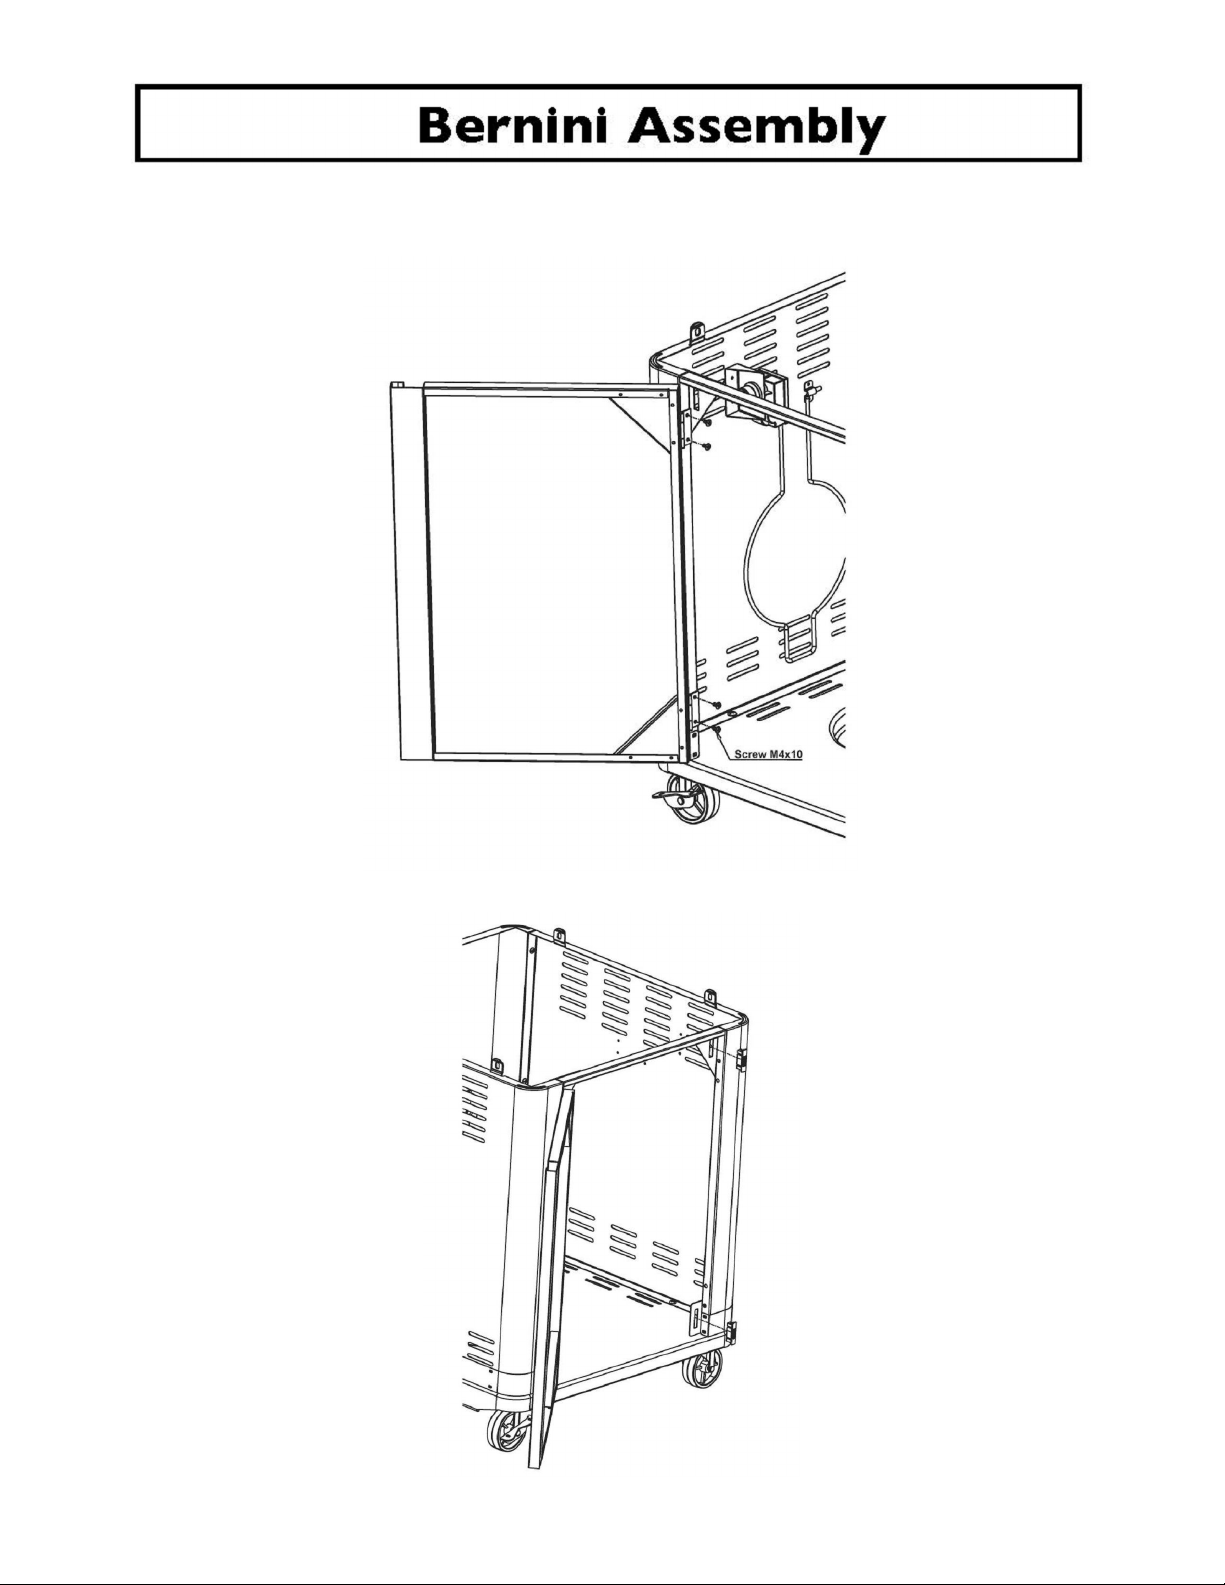
BORETTI Bernini User manual


Table of Contents
Welcome . . . . . . . . . . . . . . . . . . . . . . . . . . .. . . . . . . . . . . . . . . . . . . . . . . . . . . . 3
General Safety Instructions . . . . . . . . . . . . . . . . . . . . . . . . . . . . . . . . . . . . . . . 4-5
Assembly . . . . . . . . . . . . . . . . . . . . . . . . . . . . . . . . . . . . . . . . . . . . . . . . . . . . . 6-15
Gas Requirements . . . . . . . . . . . . . . . . . . . . . . . . . . . . . . . . . . . . . . . . . . . . . 16-17
Pre-Operation Leak Testing . . . . . . . . . . . . . . . . . . . . . . . . . . . . . . . . . . . . . . . . 19
Lighting The Grill . . . . . . . . . . . . . . . . . . . . . . . . . . . . . . . . . . . . . . . . . . . . . . . . 20
Using the Grill . . . . . . . . . . . . . . . . . . . . . . . . . . . . . . . . . . . . . . . . . . . . . . . . . 21-22
Care and Maintenance . . . . . . . . . . . . . . . . . . . . . . . . . . . . . . . . . . . . . . . . . 23-24
Troubleshooting . . . . . . . . . . . . . . . . . . . . . . . . . . . . . . . . . . . . . . . . . . . . . . . . . . 25
Warranty . . . . . . . . . . . . . . . . . . . . . . . . . . . . . . . . . . . . . . . . . . . . . . . . . . . . . . . 27
2

Welcome & Congratulations
Congratulations on your purchase of a new grill! We are very proud of our product and we are completely
committed to providing you with the best service possible. Your satisfaction is our #1 priority.
Please read this Use & Care Manual very carefully. It contains valuable information on how to properly
maintain your new grill.
We know you’ ll enjoy your new grill and thank you for choosing our product. We hope you consider us for
future purchases.
PLEASE READ AND SAVE THESE INSTRUCTIONS
This Use & Care Manual provides specific operating instructions for your model. Use your grill only as
instructed in this manual. These instructions are not meant to cover every possible condition and situation
that may occur. Common sense and caution must be practiced when installing, operating and maintaining
any appliance.
Please record your model and serial numbers below for future reference. This information is found on the serial
plate located on the inside of the grill door.
NOTE: Use only soap and water to clean serial plate.
Model Number: _____________________________
Serial Number: ______________________________
Purchase Date: _____________________________
Gas Type: __________________________________
3

General Safety Instructions
IMPORTANT SAFETY INFORMATION
• Read this manual carefully before using your grill to reduce the risk of fire, burn hazard or other injury.
• Extreme care should be used because of the high temperatures produced by this appliance. CHILDREN
SHOULD NOT BE LEFT UNATTENDED IN AN AREA WHERE THE GRILL IS BEING OPERATED.
• This appliance must be kept clear from combustible materials, gasoline or other flammable vapors and
liquids. Do not allow flammable materials to come in contact with grate, burner or hot surfaces.
• Use only outdoors and provide good ventilation to avoid carbon monoxide buildup which could result
in injury or death.
•DO NOT repair or replace any part of this appliance unless it is specifically recommended in this manual.
Aqualified service technician should conduct all other service.
• Follow the installation and servicing instructions provided with this product. Have your grill installed by a
qualified service technician.
• Locate the main gas supply valve so that you know how to shut the gas off to your grill.
• If you smell gas, make sure all gas connections are tight before operation. If you continue to smell gas
call a qualified technician.
• When lighting a burner, always pay close attention to what you are doing and be certain you are pushing
the igniter that lights the burner you intend on using.
• Always keep your face and body as far away from the grill as possible when lighting to reduce the
risk of burn.
• Extinguish all flames and DO NOT smoke while engaging gas and igniting the grill.
RECOGNIZE SAFETY SYMBOLS, WORDS AND LABELS
WARNING WARNING indicates a potentially hazardous situation which, if not
avoided, could result in death or serious injury.
NOTE indicates an important piece of information that needs to be
observed to ensure the proper operation of your grill.
DANGER
If you smell gas:
1. Shut off gas to the appliance
2. Extinguish any open flame
3. Open lid
4. If odor continues, keep away from the
appliance and immediately call your
gas supplier or fire department
WARNING
1. Do not store or use gasoline or other
flammable liquids or vapors in the
vicinity of this or any other appliance.
2. An LP cylinder not connected for use
shall not be stored in the vicinity of
this or anyother appliance
INSTALLER
Please retain these instructions with the owner so that they
maymaintain them for future reference.

General Safety Instructions
WARNING
Do not use the rotisserie in the rain.
WARNING
Electrical Grounding Instructions
This appliance (rotisserie motor) is equipped with
athree-prong (grounding) plug for your protection
against shock hazard and should be plugged
directly into a properly grounded three-prong
receptacle. DO NOT cut or remove the grounding
prong from this plug.
WARNING
Keep any electrical supply cords and the fuel
supply hose away from any heated surfaces.
WARNING
The Spare L.P. Gas Tank Barrier must be installed
to prevent storage of spare L.P. Gas Tanks. Failure to
comply with these instructions could result in
afire or explosion that could cause serious
bodily injury, death, or property damage.
FOR YOUR SAFETY
If you smell gas:
1. Shut off gas to the appliance.
2. Extinguish anyopen flames.
3. Open grill hood.
4. If odor continues, immediately call
your gas supplier and local
Fire Department.
This appliance is not intended to be installed
in or on recreational vehicles or boats.
WARNING
NOTE: DO NOT operate the main burners and
infrared back burner at the same time. This can
cause warping of the roll top grill hood.
WARNING
DO NOT use the grill in garages, breezeways, sheds
or any enclosed area. Never operate the grill in
enclosed areas as this could lead to a carbon
monoxide buildup, which could result in injury or
death. Place the grill on a level surface. Avoid
moving the grill while it is in operation.
WARNING
Always have a qualified service technician perform
difficult conversions or modifications.
WARNING
Never attach an unregulated gas line to the
appliance. Connection to an unregulated gas
line can cause excessive heat or fire
FOR YOUR SAFETY
DO NOT store or use gasoline or other
flammable vapors and liquids in the vicinity of
this or anyother appliance.
An L.P. cylinder not connected for use shall not be
stored in the vicinity of this or any other appliance.
WARNING
DO NOTtrylighting this appliance without reading the
"LIGHTING INSTRUCTIONS" section of this manual.
THIS GRILL IS FOR OUTDOOR USE ONLY
Installation must conform with local codes

PARTS LIST
1 Bottom Panel Assy. x
1PCS 2 Castor w/ lock x 2PCS 3 Castors w/o lock
x2PCS 4 Trolley Front Panel
Assy. x 1PCS
5 Trolley Left Side
Panel Assy. x 1PCS 6 Trolley Right Side
Panel Assy. x1PCS 7 Trolley Bar Assy. x
1PCS 8 Door Assy. x 1PCS
9 Magnet x2PCS 10 Fire Box Assy. x
1PCS 11 Side Shelf x 1PCS 12 Side Burner Assy.
x1PCS
13 Side Burner Knob
Assy. x 1PCS 14 Battery x 1PCS 15 Drip Cup x1PCS 16 Warming Rack x
1PCS
A M6x12 Screw x
28PCS B M5x10 Screw x 6PCS C M4x10 Screw x4PCS
D M4x10 sunk screw
x4PCS

1. Attaching 2 x Castors (w/ lock) onto the bottom panel with 8pcs M16*12 screw. Remark: Put the locking
castors at one side with bending edge narrower.
2. Attach 2 * Castors (w/o lock) onto the bottom panel with (8pcs) M6*12 screw.

3. Attach the trolley front panel onto the bottom panel with (2pcs) M6*12 screw.
4. Attach the trolley left side panel assy. onto the bottom panel with (3pcs) M6*12 screw, then fix the side panel
and front panel with (3pcs) M5*10 screw.

5. Attach the trolleyright side panel assy. onto the bottom panel with (3pcs) M6*12 screw, then fixthe side panel
and front panel with (3pcs) M5*10 screw.
6. Attach the trolley bar between the trolleyleft and right side panel assy. with (4pcs) M4*10 screw.

7. Attach the door assy. onto the trolley right side panel assy. with (4pcs) M4*10 sunk screw.
8. Insert the magnets into the slots accordingly.

9. Putting the fire boxassy. onto the trolley frame assy. and fixing them with 4pcs M6*12 screw
10. a). Loosen (4pcs) M6*12 screws of the fire boxleft side panel around 6mm
b). Attachi the side shelf onto the left side of the fire boxvia (4pcs) M6*12 screw and fixing the screws.

11. a). Loosing 4pcs screws of the fire boxright side panel around 6mm
b). Attaching the side burner shelf onto the right side of the fire boxvia 4pcs screw and fixing the screws
12. Connect the flex tube to the side burner valve and fixing it.

13. a). Connecting the needle wire.
b). Connecting the pluse ignition wire properly.
14. a). Connect 3 * needle wires (2.8mm large ending) with onto the ignition box.
b). Connect 2 pulse ignition wires (4.8mm large ending) onto the ignition box.

15. Loosen the cap of the ignition box, then putting the battery inside and fixing the cap again.
16. Fixing the drip cup.

17.Attach the warming rack.


L.P. Gas Cylinder Installation
Afrosty cylinder valve indicates possible gas over fill.
Close the L.P. valve and call your dealer immediately.
1. Never store any extra cylinder under or near your grill.
2. Never fill your cylinder over 80% full by weight. This may cause release of
gas from the safety relief valve.
3. If the information in points 1 and 2 above is not followed exactly, a fire
causing death or serious injury may occur.
WARNING
WARNING
1. The gas supply must be turned off at the LP gas supply cylinder when this
gas grill is not in use.
2. Storage of this gas grill indoors is permissible only if the cylinder is
disconnected and removed from the gas grill.
3. Cylinders must be stored outdoors out of reach of children and must not be
stored in a building, garage or any other enclosed area.
WARNING
L.P. GAS CYLINDER INSTALLATION
1. Lift the cylinder lock ring up and place the propane cylinder in the hole on the cart base. (See Fig. 25)
2. Secure the ring on the neck of the propane cylinder to lock the cylinder in position. (See Fig. 26 & 27)
3. Attach the LP hose and regulator to the propane cylinder. (See Fig. 26 & 27)
Fig. 25 Fig. 26 Fig. 27
Cylinder Lock Ring

Pre-Operation Leak Testing
GENERAL INFORMATION
Although all gas connections on the grill are leak tested prior to shipment, a complete gas tightness check
must be performed at the installation site due to possible shifting during shipment, installation or excessive
pressure unknowingly being applied to the unit. Periodically check the whole system for leaks and
immediately check the system if the smell of gas is detected.
BEFORE TESTING
• DO NOT smoke while leak testing.
• Extinguish all open flames.
• Never leak test with an open flame.
• Mix a solution of equal parts mild detergent or liquid soap and water.
TESTING
1. Turn off the burner control knobs.
2. Turn the top knob of the fuel supply cylinder counter-clockwise (right to left) two (2) rotations to open.
3. Apply the soap solution to connections of the fuel supply assembly. If no soap bubbles appear, there is no
gas leak. If bubbles form at the connections, a leak is detected. If a leak is detected, immediately turn off
the gas supply, tighten any leaking fittings, turn gas ON, and repeat steps 1 - 3.
4. Turn off the knob on the fuel supply cylinder.
5. Turn on the burner control knobs for a moment to release the pressure in the hose, then turn the control
knobs back off.
6. Wash off soapy solution with cold water and towel dry.
Checkall gas supply fittings before each use and each time the gas supply cylinder is connected to the
regulator. Have a qualified service technician leak test the grill any time a part of the gas system is replaced.
It is also recommended to perform a leak test a least once a year whether or not the L.P. gas supply cylinder
has been disconnected.
NOTE: When leak testing this appliance, make sure to test and tighten all loose connections,
including the side burner. A slight leak in the system can result in a low flame, or hazardous
condition. Most L.P. gas tanks now come equipped with a leak detector mechanism internal
to the tank, when gas is allowed to escape rapidly, it shuts of the gas supply. a leak may
significantly reduce the gas flow making the grill difficult to light or causing low flames.
NOTE: If you cannot stop a gas leak turn off the gas supply and call your local gas supplier or
the dealer you purchased the appliance from. If necessary, replace the faulty part with the
manufacturer's recommended replacement part. A slight leak could cause a fire.


Table of contents
Other BORETTI Grill manuals

BORETTI
BORETTI NERONE User manual

BORETTI
BORETTI BAMBINO User manual

BORETTI
BORETTI ROBUSTO User manual

BORETTI
BORETTI LIGORIO User manual

BORETTI
BORETTI BARILO User manual

BORETTI
BORETTI IBRIDO TOP User manual

BORETTI
BORETTI PICCOLINO User manual

BORETTI
BORETTI CERAMICA User manual

BORETTI
BORETTI FOCOLARE User manual

BORETTI
BORETTI Michelangelo User manual

BORETTI
BORETTI LUCIANO NERO User manual

BORETTI
BORETTI TONELLO User manual

BORETTI
BORETTI MAGGIORE User manual

BORETTI
BORETTI Addizio User manual

BORETTI
BORETTI Majestuoso User manual

BORETTI
BORETTI Grande User manual

BORETTI
BORETTI IBRIDO TOP User manual

BORETTI
BORETTI CARBONE User manual

BORETTI
BORETTI IBRIDO TOP User manual

BORETTI
BORETTI LIGORIO User manual