BORETTI MLBS45 User manual

MLBS45MLBS45
EN | USER MANUAL / INSTALLATION MANUAL
www.boretti.com

2
ENMLBS45 / User guide - Installation advice
Contents
* 1. Safety Information ................................................................................................... 3
* 2. Before rst use.......................................................................................................... 7
* 3. Other important instructions.................................................................................. 7
* 4. Description of the appliance .................................................................................. 8
* 5. Control panel............................................................................................................. 8
* 6. Oven Functions......................................................................................................... 9
* 7. Initial Settings..........................................................................................................10
* 8. Cooking Settings ....................................................................................................11
* 9. Automatic Cooking ................................................................................................13
* 10. General settings ...................................................................................................16
* 11. Timer settings.......................................................................................................19
* 12. Safety......................................................................................................................20
* 13. Meat Probe............................................................................................................21
* 14. Descaling procedure............................................................................................22
* 15. Filling the water tank ...........................................................................................24
* 16. General oven functions ....................................................................................... 26
* 17. Accessories........................................................................................................... 28
* 18. Cleaning and maintenance ................................................................................30
* 19. Troubleshooting ...................................................................................................35
* 20. Technical characteristics.................................................................................... 36
* 21. Installation.............................................................................................................37
* 22. Tables and Suggestions .....................................................................................40
* 23. Environmental protection...................................................................................49

3
ENMLBS45 / User guide - Installation advice
1. Safety Information
Before the installation and use of the appliance, carefully read the
supplied instructions. The manufacturer is not responsible if an
incorrect installation and use causes injuries and damages.
Always keep the instructions with the appliance for future reference.
1.1 Children and Vulnerable People Safety
*
Warning!
Risk of suffocation, injury or permanent disability.
*This appliance can be used by children aged from 8 years and above and
persons with reduced physical, sensory or mental capabilities or lack of
experience and knowledge if they are supervised by an adult or a person who is
responsible for their safety.
*Children should be supervised to ensure that they do not play with the
appliance.
*Keep all packaging away from children.
*
Warning!
The appliance and its accessible parts become hot during use. Care
should be taken to avoid touching heating elements. Children less than
8years of age shall be kept away unless continuously supervised.
*
Warning!
When the appliance is operated in the combination mode, children should
only use the oven under adult supervision due to the temperatures
generated.
*If the appliance has a child safety device, we recommend that you activate
it. Children under 3 years must not be left unsupervised in the vicinity of the
appliance.
*Cleaning and user maintenance shall not be made by children without
supervision.

4
ENMLBS45 / User guide - Installation advice
1.2 General Safety
*This appliance is intended to be used in household applications and not in hotels,
shops, offices and other similar environments.
*Internally the appliance becomes hot when in operation. Do not touch the
heating elements that are in the appliance. Always use oven gloves toremove
or put in accessories or ovenware.
*When heating food in plastic or paper containers, keep an eye on the appliance
due to the possibility of ignition.
*The appliance is intended for heating food and beverages. Drying of food or
clothing and heating of warming pads, slippers, sponges, damp cloth and
similar may lead to risk of injury, ignition or fire.
*If smoke is emitted, switch off or unplug the appliance and keep the door
closed in order to stifle any flames.
*Make sure you never catch the power cables of other electrical appliances
in the hot door or the oven. The cable insulation may melt. Danger of short-
circuiting!
*
Warning!
Please cover the socket inside the cavity if you are not using the food
probe. Failure to cover the socket will cause damages to the oven.
*Only use the food probe recommended for this oven.
*The tray and rack have a system for easy partial removal and handling of food.
Always place these accessories inside the oven, as indicated in the Accessories
section.
*Do not keep any inflammable object inside the oven as it may burn if the oven is
switched on.
*Do not use the oven as a pantry.
*Do not lean or sit on the open oven door. This may damage the oven, especially in
the hinge zone. The door can bear a maximum weight of 8 kg.
*Failure to secure tightly the support with the nuts may lead to overheating
and damages.

5
ENMLBS45 / User guide - Installation advice
1.3 Installation
*The installation must comply with current regulations.
*The electrical installation is to be set up so that the appliance can be isolated
from the mains with a minimum 3mm all-pole contact separation. Suitable
separation devices include e.g. cutouts, RCD’s and contactors.
*If the electrical connection is done through a plug and this remains accessible
after installation, then it is not necessary to provide the mentioned separation
device.
Warning!
The oven must be earthed.
Warning!
The appliance is intended to be built in. Please refer to the last pages of
this user manual for detailed information on the installation dimensions.
1.4 Cleaning and Maintenance
Warning!
Cut the power supply before cleaning and maintenance.
*The appliance should be cleaned regularly and any food deposits removed.
*Failure to maintain the appliance in a clean condition could lead to deterioration
of the surface that could adversely affect the life of the appliance and possibly
result in a hazardous situation.
*Do not use harsh abrasive cleaners or sharp metal scrapers to clean the glass
door since they can scratch the surface, which may result in shattering of the
glass.
*Do not use a steam cleaner to clean the appliance.
*The door contact surfaces (the front of the cavity and the inside part of the
doors) must be kept very clean in order to ensure the oven functions correctly.
*Please follow the instructions regarding cleaning in the section "Oven Cleaning
and Maintenance".
Warning!
Ensure that the appliance is switched off before replacing the lamp
to avoid the possibility of electric shock. Please refer to the chapter
"CHANGING THE OVEN LIGHT BULB".

6
ENMLBS45 / User guide - Installation advice
1.5 Service and Repair
Warning!
Cut the power supply before repair.
Warning!
If the door or door seals are damaged, the appliance must not be operated
until it has been repaired by a competent person.
*If the power cable is damaged it should be substituted by the manufacturer,
authorized agents or technicians qualified for this task in order to avoid
dangerous situations.
*Repair and maintenance work, especially of current carrying parts, can only be
carried out by technicians authorized by the manufacturer.

7
ENMLBS45 / User guide - Installation advice
2. Before rst use
There may be traces of fat and other substances in the oven as a result of the
manufacturing process. These should be removed using the following procedure:
1. Remove all the packaging from your oven, including the protective plastic,
if any.
2. Turn your oven to or , at 200 ºC for 1 hour.
3. Cool the oven with the door open so that it ventilates, and no odors remain
inside it.
4. Once cold, clean the oven and the accessories.
During this first operation, smoke and smells will be produced. The kitchen should
therefore be well ventilated.
3. Other important instructions
*Do not cover the bottom of the oven with aluminum foil as this may affect
cooking performance and damage the enamel inside the oven and the interior
of your kitchen unit.
*Do not pour water on the bottom surface when in use; this may damage the
enamel.
*It is normal for condensation to occur on the oven door when cooking food
with a high liquid content.
*When closing the oven door during cooking, the sound of the air inside it can be
heard. This effect is normal due to the pressure exerted by the door when it is
closed, guaranteeing the sealing of the cavity.
8
ENMLBS45 / User guide - Installation advice
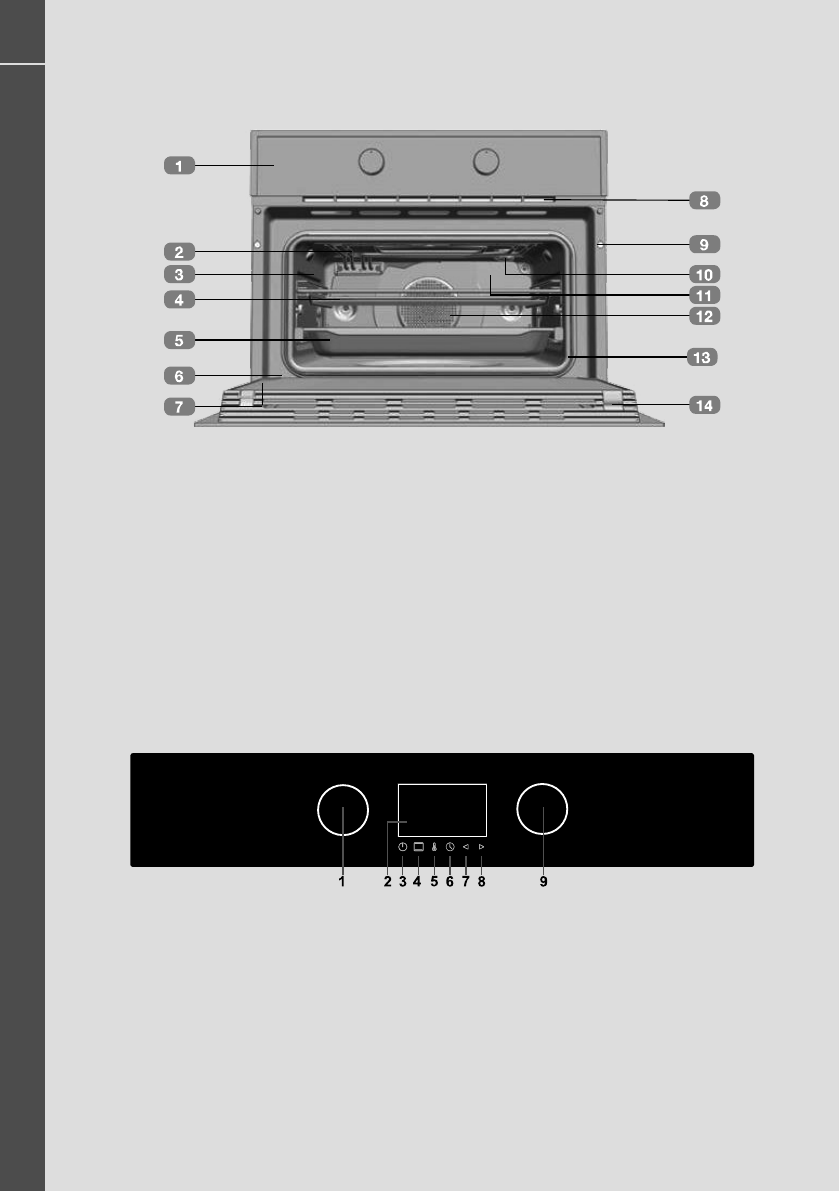
4. Description of the appliance
1. Control panel
2. Grill element
3. Tray supports
4. Grid shelf
5. Tray
6. Hinge
7. Inner Glass
8. Air cooling outlet
9. Unit mounting
10. Lamp
11. Back Wall Panel
12. Fan
13. Oven Seal
14. Door
15. Perforated tray
(not shown in the picture)
5. Control panel
1. Left knob
2. Display
3. On/Off key
4. Cooking function key
5. Temperature key
6. Clock key
7. Backward key
8. Forward/ OK key
9. Right knob
9
ENMLBS45 / User guide - Installation advice
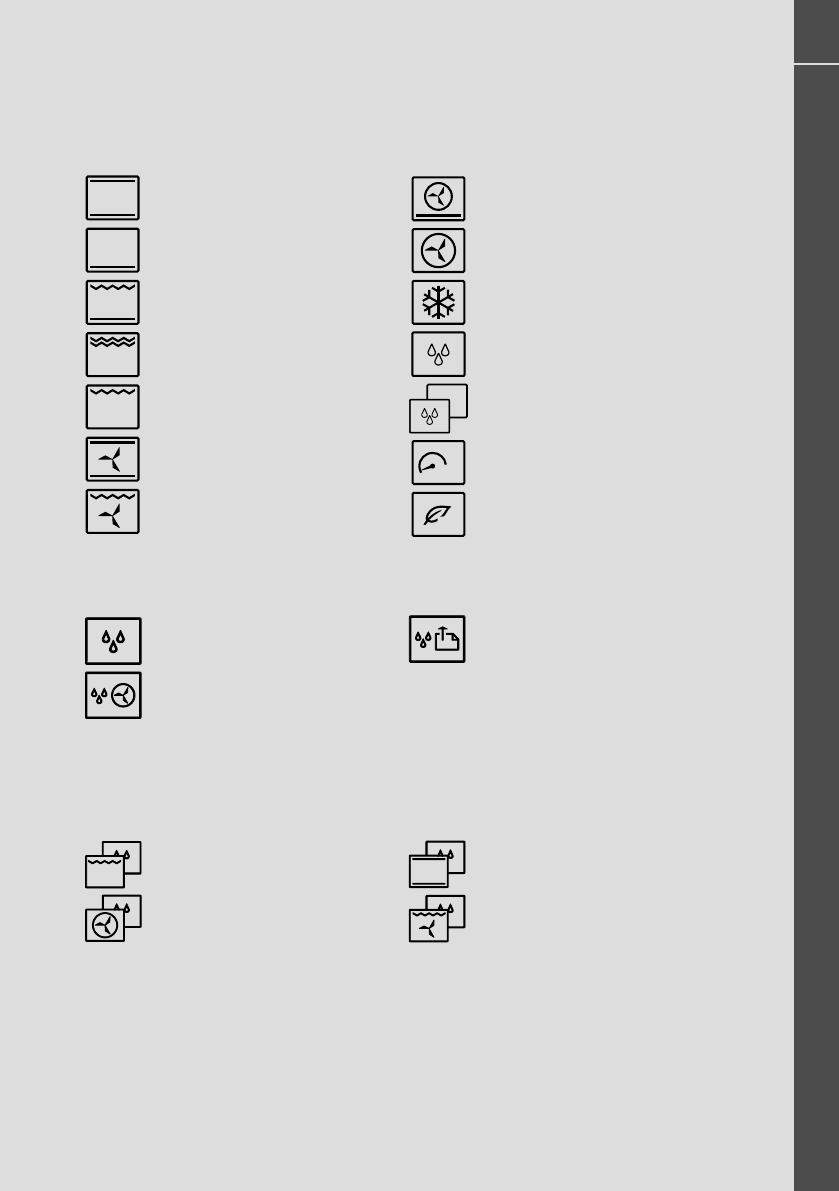
6. Oven Functions
6.1 Traditional functions
Top + Bottom
Bottom
Grill + Bottom
Double Grill
Grill
Ventilated Top + Bottom
Ventilated Grill
SLOW
ECO
Hot air + Bottom (Pizza)
Hot air
Defrost
Steam
Combi Steam
Slow Cooking
Eco
6.2 Steam functions
Steam 100%
Regenerate manual:
- 50% Steam
- 50% Hot air
Sous Vide
6.3 Combi Steam functions
Steam + Grill
Steam + Hot Air
Steam + Top + Bottom
Steam + Grill + Hot Air

10
ENMLBS45 / User guide - Installation advice
7. Initial Settings
7.1 Language Selection
When plugging the oven in for the first
time, the logo will appear followed by the
language selection menu. You must set
the desired language in order to use the
oven.
*Rotate the Right knob to select the
desired language.
*Press to confirm.
7.2 Setting the clock
Before setting the clock, you need to select
the hour format.
*Rotate the Right knob to select the
desired format.
*Press to confirm.
After this, the time needs to be set:
*Rotate the Right knob to set the clock.
*Press to confirm.
7.3 Setting the date
After setting the clock, you need to select
the date.
*Rotate the Right knob to set the date.
*Press to confirm.
7.4 Water Hardness
After all the previous settings, you need to
set the water hardness (see page 17):
*Rotate the Right knob to set the water
hardness.
*Press to confirm.
Table of contents
Other BORETTI Oven manuals

BORETTI
BORETTI FI 601 MARMO Specification sheet

BORETTI
BORETTI CFBG903AN Technical manual

BORETTI
BORETTI BPO-90 User manual

BORETTI
BORETTI MLBC45 User manual

BORETTI
BORETTI BPOL-60 User manual

BORETTI
BORETTI BS-45 Instruction Manual

BORETTI
BORETTI BPON 45 User manual

BORETTI
BORETTI CRG916 User manual

BORETTI
BORETTI BPM-60 User manual

BORETTI
BORETTI Maggiore Cucine Specification sheet


