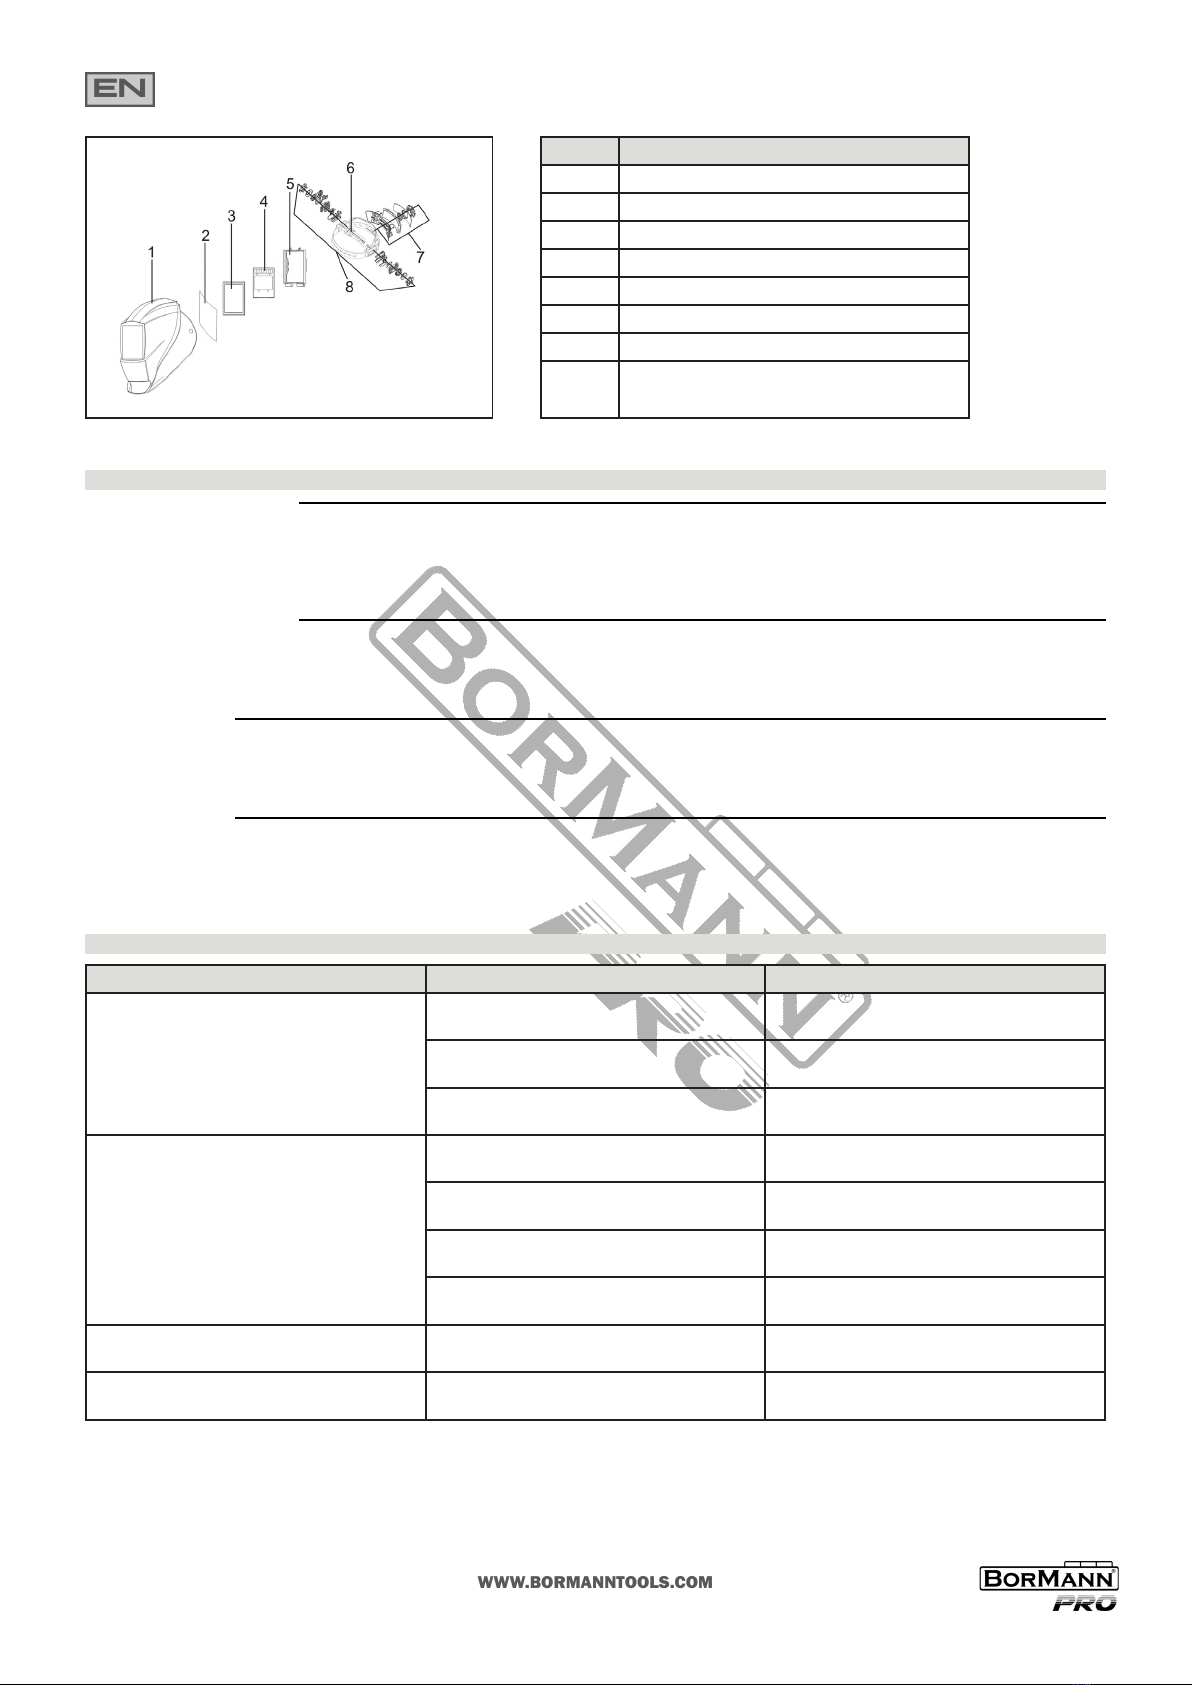
BorMann PRO BIW2020 User manual

Art Nr:
WWW.BORMANNTOOLS.COM
en
el
BIW2020 - BIW2030
v2.1
037323 037323

EN
WWW.BORMANNTOOLS.COM
2
WARNING: Please read and understand all instrucon before use. Retain this manual for future reference.
Safety instrucons
Technical data
• Before welding, always inspect helmet and auto-darkening lter (ADF) to be sure they are ed properly and in good condion.
• Keep the sensors, solar cell and lter lens clean. Clean the lter cartridge using a soap water soluon and so cloth. Do not use solvents or abrasive cleaning
detergent.
• Do not weld in the overhead posion while using this helmet.
• Inspect the lter lens frequently and immediately replace any scratched, cracked, or pied lter lens or cover lenses.
• Always wear safety glasses or goggles under the welding helmet, and protecve clothing to protect your skin from radiaon, burns and spaer.
ARC Rays can injure eyes and burn skin
Model: BIW2020 BIW2030
Viewing Area 98×62mm 98x88mm
Arc Sensors 4 4
UV/IR Protecon DIN 16 DIN 16
Light State DIN 4 DIN 4
Dark State DIN 9-13 DIN 9-13
Sensivity Control Low — High, by innitely dial knob Low — High, by innitely dial knob
Switch Time (Light to Dark) 1/30,000s 1/30,000s
Delay Control (Dark to Light) 0.1-1.0S, by innitely dial knob 0.1-1.0S, by innitely dial knob
Power Supply Solar cell and replaceable 2×CR2450 lithium baer-
ies (*not included with all models)
Solar cell and replaceable 2×CR2450 lithium baeries (*not
included with all models)
* The manufacturer reserves the right to make minor changes to product design and technical specicaons without prior noce unless these changes
signicantly aect the performance and safety of the products. The parts described / illustrated in the pages of the manual that you hold in your hands may
also concern other models of the manufacturer's product line with similar features and may not be included in the product you just acquired.
* Please note that our equipment has not been designed for use in commercial, trade or industrial applicaons. Our warranty will be voided if the machine
is used in commercial, trade or industrial businesses or for equivalent purposes.
* To ensure the safety and reliability of the product and the warranty validity, all repair, inspecon, repair or replacement work, including maintenance and
special adjustments, must only be carried out by technicians of the authorized service department of the manufacturer.

EN
WWW.BORMANNTOOLS.COM
3
Operang instrucons
Headgear Adjustment
1. Adjust the headgear diameter with the twist knob on the back. The knob is locked unl pushed in. Once unlocked, twist clockwise to
ghten and counterclockwise to loosen.
2. Adjust the height by snapping the pin into the hole to lock securely in place.
3. To adjust the viewing angle, loosen the knob on both sides of the helmet and change angle locker to the desired lt posion (5 selec-
on and posioned in the middle by default). Once achieving the desire angle, ghten the knobs unl snug. The helmet should sll swing
up, but it should not dri downward when in place for welding.
4. To adjust the distance between the user’s face and ADF, loosen the knobs on both sides of the helmet unl the headband can move
back and forth freely, reposion the headband at one of the 3 slots as desired (The headband is posioned in the middle by default).
This should be done one side at a me and both sides should be located at the same posion for proper auto-darkening lter operaon.
Self-check
Press the TEST Buon anywhere to see if it automacally switches to dark state and release it to check that the lter returns to the light state.
Shade Control
Select the shade 9 to 13 based upon the welding process you will use by consulng the “Shade Guide Table”. The welding helmet can also be used to protect
the face when grinding. Grind mode prevents lter lens from auto-darkening.
Arc Current (Amperes)
Welding
Process
SMAW
SMAW - COVERED ELECTRODES
MAG - METAL ARC WELDING
TIG-GAS TUNGSTEN ARC WELDING
MIG (HEAVY) - MIG WITH HEAVY METALS
MIG (LIGHT) - MIG WITH LIGHT ALLOYS
PAC - PLASMA JET CUTTING
PAW - MICROPLASMA ARC WELDING
MAG
TIG
MIG (HEAVY)
MIG (LIGHT)
PAC
PAW
NOTE
Descripon of main parts
1
234
5
611
79
810
10
Part # Descripon
1 Delay Control
Knob
2Sensivity
Control Knob
3LCD
4 Weld/Grind
Switch Knob
5 Self-test Buon
6Low Voltage
Indicator
7Shade Number
Control Knob
8Baery
compartment
9Solar Panel
10 Arc Sensors
11 UV/IR Filter

EN
WWW.BORMANNTOOLS.COM
4
Part # Descripon
1 Helmet Shell
2Front Cover Lens
3 Rubber Gasket
4ADF
5 Retaining Frame
6Headgear Height Adjusng Pin
7Headgear Diameter Adjusng Knob
8Headgear Angle& Distance Adjusng Knobs
Maintenance
Troubleshoong
Front Cover Lens Replacement
Replace the front cover lens if it is damaged (cracked, scratched, pied or dirty). Remove the old front cover lens by pressing two Lock Switches at the boom
of the Retaining Frame and pull the frame and ADF out. Take the old front cover lens out, and remove any protecve lm before installing the new one.
Inside Cover Lens Replacement
Replace the inside cover lens if it is damaged (cracked, scratched, pied or dirty). Place your nger or thumb into the recess and ex the inside cover lens up-
wards unl it releases from one edge. Then remove any protecve lm before installing the new one.
Baery Replacement
When low voltage indicator turns red, you have to change baeries. Replace baeries by removing ADF from the retaining frame. Slide cover plates on the
boom le and right,and replace the old baeries by CR2450 lithium baeries. Aer that, put on cover plates of baeries and install ADF back to frame.
Cleaning and Storing
Keep the sensors, solar cell and lter lens clean. Clean lter cartridge and helmet shell by using a soapy water soluon and so cloth. Do not use solvents or
abrasive cleaning detergent. Switch the product to Grind Mode and put it in a clean, dry locaon for storage.
Problem(s) Possible cause(s) Suggested soluon(s)
Dicult to see through lter Protecve lm on front/inside cover lens not
removed
Remove protecve lm
Front/inside cover lens dirty Clean or replace front/inside cover lens
Filter lens dirty Clean lter lens
Filter does not darken when arc is struck Grind Mode Selected Select Weld Mode and adjust Shade from 9 to 13
Sensors or Solar Panel blocked Make sure sensors or solar panel are exposed to
weld arc without blocking
Set Sensivity to LOW Adjust sensivity to required level
Low Voltage of lithium baery Replace with new lithium baery if indicator
turns red
Filter darkens without arc Set Sensivity to HIGH Adjust sensivity to required level
Filter remains dark aer welding Set Delay to MAX Adjust delay to required level

WWW.BORMANNTOOLS.COM
5
EL
ΠΡΟΕΙΔΟΠΟΙΗΣΗ: Διαβάστε και κατανοήστε όλες τις οδηγίες πριν από τη χρήση. Διατηρήστε το παρόν εγχειρίδιο για μελλοντική αναφορά.
Οδηγίες ασφαλείας
- Πριν από τη εργασία συγκόλλησης, επιθεωρείτε πάντα την μάσκα και το φίλτρο αυτόματης συσκότισης (ADF) για να βεβαιωθείτε ότι είναι σωστά τοποθε-
τημένα και σε καλή κατάσταση.
- Διατηρείτε τους αισθητήρες, την ηλιακή κυψέλη και το φακό του φίλτρου καθαρά. Καθαρίζετε το φίλτρο χρησιμοποιώντας διάλυμα σαπουνόνερου και
μαλακό πανί. Μην χρησιμοποιείτε διαλύτες ή διαβρωτικά καθαριστικά.
- Μην κάνετε συγκόλληση σε σημεία που βρίσκονται σε μεγαλύτερο ύψος από το κεφάλι σας ενώ χρησιμοποιείτε αυτό την μάσκα.
- Επιθεωρείτε συχνά την επιφάνεια του φίλτρου και αντικαταστήστε το αμέσως αν παρατηρήσετε γρατσουνιές, ραγίσματα ή άλλες ενδείξεις φθοράς με ένα
νέο.
- Φοράτε πάντα γυαλιά προστασίας κάτω από την μάσκα συγκόλλησης και ρουχισμό ατομικής προστασίας για να προστατεύετε το δέρμα σας από την
ακτινοβολία και τα εγκαύματα.
Οι ακτίνες ARC μπορούν να προκαλέσουν τραυματισμό στα μάτια και
να εγκαύματα στο δέρμα σας.
Τεχνικά χαρακτηριστικά
Μοντέλο: BIW2020 BIW2030
Οπτικό πεδίο 98×62mm 98x88mm
Ηλιακές κυψέλες 4 4
Προστασία UV/IR DIN 16 DIN 16
Σκίαση αναμονής DIN 4 DIN 4
Σκίαση λειτουργίας DIN 9-13 DIN 9-13
Ρύθμιση ευαισθησίας Χαμηλή — Υψηλή μέσω επιλογέα Χαμηλή — Υψηλή μέσω επιλογέα
Χρόνος συσκότισης 1/30,000s 1/30,000s
Ρύθμιση χρονοκαθυστέρησης 0.1-1.0S μέσω επιλογέα 0.1-1.0S μέσω επιλογέα
Πηγή ενέργειας Ηλιακή κυψέλη, 2×CR2450 (μη-επαναφορτιζόμε-
νες) μπαταρίες λιθίου* (δεν περιλαμβάνονται σε
όλα τα μοντέλα)
Ηλιακή κυψέλη, 2×CR2450 (μη-επαναφορτιζόμενες) μπαταρίες
λιθίου* (δεν περιλαμβάνονται σε όλα τα μοντέλα)
*Ο κατασκευαστής διατηρεί το δικαίωμα να πραγματοποιήσει δευτερεύουσες αλλαγές στο σχεδιασμό του προϊόντος και στα τεχνικά χαρακτηριστικά χωρίς προηγούμενη ειδοποίηση, εκτός εάν οι αλλαγές
αυτές επηρεάζουν σημαντικά την απόδοση και λειτουργία ασφάλειας των προϊόντων. Τα εξαρτήματα που περιγράφονται / απεικονίζονται στις σελίδες του εγχειριδίου που κρατάτε στα χέρια σας ενδέχεται
να αφορούν και σε άλλα μοντέλα της σειράς προϊόντων του κατασκευαστή, με παρόμοια χαρακτηριστικά, και ενδέχεται να μην περιλαμβάνονται στο προϊόν που μόλις αποκτήσατε.
* Λάβετε υπόψη ότι ο εξοπλισμός μας δεν έχει σχεδιαστεί για χρήση σε εμπορικές, επαγγελματικές ή βιομηχανικές εφαρμογές. Η εγγύησή μας θα ακυρωθεί αν το προϊόν χρησιμοποιείται σε εμπορικές, επαγ-
γελματικές ή βιομηχανικές επιχειρήσεις ή για ανάλογους σκοπούς.
* Για να διασφαλιστεί η ασφάλεια και η αξιοπιστία του προϊόντος καθώς και η ισχύς της εγγύησης όλες οι εργασίες επιδιόρθωσης, ελέγχου, επισκευής ή αντικατάστασης συμπεριλαμβανομένης της συντήρη-
σης και των ειδικών ρυθμίσεων, πρέπει να εκτελούνται μόνο από τεχνικούς του εξουσιοδοτημένου τμήματος Service του κατασκευαστή.
This manual suits for next models
2
Table of contents
Languages:
Other BorMann Welding Accessories manuals