manuals.online logo
Brands
  1. Home
  2. •
  3. Brands
  4. •
  5. BOSSCO
  6. •
  7. Recording Equipment
  8. •
  9. BOSSCO BR-80 Instruction manual

BOSSCO BR-80 Instruction manual

1
Workshop
MICRO BR® BR-80 Digital Recorder
Using the BR-80 as an Audio Interface
© 2011 BOSS Corporation U.S.
All rights reserved. No part of this publication may be reproduced in any form without the written permission of Roland Corporation U.S.
Windows 7™, Windows XP™, and Windows Vista™ are trademarks of Microsoft Corporation. Mac, OS X, and GarageBand™ are trademarks of Apple Inc. SONAR X1 LE and SONAR X1 Essential , SONAR X1 Studio, and SONAR
X1 Producer are Cakewalk by Roland® products. Ableton Live ™ is a trademark of Ableton AG. Microsoft Corporation, Apple Inc., and Ableton AG are not associated or aliated with Roland in any manner.
BR80WS05
2
About the BOSS BR-80 Workshop Booklets
The BOSS MICRO BR® BR-80 is an awesome portable tool for any songwriter
or musician, especially if you’re a guitarist. Packed into its convenient,
pocket-sized body are three incredibly useful tools: a stereo recorder for
capturing ideas and live sounds using the high-quality built-in mics, an
eight-track multitrack recorder for developing your songs, and an irresistibly
fun eBand jamming system. The MICRO® BR BR-80 also contains a library of
acclaimed BOSS COSM® amps and effects, as well as tons of rhythms you can
use in your songs. If you’re a computer user, the MICRO BR® BR-80 can serve
as an effect-packed USB audio interface for your recording software, and it
comes with a copy of SONAR X1 LE for Windows.
Each MICRO BR® BR-80 Workshop booklet focuses on one MICRO BR® BR-80
topic, and is intended as a companion to the MICRO BR® BR-80 Owner’s
Manual.
About This Booklet
You can use the BR-80 as an audio interface that brings mic and instrument
sounds into your computer for recording, and its onboard BOSS effects
allow you to get them sounding great before they even get there. Being so
compact, it makes a perfect companion for a laptop-based recording system
on-the-go. This booklet explains how to use the BR-80 as an audio interface.
Understanding the Symbols in This Booklet
Throughout this booklet, you’ll come across information that deserves
special attention—that’s the reason it’s labeled with one of the following
symbols.
A note is something that adds information about the topic at hand.
A tip offers suggestions for using the feature being discussed.
Warnings contain important information that can help you avoid
possible damage to your equipment, your data, or yourself.
The BR-80 and DAWs
The BR-80 as Your Audio Interface
Live audio...
U
S
B
...is recorded in the DAW. Hear the DAW’s audio output...
U
S
B
...through the BR-80.
One of the most important pieces of equipment you need to purchase when
setting up a DAW system is a device to which you can connect your mics and
instruments in order to get their sounds into your computer. Likewise, the
device provides a way to properly listen to your DAW’s audio outputs. This
device is your “audio interface.” The BR-80 can be the 44.1 kHz, 16-bit audio
interface for your DAW.
We’ll explain how to use the BR-80 with Cakewalk by Roland’s SONAR X1 LE,
Apple’s GarageBand, and Ableton Live.
The BR-80 comes with a copy of SONAR X1 LE for Windows on the
enclosed DVD. Install SONAR X1 LE according to the instructions
provided on its disc.
We’ll assume you know how to use your computer. If you need help,
please consult its documentation.
3
If you need to change the setting from AUDIO to STORAGE, a dialog
appears—press ENTER, restart your BR-80, and skip to Step 8 below.
7 If USB Mode’s already set to STORAGE, press EXIT three times.
8 Connect the mini-B end of the USB
cable to the BR-80’s left side panel’s
USB jack, and the other end to an
unused USB port on your computer.
When you connect the BR-80 to your
computer via USB, you’ll typically get the
best results using USB jacks on the back
of a desktop computer or on the side of
a laptop. We recommend not using a hub.
The BR-80’s display shows “ACCESSING...” and then “IDLING...” as it
handshakes with the computer, and then waits for you.
The BR-80’s SD card appears as a removable drive on your computer.
If you’re on a Mac, it’ll be on your desktop. If you’re using Windows,
it’ll appear as one of your computer’s drives.
BR-80
EBAND BR-80 EBAND (E:)
In OSX: In Windows:
On Windows, you’ll need to wait a few moments as Windows installs
the necessary drivers for the BR-80 to become available.
A mini-B
An Audio Interface Plus Effects
An added bonus with the BR-80 is its BOSS effect processor. You can record
your mics and instruments in your DAW without effects, or “dry,” or you can
take advantage of the BR-80’s effects, easily adding them to your sounds on
the way in to the computer. We’ll discuss how to do this later.
Connecting the BR-80 to Your Computer
We’ll start by connecting the BR-80 to the computer so it can get to the
driver software on the BR-80’s factory SD card.
If you prefer to download the latest software, you can connect the
BR-80 to your computer later. We’ll tell you where to find it later on.
The BR-80 ships with the USB A/mini-B cable you’ll need for connecting
it to your computer.
1 Turn on your BR-80.
2 Press the MENU button to display the Menu screen.
3 Highlight FUNCTION.
4 Press ENTER, and then highlight USB.
We’re showing MTR mode’s
Menu > Function screen here,
but you’ll find a similar screen
in all of the BR-80’s modes.
5 Press ENTER.
6 If USB isn’t set to STORAGE, turn the Value dial so it is.
4
Installing the BR-80 Drivers
Installing the BR-80 Drivers in Windows 7
If you’re installing the drivers for Windows XP or Vista, please see the
instructions accompanying the installer files.
Throughout the installation process, Windows 7 may ask you to allow
the installer to change your computer. Click Yes to continue.
1 Power up your PC with all USB cables disconnected except for your
keyboard and mouse. If any applications are running, quit them.
2 You can install the drivers using the
• installer you copied from the BR-80’s SD card, or
• the latest installer on the RolandUS website—by downloading the
MICRO BR® BR-80 Driver for Windows 7/Vista/XP file here.
When you download the installer, save it to your desktop without
opening it. Then, right-click the downloaded file and select Extract
All..., choosing the Desktop as the extraction destination. You’ll find
the installer file in the resulting folder.
3 Double-click the installer Setup file to display the following window:
Copying the BR-80 Driver Software to Your Computer
1 Double-click the BR-80 removable drive on your computer to reveal
its Win folder (Windows) or Drivers folder (Mac).
2 If you’re using
• OS X—Double-click the Drivers folder and drag the BR80_
USBDriver.mpkg file to your desktop to copy it to your computer.
• Windows—Drag the Win file to your desktop. Then, right-click
the file and select Extract All..., choosing the Desktop as the
destination. Inside the extracted Drivers folder, there’s a folder
containing the installer for the version of Windows you’re using.
3 Unmount the BR-80 from your computer as you would any other
removable drive.
Configuring the BR-80 for Audio Interface Use
1 Without turning off the BR-80, disconnect it from your computer.
2 Press the BR-80’s MENU button to display the Menu screen.
3 Highlight FUNCTION, press ENTER.
4 Highlight USB, and then press ENTER.
5 If USB isn’t set to AUDIO, turn the Value dial so it is.
6 If you need to change the setting, a dialog appears—press ENTER
twice, and then restart your BR-80.
7 Switch to MTR mode if you’re not already there, and then turn off
the BR-80.
You don’t need to re-connect the BR-80 to your computer yet—we’ll let
you know when it’s time to do that.
5
Once you do these things, Windows finishes installing the BR-80
drivers.
8 Click the Close button.
9 Skip now to “Configuring the BR-80 for Audio Interface Use” on page 6.
Installing the BR-80 Drivers in OS X
1 Begin by
• locating the BR-80 driver software—you copied from the BR-80’s
SD card, or
• downloading the approporiate MICRO BR® BR-80 driver software
for the version of Mac OS X you’re using—from here. If you’re
using OS X 10.7 (Lion), click MICRO BR® BR-80 USB Driver Mac
OS 10.7 v1.0.0. If you’re using Mac OS X 10.6, 10.5, or 10.4, click
MICRO BR® BR-80 USB Driver Mac OS 10.6/10.5/10.4. Once
you’ve downloaded the necessary file to your Downloads folder,
double click its folder to reveal the installer file.
2 When the installer launches, the computer may display a message
about verifying that your computer can use the BR-80 driver. If you
see this message, click Continue to display the installer’s Introduction
screen that lets you confirm you have the correct installer for your
version of OS X.
3 Click Install to view the Installation Type screen.
4 Click Next to display the installation start window:
5 Click Next—Windows 7 begin to install the driver, and asks if you
wish to complete the process.
6 Checkmark Always trust software from “Roland Corporation”, and
then click Install to proceed.
7 Windows 7 presents a window instructing you to
• make sure the BR-80 is turned off—and then
• connect the BR-80 via USB to your computer—as we described on
page 3, and then
• turn on the BR-80.
6
Using the BR-80’s Inputs
Controlling the BR-80 Inputs
The BR-80 uses a clever scheme for figuring out the input you want to use.
Here’s how it works. To record using
• the built-in mics—make sure nothing’s plugged into the GUITAR/MIC
LINE jack or the LINE IN jack.
• an electric guitar or bass, or external mic—connect your instrument or
mic to the GUITAR/MIC LINE jack and make sure nothing’s connected
to the LINE IN jack.
• the LINE IN jack—connect your external device to the LINE IN jack. If you
want to record its signal
• alone—turn the turn the BR-80’s REC LEVEL wheel all the way
down, and adjust the connected device’s level from its own
output controls.
• mixed with the internal mics’ or GUITAR/MIC IN jack’s signal—use
the REC LEVEL wheel to set the balance between it and the LINE
IN signal.
To connect the outputs of a stereo instrument to the LINE IN jack, use
a dual-1/4”-to-stereo 1/8” (mini) adapter.
4 Click Install—the installer asks for your admin login and password.
5 Enter your admin login and password, and click OK—the software
is installed, and the installer tells you you need to restart your Mac.
6 Click Restart.
If your Mac displays a message about reboot caches, click OK.
8 Once your Mac has restarted, you can re-connect the BR-80 to your
computer, and then power up the BR-80.
7
The BR-80 and SONAR X1 LE
Setting Up SONAR X1 LE
Your BR-80 ships with SONAR X1 LE, so we’ll show you how to set
it up for use with the BR-80. If you own another version of SONAR
X1—Essential, Studio, or Producer—you can follow the same setup
instructions for using your SONAR X1 version with the BR-80.
Selecting the BR-80 as SONAR X1 LE’s Audio Interface
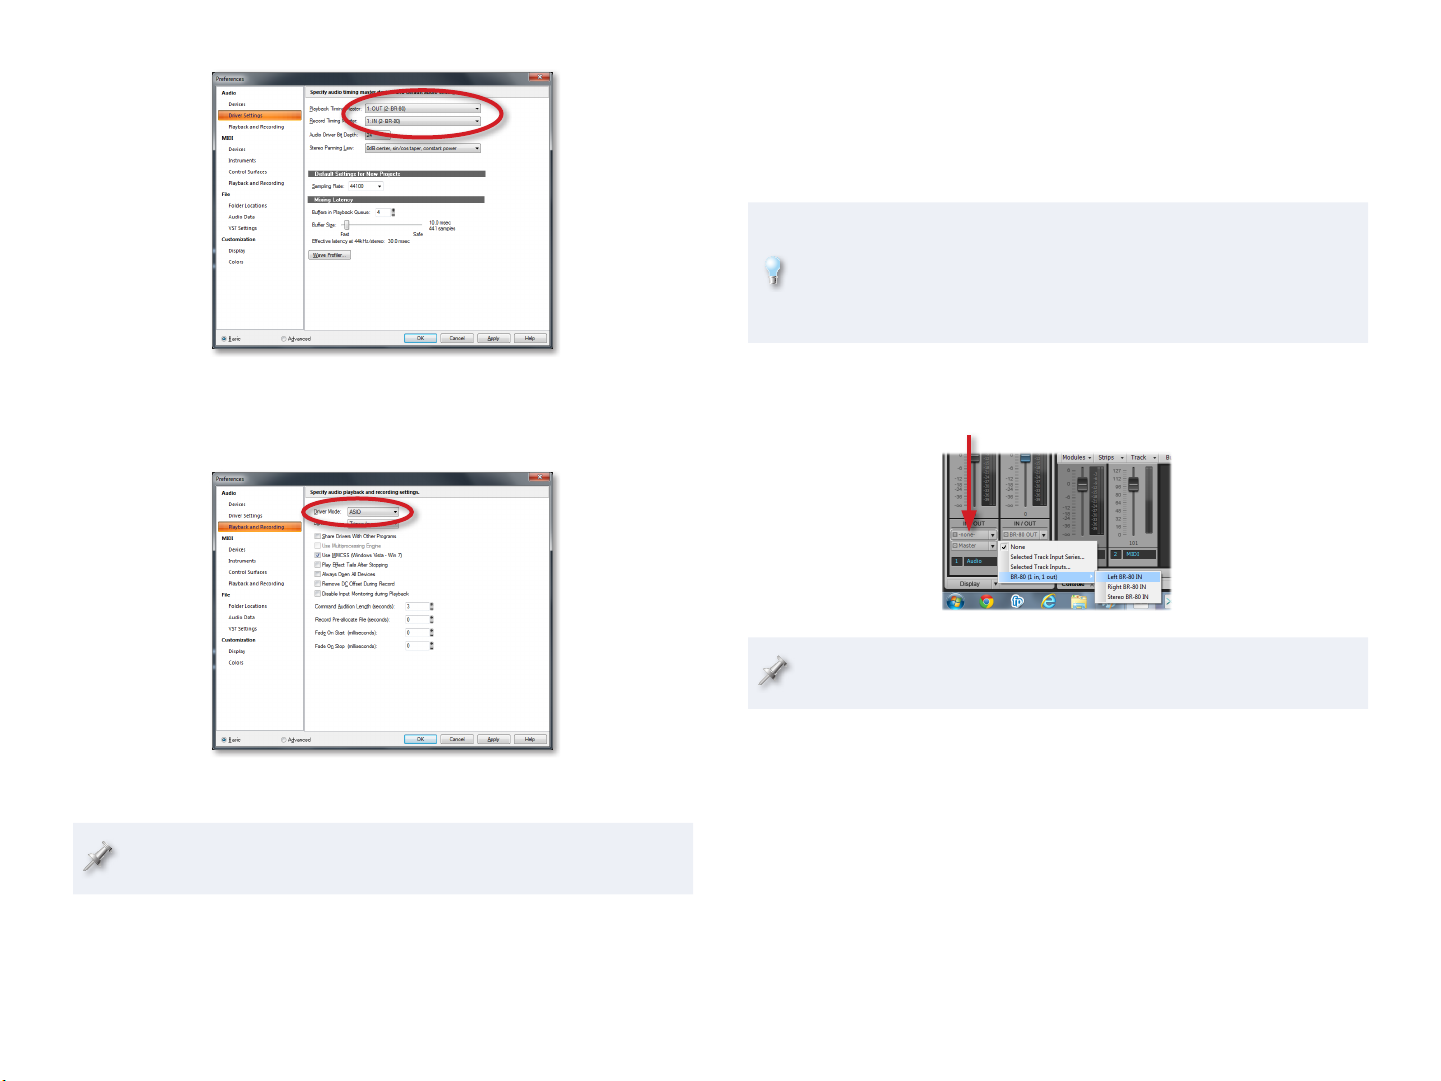
1 From SONAR X1 LE’s Edit menu, select Preferences... .
2 Click the Basic button in the lower left of the Preferences window.
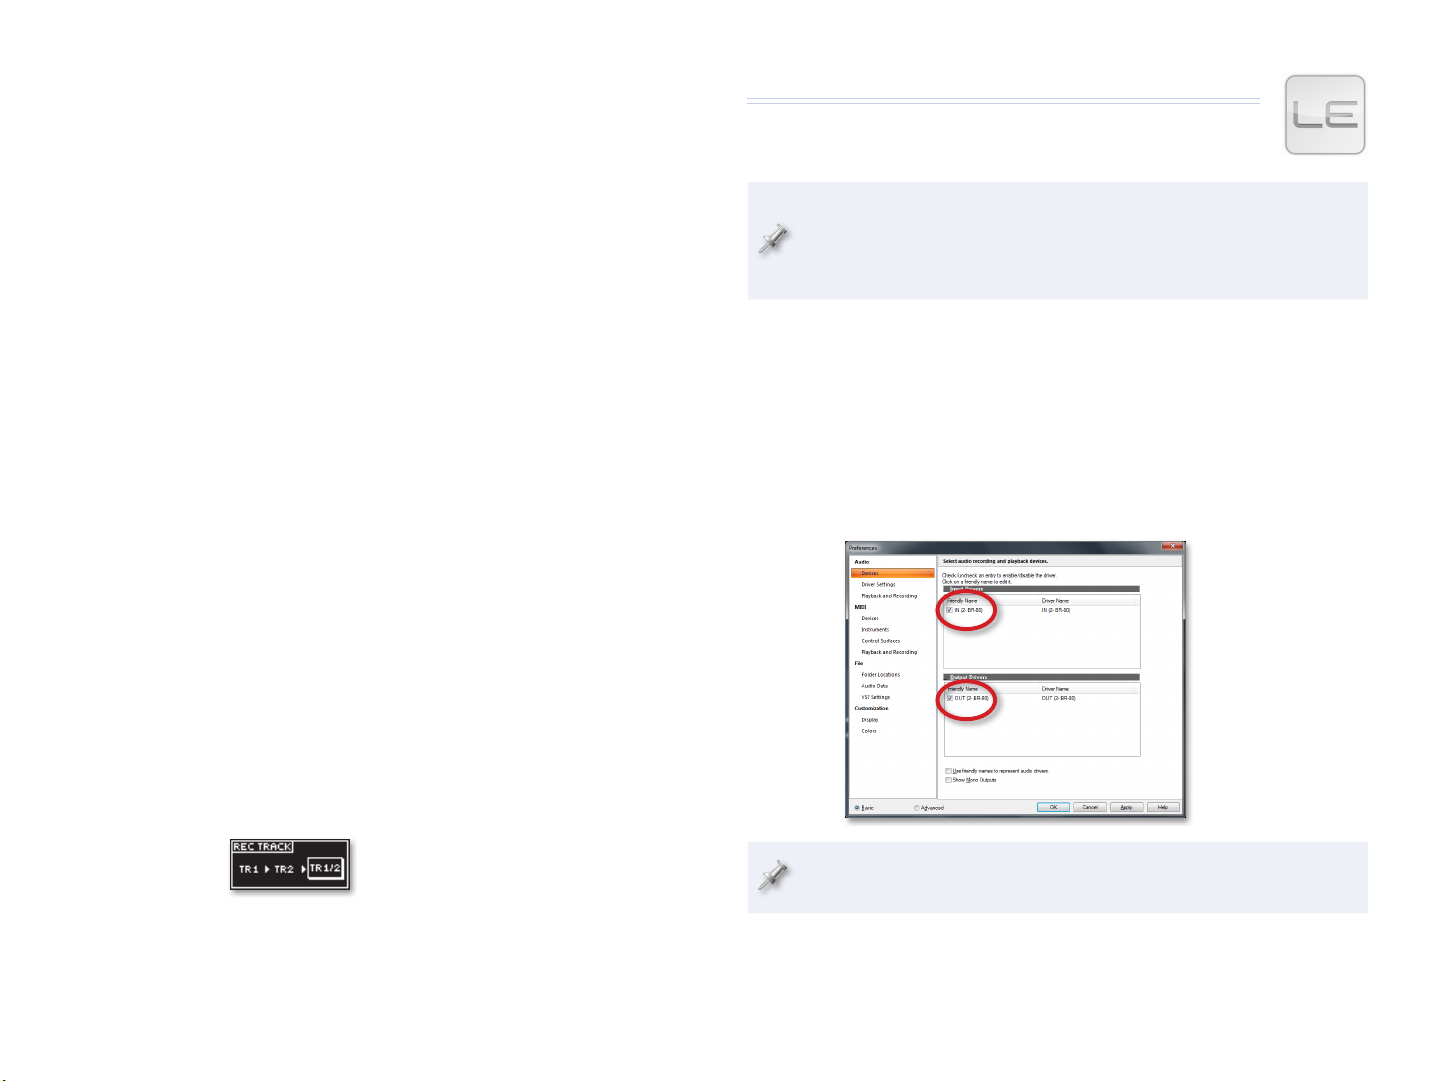
3 Click Devices in the Audio section at the left of the screen if it’s not
already highlighted.
4 Un-check all of the available Input Driver and Output Driver
checkboxes except for IN (2- BR-80) and OUT (2- BR-80).
If you don’t see the
BR-80 on this screen,
jump to Step 8, and
then come back
here.
At some point in the setup process, Windows may automatically check
the audio interface’s specs.
5 Click Apply.
6 Click Driver Settings, and then set Playback Timing Master to 1: OUT
(2: BR-80) and Record Timing Master to 1: IN (2: BR-80).
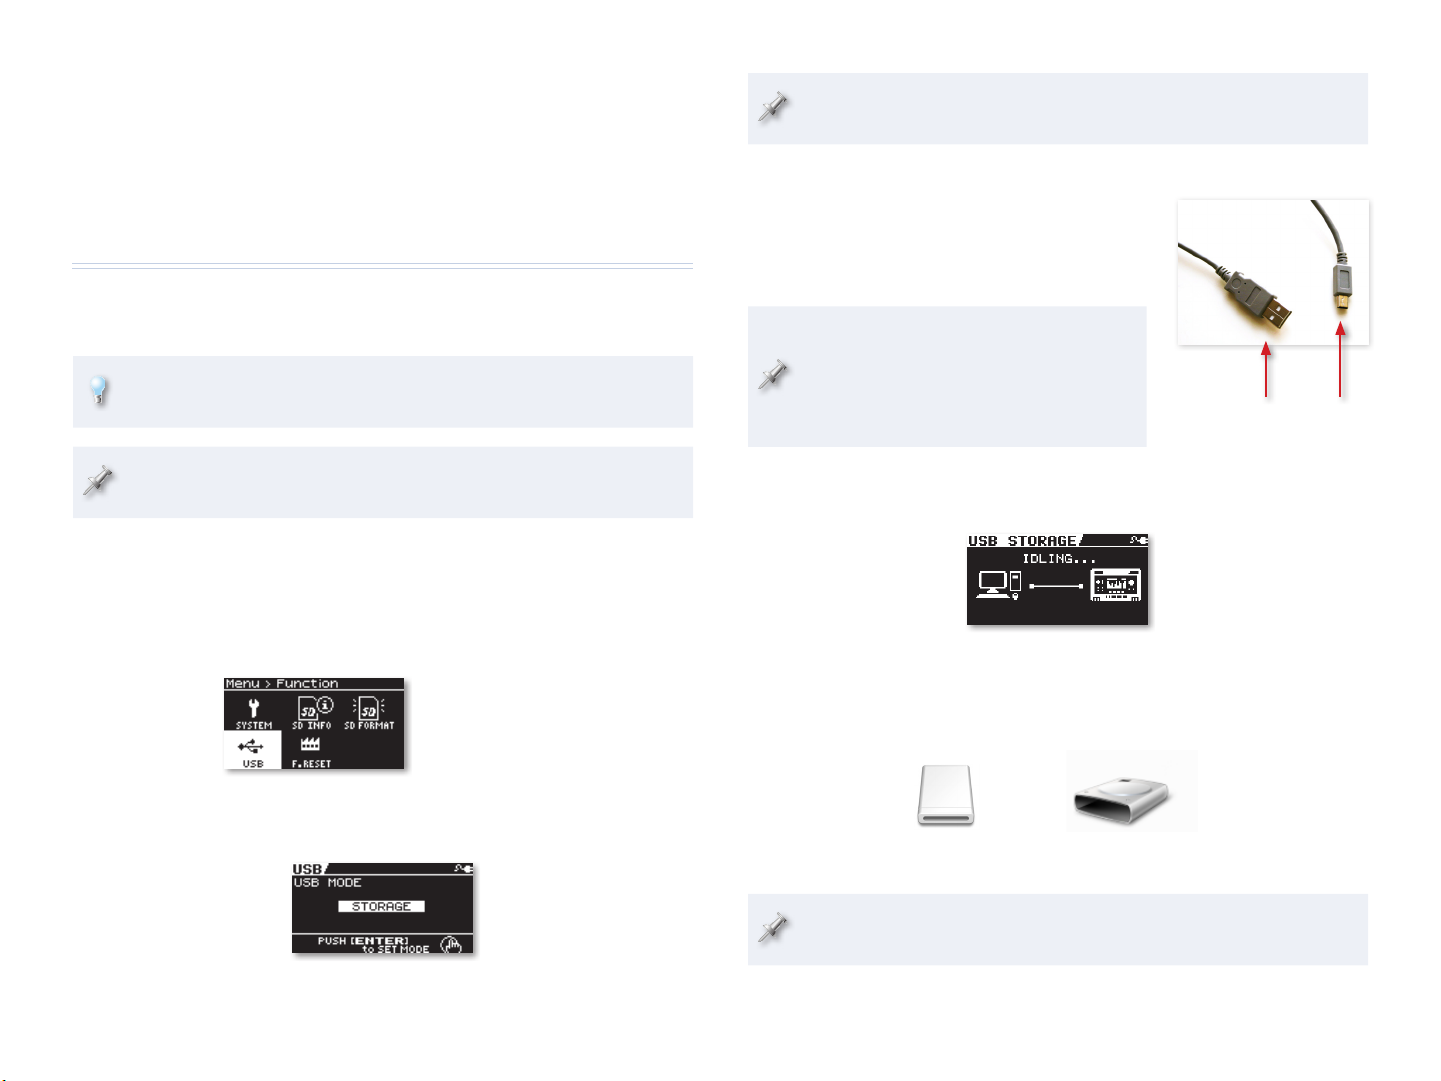
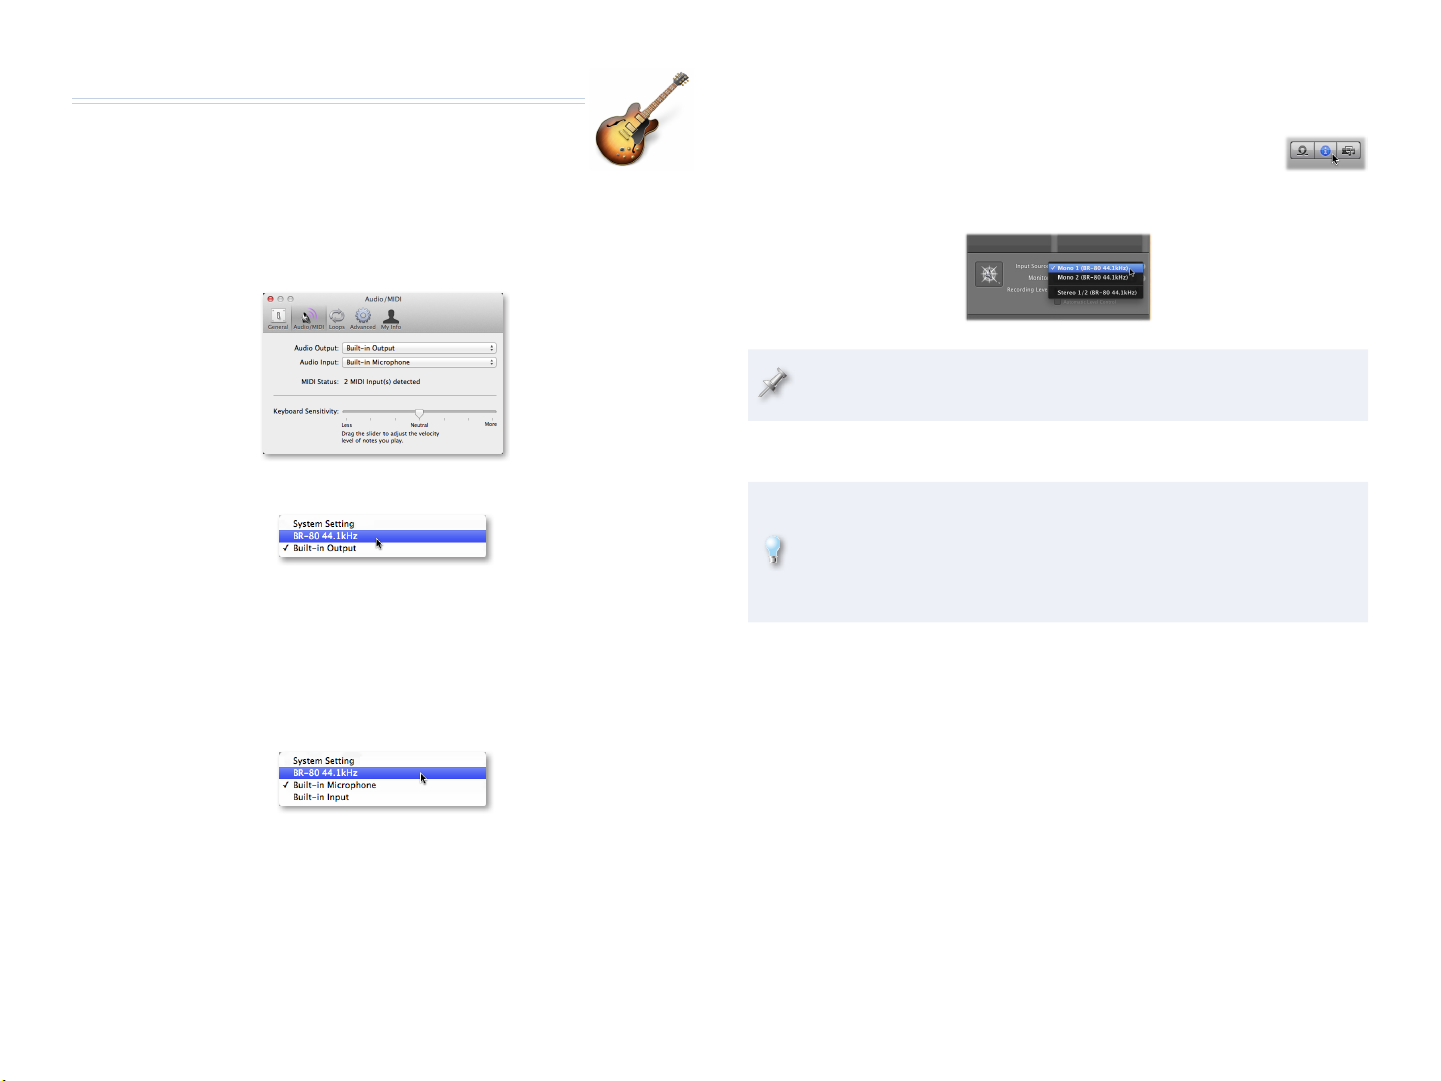
Selecting the Desired BR-80 Output in the DAW
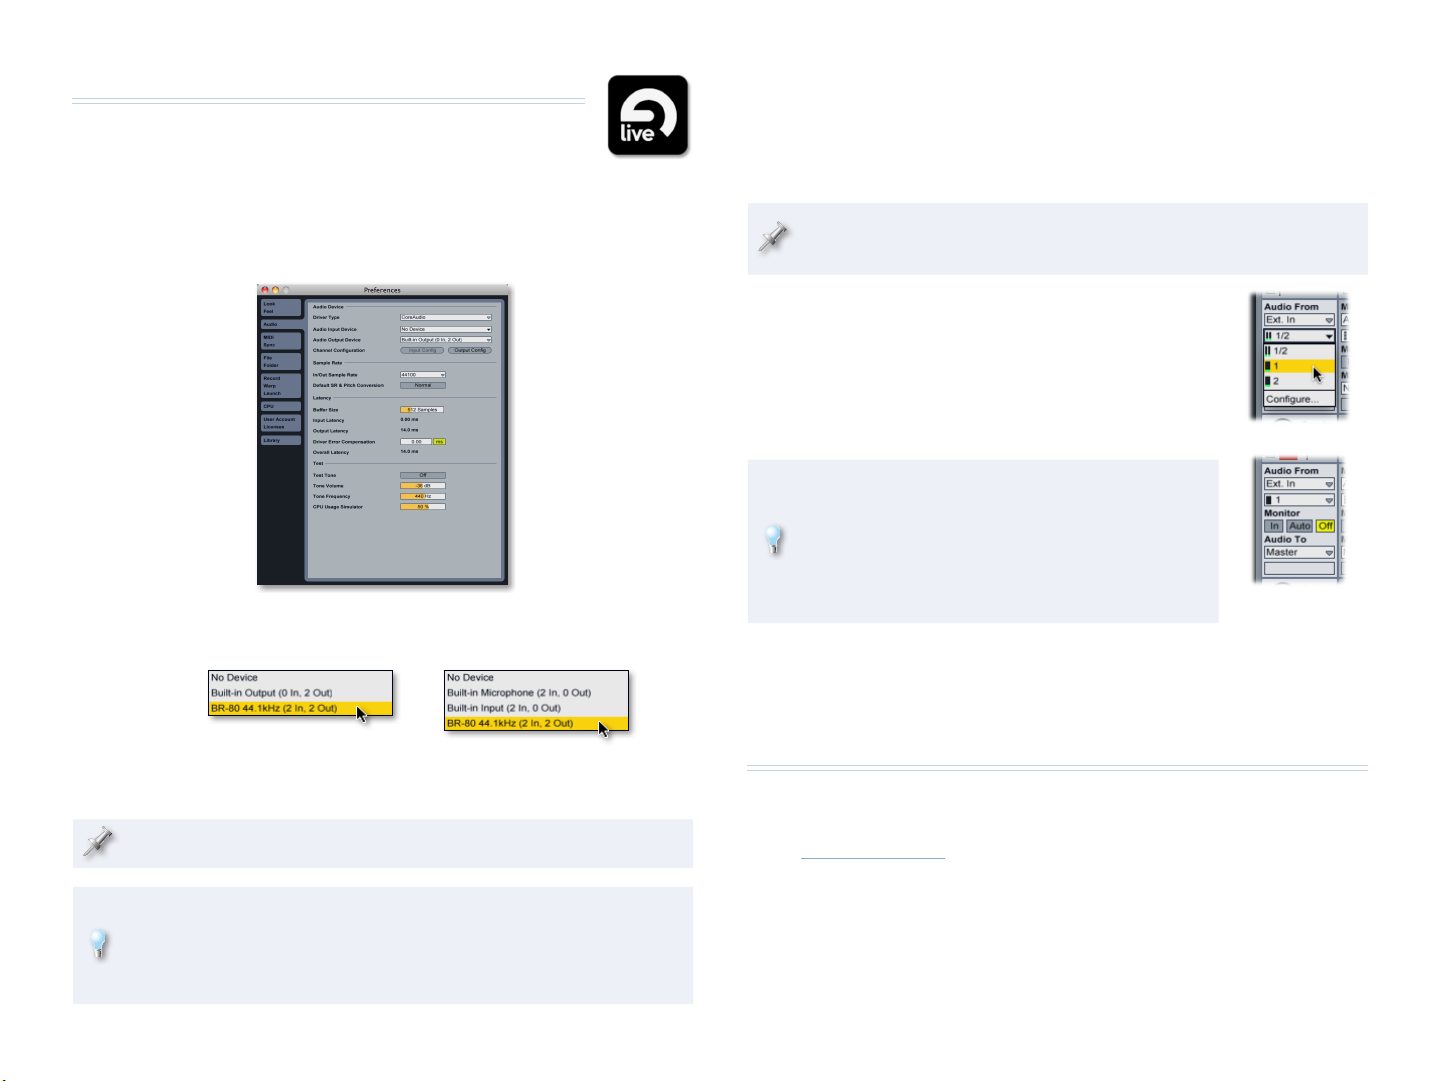
Within the DAW, you can choose to record
• Mono 1 or Mono 2 (BR-80 44.1kHz)—the left and right sides of the BR-80’s
stereo output. Use either of these to record a mono instrument or vocal
from the BR-80’s GUITAR/MIC IN jack.
• Stereo 1/2 (BR-80 44.1kHz)—the entire stereo output of the BR-80. Use
this when you want to record
• the BR-80’s built-in mics
• a stereo signal from the BR-80’s LINE IN jack—such as a stereo
synthesizer or beat box, a personal music player, or a turntable
• a mix of already-recorded BR-80 tracks
• a LIVE REC or eBand recording.
Adding BR-80 Effects to Your Sounds
You can use the BR-80’s COSM effect on any sound you want to record by
inserting an effect on its input, just as you would with a sound you were
going to record on the BR-80 itself: Press the COSM button and choose or set
up the desired effect. The BR-80 can produce both mono and stereo effects.
(To turn off effects, press the COSM button again.)
About Using the BR-80’s Stereo Output
To enable the BR-80’s stereo output to your DAW, select Stereo 1/2 (BR-80
44.1kHz) in your DAW, and then set up the BR-80 as if you were about to
record a stereo track on the BR-80 itself, as follows.
1 Switch to MTR mode if you’re not already there.
2 On the MTR home screen, press TR1/2 and select TR 1/2.
You can actually use any
tracks for activating the
BR-80’s stereo output: TR
3/4, TR 5/6, or TR 7/8.
8
Using SONAR X1 LE with the BR-80
Selecting a BR-80 Input for Recording on a Track
1 In SONAR X1 LE, create an audio track or select one that’s not in use.
Depending on the speed of your computer, you may hear a lag, or
“latency,” between the sound of your instrument or vocal in the BR-80
and then in SONAR X1 LE. To avoid latency as you record, you can turn
off the Input Echo button. (If you want to hear SONAR X1 LE’s effects
on your signal as you record, leave it turned on.)
2 Click the Input popup and select the desired BR-80 left, right, or
stereo input signal.
Input popup menu
If you want to record the BR-80’s stereo output, be sure to enable it
as described in “About Using the BR-80’s Stereo Output” on page 7.
Control your recording level in SONAR X1 LE using the BR-80’s REC
LEVEL wheel, or a connected line-in device’s own controls.
7 Click Apply.
8 Click Playback and Recording at the left of the window and make sure
ASIO from the Driver Mode popup is selected:
9 Click Apply.
If you didn’t see the BR-80 in the Devices pane earlier, click Devices
now, and make sure only IN (2: BR-80) and OUT (2: BR-80) are checked.
10 Click Close.
You can now listen to SONAR X1 LE through the BR-80, and record
from its inputs.
9
Selecting a BR-80 Input for Recording on a Track
1 Create a new Real Instrument track in GarageBand.
2 If the Track Info pane isn’t visible, click the Info
button to open it.
3 From the Input Source popup menu, select the desired BR-80 input.
If you want to record the BR-80’s stereo output, be sure to enable it
as described in “About Using the BR-80’s Stereo Output” on page 7.
4 Set Monitoring as desired.
Depending on the speed of your computer, you may hear a lag, or
“latency,” between the sound of your instrument or vocal in the BR-80
and then in GarageBand. To avoid latency as you record, you can set
Monitoring to Off. (If you want to hear GarageBand’s effects on your
signal as you record, turn Monitoring on.)
Control your recording level in GarageBand using the BR-80’s REC
LEVEL wheel, or a connected line-in device’s own controls.
The BR-80 and GarageBand
Setting Up
GarageBand
Selecting the BR-80 as GarageBand’s Audio Interface
1 In GarageBand, select Preferences... from the GarageBand menu.
2 Click the Audio/MIDI tab.
3 From the Audio Output popup menu, select BR-80 44.1kHz.
4 When GarageBand asks if you’re sure you want to change audio
drivers, click Yes.
You’ll now hear GarageBand through headphones or earbuds you’ve
connected to the BR-80’s PHONES/LINE OUT jack.
5 From the Audio Input popup menu, select BR-80 44.1kHz, and when
GarageBand asks again about changing audio drivers, click Yes.
GarageBand can now use the BR-80’s audio inputs for recording.
6 Close the Preferences window.
10
Selecting a BR-80 Input for Recording on a Track
1 Create a new audio track or select an unused one.
By default, a new audio track is set to Ext. In and Inputs 1/2, which are
the BR-80’s stereo output. If this is what you want, you’re good to go.
If you want to record the BR-80’s stereo output, be sure to enable it
as described in “About Using the BR-80’s Stereo Output” on page 7.
2 To record the mono sound from an instrument
or mic connected to the GUITAR/MIC IN jack,
select either 1 or 2, the left or right BR-80
output. (It doesn’t matter which one you
choose.)
3 Set the track’s Monitor popup as desired.
Depending on the speed of your computer, you
may hear a lag, or “latency,” between the sound
of your instrument or vocal in the BR-80 and then
in Live. To avoid latency as you record, you can set
Monitor to Off. (If you want to hear Live’s effects
on your signal as you record, turn Monitoring on.)
Control your recording level in Live using the
BR-80’s REC LEVEL wheel, or a connected line-
in device’s own controls.
The End
We hope you’ve found this workshop helpful. Keep an eye out for other
MICRO BR® BR-80 Workshop booklets available for downloading at
www.Rolandus.com.
This is what your track
will look like after
selecting a mono BR-80
output and turning off
Monitor.
The BR-80 and Live
Setting Up
Live
Selecting the BR-80 as Your Audio Interface
1 From the Live menu, select Preferences... and click Audio along the
left edge of the Preferences window to open the Audio tab.
2 From the Audio Input Device and Output Device popup menus,
select BR-80 44.1kHz (2 In, 2 Out).
You can now listen to Live through the BR-80, and record from its
inputs.
Live’s sample rate is set by the BR-80.
Live has an easy-to-use system for setting the optimal buffer size, a
key element in smooth audio-recording operations. To learn about it,
see “Learn how to set up your audio hardware” in the Setup section of
Live’s built-in Help pane.

Other manuals for BR-80

7

Other BOSSCO Recording Equipment manuals

BOSSCO DUAL DIGITAL DELAY SDE-3000D User manual

BOSSCO

BOSSCO DUAL DIGITAL DELAY SDE-3000D User manual

BOSSCO BR-900CD User manual

BOSSCO

BOSSCO BR-900CD User manual

BOSSCO ME-50B User manual

BOSSCO

BOSSCO ME-50B User manual

BOSSCO Chorus Ensemble CE-20 User manual

BOSSCO

BOSSCO Chorus Ensemble CE-20 User manual

BOSSCO GT-5 User manual

BOSSCO

BOSSCO GT-5 User manual

BOSSCO EQ-20 Advanced EQ User manual

BOSSCO

BOSSCO EQ-20 Advanced EQ User manual

BOSSCO BR-1600CD User manual

BOSSCO

BOSSCO BR-1600CD User manual

BOSSCO DD-500 User manual

BOSSCO

BOSSCO DD-500 User manual

BOSSCO ME-25 User manual

BOSSCO

BOSSCO ME-25 User manual

BOSSCO GS-10 User manual

BOSSCO

BOSSCO GS-10 User manual

BOSSCO PRO SE-70 User manual

BOSSCO

BOSSCO PRO SE-70 User manual

BOSSCO BR-600 User manual

BOSSCO

BOSSCO BR-600 User manual

BOSSCO RV-100 User manual

BOSSCO

BOSSCO RV-100 User manual

BOSSCO AB-2 User manual

BOSSCO

BOSSCO AB-2 User manual

BOSSCO BR-8 User manual

BOSSCO

BOSSCO BR-8 User manual

BOSSCO MICRO BR User manual

BOSSCO

BOSSCO MICRO BR User manual

BOSSCO ME-20B User manual

BOSSCO

BOSSCO ME-20B User manual

BOSSCO RSD-10 User manual

BOSSCO

BOSSCO RSD-10 User manual

BOSSCO ME-20 User manual

BOSSCO

BOSSCO ME-20 User manual

BOSSCO ME-50 User manual

BOSSCO

BOSSCO ME-50 User manual

BOSSCO BR-864 User manual

BOSSCO

BOSSCO BR-864 User manual

BOSSCO RC-500 User manual

BOSSCO

BOSSCO RC-500 User manual

BOSSCO BR-80 Instruction manual

BOSSCO

BOSSCO BR-80 Instruction manual

BOSSCO LS-2 User manual

BOSSCO

BOSSCO LS-2 User manual

Popular Recording Equipment manuals by other brands

Yamaha MU80 Sound list

Yamaha

Yamaha MU80 Sound list

Yamaha TNR-W manual 

Yamaha

Yamaha TNR-W manual 

ESD CAN-PCI/405 Hardware manual

ESD

ESD CAN-PCI/405 Hardware manual

Akai Professional MPC 1000 Specifications

Akai

Akai Professional MPC 1000 Specifications

Siemens SIMATIC RTLS4040T operating instructions

Siemens

Siemens SIMATIC RTLS4040T operating instructions

Renkus-Heinz X1 Operation manual

Renkus-Heinz

Renkus-Heinz X1 Operation manual

Olimpia splendid B1014 Installation and maintenance  instruction

Olimpia splendid

Olimpia splendid B1014 Installation and maintenance instruction

Vimar 01515.1 manual

Vimar

Vimar 01515.1 manual

Siemens RNI installation instructions

Siemens

Siemens RNI installation instructions

Honeywell SYSNet QS7700A Product data

Honeywell

Honeywell SYSNet QS7700A Product data

elysia nvelope 500 manual

elysia

elysia nvelope 500 manual

Radio Shack 43-2208 owner's manual

Radio Shack

Radio Shack 43-2208 owner's manual

Disaster Area Designs NNB user manual

Disaster Area Designs

Disaster Area Designs NNB user manual

Fryette Power Load PL-IR owner's manual

Fryette

Fryette Power Load PL-IR owner's manual

Unika PRO Series user manual

Unika

Unika PRO Series user manual

Burkert 2510 operating instructions

Burkert

Burkert 2510 operating instructions

Cebora 448.00 instruction manual

Cebora

Cebora 448.00 instruction manual

Custom Audio Electronics RS-10 operating guide

Custom Audio Electronics

Custom Audio Electronics RS-10 operating guide

manuals.online logo
manuals.online logoBrands
  • About & Mission
  • Contact us
  • Privacy Policy
  • Terms and Conditions

Copyright 2025 Manuals.Online. All Rights Reserved.