BougeRV ISE108-B037 User manual

INSTRUCTIONS
MANUAL
For 120W solar panel kit
www.bougerv.com
WARRANTY CERTIFICATES
BougeRV 120W Solar Panel Kit comes with an 18-month
warranty that commences from the date of purchase. If
you have any questions during use, please feel free to
contact us at
service@bougerv.com
1-669-232-7427
www.bougerv.com
Message through “Ask a question” in BougeRV Amazon shop.
(Leave us voice messasges)
Thank you for choosing BougeRV 120W Solar Panel KIT.
Please read and understand the installation manual
before installing BougeRV 120W Solar Panel Kit. With
proper operation and maintenance, KIT will provide
you with clean, renewable solar electricity for many
years. This manual contains important installation,
maintenance and safety information. Retain this
manual for future reference.
IMPORTANT!
1

IMPORTANT!
1.1 Disclaimer of Liability
1.2 Limited Warranty
3.1 Package Contents
3.2 Solar Panel Kit Pecification
3.3 Solar Panel Electrical parameters
4.1 Series Connection
4.2 Parallel Connection
5.1 Installation Overview
5.2 Module Handling
5.3 Mounting
1-Introduction 3
1
3
3
3
4
4
5
4
5
5
5
6
6
6
6
8
9
2-Safety Precautions
3-120W Solar Panel Kit Details
4-Electrical Connections
5-Installation
7-Frequently Asked Questions
Warranty Certificates 1
6-Maintenance and Cleaning
2

3
1INTRODUCTION
1.1 Disclaimer of Liability
The installation techniques, handling, and use of this product
are beyond company control. Therefore, BougeRV assumes no
responsibility for loss, damage, or expense resulting from improper
installation, handling, or use.
1.2 Limited Warranty
Kit limited warranties are described in full in the BougeRV warranty
certificates. In summary, the Limited Warranties do not apply to any
of the following:
The kit which in BougeRV's absolute judgment have been
subjected to misuse, abuse, neglect or accident; alteration; or
improper installation, application, or removal. This includes, but is
not limited to, installation, application, or removal by any party other
than a BougeRV authorized dealer; non-observance of BougeRV's
installation, user’s and/or maintenance instructions; power failure
surges, lightning, flood, fire, accidental breakage, or other events
beyond BougeRV's control.
2SAFETY PRECAUTIONS
•Do not stand on, drop, scratch, or allow objects to fall on solar panel
as doing so may damage them and void the warranty.
• Do not place anything on the solar panel, even for a moment
because resulting residue may damage or stain the glass surface.
• If the front glass is broken, or the back sheet is torn, contact with
any panel surface or panel frame can cause electric shock.
• Broken J-boxes or connectors are electrical hazards as well as
laceration hazards. Installers should remove any such solar panel
from the array and contact BougeRV for disposal instructions.
• Do not install or handle the solar panel when they are wet or during
periods of high wind.
• Do not block drain holes or allow water to pool in or near module
frames.
• Unconnected connectors must always be protected from pollution
(e.g dust, humidity, foreign particles, etc), prior to installation. Do not
leave unconnected (unprotected) connectors exposed to the
environment. A clean assembly environment is therefore essential
to avoid performance degradation.
4
3120W SOLAR PANEL KIT DETAILS
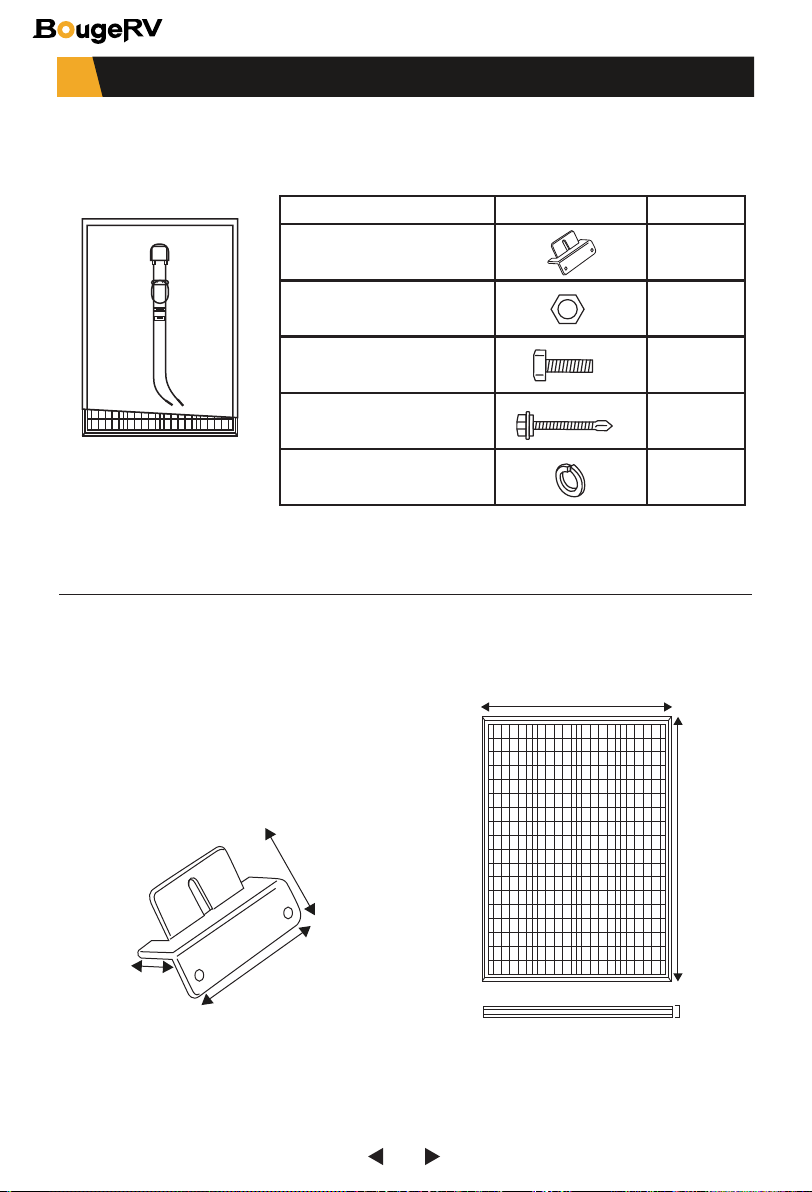
3.1 Package Contents:
3.1 Package Contents:
120W solar panel with
3ft MC4 cable
Destiption Picture Quantity
Mounting brackets
Hex nuts
1/4-20 x 3/4" hex bolts
Flat washers
Split ring lock washers
4
4
4
8
4
26.38"
38.58"
1.38"
2.52"
3.94"
1.57"

5
3.3 Solar Panel Electrical parameters
Peak power Pm (W)
Open circuit voltage Voc (V)
Max.power voltage Vmp (V)
Short circuit current Isc (A)
Max.power current Imp(A)
Solar cells Efficiency
Solar cell
No.of cells and connections
Lamination
Front cover (material / thickness)
Encapsulant(material)
Frame (material / collor)
Cable / Cable connector Model
Junction box model / size
Max.static load, front (e.g.,snow / wind)
Max.static load, back (e.g.,wind)
Max.hailstone impact (diameter / velocity)
Series fuse rating
Application Class
NOCT
Operating temperature limits
Product Certification /Standard
Monocrystalline
68pcs Series and parallel connection
Tempered glass lamination
Tempered Glass / 3.2mm
EVA
Anodized aluminum frames
HX026
12AWG 3FT MC4 connectors
2400Pa
2400Pa
25mm / 23m/s
15A
Max.system voltage(V) 1000V DC
Class A
118.4±3.6℉
-4℉~~ +167℉
CE,ROHS
120±3%
22.1±3%
17.68±3%
6.79±3%
7.13±3%
22%±0.5%
4ELECTRICAL CONNECTIONS
4.1 Series Connection
4.2 Parallel Connection
The panel may be wired in series to produce the desired voltage
output.
The solar panel can be wired in parallel to produce the desired
current output with the parallel connector.
Choose a site for mounting the solar panels that is free from shade
and located in an area that receives maximum sunlight daily.For
maximum solar power absorption throughout the day, a
tilt-mounting kit is recommended. (The tilt mount kit can be searched
at www.amazon.com/dp/B08DNQGLZR or "bougerv tilt brackets" in
Amazon)
6
5INSTALLATION
5.1 Installation Overview
5.2 Module Handling
•Open the packaging and check to make sure that all parts have
been received.
•Arrange to have on hand the proper tools (NOT INCLUDED) to
carry out the mounting installation.
•Determine the mounting location of the solar panels .
•Mount the charge controller(NOT INCLUDED)within 5 feet of
battery or loss of current may occur.
•Wire the battery(NOT INCLUDED)to the charge controller and
then the solar panel to the charge controller to ensure thatthe
correct polarity is observed.
•Use gloves when handling panels.
•The panel glass is sensitive to oils and abrasive surfaces, which may
lead to scratches and irregular soiling.
•Do not place panels such that the glass comes in contact with
abrasive surfaces, and minimize any contact with the glass in
general.
•Do not place anything on the panels, even for a moment.
•Never lift or move the panel using the cables or the junction box
under any circumstances.
5.3 Mounting
Recommendations
The solar panels can be permanently installed level using the
hardware included.If you choose not to use the included Z brackets
ensure that you create a ½ inch space between the mounting
surface and the solar panel to allow for proper airflow under the solar
panel.
When making connections ensure polarity is maintained,reverse polarity
may cause damage and will void the warranty.
7
Measure the distance between the mounting site and the battery
location.The charge controller should be mounted in close proximity
to the battery bank within 5 feet.Refer to the DC electrical wire guide
to choose an appropriate gauge wire for the length of the wire.
If you choose to mount your Solar Panel to your RV,be sure you solidly
mount your panels to the roof. If you have a rubber roof over thin
plywood you may want to use molly fasteners(NOT INCLUDED) to get
a better grip. if you have a fiberglass roof,drill some pilot holes
through the fiberglass to reach plywood below.This will prevent
cracking or damaging the fiberglass. If your RV is equipped with a
metal roof you must mount the solar panel to the joists supporting
the roof.
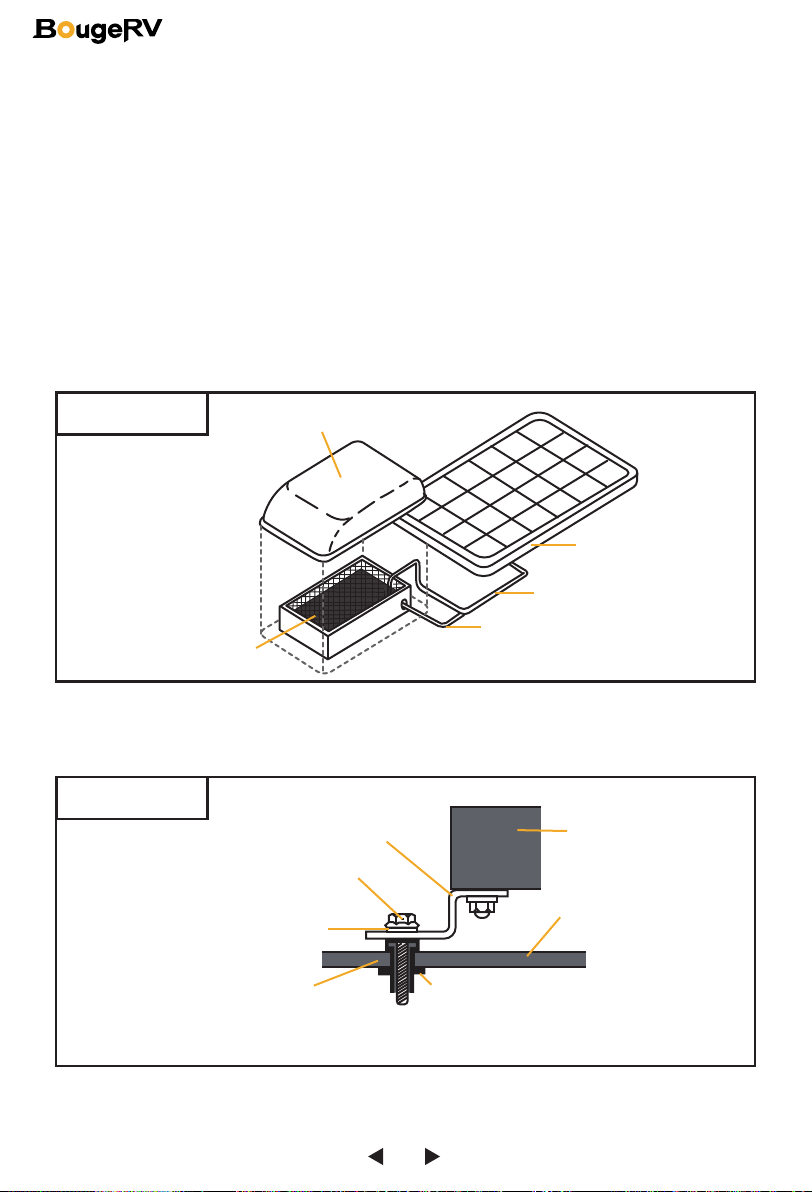
Figure 4 shows an example of how the panel can be mounted with
the Z brackets included.
The wire from the solar panel can be routed to the interior of the RV
through the roofMtop refrigerator vent.(In this kind of installation
attempt to mount the panel near the refrigerator vent. See Figure 3.
Solar Panel
Method B
Method A
Refrigerator
Vent Cover
Vent
Screen
Figure 3
Figure 4
Mounting Bracket
¼"-20x1¼"
flange bolt
¼"flat washer
Well-Nut Rubber bushing materialexpands
when bolt is tightened to securely
anchor hardware
Solar
Module
Rv roof material
up to approx 3/8"
thickness

8
6MAINTENANCE AND CLEANING
For smaller systems, wet the panel glass with the solution, let it stand
for five minutes, and then wet them again and use a soft sponge or
seamless cloth to wipe the glass surface in a circular motion.
For large systems, wet the panels with the cleaning solution, let them
stand for five minutes, and then rinse them with high-pressure water
or a soft squeegee. Do not use harsh industrial-strength cleaning
materials such as scouring powder, steel wool, scrapers, blades, or
other sharp instruments to clean the panel glass. Use of such
materials will void the product warranty.
Periodic cleaning of panel glass has resulted in improved performance
levels, especially in regions with low levels of annual precipitation;
therefore BougeRV recommends periodic cleaning of the panels.
In order to avoid potential risk of electrical shock or burn, BougeRV
suggests cleaning the modules during early morning and evening
with low irradiance and low modules temperature especially area
with high average temperature.
In order to avoid potential risk of electrical shock, do not try to clean
the modules with glass damage or expose wires.
To clean a panel, wash its glass surface with potable, non-heated
water. Normal water pressure is adequate, but pressurized water (up
to 1500 psi) may be used. Some fingerprints, stains, or accumulations
of dirt on the glass may be removed with over-the-counter glass
cleaners, or with a 3% soap-and-water solution.

9
Q:I want to have more solar power and charge my battery faster
– can I upgrade the solar kit?
A:You can easily upgrade this kit from 120W to 240W by adding a
similar 120W solar panel to the same charge controller. The output
will double and the charging time will halve.
Q:Does it work with the portable power station?
A:Yes,BougeRV solar panels with mc4 connectors are suitable for
most portable power stations on the market. If you want to inquire
about the specific model, please contact us.
Q:What should I do if my solar panel I received is damaged,
missing parts or no output?
A:Please send relevant pictures to our after-sales mailbox
service@bougerv.com immediately, and leave your order number. We
will reply one by one according to the chronological order sent by the
customers.
Q:Do I need to clean my solar panel?
A:Yes. Regular cleaning increases energy yield. Always remember
that any shading will reduce the output of the solar panel.
Q:How many watts does this panel produce?
A:Solar panel output power is affected by several factors such as
light intensity, light angle and shadow shading, the power
generation is about 60-80%, so the output power of 120W solar
panel is about 72W~~96W.
Q:What size breaker should be used between this panel and the
charge controller?
A:The solar panel is a Max of 6.79 amps,so a 10amp breaker would
do it for a single panel
Q:How to choose the appropriate solar accessories that fit the
solar panel if I want to build a solar system on my own?
A:BougeRV provides you with professional technical services. You can
send us your needs and the parameter information or instructions of
your purchased accessories directly to our email: service@bougerv.com,
we will help you build the ideal DIY solar system.
7FREQUENTLY ASKED QUESTIONS
Table of contents
Other BougeRV Solar Panel manuals


