Boundless ADDS 5700 User manual

BY OUNDLESS ECHNOLOGIE
S
B T
Linux-Based Terminal
User’s Manual

TABLE OF CONTENTS
CHAPTER 1 Product Review........................................................................................................1
1.1 LBTs ..........................................................................................................................1
1.2 Terminal Specifications..............................................................................................1
1.3 Terminal Features......................................................................................................2
1.4 Terminal Overview.....................................................................................................2
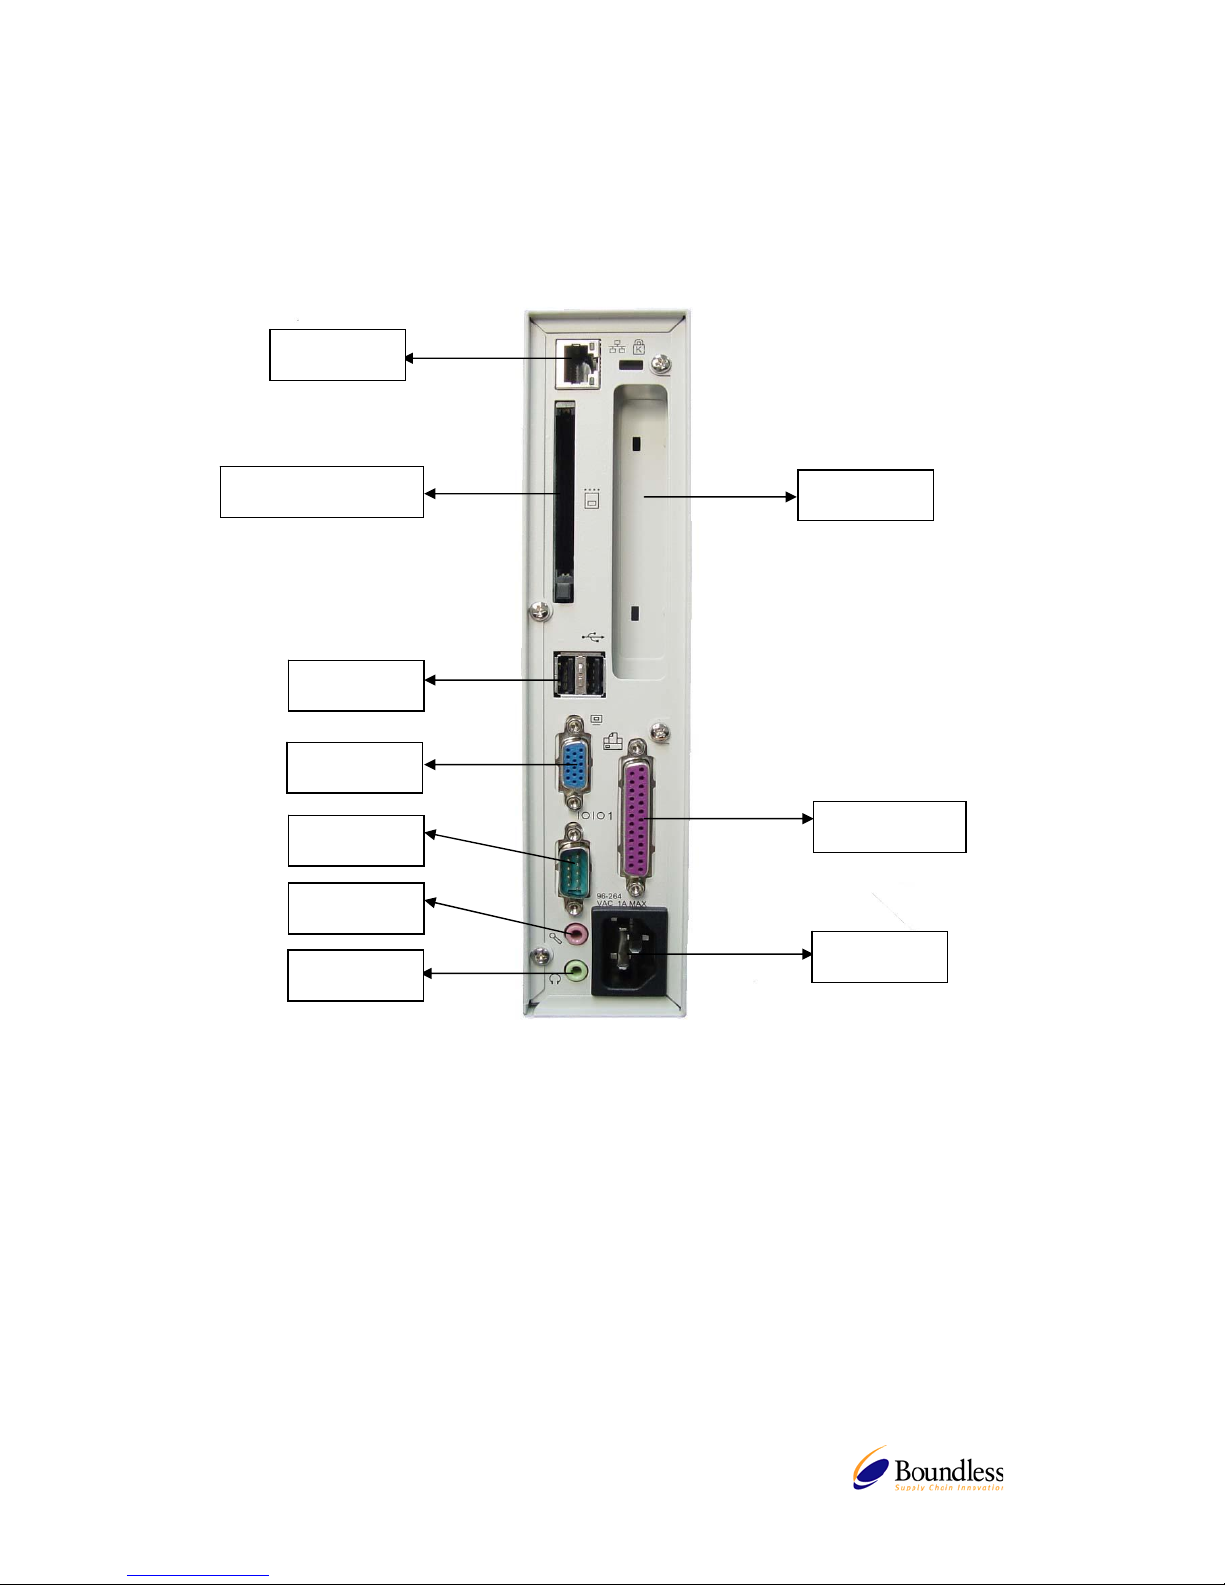
1.4.1 Connecting the Terminal .................................................................................2
1.4.2 Connector Descriptions...................................................................................3
CHAPTER 2 Initial Terminal Setup...............................................................................................5
2.1 Hot-keys Functions....................................................................................................5
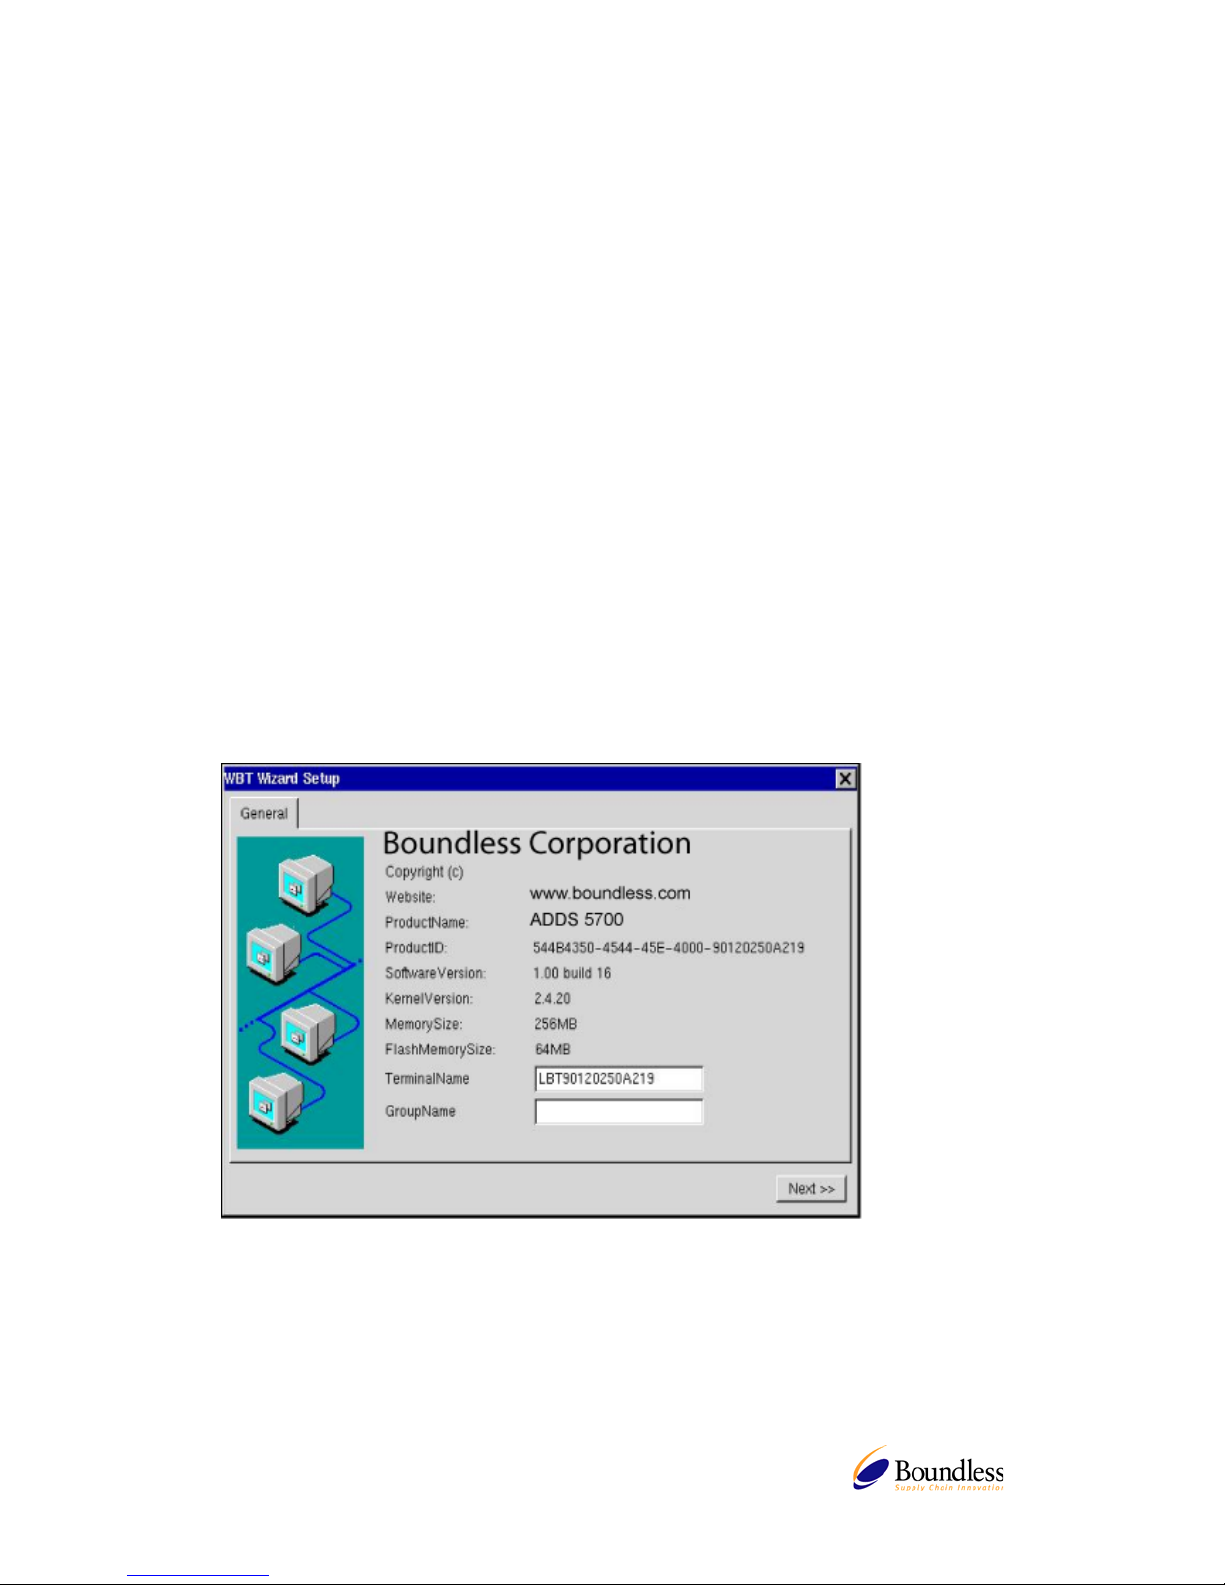
2.2 Setup Wizard.............................................................................................................5
2.2.1 Display Settings................................................................................................5
2.2.2 Locale...............................................................................................................6
2.2.3 Network Configuration ......................................................................................6
2.2.3.1 Use the IP information supplied by DHCP ................................................6
2.2.3.2 Specify a static IP address........................................................................7
2.2.3.3 Name Servers...........................................................................................7
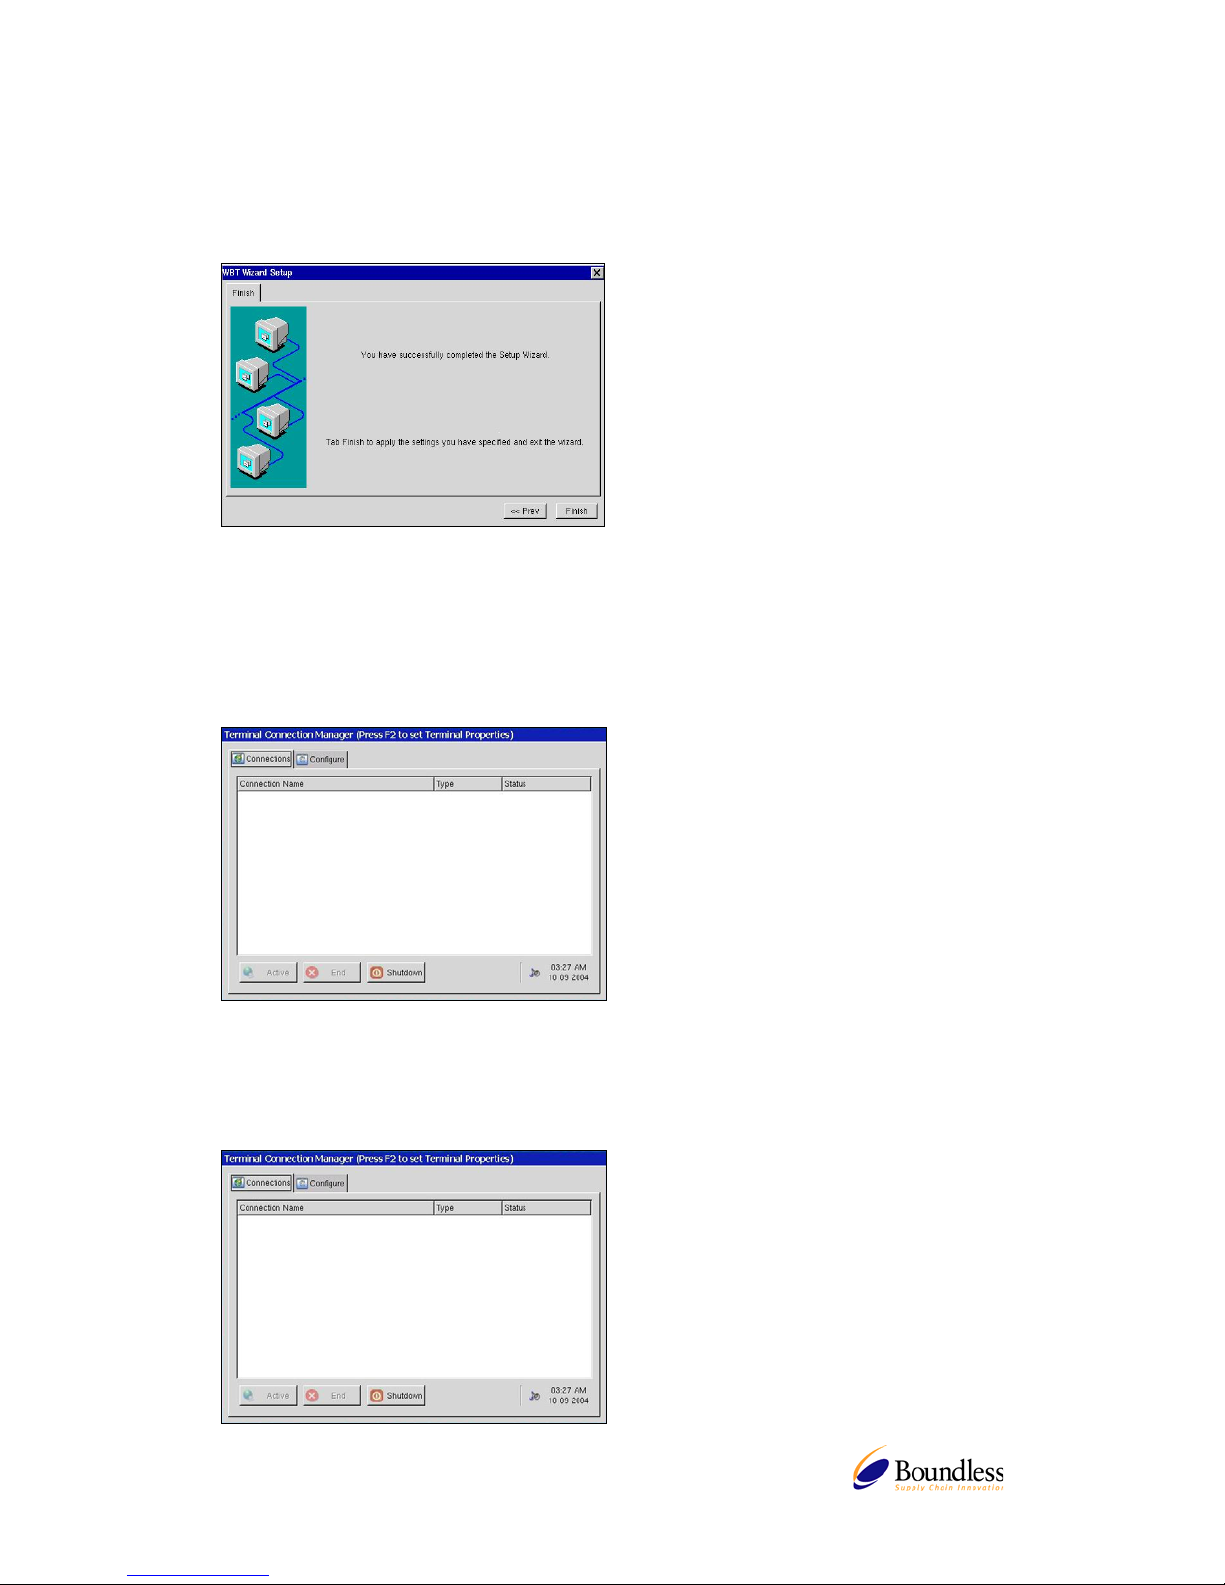
2.2.4 Finish the Setup Wizard..................................................................................8
CHAPTER 3 Connections Management......................................................................................8
3.1 Using the Connections Properties Sheet...................................................................8
3.2 Using the Configure Properties Sheet .......................................................................9
3.3 Creating New Connections........................................................................................9
3.3.1 Choosing a Connection Protocol ......................................................................9
3.4 RDP Connections......................................................................................................10
3.4.1 General .............................................................................................................10
3.4.2 Display ..............................................................................................................10
3.4.3 Local Resources................................................................................................10
3.4.4 Programs...........................................................................................................11
3.4.5 Performance......................................................................................................11
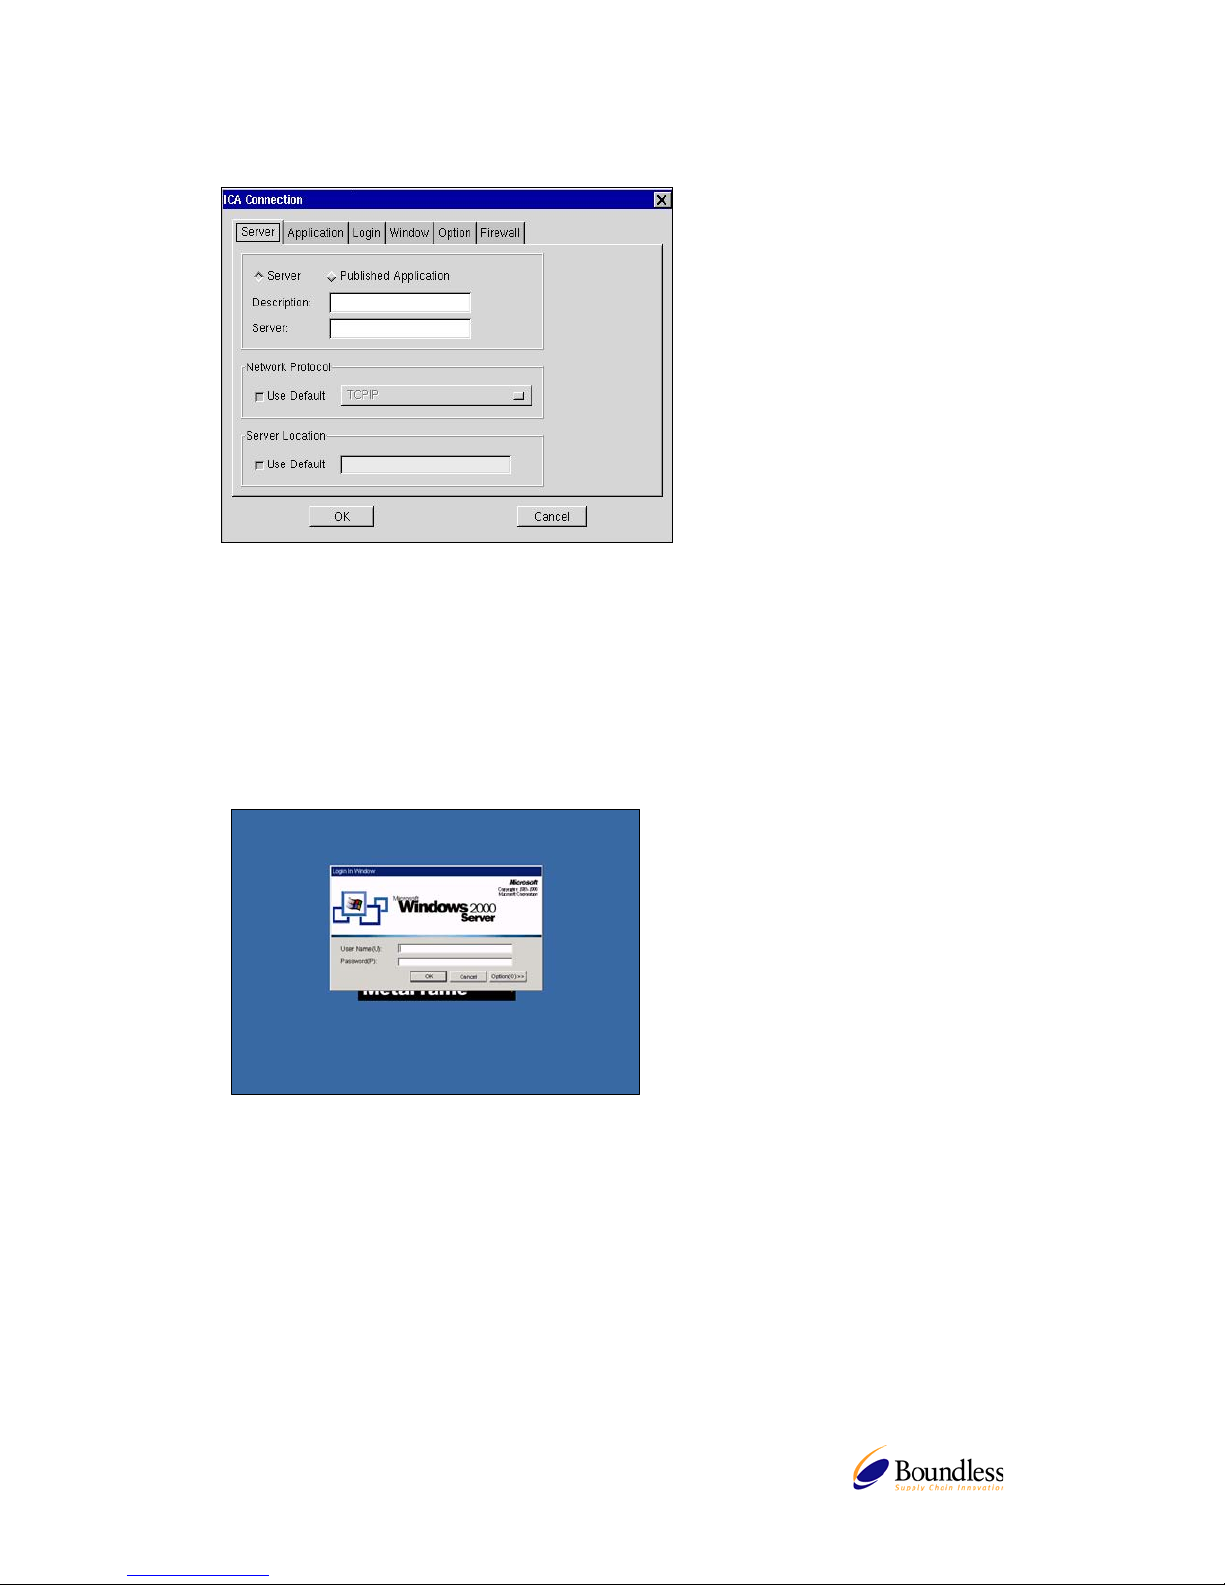
3.5 ICA Connections........................................................................................................12
3.5.1 Creating a New ICA Connection Entry..............................................................12
3.5.2 Connecting to a Citrix Server............................................................................13
3.5.3 Changing a Connection Entry...........................................................................13
3.5.3.1 To change the properties of a connection entry ........................................13
3.5.3.2 Specifying an Application to Run after Connecting to a Citrix Server ........14
3.5.3.3 Specifying Logon Information....................................................................15
3.5.3.4 Changing the Window Properties..............................................................15
3.5.3.5 Setting Connection Entry Options.............................................................16
3.5.3.6 Configuring Firewall Settings ....................................................................17
3.6 Web Browser Connection..........................................................................................18
3.6.1 To Make a New Web Browser Connection........................................................18
3.6.2 To Start a Web Browser Connection.................................................................19
3.7 X11 Client..................................................................................................................19
CHAPTER 4 Terminal Properties.................................................................................................20
4.1 General Tab...............................................................................................................20
4.1.1 Reset the terminal to factory default property settings......................................20
4.2 Display Configuration.................................................................................................21
4.2.1 Enable Screen Saver........................................................................................21
4.3 Control Panel Tab......................................................................................................22
4.3.1 System...............................................................................................................22
4.3.2 Keyboard Properties...........................................................................................23
4.3.2.1 Locale.......................................................................................................23

1
4.3.2.2 Repeat......................................................................................................23
4.3.3 Sound Volume....................................................................................................23
4.3.4 Date/Time Properties..........................................................................................24
4.3.5 NFS....................................................................................................................24
4.3.6 FTP Update........................................................................................................24
4.3.7 Thin Printer.........................................................................................................25
4.3.8 Security Control..................................................................................................25
4.3.9 Network Configuration........................................................................................26
4.3.10 Startup................................................................................................................26
4.3.11 WMMode............................................................................................................27
4.3.12 Printer ................................................................................................................28
4.3.13 VNC Server Password .......................................................................................28
CHAPTER 5 Advanced Function .................................................................................................29
5.1 VNC Client Viewer.....................................................................................................29
5.2 xterm .........................................................................................................................29
5.3 System Info ...............................................................................................................30
5.3.1 CPU Info..............................................................................................................30
5.3.2 Memory Info........................................................................................................30
CHAPTER 6 Desktop Mode..........................................................................................................31
6.1 Connections................................................................................................................31
6.1.1 RDP Connection .................................................................................................31
6.1.2 ICA Connection...................................................................................................33
6.1.3 VNC Client Viewer..............................................................................................43
6.1.4 WEB Browser......................................................................................................44
6.2 Connection manager .................................................................................................44
6.3 Control Panel............................................................................................................45

1
1. Product Overview
1.1 LBTs
LBTs (Linux -based Terminals) are designed to connect to WTS (Windows Terminal Server) servers via
RDP (Remote Desktop Protocol), or Windows NT applications server via ICA (Independent Computing
Architecture). RDP is the Windows CE-based protocol for connecting to Windows terminal servers. ICA is
a distributed presentation services protocol for Windows NT server, allowing an application's user
interface to execute on a Linux -based terminal while the application's logic executes on the server.
1.2 Terminal Specifications
CPU VIA Eden 1.0 GHz
RAM 128MB DDR-SDRAM standard, expandable to 512MB
Flash Memory 32MB CF card standard, expandable to 512MB
Flash upgrade utility via Ethernet
Resolution Resolution up to 1280x1024 / 60 Hz SVGA32 bit to True color.
1600x1200 / 60 Hz SVGA32 bit to High color.
16 million palette supports all VESA monitors
Refresh Rate Flicker-free, up to 85Hz
Video Memory Graphics utilizes system RAM
A
udio Support Full 16 bit stereo FM synthesis, 8 bit mini Microphone in
Networking Protocols 10/100 Base T Fast Ethernet, Twisted Pair (RJ45)
TCP/IP with DNS, DHCP and PPP
Load balancing supported by Citrix ICA
Remote modem dial up with Citrix ICA
Communications Protocols MS RDP / Citrix ICA/ Go-Global Client
One Parallel Port Bi-directional centronics compatible, DB-25
One Serial Port DB-9 pin male connector with RS-232C, up to 115.2K bps
One Display Port
A
nalogue VGAtype video output (DB-15)
USB Port Four USB ports
A
udio Port
A
udio out, Microphone In
KB & Mouse Interface Enhanced PS/2 keyboard and mouse interface
Extensible Slot One PCMCIA slot
One PCI slot
One Smart Card Reader
Operation System Linux Embedded
Set-up & Configuration Local power-on boot, simple start-up wizard for set-up
Configurable automatic login, Multi-language KB support,
Multiple auto-startup support
Server Operating System
Support GO-GLOBAL:
Go-Global for Windows
Go-Global for UNIX
RDP:
Microsoft Windows NT4.0 + TSE.
Microsoft Windows 2000 Server Family.
Microsoft Windows 2003 Server Family.
Microsoft Windows XP with RDP protocol
ICA:
Citrix Winframe
Microsoft Windows NT4.0 + TSE+ Citrix Metaframe
Microsoft Windows 2000 + Citrix Metaframe.
Microsoft Windows 2000/ Windows 2003 + Citrix MetaframeXP.
Terminal Emulations Console ANSI, VT 420/320/220/100/52, Wyse 120/60/50+/325
Support TVI 925, TVI 910+,ADDS A2, IBM3270, IBM5250.

2
1.3 Terminal Features
Physical Characteristics
Height 232 mm (11.21 in)
Width 51 mm (2.08 in)
Depth 202 mm (10.41 in)
Net Weight 2.20 kgs (4.85 lbs)
Power Cord 6 ft (1.83m)
Environmental
Operating Temperature 5 to 40℃(41 to 104℉)
Non-operating Temperature -40to 60℃(-40 to 150℉)
Operating Humidity 20% to 80%, non-condensing
OperatingAltitude 0 to 10,000 ftASL
NonoperatingAltitude 0 to 40,000 ftASL
Regulatory
EMC Terminal/Power Brick FCC B, CE, CB, CUL, C-TICK, BSMI,
Safety Power Brick UL1950, CB IEC60950.
Installation
1.4 Terminal Overview
1.4.1 Connecting the Terminal
Follow these instructions to connect the terminal to its peripheral devices:
A. Connect the keyboard to the keyboard connector.
B. Connect the mouse to the mouse connector.

3
C. Connect the 10/100-T network cable to the RJ-45 network connector.
D. Connect the power cord and the adapter to the power connector withAC outlet.
E. Connect the power cord to the power connector withAC outlet.
1.4.2 Connector Descriptions
LAN LED Indicators
This LED indicates the link (amber), activity (amber) status of network conditions. The detailed
information is explained as follows:
zLink Indicator (amber )
This LED lights to indicate a successful network connection.
zActivity Indicator (amber)
This LED lights when there is network packets sent or received through the RJ-45 port.
USB 2.0 Port
These connectors can be used for the USB devices.
PS/2 Mouse Connector
This connector is for a mouse using a PS/2 plug (mini DIN).
PS/2 Keyboard Connector
This connector is for a standard keyboard using a PS/2 plug (mini DIN).
RJ-45 Network Connector
Power Switch & LED
LAN Active
Smart Card LED
Smart Card Slot
Keyboard
USB 2.0
Mouse

4
This connector can be used to connect the built-in 32-bit 10/100-T Ethernet network LAN Controller to a
host or Hub.
Audio output Connector
This connector is used to connect to an outward speaker.
VGA Connector
This connector is for displaying on a standard VGA compatible device.
Serial Port Connectors
These connectors can be used for the serial device such as a modem device.
Parallel Port Connector
This connector can be used for a printer connection.
Power Connector
This connector is for connecting the power cord with the terminal and the AC outlet.
PCMCIA Slot
This slot is an optional slot, basically for Wireless LAN adapter.
DVI CON.
This slot is an optional slot for DVI Monitor
LAN
PCMCIA SLOT
VGA
SERIAL
MIC
SPEAKER
DVI CON.
USB 2.0
PARALLEL
AC

5
Smart Card Slot
This slot is an optional slot only for Smart Card-related applications.
2. Initial Terminal Setup
2.1 Hot-keys Functions
Ctrl+Alt+Up/Down Arrow
Use this function to switch sessions.
Ctrl+Alt+End:
Use this function to go back to the Windows list.
Ctrl+Alt+Home:
Use this function to activate the Start menu.
2.2 Setup Wizard
The Setup Wizard lets you set terminal network configuration and terminal display parameters. Any
future changes can be made using the Terminal Properties dialog box. You can launch this dialog box
anywhere in the program at any time by pressing the [F2] key.
There are seven dialog boxes that display in succession during the process. Each dialog box is
self-explanatory. Some dialog boxes are informational and require no user input. Other dialog boxes will
prompt you for network and display information.
General
2.2.1 Display Settings
The monitor support several kinds of resolutions. If you want to test it, choose the desired resolution from
the list box and click Test.

6

7
2.2.2 Locale
Set up the keyboard locale for the local device.
2.2.3 Network Configuration
Network attached device must contain a unique network identifier. If the network is using TCP/IP as a
communication protocol, these identifiers are called IP addresses. The following series of screens will
allow you to choose from two different methods of assigning the IP addresses.
2.2.3.1 Use the IP information supplied by DHCP
If your network provides DHCP (Dynamic Host Configuration Protocol) service and you want it to provide
the terminals IP information, leave the first option selected.
The terminal can get its IP address through a DHCP service by default. The DHCP will automatically
assign an IP address that is drawn from a pool of available IP addresses, when a terminal unit is powered
on and a request is broadcast over the network.
Use the IP information supplied by DHCP. If you need to specify static IP address for the terminal, select
the second option. The option is selected automatically if your network does not provide a DHCP service,
or if the unit is not properly connected to the network. In these cases, leave the second option selected.
IP Address

8
2.2.3.2 Specify an IP address
If the method you selected on the prior screen was to enter a static IP address, the below screen will
appear. You will be required to enter the following information onto the screen.
IP address
Required for identifying this unit to the network. The format will follow the standard addressing format.
Subnet Mask
Required for designating which network the IP address is a part of.
Gateway
Optional address which identifies the machine through which a subnet communicates with another
network.
Specify an IP Address
2.2.3.3 Name Servers
The screen shown below will appear only if you choose the Static IP Addressing method. The DHCP
method will provide this information required using a name resolution service.
Terminal servers typically support both DNS (Domain Naming Service) and WINS (Windows Internet
Naming Service) name resolution services. This screen allows the terminal unit to use one or both of
these resolution services. To enable DNS, WINS, or both, check the corresponding box. In the text boxes,
enter the following information as appropriate for each. Click OK.
Name Servers

9
2.2.4 Finish the Setup Wizard
To review or change settings made on previous pages, click Back; to apply the settings, click Finish. To
change these settings after you have finished the Setup Wizard, press [F2] key to display the Terminal
Properties sheet.
Finish
3. Connections Management
The Terminal Connection Manager dialog box is designed to help you manage your terminal's network
connections. The dialog box displays after boot, and consists of the Connections properties sheet and
the Configure properties sheet. The following figure shows the Terminal Connection Manager dialog
box.
Terminal Connection Manager
3.1 Using the Connections Properties Sheet
The functions of the Connections properties sheet are used to make (connect to) terminal
network connections. The following figure shows the Connections properties sheet.
Connections Properties Sheet

10
3.2 Using the Configure Properties Sheet
The Configure properties sheet allows the user to Add, Edit, Delete, and configure connections. The
following figure shows the Configure properties sheet.
Configure Properties Sheet
3.3 Creating New Connections
The New Connection dialog box is used to create new network connections. This dialog box is invoked
by: Clicking on the Configure tab in the Terminal Connection Manager dialog box. Clicking on Add
command button on the Configure properties sheet. The following figure shows the New Connection
dialog box.
New Connection Dialog Box
3.3.1 Choosing a Connection Protocol
Use the scroll list shown in the dialog box above to select the type of connection protocol you want. When
you choose from the list above, you are deciding which connection protocol you want to use to connect to
a server. Six selections are available:
Microsoft Remote Desktop Client
RDP (Remote Desktop Protocol) protocol, through which connects to a LBT (Linux –Based
Terminal) server. Refer to chapter 3.4 for RDP Connections.
Citrix ICA Client
ICA (Independent Computing Architecture) protocol, through which connects to an ICA
(Winframe/Metaframe) server. Refer to chapter 3.5 for ICA Connections.
Web Browser
Connects to the Internet directly via Mozilla. There are different versions of Mozilla in Linux LBTs. It
depends on the capacity of the RAM of your WBT. Refer to chapter 3.6 for the Internet applications.
VNC Viewer
VNC (Virtual Network Computing) protocol, through which connects to a VNC (WinVNC) server.
Refer to chapter 5.1 for all details.

11
3.4 RDP Connections
3.4.1 General
You can type the Computer name, User name, Password, and Domain on this page.
3.4.2 Display
You can choose the size of your remote desktop and set the color quality.
3.4.3 Local Resources
You can set the sound on this page. Choosing “Bring to this computer”. It could bring the
sounds from the server to the client device.

12
3.4.4 Programs
If you want to start a program while connection, you can click Start the following program on
connection . You can also specify path and file name when you specify a program.
3.4.5 Performance
The Performance properties sheet lets you optimize the performance with connections.

13
3.5 ICA Connections
Use this application to create a Citrix ICA connection. Choose the Network Connection or Dial-In
Connection for the remote application.
3.5.1 Creating a New ICA Connection Entry
You can configure and run two types of ICA sessions:Citrix server connections and published
applications.
Citrix server connections allow you to remotely control a session on a Citrix server from your WBT.
Citrix server connections let you access the desktop of a specific Citrix server; you can run any
applications available on the desktop, in any order.
Published applications are specific applications set up by an administrator for remote users to run.
When connected, you are presented with the application itself.
This procedure describes the simplest way to create a connection entry. When you follow these
steps, you set the essential items you need toconnect to a Citrix server from your WBT. See “Changing a
Connection Entry” for more information about how to change the other properties for a connection entry.
3.5.1.1 To create a new connection entry
a. In the Terminal Connection Manager dialog box, click the Configure tab.
b. Click Add.
c. In the New Connection dialog box, click the list box and select Citrix ICA Client. Click OK.
d.
d.5.3.5 Click Server to connect to a server or Published Application to connect to a published
application.
1. Click Server or Published Application.
2. For a server connection, type the name or IP address of the MetaFrame server or select the name
from the pop-up menu to the right of the Server field. —or—
For a published application, type the name of the published application or select the name from the
pop-up menu to the right of the Server field.
3. If you have typed the name of the MetaFrame server or published application, in the Description
field, type a unique description for the entry. The description is used to identify the connection in the
Citrix ICA Client window. If you have selected a server or published application from the pop-up
menu, a default description is automatically added.
4. Click OK to save the entry or Cancel to exit the Properties dialog box without saving the entry.
Note

14
3.5.2 Connecting to a Citrix Server
3.5.2.1 To start a previously defined connection
a. In the Terminal Connection Manager dialog box, click the Connections tab.
b. Select the desired connection name and click Connect.
If you specified a valid user name and password in the connection entry, you are logged in as that user.
If no user name and password are present in the entry or the information is incorrect, the server logon
dialog box appears. Enter a valid user name and password for the Citrix server and click “OK” to log on.
3.5.3 Changing a Connection Entry
This section describes how to change properties for an existing connection entry.
3.5.3.1 To change the properties of a connection entry
a. In the Terminal Connection Manager dialog box, click the Configure tab.
b. Click the name of the connection entry that you want to change.
c. Click Edit to display the Edit Connection Details dialog box.
d. Make the desired changes.
e. Click OK to save your changes.

15
The Edit Connection Details dialog box contains the following tabs:
a. The Server tab, where you can set the server or published application name to which to connect.
b. The Application tab, where you can specify an application to run after connecting to a Citrix server,
see section 3.5.3.2 “Specifying an Application to Run after Connecting to a Citrix Server” for more
information.
c.
The Logon tab, where you can set the user name, password, and domain to log in to the Citrix
server automatically, see section 3.5.3.3 “Specifying Logon Information” for more information.
d. The Window tab, where you can set the number of colors used for the ICA Client window, see
section 3.5.3.4 “Changing the Window Properties” for more information.
e.
The Options tab, where you can control the connection between the Citrix server and your WBT and
configure sound support, see section 3.5.3.5 “Setting Connection Entry Options” for more
information.
f. The Firewall Settings tab, where you can configure the client to use a SOCKS proxy and alternate
address re-mapping, see section 3.5.3.6 “Configuring Firewall Settings” for more information.
3.5.3.2 Specifying an Application to Run after Connecting to a Citrix Server
Use the Application tab to specify an application to run after connecting to a Citrix server. If you specify
an application, you do not see the Windows desktop when you connect and the connection is closed
when you exit the application.
This tab does not apply to connection entries for published applications. Any value entered is
ignored.
a. In the Terminal Connection Manager dialog box, click Configure.
b. Select the connection entry that you want to change and click Edit.
c. Click the Application tab.
d. In the Command Line box, specify the path and file name of the application to be run after
connecting to the Citrix server. For example, to launch Notepad automatically after connecting to the
Citrix server, type: C:\Wtsrv\Notepad.exe
e. In the Working Directory box, specify the working directory to be used with the application. If you
use Notepad to work on documents in the C:\My Documents directory, type C:\My Documents.
f. Click OK to save your changes.
Note

16
When you log on to the Citrix server, Notepad begins. In Notepad, if you select Open from the File menu,
the C:\My Documents directory is displayed.
3.5.3.3 Specifying Logon Information
You can include the settings needed to log on to the Citrix server as part of the connection entry. This
saves time when connecting to the server but is less secure.
a. In the Terminal Connection Manager dialog box, click Configure.
b. Select the connection entry that you want to change and click Edit.
c. Click the Logon tab.
d. Type a valid user name, domain, and password. If you leave these boxes blank, you are prompted
for your user name, domain, and password each time you connect to the Citrix server or published
application.
e. Click OK to save your changes.
3.5.3.4 Changing the Window Properties
Use the Window tab to change the number of colors to use for ICA connections made using the
connection entry.
a. In the Terminal Connection Manager dialog box, click Configure.
b. Select the connection entry that you want to change and click Edit.
c. Click the Window tab.

17
d. In the Window Colors box, set the number of window colors to 16, 256, 32 Thousand or 16 Million.
e. Click OK to save your changes.
3.5.3.5 Setting Connection Entry Options
Use the Options tab to set options specific to the connection entry, such as data compression and sound
support.
a. In the Terminal Connection Manager dialog box, click Configure.
b. Select the connection entry that you want to change and click Edit.
c. Click the Options tab.
d. Click Use Data Compression to reduce the amount of data transferred between the ICA Client and
the Citrix server. If your connection is bandwidth-limited, enabling compression can increase
performance. If your client device is on a high-speed LAN, you may not need compression. If you
have sufficient bandwidth, leave compression off to conserve processing power on the Citrix server.
e. Enable the Bitmap Cache
Bitmap caching stores commonly-used bitmaps (images) locally on your client so that they do not
have to be transferred over the ICA connection every time they are needed.
f. Speed Screen Latency Reduction
SpeedScreen Latency Reduction improves performance over high latency connections by providing
instant feedback to the user in response to typed data or mouse clicks.
Note:SpeedScreen Latency Reduction will work only when it is available on the MetaFrame server you
This manual suits for next models
1
Table of contents
Other Boundless Desktop manuals

Boundless
Boundless Capio II Installation manual

Boundless
Boundless VT525 User manual

Boundless
Boundless ADDS 4000/260 User manual

Boundless
Boundless 2900/260 LF User manual

Boundless
Boundless ADDS 4000/160 User manual

Boundless
Boundless VGB10 User manual

Boundless
Boundless VGB10 User manual

Boundless
Boundless ADDS 60 User manual

Boundless
Boundless VT520 User manual

Boundless
Boundless ADDS 4000/260 User manual