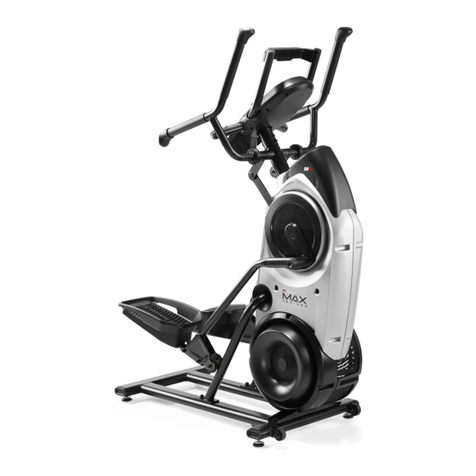
Bowflex Max Trainer M3 User manual

ASSEMBLY / OWNER’S MANUAL
OWNER’S / ASSEMBLY MANUAL
M3
OWNER’S / ASSEMBLY MANUAL
ASSEMBLY / OWNER’S MANUAL
M3M3
OWNER’S / ASSEMBLY MANUALOWNER’S / ASSEMBLY MANUALOWNER’S / ASSEMBLY MANUALOWNER’S / ASSEMBLY MANUALOWNER’S / ASSEMBLY MANUALOWNER’S / ASSEMBLY MANUAL
Manual en Español
Latino Americano:
www.support.nautilus.com

Assembly / Owner’s Manual
18
Moving the Machine
The machine may be moved by one or more persons depending on their physical
able to move the machine safely.
1. Grasp the inner, unmoving part of the Pivot Assembly to carefully tilt the machine
toward you onto the transport rollers.
Be aware of the Handlebars and the weight of the machine before tilting the
machine.
2. Push the machine into position.
3. Carefully lower the machine into position.
NOTICE: Be careful when you move the machine. All abrupt motions can affect the
computer operation.
Leveling the Machine
1. Place the machine in your workout area.
Do not adjust the levelers to such a height that they detach or unscrew from the machine. Injury to you or damage to the machine can occur.
3. Tighten the locking nuts.
Adjustments

Assembly / Owner’s Manual
19
This icon means a potentially hazardous situation which, if not avoided, could result in death or serious injury.
Before using this equipment, obey the following warnings:
Read and understand the complete Manual. Keep the Manual for future reference.
Read and understand all warnings on this machine. If at any time the Warning stickers become loose, unreadable or
dislodged, contact Nautilus®Customer Service for replacement stickers.
To reduce the risk of electrical shock or usage of the equipment, always unplug the power cord from
the wall outlet and the machine and wait 5 minutes before cleaning, maintaining or repairing the machine. Place the
power cord in a secure location.
• Children must not be let on or near to this machine. Moving parts and other features of the machine can be dangerous
to children.
• Not intended for use by anyone under 14 years of age.
• Consult a physician before you start an exercise program or a new health and diet plan. Stop exercising if you feel
pain or tightness in your chest, become short of breath, or feel faint. Contact your doctor before you use the machine
again. Use the values calculated or measured by the machine’s computer for reference purposes only. The heart rate
displayed on the console is an approximation and should be used for reference only.
• Before each use, examine this machine for loose parts or signs of wear. Do not use if found in this condition. Monitor
the Pedals and Crank Arms closely. Contact Nautilus®Customer Service for repair information.
• Maximum user weight limit: 300 lbs. (136 kg). Do not use if you are over this weight.
• This machine is for home use only.
moving parts of the exercise equipment.
• Set up and operate this machine on a solid, level, horizontal surface.
• Make the Pedals stable before you step on them. Use caution when you step on and off the machine.
• Do not operate this machine outdoors or in moist or wet locations.
• Keep at least 24” (0.6 m) on each side of the machine clear. This is the recommended safe distance for access and
passage around and emergency dismounts from the machine. Keep third parties out of this space when machine is in
use.
• Do not over exert yourself during exercise. Operate the machine in the manner described in this manual.
• Perform all regular and periodic maintenance procedures recommended in the Owner’s Manual.
• Keep the Pedals clean and dry.
• Exercise on this machine requires coordination and balance. Be sure to anticipate that changes in speed and
resistance level can occur during workouts, and be attentive in order to avoid loss of balance and possible injury.
• This machine cannot stop the Pedals or Upper Handlebars independently of the Resistance Fan. Reduce the pace to
slow the Resistance Fan, the Upper Handlebars, and Pedals to a stop. Do not dismount the machine until the Pedals
and Upper Handlebars have come to a complete stop.
• Do not drop or put objects into any opening of the machine.
• Prior to use read and understand the Owner’s Manual. The appliance is not to be used by persons with functional
limitations and impairments, reduced physical, sensory or mental capabilities, or lack of experience and knowledge.
Important Safety Instructions
Assembly / Owner’s Manual
21
Maximum Burn Rate LED Marker
Calories
LCD Display Data
The console display shows the workout measurements
and current options.
Time
workout. There are three types of time display depending
on the style of workout: Interval, Manual, or Steady State.
ACTIVE: During an Interval workout, the TIME display
segment of the Interval workout.
TOTAL: During a Manual workout, the TIME display will count up until the workout is ended.
REST:
Total Time
PAUSE/END
START
MAX
Interval
ENTER USER
USER
TOTAL
ACTIVE
REST TOTAL
BURN
RAT E
RESISTANCE
LEVEL
0
10
20
40
30 Target
Burn
Rate LED
Range
Calories
Console Features
The Console provides information about your workout on the display
screen.
Burn Rate Display
The Burn Rate Display shows the level of calories being burned per
minute. This rate is a function of the current level of RPM (pedal speed)
and resistance level (1-8). As either of those values increase, the Burn
Rate will increase.
Target Burn Rate LED Range
The Target Burn Rate LED Range is a workout coach based on the
user.
Note:
and suggested target range.
The Target Burn Rate LED Range is a suggested workout level,
Burn Rate
Display
USER
TOTAL
ACTIVE
REST TOTAL
Workout
Profile
Display
Time Total Time

Assembly / Owner’s Manual
22
Note:
RPM
Heart Rate
The Heart Rate display shows the heart rate in beats per minute (BPM) from the heart rate sensors. This value will not be shown if a heart rate signal
is not detected.
or feel faint. Contact your doctor before you use the machine again.
be used for reference only.
Burn Rate
Level
Keypad Functions
ENTER button- Push to accept the displayed value for the option.
the MAX workout program.
BURN RATE Increase () button- Increases the Target Burn Rate during a workout, or increases a value (time, age, weight, or height).
START button- From the WELCOME screen starts a Manual workout, starts a selected Program workout, or resumes a paused workout.
BURN RATE Decrease () button- Decreases the Target Burn Rate during a workout, or decreases a value (time, age, weight, or height).
PAUSE/END button- Pauses an active workout, ends a paused workout, or goes back to the previous screen.
Resistance Level Shifter
®machine uses Resistance to change the intensity of your workout or to adjust the pace of the Pedals. The level of Resis-
resistance. The closer the Shifter is set to the “8” setting, the more energy will be needed to move the Pedals downward.
During a workout, if you keep your RPM rate stable and increase the Pedal Resistance, your Calorie Burn Rate will increase. This results in a more
intense workout.

Assembly / Owner’s Manual
23
To get yourself oriented with the process, begin with the Shifter set to 4. If this setting does not allow enough Pedal
travel at a casual stepping pace, adjust the Shifter toward the 1 setting until you are comfortable with the amount
the Shifter setting toward the 8 setting, allowing less Pedal movement. The Pedals should be set so they displace
enough to absorb the impact of your motion at your desired stepping pace.
Note: “Bottomed out” is when the User is unable to start a workout because the Pedals will not move. If this
occurs, safely grasp the Static Handlebars and apply your weight to the heel of the higher foot. While still
grasping the Static Handlebar, lean back slightly applying more weight onto the heel. Once the Pedals
begin to move, resume your intended workout.
It may be helpful to note the Shifter setting for future reference when there are multiple users of the machine.
Remote Heart Rate Monitor
Note: The heart rate chest strap must be an uncoded heart rate strap from Polar Electro or an uncoded POLAR®compatible model. (Coded
POLAR®heart rate straps such as POLAR®OwnCode®chest straps will not work with this equipment.)
If you have a pacemaker or other implanted electronic device, consult your doctor before using a wireless chest strap or other telemetric heart
rate monitor.
Chest Strap
Using the heart rate transmitter chest strap lets you monitor your heart rate at any time during your workout.
reference purposes only.
To put on your chest strap:
buckle it.
2. Lift the transmitter off your chest and moisten the two Grooved Electrode Areas on the back.
Always remove the transmitter before you clean the chest strap. Clean the chest strap regularly with mild soap and water, and thoroughly dry it.
Residual sweat and moisture may keep the transmitter active and drain the battery in the transmitter. Dry and wipe clean the transmitter after each
use.
Note: Do not use abrasives or chemicals such as steel wool or alcohol when you clean the chest strap, as they can damage the electrodes
permanently.
making contact with your skin. You may need to lightly wet the contact areas. If no signal appears or you need further assistance, call your Nautilus®
Representative.

Assembly / Owner’s Manual
33
Manual ( Quick Start ) Program
The Manual workout program is an open-ended workout that tracks your total time, allowing you total control. The
1. Stand on the machine.
3. Push the START button to begin the Manual workout program.
4. When done with your workout, stop pedaling and push PAUSE/STOP to pause the workout. Push the PAUSE/STOP button again to end the
workout.
MAX Interval Workout Program
The MAX Interval Workout Program is a workout that alternates from intense
period ( “REST” ), both of which are repeated over eight cycles. The Workout
1. Stand on the machine.
Note: During the workout, the Console will show the Target LED Range
3. Push the MAX Interval button.
Note:
4. The workout will begin with an audible countdown as the Burn Rate display needle sweeps across the display and then settles on the current
Note:
-
propriate Burn Rate button until the Target Range is near the desired value.
-
ment, will begin.
The Target LED Range will shift from red to green and sweep to a reduced Burn Rate. During the REST Interval, continue to workout but at a
lower level.
At the last 3 seconds of the “REST” workout, the Console will begin an audible countdown. The interval is about to shift from a “REST” to an
7. When the last “REST” segment is completed, the Console will display ”WORKOUT COMPLETE”, and then show the workout results. The Con-
go into Sleep Mode.
Note: If an Interval workout is ended before all 16 segments have been completed, the Console will only show the last segment completed on
USER
TOTAL
ACTIVE
REST TOTAL
Manual *

Assembly / Owner’s Manual
34
Paused / Results Mode
To Pause a workout:
1. Stop pedaling and push the PAUSE/STOP button to pause your workout.
Note:
2. To continue your workout, push START or start pedaling.
If the workout does not resume or if the PAUSE/STOP button is pushed, the workout will display “WORKOUT
COMPLETE”, and the result values are displayed (Total Calories, Total Time, Average RPM, Average Heart Rate,
Changing Resistance Levels
Use the Resistance Level Dial to adjust the resistance level. A Resistance level of “1” is the least resistance, a setting of “8” is the highest resistance
level.
2. Push and hold the USER button for 3 seconds to begin the Edit User mode.
3. The Console will display the AGE prompt with the default age value ( “32” ). Use the Burn Rate/Increase or Burn Rate/Decrease buttons to
adjust the value, and push ENTER to set the value.
4. The Console will display the GENDER prompt with the default gender value ( “FEMALE” ). Use the Burn Rate/Increase or Burn Rate/Decrease
buttons to adjust the value, and push ENTER to set the value.
adjust the value, and push ENTER to set the value.
6. The Console will display the WEIGHT prompt with the default weight value ( “160” ). Use the Burn Rate/Increase or Burn Rate/Decrease but-
tons to adjust the value, and push ENTER to set the value.
7. The Console will display the HEIGHT prompt with the default height value ( “60 INCHES” ). Use the Burn Rate/Increase or Burn Rate/Decrease
buttons to adjust the value, and push ENTER to set the value.
8. The Console will display the RESET SETTINGS prompt with the default value ( “NO” ). Use the Burn Rate/Increase or Burn Rate/Decrease
buttons to adjust the value, and push ENTER to accept the value. All Workout settings for the User will be reset to the default settings.
9. The Console will display the RESET USER prompt with the default value ( “NO” ). Use the Burn Rate/Increase or Burn Rate/Decrease buttons
to adjust the value, and push ENTER to accept the value. All Workout results and settings for the User will be erased with a reset.
PAUSE/END
START
BURN
RAT E
MAX
Interval
ENTER USER
RESISTANCE
LEVEL

Assembly / Owner’s Manual
35
Customize the MAX Interval Program
The interval times and burn rate levels can be adjusted on the MAX Interval Program. The adjusted values will be set as the default settings for
future workouts.
1. Step up to the machine.
2. Push and hold down the MAX Interval button for 3 seconds.
Note:
minutes.
4. Push the ENTER button to set the displayed value.
6. Push the ENTER button to set the displayed value.
Rate/Decrease buttons to adjust the “REST” interval time.
8. Push the ENTER button to set the displayed value.
buttons to adjust the “REST” Burn Rate level.
10. Push the ENTER button to set the displayed value.

Assembly / Owner’s Manual
36
1. Push and hold down the Burn Rate/Increase and PAUSE/END buttons for 3 seconds while in the Power-Up Mode to go into the Console Setup
Mode.
Note:
2. The Console display shows the Sound Settings prompt with the current setting. Push the Burn Rate/Increase or Burn Rate/Decrease buttons to
change between the settings of “OFF” and “1” through “7”. A setting of 7 is the loudest sound level.
3. Push ENTER to set.
4. The Console display shows the TOTAL RUN HOURS for the machine.
The Console will display the Power-Up Mode screen.
Console Setup Mode
Other manuals for Max Trainer M3
2
Table of contents
Other Bowflex Elliptical Trainer manuals

Bowflex
Bowflex Gym Style Ab Crunch Station User manual

Bowflex
Bowflex BXE116 Installation and operating instructions

Bowflex
Bowflex Lateralx LX5 User manual

Bowflex
Bowflex Max Trainer M5i User manual

Bowflex
Bowflex Max Trainer M6 User manual

Bowflex
Bowflex BXE116 User manual

Bowflex
Bowflex TreadClimber TC1000 User manual

Bowflex
Bowflex MAX TRAINER MAX TOTAL Series User manual

Bowflex
Bowflex TreadClimber TC5 User manual

Bowflex
Bowflex BXE216 User manual