Boxfish LUNA User manual

Boxfish Luna Camera Operation
R5. All rights reserved. Information and specifications may change at any time without notice. p0
Camera Operations
Manual

Boxfish Luna Camera Operation
p1 R5. All rights reserved. Information and specifications may change at any time without notice.

Boxfish Luna Camera Operation
R5. All rights reserved. Information and specifications may change at any time without notice. p2
Table of Contents
1 About the main camera inside the Boxfish Luna ..................................................... 5
1.1 Supported cameras ....................................................................................................... 5
1.2 Limitations.................................................................................................................... 5
2 Overview of recording devices and storage devices .............................................6
2.1 Video recording devices ..........................................................................................6
2.2 Video file storage devices ....................................................................................... 7
2.3 Photo file storage device......................................................................................... 7
3 Initial camera setup ...........................................................................................................8
3.1 NTSC vs PAL ...............................................................................................................8
3.2 HDMI Output Settings..............................................................................................8
4 What types of footage can be recorded with the Luna? ..................................... 11
4.1 Videos ........................................................................................................................... 11
4.2 Photos.......................................................................................................................... 13
5 Overview diagram of recording options (NTSC) .................................................... 14
6 Overview diagram of recording options (PAL).........................................................15
7 Overview of Control Station controls for Boxfish Luna ...................................... 16
8 How to start the camera and access camera controls.........................................17
8.1 Power up sequence..................................................................................................17
8.2 Camera Control GUI startup screen ...................................................................17
8.3 Troubleshooting ........................................................................................................17
9 How to remotely change movie/photo settings on the camera....................... 18
9.1 How to load camera settings upon startup..................................................... 18
9.2 Changing from movie mode to photo mode (and back).............................. 18
9.3 Camera control settings labels on the Camera Control GUI ..................... 18
9.4 How to change camera settings ......................................................................... 18
9.5 Rapidly adjust ISO and aperture (optional feature) ...................................... 19
9.6 Troubleshooting ....................................................................................................... 19
10 How to change zoom and focus................................................................................. 20
10.1 Remotely zoom the camera................................................................................. 20
10.2 Focus controls.......................................................................................................... 20
11 How to connect and set up the Ninja V (if using).................................................. 21
11.1 Hardware required................................................................................................... 21

Boxfish Luna Camera Operation
p3 R5. All rights reserved. Information and specifications may change at any time without notice.
11.2 When to use the HDMI dongle ............................................................................ 21
11.3 How to connect the Ninja V to Control Station ............................................. 21
11.4 Set up Ninja V with your desired settings........................................................22
11.5 Recording with the Ninja V ...................................................................................24
11.6 Downloading video recorded to the Ninja SSD..............................................25
12 How to record video with the Ninja V .......................................................................26
12.1 For tethers ≤300m ..................................................................................................26
12.2 For tethers > 300m ..................................................................................................26
12.3 Hardware required...................................................................................................26
12.4 Ensure Ninja settings are correct .......................................................................26
12.5 Configure camera settings as desired ..............................................................26
12.6 Start recording..........................................................................................................27
12.7 Download recording ................................................................................................ 27
13 How to take RAW still images (photos) ................................................................... 28
13.1 Hardware required.................................................................................................. 28
13.2 Insert and initialise USB stick.............................................................................. 28
13.3 Change to PHOTO mode and adjust photo-related settings................... 28
13.4 Take photos and transfer to USB stick.............................................................29
13.5 Eject USB stick and view photo files .................................................................29
14 How to record video on the camera ......................................................................... 30
14.1 Hardware required.................................................................................................. 30
14.2 Prerequisite camera settings ............................................................................... 31
14.3 (Optional) Set up Ninja to record alongside on-camera recording.......... 31
14.4 Insert and initialise USB SSD device.................................................................. 31
14.5 Change settings to 4K50/60p, 4K100/120p or 8K25/30p........................... 31
14.6 Start recording to camera card ...........................................................................32
14.7 Stop recording to camera card............................................................................33
14.8 Toggle between PHOTO and VIDEO modes...................................................33
14.9 Download video to USB SSD device (Alpha 1 cameras only) .....................33
14.10 View files.................................................................................................................34
14.11 Troubleshooting .......................................................................................................34
15 Shutting down the camera before turning off ROV .............................................36
16 Troubleshooting ...............................................................................................................37
16.1 USB device does not appear in Camera Control GUI .................................. 37
16.2 USB device cannot be ejected ............................................................................ 37
16.3 Camera settings cannot be changed from the Camera Control GUI ..... 37

Boxfish Luna Camera Operation
R5. All rights reserved. Information and specifications may change at any time without notice. p4
17 How to open your Boxfish Luna to access front camera................................... 38
17.1 Take out tray from inside ROV ........................................................................... 38
18 How to slide camera forward / back on rails........................................................... 41
18.1 Take off front plate surrounding lens................................................................ 41
18.2 Unclip navigation camera ...................................................................................... 41
18.3 Loosen hot shoe clamp ..........................................................................................42
18.4 Loosen sled on bottom rails .................................................................................42
19 How to adjust settings on the camera itself, insert card and format card ...43
19.1 How to adjust and save new settings ...............................................................43
19.2 How to insert / format memory card.................................................................43
20 How to swap between camera lenses...................................................................... 44
20.1 Preparing for lens swap ........................................................................................ 44
20.2 Loosen / rotate zoom mechanism................................................................. 44
20.3 Eject lens and put new one on........................................................................ 44
20.4 Ensure lens can move freely.............................................................................45
20.5 Position of camera on rails with different lenses ......................................45
21 How to put the camera and tray back into the Luna........................................... 46
21.1 Re-secure camera on the mount ....................................................................... 46
21.2 Put tray back into ROV ......................................................................................... 46
22 Document history............................................................................................................ 48

Boxfish Luna Camera Operation
p5 R5. All rights reserved. Information and specifications may change at any time without notice.
1 About the main camera inside the Boxfish Luna
1.1 Supported cameras
The Boxfish Luna is designed to contain either a Sony a7S III or Sony
Alpha 1 camera.
The camera mounting system and robotics within the Luna are designed with
the flexibility to swap between these two cameras if you wish. Additionally, the
Luna can support multiple lenses for each camera.
1.2 Limitations
Our design works within the following constraints:
Each camera integrates differently with the Luna. The way that each of the
camera outputs have been designed by Sony impacts how we are able to
integrate them into our Luna system.
Bandwidth and length of the Luna fibre-optic tether. Different recording
and monitoring options for each camera are available for different tether
lengths (depending on whether your tether is 300m or shorter, or over
300m).
Boxfish Luna Camera Operation
R5. All rights reserved. Information and specifications may change at any time without notice. p6
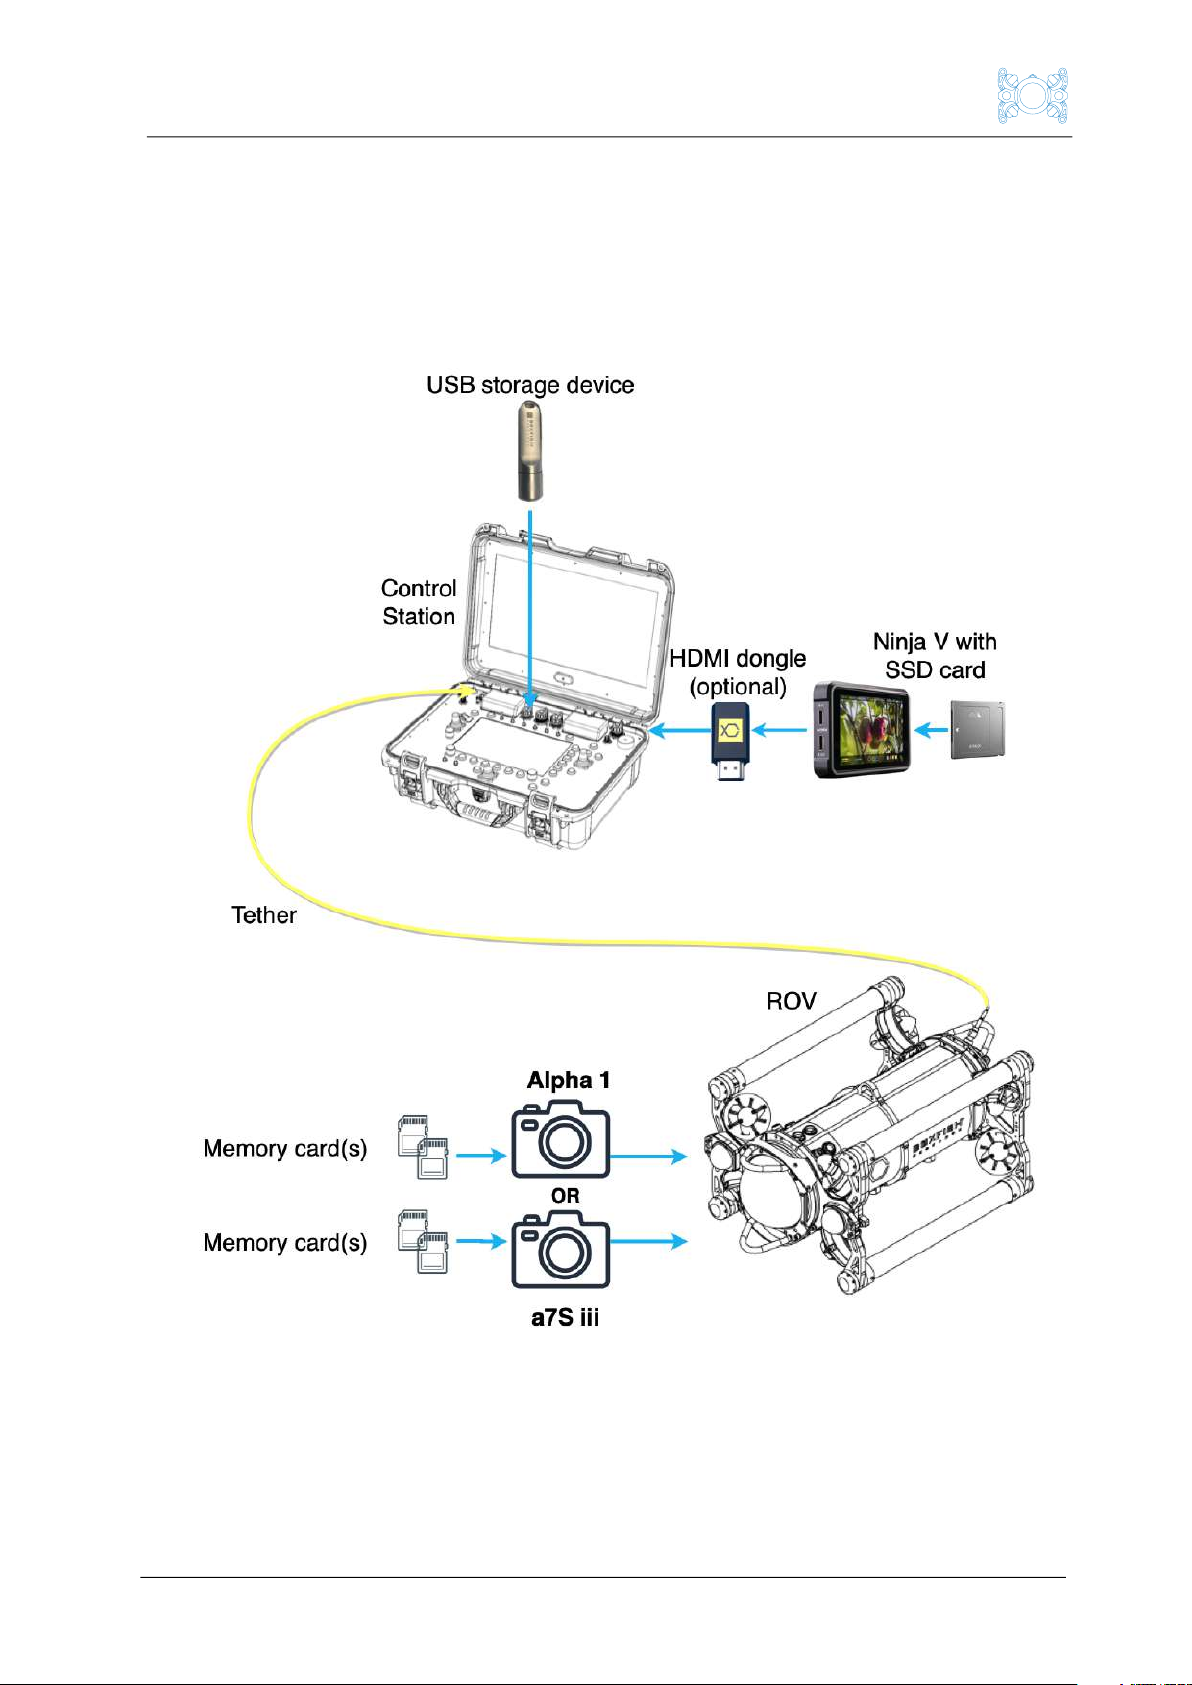
2 Overview of recording devices and storage devices
The diagram below shows the recording and storage devices that may be used
with the Luna. Not all devices are necessary; we will explain which devices are
required further in this manual.
2.1 Video recording devices
The Luna provides two options for recording video. Generally, we would
recommend recording with one or the other, however in certain scenarios you
can record with both devices simultaneously. The devices are:

Boxfish Luna Camera Operation
p7 R5. All rights reserved. Information and specifications may change at any time without notice.
1. The Ninja V. This device is attached to the Control Station. It records the
camera’s HDMI output, which is sent from the camera over the Luna’s tether.
The HDMI dongle only works with tethers ≤300m long, and its use is
explained later in this manual. OR
2. The Alpha 1 or a7S III camera itself. To record video using either of these
cameras, there must be a memory card installed in the camera (there will be
an 80GB CFExpress card installed in the front camera at our factory).
2.2 Video file storage devices
Where the video file is stored depends on the recording device used:
For video files recorded with the Ninja V: Video files recorded by the Ninja
is stored on the Angelbird SSD attached to the Ninja. A 500GB or 2TB SSD
will be supplied with your Luna (depending on what you have ordered).
For video files recorded by Alpha 1 cameras: Video files are stored on the
memory card inside the camera. When recording has finished, the files can
be downloaded over the tether to a USB storage device (a high-speed SSD
is preferable) attached to the Control Station. After the files are sent to the
USB device, they are deleted from the memory card.
For video files recorded by a7S III cameras: Video files are stored on the
memory card inside the camera. Video files for the a7S III are not the type
that can be sent over the tether, and so the card must be taken out of the
camera to access them (requires opening the Luna to access the camera).
2.3 Photo file storage device
Regardless of camera type, when a photo is taken by the Luna, the file is
temporarily stored by the camera’s internal memory (there is no need for a
memory card to be inside the camera). The file is then immediately transferred
over the tether to a USB stick attached to the Control Station.
Boxfish Luna Camera Operation
R5. All rights reserved. Information and specifications may change at any time without notice. p8
3 Initial camera setup
We will set up your Alpha 1 or a7S III at our factory. Full setup instructions will be
available in a separate document.
We have described some of the important settings you may wish to change
below:
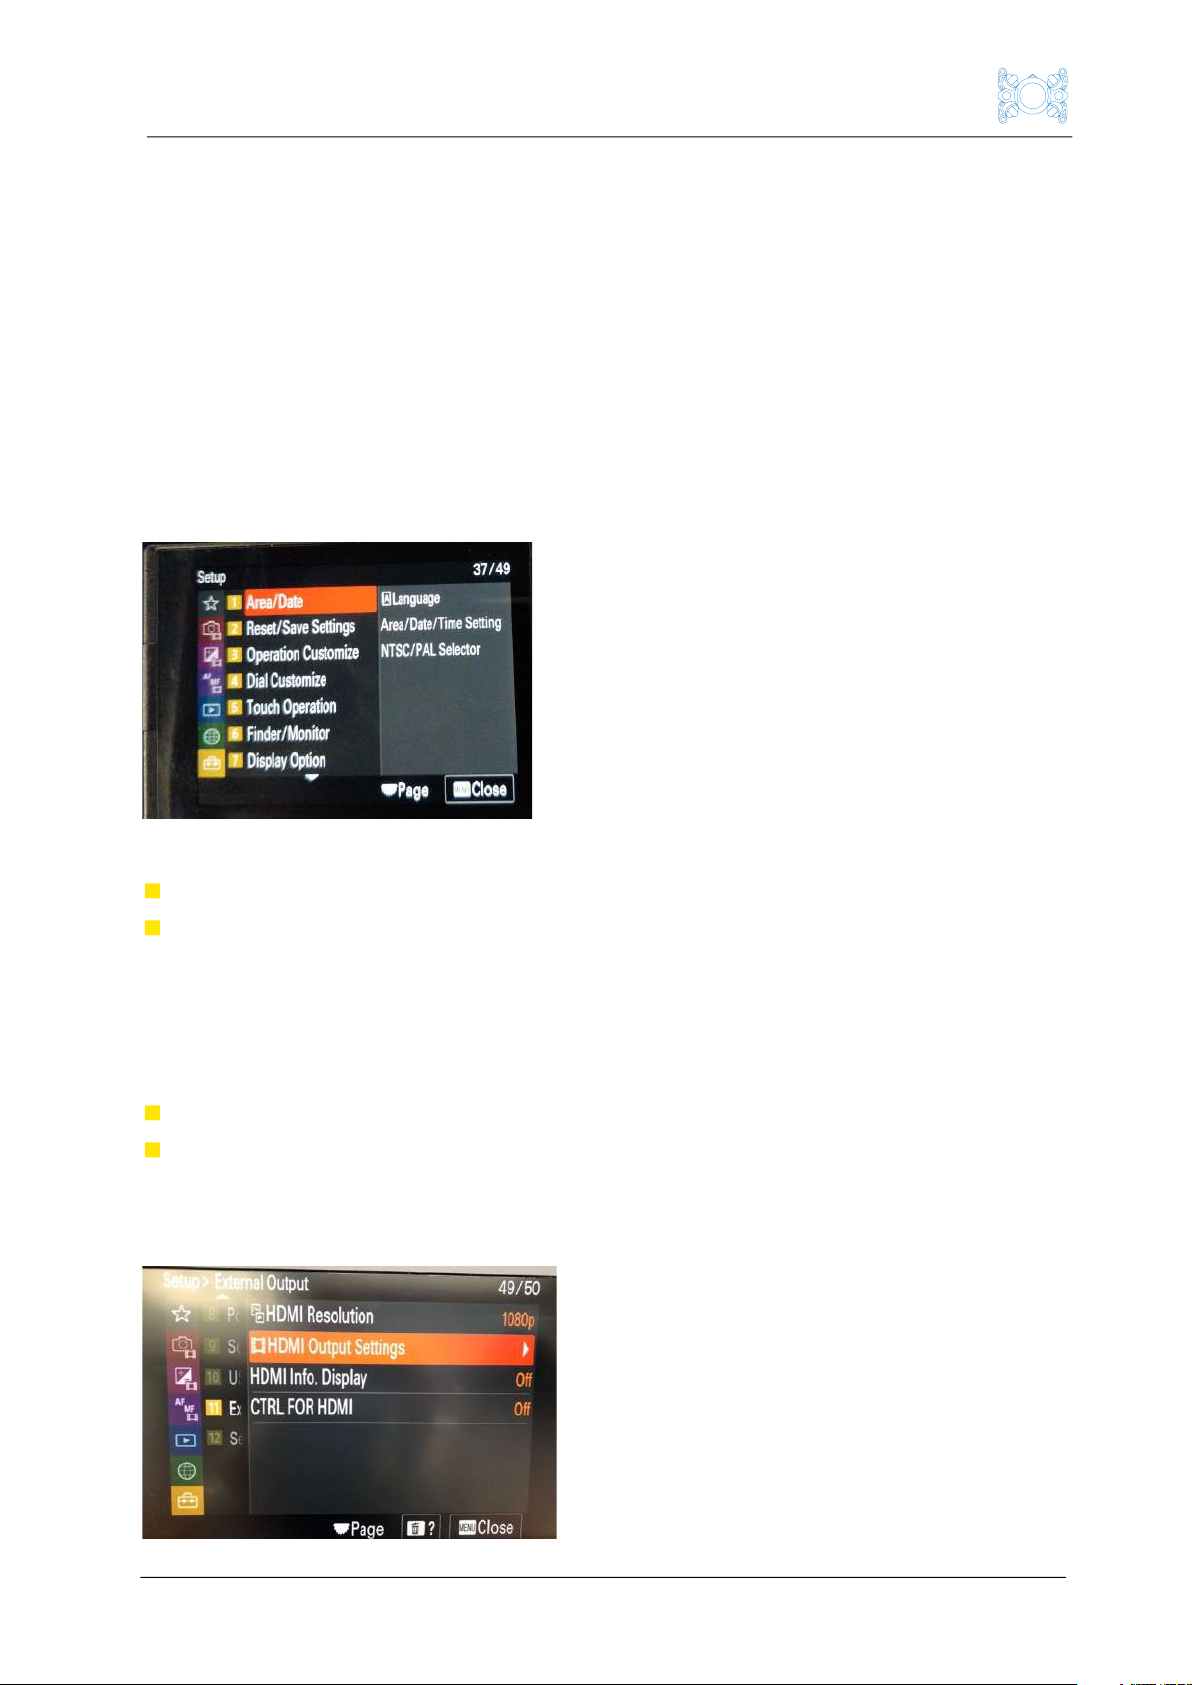
3.1 NTSC vs PAL
Depending on your region we will set up your camera for NTSC or PAL. This
setting can be found in the Setup > Area/Date > NTSC/PAL Selector menu.
Note that:
For NTSC, available recording framerates are 30p, 60p or 120p
For PAL, available recording framerates are 25p/50p/100p.
3.2 HDMI Output Settings
We will configure your HDMI Output Settings. These can be found on the Setup
> External Output > HDMI Output Settings depending on several factors:
The tether length of your Luna system (≤300m or > 300m)
The framerate you wish to record at, which determines the video resolution
you can output to the surface (to Ninja and Control Station 17” screen).
For reference, these settings are available on the camera in the following menu:

Boxfish Luna Camera Operation
p9 R5. All rights reserved. Information and specifications may change at any time without notice.
3.2.1 Tether length ≤300m
For Lunas with tethers that are 300m or less, we will set up your camera with
the below settings in the HDMI Output Settings menu:
Setting name
Value
RAW Output
On
Output Resolution
2160p
With these settings and tether length, you have a few options for recording
video, depending on whether you wish to record 25/30p or higher.
1. At 25/30p, you may:
Transmit RAW Output over the tether, which allows you to output 4.3K25p
(PAL) / 4.3K30p (NTSC) to the surface and use ProRes RAW compression on
the Ninja
Change from RAW to 10-bit by inserting the supplied HDMI dongle – this
allows you to record 4K25p (PAL) / 4K30p (NTSC) at either 10-bit 4:4:4 or 10-
bit 4:2:2 on the Ninja.
2. If you wish to record at higher framerates than 25/30p, you may record at
the frame rates below:
NTSC: 4K60p, or 4K120p or 8K30p on the camera, while transmitting 4K30p
to the surface for recording with the Ninja
PAL: 4K25p or 4K50p or 8K25p on the camera while transmitting 4K25p to
the surface for recording with the Ninja.
3.2.2 Tether length > 300m
Setting name
Value
RAW Output
Off
Output Resolution
2160p or 1080p
If your Luna has a tether longer than 300m, the tether is too long to transmit
RAW data to the surface. We will therefore set RAW Output to OFF on the
camera.
For the Output Resolution setting, we will select 2160p or 1080p for you at the
factory depending on what you prefer to record:
1. We will set 2160p if you wish to record mainly with the Ninja. This allows:
Transmission of 4K25p (PAL) / 4K30p (NTSC) over the tether for display and
recording on the Ninja.

Boxfish Luna Camera Operation
R5. All rights reserved. Information and specifications may change at any time without notice. p10
The option to record 8K30p on-camera, while also outputting 2160p to the
surface, so you can view 4K images on the Ninja and Control Station, and
simultaneously record 4K25p (PAL) / 4K30p (NTSC) on the Ninja if you wish.
2. We will set 1080p if you wish to record in framerates higher than 25p (PAL)
or 30p (NTSC). This allows you to record 4K50p (PAL) / 4K60p (NTSC) or
4K100p (PAL) / 4K120p (NTSC) on-camera. Note that surface monitoring and
any recording to the Ninja will be limited to 1080p.

Boxfish Luna Camera Operation
p11 R5. All rights reserved. Information and specifications may change at any time without notice.
4 What types of footage can be recorded with the Luna?
You can take both video and photos with your Luna.
4.1 Videos
Video recordings you can make with the Luna depend on a few factors:
The camera used (Alpha 1 or a7S III), and
Your Luna’s tether length (whether it is ≤300m or >300m), and
How we have configured the settings on your camera for RAW and Output
Resolution (see Section 3: Initial camera setup), and
Your desired recording framerate. Higher framerates of 50/100fps (PAL) or
60/120fps (NTSC) can be recorded on-camera, but this has an impact on
video resolution output to the surface. Surface recording with the Ninja is
limited to 25fps (PAL) / 30fps (NTSC).
4.1.1 Video options available for tether length of ≤300m
The table describes the recording options and various devices used if RAW
Output is ON and Output Resolution is 2160p.
Recording options
Monitoring at
surface
Recording
device
Storage
device
Retrieval
device
Record with Ninja:
RAW 4.3K25p (PAL) /
4.3K30p (NTSC)
4.3K25p (PAL) /
4.3K30p (NTSC)
Ninja
Ninja
SSD
Ninja
SSD
Record with Ninja:
10-bit 4K25p (PAL) / 4K30p
(NTSC) at 4:2:2 or 4:4:4 *
(must use HDMI dongle)
4K25p (PAL) /
4K30p (NTSC)
Ninja
Ninja
SSD
Ninja
SSD
Record on-camera (Alpha 1):
PAL: 10-bit up to
4K50p/4K100p or 8K25p
(must use HDMI dongle)
NTSC: 10-bit up to
4K60p/4K120p or 8K30p
(must use HDMI dongle)
4K25p (PAL) /
4K30p (NTSC)
Camera
Camera
memory
card
USB SSD
attached
to
Control
Station
Record on-camera (a7S III):
PAL: 10-bit up to
NTSC: 10-bit up to
4K60p/4K120p or 8K30p
(must use HDMI dongle)
4K25p (PAL) /
4K30p (NTSC)
Camera
Camera
memory
card
Camera
memory
card **

Boxfish Luna Camera Operation
R5. All rights reserved. Information and specifications may change at any time without notice. p12
* 4:4:4 colour sampling not available for a7S III cameras
** a7S III video files cannot be sent over the tether, therefore on-camera
recording requires opening Luna to get memory card from inside camera.
4.1.2 Video options available for tether length of > 300m
For tethers longer than 300m, RAW Output is not available, and surface
monitoring is limited to 1080p when framerates exceed 25p (PAL) / 30p (NTSC)
on-camera.
1. To record 4K50p (PAL) / 4K60p (NTSC), 4K100p (PAL) / 4K120p (NTSC) or
8K25p (PAL) / 8K30p (NTSC (on-camera), HDMI Output Settings must be
set up as follows:
RAW Output: Off
Output Resolution: 1080p
Footage options
Monitoring
at surface
Recording
device
Storage
device
Retrieval
device
Record on-camera (Alpha 1):
10-bit 4K50p (PAL) /
4k60p (NTSC)
10-bit 4K100p (PAL) /
4K120p (NTSC)
10-bit 8K25p (PAL) /
8K30p (NTSC)
1080p
Camera
Camera
memory
card
USB SSD
attached
to Control
Station
Record on-camera (a7S III):
10-bit 4K50p (PAL) /
4k60p (NTSC)
10-bit 4K100p (PAL) /
4K120p (NTSC)
10-bit 8K25p (PAL) /
8K30p (NTSC)
1080p
Camera
Camera
memory
card
Camera
memory
card *
*For a7S III cameras, must retrieve card from inside camera (open ROV)
2. To record 8K25p (PAL) / 8K30p (NTSC) on-camera (and 10-bit 4K25p (PAL) /
4K30p (NTSC) on the Ninja, if desired):
You can record 8K25p (PAL) / 8K30p (NTSC) on-camera, however the tether
limits display to 4K25p / 4K30p at the surface. It is also possible to record

Boxfish Luna Camera Operation
p13 R5. All rights reserved. Information and specifications may change at any time without notice.
4K25p / 4K30p with the Ninja simultaneously if you wish. HDMI Output Settings
must be set up as follows:
RAW Output: Off
Output Resolution: 2160p
Details
Monitoring
at surface
Recording
device
Storage
device
Retrieval
device
Record on-camera (Alpha 1):
10-bit 4K25p (PAL) /
4K30p (NTSC)
10-bit 8K25p (PAL) /
8K30p (NTSC)
4K25p /
4K30p
Camera
Memory
card
USB SSD
attached to
Control
Station
Record on-camera (a7S III):
10-bit 4K25p (PAL) /
4K30p (NTSC)
10-bit 8K25p (PAL) /
8K30p (NTSC)
4K25p /
4K30p
Camera
Camera
memory
card
Camera
memory
card *
Record with Ninja: 10-bit
4K30p
4K25p /
4K30p
Ninja
Ninja
SSD
Ninja SSD
*For a7S III cameras, must retrieve card from inside camera (open ROV)
4.2 Photos
Photo resolution depends on the type of camera: Alpha 1 takes 50MP RAW
photos and a7S III takes 12MP RAW photos. As soon as the photo is taken by
the camera it will be automatically transferred up the tether to the USB stick
attached to the Control Station (and deleted from the memory stick).
Photo options
Recording
device
Storage device
Alpha 1 (RAW 50MP)
Camera
USB stick attached
to Control Station
A7S III (RAW 12MP)
Camera
USB stick attached
to Control Station

Boxfish Luna Camera Operation
R5. All rights reserved. Information and specifications may change at any time without notice. p14
5 Overview diagram of recording options (NTSC)

Boxfish Luna Camera Operation
p15 R5. All rights reserved. Information and specifications may change at any time without notice.
6 Overview diagram of recording options (PAL)
Boxfish Luna Camera Operation
R5. All rights reserved. Information and specifications may change at any time without notice. p16
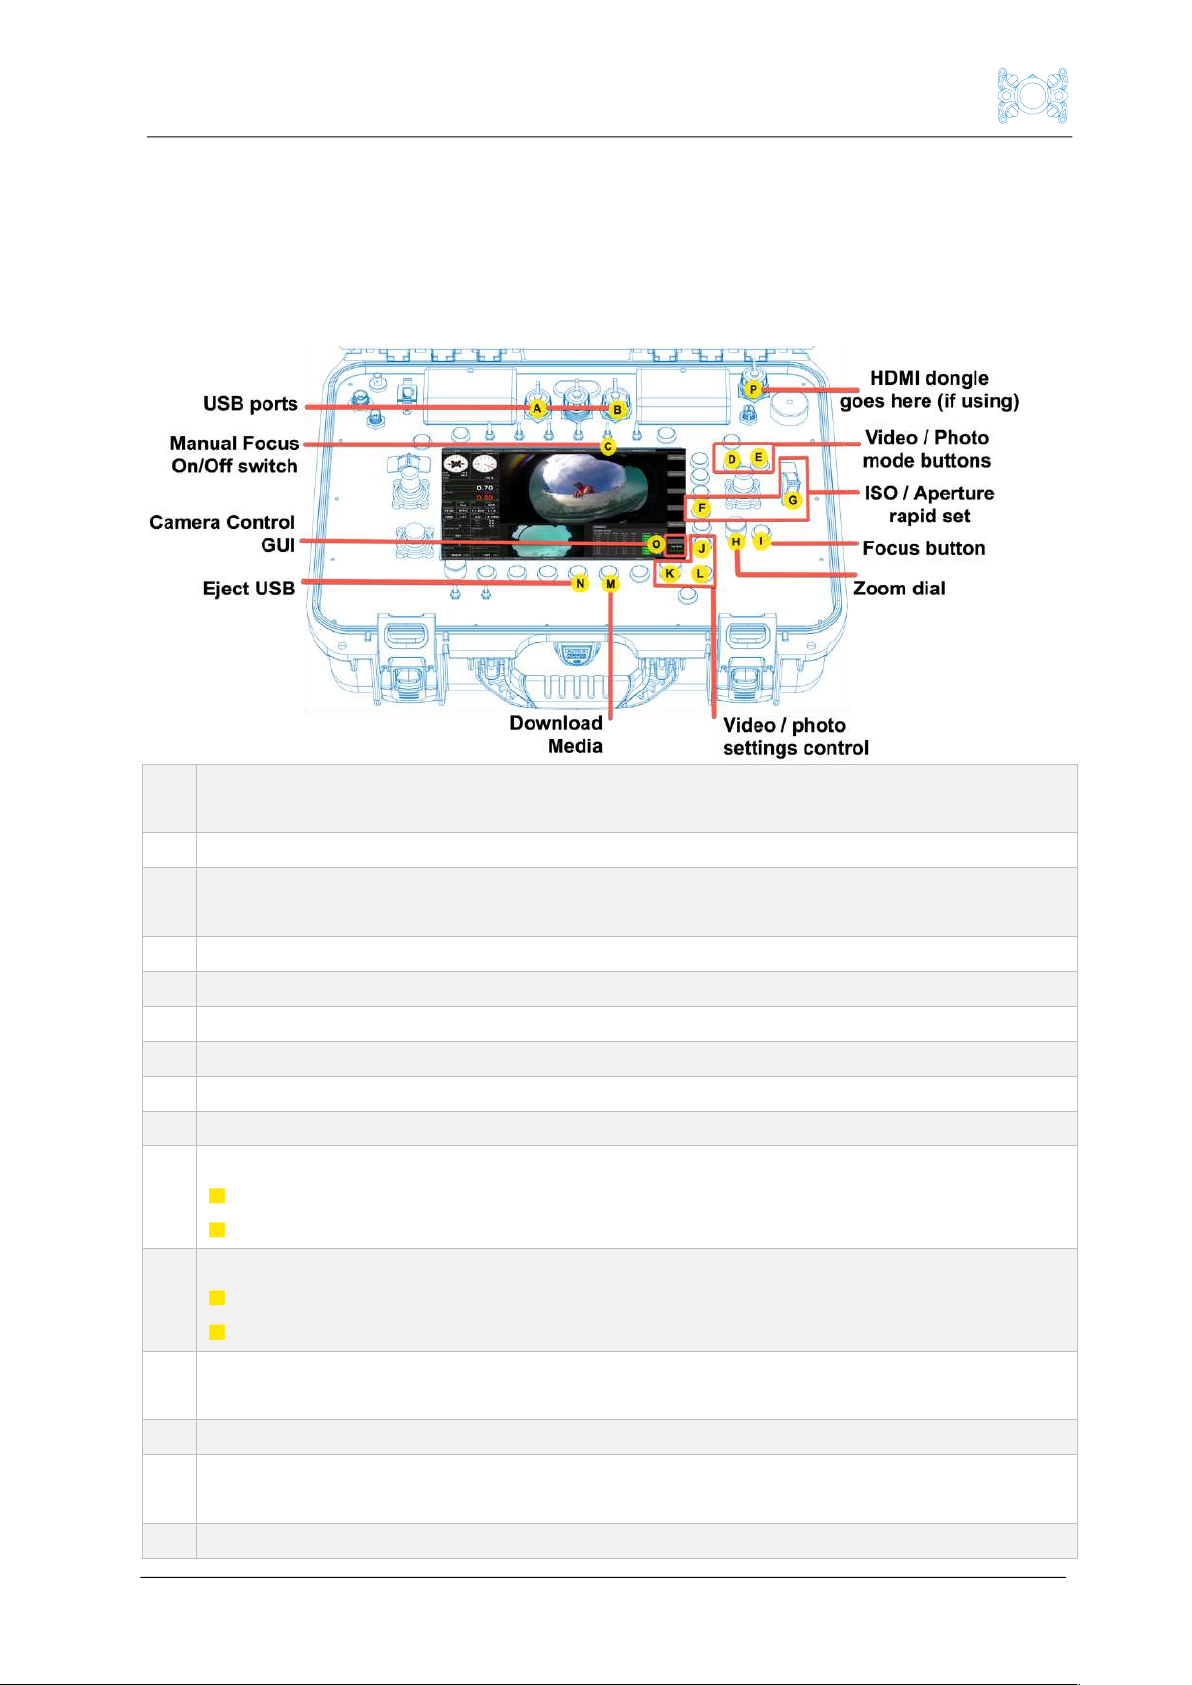
7 Overview of Control Station controls for Boxfish Luna
The below diagram shows the specific areas of the control station that are used
for functions of the Boxfish Luna. We will explain how to use these controls in
the appropriate sections of this manual.
A.
B.
USB ports: Used to connect a USB stick/SSD device to the Control Station for
photo and video transfer (video transfer available for Alpha 1 cameras only).
C.
Manual Focus On/Off switch
D.
VIDEO button. Change to video mode/start recording video, or press and hold
for six seconds to restart camera
E.
PHOTO button. Change to photo mode/take a photo
F.
(Optional) Rapid Set button. Use in conjunction with thumb wheel (G)
G.
(Optional) Thumb wheel to rapidly change ISO or aperture values
H.
Zoom dial. Zooms camera in and out
I.
Focus button
J.
Button to display available settings menus for photo and video.
K.
Scroll dial. Can be used to:
Scroll through available settings for each menu selected with (J)
Scroll through available USB ports (Aand Babove)
L.
OK button (✓). Can be used to:
Select a new setting
Select a device attached to the USB ports (Aand Babove)
M.
Download Video button. Used to download video recorded on-camera (to
memory card) up the tether to a USB stick
N.
Eject USB button: Use this to properly eject any USB devices attached to Aor B
O.
Camera Control GUI: Graphical User Interface for the camera control options
available on the Control Station
P.
HDMI dongle goes here if using (between HDMI port and HDMI cable to Ninja)

Boxfish Luna Camera Operation
p17 R5. All rights reserved. Information and specifications may change at any time without notice.
8 How to start the camera and access camera controls
8.1 Power up sequence
You should always power on the Control Station before powering up the ROV.
This will ensure that the correct camera settings display appears on the Control
Station.
When the Luna is powered up, the device powering the camera controls
(indicated by the Camera Control GUI) will also start up. Startup of the camera
controls can take a few minutes; please be patient and wait until the below
screen appears on the Control Station.
8.2 Camera Control GUI startup screen
During startup you will see messages appear on the
Camera Control GUI. On completion of a successful
startup, the screen will display a1 active or a7s III active in
green text. From this screen, you can start to adjust camera
settings. The next section describes the buttons/dials you
can use to see current settings and adjust their values.
If the Control Station was started after the Luna was powered on, the Camera
Control GUI will display Press to Start. From this screen you can also start to
adjust camera settings using the instructions in the following section.
8.3 Troubleshooting
If there are any problems during the startup process, an error message will
display on the Camera Control GUI, or you will not have any response when you
try to adjust camera settings.
In this case, you can restart the camera by pressing and holding the VIDEO
button for 10 seconds. Wait a few minutes for the Luna to power up correctly
and for a1 active or a7s III active to appear on Camera Control GUI.
IMPORTANT!
Please power on the Control Station and allow it to completely boot up
before powering up the ROV. Do not connect any USB devices to the
Control Station before it is powered up.
Boxfish Luna Camera Operation
R5. All rights reserved. Information and specifications may change at any time without notice. p18
9 How to remotely change movie/photo settings on the camera
Movie and photo settings are available on the Camera Control GUI (under the
Camera Control label on the bottom right of the telemetry screen).
9.1 How to load camera settings upon startup
As outlined in the previous section, best practice for the Luna system is to start
the Control Station first and then the Luna.
1. Power on the Control Station and wait for it to boot.
2. Power on the ROV and wait until the a1 active or a7s III active appears in
green text on the Camera Control GUI, as explained in Section 8: Camera
Control GUI startup screen.
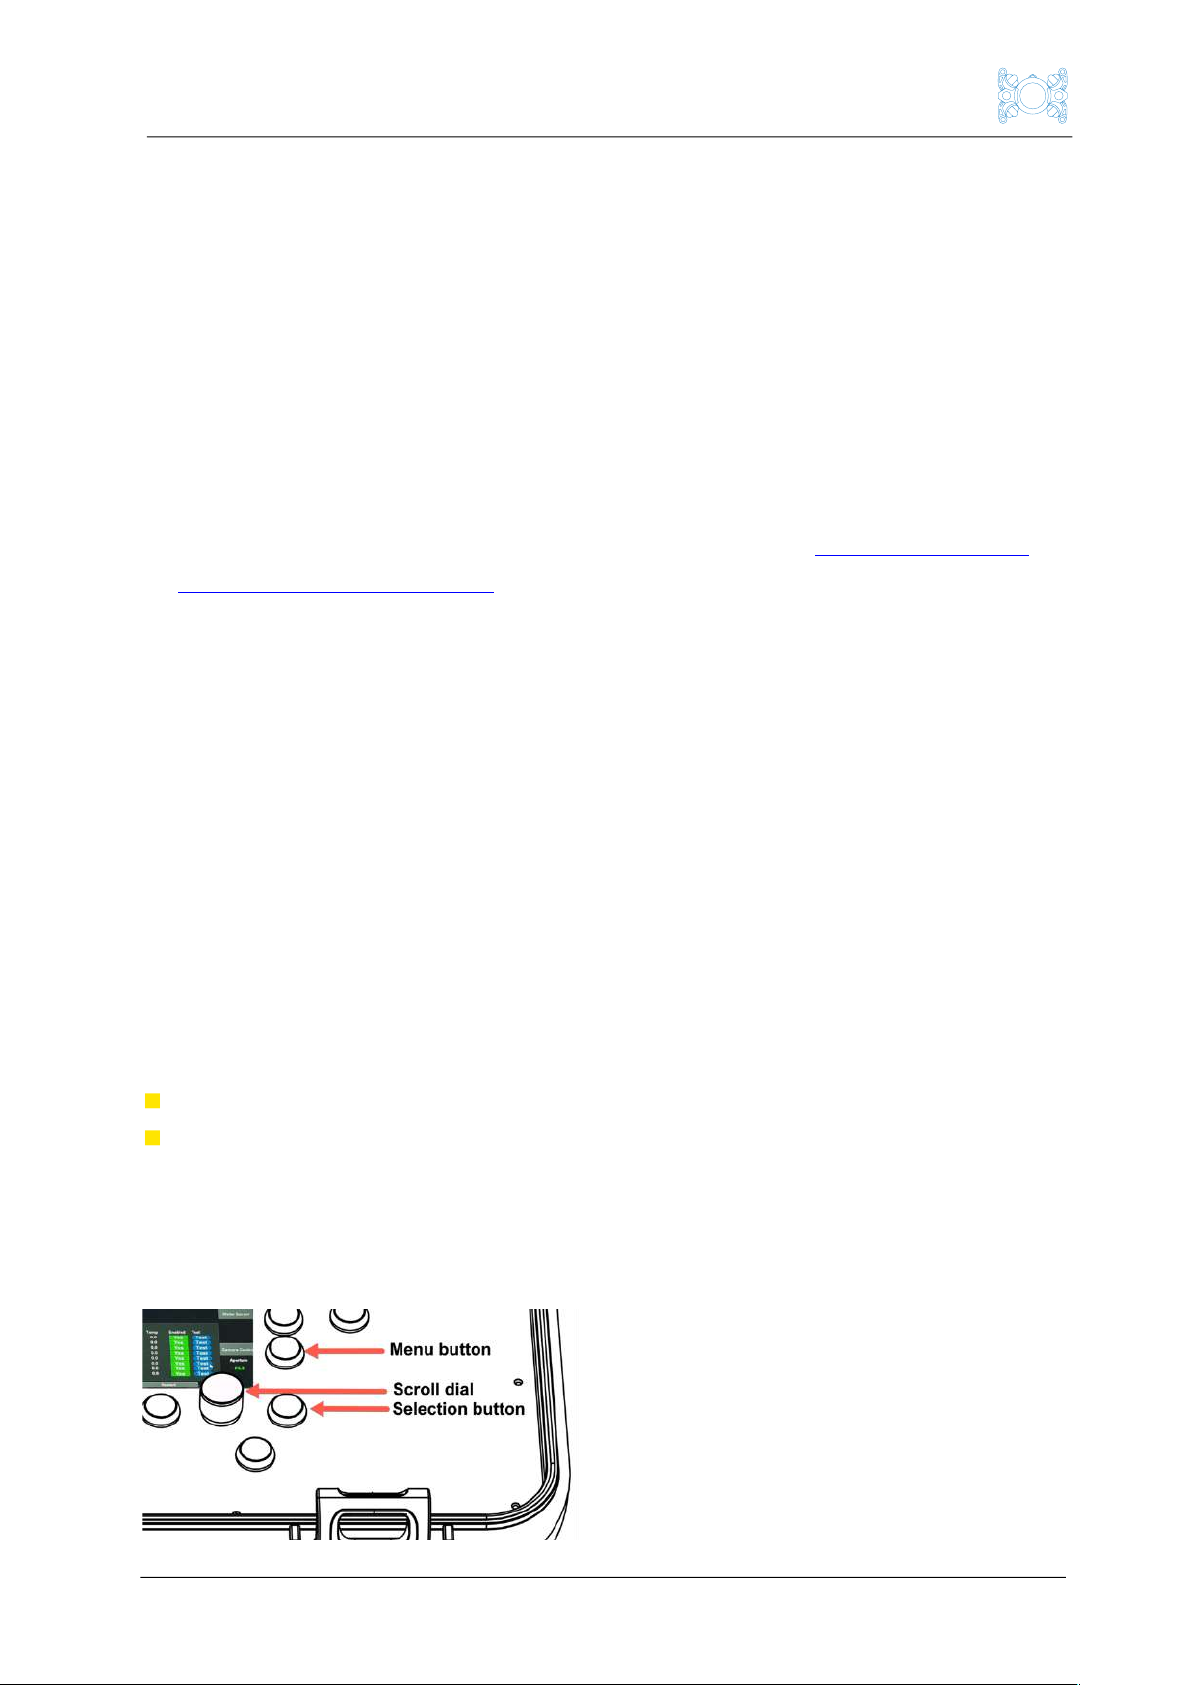
3. Press the Menu button (shown below). This will load the current settings
saved on the camera. By default, on startup the camera will be in Movie
mode. Therefore, movie settings will appear.
9.2 Changing from movie mode to photo mode (and back)
If you wish to change to Photo mode, press the PHOTO button on the Control
Station once. While settings are loading, the label Photo-Manual will display in
yellow text. When settings have loaded, it will appear in green text.
To change back to Movie mode, press the VIDEO button once. When settings
have loaded, Movie-Manual will appear in green text.
9.3 Camera control settings labels on the Camera Control GUI
Under the Camera Control heading are the following labels:
Top label in white colour (eg Aperture) is the name of the setting
Middle label in green colour (eg F6.3) is the currently selected value for the
setting
9.4 How to change camera settings
To change a setting, use the controls shown below.

Boxfish Luna Camera Operation
p19 R5. All rights reserved. Information and specifications may change at any time without notice.
1. Use the Menu button to move through the settings menus.
2. When the setting you want is displayed, use the scroll dial to scroll through
available values for the setting displayed. The value that is currently in use
will be displayed in green text. Other available values for the setting will be
displayed in white text.
3. Press the OK button (
✓
)to select the currently displayed value as the new
value for the setting. When you press the OK button, the value label on-
screen will turn yellow briefly before turning green to indicate it this setting
is now in use.
Note: As you change settings, the Luna will continuously check to see how it
has influenced other settings. When the Luna is updating settings, an orange
star in the top left will appear. While this is happening, the setting you see on
the Camera Control GUI may not be 100% correct, so wait until the star
disappears before changing other settings.
9.5 Rapidly adjust ISO and aperture (optional feature)
If your Control Station has this feature, you can use the Rapid Set button (F) in
conjunction with the thumb wheel (G) to rapidly adjust ISO and/or aperture
values.
Hold the Rapid Set button and move the thumb wheel up to increase values and
down to decrease values.
Stop moving the thumb wheel when your desired value appears onscreen (O).
9.6 Troubleshooting
If you experience any problems with changing settings, press and hold the
VIDEO button for six seconds. This will restart the camera. Wait for the settings
to become available again in the Camera Control GUI.
Other manuals for LUNA
4
Table of contents
Other Boxfish Drone manuals


