Boxfish LUNA User manual

Boxfish Luna Owner’s Manual
R2. All rights reserved. Information and specifications may change at any time without notice. p0
Owner’s Manual

Boxfish Luna Owner’s Manual
p1 R2. All rights reserved. Information and specifications may change at any time without notice.

Boxfish Luna Owner’s Manual
R2. All rights reserved. Information and specifications may change at any time without notice. p2
Table of Contents
1 Welcome to Boxfish ..........................................................................................................6
2 Safety..................................................................................................................................... 7
Lifting............................................................................................................................. 7
Hazards.......................................................................................................................... 7
Battery safety..............................................................................................................8
Safe ROV operation...................................................................................................9
3 About this document......................................................................................................10
Camera control .........................................................................................................10
Important notices and warning messages.......................................................10
4 Notices ................................................................................................................................. 11
5 Boxfish Luna ROV system overview .......................................................................... 12
Charge battery after receiving your ROV ........................................................ 12
Storage and shipping cases.................................................................................. 12
ROV............................................................................................................................... 13
Control Station.......................................................................................................... 14
Tether reel .................................................................................................................. 18
Accessory Box contents........................................................................................ 19
Optional accessories for the Boxfish ROV system.......................................25
6 Charging the ROV battery............................................................................................ 26
Battery charging safety information................................................................. 26
Summary of recommended voltages for ROV battery ................................27
Boxfish ROV battery charging procedures......................................................27
7 Putting together the Boxfish Luna system..............................................................32
Charge the ROV battery........................................................................................32
Affix front dome to ROV (if required)................................................................32
Connecting cables - connection diagram....................................................... 34
Connect Control Station to power.................................................................... 34
Assemble tether reel...............................................................................................35
Connect fibre patch cable to tether reel..........................................................35
Connect fibre patch cable to Control Station............................................... 36
Connect tether cable to ROV ..............................................................................37
Store fibre port caps and fibre cable caps safely......................................... 38
Attach Ninja V monitor/recorder to Control Station................................... 39
Familiarity with your ROV..................................................................................... 40

Boxfish Luna Owner’s Manual
p3 R2. All rights reserved. Information and specifications may change at any time without notice.
8 Powering on the Boxfish Luna.................................................................................... 42
Power on ROV with magnetic key..................................................................... 42
Power on Control Station..................................................................................... 42
View feeds on telemetry screen......................................................................... 42
9 Pre-deployment checks................................................................................................ 44
Camera setup and testing.................................................................................... 44
Apply and test vacuum on ROV pressure vessel.......................................... 44
Test LED illumination lights ................................................................................. 46
Test thrusters........................................................................................................... 46
Test scaling lasers (if present) .............................................................................47
Lubricate tether penetrator O-rings..................................................................47
Test Ninja V............................................................................................................... 48
Test camera setting controls .............................................................................. 48
10 Boxfish Luna pack up sequence (from out-of-water testing) ...................... 49
Eject USB stick ........................................................................................................ 49
Power off Ninja V Recorder................................................................................. 49
Power down camera and ROV............................................................................ 49
Unplug tether from ROV....................................................................................... 49
Disconnect fibre patch cable.............................................................................. 50
Power off Control Station .................................................................................... 50
Pack away other components ............................................................................. 51
11 Planning your dive............................................................................................................52
Charge ROV Battery ...............................................................................................52
Safety...........................................................................................................................52
Research your launch vessel/site.......................................................................52
Hazards........................................................................................................................53
Keeping the ROV cool ............................................................................................53
12 Deploying your Boxfish Luna in the water .............................................................. 54
Overview .................................................................................................................... 54
Assembling Boxfish Luna for a dive.................................................................. 54
Power on ROV and Control Station .................................................................. 54
Pre-deployment checks........................................................................................ 54
Turn on Sensor Power switch ............................................................................. 54
Put ROV in the water ..............................................................................................55
Make ROV balanced and neutrally buoyant....................................................55
Check depth sensor ............................................................................................... 56

Boxfish Luna Owner’s Manual
R2. All rights reserved. Information and specifications may change at any time without notice. p4
Begin launch sequence ......................................................................................... 56
13 Piloting your ROV.............................................................................................................57
Useful telemetry screen info for piloting .........................................................57
Navigation directions............................................................................................. 59
Piloting modes ......................................................................................................... 59
Speed.......................................................................................................................... 62
Using the LEVEL button ....................................................................................... 62
Adjusting the ROV LED illumination lights ..................................................... 63
Activate RTS Disable (Return to Surface Disable) ....................................... 63
More about Sea Mode and ROV Mode ............................................................ 63
Battery monitoring during your dive................................................................. 64
Battery limits ........................................................................................................ 64
Piloting tips and tricks........................................................................................... 64
Notes....................................................................................................................... 64
14 Managing tether cable during a dive ........................................................................ 66
Safety.......................................................................................................................... 66
Communication between tether operator and ROV pilot.......................... 66
Tips for tether management................................................................................ 66
Winding in the tether cable ................................................................................. 66
15 Bringing the ROV back to surface..............................................................................67
Safe ascent practices .............................................................................................67
How to bring ROV back to surface ....................................................................67
Power down camera and ROV.............................................................................67
16 After-dive procedures................................................................................................... 68
Disconnect ROV components and cables ...................................................... 68
Rinse ROV and tether............................................................................................ 68
Leave ROV components to dry .......................................................................... 68
Charge ROV battery............................................................................................... 68
17 Storing your ROV ............................................................................................................ 69
Prepare for storage ................................................................................................ 69
Adjust battery to storage voltage ..................................................................... 69
Power on your ROV for six hours, once per month ..................................... 69
18 Updating your ROV system ......................................................................................... 70
How to update Control Station .......................................................................... 70
How to update ROV .................................................................................................71

Boxfish Luna Owner’s Manual
p5 R2. All rights reserved. Information and specifications may change at any time without notice.
Troubleshooting for updates................................................................................72
19 Troubleshooting ...............................................................................................................73
Potential issues and solutions .............................................................................73
How to recalibrate ROV compass ......................................................................75
How to retrieve log files from Control Station ............................................... 77
Troubleshooting thrusters during a dive.......................................................... 77
20 ROV Maintenance........................................................................................................79
Cleaning the fibre optic connections ................................................................79
O-Ring maintenance ........................................................................................... 81
How to release vacuum from inside the ROV............................................ 82
How to replace thrusters and propellers .................................................... 83
How to reattach a thruster to the ROV ........................................................87
How to take out ROV tray and reinstall....................................................... 90
How to remove and replace the ROV battery pack..................................... 93
21 Shipping or travelling with the ROV...........................................................................97
Preparation.................................................................................................................97
Packing the ROV components.............................................................................97
Safe voltage for travelling with or shipping ROV battery...........................97
Shipping the ROV by air........................................................................................ 98
Taking out the ROV battery pack for travel ................................................... 98
22 Appendix I: Control Station – more information..............................................102
23 Appendix II: Telemetry screen – more information..........................................110
24 Appendix III: Boxfish Luna ROV – more information .......................................112
Status indicator LEDs............................................................................................113
25 Appendix IV: Document history..............................................................................115

Boxfish Luna Owner’s Manual
R2. All rights reserved. Information and specifications may change at any time without notice. p6
1 Welcome to Boxfish
Congratulations on your Boxfish Luna! Please read these instructions carefully
before use.
The Boxfish Luna is an ROV with an advanced camera (Sony a7S III or Alpha 1)
with surface recording and camera controls to capture cinematic-quality
underwater video and still images.
In this manual, and the accompanying Boxfish Luna Camera Operations Manual,
we aim to give you easy to follow instructions for using your Boxfish Luna.
We hope you enjoy your Boxfish Luna!
Boxfish Luna Owner’s Manual
p7 R2. All rights reserved. Information and specifications may change at any time without notice.
2 Safety
To prevent damage to your Boxfish product or injury to yourself or others, read
the following safety precautions before using your ROV. Keep this manual
where all those who use this product can read it.
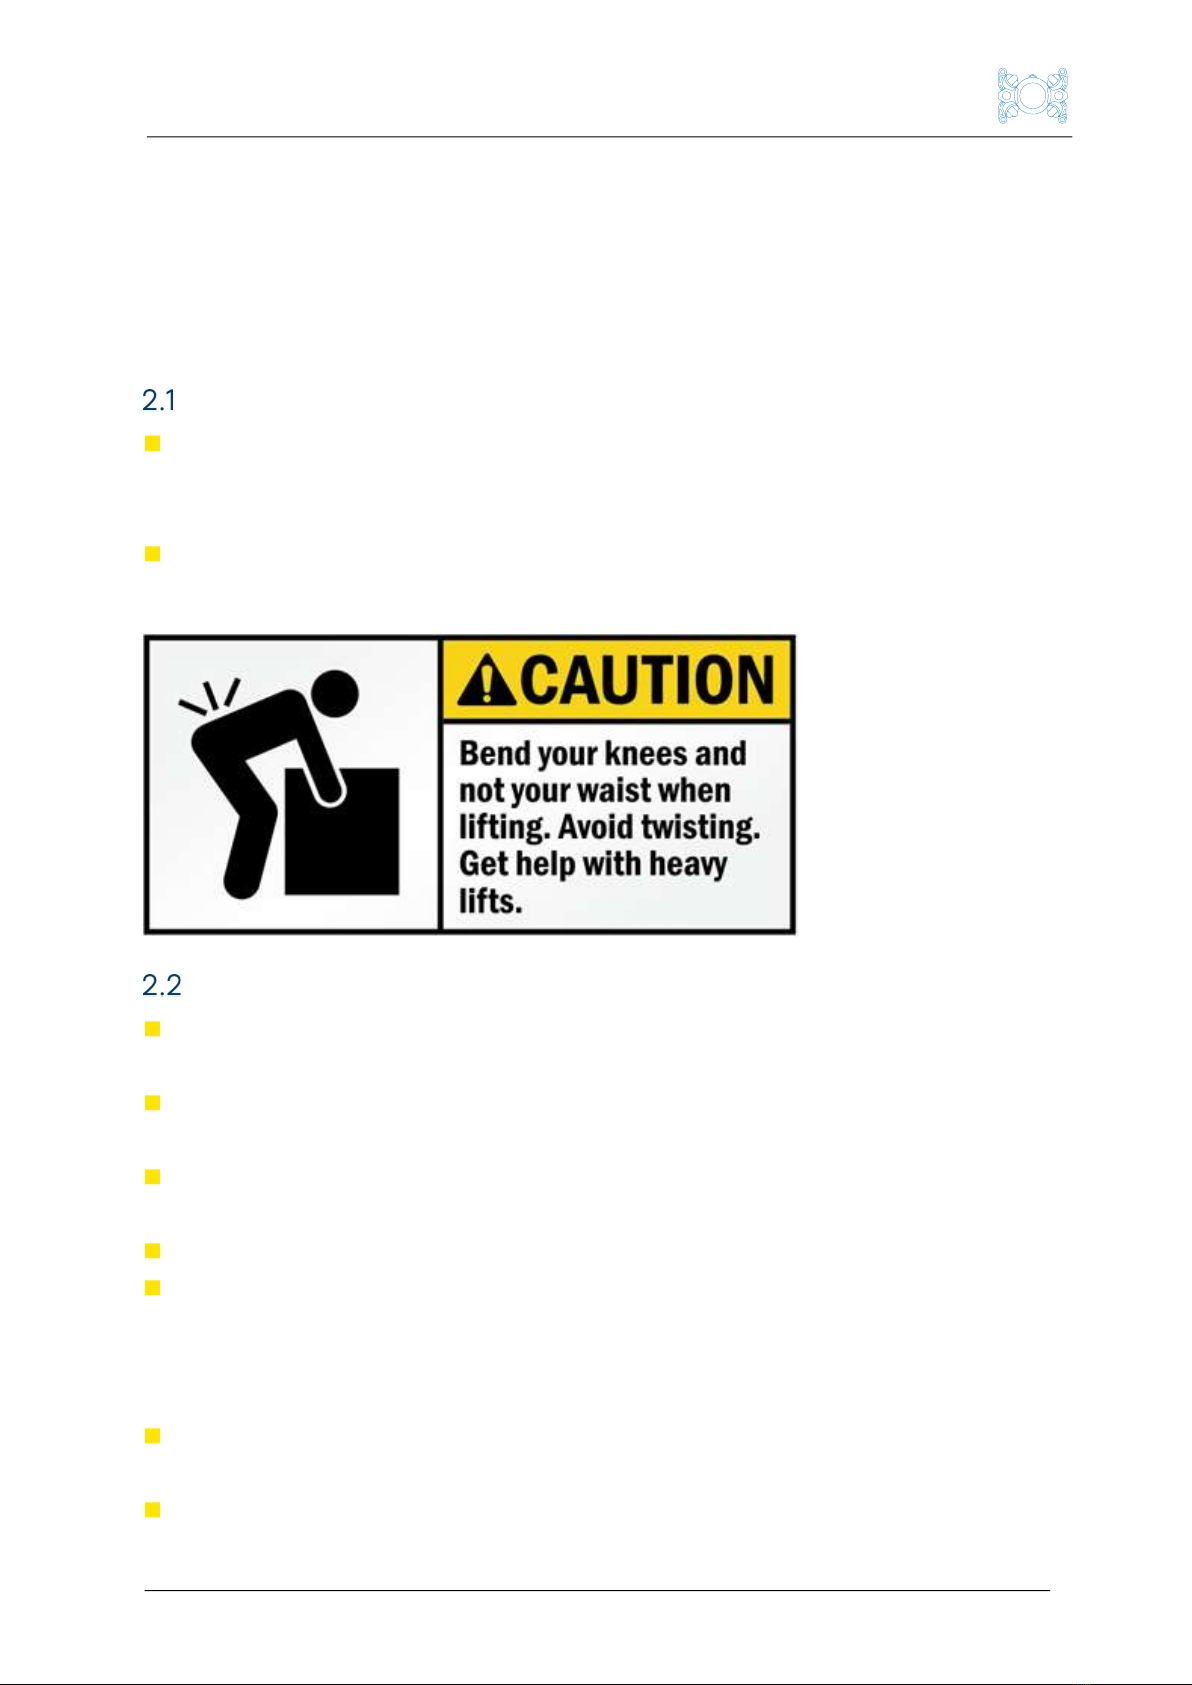
Lifting
The ROV, travel cases and larger tether reels (>1.2km version) are a two (2)
person lift. Some components of the Boxfish ROV system are bulky, heavy
and awkward; please take care when lifting.
The ROV can only be safely lifted by the stainless steel bumper/protection
bars, carbon fibre frame tubes, or the lifting eye on top.
Hazards
Take extreme care around deep water and potential slip hazards when
piloting and retrieving the ROV.
Plan your operations to minimize trip hazards from the ROV system,
especially the tether and cables.
Never operate the ROV in the presence of unaware swimmers or other
vessels.
Always supervise children around water and when ROV is operating.
While ROV is running pay close attention to the thrusters. Do not touch the
thrusters any time the ROV is powered on or serious injury may occur. Keep
fingers, long hair and loose clothing or anything that may become entangled
well clear of the thrusters when operating.
The ROV should not be operated close to any object which may get caught
in the thrusters.
DO NOT look directly into the ROV LED illumination lights when they are
turned on.

Boxfish Luna Owner’s Manual
R2. All rights reserved. Information and specifications may change at any time without notice. p8
DO NOT look directly into the ROV scaling lasers (if supplied). The scaling
lasers emit Class 3R laser light. Laser protective eye wear is normally not
necessary. A Class 3R laser is not a skin or materials burn hazard.
Battery safety
The ROV uses lithium-ion batteries. Misuse of the battery may cause the
battery to get hot, rupture or ignite and could cause serious injury.
Be sure to follow the safety rules listed below.
General battery safety
DO NOT place battery in a fire.
DO NOT heat battery.
DO NOT install battery so polarity is reversed.
DO NOT connect the positive and negative terminals of the battery to each
other with conductive material (such as wire).
DO NOT pierce, strike, stand on or subject the battery to strong impacts or
shocks.
DO NOT expose the battery to water or allow the battery to get wet.
DO NOT disassemble or modify the battery.
ONLY use replacement batteries supplied by Boxfish.
Battery charging for storage, diving and shipping
Follow the charging instructions, including the safety information, before
charging your ROV. See Section 6: Charging the ROV battery for all charging
information and the appropriate voltages for diving, storage and shipping.

Boxfish Luna Owner’s Manual
p9 R2. All rights reserved. Information and specifications may change at any time without notice.
Charging the ROV battery immediately after receiving your
ROV
To avoid damage to the battery and/or the ROV and its components, you MUST
charge the battery to 15.6V as soon as you receive your ROV.
Avoiding battery drain and battery damage
Internal components can cause the battery to drain even when the ROV is
powered down.
To protect the battery against total discharge, which is dangerous as well as
damaging for the battery and several other components inside the ROV, please
also power on the ROV once a month for six hours, after which you must charge
the battery to 15.6V.
Shipping the ROV battery
ROV battery must be discharged to a safe voltage of 15.0V for safe shipping
requirements. More information about shipping the ROV is contained in Section
21: Shipping or travelling with your ROV.
Disposing of the ROV battery
If you should need to, please dispose of the ROV battery safely, according to
local battery disposal laws.
Safe ROV operation
The Boxfish Luna takes at least two people to operate: one person to pilot
the ROV and one person to manage the tether cable.
DO NOT use the ROV below its depth rating: check the rating specified in
your order or contact us if you are unsure.
DO NOT operate in currents where control is impeded.
DO NOT operate outside the water temperature range of -10˚C to +45˚C.
DO NOT store the ROV outside the range of -20˚C to +70˚C.

Boxfish Luna Owner’s Manual
R2. All rights reserved. Information and specifications may change at any time without notice. p10
3 About this document
When first using your Boxfish Luna ROV, we recommend reading this document
from beginning to end. Once you are familiar with your ROV, you can use it as a
reference or to refresh your memory.
This document covers information related to piloting your ROV, and general
usage, maintenance and troubleshooting instructions, including:
Components of the ROV system.
How-to guides for using your ROV, from out-of-water familiarity and testing,
right through to detailed operations.
Tips and tricks to get the best out of your ROV.
Storage instructions.
Maintenance instructions.
Troubleshooting tips.
Appendices with more detailed specifications of ROV components.
Camera control
This document does not go into detail about how to take video or still images
with the Luna. We have created a separate manual, the Boxfish Luna Camera
Operations Manual with all information related to shooting video and photos.
Important notices and warning messages
Throughout this document you will see the following messages:
IMPORTANT!
Important notices draw your attention to things you must do (or must not
do) so that you don’t BREAK OR DAMAGE the ROV or its accessories.
WARNING!
Warnings are for your SAFETY so that you don’t CAUSE
INJURY to yourself, any other operators of the ROV, or people
nearby.

Boxfish Luna Owner’s Manual
p11 R2. All rights reserved. Information and specifications may change at any time without notice.
4 Notices
Boxfish Research reserves the right to change the specifications of the
hardware and software described in this manual at any time and without prior
notice.
Boxfish Research will not be held liable for any damages resulting from the use
of this product.
While every effort has been made to ensure that the information in this manual
is accurate and complete, Boxfish Research will not be held responsible for any
errors or omissions. We would appreciate it if you could bring any errors or
omissions to the attention of Boxfish Research.

Boxfish Luna Owner’s Manual
R2. All rights reserved. Information and specifications may change at any time without notice. p12
5 Boxfish Luna ROV system overview
Charge battery after receiving your ROV
Storage and shipping cases
Your Boxfish Luna system will arrive in at least three large waterproof Pelican
cases. The ROV should be stored and shipped in these cases.
1.
Front dome case. Contains front dome for ROV.
2.
Tether reel case. Includes tether reel, tether cable and winder handle.
3.
Control Station case / Accessories Box. Contains the Control Station
in its own case*. Also includes all necessary cables, tools and spare
parts for your ROV.
4.
ROV case. Can also be used to soak ROV for cleaning.
* Note: The Control Station MUST be inside the Accessory Box for protection
during shipping or travel.
IMPORTANT!
As soon as possible after receiving your ROV, you MUST charge its battery
to 15.6V This will prevent the battery from draining completely and will
prolong the life of the battery and protect the components inside the ROV.
See Section 6: Charging the ROV battery for instructions.
Boxfish Luna Owner’s Manual
p13 R2. All rights reserved. Information and specifications may change at any time without notice.
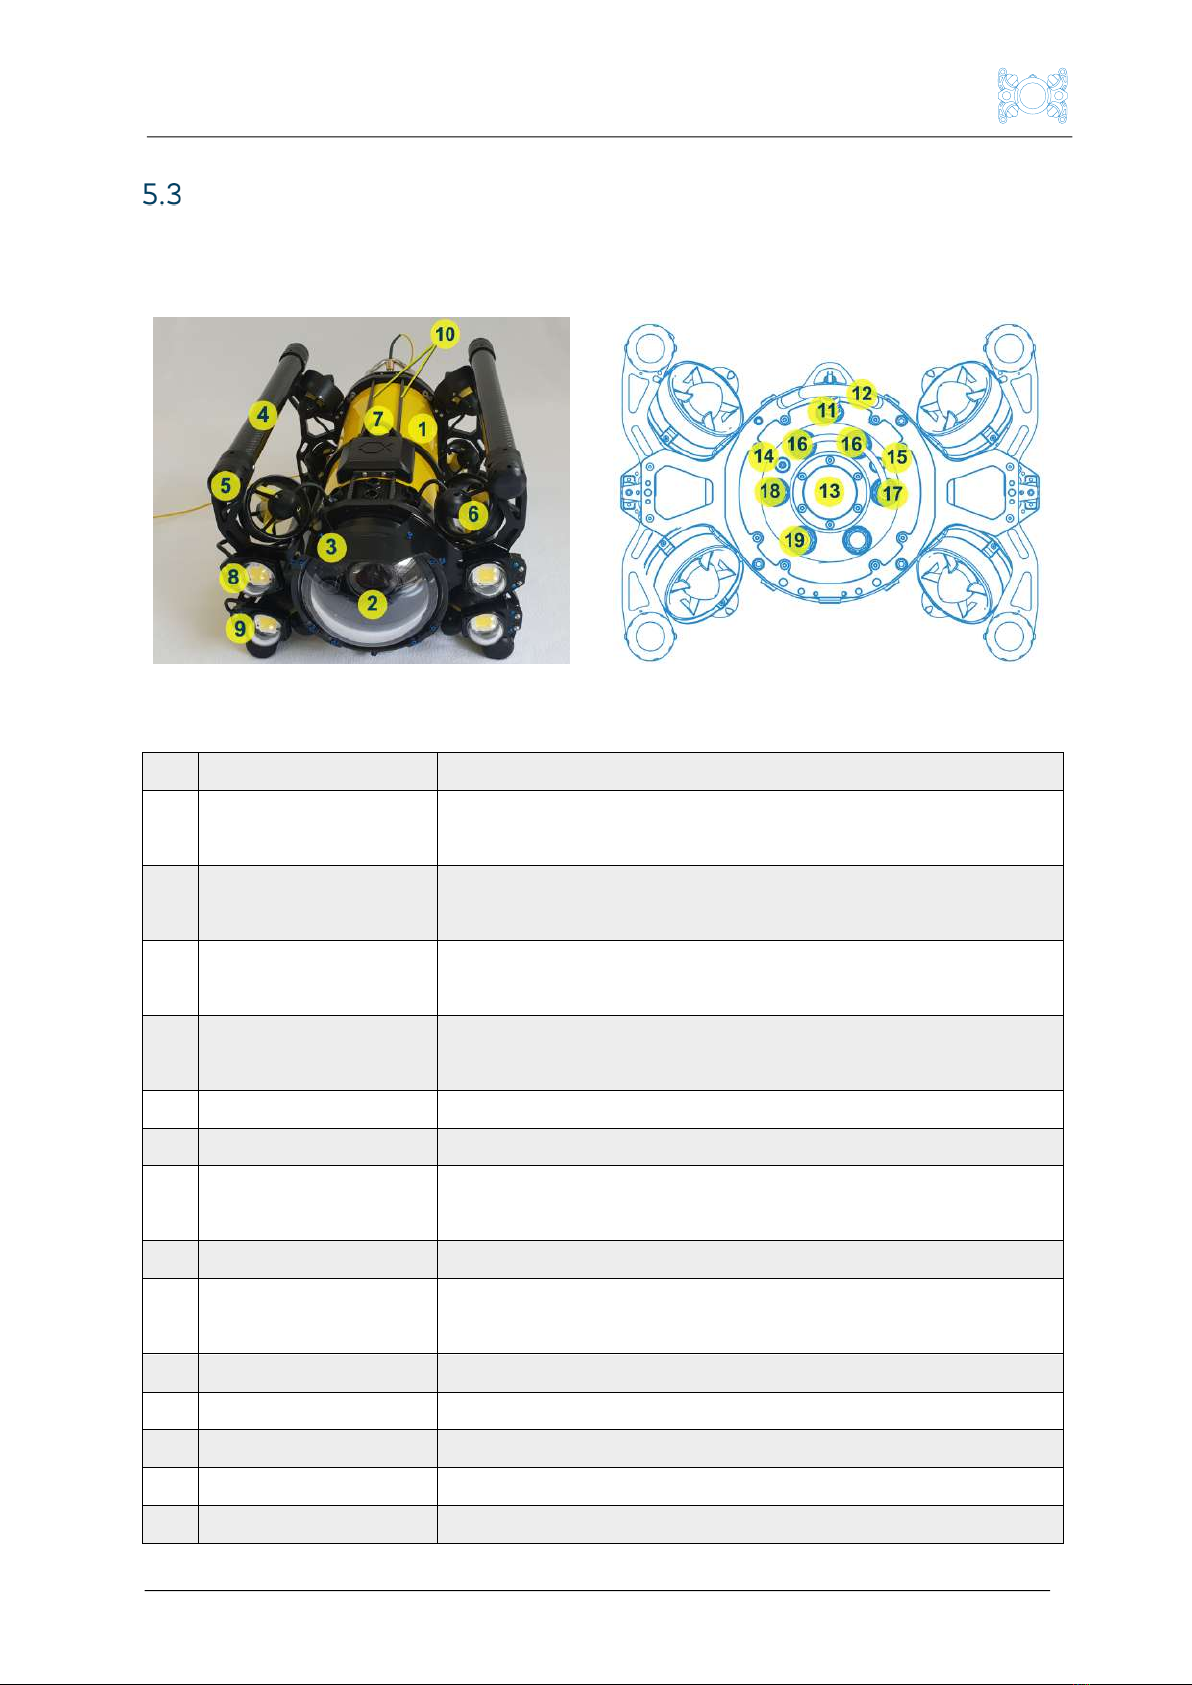
ROV
Note: Individual Boxfish Luna ROVs may vary slightly from pictures and
descriptions below, but most components will remain the same.
Front and left side view
Rear view
1.
Pressure vessel
Pressure-rated ROV body
2.
Front dome
Contains Sony a7S III or Sony Alpha 1 front camera
and wide-angle navigation camera.
3.
Sunshade/bumper
Black Perspex sunshade/bumper on top and
bottom of dome
4.
Frame tube/lifting
tube
Carbon-fibre shock-absorbing buoyancy tubes with
balancing chambers at each end
5.
Ballast chambers
Ballast chambers for holding ballast rings at each
end of frame tubes
6.
Thrusters
Eight 3D vectored thrusters
7.
Lifting eye
For attachment of a lifting or securing cable
8.
Lighting arms and
LED lights
Adjustable arms with LED illumination lights
9.
(Optional)
Adjustable LEDs (optional extra)
10.
Rails for optional
accessories
For mounting accessories such as sonar or USBL
11.
Tether port
To connect fibre optic tether cable
12.
Rear bumper
Stainless steel protective bumper
13.
Rear dome
Contains Status LEDs and rear camera
14.
Off pad (red)
For powering off ROV using magnetic key
15.
On pad (green)
For powering on ROV using magnetic key

Boxfish Luna Owner’s Manual
R2. All rights reserved. Information and specifications may change at any time without notice. p14
16.
Battery charge
ports
Positive and negative ports (terminals) for battery
charging
17.
Battery balance
port
For connecting cell balancing cable to charge each
battery cell to the same voltage
18.
Vacuum port
Port for applying vacuum to ROV body
19.
Depth sensor
Port containing ROV depth sensor
Front camera
With the Boxfish Luna ROV there are two options for the front camera: the
Sony a7S III and Sony Alpha 1.
An easy-to-use mounting system inside the ROV makes it easy to change
lenses (if supplied), adjust physical dials on the camera and even swap between
cameras (if both cameras are ordered).
Please see the separate Boxfish Luna Camera Operations Manual for details on
how to use the camera.
Note about front dome
Luna ROVs with the larger Nauticam N200 dome must have the dome removed
so that the ROV can fit inside its case. A cap will be affixed to the front of the
ROV to protect components during shipping.
Control Station
The Control Station is a multifunctional surface unit. It is used to:
Receive and display video and telemetry data from the ROV
Pilot the ROV
Remotely operate the front camera inside the ROV and facilitate recording
of photos and video
Plug in optional accessories or connect a computer
Update software and firmware for the ROV and Control Station
Retrieve logs from the ROV (if needed for troubleshooting purposes).
The Control Station is connected to the ROV via the fibre patch cable and
tether cable.

Boxfish Luna Owner’s Manual
p15 R2. All rights reserved. Information and specifications may change at any time without notice.
Control Station layout
1.
17” 4K monitor. Displays video feed from front camera
2.
POWER: Power in port. Provides power to the Control Station, via:
Boxfish AC Adapter (15 Volts 13.4 Amps), OR
IMPORTANT!
The Control Station is designed to be splash-proof but it is not waterproof.
Ensure all ports are covered when not in use. Do not block the air vents
otherwise the Control Station could overheat.

Boxfish Luna Owner’s Manual
R2. All rights reserved. Information and specifications may change at any time without notice. p16
Directly from a DC supply capable of supplying 10 Amps with the
Boxfish DC Power Cable, OR
Boxfish DTap power cable.
3.
FIBRE communication port: used to send/receive telemetry, control
signals and video between the Control Station and the ROV.
Communication is provided by connecting a fibre optic patch cable
between the fibre communication port and the tether reel fibre
connector and the tether cable to the ROV.
4.
EXT port. Supplies 12V and can be used to power the local USBL beacon
(if USBL accessory is supplied). Usage will be detailed in the accessory
manual.
5.
ETHERNET: RJ45 network port. Can be used to connect a
laptop/computer to the Control Station. Use only if you have specific
accessories fitted (such as sonar or USBL) that require a laptop to be
connected. Usage will be detailed in the accessory manual.
6.
LEVEL button. Can be used to zero the controls and restore the ROV to
zero roll and pitch
7.
ENABLE button (green). Used to power on Control Station, and to enable
the thrusters during the launch sequence
8.
THRUST control thumb wheel. Used to adjust speed of the ROV through
the water
9.
LEFT joystick. Controls the ROV depth and lateral (sideways “crab”)
movement
10.
AUX joystick. Controls pitch and roll ROV movements
11.
Dial for adjusting intensity of LED illumination lights
12.
Lighting Switch. Turns on and off LED illumination lights
13.
Lasers Switch. Turns on and off lasers (if optional lasers are fitted)
14.
Mode button. For selecting ROV operational mode: Sea Mode, Sea-Q
Mode, ROV Mode or ROV-Q Mode
15.
Stabilisation Hold switch. To enable/disable Stabilisation Hold function
16.
Depth Hold switch. To enable/disable Depth Hold function
17.
Sensor Power on/off switch. Used to supply power to additional sensors
or accessories (if present on your ROV). Use only as directed in the
applicable manual for the sensor/accessory
18.
RTS Disable switch (Return to Surface Disable) to enable/disable
automatic return to surface functionality

Boxfish Luna Owner’s Manual
p17 R2. All rights reserved. Information and specifications may change at any time without notice.
19.
Manual Focus on/off switch. To toggle focus mode of front camera
between Auto Focus and Manual Focus
20.
Altitude Hold on/off switch (can only be used if optional altimeter
accessory is present)
21.
Multi-functional buttons – includes controls for changing settings on the
front camera, compass calibration and troubleshooting features.
Functions of specific buttons are explained further in this manual
22.
Dial to scroll through available settings for the front camera on the
Control Station Camera Application
23.
OK button (✓). Used for thruster test or to select a setting for the front
camera using the camera application
24.
Cancel button (X).
25.
Zoom dial to adjust zoom on front camera
26.
FOCUS button. Used to manually focus the front camera
27.
RIGHT joystick. Controls ROV yaw and forward/back movement
28.
PHOTO button. Can be used to take a photo with the front camera – see
separate Boxfish Luna Camera Manual for details
29.
VIDEO on/off toggle button. Pressing once will turn the camera off.
Pressing again will turn the camera on again – can be used for
troubleshooting
30.
ZOOM/FN thumb wheel. Used to adjust camera’s aperture and ISO
31.
Stop button (red). Used to power off the Control Station
32.
¼” mounting plate. Used to attach the mount for the Ninja V Recorder
accessory
33.
ACCESSORY port. Supplies power to the Ninja V
34.
CLEAN HDMI port. Used to route the video signal from the ROV to the
Ninja V Recorder)
34.
Air ventilation intakes. Used to keep Control Station cool. Do not cover
or allow water to enter
36.
Left USB port. Can be used to upload photo files from the front camera
to a USB stick. Also used for updates to the Control Station and ROV
37.
HDMI In port used to send video signal from the Ninja to the 17” 4K
screen
38.
Right USB port
39.
Telemetry screen. Used to view data and navigation video from the ROV
to assist in piloting

Boxfish Luna Owner’s Manual
R2. All rights reserved. Information and specifications may change at any time without notice. p18
More information and specifications of the Control Station is in Appendix I:
Control Station – more information. Camera-related controls are explained in
detail in the separate Boxfish Luna Camera Operations Manual.
Tether reel
The tether reel comes in a few standard sizes and lengths depending on the
depth capability of your ROV. The parts shown below are common to all sizes.
The tether penetrator (at the end of the fibre optic tether cable) attaches to
the ROV.
The tether reel connects to the Control Station via a fibre patch cable, which is
attached to the side of the tether reel.
1.
Tether cable
(fibre optic)
Durable fibre optic cable neutrally buoyant in salt water.
Carries all control and video signals to and from ROV.
Comes in a few standard diameters, depending on the
depth capability of your ROV: 2.7mm, 3.7mm or 4.3mm.
2.
3.
Tether
penetrator and
protective
caps
This is the brass connector containing the fibre cable at
the end of the tether cable, The tether penetrator is
used to attach the tether to the ROV. The tether
penetrator should always be covered with TWO caps
when not connected to ROV: a small clear plastic cap
should cover the exposed end of the fibre cable, and
the large black plastic cap should cover the whole brass
assembly. Additionally, the black plastic cap should be
screwed into its black plastic collar on the tether cable.
4.
Drum
Stores the wound tether cable. Cable should not be
kinked or twisted. Light tension should be applied to the

Boxfish Luna Owner’s Manual
p19 R2. All rights reserved. Information and specifications may change at any time without notice.
Accessory Box contents
The following accessories are provided in the Accessory Box as a minimum.
There may be more items if you have ordered additional accessories.
Camera peripherals
Original lens cap(s) for camera and any spare lenses supplied
Original battery charger and a spare battery
Boxfish HDMI dongle (pictured below) to plug into CLEAN HDMI port on
Control Station. See Boxfish Luna Camera Operations Manual for usage.
Control Station power cables
Power can be supplied to the Control Station via one of the options below:
AC outlet, or
D-Tap, or
12V DC source such as boat or car.
Universal single-phase (100-250V AC 50-60 Hz) AC
adaptor for powering the Control Station from an AC
supply.
tether cable to make sure it is not jammed or kinked
while winding on to the drum.
5.
Carry handles
Used to carry and move the tether reel. Larger tether
reels (carrying more than 1000m tether cable) are a two
(2) person lift; please take care when lifting.
6.
Fibre patch
cable port
Port for the fibre optic patch cable between the tether
reel and the Control Station. Always cover the
connector with its red/yellow cap when not in use.
7.
Tether reel
winder handle
and
thumbscrew
Used to wind the tether cable back onto the drum.
Needs to be attached using the thumbscrew provided.
Not for use as a winch: do not use winder to retrieve
ROV using the tether cable.
Other manuals for LUNA
4
Table of contents
Other Boxfish Drone manuals


