7
4. Operation
¾Before plugging in and switching on the machine, check to ensure
that the voltage on the rating plate is in accordance with the
voltage at your site (see type plate).
¾The machine can be switched on and off with one hand by means
of the sliding switch 51, which is located midway between the two
ends of the machine (see fig.).
CAUTION
¾Do not under any circumstances switch on the machine if it has
not been properly fitted out with cutter plates!
¾Always unplug the machine before carrying out any
maintenance work on it!
¾Always lay the machine on a dry surface, and store it in a dry
place!
Please note
The overload switch shuts the machine down if there is excessive
pressure on the plates, if the cutting head is jammed, or if the motor is
malfunctioning. When the overload switch is activated, the head of the
switch pops out of the back of the motor cover.
Inspect the machine with the plug disconnected from the socket, and
eliminate the cause of the shutdown. The overload switch can be
turned back on after a few minutes by pressing the head of the switch,
which is at the back of the motor.
5. Oiling the cutter head
Important
¾Oil the machine only while it is running!
¾Never immerse the cutter head in liquid of any kind!
¾Use either a light lubricating oil (see parts list for cutter head
GT 369) or SAE 20 motor oil.
¾Oiling hole A(eccentric bearing): Apply 5-10 drops of oil for every
2 hours of operation.
¾Oiling holes Band C: Apply 5-10 drops of oil every 15 minutes.
¾Cutter plates 1and 2should be kept well-oiled at all times, the
quantity of oil used varying from animal to animal (see fig.)
6. Greasing the cutter head
¾Use only gear grease GT 605!
1-2 times per shearing season:
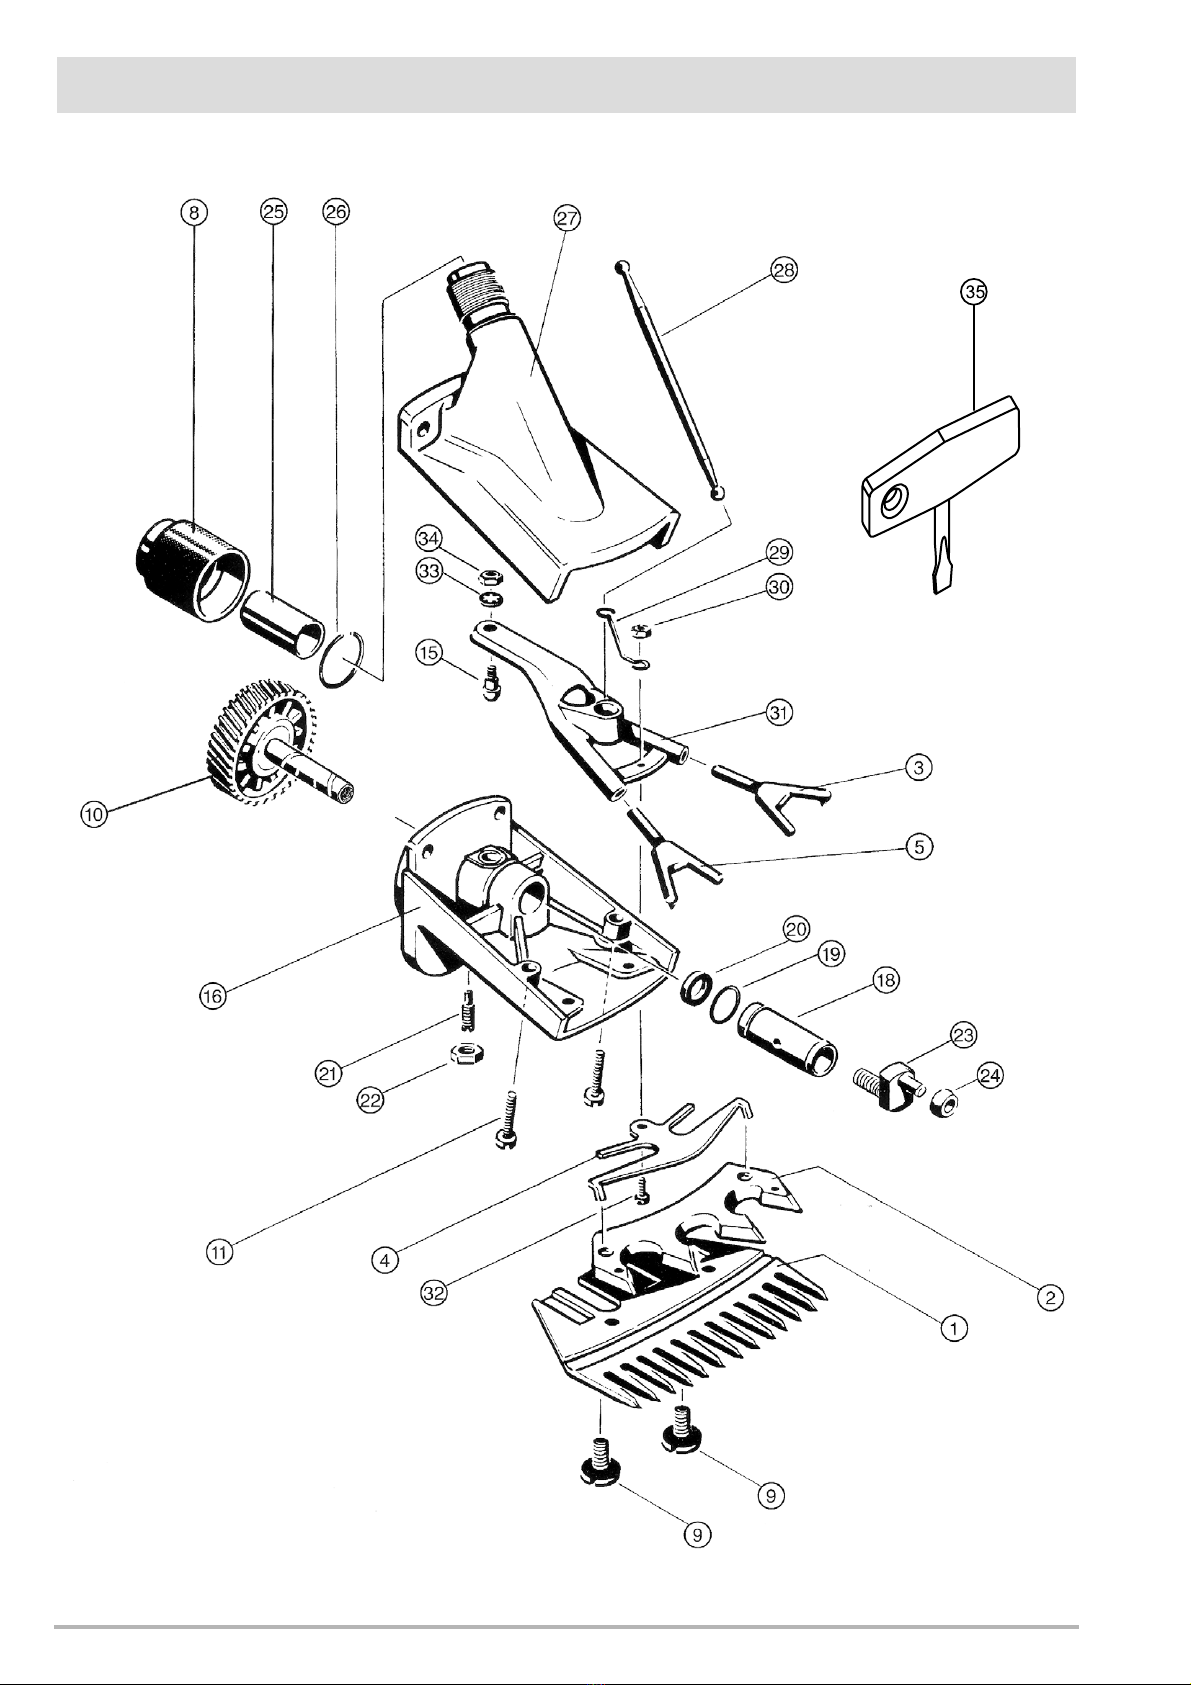
¾Apply approx. 1 cm of grease to opposing points on the gear
wheel 10. Remove the cutter head (see section 9).
¾Grease the inside of both the regulating nut 8and the thrust
bearing sleeve 25.
¾Grease the clamping jaw shafts 3and 5.
7. Changing the cutter plates
¾Unplug the machine before changing the cutter plates!
¾The upper cutter plate 2needs to be changed 2-3 times more
frequently than the lower one 1.
¾To do so, loosen the regulating nut 8until the upper cutter plate 2
can be removed from beneath the clamping jaws 3and 5(see fig.).
¾Then insert the new cutter plate, ensuring that both the tips Dof
the two clamping jaws 3and 5, as well as the lugs Eand the
retaining springs 4, engage properly with their respective borings
in the upper cutter plate (see fig.).
¾Never attempt to change the lower cutter plate 1without first
loosening the regulating nut 8.
¾To do this, loosen both fixing screws 9and pull the plate out in a
forward direction (see fig.).
¾When reassembling, check to ensure that the lower cutter plate 1
extends ca. 2 mm beyond the upper cutter plate 2(see fig.).
Important notes
Keep your sheep closely huddled together just prior to shearing. Doing
this will help to soften and liquefy the lanolin in their fleece, thereby
making it easier for the cutter plates to glide through the fleece and
over the sheep's skin.
If shearing is interrupted and the lanolin congeals, causing the cutter
plates to become sticky, it is best to remove the cutting plates from the
shearer and clean them thoroughly in warm water before proceeding.
After cleaning, the cutter plates should be thoroughly dried, and then
re-oiled.
8. Adjusting cutter plate pressure
Adjustment of the cutter plates should be carried out while the
machine is running.
¾First, carefully loosen the regulating nut 8until the upper cutter
plate 2is no longer pressing against the lower cutter plate 1(the
sound of the motor becomes noticeably higher-pitched) (see fig).
¾Next, slowly turn the regulating nut 8in a clockwise direction until
the motor begins to run slower (adjustment according to motor
sound).
¾Avoid setting the pressure on the cutter plates too high, as this will
lead to excessive heat build-up, which in turn will cause the cutter
plates to wear out more quickly.
= high running speed = lower pressure on the
plates = less wear
Sheep shearing machine GT 494 and cutter head GT 369