Bridge City Chopstick Master User manual


English Version
-1-

Chopstick Master ®
User Manual
For your optimal enjoyment, please read this manual
completely before beginning.
Congratulations on your purchase of the Chopstick Master ®!
The Chopstick Master ®is easy to use and allows young and
old alike to make professional-grade, reusable chopsticks
without woodworking experience or ability. A set of chopsticks
typically takes less than fifteen minutes to produce and is a
rewarding, fun, and memorable experience that is sure to bring
a smile to your face!
I. How the Chopstick Master ® Works
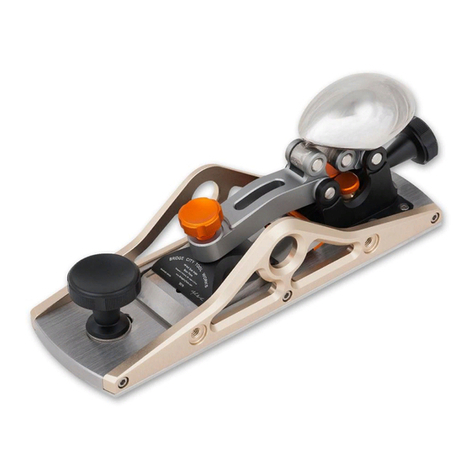
The Chopstick Master ®works by tapering all four sides of the
with the HP-8 block plane as pictured in Fig 1.). All four
sides are tapered to keep the wood grain running down the
centerline of the chopstick blank.
Before beginning, you will need to determine the style
of chopstick you want to make. Generally speaking, the
Chinese prefer chopsticks with a tip diameter of 5 mm. Other
cultures, most notably the Japanese, prefer a tip diameter of
approximately 2 mm. The Chopstick Master ®will allow you
to do either simply by changing the colored adjustable arms:
the included red arm is for making chopsticks with 5 mm tips
and the optional green arm will make chopsticks with 2 mm
tips. PLEASE NOTE: The green arm is only available as an
accessory.
II. Before Using the Chopstick Master ®
A. Setting the Plane Depth Skids
The Depth Skids are set correctly at the factory, but it they
and tighten the skids so the bottoms are planar with the sole
of the HP-8 block plane.
attach the pivoting depth sled to one of the skids. Use the
hole in the depth skid that is closest to the opening in the
plane sole. Figure 1
Figure 1
-3--2-
B. Setting the Cutting Depth of the Hand Plane
The small block plane (Fig. 2) included with the Chopstick
Master ®is a precision tool with a sharp iron. When
properly set-up, it will give you silky shavings with minimal
effort.

The cutting blade (the “iron”) is always inserted into
the plane body with the bevel up — this is a bevel-up
block plane. The depth of cut is adjusted by rotating the
iron depth adjustor at the back of the plane (clockwise
advances the iron, counterclockwise retractsthe iron). This
plane also features an adjustable mouth that is adjusted
by loosening the throat plate lock knob, sliding the throat
plate forwards or backwards to the correct position, and
then locking in place by retightening the knob.
The following steps should allow you to have the
plane working optimally.
1. Open the mouth as far as it will go and lock it in place.
2. Advance the sharp iron until you can feel it barely
protruding from the bottom of the plane by brushing
lightly with your finger. Gently tighten the iron (lever)
cap to lock it in place. You do not need to tighten the
lever cap knob very much to hold the blade in place.
3. Close the mouth so you can still see light between the
cutting edge of the iron and the throat plate. The iron
edge should be parallel with the throat plate. If it is
not, rotate the iron slightly sideways until it is parallel
with the throat plate. The gap between the iron and
the throat plate should be just large enough for the
shavings to clear. The objective is to barely feel the
iron with your finger. The gap between the iron and
throat plate should be just wide enough for the shaving
thickness.
4. Adjust the iron depth until the shaving is thin and easy.
Once the iron depth has been set, make sure the iron
makes the depth of cut too deep. If so, loosen the cap,
cap is tight. You may find that tightening the iron cap
slightly retract the iron, and re-tighten the cap.
C. Determining Chopstick Tip Diameter: 5 mm or 2 mm?
The Chopstick Master ®makes “Chinese-style” chopsticks
with 5 mm tips (approx. 3/16”). For “Japanese-style”
chopsticks with 2 mm tips (approx. 5/64”), use the optional
green arm. To switch arms, remove the “L” shaped pivot
pin, insert the arm of your choice and re-insert the pivot pin
(Fig. 3). (The optional green arm is identical to the green
arm included with version 1 of the Chopstick Master ®.)
Figure 2
-5--4-

the counter edges. However, if this is a concern, run paper
under the Chopstick Master ®so it falls between the
counter edge and the hook.
E. Chopstick Blanks
The Chopstick Master ®is designed for a specific sized
chopstick blank: 7 mm square by 270 mm in length. If you
choose to make your own blanks, understand that if your
blanks are less than 7 mm square, your results will yield
chopsticks with an uneven taper. Blanks larger than 7 mm
square will require extra work in planing. Blanks over 270
less than 270 mm can cause clamping problems in the
event of reverse grain.
The best chopstick blanks are typically made from a
straight-grained hardwood, though many woods will make
excellent chopsticks. If you are using a wood that is known
to be toxic, you will want to apply a surface finish such
as varnish or lacquer to prevent the wood toxins from
contacting your food or skin. If you are going to paint or
lacquer your blanks, we recommend a closed grain wood
such as hemlock or poplar.
F. Sharpening the Plane Iron
The plane blade (the “iron”) that comes with the Chopstick
Master
®
has been sharpened at the factory; you should be
able to make up to 10 sets of chopsticks before it needs to
be sharpened. Keeping the iron sharp will make the planing
smoother and easier. It is easy to do with the included
honing guide (Fig 4).
Figure 3
D. Choosing a Working Location for the Chopstick
Master ®
The Chopstick Master ®can be used on workbenches
or sturdy tables but is primarily designed to be used on
counters with the user standing.
Although the Chopstick Master ®makes very little dust, it
does make lots of shavings. These are easy to clean up
with a vacuum, but can also be easily picked up by placing
an old newspaper on the counter prior to beginning; the
shavings can simply be rolled up and disposed of with the
newspaper upon completion. We have found it useful to
the plane shavings as they build up within the plane body.
(You may want to save the shavings and use them as gift
packaging material.)
The hook is milled from aluminum and should not harm
-7--6-
mm in length will not fit in the Chopstick Master® . Blanks

1. Loosen the iron cap lock knob on the block plane and
remove the iron by lifting it up off the pin, and back out
of the plane.
2. With the iron bevel facing DOWN, insert the iron into the
honing guide as illustrated in Figure 4. Lightly tighten
the iron locking knob so that you can still move the iron.
3. With both rollers of the honing guide touching a flat
surface (a granite countertop or piece of glass is ideal),
advance or retract the iron so that the cutting edge is
touching the surface. Make sure the right-hand side of
the iron is flush against the side of the honing guide
groove. The iron is now pitched at exactly 30 degrees.
place.
4. Turn the Chopstick Master
®
upside down and place on
Figure 4
5. The 1 micron abrasive strip on the underside of the
Chopstick Master
®
body is equivalent to an 8000 grit
honing stone. Place the honing guide in the channel
and stroke back and forth on the abrasive strip, using
iron. Check the edge after every 4 to 6 strokes; you can
test for sharpness by slicing a piece of paper. Once
sharp, insert the iron into the plane body with the bevel
UP, adjust the depth of cut, and you are ready to make
more chopsticks! Replacement abrasive strips can be
ordered at www.ChopstickMaster.com or from your local
dealer.
Figure 5
III. How to Make Chopsticks with the Chopstick
Master ®
Step-By-Step Instructions
1. Numbering the Faces of Each Chopstick Blank
Prior to tapering the blanks, the faces need to be numbered
sequentially 1, 2, 3, and 4 in the middle of the chopstick
blank. This will allow you to keep track of the chopstick-
-9--8-

blank faces as you progress through the planing process
for each face. The numbers will be removed as the blank is
tapered.
2. Setting the Adjustor Knobs to the Proper Setting
If you are using the red arm, set both adjustor knobs to
“1” as you look down on the knobs. If you are using the
optional green arm, begin with both adjustors set to “2”.
Initial Adjustor Settings with the Red Arm (Fig. 6)
Figure 6
3. Inserting the Chopstick Blank in the Chopstick
Master ®
Chopstick blanks are positioned diagonally in the Chopstick
Master ®to utilize the entire width of the plane iron. They
are held in place with two tapered wedges as illustrated
in Figure 6. Notice that side “1” of the chopstick blank is
up, both knobs are set to “1” (red arm) and the rear of the
chopstick blank is adjacent tothe reverse grain stop pin (Fig.
ehtlitnurehtohcaesdrawotsegdewgnikcolehtedilS.)3
4. Planing Adjacent Sides 1 and 2 of the Chopstick
Blanks
With the Chopstick Master ® properly positioned and
side “1” of the chopstick blank facing up, you are ready
to taper side “1”. With the plane skids straddling the rails
of the Chopstick Master ®, take full strokes pushing the
plane forward with downward pressure. Make multiple
passes with the plane until it is obvious that the plane is
no longer cutting wood — the pivoting depth sled will limit
the amount of material that can be removed. After every
few passes, empty the shavings out of the plane into the
wastebasket, and ensure that the mouth is not blocked
with any shavings. Planing should feel almost effortless
when the shavings are thin.
Remove the two locking wedges, and turn the blank so
that side “2” is up. Lock the blank in place with the two
locking wedges. Repeat the planing process.
Set this chopstick blank aside and repeat the above steps
for sides “1” and “2” of your second blank.
5. Planing Adjacent Sides 3 and 4 of the Chopstick
Blanks
If you are using the red arm, rotate both knobs to read “2”.
If you are using the optional green arm, rotate both knobs
to read “3”. You may need to lift the far end of the arm up
slightly to rotate the knobs.
With side “3” facing up, lock your chopstick with the
-11--10-

6. Shaping the Octagon Tip
The adjustor settings for creating the octagon are the
same settings used for planing sides “3” and “4” (“2” for
the red arm, or “3” for the optional green arm).
Place one corner edge of the chopstick blank in the “V”
groove located in the arm as illustrated (Fig. 7). The
narrow end of the chopstick should be against the stop at
the far end of the arm. Hold the plane in your favorite hand
and with the opposite thumb push the blank into the stop
at the end of the arm. Plane the corner of the blank that is
facing up until the plane quits cutting. You will only need
to plane the far one-half to one-third of the length of the
chopstick. Repeat for the other 3 edge corners.
When complete, you should have a perfectly shaped
octagon on the tip of each blank.
NOTE:The accuracy of the octagon is dependent on
the shaving thickness. If it appears that your corners
are too short for all eight tip edges to be the same
length, you can either increase the cutting depth of the
plane, or slide a piece of paper under the arm where
Figure 7
locking wedges, and plane until the plane quits cutting.
Remove the locking wedges, place side “4” up and wedge
in place with the locking wedges. Plane until the plane
quits cutting.
Set aside this blank and repeat the above steps for sides
“3” and “4” of your second chopstick.
You should now have two chopstick blanks that are
perfectly tapered on all four sides with both ends perfectly
square.
NOTES: There will be times when it is impossible to
get a sommth finish because the grain of the chopstick
blank is running the against the direction of the plane.
In these cases, you will need to pull the plane toward
you while holding the orange bench hook against the
work surface with your free hand. In rare cases, the
grain switches direction several times and no matter
what direction you plane, you cannot get a smooth
surface. When this occurs we recommend you discard
the blank. A sharp plane blade will help to minimize
these problems.
.gnitadommoccaeromsiseerged05otdenohnorina
Visit www.ChopstickMaster.com or your local retailer
for more information on the 50 Degree Honing Kit.
If your chopstick blank is warped, you will still be able
to make a chopstick, however, the warp will remain
when complete.
-13--12-

Figure 8
the magnet meets the adjustor (which is typically
much faster). Re-plane all four CORNERS. Before you
make another set of chopsticks, slightly advance the
cutting edge so this problem is not repeated.
If it appears that the chamfered corners are too long
at the tip, you can slide a piece of paper between
the magnet and the arm and re-plane all four SIDES.
Before you make another set of chopsticks, slightly
retract the cutting edge so this problem is not
repeated.
7. Planing the Pyramidal Finial
Chopstick Master ®.
Figure 9
Set the depth stop 8mm from the bottom of the depth
stop arm. (Fig. 9) This distance should work perfectly, but
if it doesn’t, adjust until you can make perfect finials by
removing the least amount of wood.
To begin, slide the red bench hook into the slot in the
Chopstick Master ®body. Next, insert the red clamp and
lock in place with the thumb screw on the side of the
Chopstick Master ®body.
Place the chopstick in the clamp system as illustrated in
Figure 10 and lock the chopstick in place with the locking
thumb wheel.
The finial is cut with a series of very short strokes,
approximately 25mm (1”) in length. To begin, position the
lock knob of the plane directly above the protruding end of
the chopstick blank. Lower the plane until the sole touches
the top edge of the chopstick blank. Next, angle the plane
about 30 degrees so you can make shearing cuts. The
setup should look like Fig. 10
-15--14-
Adding a pyramidal finial (Fig. 8) adds a professional touch
to your chopsticks and is very easy to accomplish with the

8. Finishing the Chopsticks
Congratulations! Your newly made chopsticks should feel
smooth in the hand. If there are corners that feel sharp,
lightly sand with 400 grit sandpaper. You do not need to
sand the entire chopstick, just those areas that feel either
sharp or rough.
For multiple-use chopsticks, you need to apply a finish.
Included with your Chopstick Master ®is a small amount
of food-grade mineral oil. With a paper towel, apply a small
amount to each chopstick, let sit for a couple of minutes
and wipe clean. After each use, wipe your chopsticks
clean. For a thorough cleaning, wipe with rubbing alcohol.
If desired, you can hand wash your chopsticks with soap
and water, and then immediately dry and reapply mineral
oil. If the chopsticks look dull, apply another coat of food-
grade mineral oil (depending on use, this may be several
Figure 10
times a year). With proper care, a pair of handmade
chopsticks can last a lifetime.
shellac. You can also gild with metal leaf, or explore many
other decorative ideas to make your chopsticks unique!
Other finishing options include varnish, panint, lacquer, or
CONGRATULATIONS — You are now a Chopstick
Master ®!
On behalf of the Bridge City Tool Works Chopstick Master ®
design team in Portland, Oregon USA, and Harvey Industries,
our manufacturing partners in Nanjing, China, we sincerely
thank you for your purchase of the Chopstick Master ® . We
know you had a lot of fun making your chopsticks and hope
that you share this experience with your family and friends! One
really fun way to enjoy your Chopstick Master ® is by hosting a
party where your guests get to make their own chopsticks (or
they go home hungry)!
The Chopstick Master ® makes a wonderful gift for family and
friends. We can’t think of any other wood-working project that
takes 10 minutes and generates so much enthusiasm, joy, and
satisfaction. For additional Chopstick Master ® kits, chopstick
blanks, bags, and repair parts visit www.ChopstickMaster.com
to locate a distributor near you.
-17--16-
.gnittucstiuqenalpehtlitnutuc,sekortstrohsgnisU
Repeat for the other three facets.
中文版本
-19-

筷子大师®使用说明
为了让您享受到最佳的使用体验,请在开始操作前仔细阅
读使用说明。
恭喜您购买了一台筷子大师® !筷子大师® 操作简 单,可
以让没有任何木工经验的老年人和孩子制作出具有专业水准并
且可重复使用的筷子。使用筷子大师® ,可以让您在短短十分
钟内制作出一双筷子,绝对会让您眼前一亮!
I. 筷子大师® 如何工作
筷子大师® 配合一把多功能短 刨(HP-8,配有深度限位
装置,如图一所示)便可以制作筷子的四个倾斜侧面。这四个
侧面都以相同的角度顺着木纹向中心倾斜。
在开始前,请先确认您所喜欢的筷子类型。通常来说,中
国人喜欢使用筷子尖头直径为 5毫米的中式筷子。在其他文
化中,例如日本,则更偏向于筷子尖头直径为 2mm 的筷子。
筷子大师® 配备这两类筷子的模 板,只需要更换不同颜色的调
节杠杆即可制作出两种不同类型的筷子:红色杠杆可以制作出
尖头直径为 5毫米的筷子,绿色杠杆可以制作出尖头直径为 2
毫米的筷子。请注意:绿色杠杆为选配附件。
II. 使用筷子大师® 前的准备工作
A. 设置深度限位装置
深度限位装置在出厂前已经正确设置过,但是如果需
要调节,则应与刨底保持齐平。简单地将 HP-8 多功能短
刨放置在一个平整的表面,然后锁紧深度限位锁紧螺母。
这时多功能短刨的刨底与深度限位装置齐平。
一旦深度限位装置设置正确,将深度限位滑槽安装至
一边的深度限位装置上。安装时使用离刨底开口最近的那
个孔洞。图一
图一
B. 设定多功能短刨的刨削深度
多功能短刨(图二)需要与筷子大师® 配合使 用。多
功能短刨是一个非常精密的工具,配有锋利的刨刀。设置
正确后,不费吹灰之力便可刨削出丝绸般的刨花。
这是一个低角度刨,安装刨刀时,应一直保持刨刀斜
面向上。若需要调节刨刀的深度,只需要旋转多功能短刨
后侧的刨刀深度调节旋钮即可(顺时针旋转增加刨刀深度,
逆时针旋转减少刨刀深度)。这个多功能短刨还可以调节
刨口。首先拧松喉板锁紧旋钮,其次前后滑动旋钮调节喉
板至正确位置,再重新锁紧旋钮固定喉板位置即可完成。
请根据以下步骤设置多功能短刨以达到最佳体验
1. 将刨口打开至最大处并锁紧。
2. 增大刨刀深度直至指腹轻抚刨底时能感觉到刀刃。轻轻
地锁紧刨刀压紧盖。注意此时无须用力。
3. 将刨口缩小直至您可以看见喉板与刀刃间的微弱光线。
刨刀刀刃应与喉板保持平行。如果两者间不平行,轻微
旋转刨刀直至刀刃与喉板平行。应保证喉板与刀刃间的
间隙应足够使刨花穿过。目的是用指腹可以轻微感觉到
刨刀,同时喉板与刨刀之间的宽度正好满足刨花的厚度。
-21--20-

图二
4. 适当调节刨刀深度,使刨削轻松自如,刨花薄透。一旦
刨刀深度设置好后请锁紧刨刀压紧盖。如果锁紧刨刀压
紧盖后发现刨刀深度增加,超过了预期深度,请拧松压
紧盖,稍微减少一点刨刀深度之后再次锁紧。
C. 确定筷子尖头直径:5毫米还是 2毫米?
红色杠杆可制作出 5mm 尖头直径的中式筷子。绿色
杠杆(选配)可制作出 2mm 尖头直径的日式筷子。更换
杠杆的方法:移除 L型插销,插入杠杆,再装入 L型插销。(可
选的绿色杠杆与筷子大师® 第一代中的绿色杠杆完全一致)
图三
D. 选择筷子大师® 的操作位置
筷子大师® 可以在木工桌或任何稳定的桌面上使用,
其设计的初衷是为了方便操作者可以站立使用。
虽然筷子大师® 只产生极少的灰尘,但却会产生大量
的刨花。这些刨花可以用吸尘器轻易清除,但是如果使用
前即在筷子大师® 底部铺垫报 纸,这样使用完后,用报纸
包裹走刨花则更加快速简便。在使用者身边放置一个垃圾
篓也可以更加有效地清理刨花。(你也可能希望保留这些
刨花,并将它们用于礼盒的包装材料。)
橙色的台面挡板是由铝合金整体镂铣并研磨制作完成,
因此不会对桌边造成伤害。如果仍有顾虑,则也可以在筷
子大师® 与挡板之间以及桌面上铺垫报纸从而保护台面。
E. 准备木料
筷子大师® 需要使用精确尺寸的木料制作筷 子: 使
用7mmX7mmX270mm 尺寸的木 料。如果您选择自 己
制作木料,请注意如果木料边长小于 7mm,结果会导致
筷子弯曲并产生不规则的四边斜面。如果木料边长大于
7mm,则需要更大量的刨削工作。木料如果长于 270mm
-23--22-

则无法装入筷子大师® 。如果木料小于 270 毫米,当木纹
出现逆纹时又会无法夹紧。
最佳的选择是直纹理的硬木。尽管很多木材都是制作
筷子的优秀材料,但是如果有些木料已知有毒,您就需要
做一层表面处理(例如清漆或油脂)以防止在木头与食物
或皮肤接触过程中传播毒素。如果您准备使用清漆或油脂
处理木材表面我们推荐使用封闭导管的木材,例如:铁杉
木或白杨木。
F. 磨刀
多功能短刨所使用的刨刀在出厂时已经经过打磨,可以
直接使用并完成十双筷子的制作。保持刨刀锋利可以让
刨削更加简单顺滑。内置的磨刀导向器可以帮助您简单
快速地打磨刨刀。
图四
1. 拧松刨刀压紧旋钮,向上提起刨刀直至其从中摆脱,同
时向后拉出刨刀。
2. 将刨刀斜面向下装入磨刀导向器(如图四所示)。轻轻
锁紧旋钮,这时您仍可以移动刨刀。
3. 当两个滚轴都与平整表面接触时(最好是以大理石台面
或玻璃为平面),调节刨刀深度至刃口与表面接触。确
保刨刀右侧与磨刀导向器的边缘靠山紧靠在一起。这时
刨刀已设置成完美的 30 度角,再次锁紧旋钮。
4. 翻转筷子大师® 并将筷子大师® 放置在平整表面上。(图
五)
5. 筷子大师® 底部的一微米砂带等同 于 8000 目磨刀石。
将磨刀导向器放置在通道内并且在砂带上前后滑动,用
您的手指在刨刀前部施加一点压力即可。每当 4-6 次打
磨后检查刀刃,您可以使用刨刀切一张纸来测试锋利程
度。打磨完成后将刨刀斜面向上装入短刨,调节刨刀深
度,现在您可以开始制作更多的筷子了。如果需要更换
砂带,您可以联系海威工场或当地的经销商。
图五
III. 如何使用筷子大师® 制作筷子
步骤分解教程
1. 在材料的每一面标记数字
首先制作筷子的斜边。在每一根筷子的每一面中间做
上标记,分别标记为 1,2,3,4。这可以方便让您跟踪
制作筷子的每个侧面。当四面刨削完成后,这些数字会被
去掉。
-25--24-

3. 在筷子大师® 中安装木料
将木料以对角线的姿态安装在筷子大师® 中,这样便
可利用刨刃的整个宽度来进行刨削。同时,如图六所示,
木料需要两个梯形的嵌块固定。注意,此时木料的 1号面
应该朝上,同时将两个调节旋钮设定在位置 1处(使用红
色杠杆时)。而木料的尾部应该紧靠逆纹限位销(图三)。
之后将两个梯形嵌块向中间位置滑动并最终固定木料。
4. 刨削木料相邻的 1,2号面
将木料 1号面朝上放置在筷子大师® 上,再用嵌块固
定木料,您便可以开始刨削这个面了。将多功能短刨两侧
的深度限位滑槽跨过筷子大师® 的轨 道,将短刨向下轻微
用力并向前推动。反复刨削,直至没有任何刨花出现 ----
深度限位滑槽会限制刨刃刨削过多的木料。每当刨削几次
后将短刨中产生的刨花倒进垃圾篓,确保刨口没有被刨花
堵住。当刨花厚度很薄的时候应该感觉到刨削基本不用力。
图六
1号面刨削结束后,移除两个梯形嵌块,将木料翻转,
使2号面朝上。再使用嵌块固定木料并重复以上步骤。
刨削完成 1,2号面后取下此根木料,重新安装另一
根木料并刨削此木料的 1,2号面。
5. 刨削木料的 3,4号面
如果您使用红色杠杆,将两个调节旋钮旋转至位置 2。
如果您使用可选的绿色杠杆,则将调节旋钮旋转至位置 3。
在调节时可能需要提起杠杆以便调节旋钮旋转。
将3号面朝上,使用嵌块固定木料,同样刨削直至没
有刨花即可。移除嵌块,将 4号面朝上并使用嵌块固定,
同样刨削至没有刨花为止。
重新安装另一根木料并且重复以上步骤刨削 3,4号
面。
此时您将会拥有两根两端方头且四边都倾斜的筷子。
注意:有时会出现筷子表面不光滑的情况,这也不必担心,
这是由于木料木纹的方向和使用短刨的刨削方向不同而导
致的。当出现这种情况时,您需要一手压住橙色挡板,另
一只手将短刨向自己方向刨削。极少数的情况下才会出现
木纹回转多次,且无论任何方向的刨削都无法获得光滑表
面的情况。如果遭遇这样极少数的情况,我们建议您抛弃
此根木料。锋利的刨刀也可以减少这类情况的出现。
如果用自己的木料制作筷子胚 料,您可能需要50°
角度的刨刀处理回转木纹。预知详情可登陆www.
ChopstickMaster.com,或向当地经销商咨询相关配件。
需要注意的是,如果筷子原胚料是弯曲的,即使将筷子制
作出来了,成品还是会留有原材料所有的弯曲度。
6. 制作八边形筷子尖头
2. 将调节旋钮设定到合适位置
如果您使用红色杠杆,先将两个调节旋钮都设定在
位置 1。如果您使用绿色杠杆,请先将调节旋钮设定在位
置2。
使用红色杠杆设定调节旋钮(图六)
-27--26-

图七
以上都完成后,您会获得一个完美的、尖头为八边形
的筷子
注意:八边形的准确性取决于刨刀深度。如果棱角刨削完
成后,四个角的刨削程度过小,无法形成标准的八边形时,
您可以增加刨刀深度或在杠杆下磁铁与调节旋钮之间垫放
一张纸片(后者在操作上更快)。再重新刨削四个棱角。
另外,在制作其他筷子前增加刨刀深度可以预防此类情况
再次发生。
如果棱角刨削完成后,四个角的刨削程度过大,甚至
是形成一个新的正方形尖端时,则可在杠杆的磁铁和调节
旋钮间垫放一张纸片后重新刨削新生的四个棱角。另外,
在制作其他筷子前减小刨刀深度可以预防此类情况再次发
生。
7. 制作筷子尾部的方尖头
使用筷子大师® 可以非常简单的制作筷子尾部的方 尖
图八
头。这会让您的筷子更加优美,也更加专业。
将可调限位滑块设置到与限位杆顶端 8mm 处( 图
九),这个距离对制作方尖头是最完美的设置。但是如果
不行,调节限位滑块直到在去除最小木料的情况下仍可以
制作出完美的方尖头。
将红色夹具滑动安装进筷子大师®主体中,然后锁紧
筷子大师®主体侧面的锁紧旋钮固定夹具。
图九
调节旋钮的设置和刨削 3,4号面时的设置是一样的
(即红色杠杆设置在位置 2,绿色杠杆设置在位置 3)。
将筷子的一个直角边放入如图七所示的 V型槽中。筷
子的尖头应该朝向远端并且抵住杠杆远端的限位。一手使
用短刨,另一手用拇指推动筷子抵住限位。使用短刨刨削
朝上的棱角,您只需要刨削筷子总长度的一半或三分之一
即可。当完全刨削完此棱角后,再用同样方法刨削其他三
个棱角。
-29--28-

图十
如图十所示那样将筷子安装至夹持系统中,并通过筷
子锁紧旋钮锁紧筷子。
最终的刨削是一组非常短的刨削动作,大约 25mm
的刨削滑动距离。这时如图十所示,将刨身倾斜 30 度左右,
缓慢的将刨子放置在突出的筷子上,并与筷子接触。
这时用短刨刨削木料,直到没有刨花出现。用同样的
方法刨削另外三个面。
8. 打磨筷子
以上步骤结束之后,您手里便呈现出一双成型的筷子。
如果您觉得有些棱角略微尖锐,则可使用 400 目的砂纸
轻微打磨。当然,您并不需要将全部筷子都打磨一遍,您
只需要打磨一些较为锋利或者粗糙的地方。
为了筷子的重复使用,也为了延长筷子大师 ® 的使用
寿命,您可在筷子表面涂抹一层食用级矿物油。只需要用
一张纸巾在每一根筷子表面涂抹少量的油,放置几分钟后
擦除多余的油即可。每一次使用完筷子后擦除干净即可等
待下次使用。如果需要彻底清理则可使用酒精擦拭表面。
您也可以使用肥皂水手洗筷子,然后立即在涂抹一次食用
级矿物油。如果筷子颜色暗淡,则需重新涂抹食用级矿物
油(根据使用情况,一年大致需要涂抹几次)。如果保养
正确,一双手工制作的筷子可以终身使用。
另外,还可以使用其他方法进行表面处理,例如:清
漆,颜料,虫蜡等。您还可以使用金属修饰或者其他方法
装饰您的筷子,使之独一无二。
恭喜您
现在您是一位筷子大师®了!
谨代表在俄勒冈州 -- 波特兰的 Bridge City 工具公司-
筷子大师® 设计团队与我们在中 国 -- 南京的生产合作伙伴,
感谢您购买了筷子大师®。我们知道您因此获得了制作筷子的
乐趣并且希望您可以将之与您的家人和朋友分享!筷子大师®
还有个很有趣的使用方法,那就是举办一个派对的时候,邀请
您的客人自己制作一双筷子(否则就饿着肚子回家吧)!
筷子大师®是给家人和朋友礼物的不二之选。我们想不出
其他任何可以在 10 分钟内完成的木质作品,更何况是能带来
无与伦比的快乐和满足感的作品!如有需求,您可以登陆网站
www.ChopstickMaster.com 获得更多有关筷子大师® 套件、
木料、袋子、修补件等资讯。
-31--30-

Version française
-33-

Taille-baguette
Chopstick Master ®
Mode d’emploi
I. Fonctionnement
A. Réglage de la hauteur des patins du rabot
II. Avant l’utilisation
Figure 1
-35--34-
B. Réglage de la profondeur de coupe du rabot
Pour profier au maximum de cet ensemble, veuillez lire le
présent mode d’emploi avant l’utilisation.

Pour un fonctionnement optimal du rabot, suivez les
étapes suivantes.
C. Choix du diamètre du bout des baguettes : 5 mm ou 2 mm?
Lame
Figure 2
Lumière
Ouverture de
la lumière
Molette de réglage de la
profondeur de coupe
Patin à hauteur
réglable
Molette de blocage de la
lumière Corps du rabot
Patin à hauteur
réglable
Molette du bloc
d’arrêt Plaquette
magnétique
Biseau de la
lame
Bloc d’arrêt
-37--36-
Other manuals for Chopstick Master
1
Table of contents
Languages:
Other Bridge City Tools manuals

Bridge City
Bridge City Pencil Precision PP-1 User manual

Bridge City
Bridge City HP-9v2 User manual

Bridge City
Bridge City HP-8 User manual

Bridge City
Bridge City DJ-3 User manual

Bridge City
Bridge City Chopstick Master User manual

Bridge City
Bridge City HP-14 User manual

Bridge City
Bridge City Signature Series User manual

Bridge City
Bridge City HP-12 User manual

Bridge City
Bridge City HP-9v2 User manual