99042344G
USE AND CARE
DISCONNECT ELECTRICAL POWER SUPPLY BE-
FORE SERVICING FAN.
Always unplug the fan motor before servicing the fan.
The motor is permanently lubricated and will never
need oiling.
Clean the grill in warm, soapy water. Use a mild deter-
gent, such as a dishwashing liquid. DO NOT USE
ABRASIVE CLOTHS, STEEL WOOL OR SCOURING
POWDERS.
Clean the fan blade and motor every six months by
removing the grille, unplugging the motor, and gently
vacuuming the fan blade and motor.
Broan-NuTone LLC • 926 West State Street • Hartford, WI 53027 • (1-800-637-1453)
USO Y MANTENIMIENTO
DESCONECTE LA CORRIENTE ELECTRICAANTES DE
DAR SERVICIO AL VENTILADOR.
Desconecte siempre el motor del ventilador antes de dar
servicio al ventilador. El motor esta lubricado
permanentamente y nunca necesitarán lubricación.
Limpie la rejilla en agua caliente enjabonada. Use un
detergente suave, tal como líquido lavavajillas. NO USE
TELAS ÁSPERAS, ESPONJILLAS DE LANA DE ACERO
O POLVOS ÁSPEROS.
Limpie el motor y la hélice cada seis meses quitando la
rejilla, desconectando el motor, y limpiando el motor y la
hélice cuidadosamente con una aspiradora.
GARANTIA BROAN-NUTONE LIMITADA POR UN AÑO
Broan-NuTone garantiza al consumidor comprador original de sus productos que
dichos productos carecerán de defectos en materiales o en mano de obra por un
período de un año a partir de la fecha original de compra. NO EXISTEN OTRAS
GARANTIAS, EXPLICITAS O IMPLICITAS, INCLUYENDO, PERO NO LIMITADAS
A, GARANTIAS IMPLICITAS DE COMERCIALIZACION O APTITUD PARA UN
PROPOSITO PARTICULAR.
Durante el período de un año, y a su propio criterio, Broan-NuTone reparará o
reemplazará, sin costo alguno cualquier producto o pieza que se encuentre
defectuosa bajo condiciones normales de servicio y uso.
ESTA GARANTIA NO SE APLICAA TUBOS Y ARRANCADORES DE LAMPARAS
FLUORESCENTES. Esta garantía no cubre (a) mantenimiento y servicio normales
o (b) cualquier producto o piezas que hayan sido utilizadas de forma errónea,
negligente, que hayan causado un accidente, o que hayan sido reparadas o
mantenidas inapropiadamente (por otras compañías que no sean Broan-NuTone),
instalación defectuosa, o instalación contraria a las instrucciones de instalación
recomendadas.
La duración de cualquier garantía implícita se limita a un período de un año como
se especifica en la garantía expresa. Algunos estados no permiten limitaciones
en cuanto al tiempo de expiración de una garantía implícita, por lo que la limitación
antes mencionada puede no aplicarse a usted.
LA OBLIGACION DE BROAN-NUTONE DE REPARAR O REEMPLAZAR,
SIGUIENDO EL CRITERIO DE BROAN-NUTONE, DEBERA SER EL UNICO Y
EXCLUSIVO RECURSO LEGAL DEL COMPRADOR BAJO ESTA GARANTIA.
BROAN-NUTONE NO SERA RESPONSABLE POR DAÑOS INCIDENTALES,
CONSIGUIENTES, O POR DAÑOS ESPECIALES QUE SURJAN A RAIZ DEL
USO O DESEMPEÑO DEL PRODUCTO.
Algunos estados no permiten la exclusión o limitación de daños incidentales o
consiguientes, por lo que la limitación antes mencionada puede no aplicarse a
usted. Esta garantía le proporciona derechos legales específicos, y usted puede
también tener otros derechos, los cuales varían de estado a estado. Esta garantía
reemplaza todas las garantías anteriores.
Para calificar en la garantía de servicio, usted debe (a) notificar a Broan-NuTone
al domicilio que se menciona abajo o al teléfono:1-800-637-1453, (b) dar el número
del modelo y la identificación de la pieza, y (c) describir la naturaleza de cualquier
defecto en el producto o pieza. En el momento de solicitar servicio cubierto por la
garantía, usted debe de presentar evidencia de la fecha original de compra.
BROAN-NUTONE LLC
926 West State Street,
Hartford, WI 53027 EE. UU.
PIEZAS DE SERVICIO
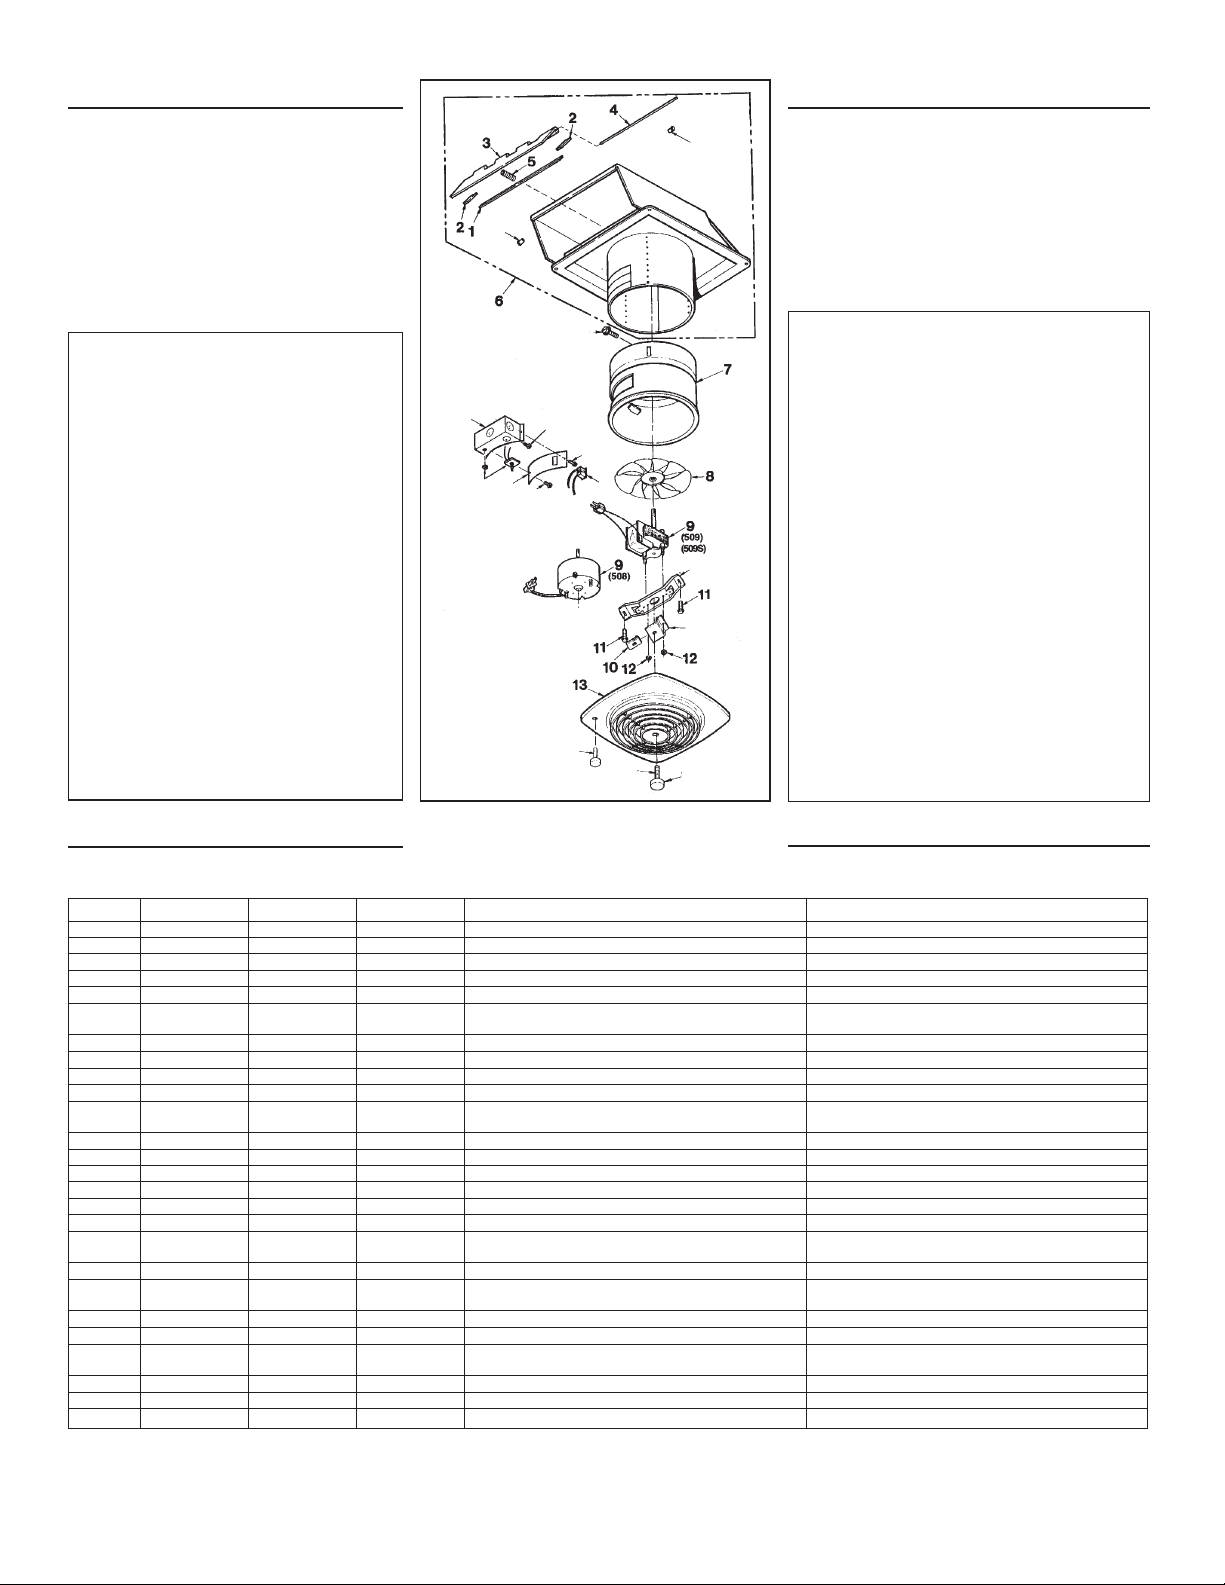
MODELOS 508, 509 y 509S
SERVICE PARTS
MODELS 508, 509 & 509S
KEY NO. 508 509 509S DESCRIPTION DESCRIPCION
1 99100489 99100489 99100489 Foam – Long (2 Req.) Espuma – larga (se necesitan 2)
2 99100490 99100490 99100490 Foam – Short (2 Req.) Espuma – corta (se necesitan 2)
3 98006086 98006086 98006086 Damper Flap Aletas del amortiguador
4 98006048 98006048 98006048 Damper Rod Eje del amortiguador
5 99140145 99140145 99140145 Damper Spring Muelle del amortiguador
6 97011241 97011240 97011240 Outer Housing Assembly Conjunto de la caja exterior
(Includes Key Nos. 1, 2, 3, 4, 5, 24) (Incluye códigos 1, 2, 3, 4, 5, 24)
7 97013672 97007085 97007085 Inner Housing Caja interior
8 99020271 99020165 99020165 Fan Blade Hélice del ventilador
9 99080460 99080180 99080180 Motor Motor
10 99260434 99260434 99260434 ¼-20 U-Type Sheet Metal Nut Tornillo de hoja de metal ¼-20 Tipo U
11 99150479 99150479 99150479 #8-32 x ½ Hex Hd. Self Tapping Screws (2 Req.)* Tornillos autoenroscables de cabeza
hexagonal #8-32 x ½ (se necesitan 2)*
12 99260425 99260428 99260428 Motor Nuts (2 Req.)* Tuercas del motor (se necesitan 2)*
13 97011851 97011919 97011727 Grille (Polymeric) (includes knob) Rejilla (Plástico) (incluye perilla de la rejilla)
15 97011918 97011918 97011918 Grille Knob Perilla de la rejilla
16 — 99420586 99420586 Grille Stud – 2-5/8" long Tornillo de la rejilla
17 98006066 98007820 98007820 Motor Bracket Soporte del motor
18 99270982 99270982 99270982 Receptacle Receptáculo
19 99170245 99170245 99170245 #8B x 3/8 Hex Hd. Self Tapping Screws (2 Req.)* Tornillos autoenroscables de cabeza
hexagonal #8-32 x 3/8 (se necesitan 2)*
20 98006047 98006047 98006047 Wiring Box Cover Cubierta de la caja de cables
21 99150471 99150471 99150471 #10-32 x ½ Hex Hd. Self Tapping Screw* Tornillo autoenroscable de cabeza
hexagonal #10-32 x ½*
22 98008494 98007819 98007819 Grille Bracket Soporte de rejilla
23 98006046 98006046 98008491 Wiring Box Caja de cables
24 99150417 99150417 99150417 #8A x ¼ Hex Hd. Sheet Metal Screws (3 Req.)* Tornillos de hoja de metal de cabeza
hexagonal #8A x ¼ (se necesitan 3)*
25 99100379 99100379 99100379 Plug, Closed End (2 Req.) Enchufe, extremo cerrado (se necesitan 2)
26 — — 97005328 Rotary Switch (Includes Nut) Interruptor giratorio (incluye tuerca)
27 — — 99360218 Rotary Switch Knob (for polymeric grille) Perilla de interruptor giratorio (para rejilla plástico)
* Standard Hardware. May be purchased locally
* Material estándar Puede ser adquirido localmente.
25
25
24
19
18
19
20
23
26
21
17
22
15
16
27
BROAN-NUTONE ONE YEAR LIMITED WARRANTY
Broan-NuTone warrants to the original consumer purchaser of its
products that such products will be free from defects in materi-
als or workmanship for a period of one year from the date of
original purchase. THERE ARE NO OTHER WARRANTIES,
EXPRESS OR IMPLIED, INCLUDING, BUT NOT LIMITED TO,
IMPLIED WARRANTIES OF MERCHANTABILITY OR FITNESS
FOR A PARTICULAR PURPOSE.
During this one-year period, Broan-NuTone will, at its option,
repair or replace, without charge, any product or part which is
found to be defective under normal use and service.
THIS WARRANTY DOES NOT EXTEND TO FLUORESCENT
LAMP STARTERS AND TUBES. This warranty does not cover
(a) normal maintenance and service or (b) any products or parts
which have been subject to misuse, negligence, accident, im-
proper maintenance or repair (other than by Broan-NuTone), faulty
installation or installation contrary to recommended installation
instructions.
The duration of an implied warranty is limited to the one-year
period as specified for the express warranty. Some states do not
allow limitation on how long an implied warranty lasts, so the
above limitation may not apply to you.
BROAN-NUTONE’S OBLIGATION TO REPAIR OR REPLACE, AT
BROAN-NUTONE’S OPTION, SHALL BE THE PURCHASER’S SOLE
AND EXCLUSIVE REMEDY UNDER THIS WARRANTY. BROAN-
NUTONE SHALL NOTBE LIABLE FOR INCIDENTAL, CONSEQUEN-
TIAL OR SPECIAL DAMAGES ARISING OUT OF OR IN CONNEC-
TION WITH PRODUCT USE OR PERFORMANCE. Some states do
not allow the exclusion or limitation of incidental or consequential
damages, so the above limitation may not apply to you.
This warranty gives you specific legal rights, and you may also have
other rights, which vary from state to state. This warranty supersedes
all prior warranties.
To qualify for warranty service, you must (a) notify Broan-NuTone at
the address stated below or telephone: 1-800-637-1453, (b) give the
model number and part identification and (c) describe the nature of
any defect in the product or part. At the time of requesting warranty
service, you must present evidence of the original purchase date.
BROAN-NUTONE LLC
926 West State Street,
Hartford, WI 53027


