manuals.online logo
Brands
  1. Home
  2. •
  3. Brands
  4. •
  5. Brother
  6. •
  7. All In One Printer
  8. •
  9. Brother DCP-T520W User manual

Brother DCP-T520W User manual

Quick Setup Guide

Panduan Cepat
Read the Product Safety Guide first, then read this guide for the correct installation procedure.
Keep this guide next to your machine for quick reference.




Bacalah Panduan Keselamatan Produk (Product Safety Guide) terlebih dahulu, kemudian bacalah panduan ini
untuk langkah-langkah pemasangan yang benar.
Simpanlah panduan ini di dekat mesin Anda untuk referensi cepat.
D01JFA001-00
ASA/SAF/THA/IDN
Version//Versi 0
Remove the protective tape
and the film covering the
machine.


Buka pita dan film pelindung
yang menutupi mesin.
en th id
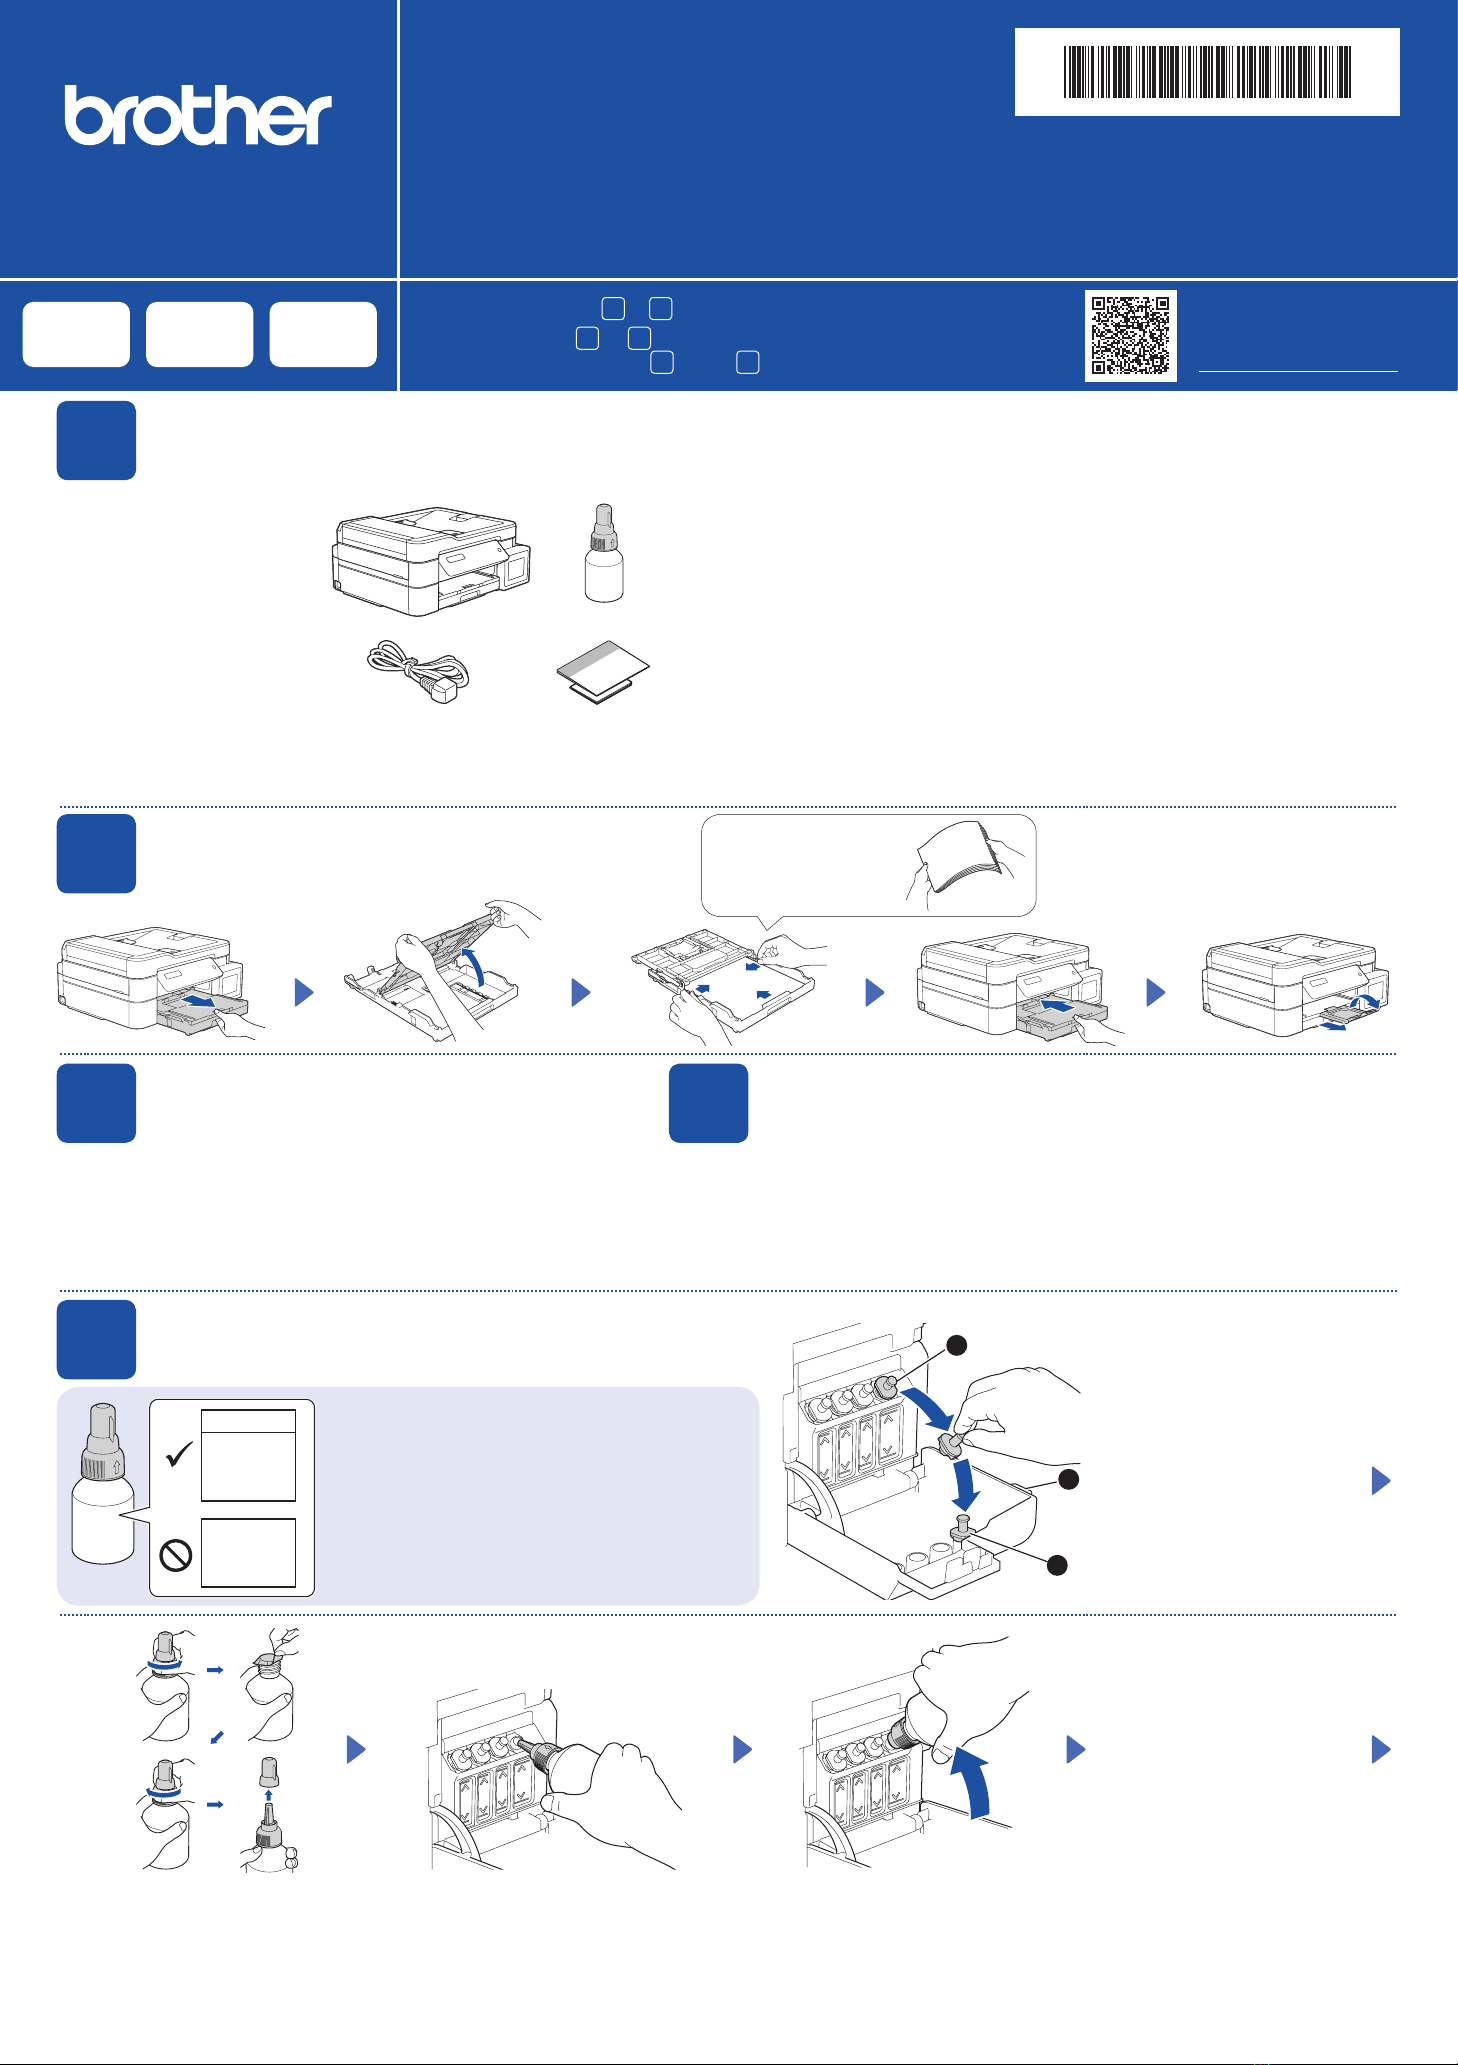
1Unpack the machine and check the components

Mengeluarkan mesin dari kemasan dan memeriksa komponennya
DCP-T520W / DCP-T525W
DCP-T720DW / DCP-T725DW
DCP-T820DW / DCP-T825DW
NOTE
• The illustrations in this Quick Setup Guide show the DCP-T720DW.
• The components may differ depending on your country.
• Save all packing materials and the box in case you must ship your machine.
• We recommend using a USB 2.0 cable (Type A/B) that is no more than
2 metres long (included in some countries).
• Use a straight-through Category 5 (or greater) twisted-pair cable for 10BASE-T or
100BASE-TX Fast Ethernet Network (not included). (DCP-T820DW/DCP-T825DW)

• 


• 
• 
•

•


CATATAN
• Ilustrasi dalam Panduan Cepat ini menunjukkan DCP-T720DW.
• Komponen mungkin berbeda tergantung negara Anda.
•
Simpan semua bahan dan kotak kemasan jika sewaktu-waktu Anda harus mengirimkan mesin Anda.
• Kami merekomendasikan penggunaan kabel USB 2.0 (Jenis A/B) yang
panjangnya tidak lebih dari 2 meter (sudah disertakan di beberapa negara).
•
Gunakan kabel pasangan berpilin straight-through Kategori 5 (atau lebih) untuk Jaringan
Ethernet Cepat 10BASE-T atau 100BASE-TX (tidak disertakan). (DCP-T820DW/DCP-T825DW)
5Fill the ink tanks with inbox ink

Isi tangki tinta dengan kotak tinta
1
2
3
Open the ink tank cover a,
remove the cap b, and place
it on the back of the cover c.
a
b
c
Buka penutup tangki tinta a,
lepaskan tutupnya b, dan
letakkan di bagian belakang
penutup c.
Remove the film and tighten the cap firmly.

Lepaskan film dan kencangkan tutup
dengan kuat.
The bottle is self-standing and
the ink fills automatically until
the bottle is empty. To fill the
ink tank faster, squeeze the
bottle on both sides.





Botol tinta dapat berdiri sendiri
dan tinta terisi secara otomatis
sampai botol kosong. Untuk
mengisi tangki tinta lebih
cepat, remas kedua sisi botol.
Remove the nozzle cap and insert the bottle nozzle firmly into the ink tank so that
the ink does not spill.

Buka penutup nosel dan masukkan nosel botol dengan kuat ke dalam tangki tinta
agar tinta tidak tumpah.
Video setup instructions:

Video petunjuk pengaturan:
support.brother.com/videos
2Load plain A4 paper in the paper tray

Masukkan kertas A4 biasa ke dalam baki kertas
Fan the paper well.

Kibas-kibaskan kertas
dengan sempurna.
Connect the power cord. The machine powers on automatically.

Sambungkan kabel daya. Mesin menyala secara otomatis.
3Connect the power cord

Menyambung kabel daya
You may need to set your country or language (depending on your machine). Follow the
steps on the LCD.


Anda mungkin diminta untuk menetapkan negara atau bahasa (tergantung pada mesin
Anda). Ikuti langkah pada LCD.
4Select your country or language

Pilih negara atau bahasa Anda
IMPORTANT
Check the ink bottle model name on the label. Using the
incorrect ink may cause damage to the machine.



PENTING
Periksa nama model botol tinta pada label. Penggunaan
tinta yang tidak benar dapat mengakibatkan kerusakan
pada mesin.
BTD60BK
BT5000CMY
BT5001CMY
BT5009CMY
BT6000BK
BT6001BK
BT6009BK
You must follow steps 1to 9to complete the setup.
 1 9
Anda harus mengikuti tahap 1hingga 9untuk menyelesaikan pengaturan.
9Connect your computer or mobile device

Sambungkan komputer atau perangkat bergerak Anda
Connect your Brother machine and computer/mobile device to the
same network.


Sambungkan mesin Brother dan komputer/perangkat bergerak
Anda ke jaringan yang sama.
Install Brother software to use your machine. Visit one of the following websites:

Pasang perangkat lunak Brother untuk menggunakan mesin Anda. Kunjungi
salah satu situs web berikut:
For Computers:

Untuk Komputer:
For Windows only, CD installation is also
available (for some countries).



Khusus untuk Windows, pemasangan melalui
CD juga tersedia (untuk beberapa negara).
For Mobile Devices:

Untuk Perangkat Bergerak:
Follow the on-screen instructions.

Ikuti petunjuk di layar.
For Wired Network Connection* and USB Connection:
Use the correct port (based on the cable you are using)
inside the machine, as shown.



Untuk Koneksi Jaringan Berkabel* dan Koneksi USB:
Gunakan port yang benar (berdasarkan kabel yang Anda
gunakan) dalam mesin, seperti pada gambar.
Install the Brother iPrint&Scan
application.

iPrint&Scan
Pasang aplikasi Brother
iPrint&Scan.
1. Press OK to set the date and time.
2. Press aor bto select the number, and then press
OK to set the date and time.
1. 
2. ab

1. Tekan OK untuk menyetel tanggal dan waktu.
2. Tekan aatau buntuk memilih nomor, dan
kemudian tekan OK untuk menyetel tanggal dan
waktu.
6Set the date and time

Mengatur tanggal dan waktu
When the machine has finished the initial cleaning process, follow the steps on the LCD to configure
the machine settings.


Setelah mesin menyelesaikan proses pembersihan awal, ikuti langkah-langkah di LCD untuk
mengatur pengaturan mesin.
• Check the print quality
• 
• Periksa kualitas cetakan
DCP-T820DW/DCP-T825DW:
• Configure the paper tray settings
• 
• Mengonfigurasi pengaturan baki kertas
7Machine settings

Pengaturan mesin
None
None 
None (Tidak ada)
A Few
A Few 
A Few (Sedikit)
About Half
About Half

About Half (Sekitar 1/2)
Many
Many

Many
(Banyak)
1. Press Menu.
2. Press aor bto select [Initial Setup] >
[Local Language] > your language, and
then press OK.
3. Press Stop/Exit.
8Select your language (if needed and only for certain models)

Pilih bahasa Anda (jika perlu dan hanya untuk model tertentu)
1. 
2. ab[Initial Setup
] >[Local Language
]

3. 
1. Tekan Menu.
2. Tekan aatau buntuk memilih [Initial
Setup (Pngtrn Awal)] > [Local
Language (Bahasa Lokal)] > bahasa
Anda, dan kemudian tekan OK.
3. Tekan Stop/Exit (Stop/Keluar).
*DCP-T820DW/DCP-T825DW
When finished, remove the bottle,
pointing the nozzle upward so the ink
does not spill.


Setelah selesai, keluarkan botol,
arahkan nosel ke atas agar tinta tidak
tumpah.
Replace the ink tank cap. Repeat step
5for the other ink tanks, and then
close the ink tank cover.

 5

Pasang kembali tutup tangki tinta.
Ulangi langkah 5untuk tangki-tangki
tinta yang lain, dan kemudian pasang
penutup tangki tinta.
setup.brother.com
brother.com/apps
Setup Complete /  / Pengaturan Selesai
Find the SSID (Network Name) and Network Key
(Password) on your wireless access point/router.


Temukan SSID (Nama Jaringan) dan Kunci
Jaringan (Kata Sandi) di jalur akses nirkabel/
router Anda.
1. Go to your machine and press WiFi.
2. Press OK to select [Find
Network].
The [WLAN Enable?] message
appears on the LCD.
3. Press ato select [On].
Select the SSID (Network Name) for your access point/
router and enter the Network Key (Password).
To enter the Network Key, hold down or repeatedly press a
or bto select a character from the list below:


ab

Pilih SSID (Nama Jaringan) untuk jalur akses/router Anda
dan masukkan Kunci Jaringan (Kata Sandi).
Untuk memasukkan Kunci Jaringan, tahan atau tekan a
atau bberulang kali untuk memilih karakter dari daftar
berikut:
abcdefghijklmnopqrstuvwxyzABCDEFGHIJKLMN
OPQRSTUVWXYZ0123456789(space /  /
spasi)!”#$%&’()*+,-./:;<=>?@[\]^_`{|}~
When the wireless setup is successful, the LCD displays
[Connected].

[Connected ]
Jika pengaturan nirkabel berhasil, LCD akan menunjukkan
[Connected (Tersambung)].
If you cannot find this information, ask your
network administrator or wireless access point/
router manufacturer.



Jika Anda tidak dapat menemukan informasi
ini, hubungi administrator jaringan atau
pabrikan jalur akses nirkabel/router Anda.
1. WiFi
2. [Find
Network ]
[WLAN Enable? 
]

3. a[On ]
1. Pada mesin Anda tekan WiFi.
2. Tekan OK untuk memilih [Find
Network (Cari Jaringan)].
Pesan [WLAN Enable? (WLAN
Aktif?)] muncul pada LCD.
3. Tekan auntuk memilih [On
(Aktif)].
Manual wireless setup (if needed)

Pengaturan nirkabel manual (jika perlu)
SSID: XXXXXXX
Network Key: XXXX
Reference and Troubleshooting /  / Referensi dan Solusi
Check Ink Volume /  / Memeriksa Volume Tinta
Improve Print Quality /  / Meningkatkan Kualitas Cetakan
21
986
53 4
7
For detailed machine operation, see the Online User’s Guide:



Untuk pengoperasian mesin yang mendetail, baca Panduan
Pengguna Online:support.brother.com/manuals
Control Panel Overview /  / Gambaran Umum Panel Kontrol
1. Liquid Crystal Display (LCD)

Tampilan Kristal Cair (LCD)
2. Warning LED

LED Peringatan
Blinks in orange when the LCD displays an error
or an important status message.


Berkedip warna oranye ketika LCD menampilkan
pesan kesalahan atau status penting.
3. Menu buttons

Tombol Menu
a/ b
Scroll through the menus and options.

Bergulir di antara menu dan opsi.
OK
Select a setting.

Memilih pengaturan.
4. Stop/Exit button

Tombol Stop/Keluar
5. Power On/Off button

Tombol Daya Hidup/Mati
Turn on the machine: Press
Turn off the machine: Press and hold


Menyalakan mesin: Tekan
Mematikan mesin: Tekan dan tahan
6. Mono Start/Colour Start buttons (Copy/Scan)

Tombol Mulai Mono/Mulai Berwarna (Salin/Pindai)
Modify scan settings in your application if
necessary.


Ubah pengaturan pindai di aplikasi Anda jika perlu.
7. Scan button

Tombol pindai
Press to switch the machine to Scan mode.

Tekan untuk mengalihkan mesin ke mode Pemindaian.
8. Wi-Fi button

Tombol Wi-Fi
9. Copy buttons

Tombol fotokopi
D01JFA001-00
Check Ink Volume /  / Memeriksa Volume Tinta
Improve Print Quality /  / Meningkatkan Kualitas Cetakan
Remove Jammed Paper /  / Mengeluarkan Kertas Macet
For FAQs, Troubleshooting, and to download software and manuals, visit support.brother.com.

Untuk T&J, Solusi, serta untuk mengunduh perangkat lunak dan panduan, kunjungi support.brother.com.
For more information about paper jams, see the Online User’s Guide.


Untuk informasi lebih lanjut mengenai kertas macet, baca Panduan Pengguna Online.
© 2020 Brother Industries, Ltd. All rights reserved.

© 2020 Brother Industries, Ltd. Semua hak dilindungi undang-undang.
Clean the print head.

Membersihkan print head.
1. Press Menu.
2. Press aor bto select [Maintenance]
> [Cleaning] > [Black], [Colour]
or [All] > [Normal], [Strong] or
[Strongest], and then press OK.
3. Press Mono Start or Colour Start.
1. 
2. ab[Maintenance 
[Cleaning ]
[Black ][Colour ][All
][Normal ][Strong ]
[Strongest ]

3. 
1. Tekan Menu.
2. Tekan aatau buntuk memilih [Maintenance
(Pemeliharaan)] > [Cleaning (Membersihkan)]
> [Black (Hitam)], [Colour (Warna)] atau [All
(Semua)] > [Normal], [Strong (Kuat)] atau
[Strongest (Paling Kuat)], lalu tekan OK.
3. Tekan Mono Start (Mulai Mono) atau Colour
Start (Mulai Berwarna).
The machine’s settings are set from the application (Brother iPrint&Scan or Brother Utilities) on your computer or mobile device.
Important Notice for Network Security: The default password to manage this machine’s settings is located on the back of the machine and marked “Pwd”. We
recommend immediately changing the default password to protect your machine from unauthorised access. See the Online User’s Guide.

Pwd”


Pengaturan mesin disetel dari aplikasi (Brother iPrint&Scan atau Brother Utilities) di komputer atau perangkat bergerak Anda.
Pemberitahuan Penting untuk Keamanan Jaringan: Kata sandi standar untuk mengelola pengaturan mesin ini tertera di belakang mesin dan bertanda “Pwd”.
Sebaiknya segera ubah kata sandi standar untuk melindungi mesin Anda dari akses yang tidak sah. Lihat Panduan Pengguna Online.
Avoid getting ink on your
hands.


Jangan sampai tinta
menodai tangan Anda.
DO NOT fill the ink tank past the maximum fill mark.

JANGAN isi tangki tinta melebihi tanda pengisian maksimum.
When the ink level reaches the lower line, refill the ink tank as soon as possible.

Ketika isi tinta mencapai garis bawah, segera isi ulang tangki tinta.
Machine Settings /  / Pengaturan Mesin

(Stop/Keluar)

Other manuals for DCP-T520W

5

This manual suits for next models

5

Other Brother All In One Printer manuals

Brother MFC-8870DW User manual

Brother

Brother MFC-8870DW User manual

Brother MFC-8220 User manual

Brother

Brother MFC-8220 User manual

Brother MFC-9420CN User manual

Brother

Brother MFC-9420CN User manual

Brother MFC-J4310DW User manual

Brother

Brother MFC-J4310DW User manual

Brother MFC-L2732DW User manual

Brother

Brother MFC-L2732DW User manual

Brother MFC-J6520DW Instruction Manual

Brother

Brother MFC-J6520DW Instruction Manual

Brother DCP-J752DW User manual

Brother

Brother DCP-J752DW User manual

Brother MFC-885CW User manual

Brother

Brother MFC-885CW User manual

Brother DCP-395CN User manual

Brother

Brother DCP-395CN User manual

Brother MFC-9880 User manual

Brother

Brother MFC-9880 User manual

Brother DCP-L2512D User manual

Brother

Brother DCP-L2512D User manual

Brother MFC 5490CN - Color Inkjet - All-in-One User manual

Brother

Brother MFC 5490CN - Color Inkjet - All-in-One User manual

Brother MFC-9460CDN Assembly instructions

Brother

Brother MFC-9460CDN Assembly instructions

Brother MFC-9440CN User manual

Brother

Brother MFC-9440CN User manual

Brother DCP-9045CDN User manual

Brother

Brother DCP-9045CDN User manual

Brother MFC 640CW - Color Inkjet - All-in-One User manual

Brother

Brother MFC 640CW - Color Inkjet - All-in-One User manual

Brother DCP-585CW User manual

Brother

Brother DCP-585CW User manual

Brother MFC-J6510DW Assembly instructions

Brother

Brother MFC-J6510DW Assembly instructions

Brother DCP 585CW - Color Inkjet - All-in-One User manual

Brother

Brother DCP 585CW - Color Inkjet - All-in-One User manual

Brother Laser MFC-4800 Owner's manual

Brother

Brother Laser MFC-4800 Owner's manual

Brother MFC 3360C - Color Inkjet - All-in-One User manual

Brother

Brother MFC 3360C - Color Inkjet - All-in-One User manual

Brother DCP-130C User manual

Brother

Brother DCP-130C User manual

Brother MFC-J3520 User manual

Brother

Brother MFC-J3520 User manual

Brother DCP 165C - Color Inkjet - All-in-One User manual

Brother

Brother DCP 165C - Color Inkjet - All-in-One User manual

Popular All In One Printer manuals by other brands

Avision AM3100L user manual

Avision

Avision AM3100L user manual

Epson Stylus Photo RX600 Tips

Epson

Epson Stylus Photo RX600 Tips

Epson XP-5150 Series user guide

Epson

Epson XP-5150 Series user guide

Canon PIXMA MG7500 Series Online manual

Canon

Canon PIXMA MG7500 Series Online manual

Dell B1165nfw Quick installation guide

Dell

Dell B1165nfw Quick installation guide

Develop ineo+ 451 user manual

Develop

Develop ineo+ 451 user manual

Ricoh Aficio 2035e Service manual

Ricoh

Ricoh Aficio 2035e Service manual

Xerox B1025 System administrator guide

Xerox

Xerox B1025 System administrator guide

Lexmark Pro715 user guide

Lexmark

Lexmark Pro715 user guide

Lexmark CX725 Series user guide

Lexmark

Lexmark CX725 Series user guide

Epson CX4800 - Stylus Color Inkjet user guide

Epson

Epson CX4800 - Stylus Color Inkjet user guide

Samsung SF-650P Series quick start guide

Samsung

Samsung SF-650P Series quick start guide

Lexmark W840 Service manual

Lexmark

Lexmark W840 Service manual

Canon imageCLASS MF4450 Basic operation guide

Canon

Canon imageCLASS MF4450 Basic operation guide

Lexmark X560 Maintenance Guide

Lexmark

Lexmark X560 Maintenance Guide

Canon MB5000 Series Online manual

Canon

Canon MB5000 Series Online manual

Oki CX2033MFP manual

Oki

Oki CX2033MFP manual

Epson XP-410 Guía de instalación

Epson

Epson XP-410 Guía de instalación

manuals.online logo
manuals.online logoBrands
  • About & Mission
  • Contact us
  • Privacy Policy
  • Terms and Conditions

Copyright 2025 Manuals.Online. All Rights Reserved.